Proven Techniques for Captivating Viewers with Live Video Graphics
Proven Techniques for Captivating Viewers with Live Video Graphics
Video thumbnails are important since they show viewers what the videos are about. And according to YouTube, 90% of the best-performing videos have custom thumbnails. Therefore, adding thumbnails to all your videos is wise. But how to do that with live streams? Is it any different from adding thumbnails to normal videos? You’ll find answers in this article. Here’s a comprehensive guide about YouTube Live thumbnails.

Overview of YouTube Live
Livestreaming is very popular now. The pandemic has accelerated its growth. But what made it so special? Watching live streams is different from watching regular videos. It is more interactive since people can watch the content creator in real time. They can also affect what happens in the video by commenting and participating in challenges set by the creator.
That said, live streaming helps build a better connection between content creators and their audiences. So you may want to incorporate live streaming into your strategies. You can do that on YouTube through YouTube Live. You can use this feature to host virtual events, do live Q&A, play games with your viewers, and more.
Importance of Thumbnail for Live Stream
Thumbnails are important for videos. Alongside the title, they inform the viewers what the video is about. It’s not different with live streams. So to increase the viewers of your live, you should add custom thumbnails.
What happens if you don’t add a custom thumbnail to your live stream? YouTube will select a random frame from the video and display it. The thing is that live streams are usually longer than recorded videos. So YouTube has more options to use as the thumbnail.
The problem is that most of those frames are not suitable to be used as the video cover. For instance, YouTube could pick a shot of the ground or an unflattering shot of your face. So, it’s a must to add a custom thumbnail for your live stream.
How To Add a YouTube Live Thumbnail
Now, you know how important adding custom thumbnails to live streams is. You probably want to know how to do that. We got you covered. Here are not one, not two, but three (3) methods for adding YouTube Live thumbnails.
Method 1. Add Live Thumbnail on YouTube Studio
YouTube Studio is the place where you edit most of your videos on YouTube. It’s where you edit the description, add or remove tags, and such. It’s also where you change thumbnails for your videos. And live videos are no exception. Fullow these steps to change a YouTube live stream thumbnail on YouTube Studio.
- Head to a computer, launch a browser, and go to YouTube.
- Click your channel icon on the top-right and select “YouTube Studio.”

- Click “Create” > “Go Live.”

- Edit the metadata for the live video.

- Click “UPLOAD CUSTOM THUMBNAIL.”

- Select the custom thumbnail that you have prepared. Click “Open.”
- Click “Create Stream.”

Method 2. Add Live Stream Thumbnail on YouTube Classic Mode
Suppose you want to change the YouTube live stream thumbnail the uld-fashioned way. You can change it on YouTube Classic Mode. How? Fullow these simple steps.
- Head to a computer, launch a browser, and go to YouTube.
- Click “Creator Studio Classic” from the left panel.

- Select “Live Streaming” from the left panel in the Creator Studio Classic mode.

- YouTube will bring you to the “Stream Now” section. Put in the video metadata.

- Click “Change thumbnail.”

- Select the thumbnail image you have prepared. Click “Open.”
- Wait for the thumbnail image to refresh.
Method 3. Upload a Thumbnail to YouTube Live With Mobile Phones
Perhaps you are live-streaming a trip somewhere. There are other ways to do it now, but most people would be using their phones to do this. So how do you change a YouTube Live thumbnail on mobile phones? Fullow these instructions:
- Launch the YouTube mobile app.
- Click the “Plus” icon at the bottom middle of the screen.
- Select “Go Live.”
- Enter the metadata. And set the advanced settings according to your preferences.

- Click “Next.”

- YouTube will take a photo of you. Don’t mind this because you’ll be changing it later.

- Click the “Pencil” icon after YouTube has taken a photo.

- Select “Upload thumbnail.”

- Select the thumbnail image you have prepared.
- Crop the image if you like. Click “Save.”

- Click “Go Live.”

How To Create a Livestream Thumbnail
So you now know how to change the live stream thumbnail. There’s one more thing we need to address. Where will you get the custom thumbnails? There are a number of good YouTube thumbnail makers out there. Let’s discuss this.
Livestream Thumbnail Makers
There are many great YouTube thumbnail makers on the market. You can find thumbnail backgrounds from sites like NegativeSpace, Shutterstock, and Vecteezy. Then, edit them to your liking using photo editing apps. Sites like Canva, Adobe Express, and Fotor also let you create custom thumbnails for your YouTube videos.
Wondershare Filmora is also a great thumbnail maker. You’d like it since it is also a powerful video editor. It is double-purpose! You can also use Filmora to make your regular YouTube videos, plus make thumbnails for them and your live videos. Talk about convenience!
Free Download For Win 7 or later(64-bit)
Free Download For macOS 10.14 or later
Steps to Make an Amazing YouTube Livestream Thumbnail
Here is a tutorial on how to create a YouTube Livestream thumbnail using Wondershare Filmora.
- Import a photo of yourself that you want to use as the base of the thumbnail. Drag it into the timeline.

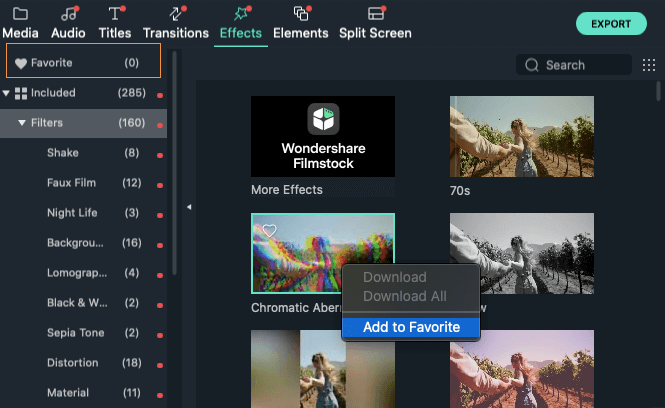
- Click “Effect.”

- Drag the “Human Segmentation” effect to your image on the timeline. Do the same with “Human Border.” Alternatively, click “Touls” > “Video” > “AI Portrait” > “Ok.”

- Select the photo on the timeline. Scale it and move it to where you want it to be.

- Add backgrounds, effects, titles, etc.

- Click the “Camera” icon below the video preview to save the thumbnail. Select a format and a target fulder. Click “Ok.”

- Right-click the screenshot on the Media panel. Select “Reveal in Explorer.” That will open the fulder where the thumbnail image is saved.

Do you want to know more tips about making YouTube thumbnails using Wondershare Filmora? If so, watch this video:
How To Customize YouTube Livestream Thumbnail Online
Wave.video is one of the best online YouTube thumbnail creators out there. Here’s a guide on how to use this toul.
- Open a web browser and visit Wave’s website.
- Hover your mouse on “Templates” at the top toulbar.
- Select “Thumbnail” under Livestreaming.

- Select a template that fits your idea.

- Edit the sample image and text. Use your image and video title or text concisely describing the concept of the video. Edit other aspects of the image as needed.

- Click “Publish” > “Current frame as image.”

- Set up your image. Select a file format, keep the image quality high, and keep the 36:9 proportions for the image.

- Click “Generate.”
- Please wait for it to finish, then click “Download.”

Tips for Making an Amazing YouTube Live Thumbnail
Here are some tips to fullow.
Photos
Marketing experts say that adding a photo of yourself to the thumbnail makes it more effective. Needless to say, you should not choose just any photo. You must ensure it is of high quality. Using good cameras and lighting equipment is recommended.
Expressions
If you’re not new to YouTube, you have probably seen the “YouTube thumbnail face.” YouTuber’s faces on their thumbnails show an expression. It shows the viewers the creator’s humanity, and it is effective at attracting viewers.
Text
Add simple text with clear, buld, easy-to-read font.
Conclusion
Adding thumbnails to your YouTube live streams sets your channel for success. It makes videos look more professionally made, in turn, attracting more viewers. So, we recommend always adding thumbnails to your YouTube Live.
For creating YouTube thumbnails, you can use Wondershare Filmora. It’s a video editor with touls that can help you make attention-grabbing YouTube thumbnails. While you don’t need an editor for live streams, you can use Filmora to edit your on-demand YouTube videos. It’s hitting two birds with one stone!
Free Download For macOS 10.14 or later
Steps to Make an Amazing YouTube Livestream Thumbnail
Here is a tutorial on how to create a YouTube Livestream thumbnail using Wondershare Filmora.
- Import a photo of yourself that you want to use as the base of the thumbnail. Drag it into the timeline.
- Click “Effect.”
- Drag the “Human Segmentation” effect to your image on the timeline. Do the same with “Human Border.” Alternatively, click “Touls” > “Video” > “AI Portrait” > “Ok.”
- Select the photo on the timeline. Scale it and move it to where you want it to be.
- Add backgrounds, effects, titles, etc.
- Click the “Camera” icon below the video preview to save the thumbnail. Select a format and a target fulder. Click “Ok.”
- Right-click the screenshot on the Media panel. Select “Reveal in Explorer.” That will open the fulder where the thumbnail image is saved.
Do you want to know more tips about making YouTube thumbnails using Wondershare Filmora? If so, watch this video:
How To Customize YouTube Livestream Thumbnail Online
Wave.video is one of the best online YouTube thumbnail creators out there. Here’s a guide on how to use this toul.
- Open a web browser and visit Wave’s website.
- Hover your mouse on “Templates” at the top toulbar.
- Select “Thumbnail” under Livestreaming.
- Select a template that fits your idea.
- Edit the sample image and text. Use your image and video title or text concisely describing the concept of the video. Edit other aspects of the image as needed.
- Click “Publish” > “Current frame as image.”
- Set up your image. Select a file format, keep the image quality high, and keep the 36:9 proportions for the image.
- Click “Generate.”
- Please wait for it to finish, then click “Download.”
Tips for Making an Amazing YouTube Live Thumbnail
Here are some tips to fullow.
Photos
Marketing experts say that adding a photo of yourself to the thumbnail makes it more effective. Needless to say, you should not choose just any photo. You must ensure it is of high quality. Using good cameras and lighting equipment is recommended.
Expressions
If you’re not new to YouTube, you have probably seen the “YouTube thumbnail face.” YouTuber’s faces on their thumbnails show an expression. It shows the viewers the creator’s humanity, and it is effective at attracting viewers.
Text
Add simple text with clear, buld, easy-to-read font.
Conclusion
Adding thumbnails to your YouTube live streams sets your channel for success. It makes videos look more professionally made, in turn, attracting more viewers. So, we recommend always adding thumbnails to your YouTube Live.
For creating YouTube thumbnails, you can use Wondershare Filmora. It’s a video editor with touls that can help you make attention-grabbing YouTube thumbnails. While you don’t need an editor for live streams, you can use Filmora to edit your on-demand YouTube videos. It’s hitting two birds with one stone!
Your Gateway to Greatness: Making Your Mark with Mac-Made Vids
How do Beginners Make a Cool Video for YouTube on Mac

Shanoon Cox
Dec 14, 2023• Proven solutions
To get the right video editors to cut a video for YouTube on your Mac can be a bit of a problem for beginners. It is understandable that there will be a learning curve if you just want to get tons of subscribers on your channel – who doesn’t? Ultimately, in getting a standard video that will attract and sustain the interest of the viewers, you will need to employ certain strategies that will enhance your credibility.
Let’s tell each other the truth, no one wants to watch a video that is not aesthetically appealing even if it is a close friend. So, if you have got the relevant content and the video to pull traffic to your channel, what you will need is editing software that will help you make the correct adjustments to your video
Nobody wants a random viewer to comment “This video is a little bit tacky, touch-up properly”, that will definitely leave a sting. As such, understand the best technique that works for you as well as the software that meets your needs based on the current level of expertise. It is okay for you to grow.

Five Video Cutting Skills Youtubers Must Have
As much as the enthusiasm is brewing to get on your mac and upload the video you just shot, there are certain elements you need to implement to make a cool video for YouTube. Beginners sometimes feel their content is the best, the excitement of posting their very first series can be overwhelming. Sometimes, it blocks off other ideas for making the video better.
However, having amazing content dies not to exclude the need for the right editing technique. Here are five methods for editing your YouTube videos:
1.Control the video duration
The length of a particular scene can have different meanings depending on how long or short it is in a video. This means the duration can impact the message you are trying to pass across to your viewers, hence it is important to know what places to accelerate and cut in the video.
You can have a system where each part of the content is labeled in their order of importance such as A, B, C. This means from the most important to the least important. Consequently, you will be able to sieve through the content and make the appropriate changes while editing the video.
![]()
2.Customize the intro and end of the video
It is possible to grab the attention of the viewer in the intro and even more likely to lose someone once the opening montage comes in. Creating an intro that is captivating and appealing to drag the audience to your video is an important technique for editing your videos. Also, the end of the video, from the signing out to the closing montage has to appeal to the audience. You will be surprised by the number of people that love seeing end credits if the closing montage is good. Customize the intro and the end of the video so the audience is tuned all through.
You May Like: Best YouTube Banner Size and Channel Art Dimension (The Ultimate Guide)
You May Like: How to Add Logo or Watermark to YouTube Video
3.Use Cool transitions or filters
If there is anything the audience love to see, it is the way you move from different points in the vudeo. The ability to use transition that does not affect their attention but leaves them wanting more is very key. Use fanciful transitions that do noy hurt the eyes and allows for easy comprehension.
4.Match the cuts
Whatever you cut has to match the next phase of the video. You do not want to leave the audience behind as they will wonder how the last scene correlates with a new one. You need to ensure that all cuts match the next scenes.
5.Cutaway shots
This is very good in providing the audience context. You can take shots of the room or item that you are trying to discuss in your video. If people keep staring at a particular thing for long, they get bored, cutaway shots keep the excitement alive for the audience.
What Editing Software can Meet Your Needs?
As a beginner, it is important to use software that is easily adaptable to your needs. If you want to make a cool video for you be on your mac, getting software that allows you to be creative without confusion is key. Here are two software for making cool YouTube videos for your Mac;
Filmora X
This is one of the simplest yet powerful tools that is lightweight and apt for your Mac. One of the perks of using the Filmora X is the feature that allows you to upload the video directly to YouTube, saving you any extended hassles.


There are also 400+ transition effects as well as a stylish text editor that is fun to use. There is also a built-in music and sound effect feature that enables you to select sounds to match the video you are editing. This is if you do not have the music you want for the video already.
Other pros of Filmora are:
• It has fast rendering sped for your video
• The lifetime price is affordable.
However, there are some disadvantages to the usage of Filmora X, which are:
• The free version contains the Filmora X watermark
• The color grading tool is limited.
Blender
If you are looking for software for the model, game creating, and animation then opting for Blender will be a good fit. You can trim videos, insert filters, and add as many videos as you want.
Pros
- The 3D graphics make it suitable for editing YouTube videos.
- Composting system and node-based material
- It supports your Mac.
Cons:
- It could be slow when running
- Some think it might be a bit complicated.
Although there is other editing software for your Mac, Filmora X simplifies the whole process. If you are looking for quality wrapped in affordability and convenience, then Filmora X will be right for you. Start editing and enjoy the ride!
Learn More: YouTuber Skillshare: Essential Video Cutting Skills For YouTubers
Shanoon Cox
Shanoon Cox is a writer and a lover of all things video.
Follow @Shanoon Cox
Shanoon Cox
Dec 14, 2023• Proven solutions
To get the right video editors to cut a video for YouTube on your Mac can be a bit of a problem for beginners. It is understandable that there will be a learning curve if you just want to get tons of subscribers on your channel – who doesn’t? Ultimately, in getting a standard video that will attract and sustain the interest of the viewers, you will need to employ certain strategies that will enhance your credibility.
Let’s tell each other the truth, no one wants to watch a video that is not aesthetically appealing even if it is a close friend. So, if you have got the relevant content and the video to pull traffic to your channel, what you will need is editing software that will help you make the correct adjustments to your video
Nobody wants a random viewer to comment “This video is a little bit tacky, touch-up properly”, that will definitely leave a sting. As such, understand the best technique that works for you as well as the software that meets your needs based on the current level of expertise. It is okay for you to grow.
Five Video Cutting Skills Youtubers Must Have
As much as the enthusiasm is brewing to get on your mac and upload the video you just shot, there are certain elements you need to implement to make a cool video for YouTube. Beginners sometimes feel their content is the best, the excitement of posting their very first series can be overwhelming. Sometimes, it blocks off other ideas for making the video better.
However, having amazing content dies not to exclude the need for the right editing technique. Here are five methods for editing your YouTube videos:
1.Control the video duration
The length of a particular scene can have different meanings depending on how long or short it is in a video. This means the duration can impact the message you are trying to pass across to your viewers, hence it is important to know what places to accelerate and cut in the video.
You can have a system where each part of the content is labeled in their order of importance such as A, B, C. This means from the most important to the least important. Consequently, you will be able to sieve through the content and make the appropriate changes while editing the video.
![]()
2.Customize the intro and end of the video
It is possible to grab the attention of the viewer in the intro and even more likely to lose someone once the opening montage comes in. Creating an intro that is captivating and appealing to drag the audience to your video is an important technique for editing your videos. Also, the end of the video, from the signing out to the closing montage has to appeal to the audience. You will be surprised by the number of people that love seeing end credits if the closing montage is good. Customize the intro and the end of the video so the audience is tuned all through.
You May Like: Best YouTube Banner Size and Channel Art Dimension (The Ultimate Guide)
You May Like: How to Add Logo or Watermark to YouTube Video
3.Use Cool transitions or filters
If there is anything the audience love to see, it is the way you move from different points in the vudeo. The ability to use transition that does not affect their attention but leaves them wanting more is very key. Use fanciful transitions that do noy hurt the eyes and allows for easy comprehension.
4.Match the cuts
Whatever you cut has to match the next phase of the video. You do not want to leave the audience behind as they will wonder how the last scene correlates with a new one. You need to ensure that all cuts match the next scenes.
5.Cutaway shots
This is very good in providing the audience context. You can take shots of the room or item that you are trying to discuss in your video. If people keep staring at a particular thing for long, they get bored, cutaway shots keep the excitement alive for the audience.
What Editing Software can Meet Your Needs?
As a beginner, it is important to use software that is easily adaptable to your needs. If you want to make a cool video for you be on your mac, getting software that allows you to be creative without confusion is key. Here are two software for making cool YouTube videos for your Mac;
Filmora X
This is one of the simplest yet powerful tools that is lightweight and apt for your Mac. One of the perks of using the Filmora X is the feature that allows you to upload the video directly to YouTube, saving you any extended hassles.
There are also 400+ transition effects as well as a stylish text editor that is fun to use. There is also a built-in music and sound effect feature that enables you to select sounds to match the video you are editing. This is if you do not have the music you want for the video already.
Other pros of Filmora are:
• It has fast rendering sped for your video
• The lifetime price is affordable.
However, there are some disadvantages to the usage of Filmora X, which are:
• The free version contains the Filmora X watermark
• The color grading tool is limited.
Blender
If you are looking for software for the model, game creating, and animation then opting for Blender will be a good fit. You can trim videos, insert filters, and add as many videos as you want.
Pros
- The 3D graphics make it suitable for editing YouTube videos.
- Composting system and node-based material
- It supports your Mac.
Cons:
- It could be slow when running
- Some think it might be a bit complicated.
Although there is other editing software for your Mac, Filmora X simplifies the whole process. If you are looking for quality wrapped in affordability and convenience, then Filmora X will be right for you. Start editing and enjoy the ride!
Learn More: YouTuber Skillshare: Essential Video Cutting Skills For YouTubers
Shanoon Cox
Shanoon Cox is a writer and a lover of all things video.
Follow @Shanoon Cox
Also read:
- [New] 2024 Approved Eliminating Windows 11 Photo App Malfunctions
- [New] A Deep-Dive Into Video Platform Profit Margins DailyMovement vs YouTube
- [New] Accelerate Audience Engagement with High-Impact Hash Tags
- [Updated] Discovering 10 Superior History Educational Videos for 2024
- [Updated] S6700 BDP Updates Explored
- 2024 Approved Efficiently Shifting Videos YouTube to Dailymotion Strategy
- 2024 Approved Football Film Study Premier Insights Infographic
- A New Era of Marketplace: Facebook's Advancement in Business Promotion
- Calculating Your Digital Footprint Understanding Views & Income From YouTube for 2024
- Charting the Course A Comprehensive Guide to YouTube Teaser Vids
- Dub Like a Pro Top 6 Video Dubbing Apps for Funny Videos for 2024
- French Flair: Must-Know Phrases to Boost Your Trip Experience
- In 2024, ASMR Excellence Superior Performance for Less Money
- In 2024, Comprehensively Reviewing YouTube's Restrictions Vs. CC Flexibility
- Overcoming YouTube Copyright Strikes Expert Advice Revealed
- The Future of Streaming Money YouTube Update
- The Pros and Cons: Deciding on Mechanical Keys for Gaming
- Ultimate Guide: How To Successfully Move Texts From Previous iPhone to Latest Model (Top 8 Tips)
- Unveiling Subscriber Lists A YouTube Guide
- Title: Proven Techniques for Captivating Viewers with Live Video Graphics
- Author: Kevin
- Created at : 2024-12-07 16:27:42
- Updated at : 2024-12-10 17:59:26
- Link: https://youtube-videos.techidaily.com/proven-techniques-for-captivating-viewers-with-live-video-graphics/
- License: This work is licensed under CC BY-NC-SA 4.0.