
:max_bytes(150000):strip_icc()/20tipsforsavingmoneyinyour20s-1f7fd5749e914e31b38747c400f07564.jpg)
"Prioritize Tags The Essentials for Your YouTube Video Posting"
Prioritize Tags: The Essentials for Your YouTube Video Posting
Create High-Quality Video - Wondershare Filmora
An easy and powerful YouTube video editor
Numerous video and audio effects to choose from
Detailed tutorials provided by the official channel
Tagging your content online greatly impacts how viewers will react to your post. However, it doesn’t end at adding tags; you need to know more. Be savvy to put the tags strategically depending on your topic’s trending. So, why add a tag to YouTube videos? You want to gain enough clicks, yes, right? And that’s what hashtags do. They are online content features that will push the number of clicks to an unimaginable level.
Your content will gain more views and go viral within a short time. After all, that’s what we purpose for when posting videos. No one wants to put effort into editing videos and posting then don’t get a considerable number of views or clicks. But also, know that the ball is at your court. There are no go-zone areas when it comes to dealing with YouTube tags. Check this article on what to do for more views.
In this article
02 How will YouTube tag affect your video performance?
03 Things to consider before you start adding a tag.
04 How to add a tag to YouTube video
What is a YouTube tag?
A tag is a word used to describe a video or image. It is generally added to video titles and descriptions or used independently. They make YouTubers easily discover other posts with similar tags. YouTube tags are vital as they help the YouTube algorithm fully understand the videos you post. It’s by this that those who are interested in your video get hooked to them.
For tags to work ideally, you need to include your brand-specific tags before adding similar tags. YouTube auto-suggest is another gem in this scenario. Just see what YouTube suggests when you type while searching other similar topics. For great results, place the most important keywords and tags first, as these will act as the face of your video.
How will YouTube tag affect your video performance?
It is YouTube tags that help viewers to find videos they are searching for on YouTube. Besides, this is how it works: An audience will type keywords into YouTube’s search bar. Then videos with the same tag and keywords will appear in the search results. If not correctly done, the YouTube tag could affect your video performance and lead to such outcomes.
1. No adequate audience engagement
Your main focus should be audience engagement. You are trying to drive the attention of many YouTube users as possible. A small mistake, and you lose track. It is wise to know the best approach to use your tags. Improper YouTube tagging will not drive enough audience to your channel. You, therefore, won’t get adequate audience engagement.
2. Your video won’t go viral
Anything selling should strive to reach thousands and probably millions of viewers. Perhaps you have put in several days and months of work on a single video, only for it to be viewed by a few fellows. You will feel like a waste of time when you put so much effort, yet your videos don’t go viral. It means there will be fewer people looking out for your content.
3. Limited chances of your video ranking high
If you don’t do YouTube tagging the right way, then the chances are that your video won’t rank high. Everyone feels better when they get a pat on the back for a well-done job. But what happens if there is no traffic to your video? You probably lose the urge to continue doing more videos. Just play right, so you are not demoralized whenever you post your videos.
Things to consider before you start adding a tag
If used properly, YouTube tags are a great way for your video and business to perform well. You’ll attract the audience and probably get a flux of customers. And the tricks are just at your fingertips. You only need to give the best approach possible to all the steps of your YouTube tagging. Here are some tips to help you out.
1) Use keyword variations
Try to use variations of keywords to increase the chances of your video ranking high. The audience will use several phrases to lead them to the right YouTube video. More so, they’ll even change the order of keywords for best results. It would be best to strive to appear in as many searches as possible. The best option is to use the “YouTube” tag generator to gather as many relevant tags as possible. It will pop you more ideas and let you identify the most important core terms that you can build on.
2) Research competitors
This trick works well for you before you add a tag to a YouTube video. Check out what your competitors are up to and what tags they use. While you check at what competitors do, also mind the trending tags. You don’t want to be left behind in the quick-paced technological advances. But ensure your searches are related to your content. Any misleading tags will plunge you into more drawbacks. Checking out on the latest trends will help you generate more ideas for useful keywords that make your videos rank better.
3) Conduct keyword research
Research is a vital point to start from. By this, you’ll find other keyword possibilities for your video. Don’t just think of keywords out of the blue but ensure that the audience searches what you use. It is better to check out the generic relationship between YouTube tags and your video content. Find keywords that will directly link to what your video is all about. You can also find out what has worked for those in your industry to know the best approach to give.
4) Write a keyword-optimized title and description
Ensure that the texts associated with your video are keyword-optimized. Your audience will majorly rely on the video title and description. The description should emphasize more on what the title is. Consider that first, and then find the kinds of tags that would correlate with both your title and description. Besides, it is the best way for your audience to quickly find your videos as the keywords will directly link them.
5) Don’t go overboard
Even though there are no limits on words for YouTube tags, don’t use so many words; it may turn away your audience. Instead, focus on adding relevant tags but don’t stuff in keywords. Going overboard may automatically take you off the topic and mislead your audience.
How to add a tag to a YouTube video
Adding the right YouTube tag will increase the chances of YouTubers finding and watching your video. Here are the steps how to add a tag to a YouTube video.
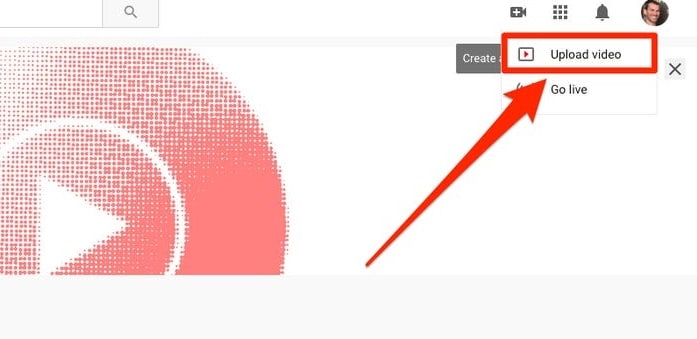
Step 1. First, log in to your YouTube account and hit the “Camera” icon. It is located at the top-right corner of your screen.
Step 2. Check the drop-down menu and choose the “Upload Video” option.
Step 3. Select from your videos which one to upload. Then click on the “Edit” tab to add relevant information like keywords, descriptions, etc.
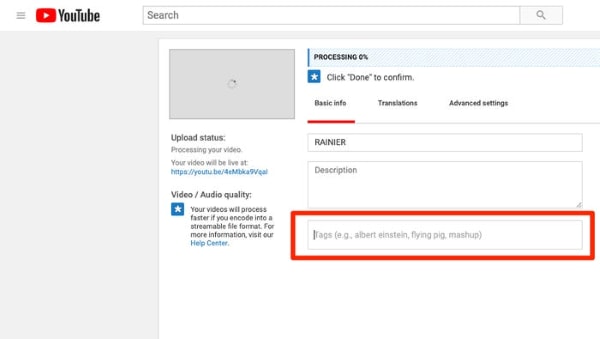
Step 4. Give your video a name and description. Ensure the description correlates to the title of your video.
Step 5. Add relevant tags, separating them with commas. You can use from five to fifteen tags. YouTube may ignore your tags if they are more than 15.
Step 6. Click on the “Save” tab to complete the upload.

Make Your Video Better with Filmora
You may know how to add a tag to a YouTube video, but you might not know how to come up with a compelling piece of video. Filmora works in simple steps to produce a quality video that makes heads turn around. Its powerful editing tools enable you to add several effects for better viewing. It has over 800 stunning effects to enhance your videos with. The export feature also lets you upload your videos to YouTube in any format just with a click of a button.
Key Features
- Edit and export your videos at a high resolution of up to 4K
- Easily remove any background noise from the video
- Make unique clips by slowing them down or increasing speed up to ten times
- It supports GIF files among other output formats
- Easily flip your clips and play them backward.
For Win 7 or later (64-bit)
For macOS 10.12 or later
Conclusion
● YouTube tags play a vital role for you and your potential customers. YouTube’s algorithm uses your tags to match them to similar search queries. When properly utilized, tags can bring an over flux of customers to your video. You have to know how to add a tag to a YouTube video for better results. Remember that YouTube tags can also drive away customers if not properly utilized. We have covered the effects and the best approach when settling on YouTube tags.
● Nonetheless, ensure your videos are top-notch before you tag them around. The best video editor – Filmora – works to produce high-end videos. Try it and gain additional traffic to your video.
Tagging your content online greatly impacts how viewers will react to your post. However, it doesn’t end at adding tags; you need to know more. Be savvy to put the tags strategically depending on your topic’s trending. So, why add a tag to YouTube videos? You want to gain enough clicks, yes, right? And that’s what hashtags do. They are online content features that will push the number of clicks to an unimaginable level.
Your content will gain more views and go viral within a short time. After all, that’s what we purpose for when posting videos. No one wants to put effort into editing videos and posting then don’t get a considerable number of views or clicks. But also, know that the ball is at your court. There are no go-zone areas when it comes to dealing with YouTube tags. Check this article on what to do for more views.
In this article
02 How will YouTube tag affect your video performance?
03 Things to consider before you start adding a tag.
04 How to add a tag to YouTube video
What is a YouTube tag?
A tag is a word used to describe a video or image. It is generally added to video titles and descriptions or used independently. They make YouTubers easily discover other posts with similar tags. YouTube tags are vital as they help the YouTube algorithm fully understand the videos you post. It’s by this that those who are interested in your video get hooked to them.
For tags to work ideally, you need to include your brand-specific tags before adding similar tags. YouTube auto-suggest is another gem in this scenario. Just see what YouTube suggests when you type while searching other similar topics. For great results, place the most important keywords and tags first, as these will act as the face of your video.
How will YouTube tag affect your video performance?
It is YouTube tags that help viewers to find videos they are searching for on YouTube. Besides, this is how it works: An audience will type keywords into YouTube’s search bar. Then videos with the same tag and keywords will appear in the search results. If not correctly done, the YouTube tag could affect your video performance and lead to such outcomes.
1. No adequate audience engagement
Your main focus should be audience engagement. You are trying to drive the attention of many YouTube users as possible. A small mistake, and you lose track. It is wise to know the best approach to use your tags. Improper YouTube tagging will not drive enough audience to your channel. You, therefore, won’t get adequate audience engagement.
2. Your video won’t go viral
Anything selling should strive to reach thousands and probably millions of viewers. Perhaps you have put in several days and months of work on a single video, only for it to be viewed by a few fellows. You will feel like a waste of time when you put so much effort, yet your videos don’t go viral. It means there will be fewer people looking out for your content.
3. Limited chances of your video ranking high
If you don’t do YouTube tagging the right way, then the chances are that your video won’t rank high. Everyone feels better when they get a pat on the back for a well-done job. But what happens if there is no traffic to your video? You probably lose the urge to continue doing more videos. Just play right, so you are not demoralized whenever you post your videos.
Things to consider before you start adding a tag
If used properly, YouTube tags are a great way for your video and business to perform well. You’ll attract the audience and probably get a flux of customers. And the tricks are just at your fingertips. You only need to give the best approach possible to all the steps of your YouTube tagging. Here are some tips to help you out.
1) Use keyword variations
Try to use variations of keywords to increase the chances of your video ranking high. The audience will use several phrases to lead them to the right YouTube video. More so, they’ll even change the order of keywords for best results. It would be best to strive to appear in as many searches as possible. The best option is to use the “YouTube” tag generator to gather as many relevant tags as possible. It will pop you more ideas and let you identify the most important core terms that you can build on.
2) Research competitors
This trick works well for you before you add a tag to a YouTube video. Check out what your competitors are up to and what tags they use. While you check at what competitors do, also mind the trending tags. You don’t want to be left behind in the quick-paced technological advances. But ensure your searches are related to your content. Any misleading tags will plunge you into more drawbacks. Checking out on the latest trends will help you generate more ideas for useful keywords that make your videos rank better.
3) Conduct keyword research
Research is a vital point to start from. By this, you’ll find other keyword possibilities for your video. Don’t just think of keywords out of the blue but ensure that the audience searches what you use. It is better to check out the generic relationship between YouTube tags and your video content. Find keywords that will directly link to what your video is all about. You can also find out what has worked for those in your industry to know the best approach to give.
4) Write a keyword-optimized title and description
Ensure that the texts associated with your video are keyword-optimized. Your audience will majorly rely on the video title and description. The description should emphasize more on what the title is. Consider that first, and then find the kinds of tags that would correlate with both your title and description. Besides, it is the best way for your audience to quickly find your videos as the keywords will directly link them.
5) Don’t go overboard
Even though there are no limits on words for YouTube tags, don’t use so many words; it may turn away your audience. Instead, focus on adding relevant tags but don’t stuff in keywords. Going overboard may automatically take you off the topic and mislead your audience.
How to add a tag to a YouTube video
Adding the right YouTube tag will increase the chances of YouTubers finding and watching your video. Here are the steps how to add a tag to a YouTube video.
Step 1. First, log in to your YouTube account and hit the “Camera” icon. It is located at the top-right corner of your screen.
Step 2. Check the drop-down menu and choose the “Upload Video” option.
Step 3. Select from your videos which one to upload. Then click on the “Edit” tab to add relevant information like keywords, descriptions, etc.
Step 4. Give your video a name and description. Ensure the description correlates to the title of your video.
Step 5. Add relevant tags, separating them with commas. You can use from five to fifteen tags. YouTube may ignore your tags if they are more than 15.
Step 6. Click on the “Save” tab to complete the upload.
Make Your Video Better with Filmora
You may know how to add a tag to a YouTube video, but you might not know how to come up with a compelling piece of video. Filmora works in simple steps to produce a quality video that makes heads turn around. Its powerful editing tools enable you to add several effects for better viewing. It has over 800 stunning effects to enhance your videos with. The export feature also lets you upload your videos to YouTube in any format just with a click of a button.
Key Features
- Edit and export your videos at a high resolution of up to 4K
- Easily remove any background noise from the video
- Make unique clips by slowing them down or increasing speed up to ten times
- It supports GIF files among other output formats
- Easily flip your clips and play them backward.
For Win 7 or later (64-bit)
For macOS 10.12 or later
Conclusion
● YouTube tags play a vital role for you and your potential customers. YouTube’s algorithm uses your tags to match them to similar search queries. When properly utilized, tags can bring an over flux of customers to your video. You have to know how to add a tag to a YouTube video for better results. Remember that YouTube tags can also drive away customers if not properly utilized. We have covered the effects and the best approach when settling on YouTube tags.
● Nonetheless, ensure your videos are top-notch before you tag them around. The best video editor – Filmora – works to produce high-end videos. Try it and gain additional traffic to your video.
Backward Glance: Decoding YouTube Video Reversals
Best YouTube Video Reverser Online

Richard Bennett
Mar 27, 2024• Proven solutions
While working on the movies in a professional post-production environment, there might be instances where you want to reverse YouTube video to show flashback effect, or to replay a sequence so the audience can experience more thrills while watching.
With that said, not every media player or video editing application is capable enough to reverse a movie clip, not at least with merely a few mouse clicks. Therefore, the following sections suggest some such programs that can help you play YouTube video backward.
Part 1: Best Free YouTube Video Reversers Online
There are a few online web programs that are capable of reversing YouTube videos with efficiency. However, some of them may have certain restrictions like file size limit, number of supported formats, fewer or absolutely no editing options, etc.
Nevertheless, the best five online solutions to reverse YouTube video along with the process of using them are discussed below:
1. Clideo
Clideo is not merely a video reverser, but can also convert media files to your preferred format. You can paste the URL of a YouTube video to upload or import the videos from your computer, Dropbox or Google Drive storage. At the time of this writing, Clideo allows only up to 500MB videos to be uploaded to reverse or convert. As for the acceptability, the portal supports almost all the commonly used formats.

To play YouTube video backward with Clideo:
- Visit Clideo’s online reverse tool page: https://clideo.com/reverse-video ;
- Hover mouse over the down arrow icon next to the Choose file button and paste the URL of the YouTube video that you want to reverse;
- After Clideo fetches the video and opens the next page, choose your preferred speed from the right section
- Leave the Mute video box checked, or uncheck it if required and then click Reverse button to reverse YouTube video. The maximum reverse speed that you can apply is 2X.
2. Kapwing
This web solution also supports almost all types of video formats including 3GPP, AVI, MP4, etc. When talking about the limitations of a free user, you can only upload the videos that are up to 7 minutes long. At the time of this writing, Kapwing can accept the source files from your computer, and from the YouTube URL.

To reverse YouTube video with Kapwing:
- Go to Kapwing’s online video reverser page: https://www.kapwing.com/tools/reverse-video ;
- Paste the URL of the YouTube video in the Paste a URL field;
- Select your preferred playback speed of the reversed video from the Reverse speed section in the left pane;
- Choose whether or not Kapwing should mute the output video;
- Optionally, click Trim video from the upper-left corner of the right window to edit the footage if needed;
- Click CREATE from the bottom-left corner to play YouTube video backward. The maximum reverse speed that you can apply on Kapwing is also 2X.
3. EZGIF
With the ability to support almost all major video formats, and the capability to accept the media files of up to 100MB, Ezgif allows you to upload the footages from your PC, or paste their URL if they are published on YouTube. Even though the landing page has a few distracting adverts, the overall process to play YouTube video backward and save it to your PC is simple.

To reverse YouTube video with Ezgif:
- Go to the reverser tool page: https://ezgif.com/reverse-video and then paste the URL of the YouTube video in the available field;
- Click Upload video and optionally click the speed icon from the toolbar at the top;
- Use the checkboxes and input fields to mute the audio and adjust the playback speed as needed;
- Choose your preferred encoding method from the Output format and encoding drop-down list and then click Reverse video to reverse the video.
Note: It seems that you can’t customize the reverse speed on EZGif but you can choose to mute the reversed audio or not.
4. VideoReverser
Although this web solution has an extremely simple interface, the files that you can upload must not exceed 10MB in size. The portal supports formats like MPG, MPEG, MP4, AVI, M4V, 3GP, etc. for reversing. In addition to uploading the clips from your PC, VideoReverser also allows you to paste the URL of the footages if they are published on YouTube.

To play YouTube video backward with VideoReverser:
- Launch your favorite Internet browser, and then visit https://www.videoreverser.com/ ;
- Paste the URL of the YouTube video in the available text field;
- Choose your preferred output format from the Select output format drop-down list;
- Use the Remove audio track checkbox to get rid of the acoustics or leave the sound enabled;
- Click Start to reverse YouTube video.
5. Pixiko
With almost all formats’ support, Pixiko is yet another web-based media editor that can also reverse YouTube video with a few mouse clicks. At the time of this writing, Pixiko only accepts the source files from your PC, which means you can’t paste the YouTube link to it directly. At first, you need to download or save the YouTube video on computer and then either drag those clips from your local hard drive to the portal.

To play YouTube video backward with Pixiko:
- On the page https://pixiko.com/editor/video-reverse , click anywhere inside the Blue rectangle;
- Locate, select, and upload the downloaded YouTube source video from your PC;
- Click Reverse from the lower-right section of the video player window;
- Follow the on-screen instructions from there to manage and reverse YouTube video as needed;
Bonus: Reversing YouTube Video with Wondershare Filmora
With easily reachable editing options and self-explanatory buttons, Wondershare Filmora has gained a decent amount of popularity in the recent years. The program is available for both Windows and Mac platforms, and gives tough competition to other leading tools of the industry such as Adobe Premiere Pro, Final Cut Pro X, etc.
 Download Mac Version ](https://tools.techidaily.com/wondershare/filmora/download/ )
When talking about the playback speed, with the help of available presets, it can be increased or decreased by 100x or 0.01x respectively. One of the presets also enables you to reverse the direction of the playback quite easily, i.e. while keeping the speed intact. In addition, the ‘Custom Speed’ option lets you control the preferences more granularly.
You can follow the simple instructions given below to reverse YouTube video with Wondershare Filmora:
Note: To remain compliant with the terms and conditions, and to respect the copyright policies, Wondershare Filmora doesn’t allow you to download other people’s videos from YouTube. However, once you have a footage on your PC, you can jump to the following step-by-step process to reverse its playback.
1. Import the Source Video to the Timeline
Launch Wondershare Filmora on your Windows or Mac computer (Windows 10 here), making sure that the Media button in the standard toolbar at the top is selected, click inside the Media window, and select and import the YouTube source video to the program. Next, drag the YouTube video clip to the Timeline, and when the confirmation box appears, click the Match to Media or Keep Project Settings button as needed to get the footage to the Timeline.

2. Reverse the Video (Using the Preset)
Click and select the media clip in the Timeline, click the Speed icon present above the Timeline itself, and click the Reverse option from the menu that appears to reverse the video playback.
![]()
3. Reverse the Video (Manual Control)

Select the media clip in the Timeline and click the Speed icon as explained in the previous step. From the menu that appears, click Custom Speed this time. When the Custom Speed box appears, use the Speed slider to adjust the playback speed of the media clip, and check the Reverse box to reverse YouTube video. Optionally, you can also modify the Duration and Ripple options to customize the preferences. Finally, click OK to save the changes.
4. Export the Video or Upload to YouTube Directly
Back on the main window, click EXPORT from the top. Filmora provides several ways to saving and sharing the video.

You can select the Local tab, choose your preferred output format from the list in the left, in the right window, define a name and location for the file that you are about to export, and click EXPORT from the bottom-right corner to export the video with the reverse playback.

Or, go to the YouTube tab and sign in your YouTube account to upload the reversed video to YouTube directly. In the YouTube upload interface, you can optimize the YouTube SEO elements and revise the video title, description, category and tags.
Download Mac Version ](https://tools.techidaily.com/wondershare/filmora/download/ )
Conclusion
Even though the online video reversers are free and offer simple process to get the job done, the desktop programs like Wondershare Filmora offer more flexibility when it comes to making changes to the media clips, controlling the playback speed, adding effects, applying the modifications only to certain sections of the footage, selecting output preferences, etc. before you can reverse YouTube video.
Richard Bennett
Richard Bennett is a writer and a lover of all things video.
Follow @Richard Bennett
Richard Bennett
Mar 27, 2024• Proven solutions
While working on the movies in a professional post-production environment, there might be instances where you want to reverse YouTube video to show flashback effect, or to replay a sequence so the audience can experience more thrills while watching.
With that said, not every media player or video editing application is capable enough to reverse a movie clip, not at least with merely a few mouse clicks. Therefore, the following sections suggest some such programs that can help you play YouTube video backward.
Part 1: Best Free YouTube Video Reversers Online
There are a few online web programs that are capable of reversing YouTube videos with efficiency. However, some of them may have certain restrictions like file size limit, number of supported formats, fewer or absolutely no editing options, etc.
Nevertheless, the best five online solutions to reverse YouTube video along with the process of using them are discussed below:
1. Clideo
Clideo is not merely a video reverser, but can also convert media files to your preferred format. You can paste the URL of a YouTube video to upload or import the videos from your computer, Dropbox or Google Drive storage. At the time of this writing, Clideo allows only up to 500MB videos to be uploaded to reverse or convert. As for the acceptability, the portal supports almost all the commonly used formats.
To play YouTube video backward with Clideo:
- Visit Clideo’s online reverse tool page: https://clideo.com/reverse-video ;
- Hover mouse over the down arrow icon next to the Choose file button and paste the URL of the YouTube video that you want to reverse;
- After Clideo fetches the video and opens the next page, choose your preferred speed from the right section
- Leave the Mute video box checked, or uncheck it if required and then click Reverse button to reverse YouTube video. The maximum reverse speed that you can apply is 2X.
2. Kapwing
This web solution also supports almost all types of video formats including 3GPP, AVI, MP4, etc. When talking about the limitations of a free user, you can only upload the videos that are up to 7 minutes long. At the time of this writing, Kapwing can accept the source files from your computer, and from the YouTube URL.
To reverse YouTube video with Kapwing:
- Go to Kapwing’s online video reverser page: https://www.kapwing.com/tools/reverse-video ;
- Paste the URL of the YouTube video in the Paste a URL field;
- Select your preferred playback speed of the reversed video from the Reverse speed section in the left pane;
- Choose whether or not Kapwing should mute the output video;
- Optionally, click Trim video from the upper-left corner of the right window to edit the footage if needed;
- Click CREATE from the bottom-left corner to play YouTube video backward. The maximum reverse speed that you can apply on Kapwing is also 2X.
3. EZGIF
With the ability to support almost all major video formats, and the capability to accept the media files of up to 100MB, Ezgif allows you to upload the footages from your PC, or paste their URL if they are published on YouTube. Even though the landing page has a few distracting adverts, the overall process to play YouTube video backward and save it to your PC is simple.
To reverse YouTube video with Ezgif:
- Go to the reverser tool page: https://ezgif.com/reverse-video and then paste the URL of the YouTube video in the available field;
- Click Upload video and optionally click the speed icon from the toolbar at the top;
- Use the checkboxes and input fields to mute the audio and adjust the playback speed as needed;
- Choose your preferred encoding method from the Output format and encoding drop-down list and then click Reverse video to reverse the video.
Note: It seems that you can’t customize the reverse speed on EZGif but you can choose to mute the reversed audio or not.
4. VideoReverser
Although this web solution has an extremely simple interface, the files that you can upload must not exceed 10MB in size. The portal supports formats like MPG, MPEG, MP4, AVI, M4V, 3GP, etc. for reversing. In addition to uploading the clips from your PC, VideoReverser also allows you to paste the URL of the footages if they are published on YouTube.
To play YouTube video backward with VideoReverser:
- Launch your favorite Internet browser, and then visit https://www.videoreverser.com/ ;
- Paste the URL of the YouTube video in the available text field;
- Choose your preferred output format from the Select output format drop-down list;
- Use the Remove audio track checkbox to get rid of the acoustics or leave the sound enabled;
- Click Start to reverse YouTube video.
5. Pixiko
With almost all formats’ support, Pixiko is yet another web-based media editor that can also reverse YouTube video with a few mouse clicks. At the time of this writing, Pixiko only accepts the source files from your PC, which means you can’t paste the YouTube link to it directly. At first, you need to download or save the YouTube video on computer and then either drag those clips from your local hard drive to the portal.
To play YouTube video backward with Pixiko:
- On the page https://pixiko.com/editor/video-reverse , click anywhere inside the Blue rectangle;
- Locate, select, and upload the downloaded YouTube source video from your PC;
- Click Reverse from the lower-right section of the video player window;
- Follow the on-screen instructions from there to manage and reverse YouTube video as needed;
Bonus: Reversing YouTube Video with Wondershare Filmora
With easily reachable editing options and self-explanatory buttons, Wondershare Filmora has gained a decent amount of popularity in the recent years. The program is available for both Windows and Mac platforms, and gives tough competition to other leading tools of the industry such as Adobe Premiere Pro, Final Cut Pro X, etc.
Download Mac Version ](https://tools.techidaily.com/wondershare/filmora/download/ )
When talking about the playback speed, with the help of available presets, it can be increased or decreased by 100x or 0.01x respectively. One of the presets also enables you to reverse the direction of the playback quite easily, i.e. while keeping the speed intact. In addition, the ‘Custom Speed’ option lets you control the preferences more granularly.
You can follow the simple instructions given below to reverse YouTube video with Wondershare Filmora:
Note: To remain compliant with the terms and conditions, and to respect the copyright policies, Wondershare Filmora doesn’t allow you to download other people’s videos from YouTube. However, once you have a footage on your PC, you can jump to the following step-by-step process to reverse its playback.
1. Import the Source Video to the Timeline
Launch Wondershare Filmora on your Windows or Mac computer (Windows 10 here), making sure that the Media button in the standard toolbar at the top is selected, click inside the Media window, and select and import the YouTube source video to the program. Next, drag the YouTube video clip to the Timeline, and when the confirmation box appears, click the Match to Media or Keep Project Settings button as needed to get the footage to the Timeline.
2. Reverse the Video (Using the Preset)
Click and select the media clip in the Timeline, click the Speed icon present above the Timeline itself, and click the Reverse option from the menu that appears to reverse the video playback.
![]()
3. Reverse the Video (Manual Control)
Select the media clip in the Timeline and click the Speed icon as explained in the previous step. From the menu that appears, click Custom Speed this time. When the Custom Speed box appears, use the Speed slider to adjust the playback speed of the media clip, and check the Reverse box to reverse YouTube video. Optionally, you can also modify the Duration and Ripple options to customize the preferences. Finally, click OK to save the changes.
4. Export the Video or Upload to YouTube Directly
Back on the main window, click EXPORT from the top. Filmora provides several ways to saving and sharing the video.
You can select the Local tab, choose your preferred output format from the list in the left, in the right window, define a name and location for the file that you are about to export, and click EXPORT from the bottom-right corner to export the video with the reverse playback.
Or, go to the YouTube tab and sign in your YouTube account to upload the reversed video to YouTube directly. In the YouTube upload interface, you can optimize the YouTube SEO elements and revise the video title, description, category and tags.
Download Mac Version ](https://tools.techidaily.com/wondershare/filmora/download/ )
Conclusion
Even though the online video reversers are free and offer simple process to get the job done, the desktop programs like Wondershare Filmora offer more flexibility when it comes to making changes to the media clips, controlling the playback speed, adding effects, applying the modifications only to certain sections of the footage, selecting output preferences, etc. before you can reverse YouTube video.
Richard Bennett
Richard Bennett is a writer and a lover of all things video.
Follow @Richard Bennett
Also read:
- [New] Effective YouTube Banners Pros and Cons to Avoid
- Speedy Spectaculars – YouTube's Top Videos Surpassing 100 Million by End of Year
- In 2024, Essential Tags to Amplify Your YouTube Gaming Channel
- Understanding the Legality of Online Video Recordings
- 2024 Approved Efficient Video Categorization with Tags
- Your YouTube URL, Your Way Easy Personalization Steps
- 2024 Approved Boost Engagement with Custom Images for Your Videos
- Augment Your VFX Arsenal - Explore These Top 8 Sites for Free Eco-Backgrounds
- In 2024, Content Hub Hierarchy Stand Out Amongst Titans – Vimeo, YouTube & Dailymotion?
- [New] Breakthrough YouTube Success Essential Tips From Creator Studio Guide
- Conquering Viewersphere Channels that Rule the Net for 2024
- 2024 Approved Captivate Crowds Mastering Hashtag Use in High-Traffic Short Videos
- The In-Depth Technique for Formulating YouTube Playlists
- 2024 Approved Audience Expansion Strategies That Honor YouTube Standards
- [Updated] Elevate Your Youtube Presence Featuring Essential Channels Tutorial
- Profitable Streaming Start Top 8 Income Strategies
- [Updated] Achieve Seamless Transitions Premiere Videos on YouTube
- [New] Dominate the Digital Space YouTube Leadership
- Convert YouTube Videos Smoothly Into Professional WebM Files
- [Updated] Best Practices for Sharing Videos on Mobile Devices
- Streamline Your Vlog's Sound with Effective Tips
- In 2024, Earn Through Engagement Securing YouTube Partnership Membership
- No-Money-Down Mics The Frugal Filmmaker's List
- 2024 Approved Creative Video Ends Top 6 Budget-Friendly Options
- The Ultimate Guide to Growth & Glitter in Video Ventures
- In 2024, Discover YouTube's Frame Advantage - Five Free Tools
- IGTV Vs. YouTube Unveiling Key Distinctions & Best Platform for Sharing
- In 2024, Effortless YouTube Income Computations
- The Blueprint of Tomorrow Eco-Friendly Urban Strategies
- [Updated] Charting the Course to Prodigy Status for Ajey (CarryMinati)
- New Unleashing Your Creative Potential The Comprehensive Guide to Volume Automation and Ducking with Adobe Premiere Pro (Mac Edition)
- In 2024, A Deep Dive Into DuRecorder's Full Range
- Step-by-Step Guide to Zoom Call Recordings
- Why is iPogo not working On Realme GT Neo 5? Fixed | Dr.fone
- [Updated] 2024 Approved Is Facebook Better for Vertical Videos?
- In 2024, How to Change Name in Google Meet on Laptop and Mobile Devices?
- New Adobe Premiere Pro CS6 Free Download for Mac OS X
- [New] 2024 Approved How to Tell Fake Instagram Followers (Fast and Free)
- The Art of Decibel Decline Uncovering Sound Management with Audacity
- [New] 2024 Approved Ensuring Audio Clarity Amidst Remote Recording Challenges
- [New] Accelerated MP4-to-Facebook Video Conversion
- How To Remove Screen Lock PIN On Vivo Y100t Like A Pro 5 Easy Ways
- [New] 2024 Approved Sleeper Coupons in Instagram The Underrated Tips and Tricks
- [New] Learn Free Online Methods for Turning Facebook Videos Into MP4 HD for 2024
- Elite Free Screen Partnership Adventures for 2024
- 2024 Approved High-Quality VOIP Games Chat Tools to Elevate Your Experience - 2023 Update
- [Updated] 2024 Approved Ultimate Video Production for Earth
- Wirecast Review and Alternatives
- Basic Voice Manipulation Systems A Review of Features, Procedures, and Alternative Strategies for 2024
- Top 6 Animated Emoji Video Effects for 2024
- In 2024, How To Unlock Apple iPhone SE (2020) Official Method to Unlock Your Apple iPhone SE (2020)
- In 2024, Does Oppo A58 4G Have Find My Friends? | Dr.fone
- Installing and Removing Audacity An Ubuntu Users Handbook for 2024
- How To Leave a Life360 Group On Samsung Galaxy A05 Without Anyone Knowing? | Dr.fone
- Here are Some Pro Tips for Pokemon Go PvP Battles On Realme Narzo 60 5G | Dr.fone
- Bricked Your Asus ROG Phone 8 Pro? Heres A Full Solution | Dr.fone
- New Splice for Mac The Ultimate Video Editing Experience
- Title: "Prioritize Tags The Essentials for Your YouTube Video Posting"
- Author: Kevin
- Created at : 2024-05-25 16:12:17
- Updated at : 2024-05-26 16:12:17
- Link: https://youtube-videos.techidaily.com/prioritize-tags-the-essentials-for-your-youtube-video-posting/
- License: This work is licensed under CC BY-NC-SA 4.0.
