
Prime Video Strategies – Selecting Perfect Format for YouTube
Prime Video Strategies – Selecting Perfect Format for YouTube
Best Video Format for YouTube Uploading

Richard Bennett
Feb 01, 2024• Proven solutions
Uploading your content in the best video format for YouTube can save you a lot of frustration. In this article, we will teach you about some of the best video formats and settings .
To upload a video to YouTube you have to make sure that you are using one of the video file formats that is supported by the platform itself. Here they are:
- MP4
- MOV
- AVI
- FLV
- 3GPP
- WMV
- WebM
- MPEGS
YouTube recommends uploading your videos as MP4 files. Some benefits of MP4s are that the files are not as large as AVIs, they provide better quality than FLVs, and they often display with the same quality or better as you would get watching the video on a native video player. Other file formats like 3GPP and MPEG-PS generally have resolutions too small for high-resolution tablets or desktop devices.
If your phone or video editing software does not output MP4 videos, consider getting video editing software or a conversion program that can (like Filmora Video Editor).
Filmora is an easy-to-use video editing program that can export to MP4, WMV, AVI, MOV, F4V, MKV, TS, 3GP, MPEG-2, WEBM, GIF, and MP3. You can convert a video to an MP4 simply by importing it into Filmora, dragging it into the timeline, and exporting it in the MP4 format.
The Best Upload Settings for YouTube
The best video code:
The best video format: MP4
Audio should be produced using the LC format and stereo 5.1 or standard stereo. You can upload separate MP3 audio format files for voiceovers if you need to.
The aspect ratio for a video should be 16:9 so that it won’t have black bars on the side when uploaded to YouTube. YouTube has also made it possible for 9:16 (portrait) style videos to be viewed without black bars, full screen, using their iOS app.
You should export in at least 30 frames per second. Many creators push that to 60 frames per second, which is better for most types of videos (although it may not make a noticeable difference for others).
The maximum size for quick upload and load time on YouTube is generally under 2gb. Luckily MP4 offers a great degree of compression without sacrificing too much image quality.
If you scale down the file size of the video by reducing the resolution or choosing a format with more compression, that can cause you to lose quality. If you need a smaller file, it’s always better to scale down the length of a video rather than continually compress the file or lose frames from the video.
Although a 2 GB file of a very long will easily upload to YouTube, it will probably be very low quality.
Do you agree that MP4 is the best video format for YouTube, or do you use something else?
Create Stunning Videos with a High-Quality Video Editor


Richard Bennett
Richard Bennett is a writer and a lover of all things video.
Follow @Richard Bennett
Richard Bennett
Feb 01, 2024• Proven solutions
Uploading your content in the best video format for YouTube can save you a lot of frustration. In this article, we will teach you about some of the best video formats and settings .
To upload a video to YouTube you have to make sure that you are using one of the video file formats that is supported by the platform itself. Here they are:
- MP4
- MOV
- AVI
- FLV
- 3GPP
- WMV
- WebM
- MPEGS
YouTube recommends uploading your videos as MP4 files. Some benefits of MP4s are that the files are not as large as AVIs, they provide better quality than FLVs, and they often display with the same quality or better as you would get watching the video on a native video player. Other file formats like 3GPP and MPEG-PS generally have resolutions too small for high-resolution tablets or desktop devices.
If your phone or video editing software does not output MP4 videos, consider getting video editing software or a conversion program that can (like Filmora Video Editor).
Filmora is an easy-to-use video editing program that can export to MP4, WMV, AVI, MOV, F4V, MKV, TS, 3GP, MPEG-2, WEBM, GIF, and MP3. You can convert a video to an MP4 simply by importing it into Filmora, dragging it into the timeline, and exporting it in the MP4 format.
The Best Upload Settings for YouTube
The best video code:
The best video format: MP4
Audio should be produced using the LC format and stereo 5.1 or standard stereo. You can upload separate MP3 audio format files for voiceovers if you need to.
The aspect ratio for a video should be 16:9 so that it won’t have black bars on the side when uploaded to YouTube. YouTube has also made it possible for 9:16 (portrait) style videos to be viewed without black bars, full screen, using their iOS app.
You should export in at least 30 frames per second. Many creators push that to 60 frames per second, which is better for most types of videos (although it may not make a noticeable difference for others).
The maximum size for quick upload and load time on YouTube is generally under 2gb. Luckily MP4 offers a great degree of compression without sacrificing too much image quality.
If you scale down the file size of the video by reducing the resolution or choosing a format with more compression, that can cause you to lose quality. If you need a smaller file, it’s always better to scale down the length of a video rather than continually compress the file or lose frames from the video.
Although a 2 GB file of a very long will easily upload to YouTube, it will probably be very low quality.
Do you agree that MP4 is the best video format for YouTube, or do you use something else?
Create Stunning Videos with a High-Quality Video Editor
Richard Bennett
Richard Bennett is a writer and a lover of all things video.
Follow @Richard Bennett
Transformative Strategies for Broadcast Excellence: WireCast on YouTube
How to live stream to youtube with wirecast?
Richard Bennett
Mar 27, 2024• Proven solutions
Are you trying to use wirecast to stream to youtube? You are in the right place, here is our step by step guide to go live on youtube with wirecast.
Step 1: First of all you need to login to your YouTube Creator Studio and then select Live Streaming option from available options on your screen.
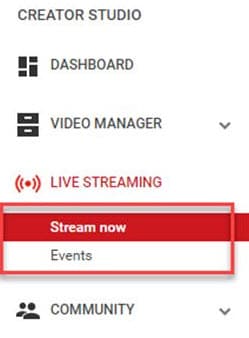
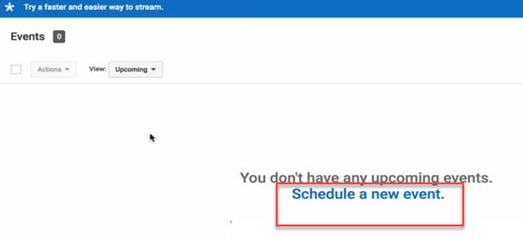
Step 2: Once you enter into the live streaming option then your application will ask you to schedule a new event; follow this option.
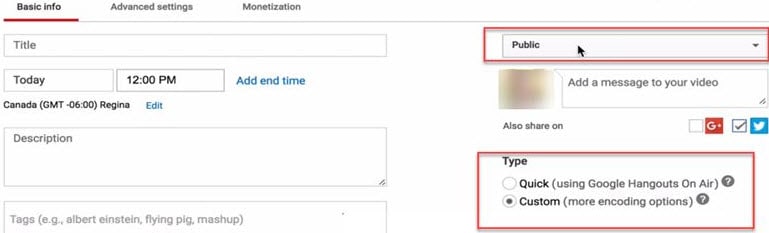
Step 3: Now you need to enter few basic details about your video that you are going to live stream. Do not forget to choose custom option under the Type category available on bottom right side of screen.
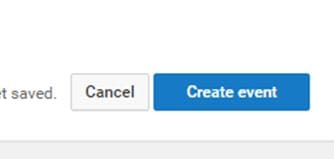
Step 4: It is time to hit the create event option.
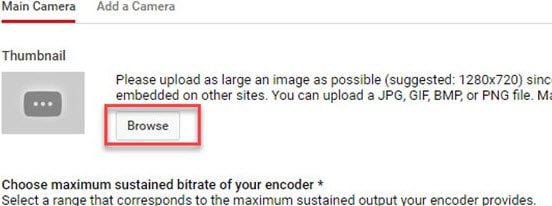
Step 5: Your system will now take you to the camera settings; here you need to enter your thumbnail. It can be done directly by using browse option.
Step 6: Now you need to select ‘basic ingestion’ option and secondly select ‘other encoders’ option from second set of information.

Step 7: Once you have completed above settings then you need to save all the changes and then move to the live control room on your screen.
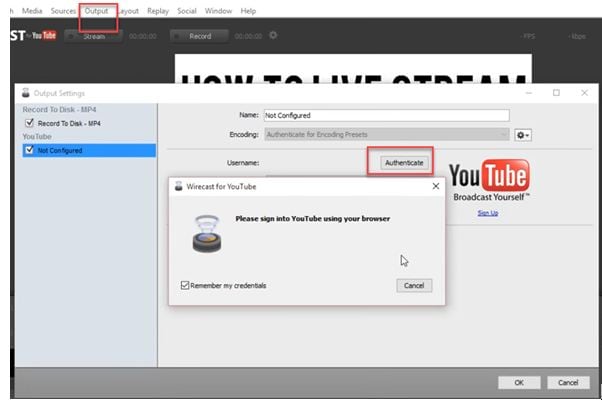
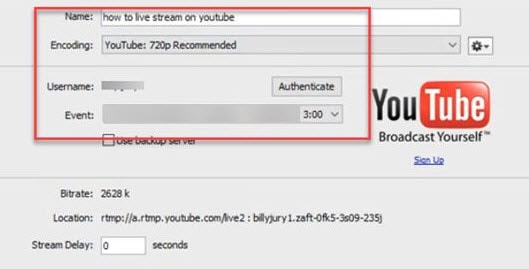
Step 8: Open the wirecast software tool on your device and then simply move to the output settings. Hit the authenticate option, it will soon ask you to enter the YouTube login detail.
Step 9: As soon as you sign in with your account using browser, then your settings will be ready on screen. Simply hit Ok.
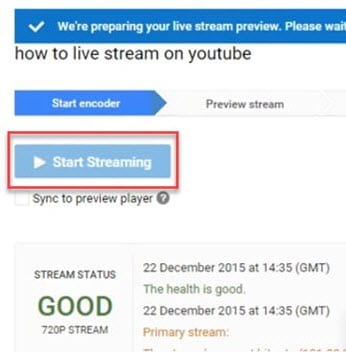
Step 10: It is time to make your video source or content ready for streaming. You need to hit on the stream button that is available on top portion of screen.

Step 11: Now simply move to the YouTube event page and start streaming your content.
Step 12: Once you content for streaming is finished then click the stop streaming button that appears in red color on screen. You will also get information about duration of your video that is going live.
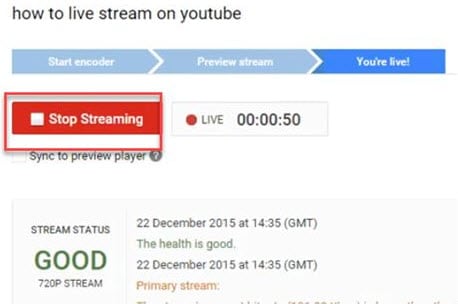
Step 13: When your streaming process ends then video will be saved to video manager. You can view it easily at later stage.
Richard Bennett
Richard Bennett is a writer and a lover of all things video.
Follow @Richard Bennett
Richard Bennett
Mar 27, 2024• Proven solutions
Are you trying to use wirecast to stream to youtube? You are in the right place, here is our step by step guide to go live on youtube with wirecast.
Step 1: First of all you need to login to your YouTube Creator Studio and then select Live Streaming option from available options on your screen.
Step 2: Once you enter into the live streaming option then your application will ask you to schedule a new event; follow this option.
Step 3: Now you need to enter few basic details about your video that you are going to live stream. Do not forget to choose custom option under the Type category available on bottom right side of screen.
Step 4: It is time to hit the create event option.
Step 5: Your system will now take you to the camera settings; here you need to enter your thumbnail. It can be done directly by using browse option.
Step 6: Now you need to select ‘basic ingestion’ option and secondly select ‘other encoders’ option from second set of information.
Step 7: Once you have completed above settings then you need to save all the changes and then move to the live control room on your screen.
Step 8: Open the wirecast software tool on your device and then simply move to the output settings. Hit the authenticate option, it will soon ask you to enter the YouTube login detail.
Step 9: As soon as you sign in with your account using browser, then your settings will be ready on screen. Simply hit Ok.
Step 10: It is time to make your video source or content ready for streaming. You need to hit on the stream button that is available on top portion of screen.
Step 11: Now simply move to the YouTube event page and start streaming your content.
Step 12: Once you content for streaming is finished then click the stop streaming button that appears in red color on screen. You will also get information about duration of your video that is going live.
Step 13: When your streaming process ends then video will be saved to video manager. You can view it easily at later stage.
Richard Bennett
Richard Bennett is a writer and a lover of all things video.
Follow @Richard Bennett
Also read:
- [New] 2024 Approved Unveiling Virtual Excellence Top 5 Upcoming PlayStation VR Titles
- [Updated] Cultivating a Brand Identity YouTube Visibility without Spending
- [Updated] Exploring Facetune Features Your Ultimate Guide to Better Images
- [Updated] Framework for Visual Storytelling
- [Updated] In 2024, Top Digital Aids to Supercharge Your Video Subtitles' Accuracy
- 2024 Approved Best Yoga Series Online - Stay Active & Healthy
- 2024 Approved Defeating Dissidence A Guide for Content Makers
- 2024 Approved Discovering the Past Best History YouTubers
- 4 Ways to Transfer Music from Oppo A38 to iPhone | Dr.fone
- APC's Powerful UPS Model - Back-UPS Pro Nv1500 Review: Enhanced Electricity Storage, Abundant Connectivity & Hot Swappable Battery Packs
- Elevate YouTube Video Quality, Minimize Distractions
- How To Change Xiaomi 14 Lock Screen Clock in Seconds
- In 2024, Deciphering the Art of Personalized Playlist Curation for YouTube
- In 2024, Disabling iPhone SE Parental Restrictions With/Without Password
- In 2024, Essential Vids Summary Uncovered
- In 2024, How to Change GPS Location on Nokia C22 Easily & Safely | Dr.fone
- Plotting the Pathway for Engaging YouTube Content
- The Core Interface YouTube Studio Explained
- Troubleshooting Windows Drivers That Won't Run – Expert Advice by YL Software Experts
- Title: Prime Video Strategies – Selecting Perfect Format for YouTube
- Author: Kevin
- Created at : 2024-12-07 16:31:14
- Updated at : 2024-12-10 18:30:03
- Link: https://youtube-videos.techidaily.com/prime-video-strategies-selecting-perfect-format-for-youtube/
- License: This work is licensed under CC BY-NC-SA 4.0.