
:max_bytes(150000):strip_icc()/what-is-a-car-power-inverter-534721-9c78d95b3d584b15a7c49052b1fe8ee8.png)
Premier Gamers' Streaming Software
Premier Gamers’ Streaming Software
15 Best Game Recording Software for YouTuber in 2024

Richard Bennett
Mar 27, 2024• Proven solutions
There is no doubt that gaming is one of the largest entertainment sources for most of people. The advanced technology has led to the development of game recorders by which you can record the video of your favorite game and share it with your friends and viewers on YouTube.
Wondershare Filmstock Gaming Video Editing Skils ](https://filmstock.wondershare.com/creative-theme-game?source%5Fchannel=seo%5Farticle&spm=rs.filmora%5Fweb )
You might be interested in:
If you are looking for a screen recorder that allows you to capture your gameplay, add markers to the important point during playing, and edit the recorded gameplay video easily, then we recommend you to try Wondershare DemoCreator.
With DemoCreator, you can:
- Add Markers to important points during recording
- Record high paced games at up to 120 fps
- Capture video, system audio, webcam, and mic at the same time
- Record the entire screen or just a part of your screen
- Change video speed and add fade in and fade out with a simple drag
- Detach audio and record voice narration during editing and reduce the noise
- Use the Blur effect to blur the private info or remove the watermark
- Share videos to Vimeo, YouTube, Facebook, and Twitch directly


However, if you are looking for a video editing software that provides various gameplay elements, I want to recommend - Wondershare Filmora , an easy to use while powerful video editor that allows you not only cut, split, crop, resize, reverse your videos, but also offers you multiple video effects specially designed for Fashion, Beauty, Gaming, Travel, Education, etc. Check the video to know more fantastic features, and keep reading the article to know why Filmora is still one of the best options when it comes to gameplay recording.
Download Mac Version ](https://tools.techidaily.com/wondershare/filmora/download/ )
15 Best Game Screen Recorders for Recording Game Videos
1. ShadowPlay
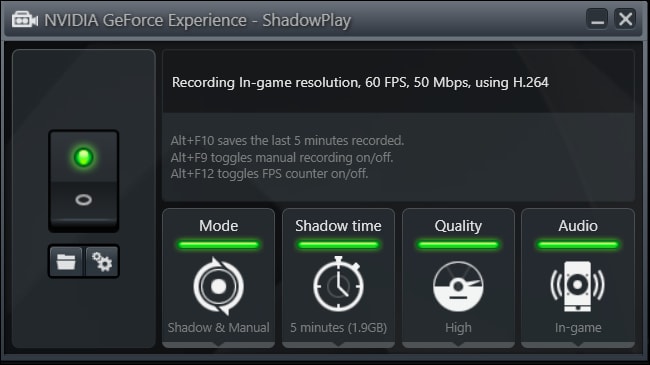
It is free game video capture software created by Nvidia GeForce for streaming game videos. There are two modes of this video recording tool i.e. Manual mode and Shadow mode.
Features:
- Instant replay and record
- Excellent hardware i.e. a GPU-accelerated video encoder
- It has a minimal performance impact
- Records up to 4K resolution at the speed of 130 Mbps
Compatibility: Windows XP, 7, 8, 8.1 and 10
Pros:
- Unlimited recording time in manual mode
- Allow it users to capture full desktop screen
Cons:
- Geforce GTX 600 and above is required to operate this software.
Price: It is available free of cost.
We have researched about how to record gameplay with Nvidia ShadowPlay, check this article How to Use Nvidia Share or ShadowPlay to Record Gameplay for the detailed information.
2. Camtasia

It is one of the best game recorders for recording professional videos on your PC. You can also import HD videos from an external source. The interactive videos can also be created by using this software.
Features:
- Stunning graphics
- Direct link to social media
- Effective recording option
- Drag and drop editing
- Google Drive integration
Compatibility: Windows 10, 8 and 7 SP1
Pros:
- You can easily include animated items
- Video, audio and cursor tracks can be edited individually
- Provides panning and zooming options
- Incorporates webcam
- You can also use the green screen effect
Cons:
- Free trial for only 30 days.
- The users cannot record videos for commercial use in the free version
- Very expensive
- Works slowly on large projects
Price: $299.00 USD but it can be reduced if you buy 5-9 licenses
3. Open Broadcast Software
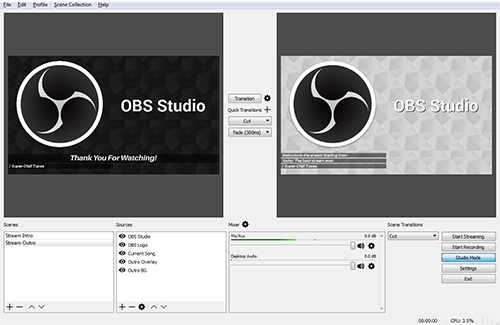
It is an open-source game recording tool having unlimited customization options. You can get idea about this software by its name i.e. the game streams can be broadcasted on various websites such as Twitch, YouTube, Hitbox etc.
Features:
- Simple interface
- Limitless scenes and sources
- It has file output to FLV or MP4
- GPU-based video game capture
Compatibility: Windows 10, 8, 8.1, Vista and 7, Version for Linux and Mac OS X is also in the pipeline
Pros:
- Easy to use
- High-speed performance
- Keyboard shortcuts
Cons:
- A sharp learning curve
- Difficult to construct scenes
Price: Free
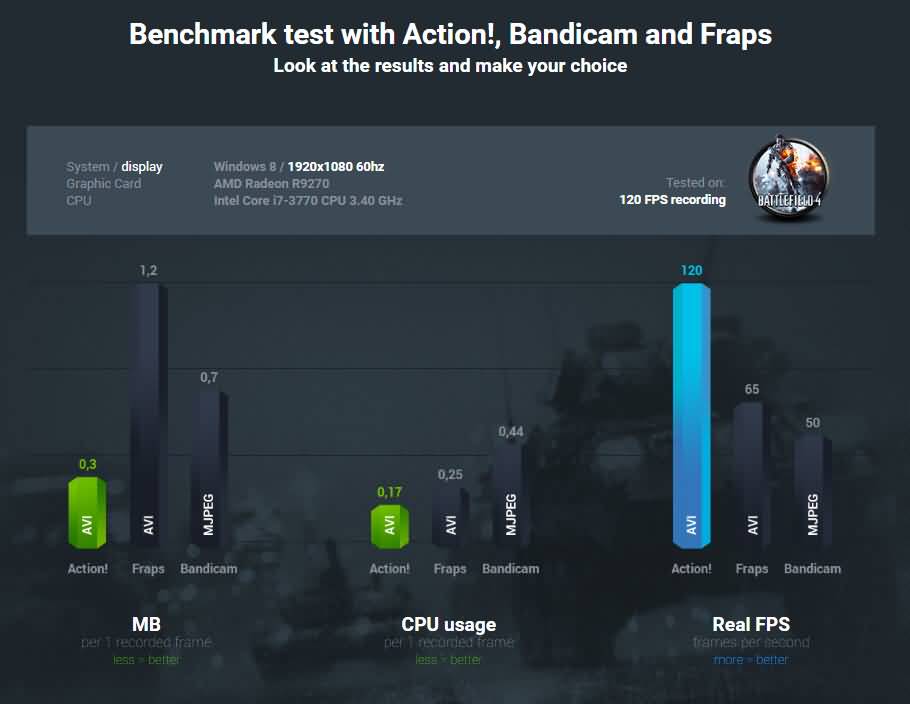
4.Bandicam
It is a perfect choice for beginners as it is easy to understand. You can also record a video game that utilizes the Direct X or OpenGL technology and share on YouTube with a single click. The size of the window can also be adjusted according to your need.
Features:
- Built-in compression feature ensuring high-quality videos
- Recording can be done for more than 24 hours
- You can record videos at 4k Ultra HD resolution
Compatibility: Windows XP, 10, 8.1, 8, and 7
Pros:
- Maximum frame rate i.e. 120 fps
- Two different audio inputs can be recorded at the same time
Cons:
- It does not proffer live streaming
Price: Free trial, $59 for two licenses, $39 for one license
5. EpicRewind

This software is developed recently introducing a unique feature i.e. RAM Rolling Buffer mode. It enables the user to replay the recording instantly. The buffer contents can also be saved by pressing a hotkey.
Features:
- You can conveniently capture screenshot and video from browser games or flash games.
- Direct-To-Disk capture mode
- Video Output Format and Codec can be configured with great ease.
Compatibility: It does not support windows
Pros:
- Videos are not encoded all the time.
Cons:
- It cannot be run on the Windows operating system.
Price: Free trial of the base version
6.D3DGear
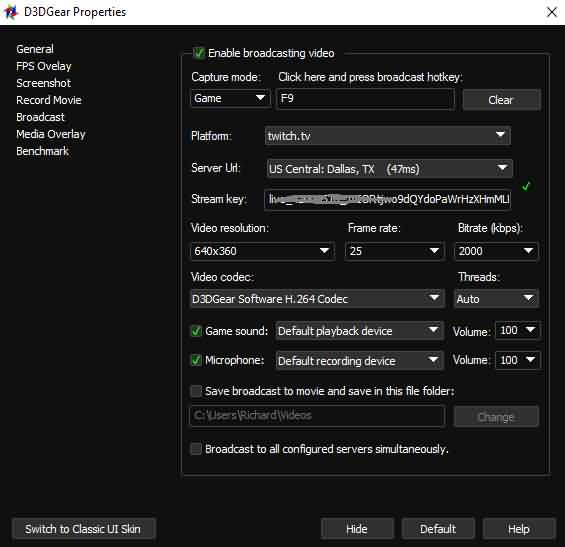
It is a very simple and light recorder. This software compresses the recorded files in real-time mode i.e. you are able to record screen activity even if there is less space in your storage drive. The videos can be shared over any social networking website.
Features:
- User-friendly interface
- Built-in compression system
Compatibility: Windows XP, 7, 10, 8, 8.1 and Vista
Pros:
- You can do live video streaming
- The audio files can be saved separately.
Cons:
- Pro version is very costly
Price: 15-day free trial otherwise it costs $34.95.
7.Fraps
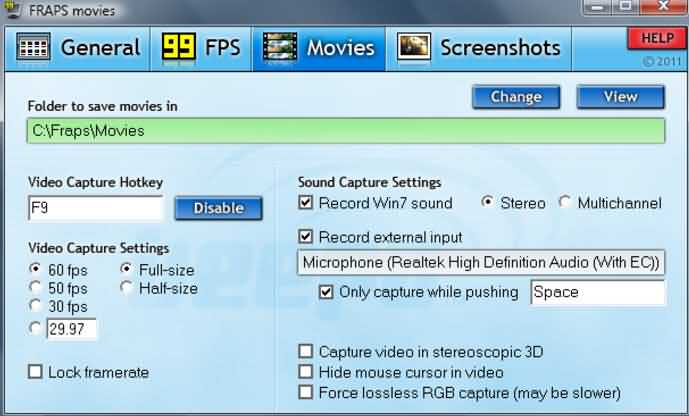
It is one of the most famous game screen recorders having superb features. The average performance rate can also be measured by using this recorder. You can also save these statistics in a different file. It is also very light software similar to D3DGear.
Features:
- It can be used as a benchmark tool.
- Capture high-quality footage
Compatibility: Windows Vista, XP, 7, 10, 8.1 and 8
Pros:
- You can record videos at 7680×4800 resolution
- Frames can be adjusted up to 120fps
Cons:
- It does not have streaming options
Price: Free version with few features, full version at $37
8.Microsoft Screen Encoder 4
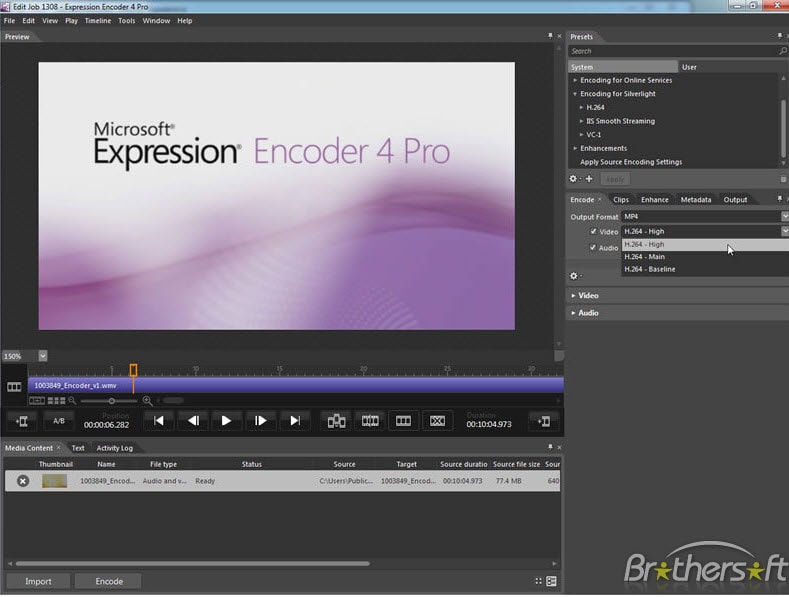
It is an advanced version of Microsoft screen encoder 3. It has wonderful graphics and live IIS (Internet Information Services) smooth streaming options. The Windows Media video, as well as audio files, can be produced with the help of this software.
Features:
- Screen capture
- GUI interface
- Live template support
Compatibility: Windows 7, Vista, Windows XP service pack2
Pros:
- High-quality playback
- Enables encoding using H.261Intuitive interface
Cons:
- Less editing tools in comparison to other software
- You cannot export your recordings to Sony Vegas11
Price: Pro version costs $199.95 while the standard version is free having limited features
9.Tinytake
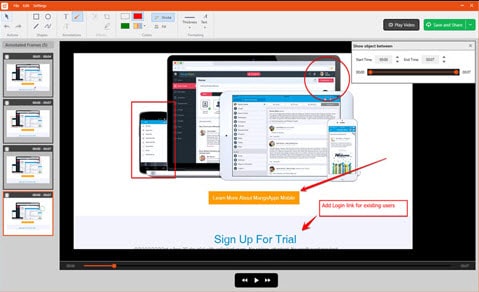
This game recorder is an ideal choice for making commercial presentations. This software allows its users to capture video from the selected region and upload it directly on YouTube or any other social media.
Features:
- Drag and drop option
- You can conveniently annotate the videos
- Inbuilt online file viewer
Compatibility: It can work with Windows as well as Mac operating system
Pros:
- You can develop custom shortcut keys
- Bulk files sharing
- You can run this software on mobile devices
Cons:
- Files are saved only in MP4 format
- Video recording can be done up to 2 hours
- No free version is available for business purposes
Price: It ranges between $29.95 and $199.95 for a yearly plan. You will also get storage memory space up to 2TB with a business plan.
10.Ezvid
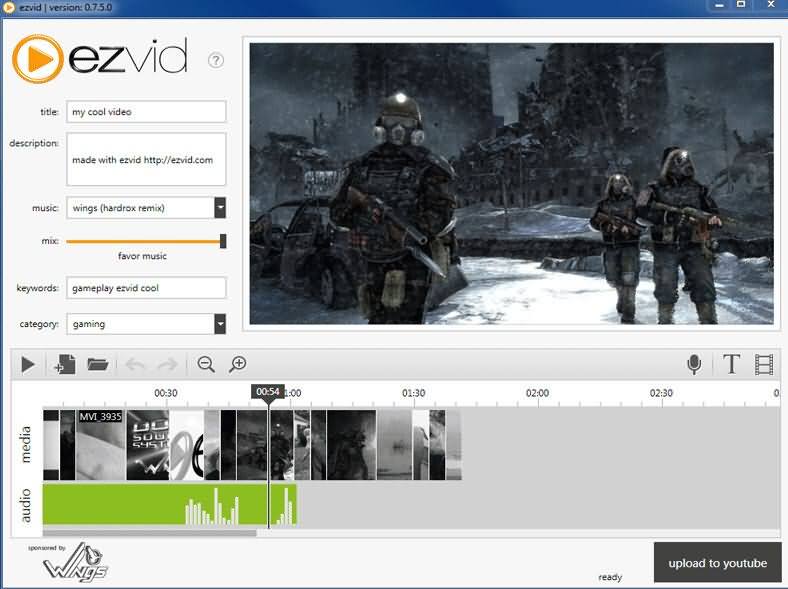
This screen software is specially designed for saving the time of the users. It also increases the recording speed and video editing capabilities. You can also add text and watermark to the videos.
Features:-
- Videos are uploaded on YouTube in a fast manner.
- It provides computer speech for narrative purposes.
- Modern and sleek interface
Compatibility: Windows XP SP3, 7 and Vista
Pros:
- High-quality video resolution
- You can also select the most popular music tracks
- It also has a facecam and a video editor
- You can also drag and drop videos
- Professional videos can be created in a few minutes
Cons:
- It is glitch and leggy.
- It requires 10GB free space
- Fewer features as compared to Camtasia software
Price: Free
11. Gecata
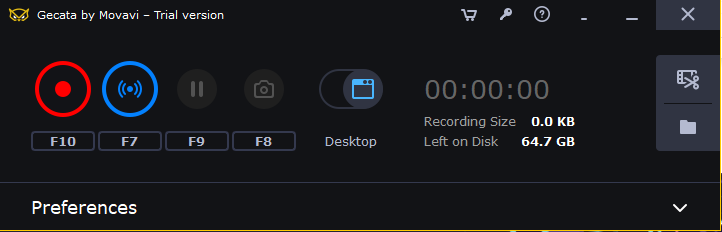
Gecata by Movavi is a lightweight video recording tool designed to capture gameplays. Screen recording with this program is easy without needing external hardware. You can capture all screen activities and save recordings in major video formats, including .MOV, .MP4, .AVI, and GIF.
Features:
- One-click screenshots
- Game mode for automatic recording
- Screen and audio recording simultaneously and separately
- Graphics hardware integration option (NVIDIA or Intel) for 400% faster encoding
Compatibility: Windows 7/8/10
Pros:
- Simple interface
- Speedy capturing
- Tested on dozens of games
- Game recording up to 120fps
Cons:
- The free version pastes a watermark on the recording
- Lagging
Price: $30.95 for a lifetime
12. EaseUS RecExperts

RecExperts by EaseUS is a premium screen recorder with many exciting features. For instance, you can record a particular part of the screen by making a selection through your mouse. Likewise, you can also record multiple screens side by side.
While RecExperts is made for gamers and YouTubers, you can use this tool for a wide range of purposes. Such as recording an online meeting, video tutorial, and more.
Features:
- Sound recording and extracting
- Web camera capturing
- Saving captured video into GIF
- Screenshots
- Schedule recording with automatic stop and split options
Compatibility: Windows 7/8.1/10/11 and macOS 10.13 or later
Pros:
- Simple software design
- Allows editing on the captured screen
- Supports different video and formats, including MP4, MKV, MOV, AVI
Cons:
- Limited editing, such as trimming and cutting
Price: $19.95 per month, $39.95 per year, and $79.95 for a lifetime
13. Flashback Express (Free Version)
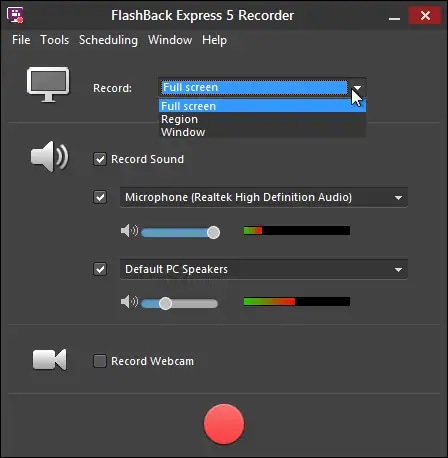
Flashback Express is a screen recording and editing software. It is a powerful tool for recording desktop screens simultaneously with mic sounds. You can also add webcam recordings to recorded gameplays as most YouTubers do.
Besides, there’s no time limit on the recording. So whether you want to capture a small portion of your video or screen record several hours of gameplay, feel free to do it.
Features:
- Video trimming
- Multi-screen recording
- Webcam overlay
- Direct YouTube uploading option
Compatibility: Windows 7/8.1/10/11
Pros:
- Easy interface
- No watermark
- Voice over during screen capturing
- Selected and full-screen recording
- You can save the recordings in MP4
Cons:
- Difficult export settings
- Unable to export audio in the free version
- You need to convert the video using other programs if you want your recording in different video formats
Price: Free
14. Snagit
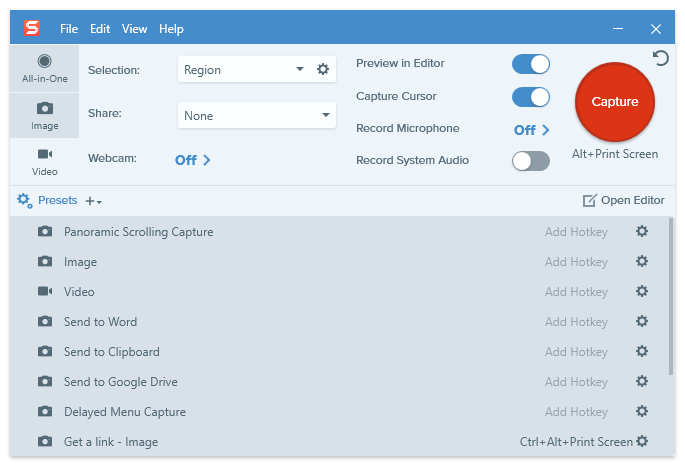
Snagit is another product by TechSmith (the developers of Camtasia). It’s a super easy tool to take screenshots and record screens.
You can save the captured video in MP4 and directly send the file through email. You can also upload files on different platforms and applications, including YouTube, Twitter, Slack, Google Drive, and more.
Features:
- Screen and audio recording
- Annotations
- Video trimming
- Webcam recording
- Cloud library
- Video conversion to GIFs
- Panoramic screen capturing
Compatibility: Windows 10/11 and Mac 11 or later
Pros:
- Simple user interface
- Fast video uploading to various platforms
Cons:
- Saved videos are only available in MP4 format
Price:$62.99 for a lifetime, including first-year maintenance (regular maintenance charges are $12.6 per year applicable after completing the first year)
15. Filmora
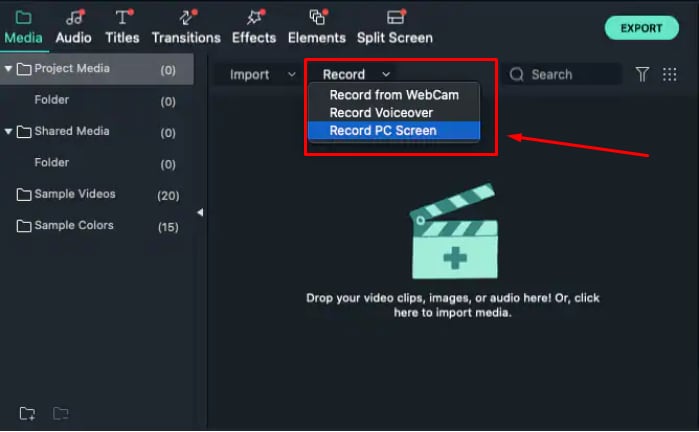
Filmora is an all-in-one program and is one of the top video editing tools cherished by all types of users – beginners and professionals. But what makes this software super cool for gamers and YouTubers is its screen recording option. With comprehensive features, you can record your gameplay and edit your screen recordings by using a wide range of features.
Features:
- Support 4K editing
- Noise removal
- Advanced text editor
- Color tuning
- Audio mixing
Compatibility: Windows 7/8/10/11 (64-bit) and macOS V10.1/V10.13/V10.14/V10.15/V11/V12
Pros:
- User-friendly interface
- Huge effects library
- Affordable perpetual licensing
- Wide range of features
- Support various video formats
- High-quality results
Cons:
- The free version includes a watermark
- You need to purchase the product to use some important features, such as keyframing
Price: $29.99 per month, $69.99 per year, and $79.99 for a perpetual
What to look for game screen recorder
There are many people who do not have any knowledge regarding game capture software. You must look for the following things before choosing a game screen recorder.
- The option of personalizing the hotkeys
- Number of built-in tools
- How to begin and pause recording
- Number of codes offered by it
- Recording time
- Editing features like cut and paste
- Custom-made Recording Resolution
- Adjustable video frames
In addition to this, some game recorders also affect your in-game fps (Frame per second). You should also check whether it is compatible with large-sized files or not. The quality of the video also depends upon the file size. The larger is file size, the higher is video quality. However, you can face problems while uploading huge-sized videos as online content distributors hardly support such files. So you must compress your video before sharing anywhere. There are also some recorders that provide a direct link to social networking sites. Thus you should consider these factors also before purchasing the game recording software.
You can easily run this recorder on your computer if it is updated and has 8GB of RAM. PC should also have two storage drives so as to install gaming software on one drive and record videos on another drive. It is also advisable to use computers than laptops for recording screen activities because laptops rarely have two storage drives.
You can easily run this recorder on your computer if it is updated and has 8GB of RAM. PC should also have two storage drives so as to install gaming software on one drive and record videos on another drive. It is also advisable to use computers than laptops for recording screen activities because laptops rarely have two storage drives.
FAQs
Q1. What software do YouTubers use to record gameplay?
Most gamers on YouTube use Open Broadcast System (OBS) and Bandicam to record their gameplays. However, there are a few more authentic screen recording tools for high-quality video recording, such as Filmora.
Using Filmora to record your gameplay will help you save the video in all major video formats. Moreover, the tool is also compatible with Mac and Windows operating systems.
Q2. How do I record my screen smoothly?
You should do a couple of things to avoid lagging while screen recording your gameplay. For example, do not use your built-in microphone to record your voice during screen recording. Instead, use an external microphone.
Only record what is important. Use high RAM and have a good graphics card. And most importantly, get screen recorders with at least 60fps.
Q3. Does screen recording decrease FPS?
Yes, it does affect your overall gaming performance. However, it depends on several factors. For instance, the fps won’t be affected much if you’re playing a less CPU-intensive game. The only way to sustain FPS is to have a high-quality screen recorder, such as OBS, Filmora, Bandicam, and Fraps.
Richard Bennett
Richard Bennett is a writer and a lover of all things video.
Follow @Richard Bennett
Richard Bennett
Mar 27, 2024• Proven solutions
There is no doubt that gaming is one of the largest entertainment sources for most of people. The advanced technology has led to the development of game recorders by which you can record the video of your favorite game and share it with your friends and viewers on YouTube.
Wondershare Filmstock Gaming Video Editing Skils ](https://filmstock.wondershare.com/creative-theme-game?source%5Fchannel=seo%5Farticle&spm=rs.filmora%5Fweb )
You might be interested in:
If you are looking for a screen recorder that allows you to capture your gameplay, add markers to the important point during playing, and edit the recorded gameplay video easily, then we recommend you to try Wondershare DemoCreator.
With DemoCreator, you can:
- Add Markers to important points during recording
- Record high paced games at up to 120 fps
- Capture video, system audio, webcam, and mic at the same time
- Record the entire screen or just a part of your screen
- Change video speed and add fade in and fade out with a simple drag
- Detach audio and record voice narration during editing and reduce the noise
- Use the Blur effect to blur the private info or remove the watermark
- Share videos to Vimeo, YouTube, Facebook, and Twitch directly
However, if you are looking for a video editing software that provides various gameplay elements, I want to recommend - Wondershare Filmora , an easy to use while powerful video editor that allows you not only cut, split, crop, resize, reverse your videos, but also offers you multiple video effects specially designed for Fashion, Beauty, Gaming, Travel, Education, etc. Check the video to know more fantastic features, and keep reading the article to know why Filmora is still one of the best options when it comes to gameplay recording.
Download Mac Version ](https://tools.techidaily.com/wondershare/filmora/download/ )
15 Best Game Screen Recorders for Recording Game Videos
1. ShadowPlay
It is free game video capture software created by Nvidia GeForce for streaming game videos. There are two modes of this video recording tool i.e. Manual mode and Shadow mode.
Features:
- Instant replay and record
- Excellent hardware i.e. a GPU-accelerated video encoder
- It has a minimal performance impact
- Records up to 4K resolution at the speed of 130 Mbps
Compatibility: Windows XP, 7, 8, 8.1 and 10
Pros:
- Unlimited recording time in manual mode
- Allow it users to capture full desktop screen
Cons:
- Geforce GTX 600 and above is required to operate this software.
Price: It is available free of cost.
We have researched about how to record gameplay with Nvidia ShadowPlay, check this article How to Use Nvidia Share or ShadowPlay to Record Gameplay for the detailed information.
2. Camtasia
It is one of the best game recorders for recording professional videos on your PC. You can also import HD videos from an external source. The interactive videos can also be created by using this software.
Features:
- Stunning graphics
- Direct link to social media
- Effective recording option
- Drag and drop editing
- Google Drive integration
Compatibility: Windows 10, 8 and 7 SP1
Pros:
- You can easily include animated items
- Video, audio and cursor tracks can be edited individually
- Provides panning and zooming options
- Incorporates webcam
- You can also use the green screen effect
Cons:
- Free trial for only 30 days.
- The users cannot record videos for commercial use in the free version
- Very expensive
- Works slowly on large projects
Price: $299.00 USD but it can be reduced if you buy 5-9 licenses
3. Open Broadcast Software
It is an open-source game recording tool having unlimited customization options. You can get idea about this software by its name i.e. the game streams can be broadcasted on various websites such as Twitch, YouTube, Hitbox etc.
Features:
- Simple interface
- Limitless scenes and sources
- It has file output to FLV or MP4
- GPU-based video game capture
Compatibility: Windows 10, 8, 8.1, Vista and 7, Version for Linux and Mac OS X is also in the pipeline
Pros:
- Easy to use
- High-speed performance
- Keyboard shortcuts
Cons:
- A sharp learning curve
- Difficult to construct scenes
Price: Free
4.Bandicam
It is a perfect choice for beginners as it is easy to understand. You can also record a video game that utilizes the Direct X or OpenGL technology and share on YouTube with a single click. The size of the window can also be adjusted according to your need.
Features:
- Built-in compression feature ensuring high-quality videos
- Recording can be done for more than 24 hours
- You can record videos at 4k Ultra HD resolution
Compatibility: Windows XP, 10, 8.1, 8, and 7
Pros:
- Maximum frame rate i.e. 120 fps
- Two different audio inputs can be recorded at the same time
Cons:
- It does not proffer live streaming
Price: Free trial, $59 for two licenses, $39 for one license
5. EpicRewind
This software is developed recently introducing a unique feature i.e. RAM Rolling Buffer mode. It enables the user to replay the recording instantly. The buffer contents can also be saved by pressing a hotkey.
Features:
- You can conveniently capture screenshot and video from browser games or flash games.
- Direct-To-Disk capture mode
- Video Output Format and Codec can be configured with great ease.
Compatibility: It does not support windows
Pros:
- Videos are not encoded all the time.
Cons:
- It cannot be run on the Windows operating system.
Price: Free trial of the base version
6.D3DGear
It is a very simple and light recorder. This software compresses the recorded files in real-time mode i.e. you are able to record screen activity even if there is less space in your storage drive. The videos can be shared over any social networking website.
Features:
- User-friendly interface
- Built-in compression system
Compatibility: Windows XP, 7, 10, 8, 8.1 and Vista
Pros:
- You can do live video streaming
- The audio files can be saved separately.
Cons:
- Pro version is very costly
Price: 15-day free trial otherwise it costs $34.95.
7.Fraps
It is one of the most famous game screen recorders having superb features. The average performance rate can also be measured by using this recorder. You can also save these statistics in a different file. It is also very light software similar to D3DGear.
Features:
- It can be used as a benchmark tool.
- Capture high-quality footage
Compatibility: Windows Vista, XP, 7, 10, 8.1 and 8
Pros:
- You can record videos at 7680×4800 resolution
- Frames can be adjusted up to 120fps
Cons:
- It does not have streaming options
Price: Free version with few features, full version at $37
8.Microsoft Screen Encoder 4
It is an advanced version of Microsoft screen encoder 3. It has wonderful graphics and live IIS (Internet Information Services) smooth streaming options. The Windows Media video, as well as audio files, can be produced with the help of this software.
Features:
- Screen capture
- GUI interface
- Live template support
Compatibility: Windows 7, Vista, Windows XP service pack2
Pros:
- High-quality playback
- Enables encoding using H.261Intuitive interface
Cons:
- Less editing tools in comparison to other software
- You cannot export your recordings to Sony Vegas11
Price: Pro version costs $199.95 while the standard version is free having limited features
9.Tinytake
This game recorder is an ideal choice for making commercial presentations. This software allows its users to capture video from the selected region and upload it directly on YouTube or any other social media.
Features:
- Drag and drop option
- You can conveniently annotate the videos
- Inbuilt online file viewer
Compatibility: It can work with Windows as well as Mac operating system
Pros:
- You can develop custom shortcut keys
- Bulk files sharing
- You can run this software on mobile devices
Cons:
- Files are saved only in MP4 format
- Video recording can be done up to 2 hours
- No free version is available for business purposes
Price: It ranges between $29.95 and $199.95 for a yearly plan. You will also get storage memory space up to 2TB with a business plan.
10.Ezvid
This screen software is specially designed for saving the time of the users. It also increases the recording speed and video editing capabilities. You can also add text and watermark to the videos.
Features:-
- Videos are uploaded on YouTube in a fast manner.
- It provides computer speech for narrative purposes.
- Modern and sleek interface
Compatibility: Windows XP SP3, 7 and Vista
Pros:
- High-quality video resolution
- You can also select the most popular music tracks
- It also has a facecam and a video editor
- You can also drag and drop videos
- Professional videos can be created in a few minutes
Cons:
- It is glitch and leggy.
- It requires 10GB free space
- Fewer features as compared to Camtasia software
Price: Free
11. Gecata
Gecata by Movavi is a lightweight video recording tool designed to capture gameplays. Screen recording with this program is easy without needing external hardware. You can capture all screen activities and save recordings in major video formats, including .MOV, .MP4, .AVI, and GIF.
Features:
- One-click screenshots
- Game mode for automatic recording
- Screen and audio recording simultaneously and separately
- Graphics hardware integration option (NVIDIA or Intel) for 400% faster encoding
Compatibility: Windows 7/8/10
Pros:
- Simple interface
- Speedy capturing
- Tested on dozens of games
- Game recording up to 120fps
Cons:
- The free version pastes a watermark on the recording
- Lagging
Price: $30.95 for a lifetime
12. EaseUS RecExperts
RecExperts by EaseUS is a premium screen recorder with many exciting features. For instance, you can record a particular part of the screen by making a selection through your mouse. Likewise, you can also record multiple screens side by side.
While RecExperts is made for gamers and YouTubers, you can use this tool for a wide range of purposes. Such as recording an online meeting, video tutorial, and more.
Features:
- Sound recording and extracting
- Web camera capturing
- Saving captured video into GIF
- Screenshots
- Schedule recording with automatic stop and split options
Compatibility: Windows 7/8.1/10/11 and macOS 10.13 or later
Pros:
- Simple software design
- Allows editing on the captured screen
- Supports different video and formats, including MP4, MKV, MOV, AVI
Cons:
- Limited editing, such as trimming and cutting
Price: $19.95 per month, $39.95 per year, and $79.95 for a lifetime
13. Flashback Express (Free Version)
Flashback Express is a screen recording and editing software. It is a powerful tool for recording desktop screens simultaneously with mic sounds. You can also add webcam recordings to recorded gameplays as most YouTubers do.
Besides, there’s no time limit on the recording. So whether you want to capture a small portion of your video or screen record several hours of gameplay, feel free to do it.
Features:
- Video trimming
- Multi-screen recording
- Webcam overlay
- Direct YouTube uploading option
Compatibility: Windows 7/8.1/10/11
Pros:
- Easy interface
- No watermark
- Voice over during screen capturing
- Selected and full-screen recording
- You can save the recordings in MP4
Cons:
- Difficult export settings
- Unable to export audio in the free version
- You need to convert the video using other programs if you want your recording in different video formats
Price: Free
14. Snagit
Snagit is another product by TechSmith (the developers of Camtasia). It’s a super easy tool to take screenshots and record screens.
You can save the captured video in MP4 and directly send the file through email. You can also upload files on different platforms and applications, including YouTube, Twitter, Slack, Google Drive, and more.
Features:
- Screen and audio recording
- Annotations
- Video trimming
- Webcam recording
- Cloud library
- Video conversion to GIFs
- Panoramic screen capturing
Compatibility: Windows 10/11 and Mac 11 or later
Pros:
- Simple user interface
- Fast video uploading to various platforms
Cons:
- Saved videos are only available in MP4 format
Price:$62.99 for a lifetime, including first-year maintenance (regular maintenance charges are $12.6 per year applicable after completing the first year)
15. Filmora
Filmora is an all-in-one program and is one of the top video editing tools cherished by all types of users – beginners and professionals. But what makes this software super cool for gamers and YouTubers is its screen recording option. With comprehensive features, you can record your gameplay and edit your screen recordings by using a wide range of features.
Features:
- Support 4K editing
- Noise removal
- Advanced text editor
- Color tuning
- Audio mixing
Compatibility: Windows 7/8/10/11 (64-bit) and macOS V10.1/V10.13/V10.14/V10.15/V11/V12
Pros:
- User-friendly interface
- Huge effects library
- Affordable perpetual licensing
- Wide range of features
- Support various video formats
- High-quality results
Cons:
- The free version includes a watermark
- You need to purchase the product to use some important features, such as keyframing
Price: $29.99 per month, $69.99 per year, and $79.99 for a perpetual
What to look for game screen recorder
There are many people who do not have any knowledge regarding game capture software. You must look for the following things before choosing a game screen recorder.
- The option of personalizing the hotkeys
- Number of built-in tools
- How to begin and pause recording
- Number of codes offered by it
- Recording time
- Editing features like cut and paste
- Custom-made Recording Resolution
- Adjustable video frames
In addition to this, some game recorders also affect your in-game fps (Frame per second). You should also check whether it is compatible with large-sized files or not. The quality of the video also depends upon the file size. The larger is file size, the higher is video quality. However, you can face problems while uploading huge-sized videos as online content distributors hardly support such files. So you must compress your video before sharing anywhere. There are also some recorders that provide a direct link to social networking sites. Thus you should consider these factors also before purchasing the game recording software.
You can easily run this recorder on your computer if it is updated and has 8GB of RAM. PC should also have two storage drives so as to install gaming software on one drive and record videos on another drive. It is also advisable to use computers than laptops for recording screen activities because laptops rarely have two storage drives.
You can easily run this recorder on your computer if it is updated and has 8GB of RAM. PC should also have two storage drives so as to install gaming software on one drive and record videos on another drive. It is also advisable to use computers than laptops for recording screen activities because laptops rarely have two storage drives.
FAQs
Q1. What software do YouTubers use to record gameplay?
Most gamers on YouTube use Open Broadcast System (OBS) and Bandicam to record their gameplays. However, there are a few more authentic screen recording tools for high-quality video recording, such as Filmora.
Using Filmora to record your gameplay will help you save the video in all major video formats. Moreover, the tool is also compatible with Mac and Windows operating systems.
Q2. How do I record my screen smoothly?
You should do a couple of things to avoid lagging while screen recording your gameplay. For example, do not use your built-in microphone to record your voice during screen recording. Instead, use an external microphone.
Only record what is important. Use high RAM and have a good graphics card. And most importantly, get screen recorders with at least 60fps.
Q3. Does screen recording decrease FPS?
Yes, it does affect your overall gaming performance. However, it depends on several factors. For instance, the fps won’t be affected much if you’re playing a less CPU-intensive game. The only way to sustain FPS is to have a high-quality screen recorder, such as OBS, Filmora, Bandicam, and Fraps.
Richard Bennett
Richard Bennett is a writer and a lover of all things video.
Follow @Richard Bennett
The Essential Guide to YouTube Video Lighting Tips
How To Light Your YouTube Video
Richard Bennett
Oct 26, 2023• Proven solutions
When it comes to sensitivity to light, no consumer-level camera sensor comes close in performance to the human eye. Many newbies to videography, though, don’t think about this when they use their camera indoors and discover that their recorded footage appears too dark.
If you want to use your camera indoors as many YouTubers do, you’ll need to have extra light. But the solution is not as simple as surrounding yourself with lamps that are all randomly placed.
Below, I’ll go into detail on how you can set up your lighting equipment to make your YouTube videos look good.
| Table of Contents Using Light You Already Have Window LightingHome Lighting Home Studio Lighting Light Control3-Point Lighting4-Point Lighting |
|---|
Part 1: Using Light You Already Have
Most beginner YouTubers light their videos with what they already have. That’s what I did to start as well. In the past, my video recording space consisted of natural sunlight coming from my window and ceiling light for times when the sunlight wasn’t strong enough.
1. Window Lighting
The best thing about window lighting is that it’s free. The worst thing about it is that it’s uncontrollable. The amount of light you get in your video can vary with all the changes in the weather.
Window lighting for me was especially difficult to work with because I live in a very rainy and cloudy city, Vancouver, Canada, where we pretty much just get three months of good sun.

Above are two freeze frames from one of Daniel’s past window-lit vlogs. Although these two frames are both from the same vlog, you can see that the image on the right looks brighter due to clearer skies at that moment. These varying amounts of light is what you will have to deal with if you choose to light your YouTube video with window lighting.
2. Home Lighting
Home lighting is another source of light that many new YouTubers use. In the past, when my window light wasn’t strong enough to light my video recording space, I would turn on the ceiling light.

Notice how the color of Daniel’s skin looks much more orange here (above) than the color of the skin in the two side-by-side window lighting examples? The side of the face also appears to look bluer. This all happened because he mixed up different color temperatures shining out of the two lights (cooler window light and warmer ceiling light).
Most home lighting is warmer in its color temperature. If you want to use your home lights without everything being orange-tinted, you’ll need to switch out your light bulbs for daytime LED light bulbs.
Ceiling lights are also typically situated in the center of a room in order to light an entire room evenly. This is not likely to be the best location for your filming video. Since the ceiling light was directly above the face in the above example, you can see harder shadows beneath his cheeks.
Part 2: Home Studio Lighting
If you rather not deal with all the window and home lighting challenges, you can set up studio lighting in your home.
1. Light Control
The first thing you’ll want to do to set up studio lighting in your home is to pick a room to film in and eliminate as much external lighting as you can. Use blinds, curtains, towels, or any thick fabric to block sunlight from shining into your room.
2. 3-Point Lighting
The most common setup for studio lighting is 3-point lighting. For this kind of lighting you’ll need three lights: a key light, a fill light, and a back light (also called a hair light).

Out of the three lights, the key light should be the brightest. When it is positioned to the left of you (as shown in the diagram above) your right side will have shadows.
To minimize the shadows on your right side, use a weaker light as a fill light. You don’t want your fill light to completely eliminate all your shadows or else your shot will look flat.
Lastly, a backlight positioned behind you can give an appealing highlight to the ends of your head and even help to separate your hair from blending into your background if both happen to be dark.
3. 4-Point Lighting
As a YouTuber, you may not only want yourself to be seen optimally with proper lighting, but you may also want your background to be seen optimally, especially if you’ve taken the time to decorate it for your audience.
What you’ll need to ensure that your background is sufficiently lit is 4-point lighting setup. The 4-point lighting setup is the same as a 3-point lighting setup, but with an additional light shining at your background.
For more information on lighting equipment, check out my Top 17 Video Lighting Equipment For YouTubers .
Touch Up YouTube Videos with Filmora
Filmora is one of the best video editing software for YouTube beginners to start the YouTube channel. So, if you find the lighting isn’t perfect after recording, you can use the Auto Color Enhancement feature in Filmora to adjust the color with one-click. Or, you can change the white balance, Light, color, and HSL manually. Filmora also features some presets and LUTs templates , which allows you to apply pre-programmed effects to video for color correction faster.
Richard Bennett
Richard Bennett is a writer and a lover of all things video.
Follow @Richard Bennett
Richard Bennett
Oct 26, 2023• Proven solutions
When it comes to sensitivity to light, no consumer-level camera sensor comes close in performance to the human eye. Many newbies to videography, though, don’t think about this when they use their camera indoors and discover that their recorded footage appears too dark.
If you want to use your camera indoors as many YouTubers do, you’ll need to have extra light. But the solution is not as simple as surrounding yourself with lamps that are all randomly placed.
Below, I’ll go into detail on how you can set up your lighting equipment to make your YouTube videos look good.
| Table of Contents Using Light You Already Have Window LightingHome Lighting Home Studio Lighting Light Control3-Point Lighting4-Point Lighting |
|---|
Part 1: Using Light You Already Have
Most beginner YouTubers light their videos with what they already have. That’s what I did to start as well. In the past, my video recording space consisted of natural sunlight coming from my window and ceiling light for times when the sunlight wasn’t strong enough.
1. Window Lighting
The best thing about window lighting is that it’s free. The worst thing about it is that it’s uncontrollable. The amount of light you get in your video can vary with all the changes in the weather.
Window lighting for me was especially difficult to work with because I live in a very rainy and cloudy city, Vancouver, Canada, where we pretty much just get three months of good sun.
Above are two freeze frames from one of Daniel’s past window-lit vlogs. Although these two frames are both from the same vlog, you can see that the image on the right looks brighter due to clearer skies at that moment. These varying amounts of light is what you will have to deal with if you choose to light your YouTube video with window lighting.
2. Home Lighting
Home lighting is another source of light that many new YouTubers use. In the past, when my window light wasn’t strong enough to light my video recording space, I would turn on the ceiling light.
Notice how the color of Daniel’s skin looks much more orange here (above) than the color of the skin in the two side-by-side window lighting examples? The side of the face also appears to look bluer. This all happened because he mixed up different color temperatures shining out of the two lights (cooler window light and warmer ceiling light).
Most home lighting is warmer in its color temperature. If you want to use your home lights without everything being orange-tinted, you’ll need to switch out your light bulbs for daytime LED light bulbs.
Ceiling lights are also typically situated in the center of a room in order to light an entire room evenly. This is not likely to be the best location for your filming video. Since the ceiling light was directly above the face in the above example, you can see harder shadows beneath his cheeks.
Part 2: Home Studio Lighting
If you rather not deal with all the window and home lighting challenges, you can set up studio lighting in your home.
1. Light Control
The first thing you’ll want to do to set up studio lighting in your home is to pick a room to film in and eliminate as much external lighting as you can. Use blinds, curtains, towels, or any thick fabric to block sunlight from shining into your room.
2. 3-Point Lighting
The most common setup for studio lighting is 3-point lighting. For this kind of lighting you’ll need three lights: a key light, a fill light, and a back light (also called a hair light).
Out of the three lights, the key light should be the brightest. When it is positioned to the left of you (as shown in the diagram above) your right side will have shadows.
To minimize the shadows on your right side, use a weaker light as a fill light. You don’t want your fill light to completely eliminate all your shadows or else your shot will look flat.
Lastly, a backlight positioned behind you can give an appealing highlight to the ends of your head and even help to separate your hair from blending into your background if both happen to be dark.
3. 4-Point Lighting
As a YouTuber, you may not only want yourself to be seen optimally with proper lighting, but you may also want your background to be seen optimally, especially if you’ve taken the time to decorate it for your audience.
What you’ll need to ensure that your background is sufficiently lit is 4-point lighting setup. The 4-point lighting setup is the same as a 3-point lighting setup, but with an additional light shining at your background.
For more information on lighting equipment, check out my Top 17 Video Lighting Equipment For YouTubers .
Touch Up YouTube Videos with Filmora
Filmora is one of the best video editing software for YouTube beginners to start the YouTube channel. So, if you find the lighting isn’t perfect after recording, you can use the Auto Color Enhancement feature in Filmora to adjust the color with one-click. Or, you can change the white balance, Light, color, and HSL manually. Filmora also features some presets and LUTs templates , which allows you to apply pre-programmed effects to video for color correction faster.
Richard Bennett
Richard Bennett is a writer and a lover of all things video.
Follow @Richard Bennett
Also read:
- Free Music Unlocked The Ultimate Library for Videographers
- Enriching Slides Video Incorporation From YouTube for 2024
- In 2024, Bite-Sized Tips for Aspiring Video Editors
- The Dual Lens Approach Gaining Audience Insight with 3 POV Strategies for YouTube Reactions
- [Updated] 25 Steps Forward in YouTube Mastery and Recognition
- Youtube Beginner's Basics Establishing Your Channel & Earning Profits
- Complete Walkthrough to Grab YouTube Playlists
- From Noob to Pro Selecting Webcams That Make a Difference in YouTube Livestreams
- Year's Biggest Beauty Influencers on YouTube
- [New] Crafting Cross-Social Media Content Strategy with YouTube & FB
- Decoding Steps to Access Your Channel's Eyeballs for 2024
- Digital Delegates Top YouTube Creators by Followers for 2024
- [Updated] Engaging Audiences Triad of Effective Storytelling
- Uncovering the Hottest 8 YouTube Channel Surge Insights
- In 2024, Capturing Life in Motion Top 9 Smartphone Props for Dynamic Cinematography
- Top Ten Capture Hardware Rankings for Professional Streamers
- Grasp the Basics of Sub4sub Success - Our Guide Lays It Out Clearly
- Brief but Impactful Music Shorts on YouTube Unveiled for 2024
- 2024 Approved Elevate Vlogging Effective Use of Jump Cuts
- Elevate Your Content Top-Rated Cameras for YouTubers for 2024
- In-Depth Guide to Video Money-Making Across Platforms
- In 2024, Decoding Video Thread Embellishments
- 2024 Approved Choosing a Font for Impactful YouTube Credits
- Best 10 YouTube Volume Boosters for Windows, macOS, Android, and iPhone for 2024
- Decoding the Features That Make YouTube Premium Special
- [New] Elevate Your Videography with Top SEO Gadgets
- In 2024, Beat Drops in Seconds A Beginner’s Guide to Music Videos
- [New] Building a Million Views Empire Safe and Secure Methods
- Top 9 Free YouTube Logo Makers
- [New] Conquered Everlasting Deactivation of YouTube Shorts
- The Truth Behind ASMR Video Enthusiasm
- 2024 Approved Edu-Topic 10 Selective Learning Channels Online
- 2024 Approved Essential Audio Enhancement Apps for YouTubers' Videos
- [Updated] Avoid Pitfalls Maintaining YouTube Thumbnail Quality
- [New] Cutting-Edge Content Summit
- Channel Expansion via YouTube Outros Maximizing Visibility for 2024
- [New] Elite Recommendations Top 10 High-End Video Card Models
- Academic History Lovers' Guide to Top YT Content
- Insights Into Income Average Earnings per Advertisement Playback?
- [Updated] Elevate YouTube Video Quality, Minimize Distractions
- [New] A Viewer-Friendly Approach Implementing Commentary and Alerts on YouTube
- 2024 Approved Breakthrough Techniques for Outstanding YouTube Openers (Technique 1+2)
- Economical Airborne Photography Drone Deals Under $100
- 4 Methods to Turn off Life 360 On Motorola Edge 40 Neo without Anyone Knowing | Dr.fone
- Boosting Brand Exposure Through Box for 2024
- New 2024 Approved What Is AI Advertising? | Wondershare Virbo Glossary
- 2024 Approved Ultimate Compilation Best Tools for Vimeo Files
- Fast Forward Your Footage Top Time-Lapse Apps for Mobile
- Updated Change Video Dimensions Fast A Beginners Guide
- Change Location on Yik Yak For your Oppo Reno 9A to Enjoy More Fun | Dr.fone
- [New] Android Deluxe Playtime Top GB Games on Your Phone
- New Optimal Audio Tuning Parameters for Gadgets for 2024
- [New] In 2024, Unleash Creativity Using Snapchat to Edit and Enhance Photos
- Best Quadcopters for Kids & Playtime
- 2024 Approved Film Like a Pro Scenic Filter Ideas for TikTok Stars
- Title: Premier Gamers' Streaming Software
- Author: Kevin
- Created at : 2024-05-25 16:11:44
- Updated at : 2024-05-26 16:11:44
- Link: https://youtube-videos.techidaily.com/premier-gamers-streaming-software/
- License: This work is licensed under CC BY-NC-SA 4.0.
