Pinpoint Pioneering Podium Places
Pinpoint Pioneering Podium Places
Best Free YouTube Comment Finder You Should Try

Richard Bennett
Mar 27, 2024• Proven solutions
Are you trying to make more people notice your YouTube video? According to surveys, YouTube is the second most popular search engine after Google, with more than 100 hours of video uploaded every minute.
For a YouTube influencer, comments play a crucial role, and so is comment modification.
Now, YouTube has not yet come up with a complete comment modification kit. With the existing tools and free comment finder applications combined, it has become easier to remove improper, unprofessional or offensive comments and engage with genuine followers on YouTube.
This thread is a guide for selecting the best YouTube comment finder and a tutorial to use existing YouTube tools to control comments.
Part 1: Best Free YouTube Comments Finder
YouTube Comment Finder is an SEO feature that allows you to look at the best catchphrases for any mainstream YouTube video. Here are some of the best apps that offer the feature.
YT Comment Finder is one of the most user-friendly and straightforward comment finder tools available on the internet. It is free to use and produces incredible results. Let us see how it works.
- To visit the website, click on the link below https://ytcomment.kmcat.uk/
- A search bar will be visible on the homepage. You can enter the title of the video you wish to search comments for, or the URL of the YouTube channel or a video URL, and then click the Search

- In the next step, you will find a complete list of videos with the same title. Choose your video and click on Search This Video**.**
- A new search bar will appear for any comments you choose to look up.

With YTComment, you can see the basic information about the YouTube video or channel, and to find a comment, all you have to do is type in a word you want to search, and you’ll get a list of all the comments relevant to that term or its synonyms as well.
2. YouTube First Comment Finder
Although YouTube has settings to know about the first comment in a video, that is only accessible to the creator and is a big burden process. With YouTube First Comment Finder, you’re just a click away.
- Open the website through this link https://first-comment.com/
- Paste the URL of your YouTube video in the search box. Click on the FIND There you go! The name of the first commenter of the video will come right in front of you, and you can even see what the comment is and the date of commenting.
- Unique Feature: This website comes with a tutorial and you can find out the first comment of the YouTube quickly with it. However, the feature of this tool is limited.
3. Hadzy
It is one of the most user-friendly and ad-free random comment pickers available for YouTube. Hadzy is quick and can handle more comments than other sites. Hadzy YouTube comment picker is popular among most of the Tubers.
- To open Hadzy, click on the link https://hadzy.com/
- Simply copy and paste the YouTube video’s URL into the homepage’s search bar.
- A pop-up will appear with all the details about the video. You just need to click on Load Data.
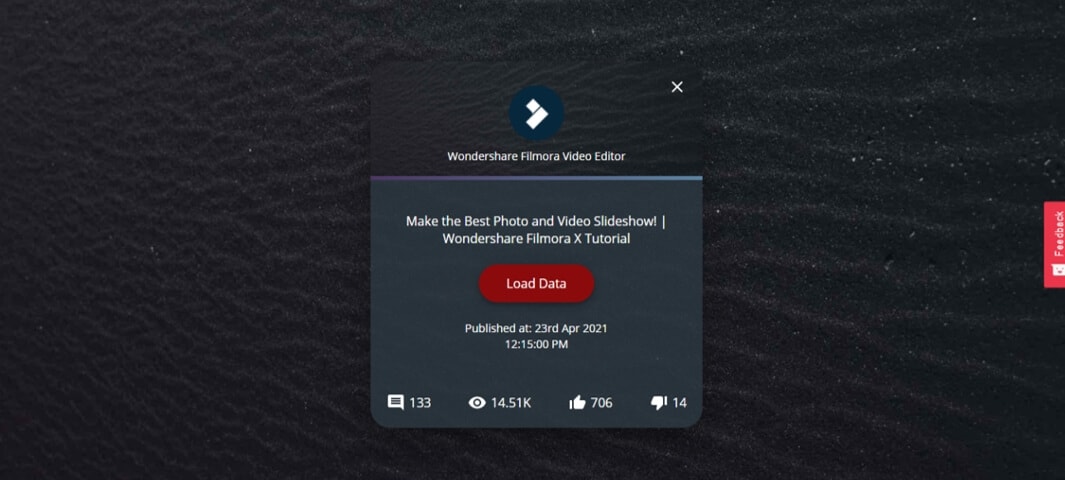
- In the next step, you will be redirected to another pop-up with two buttons- ‘View Comments’ and ‘View Statistics.’ Click on View Comments to check the first, second and all the other comments in ascending order.
- Unique feature 1: By clicking the View Statistics button, you can get a track of the popular words used in the comment section and the top questions asked by your followers.
- Unique feature 2: Along with the comment, details of the user, time of commenting, and many more things can be extracted from Hadzy.
Part 2: How to Find the First Comments You Have Posted on YouTube?
There are times when you regret what you’ve commented on in the past or wish to go back and look up your first message on YouTube. However, it is not always possible to recall the channel or video where you left the comment.
So, is there a way or a tool that can make it just a doodle? Certainly yes. Did you know that you can check for any previous comments you’ve made on YouTube regardless of how old it is?
Everything you have to do now follows the steps below. For the following methods, it is preferable to use a browser rather than the YouTube App.
- Go to the homepage of YouTube. At the top left corner, Click on the three-lined icon. Click on History next. You will be redirected to your account’s history section.
- At the right corner, choose History type as ‘community.’ Below that, click on the ‘Comments’ option. Finally, a new tab would open with all your YouTube comment history.

By these basic steps, enjoy editing or deleting your comments and replies directly on YouTube!
However, you will have to scroll down a long way before you hit the end to see your first comment posted on YouTube.
Part 3: How to Find the Latest Comments you have received on YouTube?
You do not get notifications about comments left on your YouTube videos at times. Mostly, it’s due to your notification preferences. When you enable comment notifications, you’ll be informed of all the latest comments on your videos. And this, in turn, allows you to keep track of your followers and engage with them more easily.
YouTube is a vast platform, and there are quite a few modifications hidden everywhere. To know everything is not always possible. Now that you are here let’s see how to locate the most recent comment you’ve got on YouTube.
Step 1: Enable Comment Notifications
- Open the homepage of YouTube, scroll down to ‘Settings’ and click on it. You will be redirected to the Setting page.
- From the bar in the left corner, select Notifications and scroll down and enable ‘Activity on my Channel.’
These steps are convenient both for pc as well as a mobile app. Just follow three steps, Setting-Notifications-Activity on your Channel.
Step 2: Check the Notification Bar
- Click on the bell icon at the top right corner and there you would receive notifications regarding all the comment activities. Click on the particular notification to go to that comment.
Bonus: How to Change the Comments View Order?
Did you know you can also customize your comment section as per your need? On the watch page for your video, you can rearrange the order of the comments. You may sort the comments by top comments or by date added. It’s just simple steps ahead.
- First of all, you need to sign in to YouTube Studio: http://studio.youtube.com ,
- From the left bar, select Content, click a video’s thumbnail, and click on Show More in video details page.
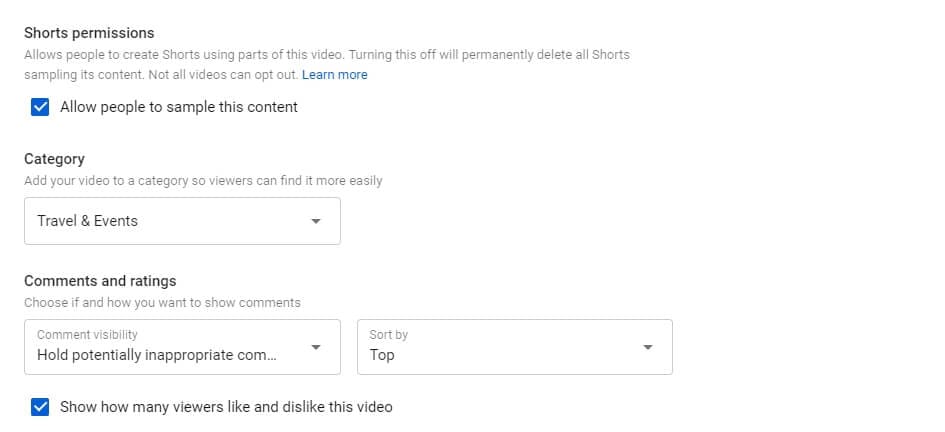
- Under ‘Comments and ratings,’ select Sort by, and then choose between “Top” and “Newest.”
- Save the changes, and you are done!
Conclusion
YouTube comments play a predominant role in handling your business as a YouTuber. It’s reasonable to believe that the search algorithm considers comments on your videos to be a significant indicator of their efficiency, and therefore gives them higher rankings for specific searches.
The higher your video content’s exposure on the internet, the more you’ll be included in YouTube or Google searches.
YouTube Comments Finder helps you keep track of the good and bad comments in your videos and definitely helps improve the SEO of your Channel. Thanks to YouTube’s advanced tools and websites like Hadzy, YouTube comment Finder, YT Comment Finder and YouTube First Comment Finder, managing third-party interaction is a lot simpler today.
Richard Bennett
Richard Bennett is a writer and a lover of all things video.
Follow @Richard Bennett
Richard Bennett
Mar 27, 2024• Proven solutions
Are you trying to make more people notice your YouTube video? According to surveys, YouTube is the second most popular search engine after Google, with more than 100 hours of video uploaded every minute.
For a YouTube influencer, comments play a crucial role, and so is comment modification.
Now, YouTube has not yet come up with a complete comment modification kit. With the existing tools and free comment finder applications combined, it has become easier to remove improper, unprofessional or offensive comments and engage with genuine followers on YouTube.
This thread is a guide for selecting the best YouTube comment finder and a tutorial to use existing YouTube tools to control comments.
Part 1: Best Free YouTube Comments Finder
YouTube Comment Finder is an SEO feature that allows you to look at the best catchphrases for any mainstream YouTube video. Here are some of the best apps that offer the feature.
YT Comment Finder is one of the most user-friendly and straightforward comment finder tools available on the internet. It is free to use and produces incredible results. Let us see how it works.
- To visit the website, click on the link below https://ytcomment.kmcat.uk/
- A search bar will be visible on the homepage. You can enter the title of the video you wish to search comments for, or the URL of the YouTube channel or a video URL, and then click the Search
- In the next step, you will find a complete list of videos with the same title. Choose your video and click on Search This Video**.**
- A new search bar will appear for any comments you choose to look up.
With YTComment, you can see the basic information about the YouTube video or channel, and to find a comment, all you have to do is type in a word you want to search, and you’ll get a list of all the comments relevant to that term or its synonyms as well.
2. YouTube First Comment Finder
Although YouTube has settings to know about the first comment in a video, that is only accessible to the creator and is a big burden process. With YouTube First Comment Finder, you’re just a click away.
- Open the website through this link https://first-comment.com/
- Paste the URL of your YouTube video in the search box. Click on the FIND There you go! The name of the first commenter of the video will come right in front of you, and you can even see what the comment is and the date of commenting.
- Unique Feature: This website comes with a tutorial and you can find out the first comment of the YouTube quickly with it. However, the feature of this tool is limited.
3. Hadzy
It is one of the most user-friendly and ad-free random comment pickers available for YouTube. Hadzy is quick and can handle more comments than other sites. Hadzy YouTube comment picker is popular among most of the Tubers.
- To open Hadzy, click on the link https://hadzy.com/
- Simply copy and paste the YouTube video’s URL into the homepage’s search bar.
- A pop-up will appear with all the details about the video. You just need to click on Load Data.
- In the next step, you will be redirected to another pop-up with two buttons- ‘View Comments’ and ‘View Statistics.’ Click on View Comments to check the first, second and all the other comments in ascending order.
- Unique feature 1: By clicking the View Statistics button, you can get a track of the popular words used in the comment section and the top questions asked by your followers.
- Unique feature 2: Along with the comment, details of the user, time of commenting, and many more things can be extracted from Hadzy.
Part 2: How to Find the First Comments You Have Posted on YouTube?
There are times when you regret what you’ve commented on in the past or wish to go back and look up your first message on YouTube. However, it is not always possible to recall the channel or video where you left the comment.
So, is there a way or a tool that can make it just a doodle? Certainly yes. Did you know that you can check for any previous comments you’ve made on YouTube regardless of how old it is?
Everything you have to do now follows the steps below. For the following methods, it is preferable to use a browser rather than the YouTube App.
- Go to the homepage of YouTube. At the top left corner, Click on the three-lined icon. Click on History next. You will be redirected to your account’s history section.
- At the right corner, choose History type as ‘community.’ Below that, click on the ‘Comments’ option. Finally, a new tab would open with all your YouTube comment history.
By these basic steps, enjoy editing or deleting your comments and replies directly on YouTube!
However, you will have to scroll down a long way before you hit the end to see your first comment posted on YouTube.
Part 3: How to Find the Latest Comments you have received on YouTube?
You do not get notifications about comments left on your YouTube videos at times. Mostly, it’s due to your notification preferences. When you enable comment notifications, you’ll be informed of all the latest comments on your videos. And this, in turn, allows you to keep track of your followers and engage with them more easily.
YouTube is a vast platform, and there are quite a few modifications hidden everywhere. To know everything is not always possible. Now that you are here let’s see how to locate the most recent comment you’ve got on YouTube.
Step 1: Enable Comment Notifications
- Open the homepage of YouTube, scroll down to ‘Settings’ and click on it. You will be redirected to the Setting page.
- From the bar in the left corner, select Notifications and scroll down and enable ‘Activity on my Channel.’
These steps are convenient both for pc as well as a mobile app. Just follow three steps, Setting-Notifications-Activity on your Channel.
Step 2: Check the Notification Bar
- Click on the bell icon at the top right corner and there you would receive notifications regarding all the comment activities. Click on the particular notification to go to that comment.
Bonus: How to Change the Comments View Order?
Did you know you can also customize your comment section as per your need? On the watch page for your video, you can rearrange the order of the comments. You may sort the comments by top comments or by date added. It’s just simple steps ahead.
- First of all, you need to sign in to YouTube Studio: http://studio.youtube.com ,
- From the left bar, select Content, click a video’s thumbnail, and click on Show More in video details page.
- Under ‘Comments and ratings,’ select Sort by, and then choose between “Top” and “Newest.”
- Save the changes, and you are done!
Conclusion
YouTube comments play a predominant role in handling your business as a YouTuber. It’s reasonable to believe that the search algorithm considers comments on your videos to be a significant indicator of their efficiency, and therefore gives them higher rankings for specific searches.
The higher your video content’s exposure on the internet, the more you’ll be included in YouTube or Google searches.
YouTube Comments Finder helps you keep track of the good and bad comments in your videos and definitely helps improve the SEO of your Channel. Thanks to YouTube’s advanced tools and websites like Hadzy, YouTube comment Finder, YT Comment Finder and YouTube First Comment Finder, managing third-party interaction is a lot simpler today.
Richard Bennett
Richard Bennett is a writer and a lover of all things video.
Follow @Richard Bennett
Elevating Your Vlog Through Proper Lighting
Lighting Tips for Vlogging: How to Light
Richard Bennett
Mar 27, 2024• Proven solutions
One of the best things you can do for your video quality is to ensure you have great lighting. Viewers find poor lighting distracting and it’s hard for them to see how great your content is if they are busy thinking about why your video is so dark. By creating a great lighting set up you can ensure that the people watching your videos are only thinking about how much they’re enjoying them.
Going outside and using natural light is the cheapest way to get a lot of light for your videos. If your vlog is not suited to the great outdoors then you need to get more strategic. You can turn on all the lights in your living room and still end up with a dark, grainy, video.
Video Lighting Basics: Three Point Lighting

The most common technique of lighting a scene is called three-point lighting. It involves three different sources of light in the shot and is used by portrait photographers, which is also a great method for lighting your vlog.
The brightest source of light is also known as the key light which need to be high quality. A window will work, but if you do not have access to one where you are filming then consider an LED panel light or a softbox light like the ones used in portrait photography.
This first light will create a dramatic shadow across half of your face. You want to reduce this shadow, but not get rid of it completely.
Rather than setting up another light source on the opposite side of the camera, put up a reflector to bounce some light back onto your face. This reflector is called your ‘Fill Light’.
The fill light is less bright than the primary source of light and it is placed on the side opposite to the key light. Its purpose is to reduce shadows produced by the key light and the reflector will need to be mounted on a stand.
The final step to creating three point lighting is to set up another light behind you. This is your ‘Backlight’, and it will help you stand out from your background. Backlight or Hair light is always placed behind and above the subject to create separation between the subject in the shot and the background. This basic lighting technique can be applied in almost every scene you shoot, which is why it is important to keep an open mind and to continue experimenting with possible light setups.
Watch Video! Top Lighting Tips for Vlogging
Lightning Tips for Aspiring YouTube Videographers
Becoming the master of light will take some time and practice, so it is crucial to remain curious and anxious to learn new tricks throughout that process if you want to continually become better. These tips will help you make the first steps on that journey.
1. Focus Your Key Light
Try to focus your Key Light so that it lights only you and not your background. Do this by mounting anything that can cast a shadow onto your Key Light to control the area where the light hits. If you are using a window for your Key Light then you can use a curtain. If you use a softbox light then your light will already be somewhat focused.
2. Use Natural Lighting
The light provided by the Sun is still the best light source, you can have in your video. The trouble is that natural light changes quickly, which makes it highly unpredictable. The best way to deal with this challenge is to come prepared to the set and to get the shot you want as quickly as you can.
3. Try DIY Lightning
Literally, anything from candles to LED light bulbs can serve as a source of light in a shot. You just need to pay attention to the light temperature, because warmer light sources may highlight reds and yellows that can make your footage look less realistic.
4. Use Lightning Kits
This is by far the best option if you want to be in complete control of the light on your set. You can adjust the intensity of the lights, use filters, diffusers and all sorts of other accessories to create the light that flatters the subjects of your videos. The only downside is that you’ll have to spend a considerable amount of money if you want to have a professional lighting kit.
5. Set up reflectors
Sets of reflectors are often under $50, so they are fairly affordable. However, some vloggers choose to forgo purchasing reflectors and make their own out of tinfoil.

If your strong main light is too hard on your eyes then you can use a translucent ‘reflector’ to soften it. Set your translucent reflector, or other screen, up in front of your main light to diffuse it.
If you are hosting a beauty vlog then you might consider a slightly different set up. Instead of having your main light off to one side set it up directly in front of you so your entire face is lit evenly. It is still a good idea to use fill lights in this set up to give you some dimension, and a backlight is even more essential for helping you stand out from the background. The even light hitting your face will also make you look flat if you do not use a backlight.

If you are using all of the lighting options available to you and your video still looks too dark then you can try brightening it by opening up the aperture of your camera lens/setting a lower f-stop. Letting more light into your camera can help your footage look brighter, although you also run the risk of making things look overexposed/ washed out if you are not careful.
If you are stuck shooting in low light conditions it is best to use a lens with a wider aperture/lower f-stop. This will make the best of the light you do have.
Richard Bennett
Richard Bennett is a writer and a lover of all things video.
Follow @Richard Bennett
Richard Bennett
Mar 27, 2024• Proven solutions
One of the best things you can do for your video quality is to ensure you have great lighting. Viewers find poor lighting distracting and it’s hard for them to see how great your content is if they are busy thinking about why your video is so dark. By creating a great lighting set up you can ensure that the people watching your videos are only thinking about how much they’re enjoying them.
Going outside and using natural light is the cheapest way to get a lot of light for your videos. If your vlog is not suited to the great outdoors then you need to get more strategic. You can turn on all the lights in your living room and still end up with a dark, grainy, video.
Video Lighting Basics: Three Point Lighting
The most common technique of lighting a scene is called three-point lighting. It involves three different sources of light in the shot and is used by portrait photographers, which is also a great method for lighting your vlog.
The brightest source of light is also known as the key light which need to be high quality. A window will work, but if you do not have access to one where you are filming then consider an LED panel light or a softbox light like the ones used in portrait photography.
This first light will create a dramatic shadow across half of your face. You want to reduce this shadow, but not get rid of it completely.
Rather than setting up another light source on the opposite side of the camera, put up a reflector to bounce some light back onto your face. This reflector is called your ‘Fill Light’.
The fill light is less bright than the primary source of light and it is placed on the side opposite to the key light. Its purpose is to reduce shadows produced by the key light and the reflector will need to be mounted on a stand.
The final step to creating three point lighting is to set up another light behind you. This is your ‘Backlight’, and it will help you stand out from your background. Backlight or Hair light is always placed behind and above the subject to create separation between the subject in the shot and the background. This basic lighting technique can be applied in almost every scene you shoot, which is why it is important to keep an open mind and to continue experimenting with possible light setups.
Watch Video! Top Lighting Tips for Vlogging
Lightning Tips for Aspiring YouTube Videographers
Becoming the master of light will take some time and practice, so it is crucial to remain curious and anxious to learn new tricks throughout that process if you want to continually become better. These tips will help you make the first steps on that journey.
1. Focus Your Key Light
Try to focus your Key Light so that it lights only you and not your background. Do this by mounting anything that can cast a shadow onto your Key Light to control the area where the light hits. If you are using a window for your Key Light then you can use a curtain. If you use a softbox light then your light will already be somewhat focused.
2. Use Natural Lighting
The light provided by the Sun is still the best light source, you can have in your video. The trouble is that natural light changes quickly, which makes it highly unpredictable. The best way to deal with this challenge is to come prepared to the set and to get the shot you want as quickly as you can.
3. Try DIY Lightning
Literally, anything from candles to LED light bulbs can serve as a source of light in a shot. You just need to pay attention to the light temperature, because warmer light sources may highlight reds and yellows that can make your footage look less realistic.
4. Use Lightning Kits
This is by far the best option if you want to be in complete control of the light on your set. You can adjust the intensity of the lights, use filters, diffusers and all sorts of other accessories to create the light that flatters the subjects of your videos. The only downside is that you’ll have to spend a considerable amount of money if you want to have a professional lighting kit.
5. Set up reflectors
Sets of reflectors are often under $50, so they are fairly affordable. However, some vloggers choose to forgo purchasing reflectors and make their own out of tinfoil.
If your strong main light is too hard on your eyes then you can use a translucent ‘reflector’ to soften it. Set your translucent reflector, or other screen, up in front of your main light to diffuse it.
If you are hosting a beauty vlog then you might consider a slightly different set up. Instead of having your main light off to one side set it up directly in front of you so your entire face is lit evenly. It is still a good idea to use fill lights in this set up to give you some dimension, and a backlight is even more essential for helping you stand out from the background. The even light hitting your face will also make you look flat if you do not use a backlight.
If you are using all of the lighting options available to you and your video still looks too dark then you can try brightening it by opening up the aperture of your camera lens/setting a lower f-stop. Letting more light into your camera can help your footage look brighter, although you also run the risk of making things look overexposed/ washed out if you are not careful.
If you are stuck shooting in low light conditions it is best to use a lens with a wider aperture/lower f-stop. This will make the best of the light you do have.
Richard Bennett
Richard Bennett is a writer and a lover of all things video.
Follow @Richard Bennett
Also read:
- [Updated] 5-Top Link Minimizers Transforming YouTube Watchability
- [Updated] Beat Bazaar Curation of Superior DJ Video Samples for Download
- 2024 Approved Crafting the Perfect YouTube Channel Url A Quick Guide
- 6 Proven Ways to Unlock Google Phone When You Forget the Password
- Dive Into the Pros and Cons of Jabra's Speak V25 Model
- In 2024, 5 Quick Methods to Bypass Oppo F25 Pro 5G FRP
- In 2024, 9 Best Free Android Monitoring Apps to Monitor Phone Remotely For your Vivo Y100 5G | Dr.fone
- In 2024, Borrow Premium Image Footage via Top-Rated 4 YouTube Channels
- In 2024, How To Remove Flashlight From Apple iPhone 12 Pro Lock Screen
- Infographic - Social Media Trends
- Jelas Dan Mudah, Kumpulan Panduan Untuk Memperbaiki Folder Usaha Korban Di Windows 11 Atau Versi Lainnya
- Reviving Disabled 'Remove' Option for PIN Access Control
- Solutions for Resolving 'propsys.dll' File Absent Errors
- Things You Should Know About YouTube Live Thumbnails
- Your Guide to Iconic Fonts Boosting Video Engagement
- Title: Pinpoint Pioneering Podium Places
- Author: Kevin
- Created at : 2024-12-09 17:30:54
- Updated at : 2024-12-10 16:38:59
- Link: https://youtube-videos.techidaily.com/pinpoint-pioneering-podium-places/
- License: This work is licensed under CC BY-NC-SA 4.0.