
:max_bytes(150000):strip_icc()/paramount-plus-eaf802cdbbe44654b47d5f3b7aba54e7.jpg)
"Perfect Your YT Content Mastery of Windows Movie Maker"
Perfect Your YT Content: Mastery of Windows Movie Maker
How to Edit YouTube videos in Windows Movie Maker

Richard Bennett
Mar 27, 2024• Proven solutions
We all know YouTube is an important platform for sharing and watching videos. Are you a YouTuber looking for how to edit YouTube video with the best YouTube movie maker? You have come the right place if you wonder how to edit a video for YouTube on Windows. While, if you have free Windows Movie Maker already installed on your computer, you can edit YouTube videos in Windows Movie Maker and then upload to YouTube directly. In this article, I will show you all the information you need to know about how to edit a video for YouTube in Windows Movie Maker with step by step.
You may also like : The Ultimate Guide to YouTube Video Editing Tools
In case that you do not have free Windows Movie Maker in your computer, you may need to download it from other website since Microsoft has removed the downloading link after January 2017. Please pay attention when downloading the Movie Maker application from website and never download it from untrusted website.
A better way to edit YouTube Videos - Wondershare Filmora supports many formats including MP4, MOV, MKV, and FLV, which means that you will not need to convert the files before and after editing. Like Windows Movie Maker, Wondershare Filmora is easy to use but comes with many more features that allow for professional-grade videos. One of these features is the animated text. There are also built-in presets that you can use to quickly edit your videos. There is also the option to directly upload a video to YouTube from Filmora, so no time is wasted waiting for a video to process.
 Download Mac Version ](https://tools.techidaily.com/wondershare/filmora/download/ )
It is hard to list all the information of how to use Filmora to edit YouTube videos here, but we have composed an article about how to edit videos, you can check How to Edit Video in Filmora: Beginners’ Guide .
Windows Movie Maker YouTube: How to Edit YouTube Videos?
Before editing the video in Windows Movie Maker , you have to make sure that the video format is supported by free Windows Movie Maker. As you may know that Window Movie Maker only accept the following file formats at importing: .WMV/.ASF, .MPG (MPEG-1), .AVI (DV-AVI), .WMA, .WAV, and .MP3. Importing formats such as MP4/3GP, FLV and MOV, are also supported you are running Windows 7 or later and you have installed the necessary codec as well.
If your videos are not supported at importing in Windows Movie Maker, you may need to converter it first or choose a video editor like Filmora video editor which supports the almost all popular formats.
Step 1: Import Video Files Into Windows Movie Maker

To import video or photo into Windows Movie Maker, you can click on the button Add Videos or Photos located at the top of the program. A file window will open, and you can select the videos from any area of your computer. Once you have the files selected, click OK to import the files to the storyboard in the right hand panel.
You can also choose to record a webcam on your windows 10 or windows 7 computer and use it as the material.

Step 2: Trim/Cut/Split/Combine videos in Windows Movie Maker
Preview the video clips in the preview box. You can always use the Previous Frame or Next Frame to preview video frame by frame. When editing a video for YouTube, you may need to trim to remove unwanted parts from the video , combine several clips into a new one or split the video into several smaller parts .
To remove any parts of the video that you do not want in the final version of the video, locate the start frame that you want to remove in the storyboard, and then click the Split button to get the starting point of the split segment, and then locate the end frame that you want to remove and click Split again. Right-click the split video clip you want to remove and select Remove from the context menu. This can be done as many times as you want.

Step 3: Apply Transitions and Visual Effects to YouTube Video
Once you have all the clips that you want in your video, you can then add transitions to the video. At the top of Windows Movie Maker, there is a button that says Animations. This will open a menu that has different options. You need to select the clip, and add the transition that you want. The program does the rest of the work. You can see how it looks by clicking play.

Applying visual effects, overlays and filters work in the same way, but you click on Visual Effects, which is located at the top of the window. You can apply effects to any clip as along as the clip is selected first.
Step 4: Edit/Mute Audio in Video or Add New Audio Sound
If you are planning on adding music to your video, you should think about muting the audio in video or decrease the audio volume in Video. Double click the video clip to enter the Edit panel, and then then click on Video Volume button. You can then mute the audio by drag the volume slider to the left end. Of course, you can adjust the video audio volume per your need. This will affect the all the sounds on that video clip. If you want to mute all the clips, you need to select all the clips, or you will end up with one clip with no sound, and the rest of the clips having sound.

Once the sound has been adjusted on the clips, you can add new audio sound to the video. You can record narrations for your YouTube video in Windows Movie Maker by clicking Record narration button in Home tab and add music to video by clicking Add music button and select the music to import it. You can add music from your computer or find new music sound from AudioMicro, Vimeo or Free Music Archive online.

After importing the new audio file for your YouTube video, you can now adjust the music volume. In the Music Tools tab, there is an Option tab, you can control the volume and other options about the music.

Step 5: Add Title and Text to Video for YouTube
Windows Movie Maker allows you to add different types of text freely. You will see 3 buttons that allow different types of text to video: stationary title, captions and rolling credits. Click on Title, you can add text before the video begins; select Caption, you will write text to the video frames; and click Credits will add end credits to the end of the video.

After selecting the type of text you want, you can enter your text and edit the text effects. You can change the text duration and apply text visual effects, and change the text outline size and more.

Check the detailed information of How to Add Text in Windows Movie Maker .
Step 6: Save and Publish
Once all the edits are done, you can save the video by clicking on File then clicking on Publish Movie. You will need to select where you want to save the file and the file type. Since we are editing videos for YouTube, choose YouTube to upload the edited video to YouTube. You can also save the video in computer with different formats, resolution or burn to DVD. Windows Movie Maker also allows you to save the Video for Email or for mobile devices.

Conclusion
That’s it. That’s how you can edit your YouTube video with Windows Movie Maker. It is a great YouTube video editor to make video with various features. However, you may consider other YouTube movie maker as it won’t updated. Why not try Filmora. It is one of the best movie editor for YouTube. Download it now to have a try!
Download Mac Version ](https://tools.techidaily.com/wondershare/filmora/download/ )
Richard Bennett
Richard Bennett is a writer and a lover of all things video.
Follow @Richard Bennett
Richard Bennett
Mar 27, 2024• Proven solutions
We all know YouTube is an important platform for sharing and watching videos. Are you a YouTuber looking for how to edit YouTube video with the best YouTube movie maker? You have come the right place if you wonder how to edit a video for YouTube on Windows. While, if you have free Windows Movie Maker already installed on your computer, you can edit YouTube videos in Windows Movie Maker and then upload to YouTube directly. In this article, I will show you all the information you need to know about how to edit a video for YouTube in Windows Movie Maker with step by step.
You may also like : The Ultimate Guide to YouTube Video Editing Tools
In case that you do not have free Windows Movie Maker in your computer, you may need to download it from other website since Microsoft has removed the downloading link after January 2017. Please pay attention when downloading the Movie Maker application from website and never download it from untrusted website.
A better way to edit YouTube Videos - Wondershare Filmora supports many formats including MP4, MOV, MKV, and FLV, which means that you will not need to convert the files before and after editing. Like Windows Movie Maker, Wondershare Filmora is easy to use but comes with many more features that allow for professional-grade videos. One of these features is the animated text. There are also built-in presets that you can use to quickly edit your videos. There is also the option to directly upload a video to YouTube from Filmora, so no time is wasted waiting for a video to process.
Download Mac Version ](https://tools.techidaily.com/wondershare/filmora/download/ )
It is hard to list all the information of how to use Filmora to edit YouTube videos here, but we have composed an article about how to edit videos, you can check How to Edit Video in Filmora: Beginners’ Guide .
Windows Movie Maker YouTube: How to Edit YouTube Videos?
Before editing the video in Windows Movie Maker , you have to make sure that the video format is supported by free Windows Movie Maker. As you may know that Window Movie Maker only accept the following file formats at importing: .WMV/.ASF, .MPG (MPEG-1), .AVI (DV-AVI), .WMA, .WAV, and .MP3. Importing formats such as MP4/3GP, FLV and MOV, are also supported you are running Windows 7 or later and you have installed the necessary codec as well.
If your videos are not supported at importing in Windows Movie Maker, you may need to converter it first or choose a video editor like Filmora video editor which supports the almost all popular formats.
Step 1: Import Video Files Into Windows Movie Maker
To import video or photo into Windows Movie Maker, you can click on the button Add Videos or Photos located at the top of the program. A file window will open, and you can select the videos from any area of your computer. Once you have the files selected, click OK to import the files to the storyboard in the right hand panel.
You can also choose to record a webcam on your windows 10 or windows 7 computer and use it as the material.
Step 2: Trim/Cut/Split/Combine videos in Windows Movie Maker
Preview the video clips in the preview box. You can always use the Previous Frame or Next Frame to preview video frame by frame. When editing a video for YouTube, you may need to trim to remove unwanted parts from the video , combine several clips into a new one or split the video into several smaller parts .
To remove any parts of the video that you do not want in the final version of the video, locate the start frame that you want to remove in the storyboard, and then click the Split button to get the starting point of the split segment, and then locate the end frame that you want to remove and click Split again. Right-click the split video clip you want to remove and select Remove from the context menu. This can be done as many times as you want.
Step 3: Apply Transitions and Visual Effects to YouTube Video
Once you have all the clips that you want in your video, you can then add transitions to the video. At the top of Windows Movie Maker, there is a button that says Animations. This will open a menu that has different options. You need to select the clip, and add the transition that you want. The program does the rest of the work. You can see how it looks by clicking play.
Applying visual effects, overlays and filters work in the same way, but you click on Visual Effects, which is located at the top of the window. You can apply effects to any clip as along as the clip is selected first.
Step 4: Edit/Mute Audio in Video or Add New Audio Sound
If you are planning on adding music to your video, you should think about muting the audio in video or decrease the audio volume in Video. Double click the video clip to enter the Edit panel, and then then click on Video Volume button. You can then mute the audio by drag the volume slider to the left end. Of course, you can adjust the video audio volume per your need. This will affect the all the sounds on that video clip. If you want to mute all the clips, you need to select all the clips, or you will end up with one clip with no sound, and the rest of the clips having sound.
Once the sound has been adjusted on the clips, you can add new audio sound to the video. You can record narrations for your YouTube video in Windows Movie Maker by clicking Record narration button in Home tab and add music to video by clicking Add music button and select the music to import it. You can add music from your computer or find new music sound from AudioMicro, Vimeo or Free Music Archive online.
After importing the new audio file for your YouTube video, you can now adjust the music volume. In the Music Tools tab, there is an Option tab, you can control the volume and other options about the music.
Step 5: Add Title and Text to Video for YouTube
Windows Movie Maker allows you to add different types of text freely. You will see 3 buttons that allow different types of text to video: stationary title, captions and rolling credits. Click on Title, you can add text before the video begins; select Caption, you will write text to the video frames; and click Credits will add end credits to the end of the video.
After selecting the type of text you want, you can enter your text and edit the text effects. You can change the text duration and apply text visual effects, and change the text outline size and more.
Check the detailed information of How to Add Text in Windows Movie Maker .
Step 6: Save and Publish
Once all the edits are done, you can save the video by clicking on File then clicking on Publish Movie. You will need to select where you want to save the file and the file type. Since we are editing videos for YouTube, choose YouTube to upload the edited video to YouTube. You can also save the video in computer with different formats, resolution or burn to DVD. Windows Movie Maker also allows you to save the Video for Email or for mobile devices.
Conclusion
That’s it. That’s how you can edit your YouTube video with Windows Movie Maker. It is a great YouTube video editor to make video with various features. However, you may consider other YouTube movie maker as it won’t updated. Why not try Filmora. It is one of the best movie editor for YouTube. Download it now to have a try!
Download Mac Version ](https://tools.techidaily.com/wondershare/filmora/download/ )
Richard Bennett
Richard Bennett is a writer and a lover of all things video.
Follow @Richard Bennett
Elevate Your Gaming Experience on YouTube
YouTube Equipment for Gaming Channels - Best Gaming Gears
Richard Bennett
Mar 27, 2024• Proven solutions
You love gaming, you have a lot of know-how to pass on, and you have a magnetic personality: you are ready to become a great YouTube gaming commentator. All you need is gaming gear. We have already listed some of the best YouTube video shooting equipment lists for starting recording videos, here we will run through some of the best YouTube equipment for gaming channels, sorted into categories for game recording, audio, and video (facecam).
YouTube Equipment You Should Have for Gaming Channels [Gaming Gears]
1. Game Recording [Capture Card & Game Recording Software]

Game recording software, or hardware, is what you will use to capture your in-game footage. The worst thing you can do is try to point a camera at the screen of your computer or television; recording your screen directly is a must. What kind of game capture gear you need will depend on what kind of game you are playing.
For recording games on your computer screen, you may only need software, and there are a few quality game recording software out there for free. One popular option among YouTube gamers is called OBS , or ‘Open Broadcaster Software’. OBS is free to download from Obsproject.com. The thing that makes it great for gamers is it can be used for live streaming to YouTube, or other sharing sites like Twitch.tv (which has a focus on gaming videos).
For those who want to record the gameplay with ease and edit the recorded gameplay footage with the same tool, we recommend you to try Filmora , which is a 2-in-1 gameplay recording software and video editor on both Windows and Mac.
The advantages of using Filmora to record YouTube Gameplay video:
- Record 4K gameplay and high-space game
- Record gameplay and webcam at the same time
- Mark the important moment with the Marker feature when playing the game
- Basic video editing tools provide trimming, cutting, and merging features as well as annotation effects

If you are going to be making videos more related to consol games then you may need to invest in a Capture device. One of the best is the Elgato Game Capture HD60 featured above. It captures video directly onto either your Mac or PC, while a lot of the other top capture devices only work with a PC. It can record in 1080p with 60fps, and you can even live stream. The Elgato HD60 is compatible with PS4, Xbox One, Xbox 360, and the Wii U.
2. Audio Recording Devices
Your audio recording is extremely important. The thing that will set you apart from other people posting gaming commentary is your personality, and that will only come across if your videos have clear audio. It does not do you much good to be hilarious in a fuzzy commentary track.
A lot of YouTube gamers, especially gamers who are just starting to make videos, go with the Zalman ZM-Mic1 which can be used in combination with headphones. The Zalman might pick up background sounds, like mouse clicks, which is not ideal. However, it will give you significantly better audio than recording directly from your computer, and at under $10 it will not be a purchase you regret. The Zalman is a great starter-mic, especially if you download the free audio editing program Audacity and use it to clean up the little imperfections in your recording. Audacity can be downloaded at Audacityteam.org.
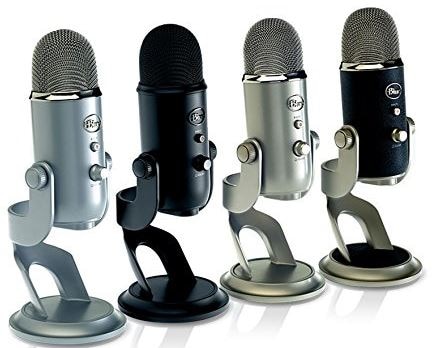
If you are looking for more control over your recording then you should consider the Blue Yeti Mic, which is featured above. This standalone mic is also used by a lot of vloggers and YouTube gamers. It has volume control and even a mute button. It plugs right into the USB drive of your computer using a ten-foot cable, which means you can take it pretty far from your computer. The Blue Yeti USB mic costs about $130.
Check our best list of audio recording devices: Best Microphones for YouTubers
3. Video Recording Devices

If you are going to add a facecam into your videos then it should be high quality, but it does not need to be a top-of-the-line 4K recording. Rather than buying a $1000 DSLR for reaction shots, you should go with a reliable webcam. Before you make a decision about what kind of webcam to get consider how often you will be using your facecam. Not all gaming videos need one. If you play a lot of survival horror games then your reactions will be a key element in your videos, but if you are not playing games that will cause you to have amusing reactions then a facecam will not really add anything to a viewer’s experience.
You may also like: how to use DSLR as a webcam
If your facecam is going to be an important element in your channel then you should expect to spend around $100 on your webcam. The above image is the Logitech C920, which is one of the best at this price point. It performs well in low light, has a good auto-focus feature, and the quality of its video recordings is quite high.
If you are only going to use a facecam occasionally then consider the Genius WideCam F100, which can be found online for around $30. Its 1080p HD recordings are not as smooth as they should be, but it performs very well at 720p and that is all you should need.
Check more options for the Best webcams for YouTuber
Conclusion
Once you have these gaming recording devices, you can now go to record a gameplay and upload it to YouTube. Before you move on, do check these 10 tips for shooting professional YouTube videos . In case you need to trim and edit the recorded gameplay video and present the most exciting moments, you can use some of the best video editing software for YouTube . Here, we recommend you try the Filmora video editor to achieve your goal.
Why choose Filmora to edit recorded YouTube gameplay videos?
- Intuitive interface for saving time
- Trim Video and Audio Quickly
- Record commentary and voiceover with ease or add royalty-free music sound from the Music Library
- 300+ stylish video effects built-in and more in Filmora Effect Store
- Upload to YouTube directly
In case you didn’t know Filmora before, here is a video tutorial for beginners about Filmora video editor, check and download it to edit your YouTube today.
Richard Bennett
Richard Bennett is a writer and a lover of all things video.
Follow @Richard Bennett
Richard Bennett
Mar 27, 2024• Proven solutions
You love gaming, you have a lot of know-how to pass on, and you have a magnetic personality: you are ready to become a great YouTube gaming commentator. All you need is gaming gear. We have already listed some of the best YouTube video shooting equipment lists for starting recording videos, here we will run through some of the best YouTube equipment for gaming channels, sorted into categories for game recording, audio, and video (facecam).
YouTube Equipment You Should Have for Gaming Channels [Gaming Gears]
1. Game Recording [Capture Card & Game Recording Software]
Game recording software, or hardware, is what you will use to capture your in-game footage. The worst thing you can do is try to point a camera at the screen of your computer or television; recording your screen directly is a must. What kind of game capture gear you need will depend on what kind of game you are playing.
For recording games on your computer screen, you may only need software, and there are a few quality game recording software out there for free. One popular option among YouTube gamers is called OBS , or ‘Open Broadcaster Software’. OBS is free to download from Obsproject.com. The thing that makes it great for gamers is it can be used for live streaming to YouTube, or other sharing sites like Twitch.tv (which has a focus on gaming videos).
For those who want to record the gameplay with ease and edit the recorded gameplay footage with the same tool, we recommend you to try Filmora , which is a 2-in-1 gameplay recording software and video editor on both Windows and Mac.
The advantages of using Filmora to record YouTube Gameplay video:
- Record 4K gameplay and high-space game
- Record gameplay and webcam at the same time
- Mark the important moment with the Marker feature when playing the game
- Basic video editing tools provide trimming, cutting, and merging features as well as annotation effects
If you are going to be making videos more related to consol games then you may need to invest in a Capture device. One of the best is the Elgato Game Capture HD60 featured above. It captures video directly onto either your Mac or PC, while a lot of the other top capture devices only work with a PC. It can record in 1080p with 60fps, and you can even live stream. The Elgato HD60 is compatible with PS4, Xbox One, Xbox 360, and the Wii U.
2. Audio Recording Devices
Your audio recording is extremely important. The thing that will set you apart from other people posting gaming commentary is your personality, and that will only come across if your videos have clear audio. It does not do you much good to be hilarious in a fuzzy commentary track.
A lot of YouTube gamers, especially gamers who are just starting to make videos, go with the Zalman ZM-Mic1 which can be used in combination with headphones. The Zalman might pick up background sounds, like mouse clicks, which is not ideal. However, it will give you significantly better audio than recording directly from your computer, and at under $10 it will not be a purchase you regret. The Zalman is a great starter-mic, especially if you download the free audio editing program Audacity and use it to clean up the little imperfections in your recording. Audacity can be downloaded at Audacityteam.org.
If you are looking for more control over your recording then you should consider the Blue Yeti Mic, which is featured above. This standalone mic is also used by a lot of vloggers and YouTube gamers. It has volume control and even a mute button. It plugs right into the USB drive of your computer using a ten-foot cable, which means you can take it pretty far from your computer. The Blue Yeti USB mic costs about $130.
Check our best list of audio recording devices: Best Microphones for YouTubers
3. Video Recording Devices
If you are going to add a facecam into your videos then it should be high quality, but it does not need to be a top-of-the-line 4K recording. Rather than buying a $1000 DSLR for reaction shots, you should go with a reliable webcam. Before you make a decision about what kind of webcam to get consider how often you will be using your facecam. Not all gaming videos need one. If you play a lot of survival horror games then your reactions will be a key element in your videos, but if you are not playing games that will cause you to have amusing reactions then a facecam will not really add anything to a viewer’s experience.
You may also like: how to use DSLR as a webcam
If your facecam is going to be an important element in your channel then you should expect to spend around $100 on your webcam. The above image is the Logitech C920, which is one of the best at this price point. It performs well in low light, has a good auto-focus feature, and the quality of its video recordings is quite high.
If you are only going to use a facecam occasionally then consider the Genius WideCam F100, which can be found online for around $30. Its 1080p HD recordings are not as smooth as they should be, but it performs very well at 720p and that is all you should need.
Check more options for the Best webcams for YouTuber
Conclusion
Once you have these gaming recording devices, you can now go to record a gameplay and upload it to YouTube. Before you move on, do check these 10 tips for shooting professional YouTube videos . In case you need to trim and edit the recorded gameplay video and present the most exciting moments, you can use some of the best video editing software for YouTube . Here, we recommend you try the Filmora video editor to achieve your goal.
Why choose Filmora to edit recorded YouTube gameplay videos?
- Intuitive interface for saving time
- Trim Video and Audio Quickly
- Record commentary and voiceover with ease or add royalty-free music sound from the Music Library
- 300+ stylish video effects built-in and more in Filmora Effect Store
- Upload to YouTube directly
In case you didn’t know Filmora before, here is a video tutorial for beginners about Filmora video editor, check and download it to edit your YouTube today.
Richard Bennett
Richard Bennett is a writer and a lover of all things video.
Follow @Richard Bennett
Also read:
- In 2024, Decoding Your YouTube's View-Zero Dilemma 10 Insights
- In 2024, Decoding the Secrets Behind Iconic Mukbang Videos
- 5 Tips to Get More Views with YouTube Optimization [Free Checklist] for 2024
- From Virality to Value Ajay’s Playbook for Profitable Content Creation
- Top Tricks Making Powerful YT Thumbnails
- [Updated] Enhancing User Interaction with Well-Sized Thumbnails
- [Updated] Essential Strategies for Memorable YouTube Closings
- In 2024, Crafting Visual Narratives with YouTube Studio's Editing Suite
- Mastering WebM From YouTube Videos
- Growth Hacks for YouTuber's Short Form Content Boosting View Counts Effectively
- [New] Decoding Veiled Content on YouTube
- Top 10 Tips for YouTube Stars Perfecting Your Music Reaction Skills
- Science Enthusiasts' Top 15 Channel List
- 10 YouTube Video Ideas for Sharing Your Personal Story
- In 2024, Academic Journey Across Time Top 10 History YouTubers
- In 2024, Building Buzz Strategies for Shaping Your Unique YouTubing Image
- [Updated] Deciphering Revenue Sharing in YouTube Shorts
- Digital Dominance Top YouTube Watch Count Chronicles for 2024
- From Conference Call to Online Showcase Google Meet on YouTube
- [Updated] Endless Eradication Guide Bypassing YouTube's Snappy Content
- In 2024, Channel Branding Hacks 10 Must-Use Online Tools
- In 2024, Achieving Profitability on YouTube Average View Count for Success
- Streamline Your Online Presence YT Descriptive Insights
- YouTube Videos Making a Statement on Instagram
- [New] Enhancing Viewers' Staying Power Top 6 Strategies for YouTube Success
- Prime Screen Recording Devices for YouTube Pioneers
- The Social Media Symphony Composing Jake Paul's YouTube Success
- Cultivate 1,000 Fanbase Followers Quickly
- [Updated] Cultivate Creativity Best Video Concepts for Viewers
- Laughter's Legacy The Process of Parody Film-Making
- A Compreenas Guide to Choosing Ideal Lenses for Filmmaking
- 2024 Approved 15 YouTube Starter Templates A Guide to Popularity
- Aim Higher Boosting Views and Reach on YouTube for 2024
- Enhancing YouTube Content with Free Music Sources for 2024
- Boost YouTube Video Performance with Rapid Rendering Methods
- Updated 3 Ways to Combine 2 or 3 Videos Into 1 for 2024
- New 2024 Approved Swift Soundscape Shifts A Practical Approach to Changing Audio Speeds
- Top IMEI Unlokers for Your OnePlus 11R Phone
- The Ultimate List for Sound Alteration Applications in VTubing
- In 2024, How to Transfer/Sync Notes from Apple iPhone 15 Pro Max to iPad | Dr.fone
- 10 Fake GPS Location Apps on Android Of your Tecno Spark 20C | Dr.fone
- New Getting Acquainted with Google Play Musics Integrated Podcast Listening Capabilities for 2024
- [Updated] In 2024, Mastering Visual Narratives Essential Snapchat Video Editors
- [Updated] Strategies for Broadcasting Social Media Happenings
- New 2024 Approved Video Editing Magic Unlocking the Secrets of Stunning Visuals
- In 2024, Can You Make an Fcpx Slideshow? Undoubtedly Yes, with the Unlimited Best Fcpx Slideshow Templates Available. To Know How to, Follow the Discussion Below
- 3 Things You Must Know about Fake Snapchat Location On Infinix Note 30 Pro | Dr.fone
- [Updated] The 1,000 Club Achievement Monthly Tips for Insta Success and Growth for 2024
- In 2024, How to Unlock Apple iPhone SE (2020)?
- [New] Is It Allowable to Distribute Videos via Social Networks for 2024
- Thinking About Changing Your Netflix Region Without a VPN On Apple iPhone 6? | Dr.fone
- Updated Best 10 Apps to Enhance Your Instagram Story Slideshow
- [Updated] 2024 Approved Unlock the Full Potential of Instagram Stories
- [Updated] Essential Tips for Mastering Instagram Reels for 2024
- Title: "Perfect Your YT Content Mastery of Windows Movie Maker"
- Author: Kevin
- Created at : 2024-05-25 16:10:39
- Updated at : 2024-05-26 16:10:39
- Link: https://youtube-videos.techidaily.com/perfect-your-yt-content-mastery-of-windows-movie-maker/
- License: This work is licensed under CC BY-NC-SA 4.0.
