
:max_bytes(150000):strip_icc()/how-to-send-stars-monopoly-go-ebaba4b122c9437eaddefc3ae3d3031c.jpg)
"Overhauen Uncovering Hidden Shorts Content"
Overhauen: Uncovering Hidden Shorts Content
How to Fix the YouTube Shorts Not Showing Up Issue?

Liza Brown
Oct 26, 2023• Proven solutions
Well, a YouTube Shorts is said to be YouTube’s short-form answer to TikTok. You can quickly scroll via algorithmically-driven feed, discover other similar short videos, and subscribe to your favorite creators.
Here, creators can record, share, and edit short-form video content that’s 60 seconds or less and vertically oriented. And, unlike Instagram stories, YouTube Shorts won’t disappear but will remain on your channel. So, that’s the brief intro of YouTube Shorts which we think everyone is aware of after YouTube has announced its YouTube Shorts availability globally.
However, certain factors are still there, raising the issue or concern of YouTube Shorts not showing. Thus, if you can’t find the YouTube Shorts option or videos, or YouTube Shorts disappeared, find a solution in this post.
Part 1: Why Do YouTube Shorts Not Showing Up?
There could be multiple reasons why YouTube Shorts not showing on your phone, the channel’s home page etc.
Besides, many scenarios arise with this issue, namely the YouTube Shorts option not showing up, the YouTube Shorts button missing, and YouTube Shorts videos not showing correctly.
And, there are valid reasons as well as to why these situations are happening to you. So, let’s discuss each of them separately in brief, along with the solutions in the next section.
- YouTube Shorts are not showing on the channel’s homepage
The standard and the most common reason why YouTube Shorts are not showing on the channel’s homepage is that you have not updated the YouTube app.
- YouTube Shorts option not showing up
This may be happening either because you’ve not updated the app or your internet connection is pretty slow to show you the option. There could be another reason as you may not have cleared the YouTube mobile app’s cache and data.
- YouTube Shorts button missing
Again, you may not have updated the YouTube app, or your internet connection is slow is the most common reason here. Moreover, the button of YouTube Shorts stays hidden behind the +icon.
- YouTube Shorts videos not showing correctly
The most valid reason for YouTube Shorts not showing correctly or YouTube Shorts disappearing is that you have a poor internet connection. Plus, we’ve discussed proper steps below if you’ve missed something while uploading the YouTube Shorts triggering this scenario.
Before we move on to fixing YouTube Shorts not showing the issue, here’s a quick note on which videos qualify as YouTube Shorts. Shorts are different from YouTube stories. Unlike YouTube stories, it gets displayed in your regular channel feed along with your other YouTube videos.
And, you must note that a YouTube Shorts video consists of two criteria as follows.
- The video has to be vertical (portrait-style)
- The video must be 60 seconds or less
Part 2: How to Fix YouTube Shorts Not Showing Up?
Here’s the section covering fixes on YouTube Shorts not showing. Please give it a read and resolve your issue happily!
Fix 1: Update the YouTube App
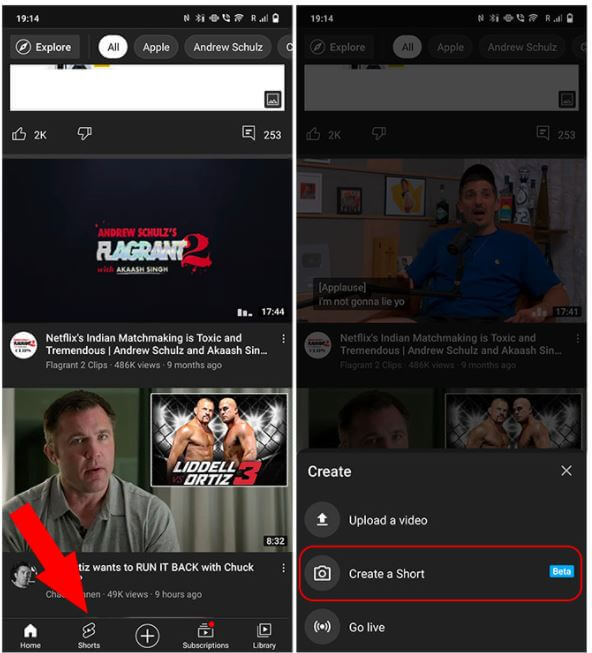
As we’ve already discussed above, check if your YouTube mobile app has the latest version. The newest version of the YouTube mobile app (Version: 16.17.36) has a dedicated Shorts button at the bottom. And, it replaces the Trending button from the YouTube app.
Moreover, the option to upload Shorts is now hidden behind the + icon. Tap on the + icon and hit the Create a Short option.
Fix 2: Check If Shorts Is Available in Your Country
Now, YouTube Shorts is available globally, but there was a phase when YouTube Shorts was a beta feature. It was only available in India and the US, which could be why you could not view Shorts in the YouTube app.
Fix 3: YouTube Shorts Is Mobile-only
As of now, YouTube Shorts is only available on a smartphone because it’s still in beta version. However, you can create Shorts via smartphone and the camera option in YouTube mobile app. Hence, there’s no point in searching for Shorts on your computer.
You can upload Shorts videos from your laptop. The entire process is similar to uploading a regular video. However, you have to mention #Shorts in the title and description to differentiate it as a Shorts video.
Common Fixes to YouTube Shorts Not Working
- Update the YouTube App to the latest version.
- Clear the YouTube mobile app’s data and cache.
- Check if your internet is connected or your internet connection is strong.
- Restart your smartphone and try again.
- The YouTube server can be down, busy, or under maintenance. Wait for a while and try again.
The fixes above are also applicable if the YouTube Shorts are not showing on iPhone as well.
Or, you can try the VPN solution before contacting the YouTube team.
If Videos Are Not Visible under YouTube Shorts
Solution 1: Ensure that you’ve added #shorts in the title and description. Those who have YouTube Shorts, they can make shorts videos via the Shorts camera. Those who can’t access this camera can also upload their current vertical videos that are less than 60 seconds after adding the hashtag #Shorts in the title or description.
All in all, you must include #shorts to let the YouTube algorithm figure out the video is created for Shorts, and the issue of YouTube Shorts not showing up will also be resolved.
Solution 2: Sometimes, you may not find YouTube Shorts videos if they’re precisely 60 seconds in duration because YouTube sometimes adds 1-2 seconds to a Shorts video for some reason. So, be alert here and ensure your Shorts video is around 58 seconds or less.
Solution 3: If your YouTube Shorts is not getting views, you need to wait more here because it takes a while for YouTube to index a Shorts video and suggest them to people. So, it’s the task of the algorithm that varies from person to person. Some Shorts videos take several days while others take weeks.
If YouTube Shorts Videos Are Not Showing up Correctly
Once uploaded, the YouTube Shorts will be displayed in a vertical thumbnail on YouTube and other regular content already there in your account. Or, it’s your choice to create a new channel for the YouTube shorts videos. If the YouTube shorts not showing correctly, you can try as follows:
Step 1. Go to your channel and select the “customize channel” option.
Step 2. Hop on to the Featured section, and choose the add section.
Step 3. You’ll see shorts videos under the “videos” section. Click that, and the videos you have which are tagged in with #shorts in the title or description will automatically display here.
Bonus Tip: How to Easily Create Vertical Videos for YouTube Shorts on PC
The YouTube Shorts app is pretty convenient to use nowadays. However, it doesn’t allow you to fine-edit the videos if you’ve explored the app or specifically when you want your videos to look more professional. The app doesn’t even have many filtering options, such as Effects, Elements, etc., to make your videos more interactive.
With that said, you can always use an efficient third-party program like Wondershare Filmora to create professional-looking YouTube Shorts videos to engage your viewers highly. Even no famous YouTuber uploads their videos directly from the app without using any third-party tool.
We recommend Wondershare Filmora because it is a production and post-production app available for Windows and Mac computers. It gives tough competition to some globally renowned tools like Final Cut Pro X, Adobe Premiere Pro, etc., because of its simplicity. Furthermore, Filmora has its inbuilt screen, voice recording features, and webcam that can be useful to create game walkthroughs, interactive videos, and voiceovers as needed.


Moreover, a YouTube Shorts video can be made through Wondershare Filmora using the below-mentioned guide.
Note: We are assuming that you have already recorded a vertical video using your smartphone and that it has been transferred to your PC.
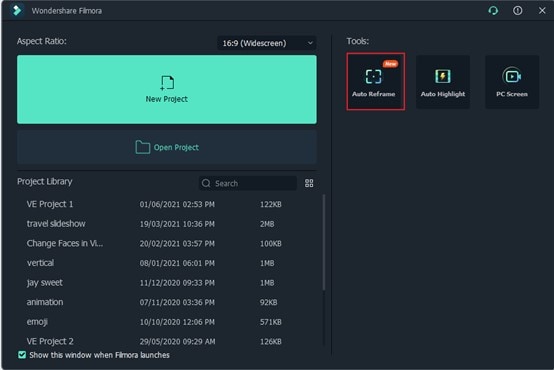
So, the signature feature to create YouTube Shorts videos on Wondershare Filmora is Auto Reframe.
Powered by AI technology, Auto Reframe automatically identifies the focal point of your video and crops it while always maintaining it within the frame. This way, the main object or action in your video never goes out of vision.
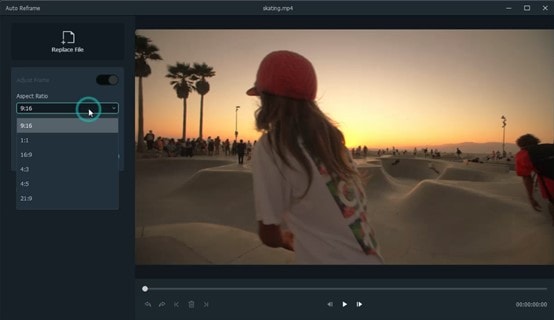
You can choose an aspect ratio that best fits YouTube Shorts which is 9:16.
How to Use Auto Reframe in Filmora?
Step 1. Open Filmora and Select Auto Reframe
You can choose among three ways to open the Auto Reframe feature in Filmora.
* **Way 1:** Once you open Filmora, the main interface will display the **Auto Reframe** tab on the right-hand panel. Click it to open directly
- Way 2: Import media as File > Import Media Files and select the file. After you import the media, right-click and choose the Auto Reframe.
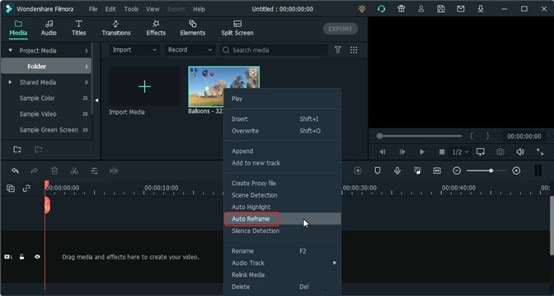
- Way 3: Lastly, you can choose the Tools option on the top menu bar and hit the Auto Reframe.

Step 2. Adjust the Aspect Ratio and Motion Speed
A separate dialog box will display once you have selected the Auto Reframe option. Now, click on Import Media and choose a single video to import. You can change the imported video by hitting the Replace File at the top menu.
There are multiple aspect ratio templates available such as square (1:1), vertical (9:16), standard (4:3), widescreen (16:9), and cinema (21:9). As you are making YouTube Shorts, so you need to select 9:16.
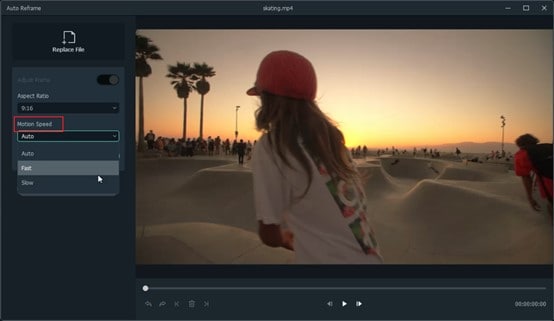
You can adjust the speed of your video in multiple options: keep it at Auto or make it Slow or Fast as per your requirements.
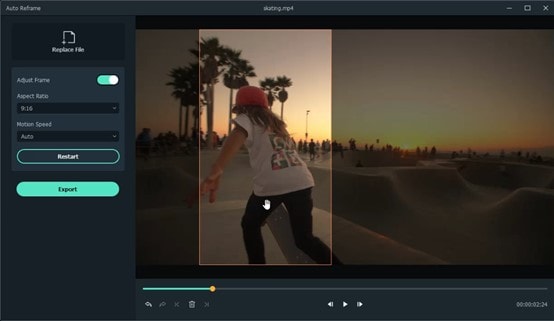
Step 3. Analyze, and Auto Reframe the Video
Once you finish the above adjustments, hit the Analysis tab. Filmora will take a few seconds to finish analyzing your video project.
Then the video will be automatically and quickly reframed to your specified speed and aspect ratio. You can modify these aspect ratios and speed options by hitting the Restart option as well.
Step 4. Preview the Reframed Video and Check
Lastly, you can preview your final video. If the video needs more work, you can also play and pause it at the point you want to adjust the frame. You can use Next Edit Point, Undo, Redo, and Previous Edit Point at the bottom panel.
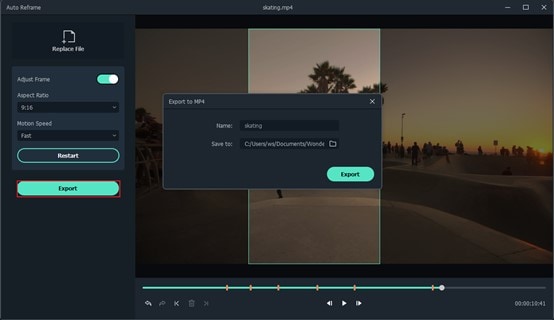
Step 5. Export the Reframed Video
Finally, after all the final adjustments, you can hit the Export tab, name your file and choose the destination folder.
Part 3: FAQs about YouTube Shorts
1. Where to download the YouTube Shorts app?
The YouTube Shorts app is currently available in the YouTube app that your iOS or Android smartphone has. To access it, sign in to your Google account, tap the + button at the bottom, and select the Create a Short option in the popup box that shows off.
2. What’s the YouTube Shorts video duration?
A YouTube Shorts video can be of only up to 60 seconds.
3. Can I Upload Shorts Video on Computer?
Yes. You can upload a Short video by following the traditional method.
- Click the Create camera icon on your PC.
- Click on Upload Videos.
- Locate the file on the PC you want to upload, and you are all done.
However, the option best works in smartphones, and still, if you are uploading through a laptop or PC, make sure to add #shorts in the title or description of the uploaded video.
4. What’s the YouTube Shorts size limitation?
YouTube hasn’t provided any information related to this as of now. However, you can rest assured that a 60 seconds long video file wouldn’t be too large for YouTube to handle.
5. How many subs do you need to access Shorts?
YouTube Shorts is available for everyone no matter how many subscribers the YouTube channel has.
6. Can you make money on Shorts?
Short-form video creators do not share revenue from advertisements played in the Shorts player right now. Instead, start the YouTube Shorts Fund, a $100M fund for creators that helps build the future of short-form video on YouTube.
Conclusion
Hopefully, you have resolved the concern of YouTube Shorts not showing. You can access your total dose of entertainment by getting the YouTube Shorts through our editing tips mentioned in the last section.
However, we’ve mainly defined the editing part of Wondershare Filmora except creating YouTube Shorts through its Auto Reframe feature. But, as you go through Filmora, you will find that editing is not a cumbersome task to follow over this platform. It’s the easiest!
Liza Brown
Liza Brown is a writer and a lover of all things video.
Follow @Liza Brown
Liza Brown
Oct 26, 2023• Proven solutions
Well, a YouTube Shorts is said to be YouTube’s short-form answer to TikTok. You can quickly scroll via algorithmically-driven feed, discover other similar short videos, and subscribe to your favorite creators.
Here, creators can record, share, and edit short-form video content that’s 60 seconds or less and vertically oriented. And, unlike Instagram stories, YouTube Shorts won’t disappear but will remain on your channel. So, that’s the brief intro of YouTube Shorts which we think everyone is aware of after YouTube has announced its YouTube Shorts availability globally.
However, certain factors are still there, raising the issue or concern of YouTube Shorts not showing. Thus, if you can’t find the YouTube Shorts option or videos, or YouTube Shorts disappeared, find a solution in this post.
Part 1: Why Do YouTube Shorts Not Showing Up?
There could be multiple reasons why YouTube Shorts not showing on your phone, the channel’s home page etc.
Besides, many scenarios arise with this issue, namely the YouTube Shorts option not showing up, the YouTube Shorts button missing, and YouTube Shorts videos not showing correctly.
And, there are valid reasons as well as to why these situations are happening to you. So, let’s discuss each of them separately in brief, along with the solutions in the next section.
- YouTube Shorts are not showing on the channel’s homepage
The standard and the most common reason why YouTube Shorts are not showing on the channel’s homepage is that you have not updated the YouTube app.
- YouTube Shorts option not showing up
This may be happening either because you’ve not updated the app or your internet connection is pretty slow to show you the option. There could be another reason as you may not have cleared the YouTube mobile app’s cache and data.
- YouTube Shorts button missing
Again, you may not have updated the YouTube app, or your internet connection is slow is the most common reason here. Moreover, the button of YouTube Shorts stays hidden behind the +icon.
- YouTube Shorts videos not showing correctly
The most valid reason for YouTube Shorts not showing correctly or YouTube Shorts disappearing is that you have a poor internet connection. Plus, we’ve discussed proper steps below if you’ve missed something while uploading the YouTube Shorts triggering this scenario.
Before we move on to fixing YouTube Shorts not showing the issue, here’s a quick note on which videos qualify as YouTube Shorts. Shorts are different from YouTube stories. Unlike YouTube stories, it gets displayed in your regular channel feed along with your other YouTube videos.
And, you must note that a YouTube Shorts video consists of two criteria as follows.
- The video has to be vertical (portrait-style)
- The video must be 60 seconds or less
Part 2: How to Fix YouTube Shorts Not Showing Up?
Here’s the section covering fixes on YouTube Shorts not showing. Please give it a read and resolve your issue happily!
Fix 1: Update the YouTube App
As we’ve already discussed above, check if your YouTube mobile app has the latest version. The newest version of the YouTube mobile app (Version: 16.17.36) has a dedicated Shorts button at the bottom. And, it replaces the Trending button from the YouTube app.
Moreover, the option to upload Shorts is now hidden behind the + icon. Tap on the + icon and hit the Create a Short option.
Fix 2: Check If Shorts Is Available in Your Country
Now, YouTube Shorts is available globally, but there was a phase when YouTube Shorts was a beta feature. It was only available in India and the US, which could be why you could not view Shorts in the YouTube app.
Fix 3: YouTube Shorts Is Mobile-only
As of now, YouTube Shorts is only available on a smartphone because it’s still in beta version. However, you can create Shorts via smartphone and the camera option in YouTube mobile app. Hence, there’s no point in searching for Shorts on your computer.
You can upload Shorts videos from your laptop. The entire process is similar to uploading a regular video. However, you have to mention #Shorts in the title and description to differentiate it as a Shorts video.
Common Fixes to YouTube Shorts Not Working
- Update the YouTube App to the latest version.
- Clear the YouTube mobile app’s data and cache.
- Check if your internet is connected or your internet connection is strong.
- Restart your smartphone and try again.
- The YouTube server can be down, busy, or under maintenance. Wait for a while and try again.
The fixes above are also applicable if the YouTube Shorts are not showing on iPhone as well.
Or, you can try the VPN solution before contacting the YouTube team.
If Videos Are Not Visible under YouTube Shorts
Solution 1: Ensure that you’ve added #shorts in the title and description. Those who have YouTube Shorts, they can make shorts videos via the Shorts camera. Those who can’t access this camera can also upload their current vertical videos that are less than 60 seconds after adding the hashtag #Shorts in the title or description.
All in all, you must include #shorts to let the YouTube algorithm figure out the video is created for Shorts, and the issue of YouTube Shorts not showing up will also be resolved.
Solution 2: Sometimes, you may not find YouTube Shorts videos if they’re precisely 60 seconds in duration because YouTube sometimes adds 1-2 seconds to a Shorts video for some reason. So, be alert here and ensure your Shorts video is around 58 seconds or less.
Solution 3: If your YouTube Shorts is not getting views, you need to wait more here because it takes a while for YouTube to index a Shorts video and suggest them to people. So, it’s the task of the algorithm that varies from person to person. Some Shorts videos take several days while others take weeks.
If YouTube Shorts Videos Are Not Showing up Correctly
Once uploaded, the YouTube Shorts will be displayed in a vertical thumbnail on YouTube and other regular content already there in your account. Or, it’s your choice to create a new channel for the YouTube shorts videos. If the YouTube shorts not showing correctly, you can try as follows:
Step 1. Go to your channel and select the “customize channel” option.
Step 2. Hop on to the Featured section, and choose the add section.
Step 3. You’ll see shorts videos under the “videos” section. Click that, and the videos you have which are tagged in with #shorts in the title or description will automatically display here.
Bonus Tip: How to Easily Create Vertical Videos for YouTube Shorts on PC
The YouTube Shorts app is pretty convenient to use nowadays. However, it doesn’t allow you to fine-edit the videos if you’ve explored the app or specifically when you want your videos to look more professional. The app doesn’t even have many filtering options, such as Effects, Elements, etc., to make your videos more interactive.
With that said, you can always use an efficient third-party program like Wondershare Filmora to create professional-looking YouTube Shorts videos to engage your viewers highly. Even no famous YouTuber uploads their videos directly from the app without using any third-party tool.
We recommend Wondershare Filmora because it is a production and post-production app available for Windows and Mac computers. It gives tough competition to some globally renowned tools like Final Cut Pro X, Adobe Premiere Pro, etc., because of its simplicity. Furthermore, Filmora has its inbuilt screen, voice recording features, and webcam that can be useful to create game walkthroughs, interactive videos, and voiceovers as needed.
Moreover, a YouTube Shorts video can be made through Wondershare Filmora using the below-mentioned guide.
Note: We are assuming that you have already recorded a vertical video using your smartphone and that it has been transferred to your PC.
So, the signature feature to create YouTube Shorts videos on Wondershare Filmora is Auto Reframe.
Powered by AI technology, Auto Reframe automatically identifies the focal point of your video and crops it while always maintaining it within the frame. This way, the main object or action in your video never goes out of vision.
You can choose an aspect ratio that best fits YouTube Shorts which is 9:16.
How to Use Auto Reframe in Filmora?
Step 1. Open Filmora and Select Auto Reframe
You can choose among three ways to open the Auto Reframe feature in Filmora.
* **Way 1:** Once you open Filmora, the main interface will display the **Auto Reframe** tab on the right-hand panel. Click it to open directly
- Way 2: Import media as File > Import Media Files and select the file. After you import the media, right-click and choose the Auto Reframe.
- Way 3: Lastly, you can choose the Tools option on the top menu bar and hit the Auto Reframe.
Step 2. Adjust the Aspect Ratio and Motion Speed
A separate dialog box will display once you have selected the Auto Reframe option. Now, click on Import Media and choose a single video to import. You can change the imported video by hitting the Replace File at the top menu.
There are multiple aspect ratio templates available such as square (1:1), vertical (9:16), standard (4:3), widescreen (16:9), and cinema (21:9). As you are making YouTube Shorts, so you need to select 9:16.
You can adjust the speed of your video in multiple options: keep it at Auto or make it Slow or Fast as per your requirements.
Step 3. Analyze, and Auto Reframe the Video
Once you finish the above adjustments, hit the Analysis tab. Filmora will take a few seconds to finish analyzing your video project.
Then the video will be automatically and quickly reframed to your specified speed and aspect ratio. You can modify these aspect ratios and speed options by hitting the Restart option as well.
Step 4. Preview the Reframed Video and Check
Lastly, you can preview your final video. If the video needs more work, you can also play and pause it at the point you want to adjust the frame. You can use Next Edit Point, Undo, Redo, and Previous Edit Point at the bottom panel.
Step 5. Export the Reframed Video
Finally, after all the final adjustments, you can hit the Export tab, name your file and choose the destination folder.
Part 3: FAQs about YouTube Shorts
1. Where to download the YouTube Shorts app?
The YouTube Shorts app is currently available in the YouTube app that your iOS or Android smartphone has. To access it, sign in to your Google account, tap the + button at the bottom, and select the Create a Short option in the popup box that shows off.
2. What’s the YouTube Shorts video duration?
A YouTube Shorts video can be of only up to 60 seconds.
3. Can I Upload Shorts Video on Computer?
Yes. You can upload a Short video by following the traditional method.
- Click the Create camera icon on your PC.
- Click on Upload Videos.
- Locate the file on the PC you want to upload, and you are all done.
However, the option best works in smartphones, and still, if you are uploading through a laptop or PC, make sure to add #shorts in the title or description of the uploaded video.
4. What’s the YouTube Shorts size limitation?
YouTube hasn’t provided any information related to this as of now. However, you can rest assured that a 60 seconds long video file wouldn’t be too large for YouTube to handle.
5. How many subs do you need to access Shorts?
YouTube Shorts is available for everyone no matter how many subscribers the YouTube channel has.
6. Can you make money on Shorts?
Short-form video creators do not share revenue from advertisements played in the Shorts player right now. Instead, start the YouTube Shorts Fund, a $100M fund for creators that helps build the future of short-form video on YouTube.
Conclusion
Hopefully, you have resolved the concern of YouTube Shorts not showing. You can access your total dose of entertainment by getting the YouTube Shorts through our editing tips mentioned in the last section.
However, we’ve mainly defined the editing part of Wondershare Filmora except creating YouTube Shorts through its Auto Reframe feature. But, as you go through Filmora, you will find that editing is not a cumbersome task to follow over this platform. It’s the easiest!
Liza Brown
Liza Brown is a writer and a lover of all things video.
Follow @Liza Brown
Integrating Timestamps: YouTube Video Link Enhancement Techniques
How to Add Timestamps on YouTube Video Link?

Richard Bennett
Mar 27, 2024• Proven solutions
It is a well-known fact that internet users have a short interest span, about just eight seconds. This attention span applies to all internet platforms including YouTube. YouTube is the second largest and most visited search engine after Google. It provides users with information through engaging and eye-catchy videos. However, certain videos are longer where only a particular section of the video holds the important information. Viewers tend to skip the long videos and if you do not want this to happen to you, you can link to that specific part on your video adding value for your channel viewers with a link known as the YouTube Timestamp link.
When you have a Timestamp link on your video, you can help your viewers directly reach the specific time in the video. This helps avoid the viewers from losing interest or to search for the key part in your video themselves.
Here in this article, we will explain Timestamp links, how to add Timestamp to YouTube video links, and what are the benefits of Timestamp.
- Part 1: YouTube Timestamp Links Introduction
- Part 2: Adding a Timestamp to YouTube Video Link on Desktop
- Part 3: How to Share Specific Parts of YouTube Video
- part 4: Getting YouTube Timestamp Link on Mobile
- Part 5: FAQ About YouTube Timestamps
Part 1: What is YouTube Timestamp Links
In this fast-paced world where viewers have limited time at hand, YouTube Timestamp links are extremely helpful. These links are anchor text or video hyperlinks found either in the description beneath the video or at the video link end.

The Timestamps links allow you to put a link to a key moment in your YouTube video allowing the viewers and subscribers to view the video at the precise time specified. Your YouTube video maybe half an hour long or maybe your users do not have the time now or forget to later watch your video, but when you add Timestamp to the YouTube link, you provide them ways to get to the content quickly enhancing the user experience.
In addition to this, you can even provide a reference in minutes and hours where necessary. The YouTube Timestamp link acts as a guide that directs viewers to the part of the video, which is most relevant to them without having to watch the entire video.
Part 2: How to Add a Timestamp to YouTube Video Link on Desktop?
In the following section, I will show you how to add timestamp to YouTube video link in several ways.
Use YouTube’s Share Feature
Using YouTube’s share feature is the simplest way to add Timestamp to YouTube videos. Here are easy steps to follow to do this.
- Open the YouTube video on your desktop that you want to share.
- Play the video or navigate the timeline and stop at the key moment you wish to apply the timestamp to.
- Now click on the Share button, a pop-up will appear. Under the URL, you will see a small box indicating Start at. The Timestamp is generated automatically, but you can adjust it.

- Copy the updated URL with Timestamp to share the video or click on the social sharing icons to do so.
- When your viewers click on this URL, the video will begin at the specified Timestamp.
Use the Browser URL to add Timestamp manually
You can add Timestamp manually as well. Follow the step-by-step guide below to add a Timestamp manually.
- Open your YouTube video in a browser on your desktop and then find the URL in the browser’s address bar.
- Enter the specific time you want the viewers to watch the video from at the end of the video URL.
You can add time manually in two ways depending on the URL.
?t=As or
&t=As
“youtu.be/” Format
If your YouTube video link is a youtu.be format, then just add ?t=As at the end of the video link. The A denotes the seconds at which you want the viewer to watch your video. The time can also be specified in minutes and seconds and when you want to do that just add ?t=AmBs. For instance, ?t=2m40s.
“youtube.com/” Format
When your YouTube video link has a youtube.com format, the adjustment starts with an ampersand. &t=As or &t=AmBs is what you can use. If you are looking to add the Timestamp at 2m40s, just add “&t=2m40s at the end of the video URL.
Whenever anybody uses the URL with Timestamp, the video will start from the specified time.
However, when adding a Timestamp manually, always leave include whole numbers. For example, if the time starts at 4m, use 4 and not 04.
Copy video URL at current time
You can use YouTube’s built-in feature to share the key parts of your YouTube video. Follow the steps here.
- Visit YouTube and open the video you want to add Timestamp link to.
- Play the video or navigate the timeline to reach the specific part you like to use in Timestamp.
- Now either press Ctrl + click or right-click anywhere on the video. A pop-up opens where you can see various texts, click on the Copy video URL at current time and share the link.

- Anyone who clicks on this link will be instantly transported to the exact segment of your YouTube video.
Part 3: How to Share Specific Parts of Videos with Vibby and Get YouTube Link with Timestamp
The above-mentioned methods to add and send YouTube link with timestamp are quick and easy, but they have a few limitations. If you need more control and share highlighted parts of YouTube video without cutting the video, you need to use a third-party tool known as Vibby.
Vibby allows you to not only share specific parts of videos from YouTube but other platforms as well like Vimeo and Twitch. With the tool, you can clip multiple sections of the video and share them with others.
- To get started, signup either with mail, Google, Twitter, Facebook, or Twitch account.
- Once signed in, go to Create vib at the top left corner and then paste the URL of the YouTube video you would like to share and then click on the Start button.

- Your video will load in the Vibby editor, now click on Highlight the parts to share.
- Here you will see the Start highlight button, jump 5-sec option, option to switch between HD and SD video quality, and volume control button. Navigate to the part you want to share and click on Start highlight.

- When you reach the end of the part, click on Finish highlight. Repeat the process to highlight multiple parts of the video. All the highlighted parts will appear in a list on the right side of the screen.
- Add a description to each part and format it, you have the option to preview before hitting the Save vib button.
- Name the vib and assign a category and then publish it to Vibby or make it a private vib.
- You get a dedicated link to your vib with the ability to embed it on your website or blog.
In this way, you can share the highlights of the YouTube video or Vimeo video easily.
Part 4: How to Get YouTube Timestamp Link on iPhone and Android?
Linking to specific YouTube Timestamp Link is straightforward on both iPhone and Android.
- Go to YouTube and select the video you want to share.
- Move through the progress bar of the video to reach the key part and click on the Share button.
- A pop-up menu appears, highlight the URL and click on the Copy button.
- Paste the URL and manually add the Timestamp using the steps mentioned in add a Timestamp manually.
Part 5: Is Timestamp Beneficial for your Video?
Timestamping your YouTube videos may decrease the watch time, but it enhances the user experience, and they want to see more of your videos. Apart from this, adding Timestamps to your videos make your videos discoverable through Google search. YouTube and Google will reward you for the videos in form of a high search engine ranking.
Bonus: How to Add YouTube Timestamp Link in YouTube Video Description
Adding a YouTube Timestamp link in your video description is easy. Here are the steps to do so.
- Go to your YouTube channel and select the video you want to add Timestamp to and then navigate to the description below it.
- Edit the description by clicking on the Edit Video button.
- You are redirected to the Video Details page. Here write 0:00 at the first part of the timecode, and then continue with the time of the key part of the video you want to add the Timestamp to in 2:40 format. You can add more Timestamp as well and then click on the Save button.

- Reload the video page and you will see auto-generated Timestamp Links at the specific time you provided in the description.
Note: You need to add at least three timestamps which are 10 seconds or longer in order to add timestamps successfully.
Conclusion
As much as possible YouTubers want to make videos short and to the point. However, if a video needs to be longer, you can still help users navigate through to find what is important to them by adding Timestamp to YouTube link or Timestamp the YouTube descriptions. This can help your viewers jump straight to the interesting part in the video, rather than viewing the entire video saving their time and boost user experience.
Richard Bennett
Richard Bennett is a writer and a lover of all things video.
Follow @Richard Bennett
Richard Bennett
Mar 27, 2024• Proven solutions
It is a well-known fact that internet users have a short interest span, about just eight seconds. This attention span applies to all internet platforms including YouTube. YouTube is the second largest and most visited search engine after Google. It provides users with information through engaging and eye-catchy videos. However, certain videos are longer where only a particular section of the video holds the important information. Viewers tend to skip the long videos and if you do not want this to happen to you, you can link to that specific part on your video adding value for your channel viewers with a link known as the YouTube Timestamp link.
When you have a Timestamp link on your video, you can help your viewers directly reach the specific time in the video. This helps avoid the viewers from losing interest or to search for the key part in your video themselves.
Here in this article, we will explain Timestamp links, how to add Timestamp to YouTube video links, and what are the benefits of Timestamp.
- Part 1: YouTube Timestamp Links Introduction
- Part 2: Adding a Timestamp to YouTube Video Link on Desktop
- Part 3: How to Share Specific Parts of YouTube Video
- part 4: Getting YouTube Timestamp Link on Mobile
- Part 5: FAQ About YouTube Timestamps
Part 1: What is YouTube Timestamp Links
In this fast-paced world where viewers have limited time at hand, YouTube Timestamp links are extremely helpful. These links are anchor text or video hyperlinks found either in the description beneath the video or at the video link end.
The Timestamps links allow you to put a link to a key moment in your YouTube video allowing the viewers and subscribers to view the video at the precise time specified. Your YouTube video maybe half an hour long or maybe your users do not have the time now or forget to later watch your video, but when you add Timestamp to the YouTube link, you provide them ways to get to the content quickly enhancing the user experience.
In addition to this, you can even provide a reference in minutes and hours where necessary. The YouTube Timestamp link acts as a guide that directs viewers to the part of the video, which is most relevant to them without having to watch the entire video.
Part 2: How to Add a Timestamp to YouTube Video Link on Desktop?
In the following section, I will show you how to add timestamp to YouTube video link in several ways.
Use YouTube’s Share Feature
Using YouTube’s share feature is the simplest way to add Timestamp to YouTube videos. Here are easy steps to follow to do this.
- Open the YouTube video on your desktop that you want to share.
- Play the video or navigate the timeline and stop at the key moment you wish to apply the timestamp to.
- Now click on the Share button, a pop-up will appear. Under the URL, you will see a small box indicating Start at. The Timestamp is generated automatically, but you can adjust it.
- Copy the updated URL with Timestamp to share the video or click on the social sharing icons to do so.
- When your viewers click on this URL, the video will begin at the specified Timestamp.
Use the Browser URL to add Timestamp manually
You can add Timestamp manually as well. Follow the step-by-step guide below to add a Timestamp manually.
- Open your YouTube video in a browser on your desktop and then find the URL in the browser’s address bar.
- Enter the specific time you want the viewers to watch the video from at the end of the video URL.
You can add time manually in two ways depending on the URL.
?t=As or
&t=As
“youtu.be/” Format
If your YouTube video link is a youtu.be format, then just add ?t=As at the end of the video link. The A denotes the seconds at which you want the viewer to watch your video. The time can also be specified in minutes and seconds and when you want to do that just add ?t=AmBs. For instance, ?t=2m40s.
“youtube.com/” Format
When your YouTube video link has a youtube.com format, the adjustment starts with an ampersand. &t=As or &t=AmBs is what you can use. If you are looking to add the Timestamp at 2m40s, just add “&t=2m40s at the end of the video URL.
Whenever anybody uses the URL with Timestamp, the video will start from the specified time.
However, when adding a Timestamp manually, always leave include whole numbers. For example, if the time starts at 4m, use 4 and not 04.
Copy video URL at current time
You can use YouTube’s built-in feature to share the key parts of your YouTube video. Follow the steps here.
- Visit YouTube and open the video you want to add Timestamp link to.
- Play the video or navigate the timeline to reach the specific part you like to use in Timestamp.
- Now either press Ctrl + click or right-click anywhere on the video. A pop-up opens where you can see various texts, click on the Copy video URL at current time and share the link.
- Anyone who clicks on this link will be instantly transported to the exact segment of your YouTube video.
Part 3: How to Share Specific Parts of Videos with Vibby and Get YouTube Link with Timestamp
The above-mentioned methods to add and send YouTube link with timestamp are quick and easy, but they have a few limitations. If you need more control and share highlighted parts of YouTube video without cutting the video, you need to use a third-party tool known as Vibby.
Vibby allows you to not only share specific parts of videos from YouTube but other platforms as well like Vimeo and Twitch. With the tool, you can clip multiple sections of the video and share them with others.
- To get started, signup either with mail, Google, Twitter, Facebook, or Twitch account.
- Once signed in, go to Create vib at the top left corner and then paste the URL of the YouTube video you would like to share and then click on the Start button.
- Your video will load in the Vibby editor, now click on Highlight the parts to share.
- Here you will see the Start highlight button, jump 5-sec option, option to switch between HD and SD video quality, and volume control button. Navigate to the part you want to share and click on Start highlight.
- When you reach the end of the part, click on Finish highlight. Repeat the process to highlight multiple parts of the video. All the highlighted parts will appear in a list on the right side of the screen.
- Add a description to each part and format it, you have the option to preview before hitting the Save vib button.
- Name the vib and assign a category and then publish it to Vibby or make it a private vib.
- You get a dedicated link to your vib with the ability to embed it on your website or blog.
In this way, you can share the highlights of the YouTube video or Vimeo video easily.
Part 4: How to Get YouTube Timestamp Link on iPhone and Android?
Linking to specific YouTube Timestamp Link is straightforward on both iPhone and Android.
- Go to YouTube and select the video you want to share.
- Move through the progress bar of the video to reach the key part and click on the Share button.
- A pop-up menu appears, highlight the URL and click on the Copy button.
- Paste the URL and manually add the Timestamp using the steps mentioned in add a Timestamp manually.
Part 5: Is Timestamp Beneficial for your Video?
Timestamping your YouTube videos may decrease the watch time, but it enhances the user experience, and they want to see more of your videos. Apart from this, adding Timestamps to your videos make your videos discoverable through Google search. YouTube and Google will reward you for the videos in form of a high search engine ranking.
Bonus: How to Add YouTube Timestamp Link in YouTube Video Description
Adding a YouTube Timestamp link in your video description is easy. Here are the steps to do so.
- Go to your YouTube channel and select the video you want to add Timestamp to and then navigate to the description below it.
- Edit the description by clicking on the Edit Video button.
- You are redirected to the Video Details page. Here write 0:00 at the first part of the timecode, and then continue with the time of the key part of the video you want to add the Timestamp to in 2:40 format. You can add more Timestamp as well and then click on the Save button.
- Reload the video page and you will see auto-generated Timestamp Links at the specific time you provided in the description.
Note: You need to add at least three timestamps which are 10 seconds or longer in order to add timestamps successfully.
Conclusion
As much as possible YouTubers want to make videos short and to the point. However, if a video needs to be longer, you can still help users navigate through to find what is important to them by adding Timestamp to YouTube link or Timestamp the YouTube descriptions. This can help your viewers jump straight to the interesting part in the video, rather than viewing the entire video saving their time and boost user experience.
Richard Bennett
Richard Bennett is a writer and a lover of all things video.
Follow @Richard Bennett
Also read:
- Tailored Audio Gear Choosing Mics for Diverse Video Platforms
- Essential Gear Picking the Very Best Among Top 9 Free Logomakers for 2024
- Academic History Lovers' Guide to Top YT Content for 2024
- How to Seamlessly Upload Videos Onto YouTube's Platform
- 2024 Approved Defeating Dissidence A Guide for Content Makers
- The Workings of YouTube After a Video Is Published
- In 2024, Crafting Captivating Cinematic Experiences in YouTube Videos
- [Updated] Double Down on Viewership YouTube + Twitch Strategy
- 2024 Approved Digital Whirlwind Top 30 Hashes for Video Stardom
- Become a Trending Sensation with These Effective YouTube SEO Strategies
- Mastering Cost-Effective Visual Integration in Writing
- [Updated] Earnings Expertise on Streaming Services The Ultimate Guide
- Streamlined Simplicity AYT's Quick Ways to Blur Background
- Essential Audio Enhancement Apps for YouTubers' Videos for 2024
- Crafting Thumbnails on the Go For Aspiring Mobile Film Makers
- In 2024, Breakdown of Mr. Beast's Financial Powerhouse
- [New] Charting 8 Most Swiftly Increasing Video Platforms
- [Updated] ASMR Video Knowledge for Beginners
- 2024 Approved Best YouTube Banner Size and Channel Art Dimension (The Ultimate Guide)
- 2024 Approved Chart New Horizons in Branding with These Top 10 YouTube Tools
- Building a Custom Link for YouTube's Auto-Subscribe for 2024
- Finding Legal Music A Producer's Manual
- 2024 Approved Enhance YT Experience The Most Outstanding Reaction Ideas
- Step-by-Step IMovie Videos on Your YouTube Channel
- 2024 Approved A Step-by-Step Approach to Crafting Your Video' Market Standouts
- Break It Down Free Techniques to Go Frame by Frame on YouTube
- [Updated] Avoid YouTube? Here Are Top 10 Indie Video Apps for Phones
- In 2024, Escaping YouTube Ranked List of 27 Alternative Streaming Services
- [New] Captivate Crowds Social Media Growth Hacks for YouTube
- New 2024 Approved Windows 8 FLV Editor A User-Friendly Video Editing Solution
- [New] In 2024, Cheap Not Bad – Chromebook's Top Recording Tools
- A Comprehensive Guide to iCloud Unlock From iPhone 14 Pro Max Online
- What's New in VR?
- CatchEmAll Celebrate National Pokémon Day with Virtual Location On Honor Magic V2 | Dr.fone
- New Step by Step to Silence Zoom Microphones on Windows, macOS, and Android Devices
- [New] In 2024, Captivate Your Circle The Art of Sending Gifs on Snapchat
- In 2024, Edit Videos Like a Pro 14 Free Software Options Without Watermarks
- Building a Following with Captivating Instagram Reels
- [Updated] Unlock and Save Your Favorite FB Videos for 2024
- [New] 2024 Approved 2023'S Largest Threaded Video Compilation
- Updated Easy Voice Cutting A Comprehensive Audacity Resource for 2024
- New 2024 Approved How Does Dynamic Range Processing Improve Audio Quality?
- Android Safe Mode - How to Turn off Safe Mode on Itel A70? | Dr.fone
- 2024 Approved Comprehensive Guide to Permanently Sever TikTok Connection
- In 2024, Professional Screenshot & Video Recorder, Win10
- [Updated] In 2024, Scoping Out the Top 10 Stream-Ready Apps
- Universal Unlock Pattern for Vivo Y17s
- Free Gamers' Guide to Selecting Best Screen Recorder Apps for 2024
- [New] In 2024, Voice Logging System Audit
- Top 4 Ways to Trace Realme GT 3 Location | Dr.fone
- Earn Big on TikTok Unveiling the Top 8 Profitable Approaches
- In 2024, 10 Easy-to-Use FRP Bypass Tools for Unlocking Google Accounts On Nokia C12 Plus
- Text Animation Made Easy Best Motion Tracking Tools for 2024
- Everything You Need to Know about Lock Screen Settings on your Nubia Red Magic 9 Pro
- How to Fix Error 495 While Download/Updating Android Apps On Realme V30 | Dr.fone
- Title: "Overhauen Uncovering Hidden Shorts Content"
- Author: Kevin
- Created at : 2024-05-25 16:10:15
- Updated at : 2024-05-26 16:10:15
- Link: https://youtube-videos.techidaily.com/overhauen-uncovering-hidden-shorts-content/
- License: This work is licensed under CC BY-NC-SA 4.0.
