
:max_bytes(150000):strip_icc()/GettyImages-492096052-5c5906d846e0fb000164e557.jpg)
"Optimize Your YouTube Videos Faster Rendering, Smarter Uploads"
Optimize Your YouTube Videos: Faster Rendering, Smarter Uploads
How to Render and Upload YouTube Videos Faster?

Richard Bennett
Oct 26, 2023• Proven solutions
You’ve shot a video you’re proud of and you can’t wait to post it! But, slow down, you have to edit all your clips together first. And then you have to export your video from the editing program, which can take a while. Then you have to wait for it to upload to YouTube, and once it’s up you have to write your description, add cards, and do a handful of other things.
The period between finishing a video and actually posting it for your subscribers to see can be long and tiresome. A lot of videos have probably died in these stages because their creators ran out of energy and patience.
Don’t let this happen to your videos! Here are 4 ways you can save time and avoid headaches during post-production:
3. Use default descriptions and tags
4. TubeBuddy’s bulk features and tagging tools
1. Create mini-projects
When you have alarge editing project with lots of different titles, animations, clip sequences, and PIP tracks it can get hard to keep track of everything. That’s especially true if you need to go back and make changes. A change to one part of your video could affect other parts of it.
Also, the more complex your video is the longer it will take to render/export.
There is a way you can keep your project more organized, save time making minor adjustments, and speed up rendering: create sub-projects of different segments of your video and import them into your main project as their own clips.
This helps you in 3 ways:
1. If there are a lot of effects it’ll be faster to render a shorter video.
2. If you import your sequence as its own clip you won’t have to worry about adjusting little parts of it whenever you change earlier sections of your video.
3. If you do want to make adjustments to your sequence you can open up your mini-project and change it without affecting anything in your main project.
2. Optimize your upload speed
At home, your videos will upload fastest if all of your internet resources are devoted to the upload. That means you should not have any other windows open on your computer while you are uploading. You should also make sure there aren’t other devices competing for wifi like smart tvs, cell phones, or really fancy coffee makers.
If you have neighbors on the same wifi signal as you and they are online at the same time, this will slow you down too.
Because there is so much that can interfere with wifi, you might want to consider a wired Ethernet cable. Ethernet connections are faster in general, and you won’t have any problems with other devices competing for resources like you get with wifi.
If you’re doing everything you can to optimize your upload speed at home and still find that it takes an unreasonable amount of time to upload videos to YouTube, go somewhere with a better connection. Save your video to a USB drive and take it to a library or college to upload. Connections in these kinds of places tend to be very strong.
3. Use default descriptions and tags
In your Creator Studio, go to Channel > Upload defaults. Here you can write in titles, descriptions, and tags which will automatically be applied to every video you upload.

Note: in the latest YouTube Studio, the upload interface is changed but the main process is similar.

You probably have tags you use for almost every video you post. For example, if your channel is about vegan cooking then every one of your videos is probably tagged ‘vegan’, ‘food’, and ‘cooking’. If you type those tags in here then you don’t have to keep adding them to every new video, and you can still add or remove tags from individual uploads so you aren’t stuck using the exact same set of tags every time.
Similarly, you probably have some default text that goes in the description of every one of your videos (i.e. a link to your personal website or a brief introduction of yourself). If you type in a default description then that text will appear automatically in every new video description and you can just add to it when you need to for individual videos.
Using defaults might only save you a couple of minutes per video, but those minutes add up.
4. TubeBuddy’s bulk features and tagging tools
TubeBuddy is a channel management tool for YouTube. Most of its features are more geared towards very large channels or companies with a YouTube presence, but there are also features that can help small or mid-sized YouTubers save time and stay organized.
Some of these tools include templates for things like cards and end screens and bulk processing tools for when you want to change a lot of things at once. For example, if you wanted to update the links in every card in every one of your videos at once then TubeBuddy could help with that.
Some of TubeBuddy’s best features for growing channels are the tagging features. TubeBuddy will help you discover tags, suggest new tags, and even copy whole lists of tags from rival videos.
There are different levels of pricing for TubeBuddy (including a free version, although it’s very limited) and you get a discount on the Pro version if you have less than 50,000 lifetime views on your channel. It ends up being $4.50USD a month (or $3.60 USD a month if you pay for a year in advance). It’s a good investment for someone who’s starting to see some growth on YouTube, but probably not if you’re still trying to reach milestones like 500 subs or 10,000 views.
You have to work hard to get anywhere on YouTube, but that doesn’t mean you should be toiling away at tedious stuff like typing in the same tags over and over. If you have any time-saving tips then make sure to share them with everyone in the comments!
Remember that your time is valuable =)

If you are using Filmora to edit YouTube videos, you can upload the video to YouTube directly from Filmora without download it again first, which can save you time. Besides, if you don’t want the video to be public, you can change Privacy to unlisted or private in Filmora.


Richard Bennett
Richard Bennett is a writer and a lover of all things video.
Follow @Richard Bennett
Richard Bennett
Oct 26, 2023• Proven solutions
You’ve shot a video you’re proud of and you can’t wait to post it! But, slow down, you have to edit all your clips together first. And then you have to export your video from the editing program, which can take a while. Then you have to wait for it to upload to YouTube, and once it’s up you have to write your description, add cards, and do a handful of other things.
The period between finishing a video and actually posting it for your subscribers to see can be long and tiresome. A lot of videos have probably died in these stages because their creators ran out of energy and patience.
Don’t let this happen to your videos! Here are 4 ways you can save time and avoid headaches during post-production:
3. Use default descriptions and tags
4. TubeBuddy’s bulk features and tagging tools
1. Create mini-projects
When you have alarge editing project with lots of different titles, animations, clip sequences, and PIP tracks it can get hard to keep track of everything. That’s especially true if you need to go back and make changes. A change to one part of your video could affect other parts of it.
Also, the more complex your video is the longer it will take to render/export.
There is a way you can keep your project more organized, save time making minor adjustments, and speed up rendering: create sub-projects of different segments of your video and import them into your main project as their own clips.
This helps you in 3 ways:
1. If there are a lot of effects it’ll be faster to render a shorter video.
2. If you import your sequence as its own clip you won’t have to worry about adjusting little parts of it whenever you change earlier sections of your video.
3. If you do want to make adjustments to your sequence you can open up your mini-project and change it without affecting anything in your main project.
2. Optimize your upload speed
At home, your videos will upload fastest if all of your internet resources are devoted to the upload. That means you should not have any other windows open on your computer while you are uploading. You should also make sure there aren’t other devices competing for wifi like smart tvs, cell phones, or really fancy coffee makers.
If you have neighbors on the same wifi signal as you and they are online at the same time, this will slow you down too.
Because there is so much that can interfere with wifi, you might want to consider a wired Ethernet cable. Ethernet connections are faster in general, and you won’t have any problems with other devices competing for resources like you get with wifi.
If you’re doing everything you can to optimize your upload speed at home and still find that it takes an unreasonable amount of time to upload videos to YouTube, go somewhere with a better connection. Save your video to a USB drive and take it to a library or college to upload. Connections in these kinds of places tend to be very strong.
3. Use default descriptions and tags
In your Creator Studio, go to Channel > Upload defaults. Here you can write in titles, descriptions, and tags which will automatically be applied to every video you upload.
Note: in the latest YouTube Studio, the upload interface is changed but the main process is similar.
You probably have tags you use for almost every video you post. For example, if your channel is about vegan cooking then every one of your videos is probably tagged ‘vegan’, ‘food’, and ‘cooking’. If you type those tags in here then you don’t have to keep adding them to every new video, and you can still add or remove tags from individual uploads so you aren’t stuck using the exact same set of tags every time.
Similarly, you probably have some default text that goes in the description of every one of your videos (i.e. a link to your personal website or a brief introduction of yourself). If you type in a default description then that text will appear automatically in every new video description and you can just add to it when you need to for individual videos.
Using defaults might only save you a couple of minutes per video, but those minutes add up.
4. TubeBuddy’s bulk features and tagging tools
TubeBuddy is a channel management tool for YouTube. Most of its features are more geared towards very large channels or companies with a YouTube presence, but there are also features that can help small or mid-sized YouTubers save time and stay organized.
Some of these tools include templates for things like cards and end screens and bulk processing tools for when you want to change a lot of things at once. For example, if you wanted to update the links in every card in every one of your videos at once then TubeBuddy could help with that.
Some of TubeBuddy’s best features for growing channels are the tagging features. TubeBuddy will help you discover tags, suggest new tags, and even copy whole lists of tags from rival videos.
There are different levels of pricing for TubeBuddy (including a free version, although it’s very limited) and you get a discount on the Pro version if you have less than 50,000 lifetime views on your channel. It ends up being $4.50USD a month (or $3.60 USD a month if you pay for a year in advance). It’s a good investment for someone who’s starting to see some growth on YouTube, but probably not if you’re still trying to reach milestones like 500 subs or 10,000 views.
You have to work hard to get anywhere on YouTube, but that doesn’t mean you should be toiling away at tedious stuff like typing in the same tags over and over. If you have any time-saving tips then make sure to share them with everyone in the comments!
Remember that your time is valuable =)
If you are using Filmora to edit YouTube videos, you can upload the video to YouTube directly from Filmora without download it again first, which can save you time. Besides, if you don’t want the video to be public, you can change Privacy to unlisted or private in Filmora.
Richard Bennett
Richard Bennett is a writer and a lover of all things video.
Follow @Richard Bennett
Decoding YouTube Exchange Threads
How to Search Comments on YouTube Quickly?
Richard Bennett
Mar 27, 2024• Proven solutions
Are you trying to search for something on a document or a web page? You know how to do that. You use the combination ‘Ctrl + F’ for Windows or ‘Command + F’ for Mac. But searching comments from the YouTube comments section can be tricky because –
- There are many comments on the video, most of which do not load immediately. You can keep scrolling and still not find the desired comment.
- Managing and analyzing the vast number of comments can be difficult for as busy a platform as YouTube.
So, if you want to search YouTube comments quickly, what can you do? We will show you in this blog.
Part 1: Using the Built-in YouTube Studio Feature to Search Comments
How does the built-in YouTube Studio Feature make searching comments on YouTube easier?
Comments are the best way to interact with subscribers on YouTube. YouTube’s Studio is a new addition to help creators filter and respond to comments and create a healthy community . Sometimes, YouTubers also receive hateful and inappropriate comments. You can use the Studio Feature to report or delete those comments as well.
If you have a channel, you can use this feature in some simple steps.
- Visit YouTubewebsite on your desktop and sign in to your YouTube account.
- Go to the top right corner of your homepage, and you will find your profile icon. Click on it and from the drop-down menu, select the YouTube Studio option.
- This will take you to the YouTube Studio home page. On the left side, find and click on the Comments option, and then you will see all comments your YouTube channel has received.
- You can now click on the Filter icon from the comments section and type in the search term directly. Or, you can click the Search from the options, and type in the words you are looking for.
- Click on Apply, and you will see the comments with the keywords you chose.
Besides the comment search feature, the YouTube Studio also has some in-built search filter categories, such as –
Search: Search for comments with particular search terms. You can also search comments posted by a specific channel by using their username as the search term.
Contains questions: Filter the comments which have questions.
Channel member status: Search for comments from the channel members. YouTube channel membership is only available to channels joined YouTube Partner Program.
Subscriber count: Filter comments with the channel subscriber count, you can search for comments from channels with a minimum number of subscribers (from 100-10M).
Response status: Filter the comments to which you have responded or haven’t responded to.
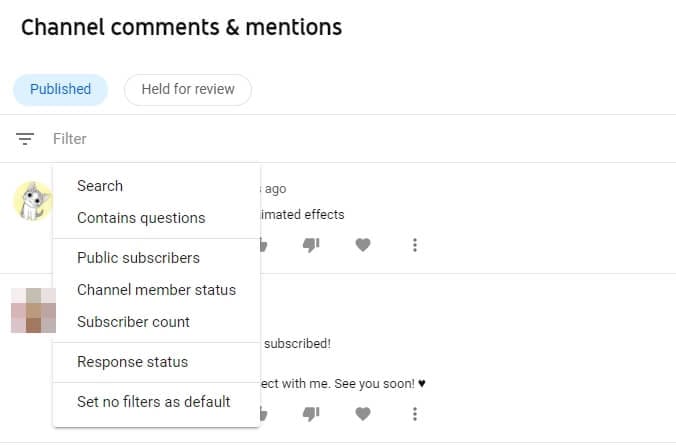
You can combine these additional filters to narrow your comments search for YouTube.
Part 2: Using YCS – YouTube Comment Search Extension
You can use the YouTube Comment Search browser extension supported by Google Chrome to help you search YouTube comments effortlessly. To use it, follow these steps below.
- First, you need to install this extension. You can click this URL https://chrome.google.com/webstore/detail/ycs-youtube-comment-searc/pmfhcilikeembgbiadjiojgfgcfbcoaa?hl=en Or, you can open the Chrome Extensions page, and in the search bar at the top, type in YCS – YouTube Comment Search and press Enter.
- Click on the result that appears and then tap on the Add to Chrome button. This will add the extension to your browser.
- Once you add the extension, openYouTube on your browser. Click on the video where you want to search the comments. You will find the YouTube Comment Search extension below it.
- Tap on ‘Load comments’ and wait till the extension loads all the comments on the video.
- Now type your keywords, press Enter, and YCS will show all comments having the keyword you typed.

Part 3: Using Comments Search for YouTube Extension
If you are looking for an easy method to search YouTube comments, you can use the Comments Search for YouTube extension. Google Chrome supports this extension that allows you to search comments on YouTube without leaving the website.
How can you use this extension to search YouTube comments? Here is a simple step-by-step tutorial.
- First, you need to download the extension fromGithub . Then, locate the file on your computer and unzip it.
- Next, you need to install it in the browser. Open your Chrome browser, and from the top right corner, click on the three vertical dots. You will find the Settings option towards the end of the drop-down menu, and then click on it.
- When the Settings page opens, select Extensions from the panel on the left side of the webpage. This will take you to a new tab.
- On the top right corner of the page, there will be a toggle switch called Developer Mode. Turn it on if it is off.
- Once the Developer Mode is on, you will see three options now. Click on Load unpacked. Locate the downloaded extension file and click on it. Finally, disable Developer Mode.
When you complete these steps, you click on the extension icon to search comments on YouTube. You can also do this by using the combination ‘Ctrl + S’ on the target YouTube page. The extension also includes some advanced features like –
1. Global Mode
In this mode, you can type ‘global: your parameter’ to search all comments on the channel that fit your parameter.
2. Advanced Mode
This mode allows you to enter special commands to carry out an advanced search. Some including typing –
- ‘:’ to look for comments with timestamps
- ‘:all’ to see all comments
- ‘:creator’ to get comments made by the creator
Part 4: How Do You Search Comments You Have Posted on YouTube?
Did you post a comment on your favorite celebrity’s video? Do you think it may be embarrassing and want to delete it now but cannot find it now amidst so many comments? It is where you can make use of YouTube’s Comment History feature.
YouTube has now added this feature which you can see all the comments you ever posted on YouTube in one place.
How to Use the Comment History feature to Search Comments?
You can see all the comments you have posted in the Comment History in a few quick steps.
- You have to visit YouTube on your desktop and sign in using your Google account.
- Once you sign in, click on the three horizontal lines at the top left corner of your YouTube page.
- Click on the History option and then you will find the option called Comments on the right side of your YouTube History page. Click on it to see all your YouTube comments.

You can also access the Comments History page directly fromhere .
Part 5: How to Find Out Who Posts the Most Comments on Your YouTube Videos?
If you are a creator on YouTube, the comments section becomes very important. Subscribers comment words of praise, encouragement, and feedback which help you grow. You may want to keep track of your most loyal followers. The best way to know that is by knowing who comments most on your videos.
Here is how you can figure out who is your channel super fan on the YouTube mobile app.
- Open YouTube app on your mobile device, and then sign in.
- From your public videos, select one from where you want to gather insights about your subscribers. Click on the video and scroll down to see the comments section.
- Choose a comment by someone whose engagement with your channel you want to check.
- On the left side of the comment, you will see the icon of the person’s channel. Click on it and you will see a pop-up menu with insights about the person. Here, you can learn about the number of comments they have posted on your channel.
This feature is helpful as it lists more than the number of comments made by someone. You can see insights like when they joined YouTube, how many subscribers they have, when someone subscribed to your channel, how many comments anyone posted on your videos, and how many responses they got from you. You can even see glimpses of all their comments. Clicking on them will take you to the whole conversation.
You can also see their channel’s banner from this section, which should tell you their channel’s niche.
Final Thoughts
YouTube is a global platform to share helpful and entertaining videos. The comments section of each video contains informative comments, feedback, and essential timestamps. Searching YouTube comments can help someone understand if the video is valuable or not. For many creators, the comments become the only way to engage with their supporters and create a tight-knit community.
Find feedback or questions. Report offensive comments. If you are a regular YouTube user, use our tips and tricks to search comments quickly and grow your channel.
Richard Bennett
Richard Bennett is a writer and a lover of all things video.
Follow @Richard Bennett
Richard Bennett
Mar 27, 2024• Proven solutions
Are you trying to search for something on a document or a web page? You know how to do that. You use the combination ‘Ctrl + F’ for Windows or ‘Command + F’ for Mac. But searching comments from the YouTube comments section can be tricky because –
- There are many comments on the video, most of which do not load immediately. You can keep scrolling and still not find the desired comment.
- Managing and analyzing the vast number of comments can be difficult for as busy a platform as YouTube.
So, if you want to search YouTube comments quickly, what can you do? We will show you in this blog.
Part 1: Using the Built-in YouTube Studio Feature to Search Comments
How does the built-in YouTube Studio Feature make searching comments on YouTube easier?
Comments are the best way to interact with subscribers on YouTube. YouTube’s Studio is a new addition to help creators filter and respond to comments and create a healthy community . Sometimes, YouTubers also receive hateful and inappropriate comments. You can use the Studio Feature to report or delete those comments as well.
If you have a channel, you can use this feature in some simple steps.
- Visit YouTubewebsite on your desktop and sign in to your YouTube account.
- Go to the top right corner of your homepage, and you will find your profile icon. Click on it and from the drop-down menu, select the YouTube Studio option.
- This will take you to the YouTube Studio home page. On the left side, find and click on the Comments option, and then you will see all comments your YouTube channel has received.
- You can now click on the Filter icon from the comments section and type in the search term directly. Or, you can click the Search from the options, and type in the words you are looking for.
- Click on Apply, and you will see the comments with the keywords you chose.
Besides the comment search feature, the YouTube Studio also has some in-built search filter categories, such as –
Search: Search for comments with particular search terms. You can also search comments posted by a specific channel by using their username as the search term.
Contains questions: Filter the comments which have questions.
Channel member status: Search for comments from the channel members. YouTube channel membership is only available to channels joined YouTube Partner Program.
Subscriber count: Filter comments with the channel subscriber count, you can search for comments from channels with a minimum number of subscribers (from 100-10M).
Response status: Filter the comments to which you have responded or haven’t responded to.
You can combine these additional filters to narrow your comments search for YouTube.
Part 2: Using YCS – YouTube Comment Search Extension
You can use the YouTube Comment Search browser extension supported by Google Chrome to help you search YouTube comments effortlessly. To use it, follow these steps below.
- First, you need to install this extension. You can click this URL https://chrome.google.com/webstore/detail/ycs-youtube-comment-searc/pmfhcilikeembgbiadjiojgfgcfbcoaa?hl=en Or, you can open the Chrome Extensions page, and in the search bar at the top, type in YCS – YouTube Comment Search and press Enter.
- Click on the result that appears and then tap on the Add to Chrome button. This will add the extension to your browser.
- Once you add the extension, openYouTube on your browser. Click on the video where you want to search the comments. You will find the YouTube Comment Search extension below it.
- Tap on ‘Load comments’ and wait till the extension loads all the comments on the video.
- Now type your keywords, press Enter, and YCS will show all comments having the keyword you typed.
Part 3: Using Comments Search for YouTube Extension
If you are looking for an easy method to search YouTube comments, you can use the Comments Search for YouTube extension. Google Chrome supports this extension that allows you to search comments on YouTube without leaving the website.
How can you use this extension to search YouTube comments? Here is a simple step-by-step tutorial.
- First, you need to download the extension fromGithub . Then, locate the file on your computer and unzip it.
- Next, you need to install it in the browser. Open your Chrome browser, and from the top right corner, click on the three vertical dots. You will find the Settings option towards the end of the drop-down menu, and then click on it.
- When the Settings page opens, select Extensions from the panel on the left side of the webpage. This will take you to a new tab.
- On the top right corner of the page, there will be a toggle switch called Developer Mode. Turn it on if it is off.
- Once the Developer Mode is on, you will see three options now. Click on Load unpacked. Locate the downloaded extension file and click on it. Finally, disable Developer Mode.
When you complete these steps, you click on the extension icon to search comments on YouTube. You can also do this by using the combination ‘Ctrl + S’ on the target YouTube page. The extension also includes some advanced features like –
1. Global Mode
In this mode, you can type ‘global: your parameter’ to search all comments on the channel that fit your parameter.
2. Advanced Mode
This mode allows you to enter special commands to carry out an advanced search. Some including typing –
- ‘:’ to look for comments with timestamps
- ‘:all’ to see all comments
- ‘:creator’ to get comments made by the creator
Part 4: How Do You Search Comments You Have Posted on YouTube?
Did you post a comment on your favorite celebrity’s video? Do you think it may be embarrassing and want to delete it now but cannot find it now amidst so many comments? It is where you can make use of YouTube’s Comment History feature.
YouTube has now added this feature which you can see all the comments you ever posted on YouTube in one place.
How to Use the Comment History feature to Search Comments?
You can see all the comments you have posted in the Comment History in a few quick steps.
- You have to visit YouTube on your desktop and sign in using your Google account.
- Once you sign in, click on the three horizontal lines at the top left corner of your YouTube page.
- Click on the History option and then you will find the option called Comments on the right side of your YouTube History page. Click on it to see all your YouTube comments.
You can also access the Comments History page directly fromhere .
Part 5: How to Find Out Who Posts the Most Comments on Your YouTube Videos?
If you are a creator on YouTube, the comments section becomes very important. Subscribers comment words of praise, encouragement, and feedback which help you grow. You may want to keep track of your most loyal followers. The best way to know that is by knowing who comments most on your videos.
Here is how you can figure out who is your channel super fan on the YouTube mobile app.
- Open YouTube app on your mobile device, and then sign in.
- From your public videos, select one from where you want to gather insights about your subscribers. Click on the video and scroll down to see the comments section.
- Choose a comment by someone whose engagement with your channel you want to check.
- On the left side of the comment, you will see the icon of the person’s channel. Click on it and you will see a pop-up menu with insights about the person. Here, you can learn about the number of comments they have posted on your channel.
This feature is helpful as it lists more than the number of comments made by someone. You can see insights like when they joined YouTube, how many subscribers they have, when someone subscribed to your channel, how many comments anyone posted on your videos, and how many responses they got from you. You can even see glimpses of all their comments. Clicking on them will take you to the whole conversation.
You can also see their channel’s banner from this section, which should tell you their channel’s niche.
Final Thoughts
YouTube is a global platform to share helpful and entertaining videos. The comments section of each video contains informative comments, feedback, and essential timestamps. Searching YouTube comments can help someone understand if the video is valuable or not. For many creators, the comments become the only way to engage with their supporters and create a tight-knit community.
Find feedback or questions. Report offensive comments. If you are a regular YouTube user, use our tips and tricks to search comments quickly and grow your channel.
Richard Bennett
Richard Bennett is a writer and a lover of all things video.
Follow @Richard Bennett
Also read:
- [New] Easy Guide Online Tools to Save Your YouTube Videos
- Save While You Teach Hosting Low-Cost Seminars via YouTube
- [Updated] Audiophiles' Choice Premium ASMR Recording Mics
- Keeping Cameras Steady in Motion Landscapes
- Seamless Blend of Text & Video Without Payment
- [New] Evaluating the Long-Term Benefits of Purchasing Video Traction
- 2024 Approved Channel Confidence Tips for Trending on YouTube
- Key Elements in ASMR Video Content
- Proven YouTube Tactics for Maximum Impact – Here's What You Need to Know
- 2024 Approved 20 Must-Watch YouTube Music Bands
- [New] Essentials YouTube's Premier Music Bands
- Ultimate 10 Audio Elevators on Computers/Mobile
- Navigating Video Migration YouTube to Dailymotion Process
- The Art of Edible Media Recipe Tutorials
- [Updated] Controlling YouTube's Playback Speed - Mobile and PC
- Step by Step Guide to Opposite List Orders on YT
- Jittery Text Magic Two Dynamic Techniques Explored
- In 2024, Discover the Power of 5 Editors Beyond Youtube's Boundaries
- 2024 Approved Capture the Essence Extracting YouTube Audio Directly
- From Device Capture to Viral Content YouTube's Upload Guide
- Exposed The Hazards of Fake Follower Purchases on YouTube
- [Updated] Efficient Storytelling in Product Revelations
- Essential List 5 Leading YouTube Shortened URL Services for 2024
- Achieving a Noiseless Presence on Social Video Platforms for 2024
- [Updated] A New Take on Favorite Movies - #7 Alternatives
- Gamers' Picks Best Recording Software
- [Updated] A Beginner's Roadmap to Professional Sports Edits
- [Updated] Effortless Repetition Replay Your YouTube Videos via TV Connection
- [New] Does YouTube Offer Frequent Payments to You?
- [New] Earning Edge Exploiting YouTube Studio for Global Viewers
- [Updated] Craft a Unique Channel Look for Free
- Direct Download Destiny Ultimate Guide to Mp3 Makers
- 2024 Approved Capturing Crisp Sound A Guide to Superior Audio Recording
- [New] Conduct Cost-Effective Seminars Using YouTube
- 2024 Approved Digital Dazzle Fine-Tuning Video Chrominance for Beauty
- Decoding the Payment Structure on YouTube for 2024
- In 2024, Access Exclusive Video Artwork – Free, Flawless, and Fast
- [Updated] Achieving Cohesion in Content with FlV Video Integration
- Break Down Top 7 Video Streaming Tools that Revolutionize YouTube Broadcasts (iPhones/Android)
- Universal Creatives for Social Media Hubs
- Striking Visuals A Deep Dive Into Optimal YouTube Thumbnail Sizes
- Essential Guide Top 10 Free YouTube-to-MP3 Tools for 2024
- Biggest FIFA Visuals YouTube Insights Graphed for 2024
- Diving Into the World of Haul Video Content
- Essential Tips for FREE YouTube Video Transcriptions
- [Updated] Boosting Views From Zeros The Top 10 Reasons & Fixes
- [New] Ensuring Online Safety The Stepwise Process of Reporting Unwanted Behavior on Discord
- Looking For A Location Changer On Samsung Galaxy A34 5G? Look No Further | Dr.fone
- How to add my signature to .docm file
- Updated 2024 Approved Get Noticed on Facebook The Simple Guide to Optimizing Your Video Aspect Ratios
- In 2024, Unlock Your Apple iPhone 11 Pro Max in Minutes with ICCID Code Everything You Need to Know
- Prime Choices Top 10 Best Vectors Websites
- In 2024, How to Cast Motorola Edge 40 Pro to Computer for iPhone and Android? | Dr.fone
- 2024 Approved Guiding Principles of Track Matte and Tracking in Adobe After Effects
- [Updated] In 2024, Filter Phenomena Social Media Hits
- Updated More Than Just an Alternative 10+ Video Editors to Try
- 2024 Approved The Top 10 Screenshot Tools of 2021
- [Updated] 2024 Approved Time-Saving Tricks for PowerPoint Projections
- Decoding the Best Android Photography Software - Is PickU King?
- [Updated] 2024 Approved SonicArchive Pro Downloads & Analysis
- Updated 2024 Approved Listen Up, Write It Down Comprehensive Guide to Free Audio-to-Text Apps for Android and iOS
- How to Share Location in Messenger On OnePlus Nord CE 3 5G? | Dr.fone
- The Top 5 Android Apps That Use Fingerprint Sensor to Lock Your Apps On Infinix Note 30
- How To Delete iCloud Account Remove Your Apple ID Permanently On iPhone 6s Plus
- Revolutionize Your Facecam Video Experience
- Different Methods for Resetting Tecno Spark 10C Phones with Screen Locked and Not | Dr.fone
- 2024 Approved Capturing Games A Guide to Options Other Than Game Bar
- Updated What Is an AI Text Generator?
- In 2024, How to Reset your Oppo A2 Lock Screen Password
- [New] Crafting a Story Unique to You Amongst TikTok Titans for 2024
- 2024 Approved Rotate Your 3GP Videos with Ease Best Free Tools of the Year
- 2024 Approved Explore Revolutionary Meeting Platforms That Cost Nothing
- 3 Smart and Simple Ways to Change Home Address on Apple iPhone 15 Pro Max | Dr.fone
- How To Unlock Stolen Apple iPhone 12 Pro In Different Conditionsin
- A Complete Guide to the Best Brand Story Videos for 2024
- How to Check Distance and Radius on Google Maps For your Google Pixel 8 Pro | Dr.fone
- Title: "Optimize Your YouTube Videos Faster Rendering, Smarter Uploads"
- Author: Kevin
- Created at : 2024-05-25 16:09:54
- Updated at : 2024-05-26 16:09:54
- Link: https://youtube-videos.techidaily.com/optimize-your-youtube-videos-faster-rendering-smarter-uploads/
- License: This work is licensed under CC BY-NC-SA 4.0.
