
:max_bytes(150000):strip_icc():format(webp)/On-Line-Job-Search-aa2565e859bd43a2aa34dfa1537dbd50.jpg)
"No-Money-Down Mics The Frugal Filmmaker's List"
No-Money-Down Mics: The Frugal Filmmaker’s List
Cheap Microphones for Youtubers on a Budget

Richard Bennett
Dec 30, 2022• Proven solutions
An expensive microphone doesn’t mean it is the best option — at least, not for YouTubers. Without professional experience or additional equipment, having a $1000 studio microphone could be wasted money.
If you are on a budget or new to YouTube, and what you want is to improve the audio quality of your video gradually, you should look into the cheaper options first.
In this article, I will highlight microphones in 3 price ranges.
We will have a look at each of these microphones, their pros, and cons, and then you can decide which one will be best for your channel and your budget.
As for keeping with your financial needs, we aren’t going to be looking at any XLR microphones, as they will require an audio interface, thus increasing your price range. The microphones in this list will be plug-and-plays, and you will only need the basic audio recording skills to get started.
Disclaimer: Prices are subjected to change.
YouTube Microphones for Under $20
BOYA BY-M1 - $16.99
TheBOYA BY-M1 is a lavalier microphone (a hand-free mic that clips onto your clothing) that connects to smartphones, DSLR, computers, and other audio recorders.

Pro: As an omnidirectional condenser microphone, it will be able to pick up audio from 360 degrees, and with 20 feet (6 meters) of cable, you can have a significant range movement even if you are connected to the camera.
The BOYA BY-M1 is a terrific choice for YouTubers on a budget that is frequently making videos on the go. It’s easy to carry around, and the ability to simply connect to a smartphone means you can set up and shoot your video on the fly.
Con: This mic, although it has a great range, can also pick up subtle movements you make as it is clipped onto you. Not great if there is a lot of action in your videos.
TONOR PC Microphone Computer Condenser - $15.99
The TONOR is an easy-to-setup condenser microphone that you can connect to your computer via USB and start recording in seconds.

Pro: The value of this microphone is in its ease of use. With a flexible, foldable stand, you can adjust the TONOR PC microphone the way it suits your setup. The legs of the stand are retractable, which makes it easy for you to store. If you are a gamer or creating videos primarily from your desk, this is a perfectly suitable microphone for you to start your YouTube journey with.
Con: The audio quality of this mic can help you get the job done, but it won’t blow you away. The cable is attached to the microphone and is 6.5 feet (2 meters) long, which isn’t a wide range. It’s pretty much restricted to the desk with your computer. This microphone has limitations, and high-achieving YouTubers will certainly grow out of it.
YouTube Microphones for Under $50
Purple Panda Lavalier Microphone - $23.99
The Purple Panda lavalier microphone comes with multiple adapters and is compatible with nearly all devices, including smartphone, DSLR, computers, and even GoPro cameras. The only device where you will need anadditional adapter is if you have an iPhone 7.

Pro: This microphone is a versatile option for YouTubers who create a variety of content. It doesn’t require any battery and is powered by whatever device it is plugged into, which is great for YouTubers with already so many devices to keep charged.
Con: Much like the BOYA BY-M1, the Purple Panda, as it is clipped onto your lapel or shirt collar, will capture the sound of your clothes brushing against it if too much movement occurs.
Samson Go Mic Portable USB Condenser Microphone - $37.73
The Samson Go microphone is the kind of mic that can fit in your pocket and be taken with you anywhere.

Pro: This microphone has both a cardioid and an omnidirectional mode. This means that you can choose to have your microphone focused more on the subject speaking by switching to cardio or switch to Omni-directional to capture audio from the entire surrounding.
It is designed to be able to clip onto a flat surface such as your computer screen. This allows you to place the microphone on different levels to record.
Con: Because of its unique design and the portability of the device, it will suffer wear-and-tear faster. Attention to storage is necessary to increase the lifespan of the device.
XIAOKOA Mini Condenser Microphone with Stand - $24.99
TheXIAOKOA portable mini condenser microphone is compatible with smartphones, computers, and any devices using 3.5mm recording jacks.

Pro: With a cardioid pickup, this condenser microphone will do a fine job picking up vocals. If you are a YouTuber who does a lot of singing videos, this is definitely an affordable microphone to check out.
Con: This microphone, perhaps primarily designed for karaoke, has an echo feature that, although might create new dimensions to your vocals, may not be desired for your YouTube video. This feature can be problematic, as it could spoil your recording.
TAKSTAR SGC-598 - $26.93
The TAKSTAR SGC is a condenser microphone, and it can be fixed onto your camera, which simplifies your YouTube setup. This camera can plug directly into your camera, reducing the audio tracks you need to manage when editing.

Pro: The camera-mounted microphone has a shock-resistant design that reduces noise when the camera is moved. The cardioid microphone will be able to pick up audio in the direction it is pointed in, reducing noise capturing from behind the camera. This is a good microphone for vlogging or interviews.
Con: The TAKSTAR SGC requires one AA battery, so you’ll have to remember to carry a backup every time you film.
Limited to a vocal subject standing 4-5 feet away, any more and the microphone will be hard-pressed to pick up the audio without capturing a lot of surround audio.
The design requires it to be mounted to the camera. If you want to separate it from the camera and still have it recorded, a bit of creativity is required to keep it standing.
YouTube Microphones for Under $100
Behringer C-1U - $59.99
The Behringer C-1U is a condenser microphone with a cardioid pickup pattern that connects to your computer via USB.

Pro: This microphone has a solid metal build and has a good weight. It is quick and easy to set up and is a good microphone for anyone wanting a simple solution for better audio on YouTube.
Con: A pop filter is recommended for this microphone as it picks up a lot of popping sounds when the subject speaks.
Blue Microphones Snowball iCE - $64.94
The Blue Microphones Snowball iCE is a cardioid condenser microphone that connects to your computer via USB.

Pro: The Snowball iCE is a plug-and-play microphone that is super easy to use and doesn’t require any additional battery. Simply connect it to the computer, and you are ready to record your voice. It captures clear and crisp audio for a single voice or single-person recording.
Con: The range of this microphone is not that great; you’ll have to be close and be speaking directly into the microphone to get the best audio. It is not ideal for recording moving subjects or those who are further than 2-3 feet away.
Marantz Professional MPM-1000U - $57.06
The Marantz Professional MPM-1000U is a condenser microphone that records in a cardioid polar pattern that connects to your computer via USB.

Pro: This budget microphone has excellent all-metal construction. It has a plug-and-play setup and doesn’t require any drivers or installations. It records great instrumentals and would recommend it to those who are recording music for YouTube.
Con: May pick up extraneous noises if you are recording vocals while there are movements in your surrounding, but otherwise, this is an excellent microphone in its price range.
Final Thoughts
When looking for microphones under $100, the difference in audio quality is not going to be drastic. What you need to consider is how you are going to be using this piece of equipment.
If your YouTube videos consist of you in a quiet studio environment, I would recommend the Marantz Professional MPM-1000U .
However, if you will be recording on the go and require your hands to be free in the scene, I recommend getting a lavalier microphone such as the Purple Panda .
But, if you are going to be recording other people, in addition to yourself, I’d say go with the TAKSTAR SGC as it will give you more audio control in busy environments.
What are you looking for in a budget microphone? Let us know in the comments below.
If you want to find a video editing solution that empowers your imagination and creativity yet takes less effort, please try this robust and user-friendly video editing software Wondershare Filmora. It provides special effects, stock photo & video, sound library, etc., which will definitely enhance your productivity and helps to make money by making videos much accessible.


Richard Bennett
Richard Bennett is a writer and a lover of all things video.
Follow @Richard Bennett
Richard Bennett
Dec 30, 2022• Proven solutions
An expensive microphone doesn’t mean it is the best option — at least, not for YouTubers. Without professional experience or additional equipment, having a $1000 studio microphone could be wasted money.
If you are on a budget or new to YouTube, and what you want is to improve the audio quality of your video gradually, you should look into the cheaper options first.
In this article, I will highlight microphones in 3 price ranges.
We will have a look at each of these microphones, their pros, and cons, and then you can decide which one will be best for your channel and your budget.
As for keeping with your financial needs, we aren’t going to be looking at any XLR microphones, as they will require an audio interface, thus increasing your price range. The microphones in this list will be plug-and-plays, and you will only need the basic audio recording skills to get started.
Disclaimer: Prices are subjected to change.
YouTube Microphones for Under $20
BOYA BY-M1 - $16.99
TheBOYA BY-M1 is a lavalier microphone (a hand-free mic that clips onto your clothing) that connects to smartphones, DSLR, computers, and other audio recorders.
Pro: As an omnidirectional condenser microphone, it will be able to pick up audio from 360 degrees, and with 20 feet (6 meters) of cable, you can have a significant range movement even if you are connected to the camera.
The BOYA BY-M1 is a terrific choice for YouTubers on a budget that is frequently making videos on the go. It’s easy to carry around, and the ability to simply connect to a smartphone means you can set up and shoot your video on the fly.
Con: This mic, although it has a great range, can also pick up subtle movements you make as it is clipped onto you. Not great if there is a lot of action in your videos.
TONOR PC Microphone Computer Condenser - $15.99
The TONOR is an easy-to-setup condenser microphone that you can connect to your computer via USB and start recording in seconds.
Pro: The value of this microphone is in its ease of use. With a flexible, foldable stand, you can adjust the TONOR PC microphone the way it suits your setup. The legs of the stand are retractable, which makes it easy for you to store. If you are a gamer or creating videos primarily from your desk, this is a perfectly suitable microphone for you to start your YouTube journey with.
Con: The audio quality of this mic can help you get the job done, but it won’t blow you away. The cable is attached to the microphone and is 6.5 feet (2 meters) long, which isn’t a wide range. It’s pretty much restricted to the desk with your computer. This microphone has limitations, and high-achieving YouTubers will certainly grow out of it.
YouTube Microphones for Under $50
Purple Panda Lavalier Microphone - $23.99
The Purple Panda lavalier microphone comes with multiple adapters and is compatible with nearly all devices, including smartphone, DSLR, computers, and even GoPro cameras. The only device where you will need anadditional adapter is if you have an iPhone 7.
Pro: This microphone is a versatile option for YouTubers who create a variety of content. It doesn’t require any battery and is powered by whatever device it is plugged into, which is great for YouTubers with already so many devices to keep charged.
Con: Much like the BOYA BY-M1, the Purple Panda, as it is clipped onto your lapel or shirt collar, will capture the sound of your clothes brushing against it if too much movement occurs.
Samson Go Mic Portable USB Condenser Microphone - $37.73
The Samson Go microphone is the kind of mic that can fit in your pocket and be taken with you anywhere.
Pro: This microphone has both a cardioid and an omnidirectional mode. This means that you can choose to have your microphone focused more on the subject speaking by switching to cardio or switch to Omni-directional to capture audio from the entire surrounding.
It is designed to be able to clip onto a flat surface such as your computer screen. This allows you to place the microphone on different levels to record.
Con: Because of its unique design and the portability of the device, it will suffer wear-and-tear faster. Attention to storage is necessary to increase the lifespan of the device.
XIAOKOA Mini Condenser Microphone with Stand - $24.99
TheXIAOKOA portable mini condenser microphone is compatible with smartphones, computers, and any devices using 3.5mm recording jacks.
Pro: With a cardioid pickup, this condenser microphone will do a fine job picking up vocals. If you are a YouTuber who does a lot of singing videos, this is definitely an affordable microphone to check out.
Con: This microphone, perhaps primarily designed for karaoke, has an echo feature that, although might create new dimensions to your vocals, may not be desired for your YouTube video. This feature can be problematic, as it could spoil your recording.
TAKSTAR SGC-598 - $26.93
The TAKSTAR SGC is a condenser microphone, and it can be fixed onto your camera, which simplifies your YouTube setup. This camera can plug directly into your camera, reducing the audio tracks you need to manage when editing.
Pro: The camera-mounted microphone has a shock-resistant design that reduces noise when the camera is moved. The cardioid microphone will be able to pick up audio in the direction it is pointed in, reducing noise capturing from behind the camera. This is a good microphone for vlogging or interviews.
Con: The TAKSTAR SGC requires one AA battery, so you’ll have to remember to carry a backup every time you film.
Limited to a vocal subject standing 4-5 feet away, any more and the microphone will be hard-pressed to pick up the audio without capturing a lot of surround audio.
The design requires it to be mounted to the camera. If you want to separate it from the camera and still have it recorded, a bit of creativity is required to keep it standing.
YouTube Microphones for Under $100
Behringer C-1U - $59.99
The Behringer C-1U is a condenser microphone with a cardioid pickup pattern that connects to your computer via USB.
Pro: This microphone has a solid metal build and has a good weight. It is quick and easy to set up and is a good microphone for anyone wanting a simple solution for better audio on YouTube.
Con: A pop filter is recommended for this microphone as it picks up a lot of popping sounds when the subject speaks.
Blue Microphones Snowball iCE - $64.94
The Blue Microphones Snowball iCE is a cardioid condenser microphone that connects to your computer via USB.
Pro: The Snowball iCE is a plug-and-play microphone that is super easy to use and doesn’t require any additional battery. Simply connect it to the computer, and you are ready to record your voice. It captures clear and crisp audio for a single voice or single-person recording.
Con: The range of this microphone is not that great; you’ll have to be close and be speaking directly into the microphone to get the best audio. It is not ideal for recording moving subjects or those who are further than 2-3 feet away.
Marantz Professional MPM-1000U - $57.06
The Marantz Professional MPM-1000U is a condenser microphone that records in a cardioid polar pattern that connects to your computer via USB.
Pro: This budget microphone has excellent all-metal construction. It has a plug-and-play setup and doesn’t require any drivers or installations. It records great instrumentals and would recommend it to those who are recording music for YouTube.
Con: May pick up extraneous noises if you are recording vocals while there are movements in your surrounding, but otherwise, this is an excellent microphone in its price range.
Final Thoughts
When looking for microphones under $100, the difference in audio quality is not going to be drastic. What you need to consider is how you are going to be using this piece of equipment.
If your YouTube videos consist of you in a quiet studio environment, I would recommend the Marantz Professional MPM-1000U .
However, if you will be recording on the go and require your hands to be free in the scene, I recommend getting a lavalier microphone such as the Purple Panda .
But, if you are going to be recording other people, in addition to yourself, I’d say go with the TAKSTAR SGC as it will give you more audio control in busy environments.
What are you looking for in a budget microphone? Let us know in the comments below.
If you want to find a video editing solution that empowers your imagination and creativity yet takes less effort, please try this robust and user-friendly video editing software Wondershare Filmora. It provides special effects, stock photo & video, sound library, etc., which will definitely enhance your productivity and helps to make money by making videos much accessible.
Richard Bennett
Richard Bennett is a writer and a lover of all things video.
Follow @Richard Bennett
Enhancing YouTube Presence with Custom Images
How To Add Custom Thumbnails to Your YouTube Videos
Richard Bennett
Mar 27, 2024• Proven solutions
YouTube custom thumbnails are a great way to get people’s attention to your YouTube video. It’s a pretty simple process but if you are wondering how to create a thumbnail and add the thumbnail to YouTube video and customize it with the correct size. You have come to the right place. While in this article, I will show you how to create and add a thumbnail to a YouTube video and how to customize the YouTube video thumbnail. Follow these easy steps below and add eyecatching customed thumbnails to your YouTube videos in no time.
- Part 1: Create and Add Custom Thumbnails to YouTube
- Part 2: Tools to Create Custom YouTube Video Thumbnails
- Part 3: How to Change A Thumbnail On YouTube
- Part 4: Things You Need to Know Before Making a YouTube Custom Thumbnail
- Part 5: Tips on How to Make Good YouTube Thumbnails to Get More Clicks
- Part 6: YouTube Thumbnail FAQs
How To Add Custom Thumbnails to Your YouTube Videos [Steps, Tools and Tips]
We have just made a video tutorial about how to make a YouTube video thumbnail, check it below to find out the tips and tricks of making customized YouTube thumbnail.
Part 1: How to Make a Thumbnail for YouTube and Add Custom Thumbnails to YouTube
After you’ve verified your account and made your thumbnail, it’s finally time to upload it to your video and make a custom thumbnail. To do this, go to Creator Studio and then Video Manager. You’ll see a button labeled “Edit” next to each video, and an arrow pointing down. Click Thumbnail Editor.
In Thumbnail Editor, you can use the still images in the video as a thumbnail, choose a solid background color for the thumbnail, or add other images from your computer. I will show you the steps of how to customize the video still as a video thumbnail.
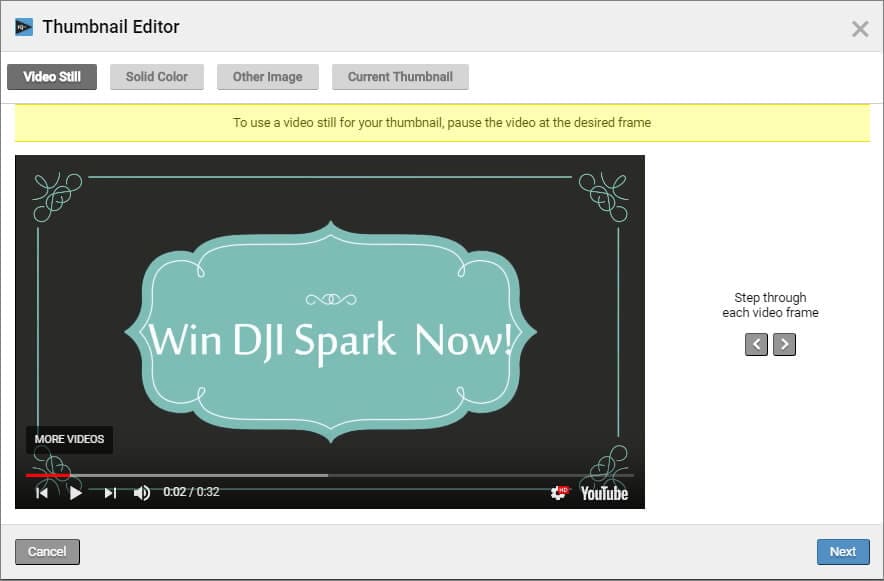
1. Preview the video and choose the target video still. You can click the Playback button and check the video and pause it at the desired frame. Or, you can step through each frame by clicking the Preview Frame button and Next Frame icon. Click Next to continue.
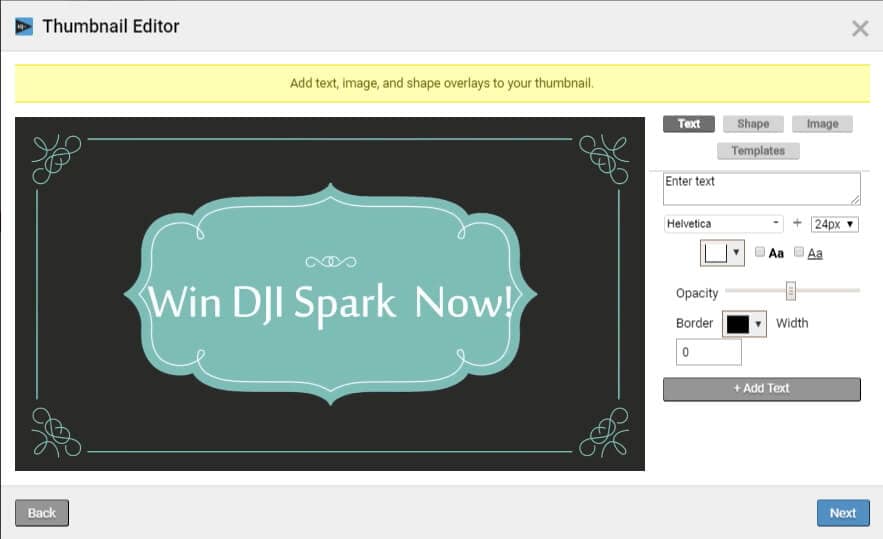
2. And now, you can add text, image and shape overlays to the thumbnail. You can change the text font, size, opacity and more.
3. Click Next to save the thumbnail and you will see how the thumbnail displays on different platforms such as YouTube, Facebook and Twitter. Click Save to save the video thumbnail.
In this way, you can add a custom thumbnail to the new videos and change the video thumbnail of the previously uploaded videos.
Part 2: Thumbnail Makers to Create Custom YouTube Thumbnails
Of course, you can use some of the best tools to make a YouTube video thumbnail. In this part, we will show you some of the best tools to create custom YouTube thumbnails.
Download Mac Version ](https://tools.techidaily.com/wondershare/filmora/download/ )
1. Create YouTube Thumbnail with Online solution - Canva
Canva is a free, powerful online image editing program with tons of great templates to get you started. One of their templates just happens to be YouTube thumbnails. Open Canva and select the “YouTube Thumbnail” design type. Use your own photo or choose from a huge library, then add text and effects to really make it stand out. Save and share — easy as that.
Check this video tutorial to see how to Make a Youtube Thumbnail using Canva.
You may also like: Best online Photo Editor
2. Design YouTube thumbnail with a Desktop solution - Gimp
Gimp is one of the most popular image editing programs around for one very simple reason: it’s powerful and free! Where Canva uses a lot of templates, Gimp gives you absolute, full control over how you want your image to look. Make a 1280x720 image and start putting together your eye-catching thumbnail exactly how you want to.
Check this video tutorial to see how to make professional Thumbnails for YouTube Videos with Gimp:
Part 3: How to Change A Thumbnail On YouTube
Note: YouTube allows verified YouTube accounts (accounts that provided YouTube with a working phone number) to upload custom thumbnail images and change them accordingly.
In this part, we’ll be going over how to change a thumbnail image on YouTube. There are pictures to make it easy to follow along.
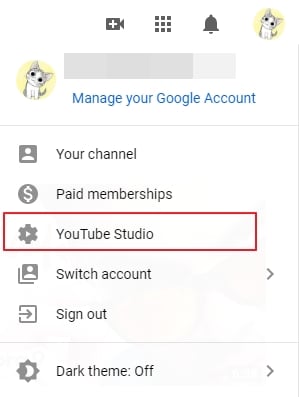
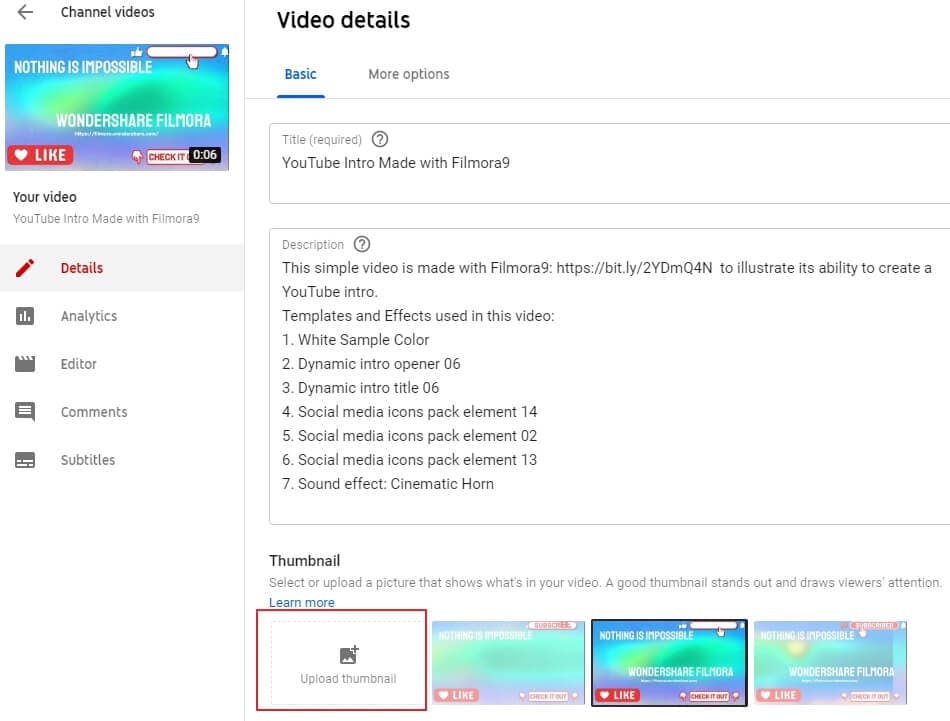
- After signing into YouTube with your Google account, click on your profile on the top right corner. Click on YouTube Studio from the drop-down menu.
- On the left side of the page, click on Videos and then find your video and click on the details button.
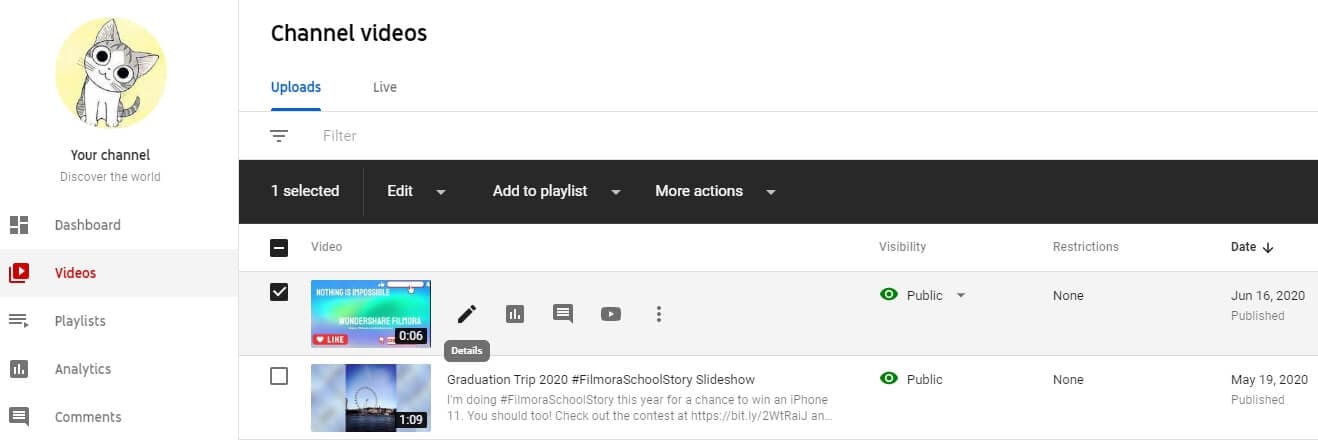
- Find the Thumbnail section in the basic video details tab, and then click the Upload thumbnail to select the image that you want to upload.
- Finally, click on the Save button on the right upper corner. And just like that, in seven easy steps, we’re done changing the thumbnail of a YouTube video.
If you don’t have an image to upload but you want to check out some online resources to make your own, check out our Top YouTube Thumbnail Makers .
Part 4: Things You Need to Know Before Making a Custom Thumbnail
- About the proper YouTube video thumbnail size: Your thumbnail should be 1280x720 pixels in size and be less than 2MB. The minimum width of the image is 640 pixels.
- About the YouTube Image thumbnail format: Use .JPG, .PNG, .GIF or .BMP files for your thumbnail image.
- You’ll want your thumbnails to stand out. Bright colored text is a simple, easy way to draw people’s attention. Red, white, yellow, or orange are all popular choices.
- You can even do a little homework to see what colors others are using for similar videos to yours, and then choose different colors to stand out.
One word of warning: your thumbnail should be related to the content of your video. Misleading thumbnail images, if reported, will reflect poorly on your channel. You’ll get a negative rating in the community status part of your channel. This can actually remove your ability to use custom thumbnails, so keep it honest!
You may also like: How to Make YouTube Channel Art
To make a creative YouTube video, you may also need a powerful video editing software. Check how to edit a YouTube video in Filmora video editor and download it to try.
You may also like: Best video editing software for YouTube
Part 5: Tips on How to Make Good YouTube Thumbnails - Get More Clicks
The thumbnails of your videos play a huge role in convincing people to watch them; a good YouTube thumbnail will get you more views and more potential subscribers. This part will give you 6 tips on creating thumbnails that help grow your channel. Now let’s learn how to make thumbnails using Wondershare PixStudio.
1. Stay On Topic
Your thumbnail should tell a story; it should be clear from looking at it what viewers will get out of watching the video, be it knowledge or entertainment. If your thumbnail sets expectations that your video doesn’t deliver on, people will click away quickly. You may get views quickly, but you won’t get much watch time. That will tell YouTube’s search algorithm ‘people aren’t getting what they want from this, rank it lower’. That leads to fewer views over time, and gives the people who do manage to find your video a negative opinion of your channel.
Very few people intentionally use thumbnails that have nothing to do with the content of their videos – i.e, most people understand not to use a picture of a kitten in the thumbnail for their tech review, unless maybe their kitten is the one doing the review (which would be adorable, someone should do that). People who want serious advice won’t click, and people who click to see a kitten will click away fast.

This thumbnail had better be for a kitten’s iPhone review video or people will click away. Fast.
A mistake a lot of creators do make is creating a thumbnail that is meant to evoke an emotion which the video itself does not justify. For example, if you see a picture of a YouTuber looking nervous alongside text that reads ‘My Secret’, you will think they are going to share something deeply personal. You will be curious, and you may even be worried about them. You’ll probably click. Then, if their secret is that they don’t like pineapple on pizza, you’ll probably be angry. This technique gets clicks, but not a lot of watch time and it will lose you subs in the long run.
2. Don’t Be Mysterious
A good thumbnail doesn’t make people guess. Your thumbnail should tell people what’s in your video, not make them wonder about it. People want to know what they’re being asked to spend time watching.
Often, they will be looking for the answer to a specific question and will completely ignore anything that doesn’t show – in the thumbnail – that it has their answer.
Sometimes big channels can get away with stuff like this, because large portions of their audiences are interested in them as people and will already be curious about anything they post. This technique will not bring in new viewers, though.

If this came up in a search for ‘smoky eye tutorial’, would you click it?
When people want answers, they want to feel confident that they video they click on will have those answers. If you have great content, then let people know it!
3. People Like People
Viewers are more likely to click on a thumbnail if they feel a connection when they look at it. One of the best ways to create a feeling of connection is through eye contact, and you can apply that principle to your YouTube thumbnails easily.
Just make sure you’re in them.
You can either compose a photo to use as your thumbnail, or use a screenshot from your video. Ideally, the image of you will convey the emotional tone of the video and tell potential viewers what it is about, besides you.
So, if you want to post a funny video that is also about making brownies, maybe a picture of you smiling while holding up a tray of brownies would be a better direction than just showing the brownies?
4. Check Out The Competition
Before you post your video, type your topic into YouTube’s search engine and see what comes up. This will give you insight into what kinds of thumbnails are performing well for other people, as well as what you can do to stand out in comparison.
Phil starts talking about thumbnails at 6:09, and he has great tips on checking out your competition!
For example, if all five of the top-ranked videos for the search ‘how to build a cabinet’ show images of the YouTuber smiling while holding a power tool, then your thumbnail for a video on the same topic should also be a picture of you smiling and holding a power tool. You know that works, so why not do it?
5. Use Color in Interesting Ways
You want to use colors that will help you stand out from the other search results. While checking out your competition if you notice that all the people in the other thumbnails are wearing black or navy blue, it will be a good idea for you to wear a brighter color for your shoot to grab a bit more attention.
Beyond simply using colors that are different from other people’s colors, you should consider the emotions different colors trigger.
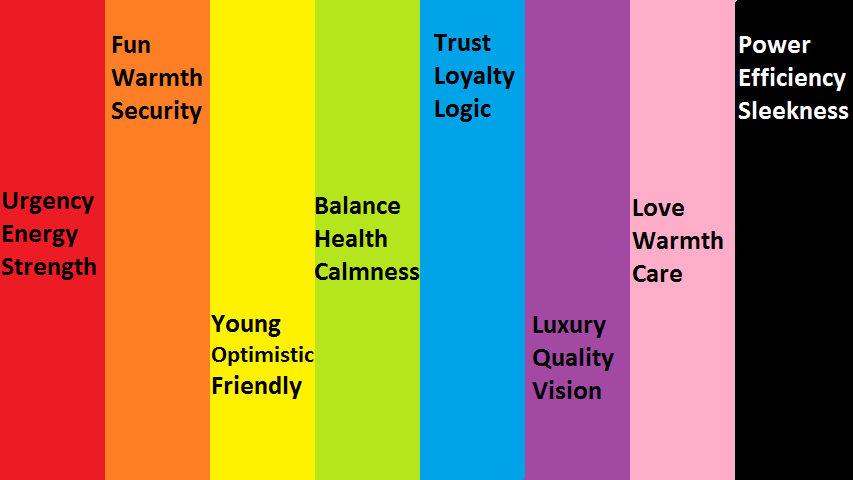
Maybe don’t use a lot of green and yellow in the thumbnail for your angry video rant?
6. Make Your Text Huge
Usually, you’ll want to use a bit of text in your thumbnail. It might be the full title of your video, or just a keyword or phrase. You don’t want to use a full sentence because you won’t have room for it if you’re using huge text.
The reason you should use huge text is so that people can read it. Remember that when people see your thumbnail in their search results, it will be much smaller than it will look while you are creating it. Text that looks big enough while you are creating your thumbnail will be much smaller when people are actually trying to read it, and that goes double for viewers watching on their small smartphone screens.
Frequently Asked Questions about YouTube Thumbnail
1. What is YouTube Thumbnail?
When you upload a video on YouTube, YouTube gives you three images to choose from in the selection of your video’s thumbnail image. These three images are just freeze-frame snapshots from different parts of your video, which may not tell your viewers what your video is really all about.
2. Can You Change YouTube Thumbnail After Publishing?
Yes, you can replace the auto-generated thumbnail with the customized thumbnail you like. But YouTube only allows verified YouTube accounts to upload custom thumbnail images.
3. How Long Does It Take for a Thumbnail to Change on YouTube?
Normally, if you have a good internet connection, you can see the thumbnail is changed within 10 seconds.
4. Why YouTube Thumbnail is Important?
When you get more people watching your video for longer, it increases your watch time and tells YouTube’s search algorithm ‘people like this, rank it higher’. Being ranked higher gets you more views, and even more watch time. It’s a wonderful cycle that all begins with a great thumbnail (paired with a good title and the right tags).
Richard Bennett
Richard Bennett is a writer and a lover of all things video.
Follow @Richard Bennett
Richard Bennett
Mar 27, 2024• Proven solutions
YouTube custom thumbnails are a great way to get people’s attention to your YouTube video. It’s a pretty simple process but if you are wondering how to create a thumbnail and add the thumbnail to YouTube video and customize it with the correct size. You have come to the right place. While in this article, I will show you how to create and add a thumbnail to a YouTube video and how to customize the YouTube video thumbnail. Follow these easy steps below and add eyecatching customed thumbnails to your YouTube videos in no time.
- Part 1: Create and Add Custom Thumbnails to YouTube
- Part 2: Tools to Create Custom YouTube Video Thumbnails
- Part 3: How to Change A Thumbnail On YouTube
- Part 4: Things You Need to Know Before Making a YouTube Custom Thumbnail
- Part 5: Tips on How to Make Good YouTube Thumbnails to Get More Clicks
- Part 6: YouTube Thumbnail FAQs
How To Add Custom Thumbnails to Your YouTube Videos [Steps, Tools and Tips]
We have just made a video tutorial about how to make a YouTube video thumbnail, check it below to find out the tips and tricks of making customized YouTube thumbnail.
Part 1: How to Make a Thumbnail for YouTube and Add Custom Thumbnails to YouTube
After you’ve verified your account and made your thumbnail, it’s finally time to upload it to your video and make a custom thumbnail. To do this, go to Creator Studio and then Video Manager. You’ll see a button labeled “Edit” next to each video, and an arrow pointing down. Click Thumbnail Editor.
In Thumbnail Editor, you can use the still images in the video as a thumbnail, choose a solid background color for the thumbnail, or add other images from your computer. I will show you the steps of how to customize the video still as a video thumbnail.
1. Preview the video and choose the target video still. You can click the Playback button and check the video and pause it at the desired frame. Or, you can step through each frame by clicking the Preview Frame button and Next Frame icon. Click Next to continue.
2. And now, you can add text, image and shape overlays to the thumbnail. You can change the text font, size, opacity and more.
3. Click Next to save the thumbnail and you will see how the thumbnail displays on different platforms such as YouTube, Facebook and Twitter. Click Save to save the video thumbnail.
In this way, you can add a custom thumbnail to the new videos and change the video thumbnail of the previously uploaded videos.
Part 2: Thumbnail Makers to Create Custom YouTube Thumbnails
Of course, you can use some of the best tools to make a YouTube video thumbnail. In this part, we will show you some of the best tools to create custom YouTube thumbnails.
Download Mac Version ](https://tools.techidaily.com/wondershare/filmora/download/ )
1. Create YouTube Thumbnail with Online solution - Canva
Canva is a free, powerful online image editing program with tons of great templates to get you started. One of their templates just happens to be YouTube thumbnails. Open Canva and select the “YouTube Thumbnail” design type. Use your own photo or choose from a huge library, then add text and effects to really make it stand out. Save and share — easy as that.
Check this video tutorial to see how to Make a Youtube Thumbnail using Canva.
You may also like: Best online Photo Editor
2. Design YouTube thumbnail with a Desktop solution - Gimp
Gimp is one of the most popular image editing programs around for one very simple reason: it’s powerful and free! Where Canva uses a lot of templates, Gimp gives you absolute, full control over how you want your image to look. Make a 1280x720 image and start putting together your eye-catching thumbnail exactly how you want to.
Check this video tutorial to see how to make professional Thumbnails for YouTube Videos with Gimp:
Part 3: How to Change A Thumbnail On YouTube
Note: YouTube allows verified YouTube accounts (accounts that provided YouTube with a working phone number) to upload custom thumbnail images and change them accordingly.
In this part, we’ll be going over how to change a thumbnail image on YouTube. There are pictures to make it easy to follow along.
- After signing into YouTube with your Google account, click on your profile on the top right corner. Click on YouTube Studio from the drop-down menu.
- On the left side of the page, click on Videos and then find your video and click on the details button.
- Find the Thumbnail section in the basic video details tab, and then click the Upload thumbnail to select the image that you want to upload.
- Finally, click on the Save button on the right upper corner. And just like that, in seven easy steps, we’re done changing the thumbnail of a YouTube video.
If you don’t have an image to upload but you want to check out some online resources to make your own, check out our Top YouTube Thumbnail Makers .
Part 4: Things You Need to Know Before Making a Custom Thumbnail
- About the proper YouTube video thumbnail size: Your thumbnail should be 1280x720 pixels in size and be less than 2MB. The minimum width of the image is 640 pixels.
- About the YouTube Image thumbnail format: Use .JPG, .PNG, .GIF or .BMP files for your thumbnail image.
- You’ll want your thumbnails to stand out. Bright colored text is a simple, easy way to draw people’s attention. Red, white, yellow, or orange are all popular choices.
- You can even do a little homework to see what colors others are using for similar videos to yours, and then choose different colors to stand out.
One word of warning: your thumbnail should be related to the content of your video. Misleading thumbnail images, if reported, will reflect poorly on your channel. You’ll get a negative rating in the community status part of your channel. This can actually remove your ability to use custom thumbnails, so keep it honest!
You may also like: How to Make YouTube Channel Art
To make a creative YouTube video, you may also need a powerful video editing software. Check how to edit a YouTube video in Filmora video editor and download it to try.
You may also like: Best video editing software for YouTube
Part 5: Tips on How to Make Good YouTube Thumbnails - Get More Clicks
The thumbnails of your videos play a huge role in convincing people to watch them; a good YouTube thumbnail will get you more views and more potential subscribers. This part will give you 6 tips on creating thumbnails that help grow your channel. Now let’s learn how to make thumbnails using Wondershare PixStudio.
1. Stay On Topic
Your thumbnail should tell a story; it should be clear from looking at it what viewers will get out of watching the video, be it knowledge or entertainment. If your thumbnail sets expectations that your video doesn’t deliver on, people will click away quickly. You may get views quickly, but you won’t get much watch time. That will tell YouTube’s search algorithm ‘people aren’t getting what they want from this, rank it lower’. That leads to fewer views over time, and gives the people who do manage to find your video a negative opinion of your channel.
Very few people intentionally use thumbnails that have nothing to do with the content of their videos – i.e, most people understand not to use a picture of a kitten in the thumbnail for their tech review, unless maybe their kitten is the one doing the review (which would be adorable, someone should do that). People who want serious advice won’t click, and people who click to see a kitten will click away fast.
This thumbnail had better be for a kitten’s iPhone review video or people will click away. Fast.
A mistake a lot of creators do make is creating a thumbnail that is meant to evoke an emotion which the video itself does not justify. For example, if you see a picture of a YouTuber looking nervous alongside text that reads ‘My Secret’, you will think they are going to share something deeply personal. You will be curious, and you may even be worried about them. You’ll probably click. Then, if their secret is that they don’t like pineapple on pizza, you’ll probably be angry. This technique gets clicks, but not a lot of watch time and it will lose you subs in the long run.
2. Don’t Be Mysterious
A good thumbnail doesn’t make people guess. Your thumbnail should tell people what’s in your video, not make them wonder about it. People want to know what they’re being asked to spend time watching.
Often, they will be looking for the answer to a specific question and will completely ignore anything that doesn’t show – in the thumbnail – that it has their answer.
Sometimes big channels can get away with stuff like this, because large portions of their audiences are interested in them as people and will already be curious about anything they post. This technique will not bring in new viewers, though.
If this came up in a search for ‘smoky eye tutorial’, would you click it?
When people want answers, they want to feel confident that they video they click on will have those answers. If you have great content, then let people know it!
3. People Like People
Viewers are more likely to click on a thumbnail if they feel a connection when they look at it. One of the best ways to create a feeling of connection is through eye contact, and you can apply that principle to your YouTube thumbnails easily.
Just make sure you’re in them.
You can either compose a photo to use as your thumbnail, or use a screenshot from your video. Ideally, the image of you will convey the emotional tone of the video and tell potential viewers what it is about, besides you.
So, if you want to post a funny video that is also about making brownies, maybe a picture of you smiling while holding up a tray of brownies would be a better direction than just showing the brownies?
4. Check Out The Competition
Before you post your video, type your topic into YouTube’s search engine and see what comes up. This will give you insight into what kinds of thumbnails are performing well for other people, as well as what you can do to stand out in comparison.
Phil starts talking about thumbnails at 6:09, and he has great tips on checking out your competition!
For example, if all five of the top-ranked videos for the search ‘how to build a cabinet’ show images of the YouTuber smiling while holding a power tool, then your thumbnail for a video on the same topic should also be a picture of you smiling and holding a power tool. You know that works, so why not do it?
5. Use Color in Interesting Ways
You want to use colors that will help you stand out from the other search results. While checking out your competition if you notice that all the people in the other thumbnails are wearing black or navy blue, it will be a good idea for you to wear a brighter color for your shoot to grab a bit more attention.
Beyond simply using colors that are different from other people’s colors, you should consider the emotions different colors trigger.
Maybe don’t use a lot of green and yellow in the thumbnail for your angry video rant?
6. Make Your Text Huge
Usually, you’ll want to use a bit of text in your thumbnail. It might be the full title of your video, or just a keyword or phrase. You don’t want to use a full sentence because you won’t have room for it if you’re using huge text.
The reason you should use huge text is so that people can read it. Remember that when people see your thumbnail in their search results, it will be much smaller than it will look while you are creating it. Text that looks big enough while you are creating your thumbnail will be much smaller when people are actually trying to read it, and that goes double for viewers watching on their small smartphone screens.
Frequently Asked Questions about YouTube Thumbnail
1. What is YouTube Thumbnail?
When you upload a video on YouTube, YouTube gives you three images to choose from in the selection of your video’s thumbnail image. These three images are just freeze-frame snapshots from different parts of your video, which may not tell your viewers what your video is really all about.
2. Can You Change YouTube Thumbnail After Publishing?
Yes, you can replace the auto-generated thumbnail with the customized thumbnail you like. But YouTube only allows verified YouTube accounts to upload custom thumbnail images.
3. How Long Does It Take for a Thumbnail to Change on YouTube?
Normally, if you have a good internet connection, you can see the thumbnail is changed within 10 seconds.
4. Why YouTube Thumbnail is Important?
When you get more people watching your video for longer, it increases your watch time and tells YouTube’s search algorithm ‘people like this, rank it higher’. Being ranked higher gets you more views, and even more watch time. It’s a wonderful cycle that all begins with a great thumbnail (paired with a good title and the right tags).
Richard Bennett
Richard Bennett is a writer and a lover of all things video.
Follow @Richard Bennett
Also read:
- Channel Up Your Wealth Profit From Effective Use of YouTube Shorts
- Unlocking the Door to Dual Video Playback
- [Updated] Effortlessly Embedding Visual Media in Free Content Creation
- 2024 Approved Accelerate YT Growth Strategies for 1K+ Subscribers
- In 2024, Earth’s Premier Online Income Tycoon
- Delving Into Trending Video Exchange for 2024
- In 2024, Ad Profits Unveiled How Much Do Creators Make on Youtube?
- Harmonizing Cityscapes and Nature The Role of Green Spaces
- Sound Savings Guide Youtuber's Selection of Affordable Mics
- Access Exclusive Video Artwork – Free, Flawless, and Fast for 2024
- [New] Crafting Comfortable Cinematography Amidst the Chill
- The Science and Art of Engaging YouTube Audiences
- In 2024, Enhance Visibility The Most Effective 30 FreeFire Tags for Video Marketing
- Secrets of Filmo
- 2024 Approved Best 5 Headsets A YouTube Gamer's Guide
- DIY YouTube Music Collection A Comprehensive Online & App Method for 2024
- 8 Best Mirrorless Cameras Vloggers Should Know for 2024
- 2024 Approved Capture Your Audience The Smartphone Guide to YouTube Thumbnails
- [New] Convert with Confidence Best Apps to Turn Spotify Into YouTube Channels
- 2024 Approved Crafting Content Gold YouTube Studio's Path to Perfection
- Crafting Captivating Edu-Vids on YouTube A Step-by-Step Guide
- [New] Beginner's Blueprint for Online Content Simple, Straightforward Video Projects
- In 2024, Craft an Inclusive Viewership Strategy for Youtube & Twitch Streaming
- Best Practices for YouTube Thumbnail Dimensions for 2024
- [Updated] Cutting-Edge PC Editing Techniques Enhancing Your YouTube Presence
- 2024 Approved Discover the Top 8 Services to Amplify Video Content
- Achieving a Noiseless Presence on Social Video Platforms for 2024
- Compare & Contrast Leading Online & Desktop GIF Tools
- Crafting Success on YouTube Standard Studio or Beta
- [New] Escalate Your Channel's Popularity to 1K+
- From Videos to Vault AJay’s Revenue Journey on YouTube
- Unlimited View of YouTube Cover Pics No Payment Required
- Valorant Image Magic Quick, Professionally Crafted Portraits
- How to Soft Reset Samsung Galaxy F54 5G phone? | Dr.fone
- Detailed Review of doctorSIM Unlock Service For Apple iPhone 12 mini | Dr.fone
- Enhance Your Instagram Content with Effective Captioning for 2024
- Why Does My Itel A60s Keep Turning Off By Itself? 6 Fixes Are Here | Dr.fone
- [New] In 2024, Decode the Mystery Top 7 TikTok Emojis Explored
- Updated The Ultimate Guide to Free iPhone Video Rotators Top 5
- [New] 2024 Approved Understanding Discord's Report System Procedures and Tips
- 2024 Approved Prime Binge-Worthy Hits Highest Tweets & View Counts
- [Updated] Enhancing Mobile Broadcasting via OBS Strategies for 2024
- How To Use Allshare Cast To Turn On Screen Mirroring On Nokia G42 5G | Dr.fone
- Ultimate T5 Camera for Extreme Clips
- [New] In 2024, The Ultimate Guide to Exclusive Content on Discord's DiscoNitro Plan
- Updated 2024 Approved From Widescreen to Square The Impact of Aspect Ratio on Your YouTube Video Style
- [Updated] Turn Your Webcam Into a Broadcast Device with VLC
- How to Ride on Others' TikTok Waves as a Guest for 2024
- [Updated] In 2024, Securely Expanding Your TikTok Audience
- Updated From Pixels to Perfection A Calculators Guide to Ratio Mastery for 2024
- In 2024, Navigating Like a Pro Tips for Mac/Windows TikTok Users
- Title: "No-Money-Down Mics The Frugal Filmmaker's List"
- Author: Kevin
- Created at : 2024-05-25 16:09:24
- Updated at : 2024-05-26 16:09:24
- Link: https://youtube-videos.techidaily.com/no-money-down-mics-the-frugal-filmmakers-list/
- License: This work is licensed under CC BY-NC-SA 4.0.
