
![[New] Tips & Tricks to Add Tags to YouTube Video](https://www.lifewire.com/thmb/INF6SYasZPz8DbBoNXqU2flP540=/400x300/filters:no_upscale():max_bytes(150000):strip_icc():format(webp)/before-you-buy-a-video-projector-1847845-v3-ED-8a08e03f2cfc4835a13872618bd4ad00.png)
[New] Tips & Tricks to Add Tags to YouTube Video
Tips & Tricks to Add Tags to YouTube Video
Create High-Quality Video - Wondershare Filmora
An easy and powerful YouTube video editor
Numerous video and audio effects to choose from
Detailed tutorials provided by the official channel
Tagging your content online greatly impacts how viewers will react to your post. However, it doesn’t end at adding tags; you need to know more. Be savvy to put the tags strategically depending on your topic’s trending. So, why add a tag to YouTube videos? You want to gain enough clicks, yes, right? And that’s what hashtags do. They are online content features that will push the number of clicks to an unimaginable level.
Your content will gain more views and go viral within a short time. After all, that’s what we purpose for when posting videos. No one wants to put effort into editing videos and posting then don’t get a considerable number of views or clicks. But also, know that the ball is at your court. There are no go-zone areas when it comes to dealing with YouTube tags. Check this article on what to do for more views.
In this article
02 How will YouTube tag affect your video performance?
03 Things to consider before you start adding a tag.
04 How to add a tag to YouTube video
What is a YouTube tag?
A tag is a word used to describe a video or image. It is generally added to video titles and descriptions or used independently. They make YouTubers easily discover other posts with similar tags. YouTube tags are vital as they help the YouTube algorithm fully understand the videos you post. It’s by this that those who are interested in your video get hooked to them.
For tags to work ideally, you need to include your brand-specific tags before adding similar tags. YouTube auto-suggest is another gem in this scenario. Just see what YouTube suggests when you type while searching other similar topics. For great results, place the most important keywords and tags first, as these will act as the face of your video.
How will YouTube tag affect your video performance?
It is YouTube tags that help viewers to find videos they are searching for on YouTube. Besides, this is how it works: An audience will type keywords into YouTube’s search bar. Then videos with the same tag and keywords will appear in the search results. If not correctly done, the YouTube tag could affect your video performance and lead to such outcomes.
1. No adequate audience engagement
Your main focus should be audience engagement. You are trying to drive the attention of many YouTube users as possible. A small mistake, and you lose track. It is wise to know the best approach to use your tags. Improper YouTube tagging will not drive enough audience to your channel. You, therefore, won’t get adequate audience engagement.
2. Your video won’t go viral
Anything selling should strive to reach thousands and probably millions of viewers. Perhaps you have put in several days and months of work on a single video, only for it to be viewed by a few fellows. You will feel like a waste of time when you put so much effort, yet your videos don’t go viral. It means there will be fewer people looking out for your content.
3. Limited chances of your video ranking high
If you don’t do YouTube tagging the right way, then the chances are that your video won’t rank high. Everyone feels better when they get a pat on the back for a well-done job. But what happens if there is no traffic to your video? You probably lose the urge to continue doing more videos. Just play right, so you are not demoralized whenever you post your videos.
Things to consider before you start adding a tag
If used properly, YouTube tags are a great way for your video and business to perform well. You’ll attract the audience and probably get a flux of customers. And the tricks are just at your fingertips. You only need to give the best approach possible to all the steps of your YouTube tagging. Here are some tips to help you out.
1) Use keyword variations
Try to use variations of keywords to increase the chances of your video ranking high. The audience will use several phrases to lead them to the right YouTube video. More so, they’ll even change the order of keywords for best results. It would be best to strive to appear in as many searches as possible. The best option is to use the “YouTube” tag generator to gather as many relevant tags as possible. It will pop you more ideas and let you identify the most important core terms that you can build on.
2) Research competitors
This trick works well for you before you add a tag to a YouTube video. Check out what your competitors are up to and what tags they use. While you check at what competitors do, also mind the trending tags. You don’t want to be left behind in the quick-paced technological advances. But ensure your searches are related to your content. Any misleading tags will plunge you into more drawbacks. Checking out on the latest trends will help you generate more ideas for useful keywords that make your videos rank better.
3) Conduct keyword research
Research is a vital point to start from. By this, you’ll find other keyword possibilities for your video. Don’t just think of keywords out of the blue but ensure that the audience searches what you use. It is better to check out the generic relationship between YouTube tags and your video content. Find keywords that will directly link to what your video is all about. You can also find out what has worked for those in your industry to know the best approach to give.
4) Write a keyword-optimized title and description
Ensure that the texts associated with your video are keyword-optimized. Your audience will majorly rely on the video title and description. The description should emphasize more on what the title is. Consider that first, and then find the kinds of tags that would correlate with both your title and description. Besides, it is the best way for your audience to quickly find your videos as the keywords will directly link them.
5) Don’t go overboard
Even though there are no limits on words for YouTube tags, don’t use so many words; it may turn away your audience. Instead, focus on adding relevant tags but don’t stuff in keywords. Going overboard may automatically take you off the topic and mislead your audience.
How to add a tag to a YouTube video
Adding the right YouTube tag will increase the chances of YouTubers finding and watching your video. Here are the steps how to add a tag to a YouTube video.
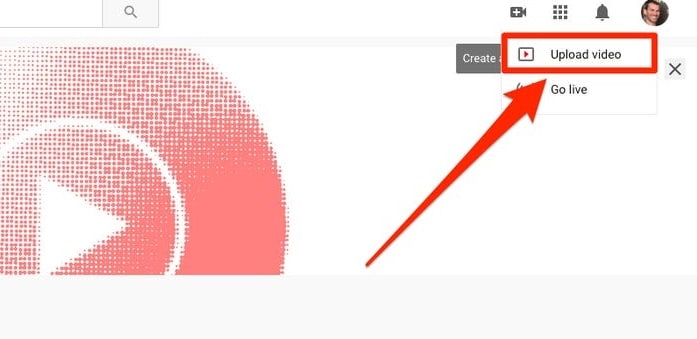
Step 1. First, log in to your YouTube account and hit the “Camera” icon. It is located at the top-right corner of your screen.
Step 2. Check the drop-down menu and choose the “Upload Video” option.
Step 3. Select from your videos which one to upload. Then click on the “Edit” tab to add relevant information like keywords, descriptions, etc.
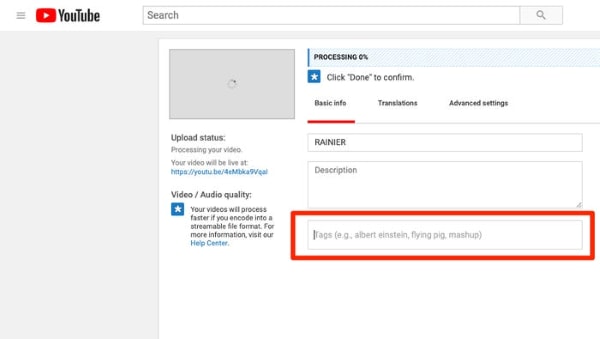
Step 4. Give your video a name and description. Ensure the description correlates to the title of your video.
Step 5. Add relevant tags, separating them with commas. You can use from five to fifteen tags. YouTube may ignore your tags if they are more than 15.
Step 6. Click on the “Save” tab to complete the upload.

Make Your Video Better with Filmora
You may know how to add a tag to a YouTube video, but you might not know how to come up with a compelling piece of video. Filmora works in simple steps to produce a quality video that makes heads turn around. Its powerful editing tools enable you to add several effects for better viewing. It has over 800 stunning effects to enhance your videos with. The export feature also lets you upload your videos to YouTube in any format just with a click of a button.
Key Features
- Edit and export your videos at a high resolution of up to 4K
- Easily remove any background noise from the video
- Make unique clips by slowing them down or increasing speed up to ten times
- It supports GIF files among other output formats
- Easily flip your clips and play them backward.
For Win 7 or later (64-bit)
For macOS 10.12 or later
Conclusion
● YouTube tags play a vital role for you and your potential customers. YouTube’s algorithm uses your tags to match them to similar search queries. When properly utilized, tags can bring an over flux of customers to your video. You have to know how to add a tag to a YouTube video for better results. Remember that YouTube tags can also drive away customers if not properly utilized. We have covered the effects and the best approach when settling on YouTube tags.
● Nonetheless, ensure your videos are top-notch before you tag them around. The best video editor – Filmora – works to produce high-end videos. Try it and gain additional traffic to your video.
Tagging your content online greatly impacts how viewers will react to your post. However, it doesn’t end at adding tags; you need to know more. Be savvy to put the tags strategically depending on your topic’s trending. So, why add a tag to YouTube videos? You want to gain enough clicks, yes, right? And that’s what hashtags do. They are online content features that will push the number of clicks to an unimaginable level.
Your content will gain more views and go viral within a short time. After all, that’s what we purpose for when posting videos. No one wants to put effort into editing videos and posting then don’t get a considerable number of views or clicks. But also, know that the ball is at your court. There are no go-zone areas when it comes to dealing with YouTube tags. Check this article on what to do for more views.
In this article
02 How will YouTube tag affect your video performance?
03 Things to consider before you start adding a tag.
04 How to add a tag to YouTube video
What is a YouTube tag?
A tag is a word used to describe a video or image. It is generally added to video titles and descriptions or used independently. They make YouTubers easily discover other posts with similar tags. YouTube tags are vital as they help the YouTube algorithm fully understand the videos you post. It’s by this that those who are interested in your video get hooked to them.
For tags to work ideally, you need to include your brand-specific tags before adding similar tags. YouTube auto-suggest is another gem in this scenario. Just see what YouTube suggests when you type while searching other similar topics. For great results, place the most important keywords and tags first, as these will act as the face of your video.
How will YouTube tag affect your video performance?
It is YouTube tags that help viewers to find videos they are searching for on YouTube. Besides, this is how it works: An audience will type keywords into YouTube’s search bar. Then videos with the same tag and keywords will appear in the search results. If not correctly done, the YouTube tag could affect your video performance and lead to such outcomes.
1. No adequate audience engagement
Your main focus should be audience engagement. You are trying to drive the attention of many YouTube users as possible. A small mistake, and you lose track. It is wise to know the best approach to use your tags. Improper YouTube tagging will not drive enough audience to your channel. You, therefore, won’t get adequate audience engagement.
2. Your video won’t go viral
Anything selling should strive to reach thousands and probably millions of viewers. Perhaps you have put in several days and months of work on a single video, only for it to be viewed by a few fellows. You will feel like a waste of time when you put so much effort, yet your videos don’t go viral. It means there will be fewer people looking out for your content.
3. Limited chances of your video ranking high
If you don’t do YouTube tagging the right way, then the chances are that your video won’t rank high. Everyone feels better when they get a pat on the back for a well-done job. But what happens if there is no traffic to your video? You probably lose the urge to continue doing more videos. Just play right, so you are not demoralized whenever you post your videos.
Things to consider before you start adding a tag
If used properly, YouTube tags are a great way for your video and business to perform well. You’ll attract the audience and probably get a flux of customers. And the tricks are just at your fingertips. You only need to give the best approach possible to all the steps of your YouTube tagging. Here are some tips to help you out.
1) Use keyword variations
Try to use variations of keywords to increase the chances of your video ranking high. The audience will use several phrases to lead them to the right YouTube video. More so, they’ll even change the order of keywords for best results. It would be best to strive to appear in as many searches as possible. The best option is to use the “YouTube” tag generator to gather as many relevant tags as possible. It will pop you more ideas and let you identify the most important core terms that you can build on.
2) Research competitors
This trick works well for you before you add a tag to a YouTube video. Check out what your competitors are up to and what tags they use. While you check at what competitors do, also mind the trending tags. You don’t want to be left behind in the quick-paced technological advances. But ensure your searches are related to your content. Any misleading tags will plunge you into more drawbacks. Checking out on the latest trends will help you generate more ideas for useful keywords that make your videos rank better.
3) Conduct keyword research
Research is a vital point to start from. By this, you’ll find other keyword possibilities for your video. Don’t just think of keywords out of the blue but ensure that the audience searches what you use. It is better to check out the generic relationship between YouTube tags and your video content. Find keywords that will directly link to what your video is all about. You can also find out what has worked for those in your industry to know the best approach to give.
4) Write a keyword-optimized title and description
Ensure that the texts associated with your video are keyword-optimized. Your audience will majorly rely on the video title and description. The description should emphasize more on what the title is. Consider that first, and then find the kinds of tags that would correlate with both your title and description. Besides, it is the best way for your audience to quickly find your videos as the keywords will directly link them.
5) Don’t go overboard
Even though there are no limits on words for YouTube tags, don’t use so many words; it may turn away your audience. Instead, focus on adding relevant tags but don’t stuff in keywords. Going overboard may automatically take you off the topic and mislead your audience.
How to add a tag to a YouTube video
Adding the right YouTube tag will increase the chances of YouTubers finding and watching your video. Here are the steps how to add a tag to a YouTube video.
Step 1. First, log in to your YouTube account and hit the “Camera” icon. It is located at the top-right corner of your screen.
Step 2. Check the drop-down menu and choose the “Upload Video” option.
Step 3. Select from your videos which one to upload. Then click on the “Edit” tab to add relevant information like keywords, descriptions, etc.
Step 4. Give your video a name and description. Ensure the description correlates to the title of your video.
Step 5. Add relevant tags, separating them with commas. You can use from five to fifteen tags. YouTube may ignore your tags if they are more than 15.
Step 6. Click on the “Save” tab to complete the upload.
Make Your Video Better with Filmora
You may know how to add a tag to a YouTube video, but you might not know how to come up with a compelling piece of video. Filmora works in simple steps to produce a quality video that makes heads turn around. Its powerful editing tools enable you to add several effects for better viewing. It has over 800 stunning effects to enhance your videos with. The export feature also lets you upload your videos to YouTube in any format just with a click of a button.
Key Features
- Edit and export your videos at a high resolution of up to 4K
- Easily remove any background noise from the video
- Make unique clips by slowing them down or increasing speed up to ten times
- It supports GIF files among other output formats
- Easily flip your clips and play them backward.
For Win 7 or later (64-bit)
For macOS 10.12 or later
Conclusion
● YouTube tags play a vital role for you and your potential customers. YouTube’s algorithm uses your tags to match them to similar search queries. When properly utilized, tags can bring an over flux of customers to your video. You have to know how to add a tag to a YouTube video for better results. Remember that YouTube tags can also drive away customers if not properly utilized. We have covered the effects and the best approach when settling on YouTube tags.
● Nonetheless, ensure your videos are top-notch before you tag them around. The best video editor – Filmora – works to produce high-end videos. Try it and gain additional traffic to your video.
Transform Your Content: 3 Effective Techniques for YouTube Reaction Magic
How to Make a YouTube Reaction Video?

Richard Bennett
Mar 27, 2024• Proven solutions
Sharing ideas and opinions on virtually any topic you can think of with millions of people around the world is arguably one of the greatest benefits YouTube gives to content creators. Even so, building your channel exclusively around reaction videos may prove to be difficult, but this doesn’t mean that you can’t use this type of video to comment on what other YouTubers are saying.
The process of making a YouTube reaction video is not overly technical, although you will have to decide which video editing technique you are going to use to make a reaction video. That is why in this article we are going to take a look at different ways to make a YouTube reaction video.
- Method 1: Making Reaction Videos with PIP feature in Filmora
- Method 2: Create YouTube Reaction Video with Split Screen Templates
- Method 3: Make A Reaction Video for YouTube with AI Portrait
How to Make a Reaction Video for Your YouTube Channel? [3 Ways]
Using the footage without the consent of the copyright owner is punishable by the law, which means that you can only include the footage in a reaction video if you have the owner’s consent. Consequently, the selection of videos you can comment on is going to be limited, since it is entirely up to the creator of the video if they are going to give you permission to use their footage in your reaction video.
You can use the following video editing techniques, once you have access to the video you would like to comment on.
Method 1: Making a reaction video with the Picture-in-Picture feature in Filmora
Video editing software, like Filmora , can also be used to create YouTube reaction videos, but you must have all the footage you would like to include in that video before you can start putting it together.
The first step is to create a new project in Filmora and then import the media assets into the editor. Besides video clips, you can also add music, pictures, or create opening titles and end credits for your reaction video.


Place the video you’re reacting to on a video track on the timeline and then add the video of your reaction to the timeline that is directly above the one to which you added the first video clip. Click on the top video in the preview window and use the handles that are positioned around the edges of the video to adjust its size.
If you would like to change the on-screen position of the overlay clip, you should simply click on it and drag it to the new location within the preview window.

Filmora offers more than sixty motion effects, hundreds of transitions, and visual effects that can make your reaction video more visually appealing to the audience.

Moreover, Filmora video editing software offers a variety of blending modes, and it lets you control the opacity of the overlay video so that you can make it more transparent. Whether or not you are going to use these options depends on the footage you’re working with and the demands of a particular project.
Pros of using the Picture in Picture feature to make reaction videos in Filmora: You can place and adjust the videos with more customizable options. Get more tips about Making a PIP video in Filmora .
Method 2: Create several reaction windows with the Split Screen feature
Besides the Picture-in-Picture option, Filmora also enables you to play two or more videos simultaneously with Split Screen templates. Drag and drop the template you want to use in your reaction video to the timeline and click on the Enable Split Screen Animation tick box if you want to use the template without animations.

Afterward, you should drag the video clips from the Media tab and drop them onto the section of the preview window where you want them to be located. Keep in mind that you cannot add more than six videos to a split-screen template.

All videos you add to a split-screen template can be edited, and you just have to click on them if you want to adjust their sizes, enhance colors, mute their audio tracks or add a new audio file to the template.
Check the details about How to make a split-screen video step by step.
Pros of using Split-screen template to make reaction video in Filmora: various templates for creating stylish video side by side easily.
Method 3: Create A YouTube Reaction Video with AI Portrait
With the human segmentation effect in AI Portrait, you can now blend the reaction video in a more natural way. The human segmentation effect will isolate people from the background, you can use any background in the video.
Note: You can use this feature after version after V 10.5 for Windows, and V 10.4 for Mac. Click the button below to get the latest version of Filmora on your desktop.
Step 1: Import the videos to the media library, and then drag the background video to the first video track, and the reaction video to the track above.

Step 2: Go to the Effects tab at the top, and click the AI Portrait category, and then you will see many effects such as Human Segmentation, Human Pixelate, Human Noise, and lighting flash. Here, drag and drop the Human segmentation effect to the reaction video.

Step 3: Select the reaction video in the timeline, and then adjust its size and position by dragging it on the preview window. See, the reaction video is fine blended with the background video.

Step 4: That’s the basic editing of making a reaction video. You can also add the neon or flashing effect to the video. If everything goes well, click Export and save the video.

You can find out more details about using the AI Portrait effect to make a reaction video .
How to Avoid Copyright Infringements While Making a YouTube Reaction Video
All videos you can find on YouTube are protected by intellectual property regulations, and you can’t use them without the copyright owner’s permission. The only way to avoid being absolutely sure that your reaction video isn’t violating the law is to contact the video creator and ask for permission to use their intellectual property. However, most YouTubers are reluctant to let others download and edit their videos unless they already have a large fan base.
In case you’re granted permission to comment on a video, you have nothing to worry about. However, if you don’t get the permission you’re all the money the reaction video generates will go to the copyright owner or you will be forced to delete the video from your channel. There are still a few things you can do, even if you don’t get permission to use the video you would like to comment on.
Muting the video’s audio or altering its pitch will make it more difficult for YouTube’s bots to detect copyright infringement, although this method may not always work. In addition, you can play a video for up to thirty seconds, then comment on that segment, and then play another segment of that video.
There is no way of saying whether any of these editing tricks are going to help you avoid a copyright claim, and you should only use them if you have no other option.
Conclusion
Anyone can master the technical aspects of making a reaction video, but the topics you react to need to be related to the general topic your channel covers. What’s more, the idea of your reaction video has to be relevant for your audience if you want to attract their attention. Which video editing techniques are you using to make a YouTube reaction video?
Download Mac Version ](https://tools.techidaily.com/wondershare/filmora/download/ )
Richard Bennett
Richard Bennett is a writer and a lover of all things video.
Follow @Richard Bennett
Richard Bennett
Mar 27, 2024• Proven solutions
Sharing ideas and opinions on virtually any topic you can think of with millions of people around the world is arguably one of the greatest benefits YouTube gives to content creators. Even so, building your channel exclusively around reaction videos may prove to be difficult, but this doesn’t mean that you can’t use this type of video to comment on what other YouTubers are saying.
The process of making a YouTube reaction video is not overly technical, although you will have to decide which video editing technique you are going to use to make a reaction video. That is why in this article we are going to take a look at different ways to make a YouTube reaction video.
- Method 1: Making Reaction Videos with PIP feature in Filmora
- Method 2: Create YouTube Reaction Video with Split Screen Templates
- Method 3: Make A Reaction Video for YouTube with AI Portrait
How to Make a Reaction Video for Your YouTube Channel? [3 Ways]
Using the footage without the consent of the copyright owner is punishable by the law, which means that you can only include the footage in a reaction video if you have the owner’s consent. Consequently, the selection of videos you can comment on is going to be limited, since it is entirely up to the creator of the video if they are going to give you permission to use their footage in your reaction video.
You can use the following video editing techniques, once you have access to the video you would like to comment on.
Method 1: Making a reaction video with the Picture-in-Picture feature in Filmora
Video editing software, like Filmora , can also be used to create YouTube reaction videos, but you must have all the footage you would like to include in that video before you can start putting it together.
The first step is to create a new project in Filmora and then import the media assets into the editor. Besides video clips, you can also add music, pictures, or create opening titles and end credits for your reaction video.
Place the video you’re reacting to on a video track on the timeline and then add the video of your reaction to the timeline that is directly above the one to which you added the first video clip. Click on the top video in the preview window and use the handles that are positioned around the edges of the video to adjust its size.
If you would like to change the on-screen position of the overlay clip, you should simply click on it and drag it to the new location within the preview window.
Filmora offers more than sixty motion effects, hundreds of transitions, and visual effects that can make your reaction video more visually appealing to the audience.
Moreover, Filmora video editing software offers a variety of blending modes, and it lets you control the opacity of the overlay video so that you can make it more transparent. Whether or not you are going to use these options depends on the footage you’re working with and the demands of a particular project.
Pros of using the Picture in Picture feature to make reaction videos in Filmora: You can place and adjust the videos with more customizable options. Get more tips about Making a PIP video in Filmora .
Method 2: Create several reaction windows with the Split Screen feature
Besides the Picture-in-Picture option, Filmora also enables you to play two or more videos simultaneously with Split Screen templates. Drag and drop the template you want to use in your reaction video to the timeline and click on the Enable Split Screen Animation tick box if you want to use the template without animations.
Afterward, you should drag the video clips from the Media tab and drop them onto the section of the preview window where you want them to be located. Keep in mind that you cannot add more than six videos to a split-screen template.
All videos you add to a split-screen template can be edited, and you just have to click on them if you want to adjust their sizes, enhance colors, mute their audio tracks or add a new audio file to the template.
Check the details about How to make a split-screen video step by step.
Pros of using Split-screen template to make reaction video in Filmora: various templates for creating stylish video side by side easily.
Method 3: Create A YouTube Reaction Video with AI Portrait
With the human segmentation effect in AI Portrait, you can now blend the reaction video in a more natural way. The human segmentation effect will isolate people from the background, you can use any background in the video.
Note: You can use this feature after version after V 10.5 for Windows, and V 10.4 for Mac. Click the button below to get the latest version of Filmora on your desktop.
Step 1: Import the videos to the media library, and then drag the background video to the first video track, and the reaction video to the track above.
Step 2: Go to the Effects tab at the top, and click the AI Portrait category, and then you will see many effects such as Human Segmentation, Human Pixelate, Human Noise, and lighting flash. Here, drag and drop the Human segmentation effect to the reaction video.
Step 3: Select the reaction video in the timeline, and then adjust its size and position by dragging it on the preview window. See, the reaction video is fine blended with the background video.
Step 4: That’s the basic editing of making a reaction video. You can also add the neon or flashing effect to the video. If everything goes well, click Export and save the video.
You can find out more details about using the AI Portrait effect to make a reaction video .
How to Avoid Copyright Infringements While Making a YouTube Reaction Video
All videos you can find on YouTube are protected by intellectual property regulations, and you can’t use them without the copyright owner’s permission. The only way to avoid being absolutely sure that your reaction video isn’t violating the law is to contact the video creator and ask for permission to use their intellectual property. However, most YouTubers are reluctant to let others download and edit their videos unless they already have a large fan base.
In case you’re granted permission to comment on a video, you have nothing to worry about. However, if you don’t get the permission you’re all the money the reaction video generates will go to the copyright owner or you will be forced to delete the video from your channel. There are still a few things you can do, even if you don’t get permission to use the video you would like to comment on.
Muting the video’s audio or altering its pitch will make it more difficult for YouTube’s bots to detect copyright infringement, although this method may not always work. In addition, you can play a video for up to thirty seconds, then comment on that segment, and then play another segment of that video.
There is no way of saying whether any of these editing tricks are going to help you avoid a copyright claim, and you should only use them if you have no other option.
Conclusion
Anyone can master the technical aspects of making a reaction video, but the topics you react to need to be related to the general topic your channel covers. What’s more, the idea of your reaction video has to be relevant for your audience if you want to attract their attention. Which video editing techniques are you using to make a YouTube reaction video?
Download Mac Version ](https://tools.techidaily.com/wondershare/filmora/download/ )
Richard Bennett
Richard Bennett is a writer and a lover of all things video.
Follow @Richard Bennett
Also read:
- [Updated] Best Student-Friendly History Vid Hubs (#1-10)
- [New] Best Free YouTube Comment Finder You Should Try
- Elevate Engagement Personalized YouTube Thumbnail Guide
- Charisma in Characters Two Ways to Enliven Text for 2024
- In 2024, Decoding Video Thread Embellishments
- Guide Deleting Items From Your YouTube'umbers List
- [Updated] A Deep Dive Into YouTube App Features on Smartphones
- [New] Choosing Streaming Giants Vimeo, YouTube, or DailyMotion?
- [Updated] Elevate Engagement Crafting Effective YouTube Shorts
- 2024 Approved Educators' Guide to Thriving YouTube Channels – 10 Must-Know Secrets
- Maker Milestones Subscriber & Interactive Feature Prizes
- Optimal YouTube Video Formats A Comprehensive Guide
- [Updated] Decoding YouTube's Mystery A Sequential Exploration Guide
- Disable Unsolicited YouTube Video Listings for 2024
- [Updated] Delving Into YouTube's Digital Video Workshop
- Leading the Way in Video Production Compreran't Free YouTube Intro Makers
- In 2024, Boosting Clickthrough Rates with Attention-Grabbing YouTube Thumbnails
- [New] 10 Strategies to Make Money on YouTube Shorts Easily
- Demystifying Video SEO on YouTube as a Novice
- [New] 2023'S Premier Movie Options Beyond The Top Selections
- [Updated] Cultivating a Community Building Followers on YouTube Without Spending
- [Updated] Cinema Comes at a Cost-Free Price Your Ultimate YouTube Movie List
- 2024 Approved Evolving Channels 8 Fastest Video Climbers
- Enrich Thumbnails Introducing Radiant Neon Elements
- 2024 Approved Binge-Watch With Ease Best Playlist Extractors Reviewed & Rated
- [New] Designing Direct URLs for Automatic Content Subscription
- How to Loop a YouTube Video The Ultimate Guide 2024
- Discover 8 Essential Sites for Pristine Green Screen Images
- [Updated] Creating a Clickable Thumbnail Enhancing Video Visibility without Costs
- 2024 Approved Above the Mainstage Significant YouTube Meetings
- Best 8 Linux Programs for Media Makers
- Best Android Apps YouTube Video Downloads Compared
- [New] Cutting Through the Clutter How to Stream Top-Notch Upside-Down Content on Youtube
- 2024 Approved Effortless Sound Transformation From YouTube to WAV Format
- [New] Channel Success Stories Earning While You Edit
- Fundamental Equipment for Channel Foundations
- Melodic Minutes Streamlined Strategies for Viral Music on YouTub
- Mastery in Motion Selecting Top Video Editors
- 2024 Approved Crafting Visibility on YouTube The Ultimate Guide to Featured Channel Placement
- Solutions for Hidden YouTube Shorts Thumbnail Problems
- YouTube Money Mastery From Clicks to Checkbook Balance
- Digital Text Generator for Videos
- 12 Premier Video Game Entrances by Top Youtubers Free & Paid Analysis
- [Updated] Diving Deep Into Lyric Video Designs, Powered by Lyric Video Maker
- Discover 7 Essential Free Audio Tracks for YouTubers
- 2024 Approved Cut Costs and Boost Creativity 8 Online Spots Offering Free Eco-Backdrops
- How To Bypass Google FRP on Vivo Y200
- Updated Online Video Flipper Top Tools and Services for 2024
- Music Video Magic 10 Essential Software and Apps for Creators for 2024
- How to Transfer Photos from Infinix Hot 40i to Laptop Without USB | Dr.fone
- How To Fake GPS On Honor Play 7T For Mobile Legends? | Dr.fone
- 2024 Approved Mastering Free & Paid Tools for Vimeo Video Downloads
- In 2024, Full Guide to Fix iToolab AnyGO Not Working On Apple iPhone 15 Plus | Dr.fone
- New Superior Mac System for Fusion of Vehicle Soundscape for 2024
- New 2024 Approved Streamlined Silence for Digital Watchers Removing Background Sound From Video Content on Computers and Websites ()
- How To Erase Apple iPhone 11 Pro Data Permanently | Dr.fone
- Updated In 2024, Turn Any Video Into a Live Photo with These Top-Rated Apps
- The Best iSpoofer Alternative to Try On Honor X50i | Dr.fone
- The Comprehensive Guide to Adjusting Siris Voice in iOS Devices
- Recover your photos after Realme C67 5G has been deleted.
- New Editing GoPro Footage on PC Quik and Its Competitors for 2024
- [Updated] Mastering Snap Ad Creation Essential Tips for Impactful Promotion
- Title: [New] Tips & Tricks to Add Tags to YouTube Video
- Author: Kevin
- Created at : 2024-05-25 16:09:05
- Updated at : 2024-05-26 16:09:05
- Link: https://youtube-videos.techidaily.com/new-tips-and-tricks-to-add-tags-to-youtube-video/
- License: This work is licensed under CC BY-NC-SA 4.0.
