
![[New] Essential Tips for FREE YouTube Video Transcriptions](https://www.lifewire.com/thmb/WlWpk5WfFyytFp2F9Ktrh0i0cdI=/400x300/filters:no_upscale():max_bytes(150000):strip_icc()/unnamed-e3283557c2e748c5a805375627b5f2f0.jpg)
[New] Essential Tips for FREE YouTube Video Transcriptions
Essential Tips for FREE YouTube Video Transcriptions
How to Transcribe a YouTube Video for FREE

Richard Bennett
Mar 27, 2024• Proven solutions
If you want to transcribe your videos to make the dialogs and speeches available in text format, you can use YouTube Transcribe feature that the streaming site offers for free. In this article, I’ll share with you a couple of methods to transcribe a YouTube video for free.
- Part 1: Transcribe YouTube Video Automatically for Free [2 Ways]
- Part 2: Transcribe YouTube Video to Text Online with Third-Party Service
- Part 3: Benefits of Transcribing YouTube Videos
- Part 4: YouTube Video Transcription FAQs
Part 1: How to Transcribe YouTube Video Automatically for Free [2 Ways]
Besides the basic video editing features on the YouTube platform, you can now quickly transcribe YouTube videos to the text as well. The good thing is, you can either use the automatic transcription feature that YouTube offers, or upload it manually while adjusting the timing as you go further.
Below are the two methods to transcribe your YouTube videos for free:
Method 1: Use the Automated Transcription Service on YouTube
As the name suggests, YouTube automatic transcription service works automatically. This means you don’t even have to click the ‘Transcribe’ button anymore to transcribe a YouTube video, and the website takes care of it on its own. All you need to do is, choose English as the language of the video when setting up subtitles. You can follow the instructions given below to do so:
Step 1 Upload a Video
Sign in to your YouTube account, click your profile picture from the top-right corner, and click YouTube Studio from the menu. Next, click CREATE from the upper-right corner, click Upload videos from the menu, and drag and drop a video from your computer to the Upload videos box that appears next.

Step 2 Select Transcription Language
On the Details page of the next box that appears, scroll down and click MORE OPTIONS, and select English in the Video language drop-down list under the Language, subtitles, and closed captions (CC) section.

Step 3 Publish the Video
Follow the on-screen instructions from this point to publish the video, and wait while YouTube automatically transcribes and adds the close captions to it.
Note: Depending on the duration of the clip, the time YouTube would take to transcribe may vary.
After YouTube has transcribed the video, you can download the transcription file in your preferred format. The instructions are given below explain how you can do so:
- Get to the Subtitles Window
While on the YouTube Studio page, click Subtitles from the left pane to go to the Channel subtitles page. And then click the video you want to modify.
- Get to Classic Studio
In the video subtitle page of the target video, hover mouse on the Published Automatic status under the Subtitles column, click the Options icon (with three vertical dots) that appears, and click Edit on Classic Studio.

- Download Transcription File
Click and open the Actions drop-down list from the top-left corner of the left pane, click your preferred transcription format including .vtt, .srt and .sbv from the list, and save the file on your local hard disk.

Method 2: Get YouTube Transcription when Watching
In addition, if you are watching any other video, you can make YouTube transcribe that for you as well. You can follow the instructions given below to get the YouTube video to text transcription:
Step 1: Play the Video
Go to the video on YouTube and start playing it. Make sure NOT to get to full-screen mode as doing so would hide the option to transcribe the clip.
Step 2: Enable Transcription
Click the More icon (with three horizontal dots) from under the bottom-right corner of the video player, and click Open transcript to see the video transcription in the Transcript pane that appears in the right.
Step 3: Manage Timestamps
Click the Options icon (with three vertical dots) from the top-right corner of the Transcript pane, and click Toggle timestamp to enable or disable the timestamps in the video transcription.
Limitations of Using YouTube Transcribe
Although YouTube’s automatic transcription is a decent feature that saves you a lot of time, since Google uses machine learning algorithms to convert the speech to text, the level of accuracy may vary depending on the accent of the speaker, and the clarity of the audio the video has. Also, even sometime you may not be satisfied with the end-results.
Alternatively, you can use Kapwing to transcribe a YouTube video and download the transcription file with the below step-by-step instructions:
Step 1: Add YouTube Video
Copy the URL of YouTube video you want to transcribe, go to https://www.kapwing.com/subtitles , paste the URL in the Paste a URL field, wait while Kapwing fetches the content of the video, and opens the Add subtitles to Video page.
Step 2: Transcribe the Video
Click Auto-generate from the right window, and follow the on-screen instructions to transcribe YouTube video to text.

Step 3: Download the Transcription File
Click Download SRT from the left pane, and follow the instructions from there to download the transcription file in *.srt format.

Pros
- Kapwing is free to use
- The auto-transcription process is quick and less tedious
- Kapwing also allows manual transcription and uploading of an existing *.srt file
Cons
- The auto-transcribed text might lack accuracy as the task is done by the speech-to-text tools that work in the background
You can follow the step-by-step instructions to transcribe a YouTube video and download the transcription file using Kapwing:
Step 1: Add YouTube Video
Copy the URL of YouTube video you want to transcribe, go to https://www.kapwing.com/subtitles , paste the URL in the Paste a URL field, wait while Kapwing fetches the content of the video, and opens the Add subtitles to Video page.
Step 2: Transcribe the Video
Click Auto-generate from the right window, and follow the on-screen instructions to transcribe YouTube video to text.
Step 3: Download the Transcription File
Click Download SRT from the left pane, and follow the instructions from there to download the transcription file in *.srt format.
Pros
- Kapwing is free to use
- The auto-transcription process is quick and less tedious
- Kapwing also allows manual transcription and uploading of an existing *.srt file
Cons
- The auto-transcribed text might lack accuracy as the task is done by the speech-to-text tools that work in the background
Part 3: Benefits of Transcribing YouTube Videos
You may need video transcriptions for several reasons, such as analyzing the summary of the entire speech in the video, extracting a single phrase or quote that was spoken in the clip, or making the video helpful even for those suffering from hearing impairment. When you transcribe a YouTube video, the transcript can be useful in many ways. Some of the most common benefits of transcribing a video include:
- Search Engine Optimization
When you add subtitles, the text can appear in Google search results when someone types a similar phrase in the search box. This helps get more views to your videos, thus giving your channel popularity, and you, monetary gains in the long run.
- Accent
If the speaker in the video is from a different region and is using an accent that you are not much comfortable with, you can turn on the subtitles and read the dialogs along with the video.
- Repurposing on Blogs
If you own a blog that you have embedded your video to, the transcription could be used to add text to it so the target audience can get a fair idea of what the video is all about. This is useful because many people prefer reading over watching.
YouTube Video Transcription FAQs
1. How to Transcribe YouTube Video to Text
Usually the transcription files have *.srt extension that are globally accepted and supported by almost all media players. However, there might be instances when you want to have the subtitles in plain text.
That said, to convert an SRT file to TXT, you can:
- Right-click the SRT file
- Go to Rename
- Replace srt with txt and press Enter
- Click OK on the confirmation box that appears next to convert SRT to TXT
After this, you can simply double-click the file, and read and modify the transcribed content as needed.
2. How to Edit and Upload Edited Transcript to YouTube
If you made any modifications to the transcript that was automatically generated by YouTube or any other third-party transcription tool, you can follow the steps given below to upload the new file to the YouTube video:
- Go to YouTube Studio and then to the Channel subtitles page as explained earlier
- Expand the Languages column of the target video
- Click the Options icon that appears under the Subtitles column when you hover mouse on to it
- Click Edit on Classic Studio
- On the next page, click Edit from the top-right corner

- Click to open the Actions drop-down list from the upper-left corner
- Click Upload a file
- Follow the on-screen instructions from there to upload the modified transcription file
- Click Save Changes from the top-right corner of the page when done
Conclusion
If you are looking for a quick and easy way of adding subtitles to your videos, letting YouTube transcribe for you could be a good approach. However, because these auto-generated transcriptions are created by machine learning algorithms, their accuracy cannot be counted on. Therefore, the best way to get the job done accurately is, let YouTube auto-transcribe your video, download the transcription file, make the necessary changes to it, and then upload the file back to the video.
Richard Bennett
Richard Bennett is a writer and a lover of all things video.
Follow @Richard Bennett
Richard Bennett
Mar 27, 2024• Proven solutions
If you want to transcribe your videos to make the dialogs and speeches available in text format, you can use YouTube Transcribe feature that the streaming site offers for free. In this article, I’ll share with you a couple of methods to transcribe a YouTube video for free.
- Part 1: Transcribe YouTube Video Automatically for Free [2 Ways]
- Part 2: Transcribe YouTube Video to Text Online with Third-Party Service
- Part 3: Benefits of Transcribing YouTube Videos
- Part 4: YouTube Video Transcription FAQs
Part 1: How to Transcribe YouTube Video Automatically for Free [2 Ways]
Besides the basic video editing features on the YouTube platform, you can now quickly transcribe YouTube videos to the text as well. The good thing is, you can either use the automatic transcription feature that YouTube offers, or upload it manually while adjusting the timing as you go further.
Below are the two methods to transcribe your YouTube videos for free:
Method 1: Use the Automated Transcription Service on YouTube
As the name suggests, YouTube automatic transcription service works automatically. This means you don’t even have to click the ‘Transcribe’ button anymore to transcribe a YouTube video, and the website takes care of it on its own. All you need to do is, choose English as the language of the video when setting up subtitles. You can follow the instructions given below to do so:
Step 1 Upload a Video
Sign in to your YouTube account, click your profile picture from the top-right corner, and click YouTube Studio from the menu. Next, click CREATE from the upper-right corner, click Upload videos from the menu, and drag and drop a video from your computer to the Upload videos box that appears next.
Step 2 Select Transcription Language
On the Details page of the next box that appears, scroll down and click MORE OPTIONS, and select English in the Video language drop-down list under the Language, subtitles, and closed captions (CC) section.
Step 3 Publish the Video
Follow the on-screen instructions from this point to publish the video, and wait while YouTube automatically transcribes and adds the close captions to it.
Note: Depending on the duration of the clip, the time YouTube would take to transcribe may vary.
After YouTube has transcribed the video, you can download the transcription file in your preferred format. The instructions are given below explain how you can do so:
- Get to the Subtitles Window
While on the YouTube Studio page, click Subtitles from the left pane to go to the Channel subtitles page. And then click the video you want to modify.
- Get to Classic Studio
In the video subtitle page of the target video, hover mouse on the Published Automatic status under the Subtitles column, click the Options icon (with three vertical dots) that appears, and click Edit on Classic Studio.
- Download Transcription File
Click and open the Actions drop-down list from the top-left corner of the left pane, click your preferred transcription format including .vtt, .srt and .sbv from the list, and save the file on your local hard disk.
Method 2: Get YouTube Transcription when Watching
In addition, if you are watching any other video, you can make YouTube transcribe that for you as well. You can follow the instructions given below to get the YouTube video to text transcription:
Step 1: Play the Video
Go to the video on YouTube and start playing it. Make sure NOT to get to full-screen mode as doing so would hide the option to transcribe the clip.
Step 2: Enable Transcription
Click the More icon (with three horizontal dots) from under the bottom-right corner of the video player, and click Open transcript to see the video transcription in the Transcript pane that appears in the right.
Step 3: Manage Timestamps
Click the Options icon (with three vertical dots) from the top-right corner of the Transcript pane, and click Toggle timestamp to enable or disable the timestamps in the video transcription.
Limitations of Using YouTube Transcribe
Although YouTube’s automatic transcription is a decent feature that saves you a lot of time, since Google uses machine learning algorithms to convert the speech to text, the level of accuracy may vary depending on the accent of the speaker, and the clarity of the audio the video has. Also, even sometime you may not be satisfied with the end-results.
Alternatively, you can use Kapwing to transcribe a YouTube video and download the transcription file with the below step-by-step instructions:
Step 1: Add YouTube Video
Copy the URL of YouTube video you want to transcribe, go to https://www.kapwing.com/subtitles , paste the URL in the Paste a URL field, wait while Kapwing fetches the content of the video, and opens the Add subtitles to Video page.
Step 2: Transcribe the Video
Click Auto-generate from the right window, and follow the on-screen instructions to transcribe YouTube video to text.
Step 3: Download the Transcription File
Click Download SRT from the left pane, and follow the instructions from there to download the transcription file in *.srt format.
Pros
- Kapwing is free to use
- The auto-transcription process is quick and less tedious
- Kapwing also allows manual transcription and uploading of an existing *.srt file
Cons
- The auto-transcribed text might lack accuracy as the task is done by the speech-to-text tools that work in the background
You can follow the step-by-step instructions to transcribe a YouTube video and download the transcription file using Kapwing:
Step 1: Add YouTube Video
Copy the URL of YouTube video you want to transcribe, go to https://www.kapwing.com/subtitles , paste the URL in the Paste a URL field, wait while Kapwing fetches the content of the video, and opens the Add subtitles to Video page.
Step 2: Transcribe the Video
Click Auto-generate from the right window, and follow the on-screen instructions to transcribe YouTube video to text.
Step 3: Download the Transcription File
Click Download SRT from the left pane, and follow the instructions from there to download the transcription file in *.srt format.
Pros
- Kapwing is free to use
- The auto-transcription process is quick and less tedious
- Kapwing also allows manual transcription and uploading of an existing *.srt file
Cons
- The auto-transcribed text might lack accuracy as the task is done by the speech-to-text tools that work in the background
Part 3: Benefits of Transcribing YouTube Videos
You may need video transcriptions for several reasons, such as analyzing the summary of the entire speech in the video, extracting a single phrase or quote that was spoken in the clip, or making the video helpful even for those suffering from hearing impairment. When you transcribe a YouTube video, the transcript can be useful in many ways. Some of the most common benefits of transcribing a video include:
- Search Engine Optimization
When you add subtitles, the text can appear in Google search results when someone types a similar phrase in the search box. This helps get more views to your videos, thus giving your channel popularity, and you, monetary gains in the long run.
- Accent
If the speaker in the video is from a different region and is using an accent that you are not much comfortable with, you can turn on the subtitles and read the dialogs along with the video.
- Repurposing on Blogs
If you own a blog that you have embedded your video to, the transcription could be used to add text to it so the target audience can get a fair idea of what the video is all about. This is useful because many people prefer reading over watching.
YouTube Video Transcription FAQs
1. How to Transcribe YouTube Video to Text
Usually the transcription files have *.srt extension that are globally accepted and supported by almost all media players. However, there might be instances when you want to have the subtitles in plain text.
That said, to convert an SRT file to TXT, you can:
- Right-click the SRT file
- Go to Rename
- Replace srt with txt and press Enter
- Click OK on the confirmation box that appears next to convert SRT to TXT
After this, you can simply double-click the file, and read and modify the transcribed content as needed.
2. How to Edit and Upload Edited Transcript to YouTube
If you made any modifications to the transcript that was automatically generated by YouTube or any other third-party transcription tool, you can follow the steps given below to upload the new file to the YouTube video:
- Go to YouTube Studio and then to the Channel subtitles page as explained earlier
- Expand the Languages column of the target video
- Click the Options icon that appears under the Subtitles column when you hover mouse on to it
- Click Edit on Classic Studio
- On the next page, click Edit from the top-right corner
- Click to open the Actions drop-down list from the upper-left corner
- Click Upload a file
- Follow the on-screen instructions from there to upload the modified transcription file
- Click Save Changes from the top-right corner of the page when done
Conclusion
If you are looking for a quick and easy way of adding subtitles to your videos, letting YouTube transcribe for you could be a good approach. However, because these auto-generated transcriptions are created by machine learning algorithms, their accuracy cannot be counted on. Therefore, the best way to get the job done accurately is, let YouTube auto-transcribe your video, download the transcription file, make the necessary changes to it, and then upload the file back to the video.
Richard Bennett
Richard Bennett is a writer and a lover of all things video.
Follow @Richard Bennett
Top 10 Music Reactions on YT: A Year-End Review
Create High-Quality Video - Wondershare Filmora
An easy and powerful YouTube video editor
Numerous video and audio effects to choose from
Detailed tutorials are provided by the official channel
Reaction videos are slowly taking over YouTube as the most popular type of channel. Everyone loves when someone reacts to something, and it can be anything from music, games, trending topics, or even random things like orange juice. They are so popular that people tag their friends to react to the series.
Music reaction videos are becoming increasingly more popular. Instead of a standard lyric video, music reaction videos show a fan listening and singing to their favorite album or single from start to finish. There are tons of fan-made music reaction videos on YouTube, but some get hundreds of thousands or even millions of views!
In this article
01 What is a music reaction video?
02 10 Best YouTube Music Reaction Video
03 How to make a Youtube music reaction video with Filmora
What is a music reaction video?
When you are on YouTube, you will see many music reaction videos. The music reaction video is the video that is based on the song. According to the situation, the person who uploads the video reacts to the song and does something funny or crazy. Many people enjoy watching these kinds of videos because they are funny and entertaining in many ways.
The best thing about these videos is that you can learn from them. You can learn how to react in certain situations, but these situations might arise only once in your life. So, it is good to react to these funny videos and make yourself aware of what should be done in such a situation.
You can even make your music reaction video and share it with your friends on social media platforms like Facebook, Twitter, and Instagram. People will love it and appreciate it, and you can also learn how to make these kinds of videos by watching other people’s reactions.
10 Best YouTube Music Reaction Video
#1. [BANGTAN BOMB] ‘Dynamite’ MV Reaction
In this video, a famous Korean Band named BTS reacts to many different music videos from the past. People love to see their reactions, and the video has over 25M views on Youtube.
#2. Rappers React to Rich Brian ft. Ghostface Killah, Desiigner, Tory Lanez & More
In this video, many street rappers react to many famous rappers and give their views about them. The video became quite popular on Youtube and got 23M+ views.
#3. Dixie D’Amelio’s Family and Friends React to her Be Happy Music Video
In this video, many people who are relatives of Dixie D’Amelio react to her music video. She recorded the reach of each one of them and shared it with the youtube community. The video got over 20M views on youtube.
#4. Elders React To Lil Dicky - Earth
In this video, many elders react to the Lil Dick’s Music video. Their reactions are quite amusing to the audience, and the video got over 19M views on Youtube.
#5. Kids React To Eminem
In this video, some kids react to the Eminem rap music videos and give their views about rap. Some of them are amused by the rap, and some of them find it difficult to understand. Overall their reaction is worth watching. The video got over 13M views on Youtube.
#6. Do Teens Know 90s Hip Hop?
In this video, many teens listen to ‘90s hip-hop music videos, and their reactions are recorded. They are familiar with some of the songs, and some are totally new and amusing to them. The video got over 11M Views on Youtube.
#7. Big Shaq - Mans Not Hot (Music Video)- Reaction
In this video, a couple of friends react to the Mans Not Hot Music video and record their reactions. They have reacted to the video quite funny, and their reactions are very amusing. People enjoy watching their reactions. The video has over 11M views on Youtube.
#8 BTS React To Fans Watching “Boy With Luv” Music Video For The First Time
In this video, The famous Koran Band BTS reacts to their fan’s videos, watching Boy With Luv Music video for the first time. So, in this video, you will see the reaction of BTS to the reaction of their fans. The video was a hit on Youtube, and it got over 9M views.
#9 “Don’t Forget” Minecraft FNAF Animation Music Video
This is a reaction mashup video in which a lot of creators are reacting to the Don’t forget music video. You rarely get to see soo many reactions in a single video. The video is a hit and has over 9M views on Youtube.
#10 Youtubers React To Top 10 Most Disliked Music Videos Of All Time
In this video, many YouTubers react to the top 10 most disliked music videos in Youtube’s history. Their reactions are priceless, and this video is definitely worth watching. The video has over 6M views on Youtube.
How to make a Youtube music reaction video with Filmora
Reaction videos are the latest trend in the world of YouTube. So many people want to create their own reaction videos but either doesn’t have the skills to do so or don’t know how to get started. This guide should give you everything you need to get started on creating your very next reaction video.
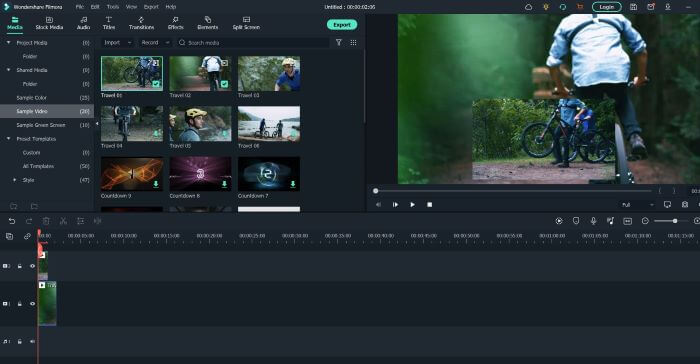
Step 1: First of all, make sure that you have downloaded and installed the latest version of Filmora on your computer. If you haven’t already downloaded it, then you can install it from their official website.
Step 2: Run the Filmora software and when a window appears on your screen, click on the new project and select the 16:9 aspect ratio of your project.
Step 3: Now first, you need to record your reaction to a music video . You can use Filmora’s Built-In screen recorder to record your reaction along with your cam. You can also record your reactions separately and then merge them with the original music video using Filmora.
Step 4: Now import the music video on which you want to react to the Filmora library along with your reaction video. You can do this by clicking on the file, import, and import media.
Step 5: Now drag the music video from the Library and drop it into the Filmora timeline.
Step 6: Now drag your reaction video and drop it above the original music video in the track.
Step 7: Decrease the size of your reaction video by using the canvas controls in the preview window and adjusting it to any side of the window.
Step 8: If you want to keep your reaction video in a big frame and your music video in a small one, you can do the opposite.
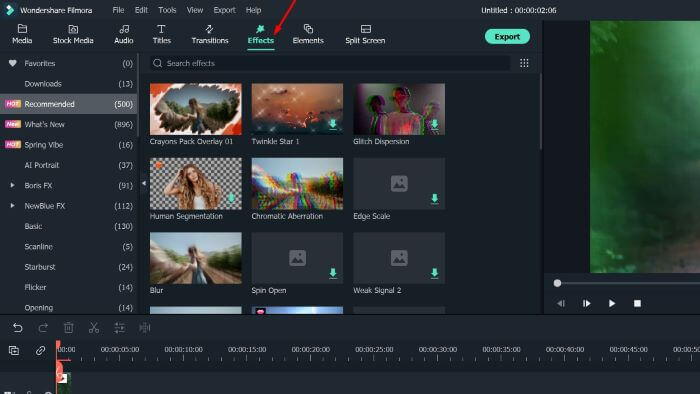
Step 9: If you want to add any effects or call-outs to your video, you can use the rich elements library of Filmora, where you can find hundreds of interactive elements.
Step 10: Once you have finalized the video, click on the import button and save the video to your computer in your desired format. Once the video is imported, you can share it on Youtube with your audience.
For Win 7 or later (64-bit)
For macOS 10.12 or later
Conclusion
● By following the steps above and using Filmora, you will be able to produce a high-quality music reaction video that can be shared with family, friends, or even your favorite artists. All of the steps above may look complicated when separated into different actions, but they became much easier and quicker when completed together and practiced in order.
Reaction videos are slowly taking over YouTube as the most popular type of channel. Everyone loves when someone reacts to something, and it can be anything from music, games, trending topics, or even random things like orange juice. They are so popular that people tag their friends to react to the series.
Music reaction videos are becoming increasingly more popular. Instead of a standard lyric video, music reaction videos show a fan listening and singing to their favorite album or single from start to finish. There are tons of fan-made music reaction videos on YouTube, but some get hundreds of thousands or even millions of views!
In this article
01 What is a music reaction video?
02 10 Best YouTube Music Reaction Video
03 How to make a Youtube music reaction video with Filmora
What is a music reaction video?
When you are on YouTube, you will see many music reaction videos. The music reaction video is the video that is based on the song. According to the situation, the person who uploads the video reacts to the song and does something funny or crazy. Many people enjoy watching these kinds of videos because they are funny and entertaining in many ways.
The best thing about these videos is that you can learn from them. You can learn how to react in certain situations, but these situations might arise only once in your life. So, it is good to react to these funny videos and make yourself aware of what should be done in such a situation.
You can even make your music reaction video and share it with your friends on social media platforms like Facebook, Twitter, and Instagram. People will love it and appreciate it, and you can also learn how to make these kinds of videos by watching other people’s reactions.
10 Best YouTube Music Reaction Video
#1. [BANGTAN BOMB] ‘Dynamite’ MV Reaction
In this video, a famous Korean Band named BTS reacts to many different music videos from the past. People love to see their reactions, and the video has over 25M views on Youtube.
#2. Rappers React to Rich Brian ft. Ghostface Killah, Desiigner, Tory Lanez & More
In this video, many street rappers react to many famous rappers and give their views about them. The video became quite popular on Youtube and got 23M+ views.
#3. Dixie D’Amelio’s Family and Friends React to her Be Happy Music Video
In this video, many people who are relatives of Dixie D’Amelio react to her music video. She recorded the reach of each one of them and shared it with the youtube community. The video got over 20M views on youtube.
#4. Elders React To Lil Dicky - Earth
In this video, many elders react to the Lil Dick’s Music video. Their reactions are quite amusing to the audience, and the video got over 19M views on Youtube.
#5. Kids React To Eminem
In this video, some kids react to the Eminem rap music videos and give their views about rap. Some of them are amused by the rap, and some of them find it difficult to understand. Overall their reaction is worth watching. The video got over 13M views on Youtube.
#6. Do Teens Know 90s Hip Hop?
In this video, many teens listen to ‘90s hip-hop music videos, and their reactions are recorded. They are familiar with some of the songs, and some are totally new and amusing to them. The video got over 11M Views on Youtube.
#7. Big Shaq - Mans Not Hot (Music Video)- Reaction
In this video, a couple of friends react to the Mans Not Hot Music video and record their reactions. They have reacted to the video quite funny, and their reactions are very amusing. People enjoy watching their reactions. The video has over 11M views on Youtube.
#8 BTS React To Fans Watching “Boy With Luv” Music Video For The First Time
In this video, The famous Koran Band BTS reacts to their fan’s videos, watching Boy With Luv Music video for the first time. So, in this video, you will see the reaction of BTS to the reaction of their fans. The video was a hit on Youtube, and it got over 9M views.
#9 “Don’t Forget” Minecraft FNAF Animation Music Video
This is a reaction mashup video in which a lot of creators are reacting to the Don’t forget music video. You rarely get to see soo many reactions in a single video. The video is a hit and has over 9M views on Youtube.
#10 Youtubers React To Top 10 Most Disliked Music Videos Of All Time
In this video, many YouTubers react to the top 10 most disliked music videos in Youtube’s history. Their reactions are priceless, and this video is definitely worth watching. The video has over 6M views on Youtube.
How to make a Youtube music reaction video with Filmora
Reaction videos are the latest trend in the world of YouTube. So many people want to create their own reaction videos but either doesn’t have the skills to do so or don’t know how to get started. This guide should give you everything you need to get started on creating your very next reaction video.
Step 1: First of all, make sure that you have downloaded and installed the latest version of Filmora on your computer. If you haven’t already downloaded it, then you can install it from their official website.
Step 2: Run the Filmora software and when a window appears on your screen, click on the new project and select the 16:9 aspect ratio of your project.
Step 3: Now first, you need to record your reaction to a music video . You can use Filmora’s Built-In screen recorder to record your reaction along with your cam. You can also record your reactions separately and then merge them with the original music video using Filmora.
Step 4: Now import the music video on which you want to react to the Filmora library along with your reaction video. You can do this by clicking on the file, import, and import media.
Step 5: Now drag the music video from the Library and drop it into the Filmora timeline.
Step 6: Now drag your reaction video and drop it above the original music video in the track.
Step 7: Decrease the size of your reaction video by using the canvas controls in the preview window and adjusting it to any side of the window.
Step 8: If you want to keep your reaction video in a big frame and your music video in a small one, you can do the opposite.
Step 9: If you want to add any effects or call-outs to your video, you can use the rich elements library of Filmora, where you can find hundreds of interactive elements.
Step 10: Once you have finalized the video, click on the import button and save the video to your computer in your desired format. Once the video is imported, you can share it on Youtube with your audience.
For Win 7 or later (64-bit)
For macOS 10.12 or later
Conclusion
● By following the steps above and using Filmora, you will be able to produce a high-quality music reaction video that can be shared with family, friends, or even your favorite artists. All of the steps above may look complicated when separated into different actions, but they became much easier and quicker when completed together and practiced in order.
Also read:
- [Updated] Blurring the Line Secure Video Content with Smoother Images
- Essential Guide for YouTube Video Clips
- Cutting-Edge Techniques A Guide to Next-Level Effectiveness in Your YouTube Ads
- In 2024, Boosting Views Mastering Hashtags in FreeFire Vids
- 2024 Approved Direct Capture Screen Record on PC/Mac + YouTube Upload
- [New] Audiophiles Recommend Top 5 Headset Choices
- Elevate Your YouTube Content SEO Methods Revealed
- 2024 Approved Decoding YouTube CPM for Content Creators' Success
- Fast Revenues Forecasting Toolkit for Vids
- Dive Into the Deep End - Your Guide to the Best Free Movies on YouTube for 2024
- Echoes of Exploration Your Step-by-Step Blueprint to Becoming a Travel Vlogger for 2024
- Elite Channel Explorer Discover Prime Video Status for 2024
- 2024 Approved Embracing Constructive Feedback, Ignoring the Rest
- [New] Enhancing YT Experience Handling Several Videos at a Time
- 2024 Approved Bridging Soundscapes & Visuals – Essentials for Innovative ASMR Videos
- 10 Best Video Streaming Alternatives to YouTube for Smartphone Users
- In 2024, A Compreshift Guide to Creating Profitable & Engaging YouTube Collaborations
- In 2024, Accelerated Fortnite Visualization Steps
- Real-Time Narrative Builder
- Unlocking Potential in 5-Second Videos
- Seamless Movie Marathons YouTube’s Top Free Content Guide
- Best 7 High-Resolution DSLRs for Engaging Video Blogs
- Elevate Your Vlogging Game with Tripod Mastery for 2024
- YouTube's Favorite Spotlight Equipment #17
- Best 8 Evidenced Tools for Video Propagation
- Essential Strategies for Effective Content Management in Creator Studio
- [Updated] Birth of an Internet Persona – The VTuber Blueprint?
- 2024 Approved Best 8 Platforms for Professional Linux Editing
- Crafting Classic Cinematography Step-by-Step Guide for 2024
- Historical Insights Top Educational YT Creators
- YouTube Mastery in Marketing The Top 5 Must-Knows for Brands
- 2024 Approved Dynamic Discussions for Regular Streaming
- Cutting-Edge Visual Techniques Selecting Premium Camera Lenses for 2024
- Sharing Stories that Resonate with a Digital Audience YT
- 2024 Approved Culinary Kings & Queens YouTube Food Experts
- 2024 Approved Essential Strategies for Viewing Your Subscribers
- New YouTube Earning Rules Unveiled
- [New] A Comprehensive Walkthrough Setting Up Your First WireCast Livestream to Youtube
- Shorts Fixed - Ready to Stream and Share
- Download YouTube Playlists with Ease - Our Instructions for 2024
- [Updated] Capture, Create, Curate Mobiles in Action for YouTube Thumbnails
- Creating Content with Confidence Free YouTube Training
- [Updated] Cutting-Edge Unboxing Strategies to Boost Viewership and Engagement
- 9 Solutions to Fix Process System Isnt Responding Error on OnePlus 11 5G | Dr.fone
- Updated Top Ten Windows 10 Fusion Applications for Superior Sound Outputs
- Mastering Momentum Go From Zero to Viral in FB for 2024
- This Article Will Show You How to Clone Yourslef in Videos with Filmora for 2024
- New 2024 Approved From Zero to Hero Top 10 Cartoon Video Makers for Beginners
- Updated In 2024, The Rhythmic Realm of KineMaster Incorporating Melodies and Beats
- The Most Useful Tips for Pokemon Go Ultra League On Oppo A56s 5G | Dr.fone
- New 2024 Approved Do VHS Effect with Final Cut Pro in the Right Way
- 8 Solutions to Solve YouTube App Crashing on Oppo Reno 10 Pro 5G | Dr.fone
- New 2024 Approved When Can I Implement Side-Chain Compression for Enhanced Clarity?
- New 2024 Approved Achieving Silence on TikTok Strategies to Mute Unwanted Sound Effects
- Screen Sharing Showdown OBS vs Twitch Studio Face-Off for 2024
- [Updated] 2024 Approved High-Quality Streaming Top 5 Recorder Devices Reviewed
- [Updated] Transform Your TikTok Footage Advanced Slow Motion Filming Techniques for 2024
- Title: [New] Essential Tips for FREE YouTube Video Transcriptions
- Author: Kevin
- Created at : 2024-05-25 16:08:35
- Updated at : 2024-05-26 16:08:35
- Link: https://youtube-videos.techidaily.com/new-essential-tips-for-free-youtube-video-transcriptions/
- License: This work is licensed under CC BY-NC-SA 4.0.
