
![[New] Essential Strategies for Memorable YouTube Closings](https://www.lifewire.com/thmb/j4Lcb4-fotHW2yU42cZWCXWVPs4=/400x300/filters:no_upscale():max_bytes(150000):strip_icc()/GettyImages-673417706-fadd780500a54285a71da83a53c70f80.jpg)
[New] Essential Strategies for Memorable YouTube Closings
Essential Strategies for Memorable YouTube Closings
Free YouTube End Screen Templates

Richard Bennett
Oct 26, 2023• Proven solutions
YouTube end screens are a great way to get your viewers who have watched your YouTube video until the end to subscribe to your channel, visit your website, or watch more of your videos. End screens work on all devices, including mobile phones and tablets. This was not the case for annotations (YouTube’s former way of doing these things). As more YouTubers have jumped onto using end screens, the need for well-designed end screen templates have rapidly grown. In this post, I will
- List some places you can download free end screen templates
- Give you a step-by-step tutorial on how to build your own outro for free


Part 1: Free End Screen Templates Download
Wondershare Filmstock Gaming Video Editing Skils ](https://filmstock.wondershare.com/creative-theme-game?source%5Fchannel=seo%5Farticle?spm=rs.filmora%5Fweb )
(The images displayed below are for preview purposes only. For the highest quality and ideal dimensions to add into your own video, click the image and follow the links that we provide)
1. The Sales Lion
In exchange for your name and e-mail address, the Sales Lion will let you download their YouTube templates pack, which includes a PhotoShop PSD file of their designed YouTube end screen.
sales-lion-outro-end-screen ](https://www.thesaleslion.com/download-youtube-templates-pack/ “The Sales Lion YouTube Templates Pack”)
2. Grabster
Grabster offers five free YouTube end screen templates. With each download, you’ll get a PhotoShop PSD file and a font file so that you can change the text.
grabster-outro ](https://mega.nz/#!l5VVwR7J!w9hv%5FBgVIN2SsEdlf5IZViISJvXgmkDbErhG4A3gGYQ “Grabster Channel Art Template”)
grabster-your-channel-name-outro ](https://mega.nz/#!RoMXlTbR!ALzroPD6CNRVuDABR7Uv3WAPajr0WJ1BT9ZVDwF4m0Y “Grabster Channel Art Template”)
grabster-youtube-end-screen ](https://mega.nz/#!B8sAhL6Q!iIaTl4uGojXONee6k%5FdTLWdSVrGOiRWPQu4BjU2zJ5o “Grabster Channel Art Template”)
grabster-youtube-end-screen-2 ](https://mega.nz/#!RokxlYTK!vuKGcwG-ymNdR9tBfSp8xjhynNIkn%5F4PC9ob%5Fq2TvWc “Grabster Channel Art Template”)
grabster-youtube-end-screen-3 ](https://mega.nz/#!otc2wRaK!pk%5F7smhaRSuymYkKpf6DVPh2yt40Vlhz8xd8wRuu9Oo “Grabster Channel Art Template”)
3. Taha Chimar
Those who do not have PhotoShop can use Taha Chimar’s end screen designs that come in png file format.
To download, you will have to follow a URL link in the description box of the YouTube videos. Be careful, though, as a lot of the links lead to free hosting websites with pop-ups that can harm your computer if you are easily fooled by them.
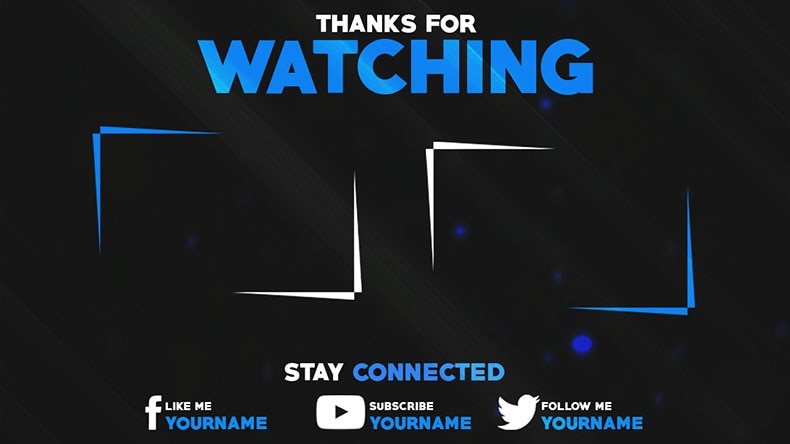
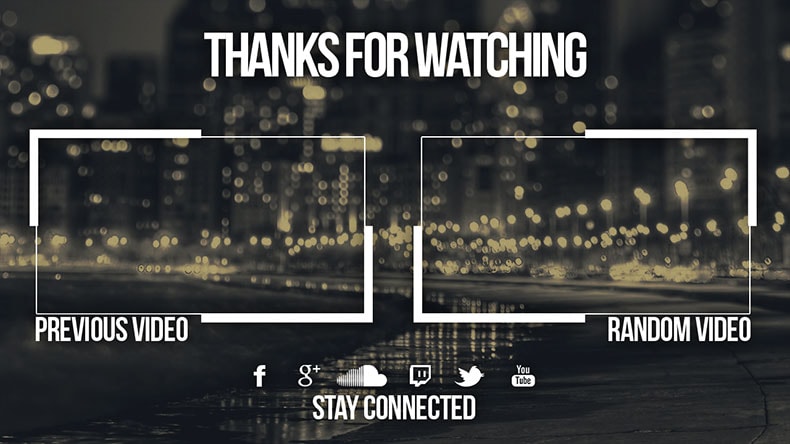
4. SoapyEdits
SoapyEdits is a YouTuber with a channel offering a whole playlist of PhotoShop PSD file end screen designs.
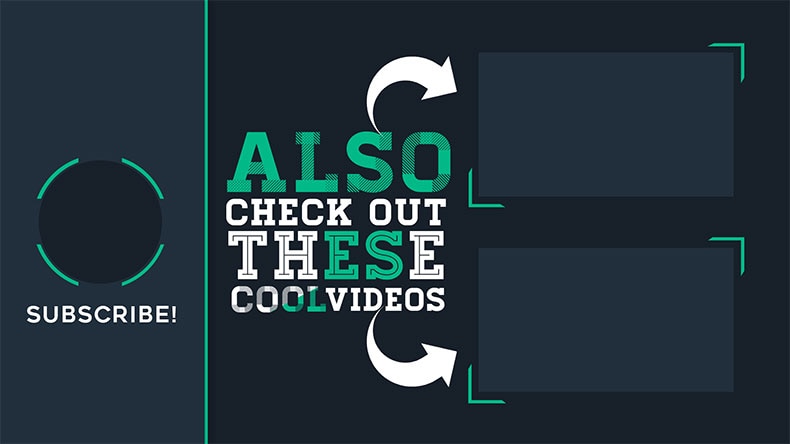
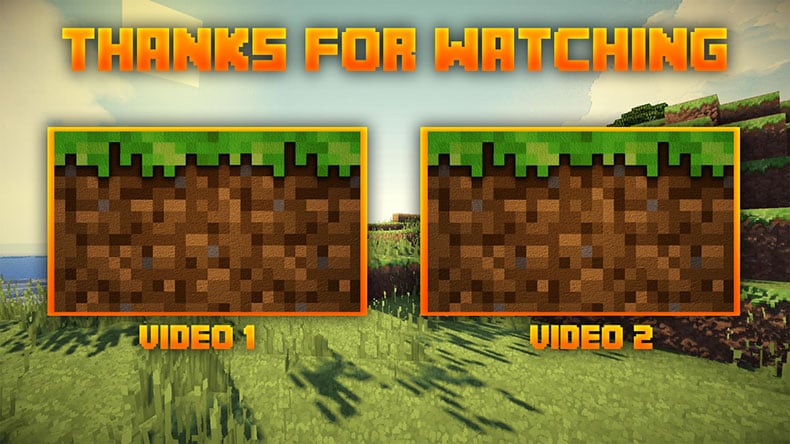
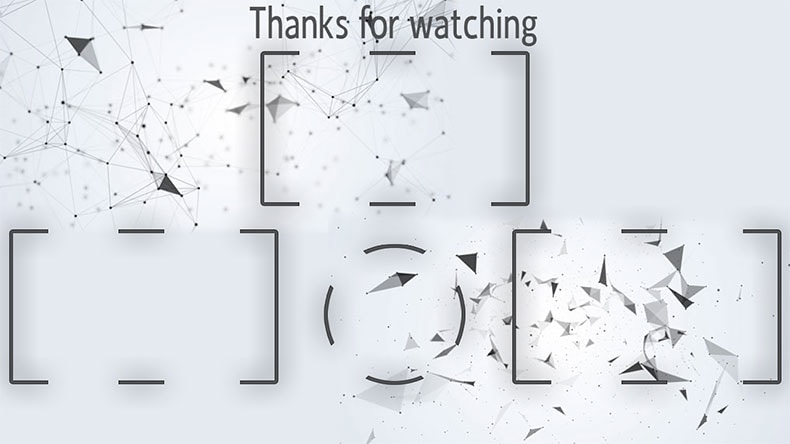
Here are some of our favorite ones.
Here’s one for the Minecraft fans:
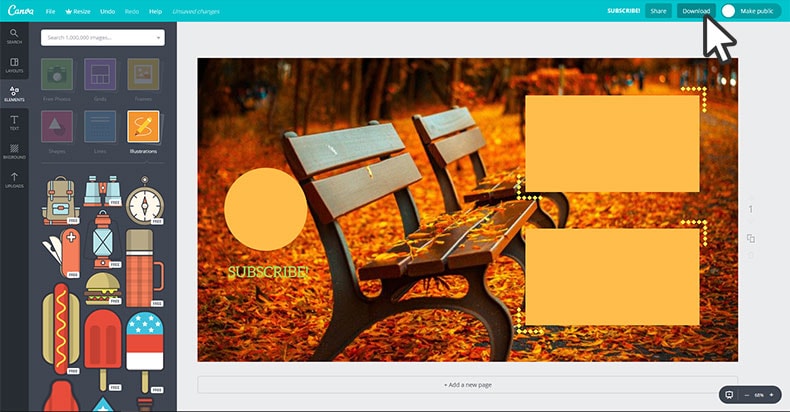
Another way to get your YouTube end screens for free, of course, is to make them yourself. Canva is a great free online design tool for this.
Part 2: How To Build Your Outro For Free (Step-by-step Canva Tutorial)
1. First, you have to sign up with an e-mail address

2. Once logged in, select “use custom dimensions” and plug in “1920” pixels as your width and “1080” pixels as your height (this, of course, may vary depending on the resolution of your video project).
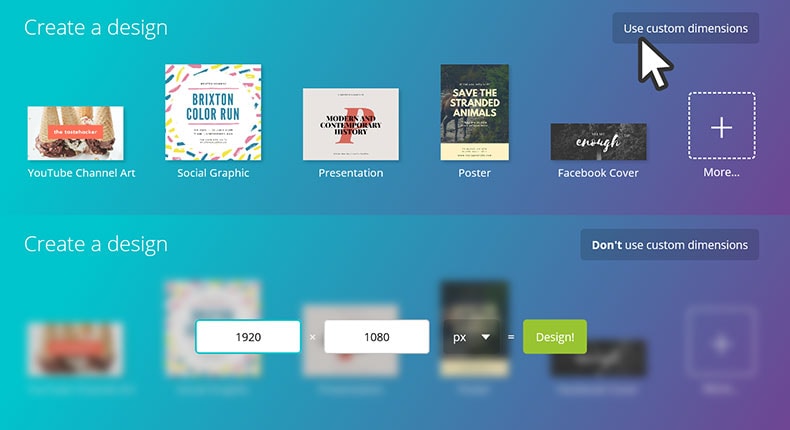
3. After clicking “Design!,” a new browser will open with a blank canvas.
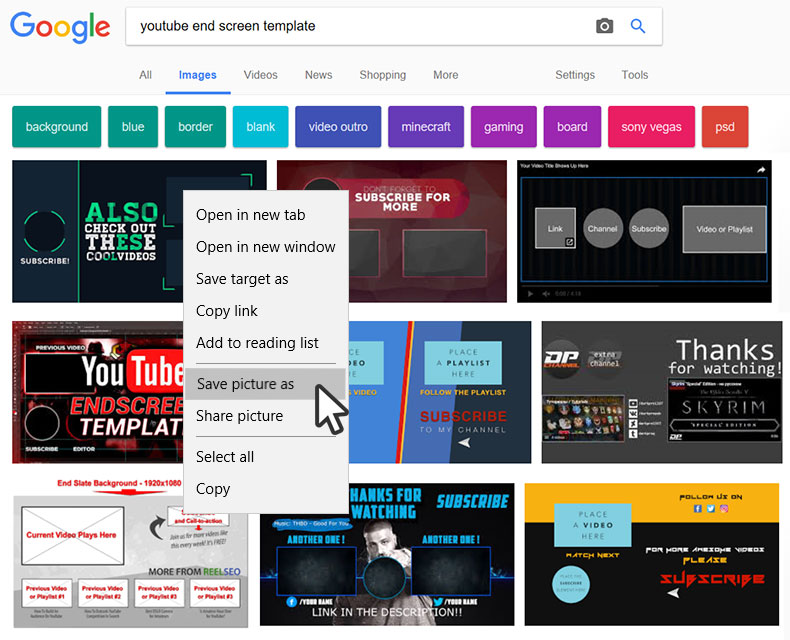
4. Next, do an image search for “YouTube End Screen,” choose an end screen with a layout that you would like to build off of, and save the image onto your computer.
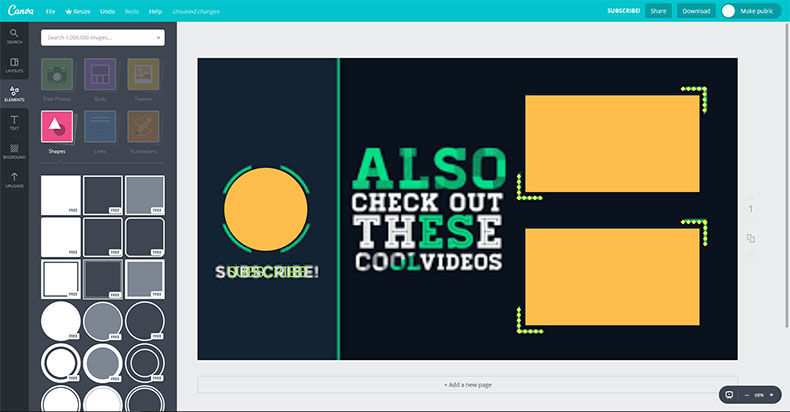
5. Upload the image onto your Canva project.

6. Stretch your image to the ends of your canvas.

7. Insert your own shapes, lines, colours, images, and text over the image.
8. When you’re done, delete the original image so that you’re left with just your own design. Go ahead and click “download.”
If you’re looking for other options to design your end screen, make sure to also check out our article on The YouTube Outro Guide . To edit the YouTube video with more effects and templates, you can try Wondershare Filmora video editor.
Richard Bennett
Richard Bennett is a writer and a lover of all things video.
Follow @Richard Bennett
Richard Bennett
Oct 26, 2023• Proven solutions
YouTube end screens are a great way to get your viewers who have watched your YouTube video until the end to subscribe to your channel, visit your website, or watch more of your videos. End screens work on all devices, including mobile phones and tablets. This was not the case for annotations (YouTube’s former way of doing these things). As more YouTubers have jumped onto using end screens, the need for well-designed end screen templates have rapidly grown. In this post, I will
- List some places you can download free end screen templates
- Give you a step-by-step tutorial on how to build your own outro for free
Part 1: Free End Screen Templates Download
Wondershare Filmstock Gaming Video Editing Skils ](https://filmstock.wondershare.com/creative-theme-game?source%5Fchannel=seo%5Farticle?spm=rs.filmora%5Fweb )
(The images displayed below are for preview purposes only. For the highest quality and ideal dimensions to add into your own video, click the image and follow the links that we provide)
1. The Sales Lion
In exchange for your name and e-mail address, the Sales Lion will let you download their YouTube templates pack, which includes a PhotoShop PSD file of their designed YouTube end screen.
sales-lion-outro-end-screen ](https://www.thesaleslion.com/download-youtube-templates-pack/ “The Sales Lion YouTube Templates Pack”)
2. Grabster
Grabster offers five free YouTube end screen templates. With each download, you’ll get a PhotoShop PSD file and a font file so that you can change the text.
grabster-outro ](https://mega.nz/#!l5VVwR7J!w9hv%5FBgVIN2SsEdlf5IZViISJvXgmkDbErhG4A3gGYQ “Grabster Channel Art Template”)
grabster-your-channel-name-outro ](https://mega.nz/#!RoMXlTbR!ALzroPD6CNRVuDABR7Uv3WAPajr0WJ1BT9ZVDwF4m0Y “Grabster Channel Art Template”)
grabster-youtube-end-screen ](https://mega.nz/#!B8sAhL6Q!iIaTl4uGojXONee6k%5FdTLWdSVrGOiRWPQu4BjU2zJ5o “Grabster Channel Art Template”)
grabster-youtube-end-screen-2 ](https://mega.nz/#!RokxlYTK!vuKGcwG-ymNdR9tBfSp8xjhynNIkn%5F4PC9ob%5Fq2TvWc “Grabster Channel Art Template”)
grabster-youtube-end-screen-3 ](https://mega.nz/#!otc2wRaK!pk%5F7smhaRSuymYkKpf6DVPh2yt40Vlhz8xd8wRuu9Oo “Grabster Channel Art Template”)
3. Taha Chimar
Those who do not have PhotoShop can use Taha Chimar’s end screen designs that come in png file format.
To download, you will have to follow a URL link in the description box of the YouTube videos. Be careful, though, as a lot of the links lead to free hosting websites with pop-ups that can harm your computer if you are easily fooled by them.
4. SoapyEdits
SoapyEdits is a YouTuber with a channel offering a whole playlist of PhotoShop PSD file end screen designs.
Here are some of our favorite ones.
Here’s one for the Minecraft fans:
Another way to get your YouTube end screens for free, of course, is to make them yourself. Canva is a great free online design tool for this.
Part 2: How To Build Your Outro For Free (Step-by-step Canva Tutorial)
1. First, you have to sign up with an e-mail address
2. Once logged in, select “use custom dimensions” and plug in “1920” pixels as your width and “1080” pixels as your height (this, of course, may vary depending on the resolution of your video project).
3. After clicking “Design!,” a new browser will open with a blank canvas.
4. Next, do an image search for “YouTube End Screen,” choose an end screen with a layout that you would like to build off of, and save the image onto your computer.
5. Upload the image onto your Canva project.
6. Stretch your image to the ends of your canvas.
7. Insert your own shapes, lines, colours, images, and text over the image.
8. When you’re done, delete the original image so that you’re left with just your own design. Go ahead and click “download.”
If you’re looking for other options to design your end screen, make sure to also check out our article on The YouTube Outro Guide . To edit the YouTube video with more effects and templates, you can try Wondershare Filmora video editor.
Richard Bennett
Richard Bennett is a writer and a lover of all things video.
Follow @Richard Bennett
Tailor-Made Video Cuts: Mac’s Top MP4 Slicers Revealed
What is the Best MP4 Cutter for YouTubers On Mac?

Liza Brown
Oct 26, 2023• Proven solutions
Editing videos is a big part of YouTubers’ job including cutting MP4, customizing intros and outros, grading video colors, adding a multitude of effects, and many more. All YouTube celebrities use a diverse set of video editing features such as filters, transitions, custom titles and captions, and overlays.
These post-processing effects ensure that their videos don’t only look aesthetically pleasing but are more engaging and interactive to keep their viewers hooked from the beginning right till the end. This is exactly why cutting MP4 videos and editing have become monumentally significant for newcomers.
Having said that, most of the beginners and hobbyists either can’t afford or want to pay for professional video editing software for cutting MP4 such as Adobe Premiere or Final Cut Pro. In this time, FilmoraX will be a better choice to cut MP4 for Youtube
Before we further delve into the details of advanced video cutter functions, let’s first develop an understanding of the basics.
Section1. Basic Video Cutter Functions
Section2. Advanced Video Cutter Functions
Section 1. Basic Video Cutter Functions
These are the features of cutting MP4 videos that are used by almost all of the YouTuber to give their videos a more engaging look and contextualize them based on the content. For instance, almost all of the YouTubers use customized captions and titles to share information that is highly valuable for the viewers and enables them to develop a connection with the YouTuber.
Almost all of the YouTubers have customized intros and outros in their videos but some of the notable names include MKBHD, PewDiePie, and Smosh. In the process of cutting MP4 videos, they add these effects to create a brand for themselves.
One of the most basic functions of cutting MP4 or other videos intended for YouTube audiences is to add your intro and outro.
- Intro - It is a customized beginning where YouTubers usually add their channel name or its logo along with the title of the video. This helps them to develop a personal brand and add context to what their audience is about to see.
- Outro - It is the customized ending of the video where most content creators choose to add a call to action (CTA) encouraging them to engage with the channel or the video in some manner. For example, they may add an outro that asks the users to subscribe to the YouTube channel.

These are customized stickers, captions, and titles that enable YouTubers to add contextual information at any point in the video to add more value to their content during the process of cutting MP4 videos. For example, if a YouTuber is running a smartphone review channel, they can add rich stickers that contain specifications of the smartphone for those who are interested in particulars.
Including such information, while cutting MP4 also adds to the credibility of the content creator as they are perceived as more professional and dedicated to their job.

Steps to Perform Basic Video Cutter Effects on Filmora X
Here’s how you can add intros and outros to your YouTube videos using Wondershare Filmora X for cutting MP4 videos.
- Add intro background and select your favorite audio or sound effect
- Add your logo and/or text to the intro video
- Now add cool effects to improve the appearance of your intro
- Export your intro video and add it to shared media
You can also use Filmora templates for cutting MP4 videos to create your intro video for your YouTube content.
In Filmora, you will find a wide variety of templates for titles, openers, end credits, plain texts, callouts, and more for cutting MP4 and other video formats. You can use the premade template to add the desired text effect and then edit them according to your preferences. If you want to use these settings again, save the customized text effects as presets. It will save you a lot of time.
Section 2. Advanced Video Cutter Functions

These are the cutting MP4 effects that aren’t used by beginners but hobbyists and professional video content creators may use them to add production value and interactive dimension to their content.
- Green Screen - This effect allows YouTubers to add any type of live or static background while cutting MP4 videos adding production value to their video.
- Motion Tracking - This is a cinematic method that enables YouTubers to include digital visuals in live-action video. It ensures that everything including scale, position, relative motion, and orientation is accurate.
- Color Matching - If you are shooting your video with different cameras, every camera records the footage in its own color profile. Color matching is used to introduce color consistency throughout the video. Filmora X is perfectly capable of handling color matching while you are cutting MP4 and other videos.
Some of the channels and YouTubers that rely on advanced video cutting MP4 effects include Vlad and Niki, MKBHD, Dude Perfect, Canal KondZilla, Like Nastya Vlog, and Kids Diana Show.
Performing Advanced Cutting MP4 Video Effects on Filmora X
Step 1 - Set up and position the green screen and add adequate lighting.
Step 2 - Make sure that you don’t wear anything that’s green and start shooting.
Step 3 - Download green screen backgrounds from the website of your choice.
Step 4 - Import your green screen footage into Filmora X and adjust the settings according to your preferences.
Step 5 - Position the background-clip so it looks natural and then export the video in your required format (MP4).
Step 1 - Go to Behaviors in Control Panel and select the top clip. Then click on the “plus” button right next to Behaviors.
Step 2 - Here, select the motion track from the list and open the folder to select the footage you want to track.
Step 3 - This will automatically start motion analysis of the video clip and you’ll be notified with grey tracker points once the analysis is complete.
Step 4 - You can draw around the region that you want to follow the motion and it will be automatically applied to the object.
Step 5 - Preview the clip and adjust any settings if the result isn’t according to your liking.
Step 1 - Drag the video clip to your timeline and move the play head to the frame you want to color match.
Step 2 - Select the remaining video clips and apply color matching through the right-click or the toolbar. Select the frame as a reference and click on ‘Match’.
Step 3 - Now, using the slider, adjust the extent to which you want the color setting of other clips that need to be matched. See the result in the ‘comparison view’.
Final Word
Cutting MP4 or other videos for YouTube content creation is a major part of the process. You need to have reliable and versatile video editing software that can get the job done without any hassle. And while there are professional packages available, they cost way too much for the YouTubers who are just starting out or are just hobbyists. That’s where Filmora X can be an exceptional alternative offering a wide variety of features at a fraction of the cost.
You can tryFilmora X for free for cutting MP4 videos before you pay for the fully-featured software.
You May Also Like:How do Beginners Make a Cool Video for YouTube on Mac>>>
Liza Brown
Liza Brown is a writer and a lover of all things video.
Follow @Liza Brown
Liza Brown
Oct 26, 2023• Proven solutions
Editing videos is a big part of YouTubers’ job including cutting MP4, customizing intros and outros, grading video colors, adding a multitude of effects, and many more. All YouTube celebrities use a diverse set of video editing features such as filters, transitions, custom titles and captions, and overlays.
These post-processing effects ensure that their videos don’t only look aesthetically pleasing but are more engaging and interactive to keep their viewers hooked from the beginning right till the end. This is exactly why cutting MP4 videos and editing have become monumentally significant for newcomers.
Having said that, most of the beginners and hobbyists either can’t afford or want to pay for professional video editing software for cutting MP4 such as Adobe Premiere or Final Cut Pro. In this time, FilmoraX will be a better choice to cut MP4 for Youtube
Before we further delve into the details of advanced video cutter functions, let’s first develop an understanding of the basics.
Section1. Basic Video Cutter Functions
Section2. Advanced Video Cutter Functions
Section 1. Basic Video Cutter Functions
These are the features of cutting MP4 videos that are used by almost all of the YouTuber to give their videos a more engaging look and contextualize them based on the content. For instance, almost all of the YouTubers use customized captions and titles to share information that is highly valuable for the viewers and enables them to develop a connection with the YouTuber.
Almost all of the YouTubers have customized intros and outros in their videos but some of the notable names include MKBHD, PewDiePie, and Smosh. In the process of cutting MP4 videos, they add these effects to create a brand for themselves.
One of the most basic functions of cutting MP4 or other videos intended for YouTube audiences is to add your intro and outro.
- Intro - It is a customized beginning where YouTubers usually add their channel name or its logo along with the title of the video. This helps them to develop a personal brand and add context to what their audience is about to see.
- Outro - It is the customized ending of the video where most content creators choose to add a call to action (CTA) encouraging them to engage with the channel or the video in some manner. For example, they may add an outro that asks the users to subscribe to the YouTube channel.
These are customized stickers, captions, and titles that enable YouTubers to add contextual information at any point in the video to add more value to their content during the process of cutting MP4 videos. For example, if a YouTuber is running a smartphone review channel, they can add rich stickers that contain specifications of the smartphone for those who are interested in particulars.
Including such information, while cutting MP4 also adds to the credibility of the content creator as they are perceived as more professional and dedicated to their job.
Steps to Perform Basic Video Cutter Effects on Filmora X
Here’s how you can add intros and outros to your YouTube videos using Wondershare Filmora X for cutting MP4 videos.
- Add intro background and select your favorite audio or sound effect
- Add your logo and/or text to the intro video
- Now add cool effects to improve the appearance of your intro
- Export your intro video and add it to shared media
You can also use Filmora templates for cutting MP4 videos to create your intro video for your YouTube content.
In Filmora, you will find a wide variety of templates for titles, openers, end credits, plain texts, callouts, and more for cutting MP4 and other video formats. You can use the premade template to add the desired text effect and then edit them according to your preferences. If you want to use these settings again, save the customized text effects as presets. It will save you a lot of time.
Section 2. Advanced Video Cutter Functions
These are the cutting MP4 effects that aren’t used by beginners but hobbyists and professional video content creators may use them to add production value and interactive dimension to their content.
- Green Screen - This effect allows YouTubers to add any type of live or static background while cutting MP4 videos adding production value to their video.
- Motion Tracking - This is a cinematic method that enables YouTubers to include digital visuals in live-action video. It ensures that everything including scale, position, relative motion, and orientation is accurate.
- Color Matching - If you are shooting your video with different cameras, every camera records the footage in its own color profile. Color matching is used to introduce color consistency throughout the video. Filmora X is perfectly capable of handling color matching while you are cutting MP4 and other videos.
Some of the channels and YouTubers that rely on advanced video cutting MP4 effects include Vlad and Niki, MKBHD, Dude Perfect, Canal KondZilla, Like Nastya Vlog, and Kids Diana Show.
Performing Advanced Cutting MP4 Video Effects on Filmora X
Step 1 - Set up and position the green screen and add adequate lighting.
Step 2 - Make sure that you don’t wear anything that’s green and start shooting.
Step 3 - Download green screen backgrounds from the website of your choice.
Step 4 - Import your green screen footage into Filmora X and adjust the settings according to your preferences.
Step 5 - Position the background-clip so it looks natural and then export the video in your required format (MP4).
Step 1 - Go to Behaviors in Control Panel and select the top clip. Then click on the “plus” button right next to Behaviors.
Step 2 - Here, select the motion track from the list and open the folder to select the footage you want to track.
Step 3 - This will automatically start motion analysis of the video clip and you’ll be notified with grey tracker points once the analysis is complete.
Step 4 - You can draw around the region that you want to follow the motion and it will be automatically applied to the object.
Step 5 - Preview the clip and adjust any settings if the result isn’t according to your liking.
Step 1 - Drag the video clip to your timeline and move the play head to the frame you want to color match.
Step 2 - Select the remaining video clips and apply color matching through the right-click or the toolbar. Select the frame as a reference and click on ‘Match’.
Step 3 - Now, using the slider, adjust the extent to which you want the color setting of other clips that need to be matched. See the result in the ‘comparison view’.
Final Word
Cutting MP4 or other videos for YouTube content creation is a major part of the process. You need to have reliable and versatile video editing software that can get the job done without any hassle. And while there are professional packages available, they cost way too much for the YouTubers who are just starting out or are just hobbyists. That’s where Filmora X can be an exceptional alternative offering a wide variety of features at a fraction of the cost.
You can tryFilmora X for free for cutting MP4 videos before you pay for the fully-featured software.
You May Also Like:How do Beginners Make a Cool Video for YouTube on Mac>>>
Liza Brown
Liza Brown is a writer and a lover of all things video.
Follow @Liza Brown
Also read:
- 2024 Approved Best YouTube Video Ideas to Spark Inspiration
- Channel Success Stories Earning While You Edit for 2024
- 2024 Approved Enhancing Visual Impact A Guide to Jump Cut Techniques
- From Passive to Profitable 8 Beginner's Revenue Hacks for YouTube
- 8 Best Mirrorless Cameras Vloggers Should Know
- Troubleshooting Made Easy YouTube Shorts Edition
- [Updated] Add Visual Appeal with These Methods for YT Video Inclusion in PPT
- Visionaries Shaping Marvel Online Experience
- Best 5 Video Editing Platforms That Don't Feature in YouToo
- Master Your Content Essential Trimmer Tools for YouTube
- 2024 Approved Amplify Content with Free Audio Samples
- Efficient Tools Simplifying the Task of Feedback Erasure
- Streamline Your Creation Process with This YouTube Shorts Guide
- [New] Ease Into Content Creation Crafting the Top 10 Accessible YouTube Videos
- 2024 Approved Elevate Video Playback Embrace the Power of AV1 in YouTube
- [New] Editor’s Elite Gadgets Best Machines for Screen Magic
- How to Create a Sports YouTube Channel on Mac?
- Historical Discoveries at Your Screen - 10 Best Educational YouTubers
- In 2024, Ascend in the YouTube Arena Through Creative Studio Mastery
- [New] Engineering Captivating Video Teasers for Online Presence
- [Updated] Boost Your Earnings on YouTube Shorts A Guide
- 2024 Approved Crafting Allure in Online Visuals for Beauty
- Unlock Audience Favorites 3 Powerful Tales
- Unlock Easy Paths for Exceptional YT Thumbnails
- Stellar Showmanship YouTube’s Best Magic Tricks Edited
- YouTube Equipment for Beginners [Ultimate Guide]
- 2024 Approved Content Creators' Dilemma Which Site Reigns - Vimeo, YouTube?
- Effective Use of AdSense on YouTube to Boost Channel Income
- The Art of Playlist Construction on YouTube
- Charting a Course to Your Signature Sphere
- [New] Create Memorable Thumbnails - Discover These 8 YouTube Aids
- How to Size Your Videos YouTube's Best Practices Unveiled
- Amplify YouTube Performance - Rapid Video Rendering Guide for 2024
- The Fastest 8 YouTube Channels Breaking Viewership Records
- Detailed Guide YouTube's End Screens Explained
- [New] Cutting-Edge Techniques in YouTube Ad Design
- 2024 Approved Earnings Expansion The Significance of 500 Subs Club
- [Updated] Building Wealth Through Video Content Revenue
- [New] 16 Best Kickstart Videos on YouTube for Visibility Boost
- 2024 Approved Elevating Your Style with YouTube's Best Hauls
- Monetize Your Youtube Shorts Essentials, Possible Income
- Streamlining Sonic Selection A Guide to Curating YouTube Content
- Elevate Visibility Comprehensive Guide to Video Marketing Titles for 2024
- Top 15 YouTube Starter Themes for Increased Viewership
- In 2024, Elevate Your Marketing Game - Free 50 YouTube Adornments Here
- [Updated] Cost-Free Translation Made Easy with These Subtitle Downloader Apps
- 2024 Approved Culinary Crescendo High-Impact Food Network Monikers
- Ideal ASMR Channel Selections
- In 2024, Choosing Streaming Giants Vimeo, YouTube, or DailyMotion?
- 2024 Approved Content Creation Evolution Studio Vs. Innovative Beta
- Achieving Seamless 360 Streaming on Facebook for 2024
- In 2024, How to Transfer Music from Honor X50i+ to iPod | Dr.fone
- [Updated] 2024 Approved HearNow Podcast and Speaker Assessment
- Perfecting Live Social Media Facebook Livestream Tutorials for Tech
- [Updated] 2024 Approved Instagram Aesthetics Final Cut Pro X for Editing Tall-Screen Content
- How to Reset Gmail Password on Nubia Red Magic 8S Pro+ Devices
- [New] Infusing Beats Into IG Story Posts Without Limits for 2024
- In 2024, Best 3 Software to Transfer Files to/from Your Tecno Pova 6 Pro 5G via a USB Cable | Dr.fone
- [Updated] In 2024, Ideal Screencasting Software for Effective Teaching
- In 2024, How to Check Distance and Radius on Google Maps For your Samsung Galaxy S24 Ultra | Dr.fone
- [New] Screen Recorder Showdown Features and Prices Compared
- In 2024, Best Pokemons for PVP Matches in Pokemon Go For Nokia 105 Classic | Dr.fone
- New The Ultimate List Best Free Video Special Effects Apps for iOS and Android
- Title: [New] Essential Strategies for Memorable YouTube Closings
- Author: Kevin
- Created at : 2024-05-25 16:08:28
- Updated at : 2024-05-26 16:08:28
- Link: https://youtube-videos.techidaily.com/new-essential-strategies-for-memorable-youtube-closings/
- License: This work is licensed under CC BY-NC-SA 4.0.
