![[New] Elite Gaming Setup Essentials Revealed](https://thmb.techidaily.com/71f657792ad13f84286b1544671aaf8455260b87c02f1f22e6d755ac15543040.jpg)
[New] Elite Gaming Setup Essentials Revealed
Elite Gaming Setup Essentials Revealed
YouTube Equipment for Gaming Channels - Best Gaming Gears

Richard Bennett
Mar 27, 2024• Proven solutions
You love gaming, you have a lot of know-how to pass on, and you have a magnetic personality: you are ready to become a great YouTube gaming commentator. All you need is gaming gear. We have already listed some of the best YouTube video shooting equipment lists for starting recording videos, here we will run through some of the best YouTube equipment for gaming channels, sorted into categories for game recording, audio, and video (facecam).
YouTube Equipment You Should Have for Gaming Channels [Gaming Gears]
1. Game Recording [Capture Card & Game Recording Software]

Game recording software, or hardware, is what you will use to capture your in-game footage. The worst thing you can do is try to point a camera at the screen of your computer or television; recording your screen directly is a must. What kind of game capture gear you need will depend on what kind of game you are playing.
For recording games on your computer screen, you may only need software, and there are a few quality game recording software out there for free. One popular option among YouTube gamers is called OBS , or ‘Open Broadcaster Software’. OBS is free to download from Obsproject.com. The thing that makes it great for gamers is it can be used for live streaming to YouTube, or other sharing sites like Twitch.tv (which has a focus on gaming videos).
For those who want to record the gameplay with ease and edit the recorded gameplay footage with the same tool, we recommend you to try Filmora , which is a 2-in-1 gameplay recording software and video editor on both Windows and Mac.
The advantages of using Filmora to record YouTube Gameplay video:
- Record 4K gameplay and high-space game
- Record gameplay and webcam at the same time
- Mark the important moment with the Marker feature when playing the game
- Basic video editing tools provide trimming, cutting, and merging features as well as annotation effects


If you are going to be making videos more related to consol games then you may need to invest in a Capture device. One of the best is the Elgato Game Capture HD60 featured above. It captures video directly onto either your Mac or PC, while a lot of the other top capture devices only work with a PC. It can record in 1080p with 60fps, and you can even live stream. The Elgato HD60 is compatible with PS4, Xbox One, Xbox 360, and the Wii U.
2. Audio Recording Devices
Your audio recording is extremely important. The thing that will set you apart from other people posting gaming commentary is your personality, and that will only come across if your videos have clear audio. It does not do you much good to be hilarious in a fuzzy commentary track.
A lot of YouTube gamers, especially gamers who are just starting to make videos, go with the Zalman ZM-Mic1 which can be used in combination with headphones. The Zalman might pick up background sounds, like mouse clicks, which is not ideal. However, it will give you significantly better audio than recording directly from your computer, and at under $10 it will not be a purchase you regret. The Zalman is a great starter-mic, especially if you download the free audio editing program Audacity and use it to clean up the little imperfections in your recording. Audacity can be downloaded at Audacityteam.org.
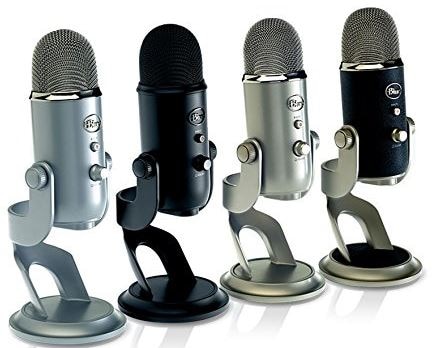
If you are looking for more control over your recording then you should consider the Blue Yeti Mic, which is featured above. This standalone mic is also used by a lot of vloggers and YouTube gamers. It has volume control and even a mute button. It plugs right into the USB drive of your computer using a ten-foot cable, which means you can take it pretty far from your computer. The Blue Yeti USB mic costs about $130.
Check our best list of audio recording devices: Best Microphones for YouTubers
3. Video Recording Devices

If you are going to add a facecam into your videos then it should be high quality, but it does not need to be a top-of-the-line 4K recording. Rather than buying a $1000 DSLR for reaction shots, you should go with a reliable webcam. Before you make a decision about what kind of webcam to get consider how often you will be using your facecam. Not all gaming videos need one. If you play a lot of survival horror games then your reactions will be a key element in your videos, but if you are not playing games that will cause you to have amusing reactions then a facecam will not really add anything to a viewer’s experience.
You may also like: how to use DSLR as a webcam
If your facecam is going to be an important element in your channel then you should expect to spend around $100 on your webcam. The above image is the Logitech C920, which is one of the best at this price point. It performs well in low light, has a good auto-focus feature, and the quality of its video recordings is quite high.
If you are only going to use a facecam occasionally then consider the Genius WideCam F100, which can be found online for around $30. Its 1080p HD recordings are not as smooth as they should be, but it performs very well at 720p and that is all you should need.
Check more options for the Best webcams for YouTuber
Conclusion
Once you have these gaming recording devices, you can now go to record a gameplay and upload it to YouTube. Before you move on, do check these 10 tips for shooting professional YouTube videos . In case you need to trim and edit the recorded gameplay video and present the most exciting moments, you can use some of the best video editing software for YouTube . Here, we recommend you try the Filmora video editor to achieve your goal.
Why choose Filmora to edit recorded YouTube gameplay videos?
- Intuitive interface for saving time
- Trim Video and Audio Quickly
- Record commentary and voiceover with ease or add royalty-free music sound from the Music Library
- 300+ stylish video effects built-in and more in Filmora Effect Store
- Upload to YouTube directly
In case you didn’t know Filmora before, here is a video tutorial for beginners about Filmora video editor, check and download it to edit your YouTube today.
Richard Bennett
Richard Bennett is a writer and a lover of all things video.
Follow @Richard Bennett
Richard Bennett
Mar 27, 2024• Proven solutions
You love gaming, you have a lot of know-how to pass on, and you have a magnetic personality: you are ready to become a great YouTube gaming commentator. All you need is gaming gear. We have already listed some of the best YouTube video shooting equipment lists for starting recording videos, here we will run through some of the best YouTube equipment for gaming channels, sorted into categories for game recording, audio, and video (facecam).
YouTube Equipment You Should Have for Gaming Channels [Gaming Gears]
1. Game Recording [Capture Card & Game Recording Software]
Game recording software, or hardware, is what you will use to capture your in-game footage. The worst thing you can do is try to point a camera at the screen of your computer or television; recording your screen directly is a must. What kind of game capture gear you need will depend on what kind of game you are playing.
For recording games on your computer screen, you may only need software, and there are a few quality game recording software out there for free. One popular option among YouTube gamers is called OBS , or ‘Open Broadcaster Software’. OBS is free to download from Obsproject.com. The thing that makes it great for gamers is it can be used for live streaming to YouTube, or other sharing sites like Twitch.tv (which has a focus on gaming videos).
For those who want to record the gameplay with ease and edit the recorded gameplay footage with the same tool, we recommend you to try Filmora , which is a 2-in-1 gameplay recording software and video editor on both Windows and Mac.
The advantages of using Filmora to record YouTube Gameplay video:
- Record 4K gameplay and high-space game
- Record gameplay and webcam at the same time
- Mark the important moment with the Marker feature when playing the game
- Basic video editing tools provide trimming, cutting, and merging features as well as annotation effects
If you are going to be making videos more related to consol games then you may need to invest in a Capture device. One of the best is the Elgato Game Capture HD60 featured above. It captures video directly onto either your Mac or PC, while a lot of the other top capture devices only work with a PC. It can record in 1080p with 60fps, and you can even live stream. The Elgato HD60 is compatible with PS4, Xbox One, Xbox 360, and the Wii U.
2. Audio Recording Devices
Your audio recording is extremely important. The thing that will set you apart from other people posting gaming commentary is your personality, and that will only come across if your videos have clear audio. It does not do you much good to be hilarious in a fuzzy commentary track.
A lot of YouTube gamers, especially gamers who are just starting to make videos, go with the Zalman ZM-Mic1 which can be used in combination with headphones. The Zalman might pick up background sounds, like mouse clicks, which is not ideal. However, it will give you significantly better audio than recording directly from your computer, and at under $10 it will not be a purchase you regret. The Zalman is a great starter-mic, especially if you download the free audio editing program Audacity and use it to clean up the little imperfections in your recording. Audacity can be downloaded at Audacityteam.org.
If you are looking for more control over your recording then you should consider the Blue Yeti Mic, which is featured above. This standalone mic is also used by a lot of vloggers and YouTube gamers. It has volume control and even a mute button. It plugs right into the USB drive of your computer using a ten-foot cable, which means you can take it pretty far from your computer. The Blue Yeti USB mic costs about $130.
Check our best list of audio recording devices: Best Microphones for YouTubers
3. Video Recording Devices
If you are going to add a facecam into your videos then it should be high quality, but it does not need to be a top-of-the-line 4K recording. Rather than buying a $1000 DSLR for reaction shots, you should go with a reliable webcam. Before you make a decision about what kind of webcam to get consider how often you will be using your facecam. Not all gaming videos need one. If you play a lot of survival horror games then your reactions will be a key element in your videos, but if you are not playing games that will cause you to have amusing reactions then a facecam will not really add anything to a viewer’s experience.
You may also like: how to use DSLR as a webcam
If your facecam is going to be an important element in your channel then you should expect to spend around $100 on your webcam. The above image is the Logitech C920, which is one of the best at this price point. It performs well in low light, has a good auto-focus feature, and the quality of its video recordings is quite high.
If you are only going to use a facecam occasionally then consider the Genius WideCam F100, which can be found online for around $30. Its 1080p HD recordings are not as smooth as they should be, but it performs very well at 720p and that is all you should need.
Check more options for the Best webcams for YouTuber
Conclusion
Once you have these gaming recording devices, you can now go to record a gameplay and upload it to YouTube. Before you move on, do check these 10 tips for shooting professional YouTube videos . In case you need to trim and edit the recorded gameplay video and present the most exciting moments, you can use some of the best video editing software for YouTube . Here, we recommend you try the Filmora video editor to achieve your goal.
Why choose Filmora to edit recorded YouTube gameplay videos?
- Intuitive interface for saving time
- Trim Video and Audio Quickly
- Record commentary and voiceover with ease or add royalty-free music sound from the Music Library
- 300+ stylish video effects built-in and more in Filmora Effect Store
- Upload to YouTube directly
In case you didn’t know Filmora before, here is a video tutorial for beginners about Filmora video editor, check and download it to edit your YouTube today.
Richard Bennett
Richard Bennett is a writer and a lover of all things video.
Follow @Richard Bennett
Perfect 360 Videography: Streaming Tips for YouTube
360 Video Editors: How to Upload 360 Video to YouTube
Richard Bennett
Mar 27, 2024• Proven solutions
360 degree videos have become incredibly popular on the Internet. Not only do they give people a complete look at a scene, but they also allow for a lot of artistic freedom. Those who are using VR-capable devices can get an even more immersive experience. It is why many content creators want to learn about the best 360 video editor they can use on their computers.
Here is a look at the 5 best 360 video converter and editor programs that you can use on your Windows or Mac computer.
Part 1: 5 Best 360 Video Editor for You
1. Movavi
Movavi is an affordable 360 degree video editor that makes it easy for you to create, edit and share these videos online. You can even add filters, titles and transitions to your videos, while soundtrack addition is also possible.
You can use the preview window in the program to see how your video will look if it is published as is. Plus you can use the software with both Windows and Mac, depending on the version that you download.
Pros:
- Works with all mainstream video formats
- Features support for 4K videos
- Includes color adjustment and picture in picture, even in 360 videos
- Speed adjustment capabilities

2. Premiere Pro
Adobe Premiere Pro CC is seen by many as the leading product that you can get if you want to edit high quality videos, including 360 degree content.
Any type of video format will be compatible. You should have no issues editing different segments of the content that you are creating, as Premiere Pro CC is known for having very efficient workflow screens.
Pros:
- Tools to adjust color, audio and graphics
- Works seamlessly with other Adobe apps
- Possible to create and edit content on the go using smartphones

3. After Effects
If you are attempting to add many unique graphics and transitions to your videos, then you will want to use Adobe After Effects. Most would recommend that be combined with Premiere Pro to get the best experience.
After Effects is ideal for adding introductions, end credits, transitions and other effects to the content that you have produced. You can use it to take the videos that you have created to the next level.
Pros:
- Support for movie titles, introductions, transitions and end credits
- Possible to animate logos and characters
- Works with Adobe Premiere Pro

4. Final Cut Pro X
Mac users who want to use their laptop or desktop to edit 360 videos will be happy to know that it is supported in Final Cut Pro X. It is one of the fastest and most powerful programs to use on a Mac, as it is completely optimized for the operating system and hardware.
It is possible to edit and playback 360 videos using a VR headset. It allows creators to not only put in great videos and edit them, but also see how they look after various adjustments.
Pros:
- Advanced color grading options
- Full HDR and 4K support
- View files with VR headset
- Optimized for Macs
- Includes free trial
Cons:
- Little bit expensive

5. Molanis VR
Molanis VR is ideal for anyone who wants to create 360 video that will look incredible when viewed through VR glasses. It is one of the most flexible software options, as it is inexpensive and includes many great features.
IT is possible to trim, cut and fade, include text and images, add effects and make other changes to videos on the fly. The software is intuitive to use, which is great for beginners who have not edited much in the past.
Pros:
- Support for 4K videos
- Options to add text, images and effects to videos
- Can manage color, correct horizon and stabilize 360 videos
- Includes a tree trial
Cons:
- Not as many tutorials on how to use the software compared to bigger brands

Part 2: How to Upload 360 Degree Videos to YouTube
It is possible to add 360 degree videos onto YouTube . Using YouTube to promote such content is sensible, as it is one of the largest streaming video platforms in the world. These videos can be seen on any of the major browsers and on certain mobile devices. But they must be uploaded from a desktop.
YouTube 360 Video Specification
The first step of the process is to create a video that YouTube will approve as a 360 submission. Such a video should be either 24, 25, 30, 48, 50, or 60 frames per second. Do not go any higher or it will not be approved.
It is also a good idea to have videos that are between 7168x3584 and 8192x4096 in resolution. Any lower and the quality of the video will not be good enough to provide a pleasant viewing experience to the audience.
How to Upload to YouTube
Now that you have your video edited, you are a step closer to uploading it onto YouTube. But there are some steps that you must follow . These include downloading the 360 Video Metadata app on your Mac or Windows device.
Then you will choose the file, check the Spherical box and save it. Make sure that 3D top-bottom is not checked when you save the file. The file should be created in the folder where the original was located. Now you can upload that file to YouTube.
Read More to Get : YouTube Video Dimensions/Size: Guide for Upload Settings
Conclusion
If you want to upload 360 video to YouTube or some other platform, using a 360 video editor is the way to go. The best 360 video converter and editor program will let you take the raw footage that you have shot and turn it into a stunning video that anyone can enjoy.
Richard Bennett
Richard Bennett is a writer and a lover of all things video.
Follow @Richard Bennett
Richard Bennett
Mar 27, 2024• Proven solutions
360 degree videos have become incredibly popular on the Internet. Not only do they give people a complete look at a scene, but they also allow for a lot of artistic freedom. Those who are using VR-capable devices can get an even more immersive experience. It is why many content creators want to learn about the best 360 video editor they can use on their computers.
Here is a look at the 5 best 360 video converter and editor programs that you can use on your Windows or Mac computer.
Part 1: 5 Best 360 Video Editor for You
1. Movavi
Movavi is an affordable 360 degree video editor that makes it easy for you to create, edit and share these videos online. You can even add filters, titles and transitions to your videos, while soundtrack addition is also possible.
You can use the preview window in the program to see how your video will look if it is published as is. Plus you can use the software with both Windows and Mac, depending on the version that you download.
Pros:
- Works with all mainstream video formats
- Features support for 4K videos
- Includes color adjustment and picture in picture, even in 360 videos
- Speed adjustment capabilities
2. Premiere Pro
Adobe Premiere Pro CC is seen by many as the leading product that you can get if you want to edit high quality videos, including 360 degree content.
Any type of video format will be compatible. You should have no issues editing different segments of the content that you are creating, as Premiere Pro CC is known for having very efficient workflow screens.
Pros:
- Tools to adjust color, audio and graphics
- Works seamlessly with other Adobe apps
- Possible to create and edit content on the go using smartphones
3. After Effects
If you are attempting to add many unique graphics and transitions to your videos, then you will want to use Adobe After Effects. Most would recommend that be combined with Premiere Pro to get the best experience.
After Effects is ideal for adding introductions, end credits, transitions and other effects to the content that you have produced. You can use it to take the videos that you have created to the next level.
Pros:
- Support for movie titles, introductions, transitions and end credits
- Possible to animate logos and characters
- Works with Adobe Premiere Pro
4. Final Cut Pro X
Mac users who want to use their laptop or desktop to edit 360 videos will be happy to know that it is supported in Final Cut Pro X. It is one of the fastest and most powerful programs to use on a Mac, as it is completely optimized for the operating system and hardware.
It is possible to edit and playback 360 videos using a VR headset. It allows creators to not only put in great videos and edit them, but also see how they look after various adjustments.
Pros:
- Advanced color grading options
- Full HDR and 4K support
- View files with VR headset
- Optimized for Macs
- Includes free trial
Cons:
- Little bit expensive
5. Molanis VR
Molanis VR is ideal for anyone who wants to create 360 video that will look incredible when viewed through VR glasses. It is one of the most flexible software options, as it is inexpensive and includes many great features.
IT is possible to trim, cut and fade, include text and images, add effects and make other changes to videos on the fly. The software is intuitive to use, which is great for beginners who have not edited much in the past.
Pros:
- Support for 4K videos
- Options to add text, images and effects to videos
- Can manage color, correct horizon and stabilize 360 videos
- Includes a tree trial
Cons:
- Not as many tutorials on how to use the software compared to bigger brands
Part 2: How to Upload 360 Degree Videos to YouTube
It is possible to add 360 degree videos onto YouTube . Using YouTube to promote such content is sensible, as it is one of the largest streaming video platforms in the world. These videos can be seen on any of the major browsers and on certain mobile devices. But they must be uploaded from a desktop.
YouTube 360 Video Specification
The first step of the process is to create a video that YouTube will approve as a 360 submission. Such a video should be either 24, 25, 30, 48, 50, or 60 frames per second. Do not go any higher or it will not be approved.
It is also a good idea to have videos that are between 7168x3584 and 8192x4096 in resolution. Any lower and the quality of the video will not be good enough to provide a pleasant viewing experience to the audience.
How to Upload to YouTube
Now that you have your video edited, you are a step closer to uploading it onto YouTube. But there are some steps that you must follow . These include downloading the 360 Video Metadata app on your Mac or Windows device.
Then you will choose the file, check the Spherical box and save it. Make sure that 3D top-bottom is not checked when you save the file. The file should be created in the folder where the original was located. Now you can upload that file to YouTube.
Read More to Get : YouTube Video Dimensions/Size: Guide for Upload Settings
Conclusion
If you want to upload 360 video to YouTube or some other platform, using a 360 video editor is the way to go. The best 360 video converter and editor program will let you take the raw footage that you have shot and turn it into a stunning video that anyone can enjoy.
Richard Bennett
Richard Bennett is a writer and a lover of all things video.
Follow @Richard Bennett
Also read:
- [New] Comprehensive HDR Workflows for Aspiring Pros
- [New] Creating Captivating Narratives for Video Blogs
- [New] Elevating Your YouTube Experience Tips on Channel Art and Sizes
- [Updated] The Ultimate Guide to FB Video Calls Best Practices for 2024
- Break Even on Youtube Monetizing with a Minimum of 500 Viewers
- Complete Guide to Fixing MSVBVM64.DLL or MSVBVM50.DLL Not Detected
- Enhancing Visuals Using Chroma Key Effectively for 2024
- In 2024, Samsung K850U BD+ 2023 Assessment
- In-Depth Analysis of the Pioneer BDR-XD05B: Spotlight on Design Issues
- Optimizing YouTube Content With Social Blade - A Stats Journey
- Step-by-Step Solutions for Unpairing Problems in Windows 10 Bluetooth Devices
- The Complete Walkthrough: Programming Functions on a Universal Remote Control
- Top Picks for Portable Gaming Devices
- Unlocking the Secrets of Valorant Video Thumbnail Designs
- VFX Artisan Suite
- Title: [New] Elite Gaming Setup Essentials Revealed
- Author: Kevin
- Created at : 2024-12-14 18:11:36
- Updated at : 2024-12-16 18:43:12
- Link: https://youtube-videos.techidaily.com/new-elite-gaming-setup-essentials-revealed/
- License: This work is licensed under CC BY-NC-SA 4.0.