
!["[New] Elevate Your Streaming Game From Twitch Viewers to YouTube Fans"](https://www.lifewire.com/thmb/zWxNYaUUEWKWwcCxwdQ9gx8_XCw=/400x300/filters:no_upscale():max_bytes(150000):strip_icc():format(webp)/how-to-safely-use-airport-charging-stations-4690583-01-6085c56e46b34f84b5f5d2d976e20677.jpg)
"[New] Elevate Your Streaming Game From Twitch Viewers to YouTube Fans"
Elevate Your Streaming Game: From Twitch Viewers to YouTube Fans
Create High-Quality Video - Wondershare Filmora
An easy and powerful YouTube video editor
Numerous video and audio effects to choose from
Detailed tutorials provided by the official channel
Amidst many online applications is Twitch. This live streaming platform takes your experience to another level. You can use it to make crafts, play games, attract broadcasters, and many more. Twitch was launched in 2011, and since then, it has attracted millions of users, managing a database of about 4 million broadcasters by early 2020. With it, users can stream their activities as others watch in real-time. Just browse a category to find a stream.
You can also follow streamers that you like on the platform and get updates and notifications immediately after they are posted. But how do you start a career on a platform like Twitch? You need to broadcast and gather a large following. You can use built-in audiences from other platforms like Facebook. Let’s dive into the core of the matter and look at how to upload Twitch streams to YouTube and build your platform.

In this article
02 What is the benefit of uploading your Twitch Streams to YouTube
03 How to upload your Twitch Streams to YouTube
What is Twitch VOD?
Twitch Video on Demand (VOD) is a recording of previously streamed content. It provides briefings if you missed catching the Twitch live stream. Just watch the VOD from your favorite streamer and be engaged the best way possible. However, VODs don’t last forever. They are removed after two weeks of broadcast. But streamers with Partner Status can have their VODs last up to 60 days.
- How to enable Twitch VOD?
VODs are the best form to archive streams that your fans missed. Even though they are not enabled by default, you can manually enable them and not let your fans miss any important event from your channel. They’ll find it under the “Videos” tab on any Twitch channel. Follow these steps to enable VOD on your channel.
Step 1. Go to your profile icon in the top right corner of Twitch
Check in the “Channel & Video” section and locate the “Stream Key & Preferences” menu.

Step 2. Click on “Creator Dashboard”
Remember, you can enable VODs from your creator dashboard. Just go under the “Settings” tab and click on the “Stream section” of the creator dashboard. Check under the subtitle “VOD Settings” and get the option to store past broadcasts. You can also toggle the slider to store your past broadcasts.

Step 3 Click on the “Settings” tab on the left-hand side and go to Stream
You’ll get various drop-down menu options. Click on the “Settings” tab and choose the “Stream” option. The system will navigate to a new page, thus setting your preferences for VODs and clips.
Step 4. Go to “VOD Settings” and toggle on the “Store Past Broadcast.”
Ensure you have the toggle option turned ON under the “VOD Settings.” If it’s “ON,” you’ll realize the toggle will be purple, with a checkmark in it. Twitch will be confirmed to be enabled if it’s purple.

- Frequently Asked Question about Twitch VOD
These are some questions frequently asked by Twitch users.
1. How long will Twitch store my VOD
Your Twitch can either be stored for 14 or 60 days, depending on your level. For Twitch Prime, Twitch Partner or a Twitch Turbo user has their past broadcasts automatically saved for 60 days before deletion. But if you are not connected to these three options, your past broadcasts will be saved for only 14 days before deletion.
Since your past broadcasts cannot be live for more than 60 days, you have the option to download the video to your computer before the validity days expire and Twitch deletes it. You can use an External Hard drive to save the past broadcast content. Likewise, it is possible to turn your past broadcast content into Highlight and, in turn, permanently store them on Twitch.
2. What is the difference between Twitch VOD, Highlights, and Clips
Twitch VOD is a previously saved video of your live stream content. You choose to save either part or the entire content of your previously streamed content. More so, you don’t need any additional requirements to use VOD.
Highlights are short videos that have been edited from your past broadcast content. You can save them on Twitch permanently. Streamers majorly use highlights to save video game achievements. Unlike VOD Twitch that can be saved up to 60 days, Highlights usually lasts no more than 3 minutes.
- To make Highlights on Twitch, first, navigate to your Dashboard.
- Then scroll down and click on “Content” > “Video Producer.
- Next, press on “All Videos” to change them to “Past Broadcasts.”
- Now press the “Highlight” button, and Twitch will immediately open a new tab for “Twitch Highlighter Tool.”
- Then select the video part to include as “Highlight” and press the “Create Highlights” button.
- Wait a while for the process to be completed, and Voila! You have your Highlights created.
When it comes to Twitch Clip, you can capture special moments in a stream you are currently watching. On the same note, you can share clips with friends and other users on social media platforms. Such shared clips contain a link where others view the source or video from.
The clips you create will automatically be saved on the streamer’s channel on the “Clips” page, where other viewers can see them too. Nonetheless, you can download “clips” to your computer and, in turn, upload them whenever you want to. And note that you can help your stream grow via “Clips” by letting your viewers clip and share your stream moments.
- To create “Clips” on Twitch, identify which Streamers channel you wish to create a clip from.
- Then click on the “Clapper board” icon. Next, edit your clip between 5 and 60 seconds long.
- Finally, create a title and publish your Clip. You’ll also enjoy the privilege to share your clip’s link to other social media networks.
What is the benefit of uploading your Twitch Streams to YouTube
You stand to gain a lot when you upload your Twitch Streams to YouTube.
1) To enlighten your followers
Your followers will see your streams and make the best decisions. Viewers can check out your recordings and other highlights from past streams. It will help them decide whether they like what they see and probably join your live streams.
2) Twitch provides content for you to share and monetize on YouTube
Since Twitch streaming is more popular nowadays, many people throng it for content. It is not wise to rely entirely on Twitch to discover as a Twitch Streamer. Posting to YouTube will make it known within a short time. You would have announced your streams most nobly and kept your followers up to date, attracting new ones as well.
3) To keep your followers engaged even when you are offline
Even though live streaming is important, some viewers may not attend the live sessions due to different time zones or other commitments. In this regard, when uploaded to YouTube, Twitch will give them a chance to watch your content just whenever they log in. They, therefore, have the option to watch a Twitch VOD of the live stream they missed.
How to upload your Twitch Streams to YouTube
Check how to upload Twitch streams to YouTube from the Twitch website.
Step 1. Identify the little arrow next to your name on the Twitch website and click on it. Then click on the “Video Producer” to take you to a list of your Twitch videos.

Step 2. Check out and click on the “three-dots” on the video you wish to upload to YouTube. Click on the “Export” tab.
Step 3. A menu will then pop up. Here, you can fill in the description, title, and tags that you would like to appear on the YouTube video. There is an option for Twitch to split your video automatically. If you wish so, then tick the “Checkbox” to enable it. Then click on the “Start Export” option to export your Twitch streams to YouTube.

Bouns! Edit Your Twitch Video with Filmora
The quality of your video matters when it comes to uploading Twitch Streams to YouTube. Using a third-party tool to edit your video is the first step in ensuring your videos communicate meaningful content. Filmora comes in handy to bring your imaginations to life. Use it for simple creation without limits, even for beginners.
- Use it to track moving objects in video clips
- Easily match any image of the selected clip
- Its powerful tools let you edit your video by cropping, splitting, adjusting speed, etc
- The video keyframe easily indicates the beginning and end of the parameters
For Win 7 or later (64-bit)
For macOS 10.12 or later
Conclusion
● Don’t just focus on how to upload Twitch streams to YouTube but also consider the quality of video you are posting to YouTube. Remember, your video quality will speak much more of you than any other description. So, strive to produce quality videos using the best tool, Filmora. The app is easy to use and will elevate your views and imaginations through your video in the most impactful way.
Amidst many online applications is Twitch. This live streaming platform takes your experience to another level. You can use it to make crafts, play games, attract broadcasters, and many more. Twitch was launched in 2011, and since then, it has attracted millions of users, managing a database of about 4 million broadcasters by early 2020. With it, users can stream their activities as others watch in real-time. Just browse a category to find a stream.
You can also follow streamers that you like on the platform and get updates and notifications immediately after they are posted. But how do you start a career on a platform like Twitch? You need to broadcast and gather a large following. You can use built-in audiences from other platforms like Facebook. Let’s dive into the core of the matter and look at how to upload Twitch streams to YouTube and build your platform.
In this article
02 What is the benefit of uploading your Twitch Streams to YouTube
03 How to upload your Twitch Streams to YouTube
What is Twitch VOD?
Twitch Video on Demand (VOD) is a recording of previously streamed content. It provides briefings if you missed catching the Twitch live stream. Just watch the VOD from your favorite streamer and be engaged the best way possible. However, VODs don’t last forever. They are removed after two weeks of broadcast. But streamers with Partner Status can have their VODs last up to 60 days.
- How to enable Twitch VOD?
VODs are the best form to archive streams that your fans missed. Even though they are not enabled by default, you can manually enable them and not let your fans miss any important event from your channel. They’ll find it under the “Videos” tab on any Twitch channel. Follow these steps to enable VOD on your channel.
Step 1. Go to your profile icon in the top right corner of Twitch
Check in the “Channel & Video” section and locate the “Stream Key & Preferences” menu.
Step 2. Click on “Creator Dashboard”
Remember, you can enable VODs from your creator dashboard. Just go under the “Settings” tab and click on the “Stream section” of the creator dashboard. Check under the subtitle “VOD Settings” and get the option to store past broadcasts. You can also toggle the slider to store your past broadcasts.
Step 3 Click on the “Settings” tab on the left-hand side and go to Stream
You’ll get various drop-down menu options. Click on the “Settings” tab and choose the “Stream” option. The system will navigate to a new page, thus setting your preferences for VODs and clips.
Step 4. Go to “VOD Settings” and toggle on the “Store Past Broadcast.”
Ensure you have the toggle option turned ON under the “VOD Settings.” If it’s “ON,” you’ll realize the toggle will be purple, with a checkmark in it. Twitch will be confirmed to be enabled if it’s purple.
- Frequently Asked Question about Twitch VOD
These are some questions frequently asked by Twitch users.
1. How long will Twitch store my VOD
Your Twitch can either be stored for 14 or 60 days, depending on your level. For Twitch Prime, Twitch Partner or a Twitch Turbo user has their past broadcasts automatically saved for 60 days before deletion. But if you are not connected to these three options, your past broadcasts will be saved for only 14 days before deletion.
Since your past broadcasts cannot be live for more than 60 days, you have the option to download the video to your computer before the validity days expire and Twitch deletes it. You can use an External Hard drive to save the past broadcast content. Likewise, it is possible to turn your past broadcast content into Highlight and, in turn, permanently store them on Twitch.
2. What is the difference between Twitch VOD, Highlights, and Clips
Twitch VOD is a previously saved video of your live stream content. You choose to save either part or the entire content of your previously streamed content. More so, you don’t need any additional requirements to use VOD.
Highlights are short videos that have been edited from your past broadcast content. You can save them on Twitch permanently. Streamers majorly use highlights to save video game achievements. Unlike VOD Twitch that can be saved up to 60 days, Highlights usually lasts no more than 3 minutes.
- To make Highlights on Twitch, first, navigate to your Dashboard.
- Then scroll down and click on “Content” > “Video Producer.
- Next, press on “All Videos” to change them to “Past Broadcasts.”
- Now press the “Highlight” button, and Twitch will immediately open a new tab for “Twitch Highlighter Tool.”
- Then select the video part to include as “Highlight” and press the “Create Highlights” button.
- Wait a while for the process to be completed, and Voila! You have your Highlights created.
When it comes to Twitch Clip, you can capture special moments in a stream you are currently watching. On the same note, you can share clips with friends and other users on social media platforms. Such shared clips contain a link where others view the source or video from.
The clips you create will automatically be saved on the streamer’s channel on the “Clips” page, where other viewers can see them too. Nonetheless, you can download “clips” to your computer and, in turn, upload them whenever you want to. And note that you can help your stream grow via “Clips” by letting your viewers clip and share your stream moments.
- To create “Clips” on Twitch, identify which Streamers channel you wish to create a clip from.
- Then click on the “Clapper board” icon. Next, edit your clip between 5 and 60 seconds long.
- Finally, create a title and publish your Clip. You’ll also enjoy the privilege to share your clip’s link to other social media networks.
What is the benefit of uploading your Twitch Streams to YouTube
You stand to gain a lot when you upload your Twitch Streams to YouTube.
1) To enlighten your followers
Your followers will see your streams and make the best decisions. Viewers can check out your recordings and other highlights from past streams. It will help them decide whether they like what they see and probably join your live streams.
2) Twitch provides content for you to share and monetize on YouTube
Since Twitch streaming is more popular nowadays, many people throng it for content. It is not wise to rely entirely on Twitch to discover as a Twitch Streamer. Posting to YouTube will make it known within a short time. You would have announced your streams most nobly and kept your followers up to date, attracting new ones as well.
3) To keep your followers engaged even when you are offline
Even though live streaming is important, some viewers may not attend the live sessions due to different time zones or other commitments. In this regard, when uploaded to YouTube, Twitch will give them a chance to watch your content just whenever they log in. They, therefore, have the option to watch a Twitch VOD of the live stream they missed.
How to upload your Twitch Streams to YouTube
Check how to upload Twitch streams to YouTube from the Twitch website.
Step 1. Identify the little arrow next to your name on the Twitch website and click on it. Then click on the “Video Producer” to take you to a list of your Twitch videos.
Step 2. Check out and click on the “three-dots” on the video you wish to upload to YouTube. Click on the “Export” tab.
Step 3. A menu will then pop up. Here, you can fill in the description, title, and tags that you would like to appear on the YouTube video. There is an option for Twitch to split your video automatically. If you wish so, then tick the “Checkbox” to enable it. Then click on the “Start Export” option to export your Twitch streams to YouTube.
Bouns! Edit Your Twitch Video with Filmora
The quality of your video matters when it comes to uploading Twitch Streams to YouTube. Using a third-party tool to edit your video is the first step in ensuring your videos communicate meaningful content. Filmora comes in handy to bring your imaginations to life. Use it for simple creation without limits, even for beginners.
- Use it to track moving objects in video clips
- Easily match any image of the selected clip
- Its powerful tools let you edit your video by cropping, splitting, adjusting speed, etc
- The video keyframe easily indicates the beginning and end of the parameters
For Win 7 or later (64-bit)
For macOS 10.12 or later
Conclusion
● Don’t just focus on how to upload Twitch streams to YouTube but also consider the quality of video you are posting to YouTube. Remember, your video quality will speak much more of you than any other description. So, strive to produce quality videos using the best tool, Filmora. The app is easy to use and will elevate your views and imaginations through your video in the most impactful way.
Seamlessly Transition Media Formats with Free Downloader
Best Free YouTube to MP3 Converters You Should Know [Online/Win/Mac]

Benjamin Arango
Mar 27, 2024• Proven solutions
Hey, when you find a wonderful or dramatic song or music in a YouTube video, what would you like to do? For me, I want to download it and listen to it when I’m offline. How about you? Instead of tapping the frequently used links on the YouTube platform, you can convert YouTube to mp3 by using a YouTube to mp3 converter. Then you can always listen to music or audio whenever you want. Therefore, this article will show 10 best free YouTube to mp3 converters for you to convert a YouTube video to mp3, on both Windows and Mac. You will learn:
- Part 1: Best Free Online YouTube to MP3 Converters
- Part 2: YouTube to MP3 Converters for Windows and Mac [Free Download]
- Part 3: Bonus Tip—Edit and Cut MP3 with Wondershare Filmora
Warning and Notice: It is illegal when you misuse the content uploaded by other users on YouTube. If it is your content, then go ahead to download the YouTube video and convert it to mp3. You should follow the terms and conditions displayed on the YouTube website.
Part 1: 5 Free Online YouTube to MP3 Converters for Windows and Mac
Whether you’re using a Windows or a Mac computer, you can find a YouTube to MP3 converter that fits your need perfectly from the below list. In the following part, I will share with you some incredible online YouTube videos to MP3 converters. Enlighten and sharpen your skills on video conversion by exploring the discussed steps below:
- **1. YtMp3 Video Converter
- **2. Flvto Converter Tool
- **3. y2mate YouTube to MP3 Converter
- **4. YOUTUBETOMP3 Online
- **5. youtubetomp3music.com
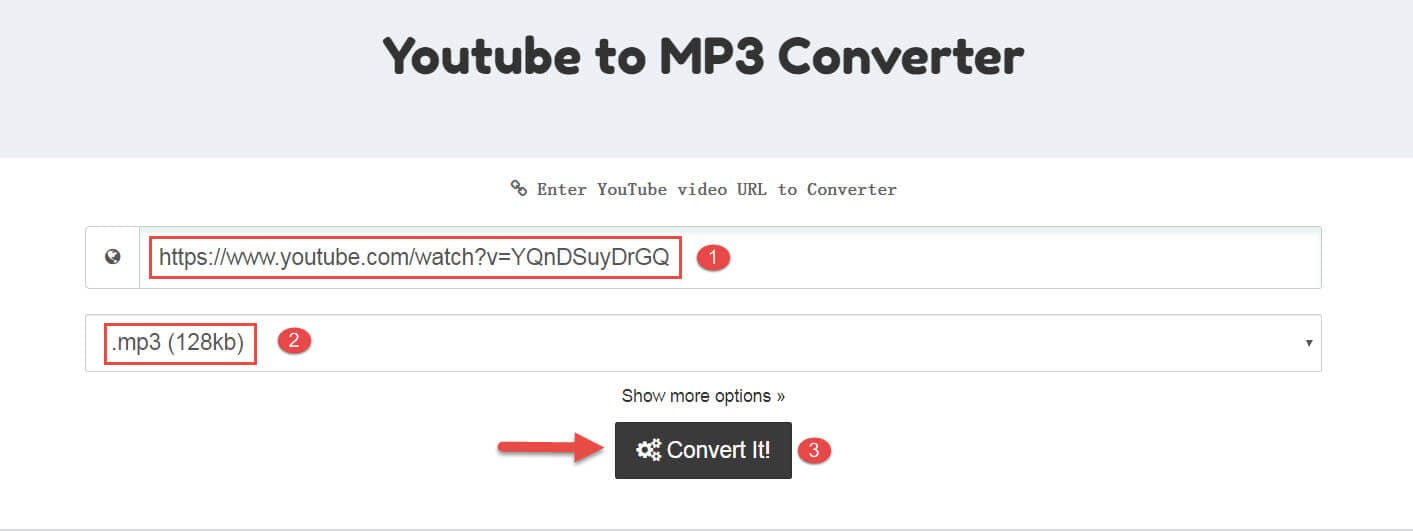
1. YtMp3 Video Converter
This is a free online YouTube to MP3/MP4 converting tool. It will assist you to accomplish reliable YouTube video conversions at free of cost. There is no need to fill in any details for registration to make use of this online service. This platform offers you an immediate solution to convert YouTube to mp3.
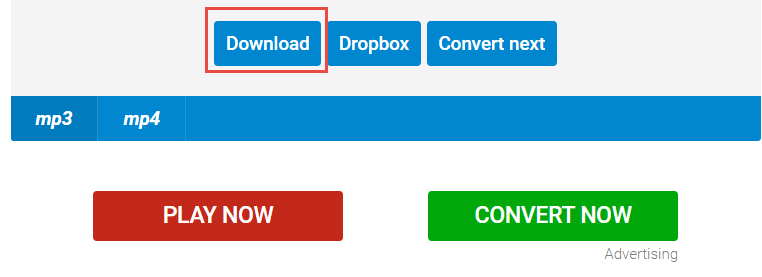
- Visit https://ytmp3.cc/youtube-to-mp3/ to open the YtMp3 converter tool with your browser
- Copy your favorite video’s URL from YouTube
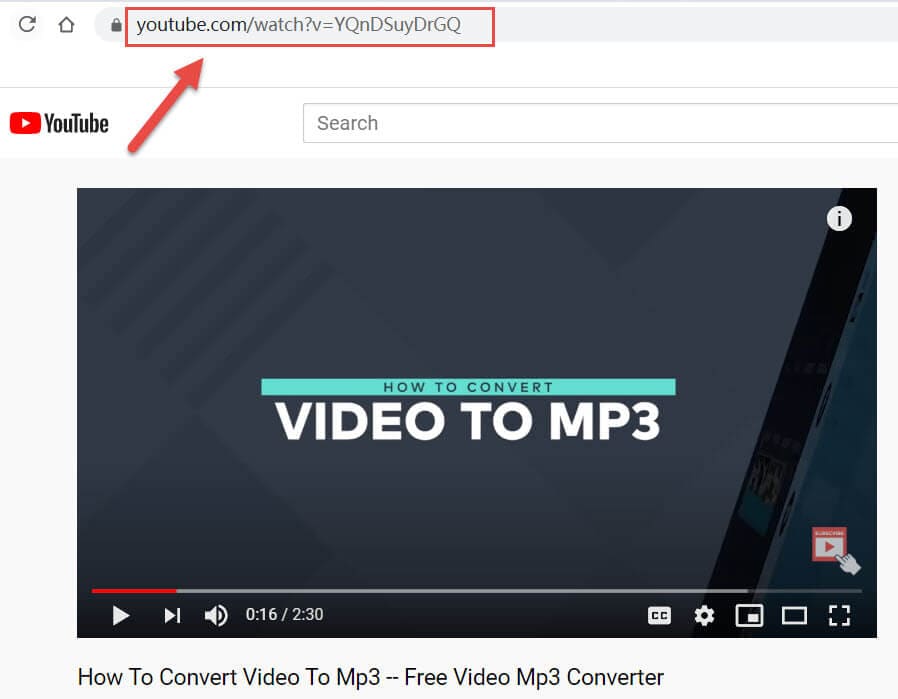
- Paste the URL on the text field. Then, choose MP3 below the text box and finally hit the Convert button to start the conversion
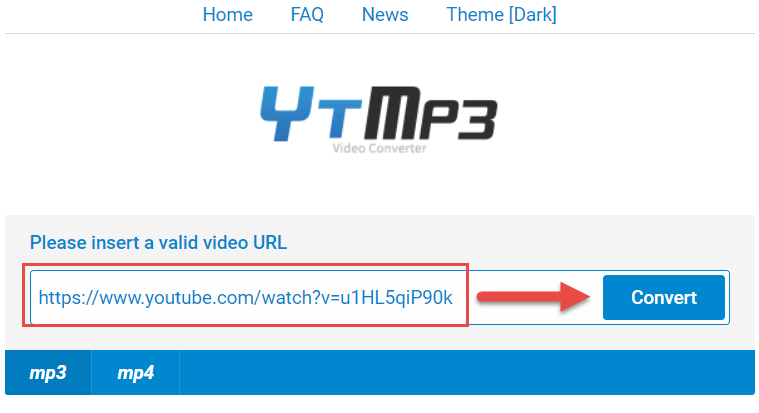
- Once the conversion finishes, click Download to save the mp4 file at your desired location in your device.
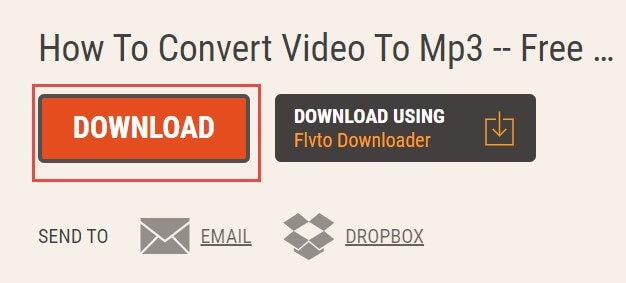
2. Flvto Converter Tool
If you are looking for a reliable online platform to convert YouTube to MP3, MP4, or AVI**,** this online tool is also the right choice. The steps are quite simple and you can perform the conversion process anytime without any issues. Save the converted file in your desired location and access it whenever you need it. Ease the YouTube conversion process using this online software by following the below instructions:
- Visit https://www.flvto.biz/en91/ to open Flvto converter tool online with your browser
- Copy your favorite video’s URL from YouTube, as mentioned before
- Enter the link to the box, then select the file format as mp3, then click CONVERT TO button to trigger the conversion process
- Once finished, press the Download icon to download and save a converted mp3 file to your computer or local device. You can also send the mp3 to an email or upload it to dropbox directly.
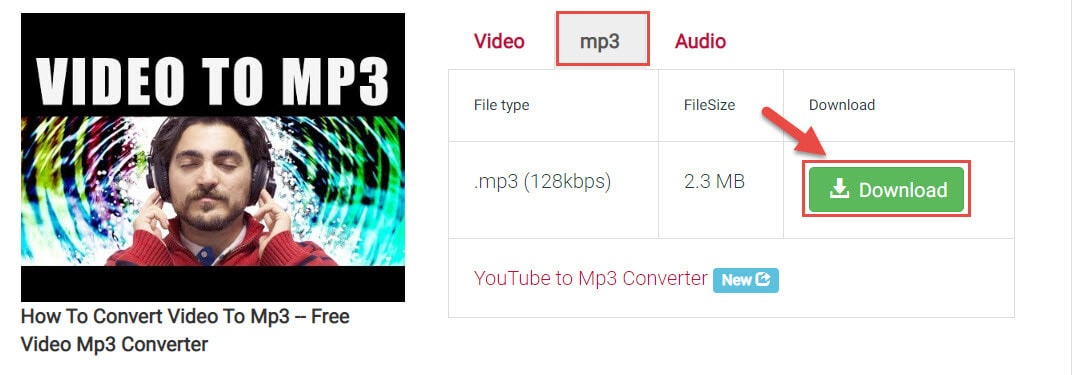
3. y2mate YouTube to MP3 Converter
Y2mate is an online YouTube video downloader and converter. This online tool is compatible with all kinds of browsers optimally. You can use this program to convert YouTube to MP3 on both Windows and Mac. This platform allows you to make unlimited file conversions without spending even a penny from your pocket. You can avail for this service anytime and anywhere without any interruptions.
- Visit https://www.y2mate.com/en68 to open y2mate YouTube to MP3 Converter with your browser
- Go to YouTube and copy your desired URL link into the clipboard
- Copy and paste the YouTube URL to the box, and click Start
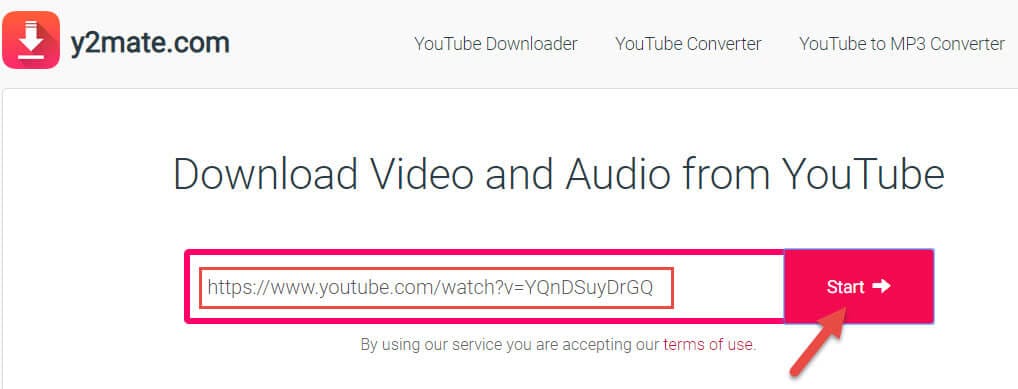
- Just a second, the YouTube video will be converted successfully. Please select the format as MP3 and then hit Download to save it at your favorite storage place in your device for easy retrieval when required.
4. YOUTUBETOMP3 Online
This extraordinary online platform wins your expectations by offering you with free service without any registration. There is no need to download any software to convert YouTube to mp3 instead of stepping into this online platform and carry on with unlimited quality conversion without any issues. Follow the below guidelines for the successful file conversion process:
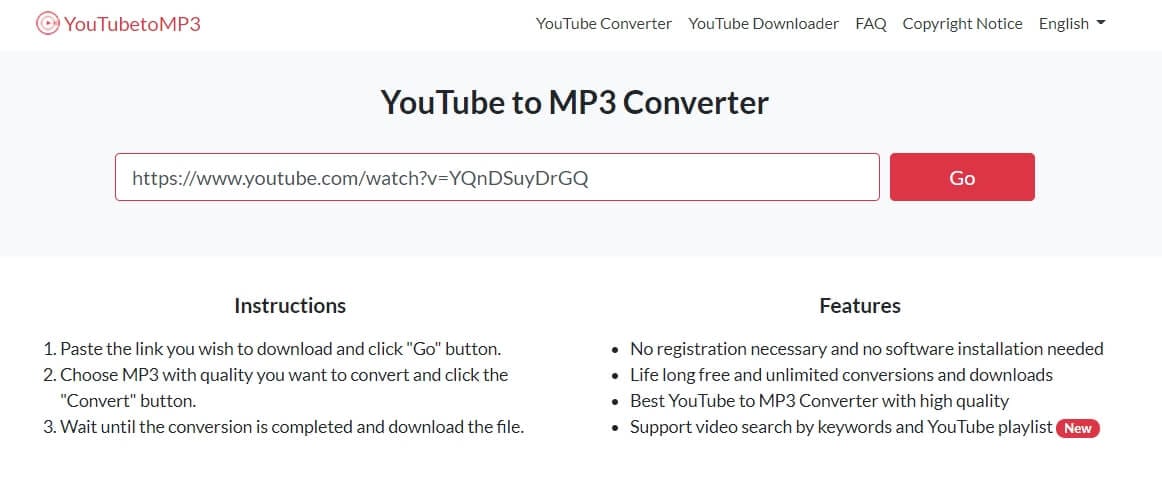
- Visit https://youtubetomp3.sc/ to open this YOUTUBETOMP3 Online tool with your browser
- Take a quick copy of your favorite YouTube link
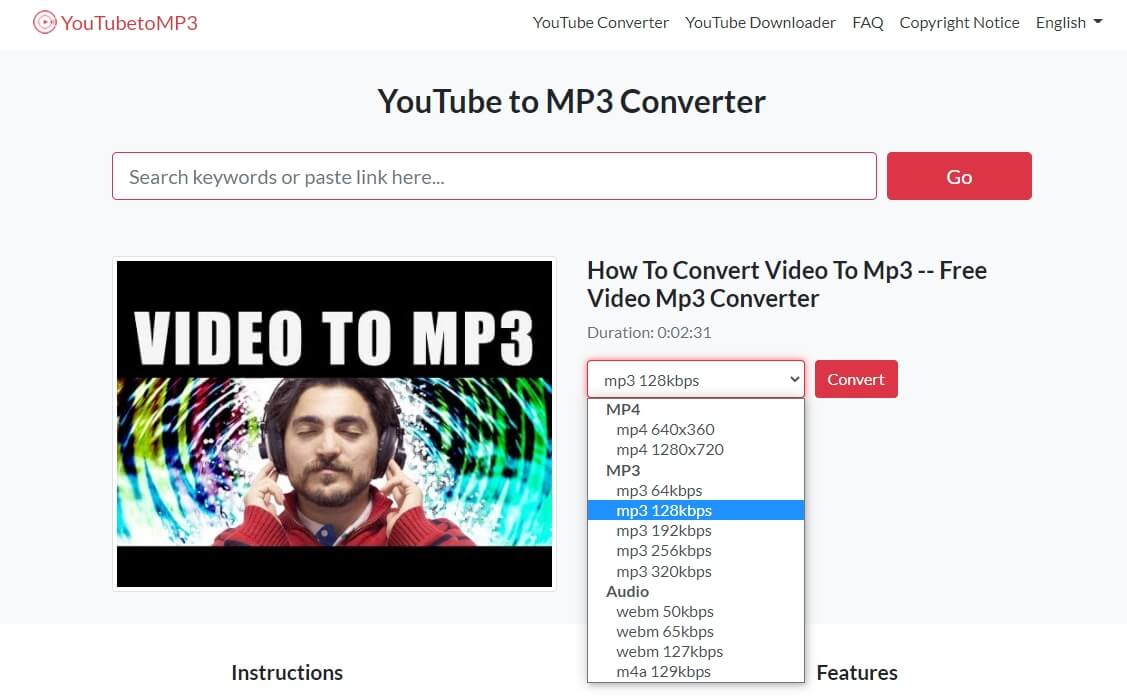
- Still paste the URL and select MP3 as the desired format in the list. Next press the Convert button.
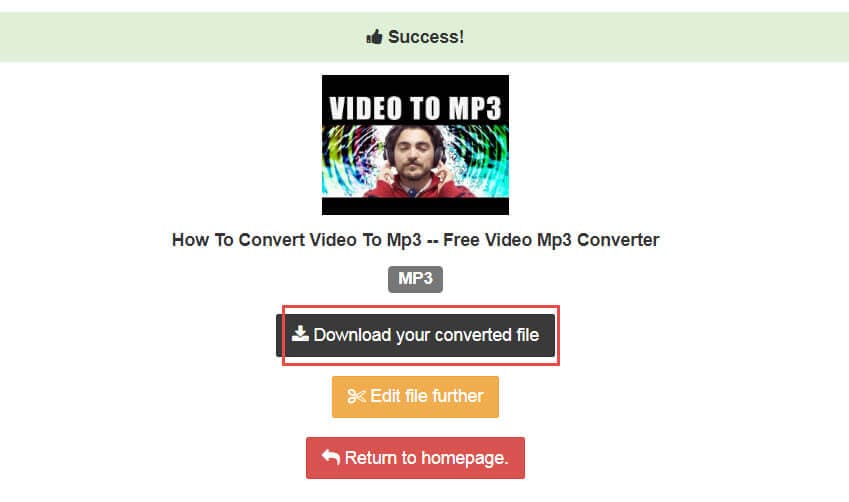
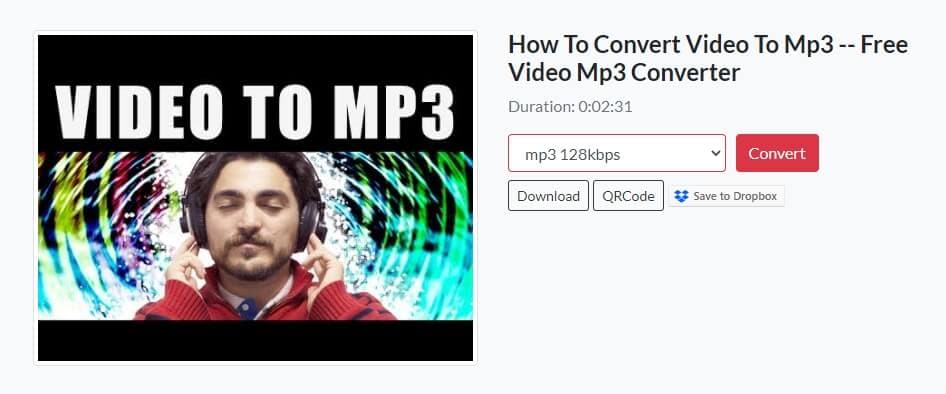
- Then it will show Success, which means the YouTube video has been converted successfully. Then you can click Download your converted file to save the mp3 as you need.
5. youtubetomp3music.com
This online YouTube to MP3 converter allows you to convert YouTube video to MP3 with high quality.
It supports both desktop and mobile devices, so you can use it on Windows, Mac, iPhone, or Android. Besides YouTube, it also supports Facebook, Vimeo and Dailymotion, which is great. Below are the brief steps of converting YouTube to MP3.
- Visit https://youtubetomp3music.com/en16/ , paste the YouTube video link, and click the Go button.
- Now, you can choose the MP3 quality from 64kbps to 320kbps, the higher the kbps, the clear the audio.
- Click Convert to start the conversion, and then you can choose Download to save the converted YouTube video to local, or choose to Save to Dropbox.
Part 2: YouTube to MP3 Converters for Windows and Mac [Free Download]
For people who will convert YouTube to MP3 audio files often, I recommend you to try the offline YouTube to MP3 downloader. If you have tried the converters above, you may find that some of them are filled with ads. Here are some YouTube to MP3 converters for Windows and Mac that you can download for free.
- **1. Wondershare UniConverter
- **2. 4K Video Downloader
- **3. DVDVideoSoft YouTube to MP3 Converter
- **4. Mediahuman’s YouTube to MP3 Converter
- **5. Clipgrab
1. Wondershare UniConverter
UniCovnerter is the professional desktop video converter application from Wondershare. This one-stop video converter provides high-quality video and audio conversion, which is compatible with both Windows and Mac OS. Converting YouTube video to MP3 audio is easy with UniConverter, check the steps below:
- Download and install UniConverter on your computer (Windows 7 64-bit or later & macOS 10.10 or later). Launch it and then go to the Downloader menu and then click the Plus File icon.
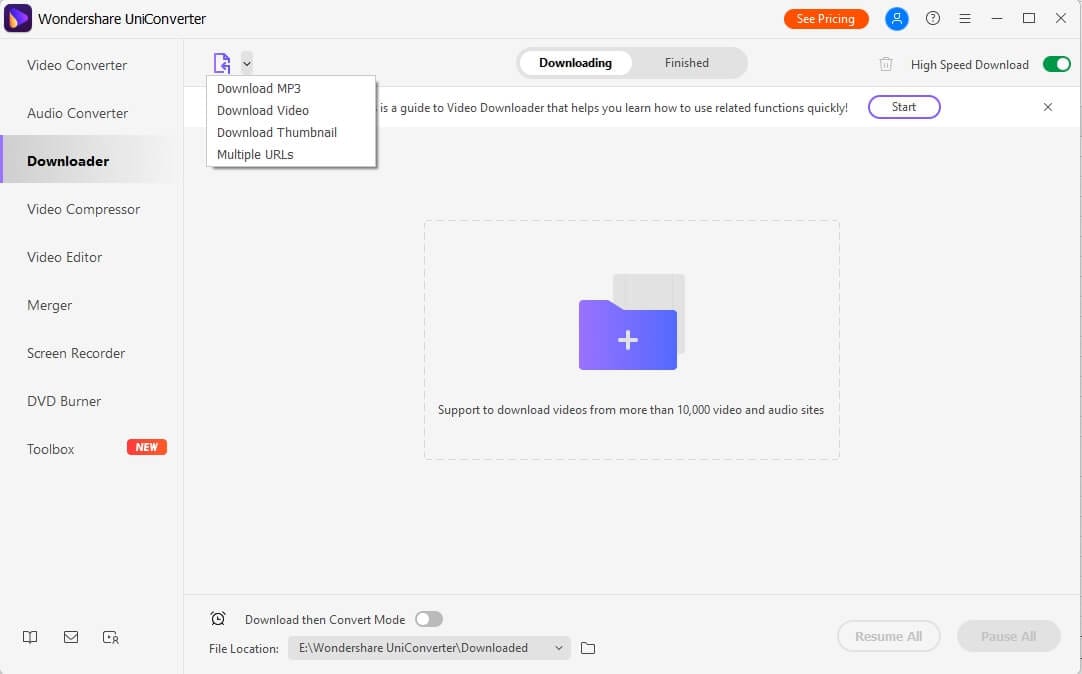
- In the pop-up window, paste the YouTube video link. If you want to download multiple MP3 files, you can paste one URL per line to continue, and then click the Download button.
- In the Download Audio tab, you can choose the downloaded audio quality. In UniConverter, you can download MP3 in 128Kbps, 256Kbps, or 320Kbps high quality. Click Download to start downloading.
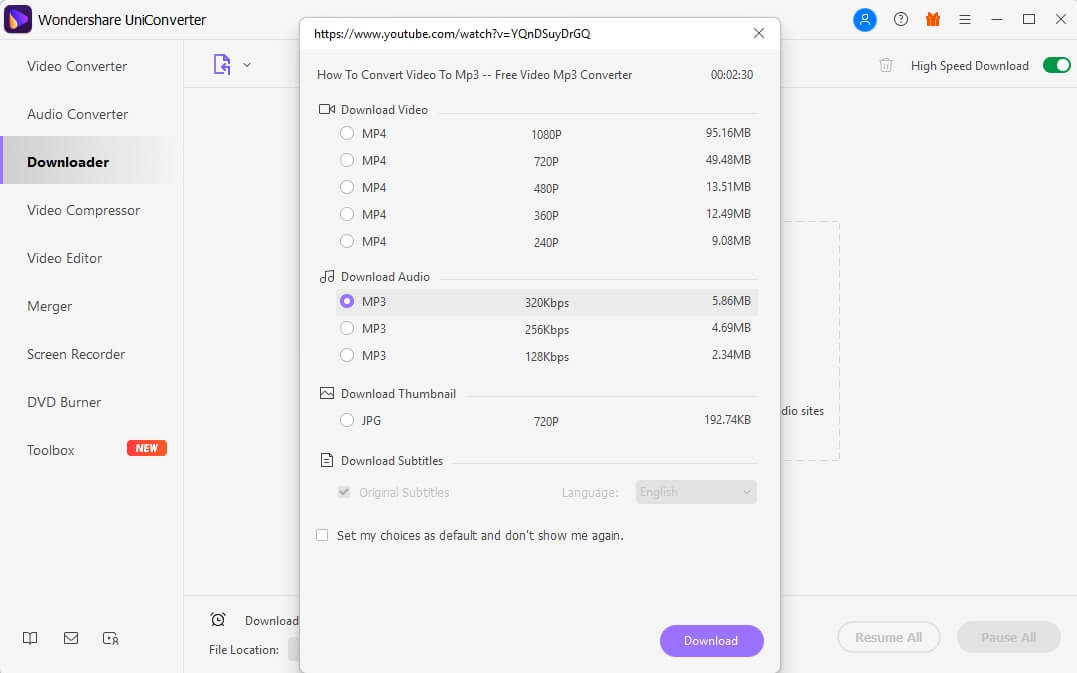
Besides MP3 audio file, you can also download the YouTube video in mp4 format, or download the thumbnail, or the subtitles if needed with UniConverter.
2. 4K Video Downloader
This tool is an offline converter where you have to download the app from its official website to discover it’s built-in features. It is a quality converter, which allows you to download full playlist and channels in your local drive for future reference. This program is compatible with all platforms like Mac, Windows, and Linux, etc. It supports more than 50 languages and it is trusted by million of users across boundaries.
Note
This 4K Video Downloader application enables you to download and convert up to 24 YouTube videos to mp3 files. You need to purchase a license for it if you want to convert more YouTube videos to mp3.
- Download the 4K Video Downloader application to your computer. It is compatible with both Windows and Mac OS
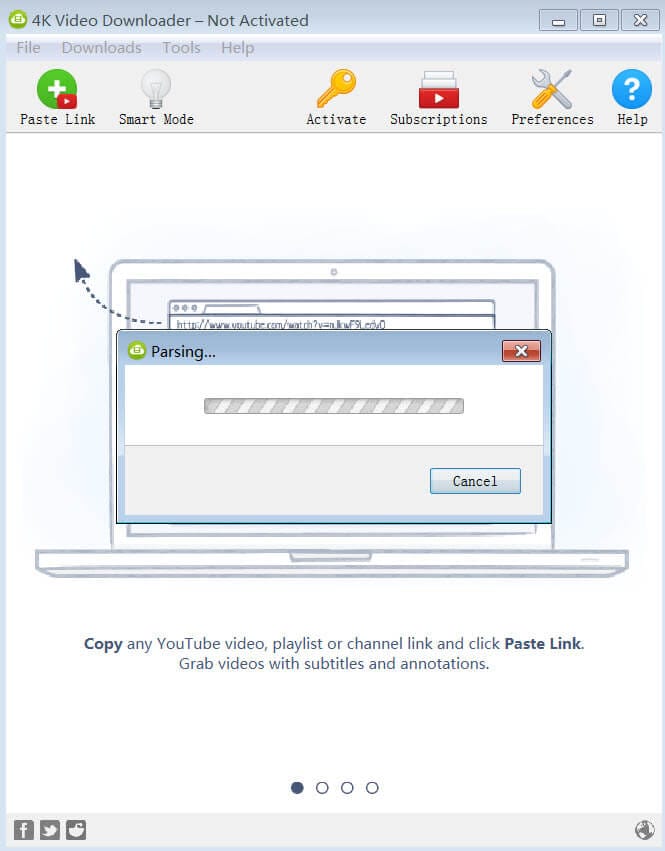
- After installation, please open this application on your computer, and copy the video URL from YouTube to your clipboard
- Tap the Paste Link option, and then this application will detect the URL automatically. You will see it’s parsing the video
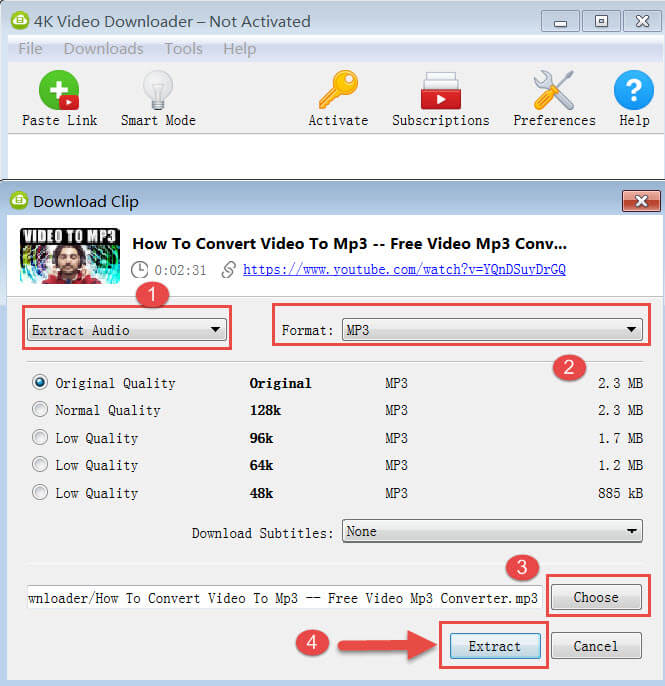
- Once done, drop down the list and select Extract Audio and MP3 as the format. You can hit Choose to change the output directory on your computer to save the converted mp3 file. Finally, press Extract to start the conversion
- After conversion, you can go to the output directory you set and find the converted mp3.

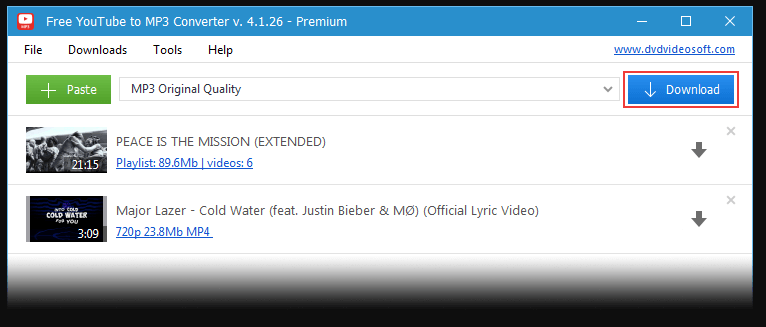
3. DVDVideoSoft YouTube to MP3 Converter
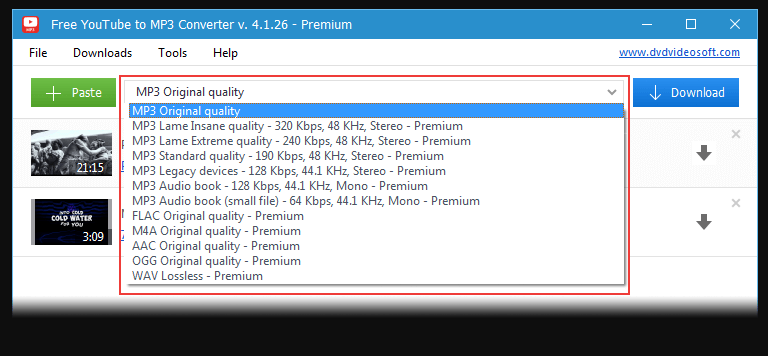
It is an excellent YouTube to MP3 converter available for free download. This application has ample features like lossless conversion, retains the quality during the conversion process, and lastly it is safe and secure to carry on with the conversion procedure. Apart from the MP3 format, you can also choose other file types like M4A, WAV, FLAC and OGG.
- Download and install this app to your PC as per the OS type
- Open this mp3 converter after installation. Copy the URL from YouTube and paste in the blank field by pressing the Paste button.
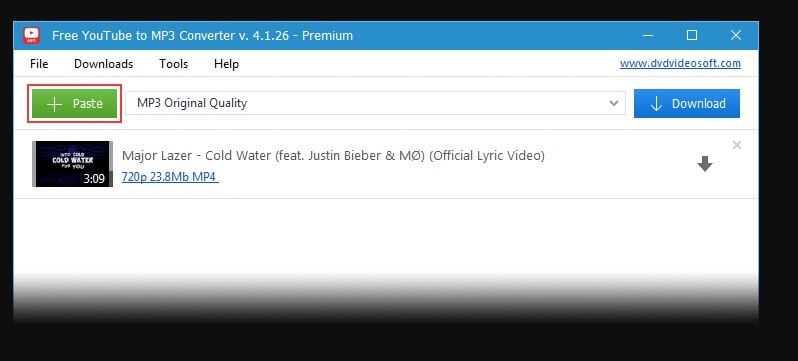
- Choose MP3 original quality from the drop-down list
- Finally hit the Download button. You can now save the file at any location of your choice without issues.
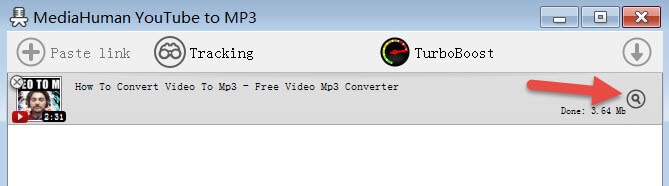
4. Mediahuman’s YouTube to MP3 Converter
This application can work on both Windows and Mac. It also supports downloading playlists and channels from YouTube. The download tracks can be merged with the iTunes platform easily. You can make a copy of HD tracks of YouTube videos at your local disk and listen to it whenever you feel like. This tool saves a lot of time and the required process completes in a few minutes. Let’s see how you can convert YouTube to mp3 using this application:
- Download this video converter tool and install it to your computer
- Launch this application. Then go to YouTube and copy the video URL to the clipboard
- Click Paste link option(you should copy the YouTube URL first, otherwise this option will gray out), and it will load the YouTube video
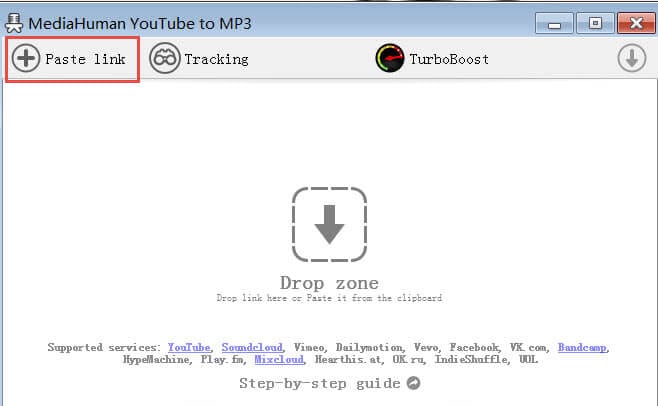
- Then hit the download icon to trigger the conversion process
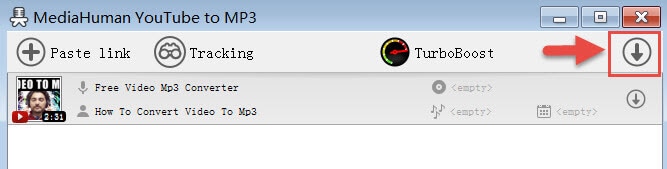
- Once done, you can click the Search icon to locate the converted mp3 file on your computer.
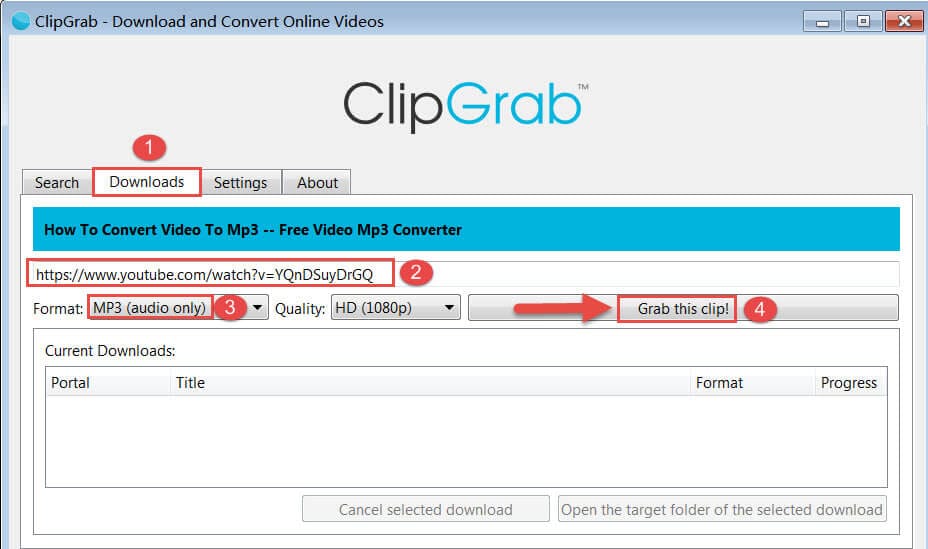
5. Clipgrab
This open-source video converter assists you to convert YouTube to mp3 optimally. It is enough if you tap the download link from its official website without any fee. This free software updates with the latest controls now and then to serve their customers efficiently. Take a glance at the steps regarding the conversion procedure
- Download and install this free application to your computer
- Open this application after installation, and go to the Downloads tab at the top
- Copy and paste and your favorite YouTube video link to the box, and choose MP3 format followed by adjusting HD quality. At last, press Grab this clip! button to trigger the conversion
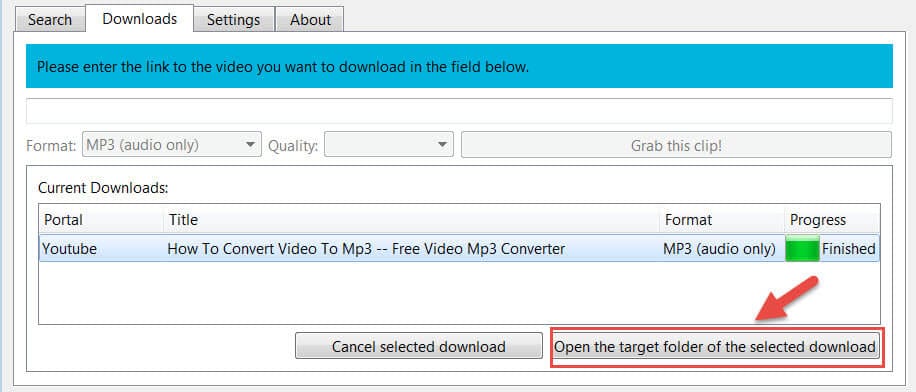
- Once finished, you can click Open the target folder of the selected download to find the converted mp3 file.
Part3: Bonus Tip—Edit &Cut MP3 with Wondershare Filmora
In case if you want to edit and customize the downloaded MP3 file from YouTube, what can you do? Get started with Wondershare Filmora! It is a prestigious product from Wondershare to carry out the editing process after you convert YouTube to mp3 from your favorite tracks.
Excited to explore dazzling features then scroll down:
- Flexible audio control to do more audio adjustment
- Cut and trim your desired tracks in audio and video files
- Get rid of noise and unwanted background disturbances in the audio files
- This tool guarantees crisp and quality video and audio files
Just surf through the below guidelines to cut or edit your mp3 file:
- Download and install the program below. Then open Filmora on your computer
 Download Mac Version ](https://tools.techidaily.com/wondershare/filmora/download/ )
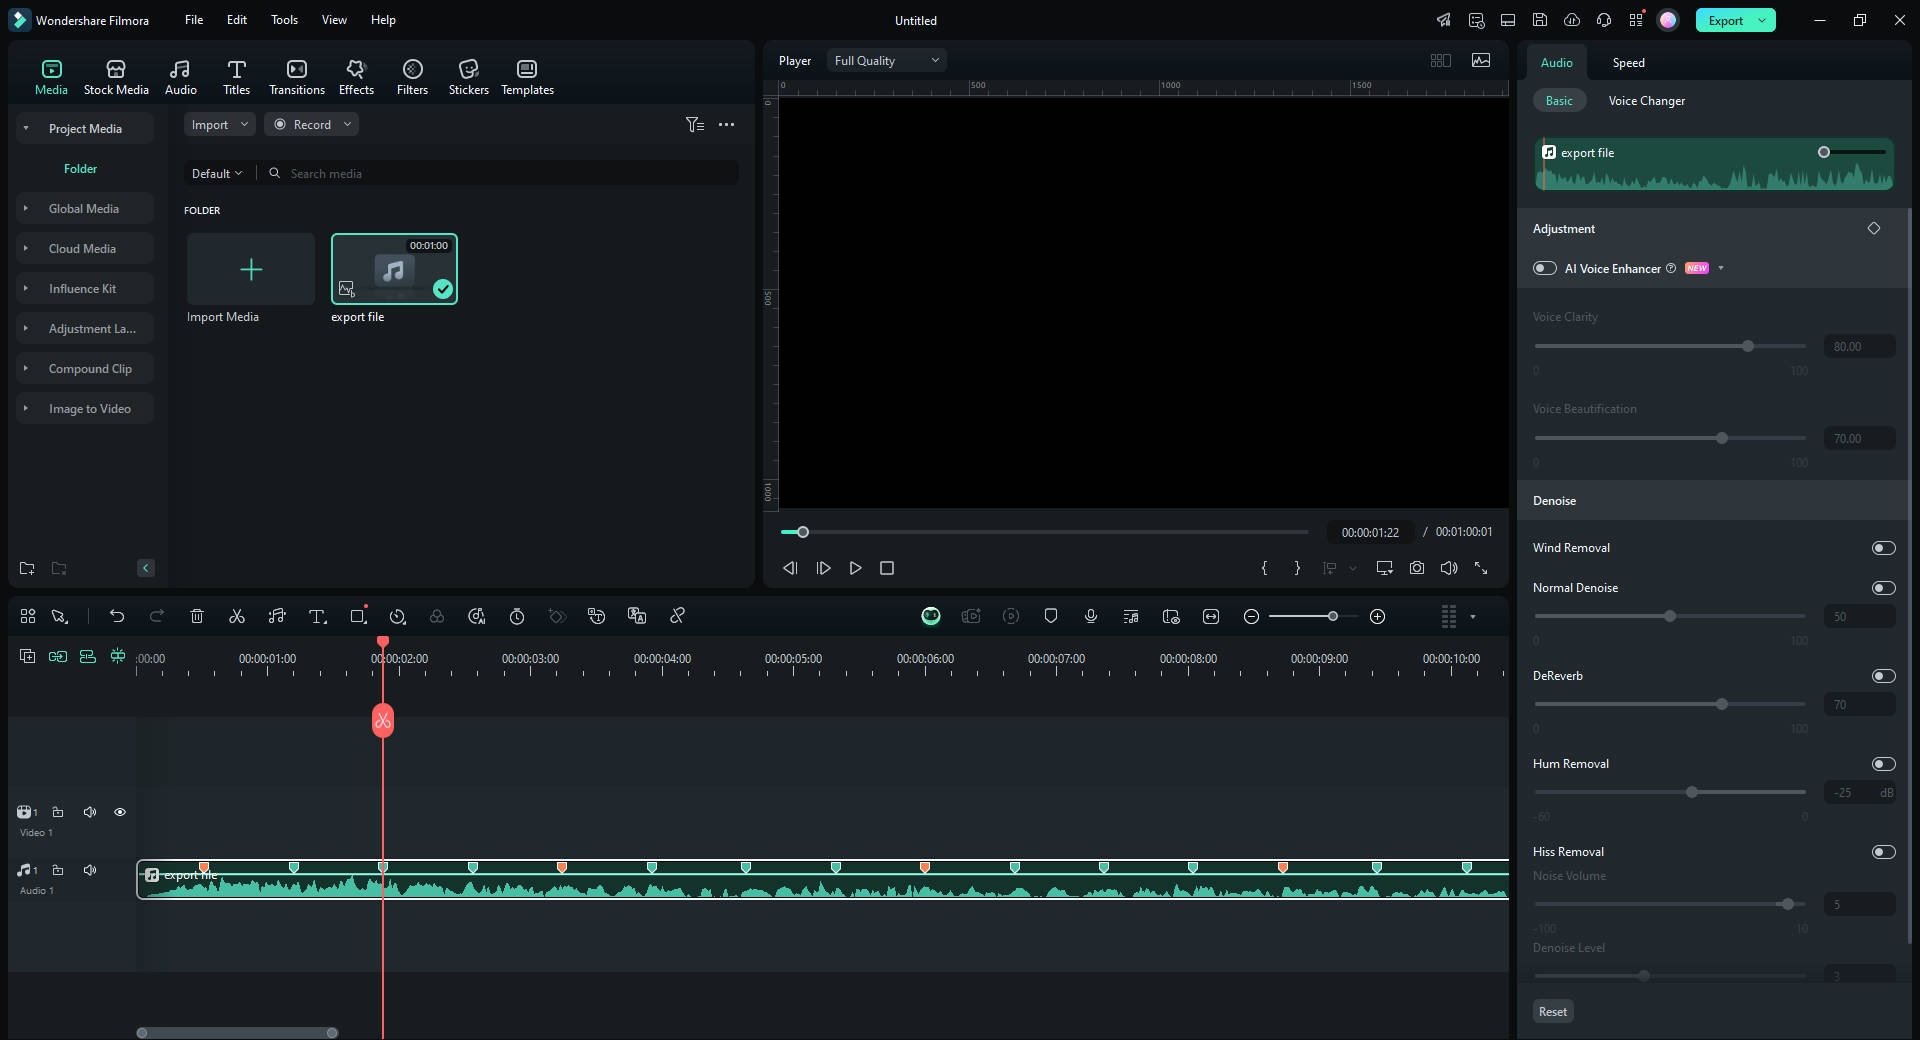
- Hit the File-Import Media option to load the converted mp3 file to the Media Library
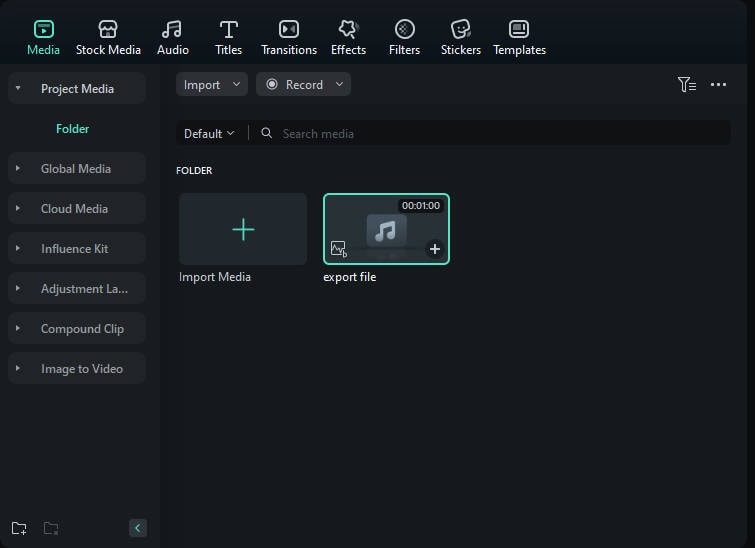
- Add the mp3 to the timeline, move the indicator to the place you want to cut, then click the red scissor icon to cut the mp3.

- And you can right-click the mp3 on the timeline, select Adjust Audio to get more audio control. The users can fade in/out the audio, adjust the volume/pitch, remove background noise, etc.
To sum up
Finally, it is time to conclude the discussion on a wide range of free YouTube to mp3 converters. You had a better idea of different video converters both on the online and offline platforms. Choose Filmora to obtain better quality edited audio and video tracks. You can now convert, edit, and store it at your desired location of video and audio files effortlessly. You can give your comments and write down your suggestions regarding this article. Get connected with us to explore and discover more facts on video editors and converters.
Benjamin Arango
Benjamin Arango is a writer and a lover of all things video.
Follow @Benjamin Arango
Benjamin Arango
Mar 27, 2024• Proven solutions
Hey, when you find a wonderful or dramatic song or music in a YouTube video, what would you like to do? For me, I want to download it and listen to it when I’m offline. How about you? Instead of tapping the frequently used links on the YouTube platform, you can convert YouTube to mp3 by using a YouTube to mp3 converter. Then you can always listen to music or audio whenever you want. Therefore, this article will show 10 best free YouTube to mp3 converters for you to convert a YouTube video to mp3, on both Windows and Mac. You will learn:
- Part 1: Best Free Online YouTube to MP3 Converters
- Part 2: YouTube to MP3 Converters for Windows and Mac [Free Download]
- Part 3: Bonus Tip—Edit and Cut MP3 with Wondershare Filmora
Warning and Notice: It is illegal when you misuse the content uploaded by other users on YouTube. If it is your content, then go ahead to download the YouTube video and convert it to mp3. You should follow the terms and conditions displayed on the YouTube website.
Part 1: 5 Free Online YouTube to MP3 Converters for Windows and Mac
Whether you’re using a Windows or a Mac computer, you can find a YouTube to MP3 converter that fits your need perfectly from the below list. In the following part, I will share with you some incredible online YouTube videos to MP3 converters. Enlighten and sharpen your skills on video conversion by exploring the discussed steps below:
- **1. YtMp3 Video Converter
- **2. Flvto Converter Tool
- **3. y2mate YouTube to MP3 Converter
- **4. YOUTUBETOMP3 Online
- **5. youtubetomp3music.com
1. YtMp3 Video Converter
This is a free online YouTube to MP3/MP4 converting tool. It will assist you to accomplish reliable YouTube video conversions at free of cost. There is no need to fill in any details for registration to make use of this online service. This platform offers you an immediate solution to convert YouTube to mp3.
- Visit https://ytmp3.cc/youtube-to-mp3/ to open the YtMp3 converter tool with your browser
- Copy your favorite video’s URL from YouTube
- Paste the URL on the text field. Then, choose MP3 below the text box and finally hit the Convert button to start the conversion
- Once the conversion finishes, click Download to save the mp4 file at your desired location in your device.
2. Flvto Converter Tool
If you are looking for a reliable online platform to convert YouTube to MP3, MP4, or AVI**,** this online tool is also the right choice. The steps are quite simple and you can perform the conversion process anytime without any issues. Save the converted file in your desired location and access it whenever you need it. Ease the YouTube conversion process using this online software by following the below instructions:
- Visit https://www.flvto.biz/en91/ to open Flvto converter tool online with your browser
- Copy your favorite video’s URL from YouTube, as mentioned before
- Enter the link to the box, then select the file format as mp3, then click CONVERT TO button to trigger the conversion process
- Once finished, press the Download icon to download and save a converted mp3 file to your computer or local device. You can also send the mp3 to an email or upload it to dropbox directly.
3. y2mate YouTube to MP3 Converter
Y2mate is an online YouTube video downloader and converter. This online tool is compatible with all kinds of browsers optimally. You can use this program to convert YouTube to MP3 on both Windows and Mac. This platform allows you to make unlimited file conversions without spending even a penny from your pocket. You can avail for this service anytime and anywhere without any interruptions.
- Visit https://www.y2mate.com/en68 to open y2mate YouTube to MP3 Converter with your browser
- Go to YouTube and copy your desired URL link into the clipboard
- Copy and paste the YouTube URL to the box, and click Start
- Just a second, the YouTube video will be converted successfully. Please select the format as MP3 and then hit Download to save it at your favorite storage place in your device for easy retrieval when required.
4. YOUTUBETOMP3 Online
This extraordinary online platform wins your expectations by offering you with free service without any registration. There is no need to download any software to convert YouTube to mp3 instead of stepping into this online platform and carry on with unlimited quality conversion without any issues. Follow the below guidelines for the successful file conversion process:
- Visit https://youtubetomp3.sc/ to open this YOUTUBETOMP3 Online tool with your browser
- Take a quick copy of your favorite YouTube link
- Still paste the URL and select MP3 as the desired format in the list. Next press the Convert button.
- Then it will show Success, which means the YouTube video has been converted successfully. Then you can click Download your converted file to save the mp3 as you need.
5. youtubetomp3music.com
This online YouTube to MP3 converter allows you to convert YouTube video to MP3 with high quality.
It supports both desktop and mobile devices, so you can use it on Windows, Mac, iPhone, or Android. Besides YouTube, it also supports Facebook, Vimeo and Dailymotion, which is great. Below are the brief steps of converting YouTube to MP3.
- Visit https://youtubetomp3music.com/en16/ , paste the YouTube video link, and click the Go button.
- Now, you can choose the MP3 quality from 64kbps to 320kbps, the higher the kbps, the clear the audio.
- Click Convert to start the conversion, and then you can choose Download to save the converted YouTube video to local, or choose to Save to Dropbox.
Part 2: YouTube to MP3 Converters for Windows and Mac [Free Download]
For people who will convert YouTube to MP3 audio files often, I recommend you to try the offline YouTube to MP3 downloader. If you have tried the converters above, you may find that some of them are filled with ads. Here are some YouTube to MP3 converters for Windows and Mac that you can download for free.
- **1. Wondershare UniConverter
- **2. 4K Video Downloader
- **3. DVDVideoSoft YouTube to MP3 Converter
- **4. Mediahuman’s YouTube to MP3 Converter
- **5. Clipgrab
1. Wondershare UniConverter
UniCovnerter is the professional desktop video converter application from Wondershare. This one-stop video converter provides high-quality video and audio conversion, which is compatible with both Windows and Mac OS. Converting YouTube video to MP3 audio is easy with UniConverter, check the steps below:
- Download and install UniConverter on your computer (Windows 7 64-bit or later & macOS 10.10 or later). Launch it and then go to the Downloader menu and then click the Plus File icon.
- In the pop-up window, paste the YouTube video link. If you want to download multiple MP3 files, you can paste one URL per line to continue, and then click the Download button.
- In the Download Audio tab, you can choose the downloaded audio quality. In UniConverter, you can download MP3 in 128Kbps, 256Kbps, or 320Kbps high quality. Click Download to start downloading.
Besides MP3 audio file, you can also download the YouTube video in mp4 format, or download the thumbnail, or the subtitles if needed with UniConverter.
2. 4K Video Downloader
This tool is an offline converter where you have to download the app from its official website to discover it’s built-in features. It is a quality converter, which allows you to download full playlist and channels in your local drive for future reference. This program is compatible with all platforms like Mac, Windows, and Linux, etc. It supports more than 50 languages and it is trusted by million of users across boundaries.
Note
This 4K Video Downloader application enables you to download and convert up to 24 YouTube videos to mp3 files. You need to purchase a license for it if you want to convert more YouTube videos to mp3.
- Download the 4K Video Downloader application to your computer. It is compatible with both Windows and Mac OS
- After installation, please open this application on your computer, and copy the video URL from YouTube to your clipboard
- Tap the Paste Link option, and then this application will detect the URL automatically. You will see it’s parsing the video
- Once done, drop down the list and select Extract Audio and MP3 as the format. You can hit Choose to change the output directory on your computer to save the converted mp3 file. Finally, press Extract to start the conversion
- After conversion, you can go to the output directory you set and find the converted mp3.
3. DVDVideoSoft YouTube to MP3 Converter
It is an excellent YouTube to MP3 converter available for free download. This application has ample features like lossless conversion, retains the quality during the conversion process, and lastly it is safe and secure to carry on with the conversion procedure. Apart from the MP3 format, you can also choose other file types like M4A, WAV, FLAC and OGG.
- Download and install this app to your PC as per the OS type
- Open this mp3 converter after installation. Copy the URL from YouTube and paste in the blank field by pressing the Paste button.
- Choose MP3 original quality from the drop-down list
- Finally hit the Download button. You can now save the file at any location of your choice without issues.
4. Mediahuman’s YouTube to MP3 Converter
This application can work on both Windows and Mac. It also supports downloading playlists and channels from YouTube. The download tracks can be merged with the iTunes platform easily. You can make a copy of HD tracks of YouTube videos at your local disk and listen to it whenever you feel like. This tool saves a lot of time and the required process completes in a few minutes. Let’s see how you can convert YouTube to mp3 using this application:
- Download this video converter tool and install it to your computer
- Launch this application. Then go to YouTube and copy the video URL to the clipboard
- Click Paste link option(you should copy the YouTube URL first, otherwise this option will gray out), and it will load the YouTube video
- Then hit the download icon to trigger the conversion process
- Once done, you can click the Search icon to locate the converted mp3 file on your computer.
5. Clipgrab
This open-source video converter assists you to convert YouTube to mp3 optimally. It is enough if you tap the download link from its official website without any fee. This free software updates with the latest controls now and then to serve their customers efficiently. Take a glance at the steps regarding the conversion procedure
- Download and install this free application to your computer
- Open this application after installation, and go to the Downloads tab at the top
- Copy and paste and your favorite YouTube video link to the box, and choose MP3 format followed by adjusting HD quality. At last, press Grab this clip! button to trigger the conversion
- Once finished, you can click Open the target folder of the selected download to find the converted mp3 file.
Part3: Bonus Tip—Edit &Cut MP3 with Wondershare Filmora
In case if you want to edit and customize the downloaded MP3 file from YouTube, what can you do? Get started with Wondershare Filmora! It is a prestigious product from Wondershare to carry out the editing process after you convert YouTube to mp3 from your favorite tracks.
Excited to explore dazzling features then scroll down:
- Flexible audio control to do more audio adjustment
- Cut and trim your desired tracks in audio and video files
- Get rid of noise and unwanted background disturbances in the audio files
- This tool guarantees crisp and quality video and audio files
Just surf through the below guidelines to cut or edit your mp3 file:
- Download and install the program below. Then open Filmora on your computer
Download Mac Version ](https://tools.techidaily.com/wondershare/filmora/download/ )
- Hit the File-Import Media option to load the converted mp3 file to the Media Library
- Add the mp3 to the timeline, move the indicator to the place you want to cut, then click the red scissor icon to cut the mp3.
- And you can right-click the mp3 on the timeline, select Adjust Audio to get more audio control. The users can fade in/out the audio, adjust the volume/pitch, remove background noise, etc.
To sum up
Finally, it is time to conclude the discussion on a wide range of free YouTube to mp3 converters. You had a better idea of different video converters both on the online and offline platforms. Choose Filmora to obtain better quality edited audio and video tracks. You can now convert, edit, and store it at your desired location of video and audio files effortlessly. You can give your comments and write down your suggestions regarding this article. Get connected with us to explore and discover more facts on video editors and converters.
Benjamin Arango
Benjamin Arango is a writer and a lover of all things video.
Follow @Benjamin Arango
Also read:
- In 2024, A Comprehensive Walkthrough for Embedding YouTube Plays in Web Design
- The Wayfinder’s Guide Your Path to YouTube Video Mastery Hub
- 2024 Approved Discovering Synergistic Partnerships on YouTube Platforms
- 2024 Approved Breaking Into the World of YouTube Stellar Intros in iMovie
- Icon & Logo Inspiration The Top 6 Website Roundup
- Elevating Video Popularity on YouTube for 2024
- Seamless Addition of YouTube Video Selections for Sites
- [Updated] A Beginner's Roadmap to Professional Sports Edits
- 2024 Approved Ahead of the Game in Sub4sub Essential Beginner's Guide Recommended
- In 2024, Comparative Study of YouTubes and DailyMentions
- In 2024, 10 Top Zero-Charge Web Tools to Craft Videos
- Elevate Your Content with These Top 5 YouTube Marketing Methods
- Crafting YouTube Video Trailers with Filmora's Guide
- In 2024, Creating Compelling Solo Videos on a Budget
- [Updated] Channeling Wealth Through Beauty Online Platforms
- Unwind YouTube Videos Advanced Retrospectives
- Boosting Your YouTube Earnings on Mobile Devices - A Comprehensive Guide for 2024
- Upgrading Your Shoot Must-Have Film Tech for Creators
- [New] Elevating the Cold with Five Cozy Cinematic Elements
- [New] Elevate Youtube Presence Ideal Release Windows
- 2024 Approved Boost Your Mobile Film Game Best 9 Camera Add-Ons For Vloggers
- [Updated] Edu-Topic 10 Selective Learning Channels Online
- Harmonizing Hit Hits Building the Perfect YouTube Soundtrack
- Building Connections Through Collaborative Playlists
- Navigating the New Streaming Landscape with YouTube Premium
- In 2024, Converting Your Favourite Tracks Bridging Spotify with YouTube Music
- YT Cover Art The Key to More Views
- 2024 Approved Digital Broadcasting Battle Comparing Facebook LIVE, YouTube Live, & Twitter Spaces
- Direct Transition From YouTube to Instagram Reels
- Mastering Desktop & Mobile Incorporate Timestamps on YouTube
- Essential Tips for Crafting YouTube Shorts Templates
- [New] Decoding the Core Contrasts Between YouTube and DailyMention
- Embarking on a YouTube Venture User Setup Essentials for 2024
- [New] 3 Techniques to Retrieve & Save YouTube's Iconic Images
- [New] Beautifying Videos for YouTube Viewers
- The Mobile Filmmaker's Guide to Creating Thumbnails for YouTube
- Elevate Your Streaming Game From Twitch Viewers to YouTube Fans
- Liberty of YouTube Download Customizable Video Themes
- [New] Chart New Horizons in Branding with These Top 10 YouTube Tools
- New In 2024, Seamless Transition Exploring the Best Free Online & Offline Audio Conversion Software
- A Working Guide For Pachirisu Pokemon Go Map On Itel S23 | Dr.fone
- [Updated] Formulating Attractive Instagram Story Captions for 2024
- How to Change Google Play Location On Oppo A1x 5G | Dr.fone
- In 2024, Best Anti Tracker Software For Lava Blaze Pro 5G | Dr.fone
- [Updated] In 2024, The TikTok Guru's Handbook for Mastering Essentials
- Updated Smooth Cuts Ahead 3 Ways to Add Transitions in FCP for 2024
- Updated 2024 Approved Take Your Instagram Videos to the Next Level Optimal Dimensions and Aspect Ratios
- How to Transfer Data from Vivo Y28 5G to Any iOS Devices | Dr.fone
- Tips for Overcoming OBS Screen Blackout for 2024
- [Updated] Gleaming Graphics The Art of Crafting Insta Highlights (3 Ways)
- 2024 Approved Windows' Best Calling Solutions, #7-#1 Ranked
- Title: "[New] Elevate Your Streaming Game From Twitch Viewers to YouTube Fans"
- Author: Kevin
- Created at : 2024-05-25 16:05:35
- Updated at : 2024-05-26 16:05:35
- Link: https://youtube-videos.techidaily.com/new-elevate-your-streaming-game-from-twitch-viewers-to-youtube-fans/
- License: This work is licensed under CC BY-NC-SA 4.0.
