
![[New] Efficiently Broadcasting Twitch Streams to YouTube Audiences](https://www.lifewire.com/thmb/QdzyneXrDNJP05LF9GWKQLcJKKQ=/400x300/filters:no_upscale():max_bytes(150000):strip_icc()/GettyImages-965113756-764697dfeb544233b50fb9965b244595.jpg)
[New] Efficiently Broadcasting Twitch Streams to YouTube Audiences
Efficiently Broadcasting Twitch Streams to YouTube Audiences
Create High-Quality Video - Wondershare Filmora
An easy and powerful YouTube video editor
Numerous video and audio effects to choose from
Detailed tutorials provided by the official channel
Amidst many online applications is Twitch. This live streaming platform takes your experience to another level. You can use it to make crafts, play games, attract broadcasters, and many more. Twitch was launched in 2011, and since then, it has attracted millions of users, managing a database of about 4 million broadcasters by early 2020. With it, users can stream their activities as others watch in real-time. Just browse a category to find a stream.
You can also follow streamers that you like on the platform and get updates and notifications immediately after they are posted. But how do you start a career on a platform like Twitch? You need to broadcast and gather a large following. You can use built-in audiences from other platforms like Facebook. Let’s dive into the core of the matter and look at how to upload Twitch streams to YouTube and build your platform.

In this article
02 What is the benefit of uploading your Twitch Streams to YouTube
03 How to upload your Twitch Streams to YouTube
What is Twitch VOD?
Twitch Video on Demand (VOD) is a recording of previously streamed content. It provides briefings if you missed catching the Twitch live stream. Just watch the VOD from your favorite streamer and be engaged the best way possible. However, VODs don’t last forever. They are removed after two weeks of broadcast. But streamers with Partner Status can have their VODs last up to 60 days.
- How to enable Twitch VOD?
VODs are the best form to archive streams that your fans missed. Even though they are not enabled by default, you can manually enable them and not let your fans miss any important event from your channel. They’ll find it under the “Videos” tab on any Twitch channel. Follow these steps to enable VOD on your channel.
Step 1. Go to your profile icon in the top right corner of Twitch
Check in the “Channel & Video” section and locate the “Stream Key & Preferences” menu.

Step 2. Click on “Creator Dashboard”
Remember, you can enable VODs from your creator dashboard. Just go under the “Settings” tab and click on the “Stream section” of the creator dashboard. Check under the subtitle “VOD Settings” and get the option to store past broadcasts. You can also toggle the slider to store your past broadcasts.

Step 3 Click on the “Settings” tab on the left-hand side and go to Stream
You’ll get various drop-down menu options. Click on the “Settings” tab and choose the “Stream” option. The system will navigate to a new page, thus setting your preferences for VODs and clips.
Step 4. Go to “VOD Settings” and toggle on the “Store Past Broadcast.”
Ensure you have the toggle option turned ON under the “VOD Settings.” If it’s “ON,” you’ll realize the toggle will be purple, with a checkmark in it. Twitch will be confirmed to be enabled if it’s purple.

- Frequently Asked Question about Twitch VOD
These are some questions frequently asked by Twitch users.
1. How long will Twitch store my VOD
Your Twitch can either be stored for 14 or 60 days, depending on your level. For Twitch Prime, Twitch Partner or a Twitch Turbo user has their past broadcasts automatically saved for 60 days before deletion. But if you are not connected to these three options, your past broadcasts will be saved for only 14 days before deletion.
Since your past broadcasts cannot be live for more than 60 days, you have the option to download the video to your computer before the validity days expire and Twitch deletes it. You can use an External Hard drive to save the past broadcast content. Likewise, it is possible to turn your past broadcast content into Highlight and, in turn, permanently store them on Twitch.
2. What is the difference between Twitch VOD, Highlights, and Clips
Twitch VOD is a previously saved video of your live stream content. You choose to save either part or the entire content of your previously streamed content. More so, you don’t need any additional requirements to use VOD.
Highlights are short videos that have been edited from your past broadcast content. You can save them on Twitch permanently. Streamers majorly use highlights to save video game achievements. Unlike VOD Twitch that can be saved up to 60 days, Highlights usually lasts no more than 3 minutes.
- To make Highlights on Twitch, first, navigate to your Dashboard.
- Then scroll down and click on “Content” > “Video Producer.
- Next, press on “All Videos” to change them to “Past Broadcasts.”
- Now press the “Highlight” button, and Twitch will immediately open a new tab for “Twitch Highlighter Tool.”
- Then select the video part to include as “Highlight” and press the “Create Highlights” button.
- Wait a while for the process to be completed, and Voila! You have your Highlights created.
When it comes to Twitch Clip, you can capture special moments in a stream you are currently watching. On the same note, you can share clips with friends and other users on social media platforms. Such shared clips contain a link where others view the source or video from.
The clips you create will automatically be saved on the streamer’s channel on the “Clips” page, where other viewers can see them too. Nonetheless, you can download “clips” to your computer and, in turn, upload them whenever you want to. And note that you can help your stream grow via “Clips” by letting your viewers clip and share your stream moments.
- To create “Clips” on Twitch, identify which Streamers channel you wish to create a clip from.
- Then click on the “Clapper board” icon. Next, edit your clip between 5 and 60 seconds long.
- Finally, create a title and publish your Clip. You’ll also enjoy the privilege to share your clip’s link to other social media networks.
What is the benefit of uploading your Twitch Streams to YouTube
You stand to gain a lot when you upload your Twitch Streams to YouTube.
1) To enlighten your followers
Your followers will see your streams and make the best decisions. Viewers can check out your recordings and other highlights from past streams. It will help them decide whether they like what they see and probably join your live streams.
2) Twitch provides content for you to share and monetize on YouTube
Since Twitch streaming is more popular nowadays, many people throng it for content. It is not wise to rely entirely on Twitch to discover as a Twitch Streamer. Posting to YouTube will make it known within a short time. You would have announced your streams most nobly and kept your followers up to date, attracting new ones as well.
3) To keep your followers engaged even when you are offline
Even though live streaming is important, some viewers may not attend the live sessions due to different time zones or other commitments. In this regard, when uploaded to YouTube, Twitch will give them a chance to watch your content just whenever they log in. They, therefore, have the option to watch a Twitch VOD of the live stream they missed.
How to upload your Twitch Streams to YouTube
Check how to upload Twitch streams to YouTube from the Twitch website.
Step 1. Identify the little arrow next to your name on the Twitch website and click on it. Then click on the “Video Producer” to take you to a list of your Twitch videos.

Step 2. Check out and click on the “three-dots” on the video you wish to upload to YouTube. Click on the “Export” tab.
Step 3. A menu will then pop up. Here, you can fill in the description, title, and tags that you would like to appear on the YouTube video. There is an option for Twitch to split your video automatically. If you wish so, then tick the “Checkbox” to enable it. Then click on the “Start Export” option to export your Twitch streams to YouTube.

Bouns! Edit Your Twitch Video with Filmora
The quality of your video matters when it comes to uploading Twitch Streams to YouTube. Using a third-party tool to edit your video is the first step in ensuring your videos communicate meaningful content. Filmora comes in handy to bring your imaginations to life. Use it for simple creation without limits, even for beginners.
- Use it to track moving objects in video clips
- Easily match any image of the selected clip
- Its powerful tools let you edit your video by cropping, splitting, adjusting speed, etc
- The video keyframe easily indicates the beginning and end of the parameters
For Win 7 or later (64-bit)
For macOS 10.12 or later
Conclusion
● Don’t just focus on how to upload Twitch streams to YouTube but also consider the quality of video you are posting to YouTube. Remember, your video quality will speak much more of you than any other description. So, strive to produce quality videos using the best tool, Filmora. The app is easy to use and will elevate your views and imaginations through your video in the most impactful way.
Amidst many online applications is Twitch. This live streaming platform takes your experience to another level. You can use it to make crafts, play games, attract broadcasters, and many more. Twitch was launched in 2011, and since then, it has attracted millions of users, managing a database of about 4 million broadcasters by early 2020. With it, users can stream their activities as others watch in real-time. Just browse a category to find a stream.
You can also follow streamers that you like on the platform and get updates and notifications immediately after they are posted. But how do you start a career on a platform like Twitch? You need to broadcast and gather a large following. You can use built-in audiences from other platforms like Facebook. Let’s dive into the core of the matter and look at how to upload Twitch streams to YouTube and build your platform.
In this article
02 What is the benefit of uploading your Twitch Streams to YouTube
03 How to upload your Twitch Streams to YouTube
What is Twitch VOD?
Twitch Video on Demand (VOD) is a recording of previously streamed content. It provides briefings if you missed catching the Twitch live stream. Just watch the VOD from your favorite streamer and be engaged the best way possible. However, VODs don’t last forever. They are removed after two weeks of broadcast. But streamers with Partner Status can have their VODs last up to 60 days.
- How to enable Twitch VOD?
VODs are the best form to archive streams that your fans missed. Even though they are not enabled by default, you can manually enable them and not let your fans miss any important event from your channel. They’ll find it under the “Videos” tab on any Twitch channel. Follow these steps to enable VOD on your channel.
Step 1. Go to your profile icon in the top right corner of Twitch
Check in the “Channel & Video” section and locate the “Stream Key & Preferences” menu.
Step 2. Click on “Creator Dashboard”
Remember, you can enable VODs from your creator dashboard. Just go under the “Settings” tab and click on the “Stream section” of the creator dashboard. Check under the subtitle “VOD Settings” and get the option to store past broadcasts. You can also toggle the slider to store your past broadcasts.
Step 3 Click on the “Settings” tab on the left-hand side and go to Stream
You’ll get various drop-down menu options. Click on the “Settings” tab and choose the “Stream” option. The system will navigate to a new page, thus setting your preferences for VODs and clips.
Step 4. Go to “VOD Settings” and toggle on the “Store Past Broadcast.”
Ensure you have the toggle option turned ON under the “VOD Settings.” If it’s “ON,” you’ll realize the toggle will be purple, with a checkmark in it. Twitch will be confirmed to be enabled if it’s purple.
- Frequently Asked Question about Twitch VOD
These are some questions frequently asked by Twitch users.
1. How long will Twitch store my VOD
Your Twitch can either be stored for 14 or 60 days, depending on your level. For Twitch Prime, Twitch Partner or a Twitch Turbo user has their past broadcasts automatically saved for 60 days before deletion. But if you are not connected to these three options, your past broadcasts will be saved for only 14 days before deletion.
Since your past broadcasts cannot be live for more than 60 days, you have the option to download the video to your computer before the validity days expire and Twitch deletes it. You can use an External Hard drive to save the past broadcast content. Likewise, it is possible to turn your past broadcast content into Highlight and, in turn, permanently store them on Twitch.
2. What is the difference between Twitch VOD, Highlights, and Clips
Twitch VOD is a previously saved video of your live stream content. You choose to save either part or the entire content of your previously streamed content. More so, you don’t need any additional requirements to use VOD.
Highlights are short videos that have been edited from your past broadcast content. You can save them on Twitch permanently. Streamers majorly use highlights to save video game achievements. Unlike VOD Twitch that can be saved up to 60 days, Highlights usually lasts no more than 3 minutes.
- To make Highlights on Twitch, first, navigate to your Dashboard.
- Then scroll down and click on “Content” > “Video Producer.
- Next, press on “All Videos” to change them to “Past Broadcasts.”
- Now press the “Highlight” button, and Twitch will immediately open a new tab for “Twitch Highlighter Tool.”
- Then select the video part to include as “Highlight” and press the “Create Highlights” button.
- Wait a while for the process to be completed, and Voila! You have your Highlights created.
When it comes to Twitch Clip, you can capture special moments in a stream you are currently watching. On the same note, you can share clips with friends and other users on social media platforms. Such shared clips contain a link where others view the source or video from.
The clips you create will automatically be saved on the streamer’s channel on the “Clips” page, where other viewers can see them too. Nonetheless, you can download “clips” to your computer and, in turn, upload them whenever you want to. And note that you can help your stream grow via “Clips” by letting your viewers clip and share your stream moments.
- To create “Clips” on Twitch, identify which Streamers channel you wish to create a clip from.
- Then click on the “Clapper board” icon. Next, edit your clip between 5 and 60 seconds long.
- Finally, create a title and publish your Clip. You’ll also enjoy the privilege to share your clip’s link to other social media networks.
What is the benefit of uploading your Twitch Streams to YouTube
You stand to gain a lot when you upload your Twitch Streams to YouTube.
1) To enlighten your followers
Your followers will see your streams and make the best decisions. Viewers can check out your recordings and other highlights from past streams. It will help them decide whether they like what they see and probably join your live streams.
2) Twitch provides content for you to share and monetize on YouTube
Since Twitch streaming is more popular nowadays, many people throng it for content. It is not wise to rely entirely on Twitch to discover as a Twitch Streamer. Posting to YouTube will make it known within a short time. You would have announced your streams most nobly and kept your followers up to date, attracting new ones as well.
3) To keep your followers engaged even when you are offline
Even though live streaming is important, some viewers may not attend the live sessions due to different time zones or other commitments. In this regard, when uploaded to YouTube, Twitch will give them a chance to watch your content just whenever they log in. They, therefore, have the option to watch a Twitch VOD of the live stream they missed.
How to upload your Twitch Streams to YouTube
Check how to upload Twitch streams to YouTube from the Twitch website.
Step 1. Identify the little arrow next to your name on the Twitch website and click on it. Then click on the “Video Producer” to take you to a list of your Twitch videos.
Step 2. Check out and click on the “three-dots” on the video you wish to upload to YouTube. Click on the “Export” tab.
Step 3. A menu will then pop up. Here, you can fill in the description, title, and tags that you would like to appear on the YouTube video. There is an option for Twitch to split your video automatically. If you wish so, then tick the “Checkbox” to enable it. Then click on the “Start Export” option to export your Twitch streams to YouTube.
Bouns! Edit Your Twitch Video with Filmora
The quality of your video matters when it comes to uploading Twitch Streams to YouTube. Using a third-party tool to edit your video is the first step in ensuring your videos communicate meaningful content. Filmora comes in handy to bring your imaginations to life. Use it for simple creation without limits, even for beginners.
- Use it to track moving objects in video clips
- Easily match any image of the selected clip
- Its powerful tools let you edit your video by cropping, splitting, adjusting speed, etc
- The video keyframe easily indicates the beginning and end of the parameters
For Win 7 or later (64-bit)
For macOS 10.12 or later
Conclusion
● Don’t just focus on how to upload Twitch streams to YouTube but also consider the quality of video you are posting to YouTube. Remember, your video quality will speak much more of you than any other description. So, strive to produce quality videos using the best tool, Filmora. The app is easy to use and will elevate your views and imaginations through your video in the most impactful way.
Discover 7 Essential Free Audio Tracks for YouTubers
7 Places to Find Royalty Free Sound Effects for YouTube Videos

Richard Bennett
Mar 27, 2024• Proven solutions
Sound effects can add a lot of excitement to your videos. Sometimes they are even used for comedic effect. For example, you might use a fake slap sound in a slapstick comedy sketch. Other times sound effects can be more subtle. You might want to add city noises to the background of your video to help set your scene, or a droning sound to build suspense. A lot of the most popular free sound effects are related to the genres of science fiction or action.
- Part 1: Three Types of Sound Effects
- Part 2: Royalty-Free Sound Effects for Your YouTube Videos
- Part 3: Free Sound Effects and Music in Filmora
Part 1: Three Types of Sound Effects
1. Without License
When you want to download sound effects for YouTube, the licensed ones cannot be used, but there are a few that do not hold a license and can be easily downloaded from the website. The quality might be poor to some extent, but you may use the sound effects without a license in any product or video.
2. Creative Commons License
The sound effects under the CC license need to be checked for their type. There are some vlog sound effects that can be used for personal projects free but not for commercial ones. There are a few sound effects that might just require attribution or credit to the creator and cannot be modified in any way.
3. Royalty-free license
You may download sound effects for YouTube by purchasing the licensed sound effects that a professional offers. When you purchase it, you will get high-quality sound, and you may use it on one or more projects, irrespective of personal or commercial types.
Where can you get free sound effects and edit audios at the same time? Just try Filmora for free!


Part 2: Royalty-Free Sound Effects for Your YouTube Videos
This article will introduce you to the six best sites to find royalty-free sound effects and explain their terms of use.
1.YouTube Audio Library – Free!
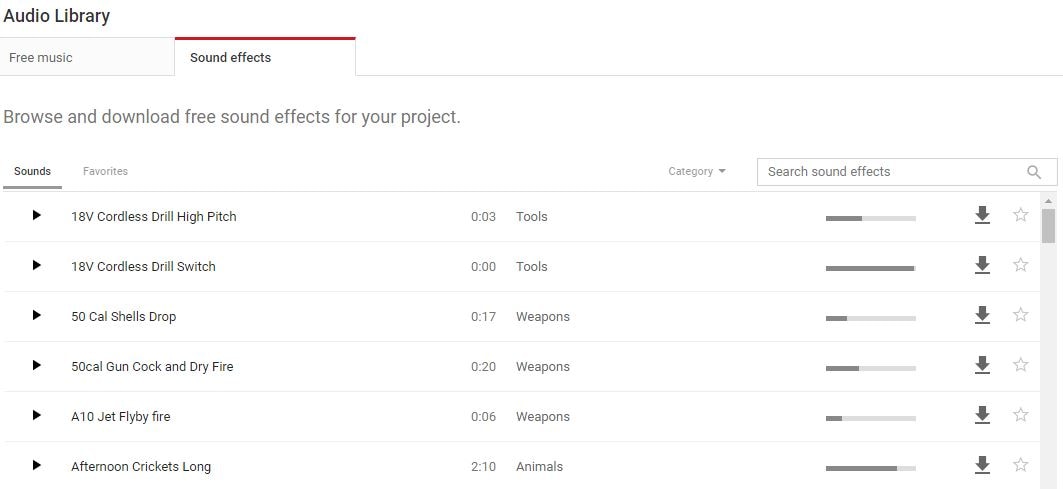
Besides royalty-free music, the YouTube Audio Library also has sound effects that you can download for free. The sound effects in YouTube’s library are organized into categories. You can select a category, i.e ‘sci-fi’, from the drop-down menu next to the search bar and browse through just the types of sounds you are interested in. You can also favorite sounds you like so you can find them again easily.
The sound effects you download from YouTube’s library can be used as many times as you like and in as many different projects. Monetizing your videos will not impact your ability to use these sound effects either. Some other sources of sound effects have different rules about monetizing or using sound effects in multiple projects.
2.Freesound – Free!
![]()
Freesound.org is a huge database of royalty-free sound effects and other audio files. All downloads are free, but there are conditions for using some of the sounds on Freesound. There are three different Creative Commons licenses uses on Freesound and which one applies to the sound effect you want depends on the user who posted it.
The three licenses used on Freesound are Zero, Attribution, and Attribution-Noncommercial.
Zero (cc0): you can do anything you want with these sound effects except claim that you created them. You can make money off of them and you do not have to credit the original creator.
Attribution (by): you should credit the creator of the sound. Usually, this means adding a ‘Sound effect by Username on Freesound’ line in the description of your video. So long as you credit the artists you can do anything with these sounds, even monetize the videos you use them in.
Attribution-Noncommercial (by –nc): you must credit the creators of these sound effects and you cannot make money off of them. This means that you cannot monetize a video in which you used these sound effects.
Freesound is a social site where you can talk to the creators of the sounds you want to download. If you are planning to monetize a video that uses an Attribution-Noncommercial sound effect you can always ask the artist for permission.
I’ve also found a YouTube video that explains the Creative Commons in detail. You can watch it below.
3.AudioJungle - $1 and Up

AudioJungle.net has a wide selection of royalty-free sound effects available for prices as low as $1. Sound effects costing more than $10 tend to either be longer or include whole sets of sounds. You can filter the sounds on AudioJungle by category, tags, and price while you browse.
There are two different licenses you can purchase on AudioJungle, SFX Single Use, and SFX Multi-Use. The prices displayed are all for the Single Use license. The Multi-Use license costs more.
The main difference between the two licenses on AudioJungle is how many projects you can use your sound effect in. If you purchase a sound under a Single-Use license you can only use it in one project. You can use it as many times as you want within that project, and you can even make money off of that project, but you cannot use it again in a second project unless you repurchase it. While it is more expensive, the Multi-Use license gives you unlimited use of your download.
If you decide to use sound effects from any of these sites then please make sure to read their more detailed legal information.
4.Free Sound Effects
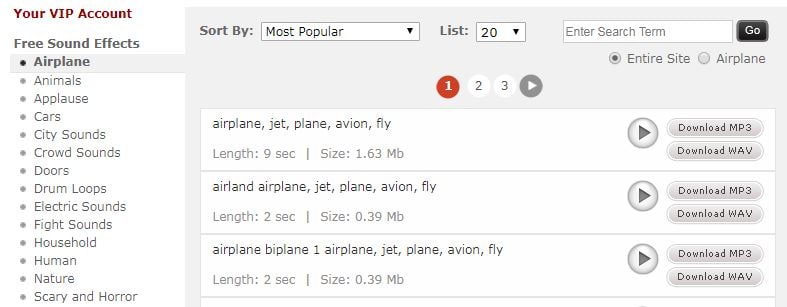
The Free Sound Effects lets you access free as well as licensed sound effects. If you want to download sound effects for YouTube videos, the legally licensed soundtracks with high-quality effects can be selected from the Pro Sound Effects sections. These are royalty-free sound effects.
It requires a one-time fee and you get access to use the sound effects as many times you want for your projects. But, if you are not really serious and just creating videos out of fun, you may also try the free sound effects like animals, applause, cars, etc. to ensure good vlog sound effects that can give life to your vlog.
5.Soundsnap

Whether you wish to spice up your games videos or make the notification alerts hilarious, the Soundsnap app lets you download some of the most amazing sound effects. It is the best platform to search and also share the free vlog sound effects or loops legally. Soundsnap offers original sound effects created by the users and not the edited or mixed sounds that you find in usual commercial libraries. It features above 200,000 loops and sound effects created by expert and knowledgeable music producers and sound engineers.
6.PacDV Free Sound Effects
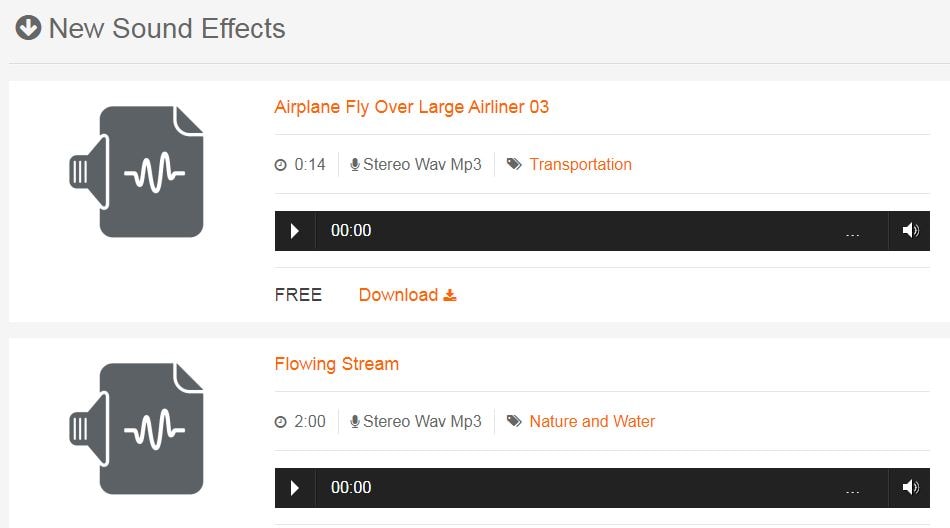
Now, you may create vlog sound effects from this royalty-free library of sounds produced by film students, multimedia developers, sound designers, music producers, etc. On the PacDV Free Sound Effects site, you can find free sound clips that have been used in a number of films, television programs, and videos.
You may definitely enjoy downloading sound effects for YouTube from this site completely free but cannot sell it or re-license it to anyone for your benefit. It must be used by you for your video only. The sound clips must not be put on site for download or link to other sound files.
Part 3: Get Free Sound Effects for YouTube Video in Filmora
If you’re using the Filmora video editor to produce YouTube videos, then you have a free sound effect library already. You can find them in the Audio library (shown below).

There are currently 25 different sound effects available, varying from animal, machine, people, sci-fi, and ambiance. After adding the sound effect to the timeline, you can change the speed to make the sound sounds fun.
Richard Bennett
Richard Bennett is a writer and a lover of all things video.
Follow @Richard Bennett
Richard Bennett
Mar 27, 2024• Proven solutions
Sound effects can add a lot of excitement to your videos. Sometimes they are even used for comedic effect. For example, you might use a fake slap sound in a slapstick comedy sketch. Other times sound effects can be more subtle. You might want to add city noises to the background of your video to help set your scene, or a droning sound to build suspense. A lot of the most popular free sound effects are related to the genres of science fiction or action.
- Part 1: Three Types of Sound Effects
- Part 2: Royalty-Free Sound Effects for Your YouTube Videos
- Part 3: Free Sound Effects and Music in Filmora
Part 1: Three Types of Sound Effects
1. Without License
When you want to download sound effects for YouTube, the licensed ones cannot be used, but there are a few that do not hold a license and can be easily downloaded from the website. The quality might be poor to some extent, but you may use the sound effects without a license in any product or video.
2. Creative Commons License
The sound effects under the CC license need to be checked for their type. There are some vlog sound effects that can be used for personal projects free but not for commercial ones. There are a few sound effects that might just require attribution or credit to the creator and cannot be modified in any way.
3. Royalty-free license
You may download sound effects for YouTube by purchasing the licensed sound effects that a professional offers. When you purchase it, you will get high-quality sound, and you may use it on one or more projects, irrespective of personal or commercial types.
Where can you get free sound effects and edit audios at the same time? Just try Filmora for free!
Part 2: Royalty-Free Sound Effects for Your YouTube Videos
This article will introduce you to the six best sites to find royalty-free sound effects and explain their terms of use.
1.YouTube Audio Library – Free!
Besides royalty-free music, the YouTube Audio Library also has sound effects that you can download for free. The sound effects in YouTube’s library are organized into categories. You can select a category, i.e ‘sci-fi’, from the drop-down menu next to the search bar and browse through just the types of sounds you are interested in. You can also favorite sounds you like so you can find them again easily.
The sound effects you download from YouTube’s library can be used as many times as you like and in as many different projects. Monetizing your videos will not impact your ability to use these sound effects either. Some other sources of sound effects have different rules about monetizing or using sound effects in multiple projects.
2.Freesound – Free!
![]()
Freesound.org is a huge database of royalty-free sound effects and other audio files. All downloads are free, but there are conditions for using some of the sounds on Freesound. There are three different Creative Commons licenses uses on Freesound and which one applies to the sound effect you want depends on the user who posted it.
The three licenses used on Freesound are Zero, Attribution, and Attribution-Noncommercial.
Zero (cc0): you can do anything you want with these sound effects except claim that you created them. You can make money off of them and you do not have to credit the original creator.
Attribution (by): you should credit the creator of the sound. Usually, this means adding a ‘Sound effect by Username on Freesound’ line in the description of your video. So long as you credit the artists you can do anything with these sounds, even monetize the videos you use them in.
Attribution-Noncommercial (by –nc): you must credit the creators of these sound effects and you cannot make money off of them. This means that you cannot monetize a video in which you used these sound effects.
Freesound is a social site where you can talk to the creators of the sounds you want to download. If you are planning to monetize a video that uses an Attribution-Noncommercial sound effect you can always ask the artist for permission.
I’ve also found a YouTube video that explains the Creative Commons in detail. You can watch it below.
3.AudioJungle - $1 and Up
AudioJungle.net has a wide selection of royalty-free sound effects available for prices as low as $1. Sound effects costing more than $10 tend to either be longer or include whole sets of sounds. You can filter the sounds on AudioJungle by category, tags, and price while you browse.
There are two different licenses you can purchase on AudioJungle, SFX Single Use, and SFX Multi-Use. The prices displayed are all for the Single Use license. The Multi-Use license costs more.
The main difference between the two licenses on AudioJungle is how many projects you can use your sound effect in. If you purchase a sound under a Single-Use license you can only use it in one project. You can use it as many times as you want within that project, and you can even make money off of that project, but you cannot use it again in a second project unless you repurchase it. While it is more expensive, the Multi-Use license gives you unlimited use of your download.
If you decide to use sound effects from any of these sites then please make sure to read their more detailed legal information.
4.Free Sound Effects
The Free Sound Effects lets you access free as well as licensed sound effects. If you want to download sound effects for YouTube videos, the legally licensed soundtracks with high-quality effects can be selected from the Pro Sound Effects sections. These are royalty-free sound effects.
It requires a one-time fee and you get access to use the sound effects as many times you want for your projects. But, if you are not really serious and just creating videos out of fun, you may also try the free sound effects like animals, applause, cars, etc. to ensure good vlog sound effects that can give life to your vlog.
5.Soundsnap
Whether you wish to spice up your games videos or make the notification alerts hilarious, the Soundsnap app lets you download some of the most amazing sound effects. It is the best platform to search and also share the free vlog sound effects or loops legally. Soundsnap offers original sound effects created by the users and not the edited or mixed sounds that you find in usual commercial libraries. It features above 200,000 loops and sound effects created by expert and knowledgeable music producers and sound engineers.
6.PacDV Free Sound Effects
Now, you may create vlog sound effects from this royalty-free library of sounds produced by film students, multimedia developers, sound designers, music producers, etc. On the PacDV Free Sound Effects site, you can find free sound clips that have been used in a number of films, television programs, and videos.
You may definitely enjoy downloading sound effects for YouTube from this site completely free but cannot sell it or re-license it to anyone for your benefit. It must be used by you for your video only. The sound clips must not be put on site for download or link to other sound files.
Part 3: Get Free Sound Effects for YouTube Video in Filmora
If you’re using the Filmora video editor to produce YouTube videos, then you have a free sound effect library already. You can find them in the Audio library (shown below).
There are currently 25 different sound effects available, varying from animal, machine, people, sci-fi, and ambiance. After adding the sound effect to the timeline, you can change the speed to make the sound sounds fun.
Richard Bennett
Richard Bennett is a writer and a lover of all things video.
Follow @Richard Bennett
Also read:
- 2024 Approved Boosting Views with Captivating Intros Filmed in iMovie
- In 2024, Access All Audio Extracted Top Free YouTube to MP3 Converter Guide
- Streamlining Your Gaming Playback
- Unseen Audiences Transform Your Zero-View Videos with These Tips
- Elevate Visibility Comprehensive Guide to Video Marketing Titles for 2024
- Building Bonds Before Buying Subscription Strategies
- 2024 Approved Crafting Timeless Videos with Retro Filmmaking Skills
- Extracting YouTube Videos Simplified
- Chorus of Creators Guidelines for Sharing Sounds Online
- [Updated] Best Student-Friendly History Vid Hubs (#1-10)
- Dive Into Digital Fandom Top 6 Interactive Questionnaires to Identify Your YouTube Spirituality for 2024
- EditPrime Vision for 2024
- How to Convert YouTube to MP3 Without Compromising Security - 3 Tips
- [Updated] Device-Friendly Tutorial Inserting Your Shorts Into YouTube
- Step-by-Step to Success Joining YouTube's Partner Program
- Optimizing YouTube Content With Social Blade - A Stats Journey
- [Updated] Elite Editing Selection Quality Software for YouTubers
- Best YouTube Ad Creators for 2024
- Essential Tips for Locating YouTube's Content Creation Hub for 2024
- 2024 Approved Collaborative Listening Made Simple on YouTube
- [New] Adding Value Instructional Design of YouTube Alerts & Annotations
- Constructing Captivating Valorant YouTube Thumbnails for 2024
- Innovative Gaming Intro Options Free Versus Paid for YouTube Creators
- What Is the Best Video Format for YouTube, In 2024
- In 2024, Essential Knowledge for Engaging with ASMR Videos
- Accelerate Audience Engagement with High-Impact Hash Tags for 2024
- 2024 Approved Boost Engagement with Custom Images for Your Videos
- 2024 Approved Charting the Financial Pathway of TSeries Within YouTube Market Space
- Simplified Path to Mastery in Using CC Licenses
- [New] A Deep-Dive Into Video Platform Profit Margins DailyMovement vs YouTube
- The Dual Life of a Professional YouTuber & Employee
- In 2024, Audience Expansion Masterclass Skyrocketing Your Youtube Numbers
- In 2024, Enhancing Visual Appeal YouTube Images in Presentations
- Elevating Video Visibility Through Thumbnails
- [Updated] Achieving 1K Subs in a Weekend A Plan of Action
- [Updated] Claim Cost-Free Visuals From Highest-Rated 4 YouTube Sources
- [Updated] Deep Dive Into Rank Tracker Solutions for Peak Success on YouTube
- Silent to Clear The Ultimate Guide to Professional Audio Recording
- In 2024, Enhancing Exposure Do Buy Views Accelerate Channel Growth?
- Cultivating Productive Collaboration A Pathway to Effective Collab Videos
- [New] Essential Gear Checklist for YouTube Success
- Charting a Course for Wealth Ajey's YouTube Income Blueprint for 2024
- [New] Crafting Compelling YouTube Profile Definitions
- Command the YouTube Stage Mastering Visibility Through Tactics for 2024
- Skyrocket Your Video Discovery with These Essential YouTube SEO Insights
- [New] 2024 Gaming Earnings on YouTube
- Unlocking Potential How to Gain More Viewers and Followers on Youtube
- Save While You Teach Hosting Low-Cost Seminars via YouTube
- 2024 Approved Say Goodbye to Premiere Rush Top 4 Alternative Video Editors
- [New] 2024 Approved Elevate Your Social Media Impact Secrets Unveiled in the Best Facebook Bios
- In 2024, Top 6 Apps/Services to Trace Any Realme GT 5 Pro Location By Mobile Number | Dr.fone
- How To Deal With the Honor 100 Pro Screen Black But Still Works? | Dr.fone
- [New] In 2024, Exclusive 7 Secure Download Services
- [Updated] The Essential Steps to Thrive in Discord Livestreaming
- Top 15 Augmented Reality Games Like Pokémon GO To Play On Apple iPhone SE (2020) | Dr.fone
- How to remove Google FRP Lock on Xiaomi Redmi Note 13 Pro 5G
- Updated Kapwing Slow Motion Tutorial A Beginners Guide to Slowing Down Your Videos for 2024
- 4 Ways to Transfer Messages from Apple iPhone 11 Pro Max to iPhone Including iPhone 15 | Dr.fone
- 2024 Approved The Ultimate Guide to Face Blurring 10 Essential Tools and Techniques
- [Updated] Unlocking Retro Titles Best PC Emulators for PS1 Games for 2024
- Updated From Audio to Video A Guide to Successful MP3 to MP4 Conversion for 2024
- Unveiling 8 Top Choices Your Go-To Templates on IG for 2024
- [New] In 2024, Should ITop Top Your List for Screen Recorders?
- How to Reset your Vivo Y100A Lock Screen Password
- In 2024, How To Change Your Apple ID on iPhone 14 With or Without Password | Dr.fone
- Fake Android Location without Rooting For Your Oppo Find X7 Ultra | Dr.fone
- Updated 2024 Approved Best iMovie Alternatives for Windows 11/10 PCs 2023
- New 2024 Approved Top-Rated Video Editing Tools for 4K Content
- [New] Mastering Twitter Videos in Ultra HD for 2024
- How To Deal With the Samsung Galaxy A54 5G Screen Black But Still Works? | Dr.fone
- [Updated] Discovering Top 5 Methods for Turning TikTok Videos Into GIFs for 2024
- Firefox's PIP Explained A User's Handbook
- The Top 10 Filmora Traits Fueling Video Magic
- Navigating the Virtual Space Mastering Discord Screencasts for 2024
- Delete Gmail Account With/Without Password On Oppo Find X7
- In 2024, For People Wanting to Mock GPS on Google Pixel 8 Pro Devices | Dr.fone
- 4 Ways to Fix Android Blue Screen of Death On OnePlus 11R | Dr.fone
- New How To Create Animated Clipart in PowerPoint for 2024
- [Updated] Top TikTok Metrics Optimizing Account Performance Tools for 2024
- In 2024, How To Do Tecno Spark 10C Screen Sharing | Dr.fone
- Beat the Best Substitutes for Samsung's VR Camera Gear 360 for 2024
- 2024 Approved Rock-Solid Footage 8 Best Free Online Video Stabilizers
- Full Guide to Catch 100 IV Pokémon Using a Map On Samsung Galaxy A23 5G | Dr.fone
- 2024 Approved Prime Selector 2.0 Twitter's Animated Treasure Chest
- Android Unlock Code Sim Unlock Your OnePlus Ace 2 Phone and Remove Locked Screen
- Title: [New] Efficiently Broadcasting Twitch Streams to YouTube Audiences
- Author: Kevin
- Created at : 2024-05-25 16:04:31
- Updated at : 2024-05-26 16:04:31
- Link: https://youtube-videos.techidaily.com/new-efficiently-broadcasting-twitch-streams-to-youtube-audiences/
- License: This work is licensed under CC BY-NC-SA 4.0.
