
![[New] Efficient Fortnite Imagery Design Quickly](https://www.lifewire.com/thmb/LwkZUw97kt_1aI6yy4WzCCTUoTM=/540x405/filters:no_upscale():max_bytes(150000):strip_icc()/iPadOS-banner-57525dc2da314a38877046ad29e0562a.jpg)
[New] Efficient Fortnite Imagery Design Quickly
Efficient Fortnite Imagery Design Quickly
How to Make Fortnite Thumbnail for Free and Easy in 2024

Ollie Mattison
Mar 27, 2024• Proven solutions
To grow a Youtube channel, you need to focus on several different factors and elements. Having an attractive and eye-catching thumbnail is one of those top factors that contribute to the growth of your channel. No matter how good your content is, if you cannot attract users to click on your videos, it will not benefit your channel. In this article, we are going to show you how you can make a Fortnite thumbnail in few simple steps using Filmora X. If you are a content creator and love to make Fortnite videos, then this article will be very helpful for you.
Filmora has recently introduced a new feature named AI Portrait that uses Artificial Intelligence to remove the background from a portrait or image. This feature doesn’t require any green screen to do that. Filmora also contains a wide range of elements and titles that help you enhance the Thumbnail and make look stunning and eye-catching.
Step 01: To start making a Fortnite thumbnail, it is important to have a screenshot of your gameplay. We can make a perfect screenshot using Fortnite Replay Mode. If you have recently played a Fortnite match, you can access its replay under the Career tab. Under the Career tab select Replays.

Step 02: If you are using a console, the game will only store 10 recent gameplays, but if you are using a PC, it will store 100 recent gameplays in this section. From all these gameplays, select the one that you want to use for the Thumbnail. Once you choose gameplay, you can control everything in it. The angle, speed, and camera mode.

Step 03: For creating a perfect thumbnail, select “Drone Free Camera” mode from the camera mode located on the bottom right corner of the screen. It will allow us to change the angle the way we want. Choose an angle of your choice and take the screenshot.

Step 04: Open Filmora X, make sure to select the 16:9 screen ratio. Import the screenshot using the import button.

Step 05: Drag and drop the screenshot into the timeline.

Step 06: Now, let’s separate the background and character. Go to the Effects, then AI Portrait, select Human Segmentation, and drop it into the screenshot.

Step 07: Filmora will ask you to purchase it, but you can now hit “Try it” to use it.

Step 08: It will remove the background of the screenshot.

Step 09: To add a background, go to the media and navigate to “Sample Color.” Drag a color of your choice and drop it below the screenshot.

Step 10: To add titles in the Thumbnail, go to the Titles tab. Here you can find several categories of titles. Find your preferred title and drop it above all the layers. You can choose titles, lower thirds, and other texts depending upon your need and requirement.

Step 11: We can make this Fortnite Thumbnail look more attractive by adding elements such as stickers and icons. Filmora contains a wide range of stickers. To access them, navigate to the Elements tab. Here you can find so many categories of elements. Choose any elements according to your need and drop them in the timeline above all other layers. If you cannot find a suitable sticker, you can download one from the internet and use it by importing it into Filmora.

Step 12: Once you are satisfied with the final results, you can take the screenshot of the Thumbnail using the Snapshot icon located below the preview panel. It will create a screenshot in the media panel of Filmora.

Step 13: To access the directory where this screenshot is saved, right-click on the screenshot and click on “Reveal in Explorer.” It will open the folder that contains all the screenshots you take through Filmora. Your Fortnite Thumbnail is ready to be used on your Youtube videos.

Conclusion
With Filmora, there are no limits. You can use your imagination to create amazing Fortnite thumbnails or thumbnails for other purposes. This article is just a demo teaching you how you use Filmora X to develop free and astounding thumbnails. Explore other options and elements of Filmora to take your thumbnails to another level.
Ollie Mattison
Ollie Mattison is a writer and a lover of all things video.
Follow @Ollie Mattison
Ollie Mattison
Mar 27, 2024• Proven solutions
To grow a Youtube channel, you need to focus on several different factors and elements. Having an attractive and eye-catching thumbnail is one of those top factors that contribute to the growth of your channel. No matter how good your content is, if you cannot attract users to click on your videos, it will not benefit your channel. In this article, we are going to show you how you can make a Fortnite thumbnail in few simple steps using Filmora X. If you are a content creator and love to make Fortnite videos, then this article will be very helpful for you.
Filmora has recently introduced a new feature named AI Portrait that uses Artificial Intelligence to remove the background from a portrait or image. This feature doesn’t require any green screen to do that. Filmora also contains a wide range of elements and titles that help you enhance the Thumbnail and make look stunning and eye-catching.
Step 01: To start making a Fortnite thumbnail, it is important to have a screenshot of your gameplay. We can make a perfect screenshot using Fortnite Replay Mode. If you have recently played a Fortnite match, you can access its replay under the Career tab. Under the Career tab select Replays.
Step 02: If you are using a console, the game will only store 10 recent gameplays, but if you are using a PC, it will store 100 recent gameplays in this section. From all these gameplays, select the one that you want to use for the Thumbnail. Once you choose gameplay, you can control everything in it. The angle, speed, and camera mode.
Step 03: For creating a perfect thumbnail, select “Drone Free Camera” mode from the camera mode located on the bottom right corner of the screen. It will allow us to change the angle the way we want. Choose an angle of your choice and take the screenshot.
Step 04: Open Filmora X, make sure to select the 16:9 screen ratio. Import the screenshot using the import button.
Step 05: Drag and drop the screenshot into the timeline.
Step 06: Now, let’s separate the background and character. Go to the Effects, then AI Portrait, select Human Segmentation, and drop it into the screenshot.
Step 07: Filmora will ask you to purchase it, but you can now hit “Try it” to use it.
Step 08: It will remove the background of the screenshot.
Step 09: To add a background, go to the media and navigate to “Sample Color.” Drag a color of your choice and drop it below the screenshot.
Step 10: To add titles in the Thumbnail, go to the Titles tab. Here you can find several categories of titles. Find your preferred title and drop it above all the layers. You can choose titles, lower thirds, and other texts depending upon your need and requirement.
Step 11: We can make this Fortnite Thumbnail look more attractive by adding elements such as stickers and icons. Filmora contains a wide range of stickers. To access them, navigate to the Elements tab. Here you can find so many categories of elements. Choose any elements according to your need and drop them in the timeline above all other layers. If you cannot find a suitable sticker, you can download one from the internet and use it by importing it into Filmora.
Step 12: Once you are satisfied with the final results, you can take the screenshot of the Thumbnail using the Snapshot icon located below the preview panel. It will create a screenshot in the media panel of Filmora.
Step 13: To access the directory where this screenshot is saved, right-click on the screenshot and click on “Reveal in Explorer.” It will open the folder that contains all the screenshots you take through Filmora. Your Fortnite Thumbnail is ready to be used on your Youtube videos.
Conclusion
With Filmora, there are no limits. You can use your imagination to create amazing Fortnite thumbnails or thumbnails for other purposes. This article is just a demo teaching you how you use Filmora X to develop free and astounding thumbnails. Explore other options and elements of Filmora to take your thumbnails to another level.
Ollie Mattison
Ollie Mattison is a writer and a lover of all things video.
Follow @Ollie Mattison
Navigating the Intersection of YouTube and FB Video Posts
Create High-Quality Video - Wondershare Filmora
An easy and powerful YouTube video editor
Numerous video and audio effects to choose from
Detailed tutorials provided by the official channel
YouTube reports that Facebook is the most utilized platform fans use to watch online content. More so, up to 40% of those who watch the content do share links with their friends online – this then makes it quick to promote YouTube content on Facebook. Simply by making your new YouTube content visible on your Facebook page, and you’ll be certain that thousands of viewers will have a glimpse of it. You must already be scratching your head for ways on how to post a YouTube video on a Facebook page. Well, we bring you several ways to go through that and make your YouTube content accessible on Facebook.
In this article
01 How to Post YouTube video on Facebook?
02 Extra Tip: Facebook Video Tips for more Views and Shares
03 Frequently Asked Question about Facebook video
How to Post YouTube video on Facebook?
Since Facebook is easily accessible, many users have more access to it than other social media platforms. More so, the page allows you to communicate with your audience via photos, videos, graphics, text, among many other multimedia contents. You don’t even need any programming skills to operate it. Here are ways to post YouTube content to Facebook.
How to share a YouTube video on Facebook using a computer
If you have a stationary point of work, i.e., a computer, it is possible to share your YouTube video through it.
Step 1. First, visit the YouTube site at https://www.youtube.com . It can launch from any web browser.
Step 2. Choose from among your videos on YouTube the one you wish to share on Facebook.
Step 3. Then find the “Share” icon located directly under the video you want to share. Click on the video and hit the “Share” button below the video.
Step 4. Choose “Facebook” from the sharing options that pop up.
Step 5. Next, sign in to “Facebook” on your desktop. Then select the destination point you want your video to land in by using the drop-down menu at the top of your desktop screen. Select the “Share to News Feed” or perhaps the share to “Story.”
Step 6. Finally, click the “Post to Facebook” tab to share your YouTube content with Facebook.
How to share a YouTube video on Facebook using a mobile device
Are you on the go and want your Facebook fans to know what content you have on your YouTube channel? Here are the simple steps on how to post a YouTube video on Facebook right from the palm of your hands – a mobile device.
Step 1. Use any browser on your mobile device to launch the YouTube app from the official website.
Step 2. Peruse through your YouTube videos and choose the one you wish to share on Facebook.
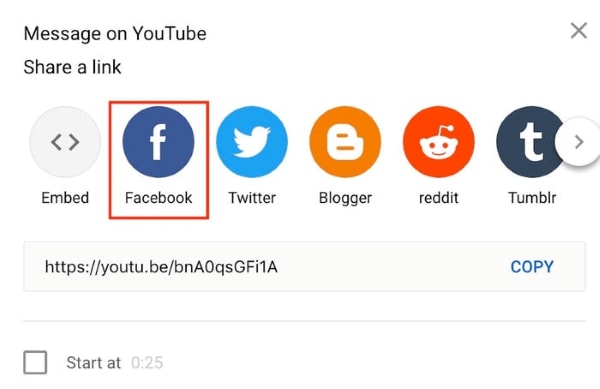
Step 3. Check below the video and click on the “Share” icon.
Step 4. Search through the app’s options and choose Facebook. Also, ensure that the “Facebook” app is installed on your mobile device to make your videos sharable.
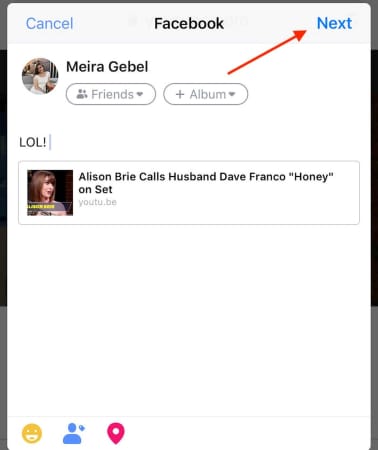
Step 5. Click on the “Next” option in the upper right-hand corner of your mobile screen. It will enable video sharing.
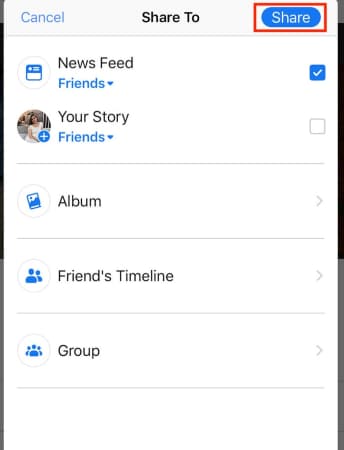
Step 6. Then choose the YouTube video’s post destination to your Facebook. It could be shared on your timeline, story, or a Facebook group’s page.
Step 7. Finally, click on the “Share” tab to make your video viewable on Facebook.
How to post a YouTube video on Facebook
Easily post your YouTube video on Facebook and let viewers access them directly from your Facebook feed. By this, your fans don’t have to click on other tabs but will access the videos directly.
Step 1. Copy the YouTube video’s link
First, go to your YouTube channel and copy the video link that you want to post to Facebook. You can as well copy the embed code.
Step 2. Embed the video link you copied
This link should be embedded into a Facebook post. Do this by first logging into your Facebook account. Then go to the top of your “Facebook News Feed” and click the “What’s on your mind” box.
Step 3. Paste your link
Right-click on the “What’s on your mind” box, then select the “Paste” option.
Step 4. Preview video
Facebook will let you preview the video you just posted. Check whether you have pasted the right video before you post it.
Step 5. Post your video
Now, scroll down and click on the “Post” tab. You can also add a message to your post. Just place a cursor after the video URL and hit the “Enter” key on your keyboard. Finally, scroll down and hit the “Post” tab to make your video public on Facebook.
Extra Tip: Facebook Video Tips for more Views and Shares
You have to play your cards well when it comes to posting and sharing your videos on Facebook. These tips are all you need.
- Catch viewer’s attention within the shortest time possible
Here, your main aim is to convince your viewers. So, don’t let them spend so much time before you catch their attention. You can bring up a point about some latest news or adventures that let your viewers connect immediately.
- Add captions to the video
It is not necessarily possible that viewers will watch your videos with the sound on. Some like it when it’s silent and might disable the sound auto-play. Add some captions so that viewers will understand your video, even on silent mode.
- Emphasize on one key-point
Focus on one key point so that your viewers are not swayed away. Your video is highly sharable if it is easy to understand.
- Add a Call To Action
Including a call-to-action will encourage your viewers to subscribe to your channel. Ensure you include it at the end of your video to tell viewers what to do next. You could also include a link to your blog post to let your viewers read and find more content from your other channels.
- Facebook ads can make a great difference
Facebook is a great place for running ads that reach a wider audience. Adverts are great ways to target a specific audience. They explain your products and services more straightforwardly.
- Embed your videos on blog posts
Numerous people get to access guest posts and blog posts. You can embed your Facebook videos on such posts to reach more people. Just get the embed code from your video, then copy and paste it to a guest or blog post.
Frequently Asked Question about Facebook video
Both viewers and content creators have a few concerns about YouTube and Facebook videos. Here are some frequently asked questions that will be of benefit to you.
1) Is it legal to share YouTube videos?
YouTube is just one platform where content creators showcase their productions. Yes, it is legal to share your content on other forums like Facebook, Twitter, Instagram, etc.
2) What is the best time to post to your Facebook page?
The best time to post on a Facebook page depends on your time zone. Generally, viewers access Facebook late in the evening and early in the night. Perhaps they are off work and now want to relax by checking the day’s updates.
3) What are Facebook business accounts and personal accounts?
Facebook business accounts are designed for users who want to use Facebook to administer their pages and advert campaigns. This account cannot be found in searching or receiving friend request apps. Nonetheless, personal accounts are used at basic and casual levels. You can search for friends and send requests. Personal accounts are also easy to manage.
4) Can I mobilize people to share my posted content on Facebook?
Yes, it is possible to let others share what you have posted. Just ensure they know your intention by constant reminders. Some popular ways that are proven to be effective include the use of “Call to Action,” using an image or video with your Facebook status update and offering some incentive to your fans for sharing.
5) Does the quality of my YouTube content drop when I share it with Facebook?
Of course not! What you pull from your YouTube channel is the kind of video that will be watched from Facebook. The quality cannot deteriorate. However, it is good to ensure you compose quality videos on YouTube before sharing them. Several video editing apps like Filmora can help you compose quality videos with high resolution.
Conclusion
● Facebook is a great platform that is accessed by a wide audience. More so, you can share your content from other platforms easily. The article has covered how to share YouTube videos on Facebook and hook your audience. You can use your computer or share directly from your mobile device in simple steps. It is also better to play some tricks on your effort to reach a wider audience. These include a CTA, embedding your Facebook videos to blogs posts, among other options.
YouTube reports that Facebook is the most utilized platform fans use to watch online content. More so, up to 40% of those who watch the content do share links with their friends online – this then makes it quick to promote YouTube content on Facebook. Simply by making your new YouTube content visible on your Facebook page, and you’ll be certain that thousands of viewers will have a glimpse of it. You must already be scratching your head for ways on how to post a YouTube video on a Facebook page. Well, we bring you several ways to go through that and make your YouTube content accessible on Facebook.
In this article
01 How to Post YouTube video on Facebook?
02 Extra Tip: Facebook Video Tips for more Views and Shares
03 Frequently Asked Question about Facebook video
How to Post YouTube video on Facebook?
Since Facebook is easily accessible, many users have more access to it than other social media platforms. More so, the page allows you to communicate with your audience via photos, videos, graphics, text, among many other multimedia contents. You don’t even need any programming skills to operate it. Here are ways to post YouTube content to Facebook.
How to share a YouTube video on Facebook using a computer
If you have a stationary point of work, i.e., a computer, it is possible to share your YouTube video through it.
Step 1. First, visit the YouTube site at https://www.youtube.com . It can launch from any web browser.
Step 2. Choose from among your videos on YouTube the one you wish to share on Facebook.
Step 3. Then find the “Share” icon located directly under the video you want to share. Click on the video and hit the “Share” button below the video.
Step 4. Choose “Facebook” from the sharing options that pop up.
Step 5. Next, sign in to “Facebook” on your desktop. Then select the destination point you want your video to land in by using the drop-down menu at the top of your desktop screen. Select the “Share to News Feed” or perhaps the share to “Story.”
Step 6. Finally, click the “Post to Facebook” tab to share your YouTube content with Facebook.
How to share a YouTube video on Facebook using a mobile device
Are you on the go and want your Facebook fans to know what content you have on your YouTube channel? Here are the simple steps on how to post a YouTube video on Facebook right from the palm of your hands – a mobile device.
Step 1. Use any browser on your mobile device to launch the YouTube app from the official website.
Step 2. Peruse through your YouTube videos and choose the one you wish to share on Facebook.
Step 3. Check below the video and click on the “Share” icon.
Step 4. Search through the app’s options and choose Facebook. Also, ensure that the “Facebook” app is installed on your mobile device to make your videos sharable.
Step 5. Click on the “Next” option in the upper right-hand corner of your mobile screen. It will enable video sharing.
Step 6. Then choose the YouTube video’s post destination to your Facebook. It could be shared on your timeline, story, or a Facebook group’s page.
Step 7. Finally, click on the “Share” tab to make your video viewable on Facebook.
How to post a YouTube video on Facebook
Easily post your YouTube video on Facebook and let viewers access them directly from your Facebook feed. By this, your fans don’t have to click on other tabs but will access the videos directly.
Step 1. Copy the YouTube video’s link
First, go to your YouTube channel and copy the video link that you want to post to Facebook. You can as well copy the embed code.
Step 2. Embed the video link you copied
This link should be embedded into a Facebook post. Do this by first logging into your Facebook account. Then go to the top of your “Facebook News Feed” and click the “What’s on your mind” box.
Step 3. Paste your link
Right-click on the “What’s on your mind” box, then select the “Paste” option.
Step 4. Preview video
Facebook will let you preview the video you just posted. Check whether you have pasted the right video before you post it.
Step 5. Post your video
Now, scroll down and click on the “Post” tab. You can also add a message to your post. Just place a cursor after the video URL and hit the “Enter” key on your keyboard. Finally, scroll down and hit the “Post” tab to make your video public on Facebook.
Extra Tip: Facebook Video Tips for more Views and Shares
You have to play your cards well when it comes to posting and sharing your videos on Facebook. These tips are all you need.
- Catch viewer’s attention within the shortest time possible
Here, your main aim is to convince your viewers. So, don’t let them spend so much time before you catch their attention. You can bring up a point about some latest news or adventures that let your viewers connect immediately.
- Add captions to the video
It is not necessarily possible that viewers will watch your videos with the sound on. Some like it when it’s silent and might disable the sound auto-play. Add some captions so that viewers will understand your video, even on silent mode.
- Emphasize on one key-point
Focus on one key point so that your viewers are not swayed away. Your video is highly sharable if it is easy to understand.
- Add a Call To Action
Including a call-to-action will encourage your viewers to subscribe to your channel. Ensure you include it at the end of your video to tell viewers what to do next. You could also include a link to your blog post to let your viewers read and find more content from your other channels.
- Facebook ads can make a great difference
Facebook is a great place for running ads that reach a wider audience. Adverts are great ways to target a specific audience. They explain your products and services more straightforwardly.
- Embed your videos on blog posts
Numerous people get to access guest posts and blog posts. You can embed your Facebook videos on such posts to reach more people. Just get the embed code from your video, then copy and paste it to a guest or blog post.
Frequently Asked Question about Facebook video
Both viewers and content creators have a few concerns about YouTube and Facebook videos. Here are some frequently asked questions that will be of benefit to you.
1) Is it legal to share YouTube videos?
YouTube is just one platform where content creators showcase their productions. Yes, it is legal to share your content on other forums like Facebook, Twitter, Instagram, etc.
2) What is the best time to post to your Facebook page?
The best time to post on a Facebook page depends on your time zone. Generally, viewers access Facebook late in the evening and early in the night. Perhaps they are off work and now want to relax by checking the day’s updates.
3) What are Facebook business accounts and personal accounts?
Facebook business accounts are designed for users who want to use Facebook to administer their pages and advert campaigns. This account cannot be found in searching or receiving friend request apps. Nonetheless, personal accounts are used at basic and casual levels. You can search for friends and send requests. Personal accounts are also easy to manage.
4) Can I mobilize people to share my posted content on Facebook?
Yes, it is possible to let others share what you have posted. Just ensure they know your intention by constant reminders. Some popular ways that are proven to be effective include the use of “Call to Action,” using an image or video with your Facebook status update and offering some incentive to your fans for sharing.
5) Does the quality of my YouTube content drop when I share it with Facebook?
Of course not! What you pull from your YouTube channel is the kind of video that will be watched from Facebook. The quality cannot deteriorate. However, it is good to ensure you compose quality videos on YouTube before sharing them. Several video editing apps like Filmora can help you compose quality videos with high resolution.
Conclusion
● Facebook is a great platform that is accessed by a wide audience. More so, you can share your content from other platforms easily. The article has covered how to share YouTube videos on Facebook and hook your audience. You can use your computer or share directly from your mobile device in simple steps. It is also better to play some tricks on your effort to reach a wider audience. These include a CTA, embedding your Facebook videos to blogs posts, among other options.
Also read:
- [Updated] Eliminate YouTube? These 10 Mobile App Alternatives Will Fill the Void
- Strategic Branding Techniques for Higher YouTube Followings
- Ranking the Most Rapidly Expanding YouTube Talks of Inspiration
- In 2024, Essential Video Promo Tips for Startups (Infographic)
- The Core Interface YouTube Studio Explained
- Unlock Free Tunes Steps for YouTube Content Creators
- Cutting-Edge Video Ad Creation Leaders Amongst Many for 2024
- [Updated] DIY Movie Making on YouTube & Comparable Creative Tools
- In 2024, Elevate Your Video Presentation with These 7 Free Makers
- Simplify Crafting Effective YouTube Subscription Buttons
- [Updated] Earning in a World Dominated by YouTubers
- [Updated] Boosting Views Essential Hashtags for Trending Shorts
- Constructing Captivating Conclusions for 2024
- [New] Brightening Up Your YouTube Pixels
- In 2024, Aspect Ratios Unveiled Your Guide to Stellar YT Images
- Effective Thumbnails The Secret to Video Success for 2024
- In 2024, Best Video Experts in Photo-Song Collaboration
- In 2024, Essential Insights on YouTube TV's Unique Features
- The Essential Checklist to Amplify Video Income on YouTube
- [Updated] Crafting Effective, Affordable YouTube Intros with Templates
- Best Camera Apps to Shoot and Record Videos on iPhone and Andriod Phones
- YouTube's Quick-Fire Hits The Next 100M by 2024
- 2024 Approved Enthralling Escapade YouTube Editors Magic Spectacle
- Earning Stream Start Small, See Big on YouTube for 2024
- [New] Comparative Review Smartphone Usage of the Leading Video Apps
- Becoming a Youtube Star Utilizing the Power of Featured Channels for 2024
- Enhance Visibility Essential YouTube SEO Strategies Revealed for 2024
- The Role of Narrative in Popularizing Your Haul Vlogs
- In 2024, Elevate Your Gaming YT Presence A Hashtag-Focused Manual
- 2024 Approved Achieve Perfect YouTube Broadcasts with Superior Webcams
- [Updated] Channel Collaboration Unified Watch Experience Across Platforms
- [Updated] Engaging Subjects for Consistent Vlogging
- [New] Clear Shots for YouTube Filmmakers
- A Professional's Approach to Video Editing on YouTube for 2024
- Efficient Techniques for YouTube Shorts Revenue
- 2024 Approved Best YouTube To GIF Makers You Should Use (Online & Desktop)
- Charting a Course for YouTube Success Viewer Numbers and Income
- Boosting Bank Balance Effective Tactics for Mobile Video Money-Making for 2024
- Constructing YouTube Video Content That Resonates with Viewers for 2024
- [Updated] Building a Brand on YouTube Navigating Through Top Video Marketing Methods
- [New] Drive More Watch Time, Not Churn Discover the Top 6 Techniques on YouTube
- [New] Decoding Aspect Ratios for Effective YouTube Videos
- Unveiling Sonic Treasures Join Our Curated List of 20 Premium YouTube Playlists
- [New] A Compreehensive Guide to YouTube Thumbnail Creation (Mac)
- [Updated] 2024 Approved Mastering Access Facebook's Classic Stories
- 5 Ways to Restart Lava Blaze 2 Pro Without Power Button | Dr.fone
- Unraveling Freeze Frames in Photobooth Recordings
- [Updated] 7 Top Free Instagram Video Clips Tools for Daily Entertainment
- In 2024, 8 Best Apps for Screen Mirroring Honor 90 Lite PC | Dr.fone
- Updated How to Make a Photo Collage Using iPhoto for 2024
- In 2024, Free Online Video Editing Tools with Background Music Options
- 2024 Approved Windows 10 MOV Recording Guide
- In 2024, Tutorial to Change Vivo Y100i IMEI without Root A Comprehensive Guide
- Top 7 Phone Number Locators To Track Xiaomi Redmi Note 12T Pro Location | Dr.fone
- Can Life360 Track Or See Text Messages? What Can You Do with Life360 On Realme V30T? | Dr.fone
- In 2024, Network Locked SIM Card Inserted On Your Vivo Y55s 5G (2023) Phone? Unlock It Now
- 11 Ways to Fix it When My ZTE Nubia Flip 5G Wont Charge | Dr.fone
- In 2024, Top IMEI Unlokers for Apple iPhone 14 Pro Max and Android Phones
- In 2024, Convert YouTube Videos to MP4 with Ease Best Tools
- How To Combine Videos On TikTok for 2024
- How To Fix Unresponsive Phone Touchscreen Of Samsung Galaxy XCover 6 Pro Tactical Edition | Dr.fone
- New S Top Video Editing Apps for iPhone A Comprehensive Guide for 2024
- New Mastering AutoTune Effects A Guide for Audacity Users for 2024
- How to Prioritize Close-Up Views for Effective Collaboration
- In 2024, Bypass Activation Lock From Apple iPhone 6s - 4 Easy Ways
- [New] The Ultimate Alternative Review to ShareX for 2024
- In 2024, Creating Impactful Twitter Campaigns for Businesses
- Capture the Moment The Hottest TikTok Trends to Embrace (Top 10) for 2024
- New Green Screens Are a Fun Way for Creators to Bring Their Personality to Their Stream, Allowing Them to Dynamically Alter Their Stream Background and Make Their Content Appear Even More Engaging and Polished
- Captivating Audience Leading 5 TikTok Font Generators of 2023
- Title: [New] Efficient Fortnite Imagery Design Quickly
- Author: Kevin
- Created at : 2024-05-25 16:04:28
- Updated at : 2024-05-26 16:04:28
- Link: https://youtube-videos.techidaily.com/new-efficient-fortnite-imagery-design-quickly/
- License: This work is licensed under CC BY-NC-SA 4.0.
