
!["[New] Easy Tutorial Uploading YouTube Shorts Video via Computer & Phone"](https://www.lifewire.com/thmb/Rjb93_fGVEdt0fvN4HgWfR_7Wu4=/400x300/filters:no_upscale():max_bytes(150000):strip_icc()/hulu-38a46c69e6734d1aa24cc728c267c1d7.jpg)
"[New] Easy Tutorial Uploading YouTube Shorts Video via Computer & Phone"
Easy Tutorial: Uploading YouTube Shorts Video via Computer & Phone
How to Upload Shorts Video on YouTube? [2024]

Richard Bennett
Mar 27, 2024• Proven solutions


Quite recently, YouTube launched Shorts to compete with Tik Tok. At the time of this writing, the users in India have access to the fully functional version of the app. Although YouTube Shorts is available for both Android and iOS platforms, its functions are limited as the application is still in its Beta phase for the remaining part of the globe.
With that said, the following sections explain the step-by-step process on how to upload a short video on YouTube Shorts both from your smartphone and a PC.
Part 1: How to Upload Short Video on YouTube from PC?
The fact is, if you are using a computer to upload short videos to YouTube, the process is identical to publishing your other, regular footage. However, there are a few guidelines that your clips must comply with so that the streaming platform could specifically identify them as YouTube Shorts. These norms include:
- Your videos must not be more than 60 seconds long in duration
- They must be shot in portrait orientation, ideally in the 9:16 aspect ratio
- The title or the description must contain ‘#Shorts’ (without quotes) in it
Once you have a video recorded using the first two guidelines from the above list, you can use the instructions given below to upload the media on YouTube:
Step 1: Select a Short Video to Upload
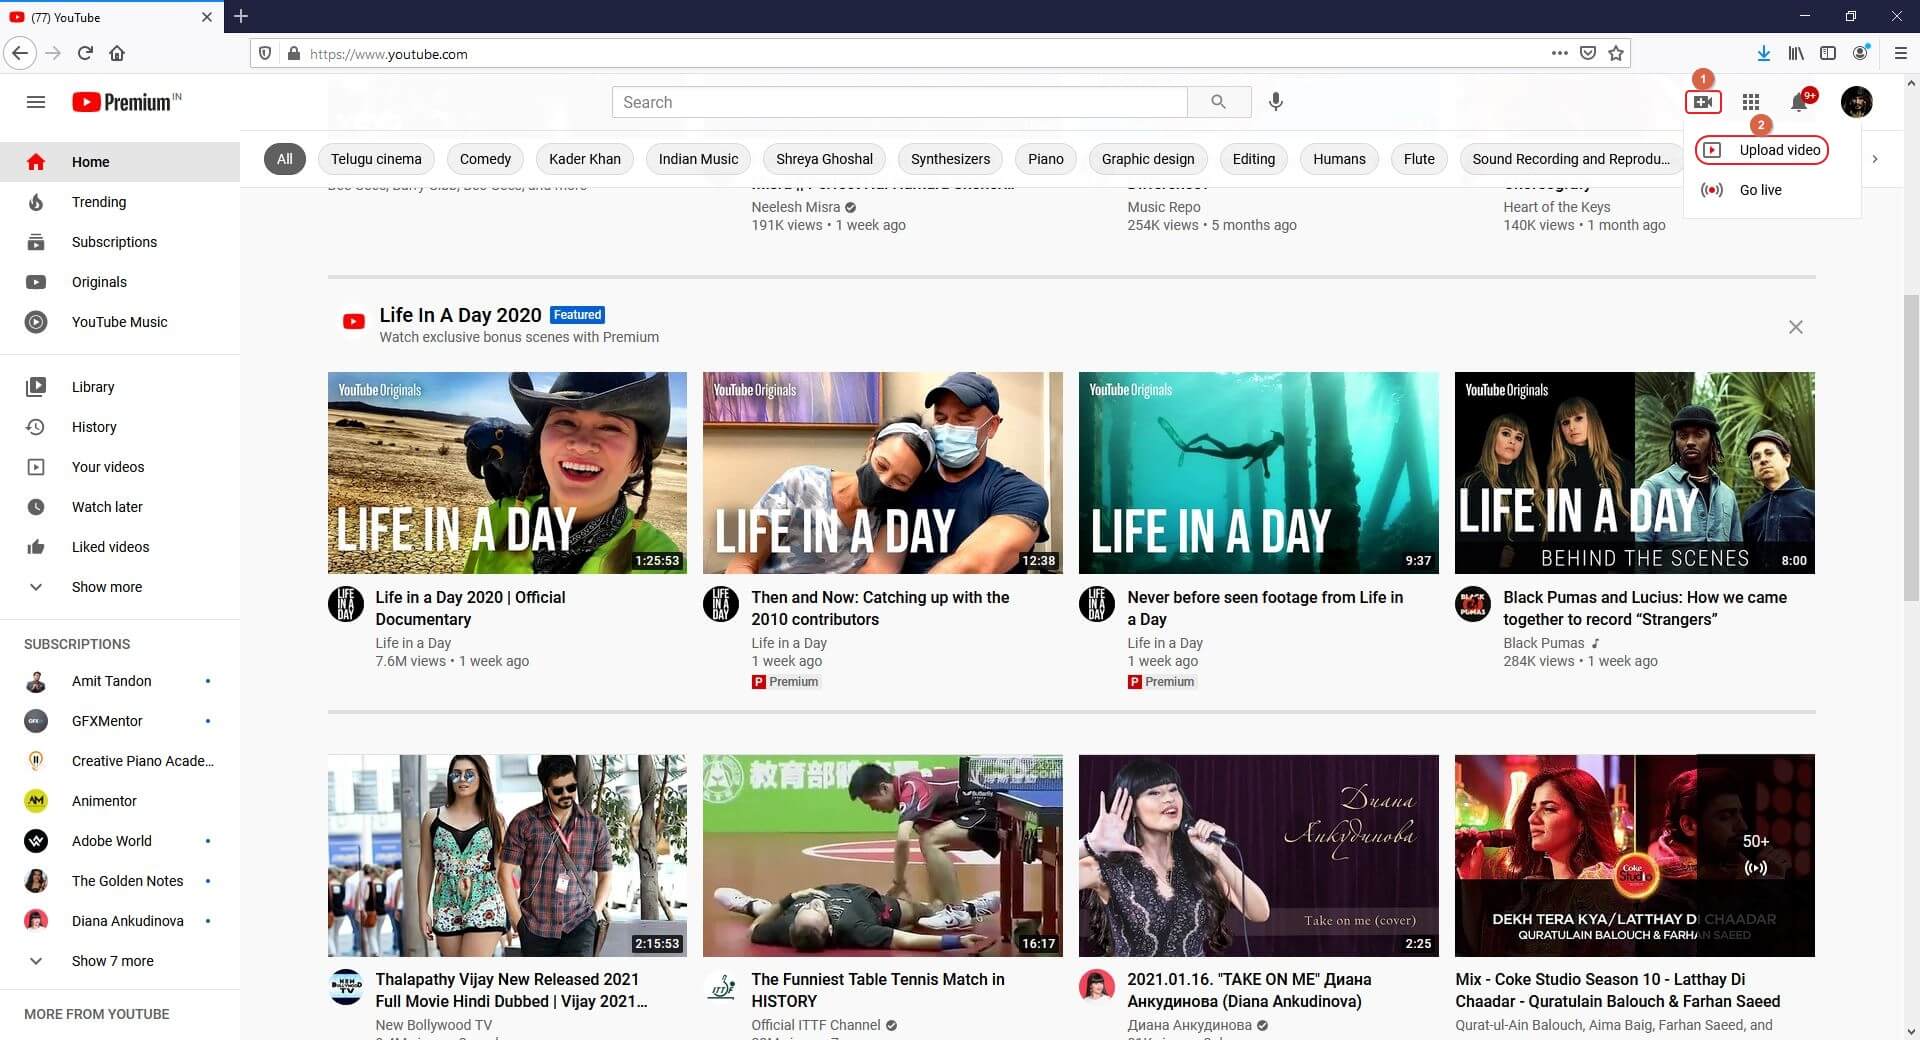
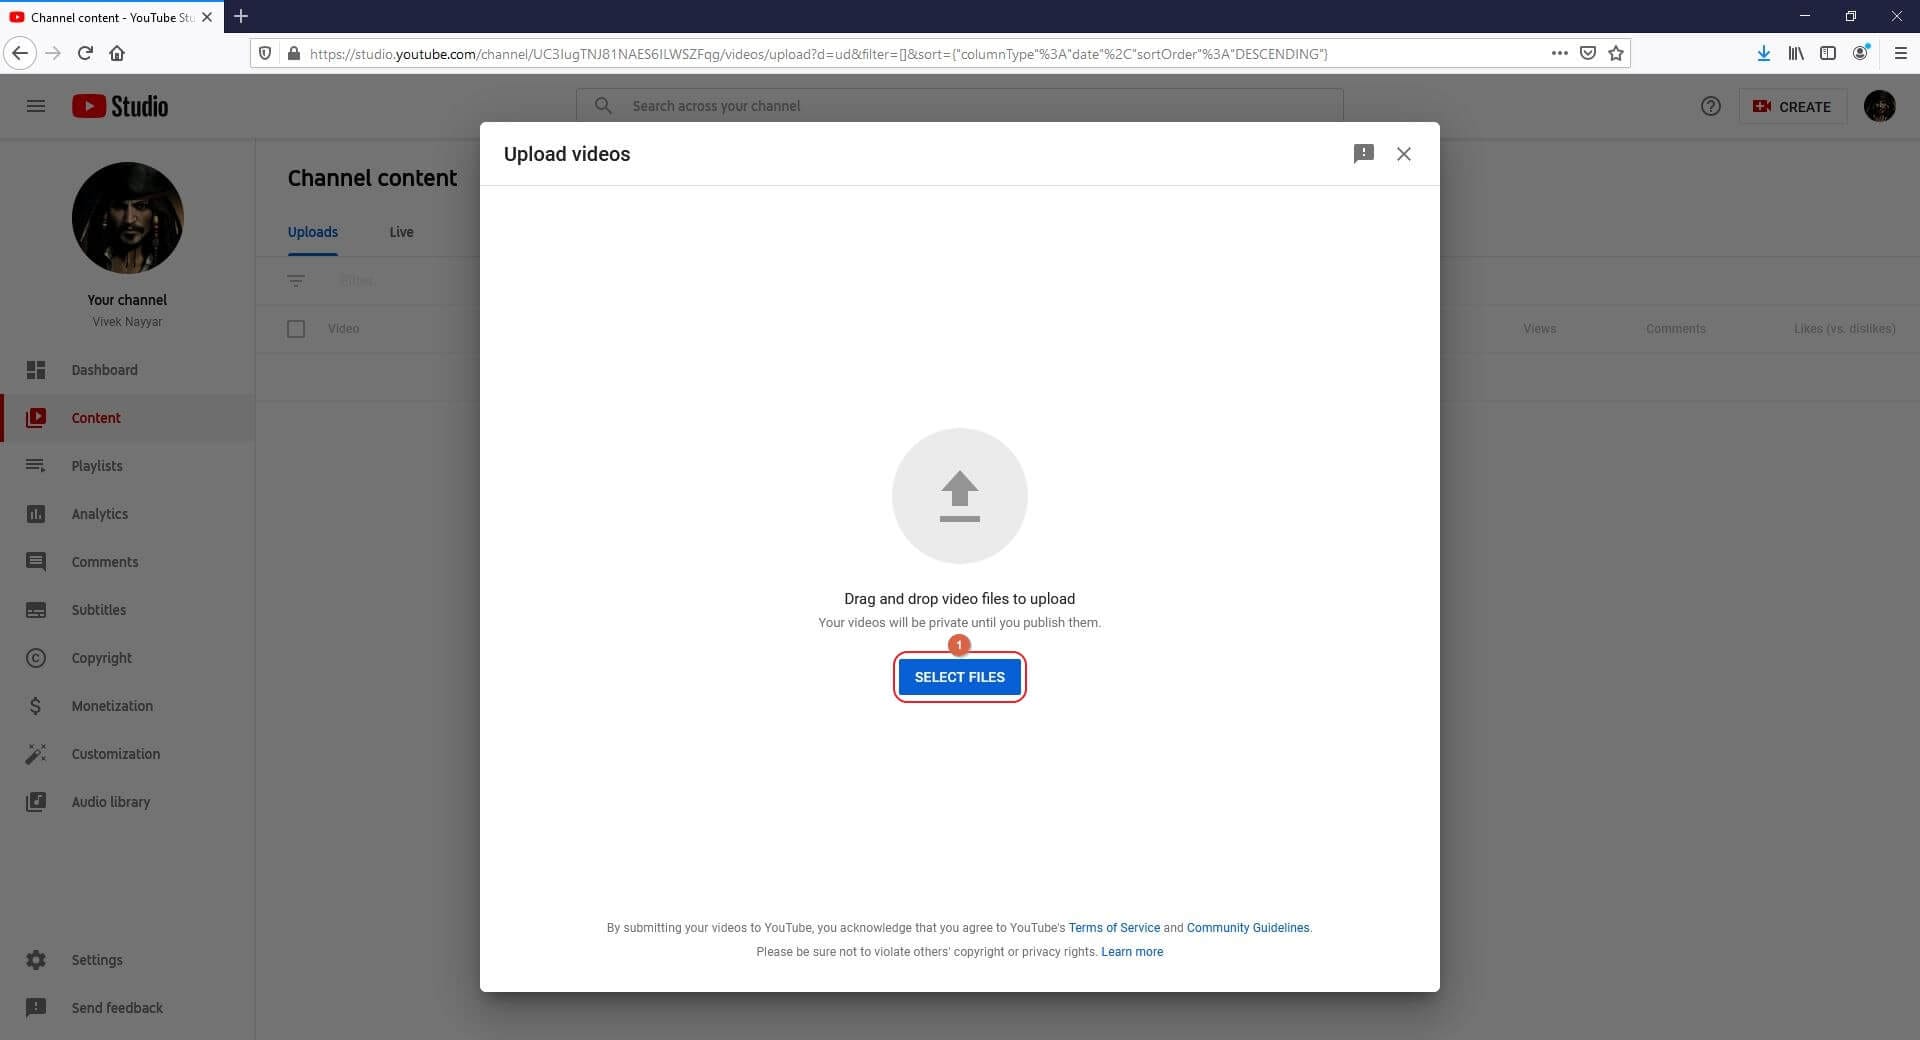
Launch your favorite web browser on your PC, go to YouTube, make sure to sign in to your YouTube account, click the Create (Camera) icon from the top-right corner of the web page, click SELECT FILES on the Upload videos window, and locate, select, and upload a short video from your PC to the portal.
Step 2: Mark the Video as Short
On the Details window that appears, add #Shorts in the Title or Description field, optionally pick a thumbnail from the suggested images present under the Thumbnail section (or upload a custom picture from your PC), select your preferred radio button from under the Audience section, make the other necessary changes if need be, and click NEXT. When the Video elements window comes up, choose your preferred options and elements, click NEXT.

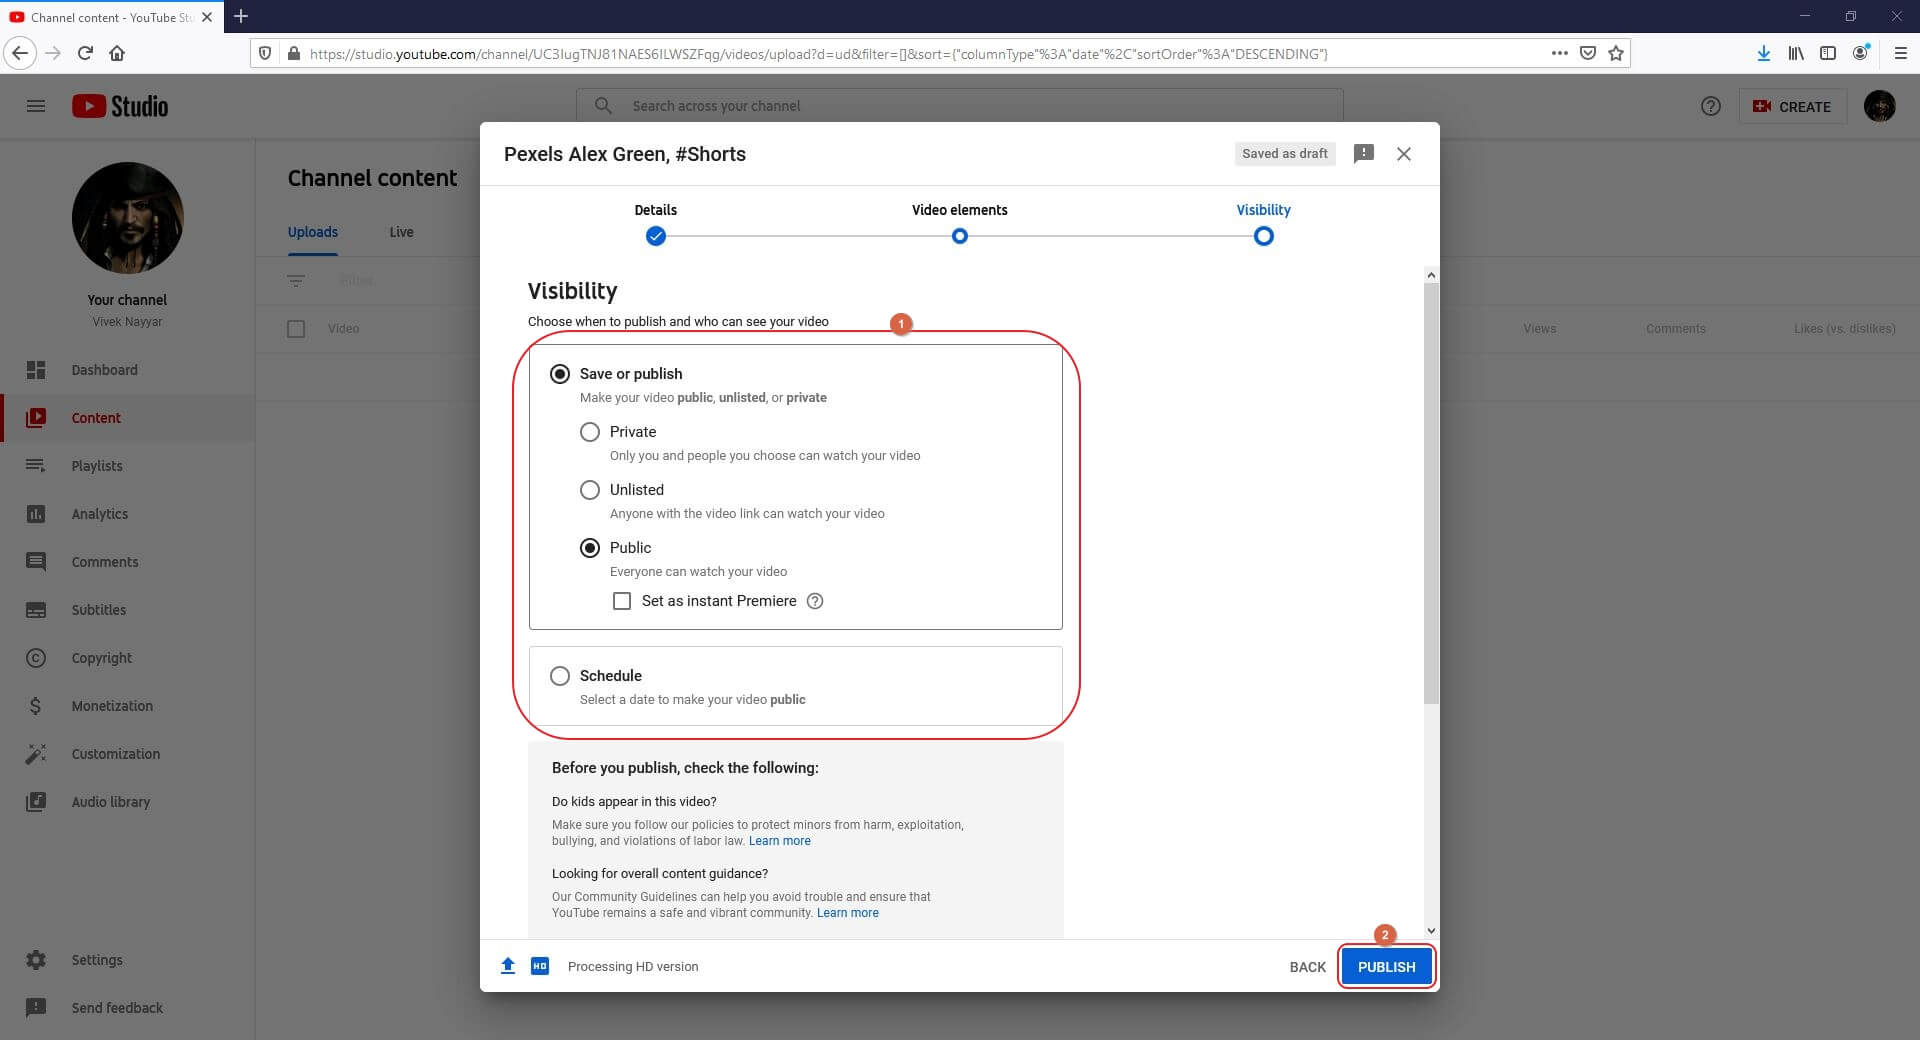
Step 3: Publish the Short Video
On the Visibility window, choose your preferred radio button from under the Save or publish section or select Schedule to set a different time when the short video should be published automatically. Finally, click SAVE to publish the clip as a short video on YouTube from your computer.
To sum up, uploading YouTube Shorts video from desktop has nothing different from uploading regular YouTube video besides the requirements listed at the beginning of this article. If you prefer to edit videos for YouTube Shortson a computer, I recommend you to try our video editor Filmora , which is an ideal solution for YouTubers. Download the free trial version below and get started.
For Win 7 or later (64-bit)
 Secure Download
For macOS 10.12 or later
Secure Download
Part 2: How to Upload Short Video on YouTube Mobile App?
The process of uploading YouTube Shorts from the mobile app is fairly simple compared to the method used on a computer. While using the app, you can either upload an existing video or shoot a new one from within the program itself then and there, add music and text, and upload it right away. Both these methods are explained below in detail:
Note: The guidelines for creating and uploading short videos to YouTube remain the same, regardless of the platform or device you use.
Method 1: Upload an Existing Short Video
Note: Make sure to have the target video on the smartphone and that you have downloaded, installed, and signed in to the YouTube app before proceeding.
Step 1: Select a Video to Upload

On your Android or iOS smartphone, launch the YouTube app, tap the + (Create) icon from the bottom, tap Create a Short from the Create box that pops up from the bottom, tap Upload from the bottom-right corner of the next screen, and select and upload a short, 60 seconds video recorded in portrait orientation from your device’s storage to the app.
Step 2: Add Details
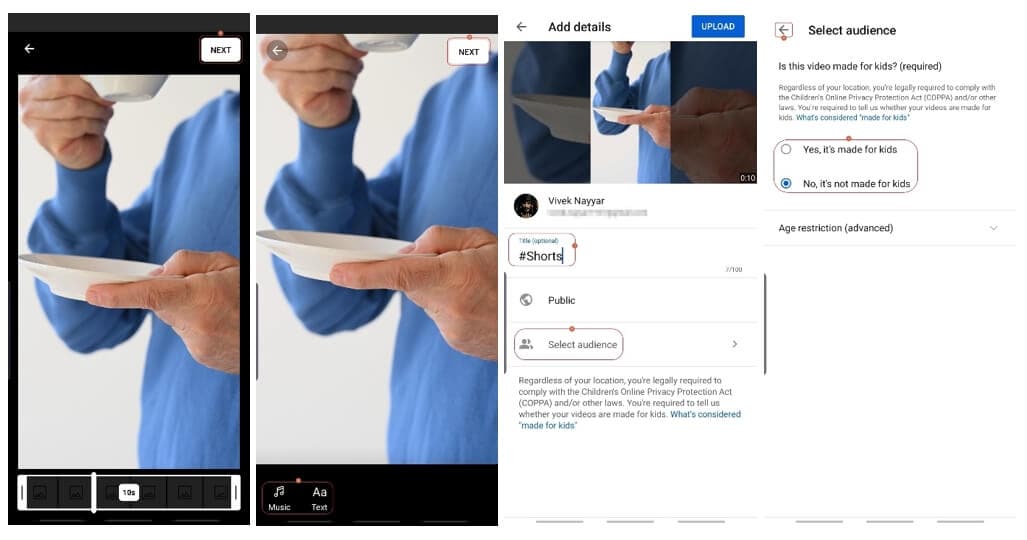
On the next screen, tap NEXT, user the Music and Text icons at the bottom-left corner to add a background music and caption to the video respectively, and tap NEXT from the top-right corner. On the next screen, enter a name for the video in the Title field along with the #Shorts tag, and tap Select audience to choose your preferred audience.
Step 3: Upload the Video
Finally tap UPLOAD from the top-right corner to upload the short video on YouTube.
Method 2: Record a Short Video and Upload
Step 1: Record Shorts Video
Previously, I have introduced how to record and upload YouTube Shorts videos , so I will keep the content concise here.
Please note you will not see the Create a Short option if you are outsides of India.

In the YouTube app, tap the + (Add) button and select Create a Short. Please note you will not see the Create a Short option if you are outsides of India.
Next, use the Speed and Timer icons to set the speed of the video and the countdown timer duration before the app starts recording the video when you press the Record button respectively.
Now tap the Record button from the bottom to start recording a video and stop to stop the recording. Make sure to shoot the footage in the portrait mode (ideally in the 9:16 aspect ratio). Tap NEXT from the bottom-right corner to proceed to the next step.
Step 2: Add Text and Music to the Short Video
On the next window, use the Music and Text buttons from the bottom-left corner to add a background music and caption to the video, and tap NEXT from the top-right corner.
Step 3: Upload and Post the Short Video
On the Add details window, enter a name for the video along with the #Shorts tag in the Create a title field, tap Select audience to select the target audience, and tap UPLOAD from the top-right corner to upload the short video on YouTube.
Conclusion
Learning the process of how to post short videos on YouTube is fairly simple as long as you have the video recorded in the portrait orientation, it is up to 60 seconds long, and contains the ‘#Shorts’ tag (without quotes) in the title or description. The good thing is, if you don’t have access to the YouTube app on your smartphone, the method for how to upload short video on YouTube explained in the first section can be followed while using your desktop computer.
Richard Bennett
Richard Bennett is a writer and a lover of all things video.
Follow @Richard Bennett
Richard Bennett
Mar 27, 2024• Proven solutions
Quite recently, YouTube launched Shorts to compete with Tik Tok. At the time of this writing, the users in India have access to the fully functional version of the app. Although YouTube Shorts is available for both Android and iOS platforms, its functions are limited as the application is still in its Beta phase for the remaining part of the globe.
With that said, the following sections explain the step-by-step process on how to upload a short video on YouTube Shorts both from your smartphone and a PC.
Part 1: How to Upload Short Video on YouTube from PC?
The fact is, if you are using a computer to upload short videos to YouTube, the process is identical to publishing your other, regular footage. However, there are a few guidelines that your clips must comply with so that the streaming platform could specifically identify them as YouTube Shorts. These norms include:
- Your videos must not be more than 60 seconds long in duration
- They must be shot in portrait orientation, ideally in the 9:16 aspect ratio
- The title or the description must contain ‘#Shorts’ (without quotes) in it
Once you have a video recorded using the first two guidelines from the above list, you can use the instructions given below to upload the media on YouTube:
Step 1: Select a Short Video to Upload
Launch your favorite web browser on your PC, go to YouTube, make sure to sign in to your YouTube account, click the Create (Camera) icon from the top-right corner of the web page, click SELECT FILES on the Upload videos window, and locate, select, and upload a short video from your PC to the portal.
Step 2: Mark the Video as Short
On the Details window that appears, add #Shorts in the Title or Description field, optionally pick a thumbnail from the suggested images present under the Thumbnail section (or upload a custom picture from your PC), select your preferred radio button from under the Audience section, make the other necessary changes if need be, and click NEXT. When the Video elements window comes up, choose your preferred options and elements, click NEXT.
Step 3: Publish the Short Video
On the Visibility window, choose your preferred radio button from under the Save or publish section or select Schedule to set a different time when the short video should be published automatically. Finally, click SAVE to publish the clip as a short video on YouTube from your computer.
To sum up, uploading YouTube Shorts video from desktop has nothing different from uploading regular YouTube video besides the requirements listed at the beginning of this article. If you prefer to edit videos for YouTube Shortson a computer, I recommend you to try our video editor Filmora , which is an ideal solution for YouTubers. Download the free trial version below and get started.
For Win 7 or later (64-bit)
Secure Download
For macOS 10.12 or later
Secure Download
Part 2: How to Upload Short Video on YouTube Mobile App?
The process of uploading YouTube Shorts from the mobile app is fairly simple compared to the method used on a computer. While using the app, you can either upload an existing video or shoot a new one from within the program itself then and there, add music and text, and upload it right away. Both these methods are explained below in detail:
Note: The guidelines for creating and uploading short videos to YouTube remain the same, regardless of the platform or device you use.
Method 1: Upload an Existing Short Video
Note: Make sure to have the target video on the smartphone and that you have downloaded, installed, and signed in to the YouTube app before proceeding.
Step 1: Select a Video to Upload
On your Android or iOS smartphone, launch the YouTube app, tap the + (Create) icon from the bottom, tap Create a Short from the Create box that pops up from the bottom, tap Upload from the bottom-right corner of the next screen, and select and upload a short, 60 seconds video recorded in portrait orientation from your device’s storage to the app.
Step 2: Add Details
On the next screen, tap NEXT, user the Music and Text icons at the bottom-left corner to add a background music and caption to the video respectively, and tap NEXT from the top-right corner. On the next screen, enter a name for the video in the Title field along with the #Shorts tag, and tap Select audience to choose your preferred audience.
Step 3: Upload the Video
Finally tap UPLOAD from the top-right corner to upload the short video on YouTube.
Method 2: Record a Short Video and Upload
Step 1: Record Shorts Video
Previously, I have introduced how to record and upload YouTube Shorts videos , so I will keep the content concise here.
Please note you will not see the Create a Short option if you are outsides of India.
In the YouTube app, tap the + (Add) button and select Create a Short. Please note you will not see the Create a Short option if you are outsides of India.
Next, use the Speed and Timer icons to set the speed of the video and the countdown timer duration before the app starts recording the video when you press the Record button respectively.
Now tap the Record button from the bottom to start recording a video and stop to stop the recording. Make sure to shoot the footage in the portrait mode (ideally in the 9:16 aspect ratio). Tap NEXT from the bottom-right corner to proceed to the next step.
Step 2: Add Text and Music to the Short Video
On the next window, use the Music and Text buttons from the bottom-left corner to add a background music and caption to the video, and tap NEXT from the top-right corner.
Step 3: Upload and Post the Short Video
On the Add details window, enter a name for the video along with the #Shorts tag in the Create a title field, tap Select audience to select the target audience, and tap UPLOAD from the top-right corner to upload the short video on YouTube.
Conclusion
Learning the process of how to post short videos on YouTube is fairly simple as long as you have the video recorded in the portrait orientation, it is up to 60 seconds long, and contains the ‘#Shorts’ tag (without quotes) in the title or description. The good thing is, if you don’t have access to the YouTube app on your smartphone, the method for how to upload short video on YouTube explained in the first section can be followed while using your desktop computer.
Richard Bennett
Richard Bennett is a writer and a lover of all things video.
Follow @Richard Bennett
Filmmaker’s Pathway to Anime Subscription Buttons in Filmora
How to Make Your YouTube Animated Subscribe Button Easily With Filmora
Richard Bennett
Mar 27, 2024• Proven solutions
The main goal of every content creator is to increase its audience to expand its reach and views. To do so, it’s essential to provide something unique and different to the viewer. Without providing them the content they are looking for, it is impossible to grow your channel and reach. Once your content is ready and you are getting many views, it is essential to make these potential viewers your permanent viewers. The animated subscribe button will help you achieve this goal. While your viewers are watching your videos, you must remind them about subscribing to your channel for receiving such incredible content in the future. Subscribe animation plays a vital role in converting your viewers into subscribers.
There are so many platforms on the internet from where you can get Youtube subscribe button animation free, and you can also purchase these subscribe png gifs. But creating your own animated subscribe button can make you stand out from the crowd and make your videos unique and exclusive. Because it enables you to design it the way you want according to your brand, so, let’s create your own subscribe animation using Wondershare Filmora .
Step-By-Step guide
Step 1: To get started,open Filmora X. On your upper left corner, click on the “Sample Colors,” select the Green color and drag it to Video Track into the timeline. We are using a Green background to easily remove it using the green screen feature in Filmora to use it in our future projects after exporting it, without creating it again. Adjust the duration of this track according to your requirement. In my case, I am trying to make an animated subscribe button of 5 seconds.
Step 2: Lock this track by clicking on the lock icon to work on subscribe animation without disturbing the background easily.
Step 3: Now it’s time to design the subscribe png gif. Go to the Sample colors again and drag the red color into the time above the green background.
Step 4: Double click on the red color in the timeline and adjust its size. Make it look like a subscribe button that is a rectangle and place it at the bottom center of the background. You can put it anywhere you want it to appear in your future videos.
Step 5: Now, let’s add Subscribe text into the button. Go to the Title and select any style that you like. “Basic 6” will work perfectly fine for this purpose. Drag and drop it into the timeline above all tracks.
Step 6: Double click on the Title on the timeline and edit it with “Subscribe” and place it under the red rectangle and click OK.
Step 7: We have put a cursor that can click on the animated subscribe button. You can use Google Search to find a transparent cursor. Make sure to save it in png format. Download it and import it into Filmora.
Step 8: Drag and drop the cursor into the timeline and place it above all the other three tracks to make it prominent. Adjust the size of the cursor place it on the Subscribe button where you want it to appear.
Step 9: Now, it’s time to animate the design using keyframes. First of all, let’s animate the red rectangle. Double click on the red color on the timeline. Go to the ‘Animation’ tab and then click ‘Customize.’ Move to the 1 second in the timeline and click ‘Add.’
Step 10: Now go back to the beginning in the timeline and adjust the scale to 0%. It will make the rectangle pop up when you play the clip.
Step 11: Text needs to be animated as well to match it with the rectangle. Double click on the text in the timeline and click ‘ADVANCED.’
Step 12: In this Advance text editor, go to the ‘Animation’ tab and select any animation that you like. On the timeline under the preview screen, adjusts the dark areas according to the time you set on the rectangle, which was 1 second. We want the text to appear on the screen in 1 second, like the rectangle. Also, adjust the ending time when you want the text to disappear again. We have set it on 4 seconds. Which means it will start to fade after 4 seconds.
Step 13: Now, to animate the mouse cursor, we will use the same process we used for a rectangle that is key framing. Double click on the cursor track on the timeline and move the time on your timeline to a point when you want the cursor to appear. Now add a key frame by clicking ‘Add’.
Step 14: Now jump back to a point in your timeline, when the cursor will start appearing from outside the screen. Move the cursor outside the screen from where you want it to start moving toward the subscribe animation.
Step 15: To animate the click of the cursor, move ahead a little bit into your timeline and scale down the cursor to around 70%. Move it a little further and scale it up to 100%.
Step 16: You can add the sound of mouse click to make it more realistic. You can find this sound anywhere on the internet. Download it and import it into Filmora. Now place it into the timeline where it can match the movement of the cursor.
Step 17: Now it’s time to make this subscribe animation button disappear. Move forward into the time to the end, at around 4 seconds. Double click on the red button in the timeline and add a key frame at its actual scale.
Step 18: After that, move further in the timeline to the end and make its scale 0. It will make it disappear.
Step 19: Do the same with the cursor. Double click on the cursor in the time and add a key frame at its actual position.
Step 20: Move ahead when you want it to disappear. Move the cursor out of the screen and click ‘OK’.
Step 21: Your Subscribe png gif is ready to be exported and used in your videos. Click on export and choose from various formats and options to choose from while exporting it.
You may also like: How to Get People to Subscribe Channel
Conclusion:Your own Animated Subscribe Button is ready to be used in your future videos and projects. This is a ready-to-use subscribe button that can be easily used using the green screen effect in Filmora. Just import the clip, remove the green screen, and you are good to go. You can also customize this Subscribe Animation using your channel and more. Keep experimenting with new things using Filmora.
Richard Bennett
Richard Bennett is a writer and a lover of all things video.
Follow @Richard Bennett
Richard Bennett
Mar 27, 2024• Proven solutions
The main goal of every content creator is to increase its audience to expand its reach and views. To do so, it’s essential to provide something unique and different to the viewer. Without providing them the content they are looking for, it is impossible to grow your channel and reach. Once your content is ready and you are getting many views, it is essential to make these potential viewers your permanent viewers. The animated subscribe button will help you achieve this goal. While your viewers are watching your videos, you must remind them about subscribing to your channel for receiving such incredible content in the future. Subscribe animation plays a vital role in converting your viewers into subscribers.
There are so many platforms on the internet from where you can get Youtube subscribe button animation free, and you can also purchase these subscribe png gifs. But creating your own animated subscribe button can make you stand out from the crowd and make your videos unique and exclusive. Because it enables you to design it the way you want according to your brand, so, let’s create your own subscribe animation using Wondershare Filmora .
Step-By-Step guide
Step 1: To get started,open Filmora X. On your upper left corner, click on the “Sample Colors,” select the Green color and drag it to Video Track into the timeline. We are using a Green background to easily remove it using the green screen feature in Filmora to use it in our future projects after exporting it, without creating it again. Adjust the duration of this track according to your requirement. In my case, I am trying to make an animated subscribe button of 5 seconds.
Step 2: Lock this track by clicking on the lock icon to work on subscribe animation without disturbing the background easily.
Step 3: Now it’s time to design the subscribe png gif. Go to the Sample colors again and drag the red color into the time above the green background.
Step 4: Double click on the red color in the timeline and adjust its size. Make it look like a subscribe button that is a rectangle and place it at the bottom center of the background. You can put it anywhere you want it to appear in your future videos.
Step 5: Now, let’s add Subscribe text into the button. Go to the Title and select any style that you like. “Basic 6” will work perfectly fine for this purpose. Drag and drop it into the timeline above all tracks.
Step 6: Double click on the Title on the timeline and edit it with “Subscribe” and place it under the red rectangle and click OK.
Step 7: We have put a cursor that can click on the animated subscribe button. You can use Google Search to find a transparent cursor. Make sure to save it in png format. Download it and import it into Filmora.
Step 8: Drag and drop the cursor into the timeline and place it above all the other three tracks to make it prominent. Adjust the size of the cursor place it on the Subscribe button where you want it to appear.
Step 9: Now, it’s time to animate the design using keyframes. First of all, let’s animate the red rectangle. Double click on the red color on the timeline. Go to the ‘Animation’ tab and then click ‘Customize.’ Move to the 1 second in the timeline and click ‘Add.’
Step 10: Now go back to the beginning in the timeline and adjust the scale to 0%. It will make the rectangle pop up when you play the clip.
Step 11: Text needs to be animated as well to match it with the rectangle. Double click on the text in the timeline and click ‘ADVANCED.’
Step 12: In this Advance text editor, go to the ‘Animation’ tab and select any animation that you like. On the timeline under the preview screen, adjusts the dark areas according to the time you set on the rectangle, which was 1 second. We want the text to appear on the screen in 1 second, like the rectangle. Also, adjust the ending time when you want the text to disappear again. We have set it on 4 seconds. Which means it will start to fade after 4 seconds.
Step 13: Now, to animate the mouse cursor, we will use the same process we used for a rectangle that is key framing. Double click on the cursor track on the timeline and move the time on your timeline to a point when you want the cursor to appear. Now add a key frame by clicking ‘Add’.
Step 14: Now jump back to a point in your timeline, when the cursor will start appearing from outside the screen. Move the cursor outside the screen from where you want it to start moving toward the subscribe animation.
Step 15: To animate the click of the cursor, move ahead a little bit into your timeline and scale down the cursor to around 70%. Move it a little further and scale it up to 100%.
Step 16: You can add the sound of mouse click to make it more realistic. You can find this sound anywhere on the internet. Download it and import it into Filmora. Now place it into the timeline where it can match the movement of the cursor.
Step 17: Now it’s time to make this subscribe animation button disappear. Move forward into the time to the end, at around 4 seconds. Double click on the red button in the timeline and add a key frame at its actual scale.
Step 18: After that, move further in the timeline to the end and make its scale 0. It will make it disappear.
Step 19: Do the same with the cursor. Double click on the cursor in the time and add a key frame at its actual position.
Step 20: Move ahead when you want it to disappear. Move the cursor out of the screen and click ‘OK’.
Step 21: Your Subscribe png gif is ready to be exported and used in your videos. Click on export and choose from various formats and options to choose from while exporting it.
You may also like: How to Get People to Subscribe Channel
Conclusion:Your own Animated Subscribe Button is ready to be used in your future videos and projects. This is a ready-to-use subscribe button that can be easily used using the green screen effect in Filmora. Just import the clip, remove the green screen, and you are good to go. You can also customize this Subscribe Animation using your channel and more. Keep experimenting with new things using Filmora.
Richard Bennett
Richard Bennett is a writer and a lover of all things video.
Follow @Richard Bennett
Also read:
- [Updated] Elevate Your YouTube Presence with Expert iDevice Screen Techniques
- Breaking Down Barriers Adding Chapters to Create Cohesive YouTube Lessons
- Funny Flicks Compilation of Chuckle-Inducing Short YouTube Videos
- Uncomplicated Method Fast Clearance of Online Discussions
- 2024 Approved Enhancing YouTube Content via FinalCut Pro Techniques
- In 2024, Digital Phenoms Who Has the Most Followers?
- Harnessing YouTube Statistics to Increase Subscribers
- [New] Conceptualists Engineering Marvel Online Worlds
- Accessing Global Hitters The #1-#6 Short Video Downloaders
- [Updated] Charting the Upward Momentum Top 8 Skyrocketing YouTube Sites
- In 2024, Debugging Techniques Identifying and Resolving Common JavaScript Errors
- Free Thumbnail Extract From YouTube Videos Today!
- 7 Best AdBlock Apps for Android
- YouTube's Shorts A Deep Dive Into Content Creation and Revenue
- Share Your Stories with Lush Soundtracks
- Circumnavigating YouTube's Block List
- Flash Clip Content Wizard
- Professional Video Production - Pick Your Favorite Sounds
- In 2024, Elevate Your Views Degrees of Rotation on YouTube - A 2023 Guide
- Maximizing Income Average AdSense Payouts Per Thousand Viewers
- YouTube Studio's Comprehensive Guide to Video Post Production
- From Script to Screen YouTube Studio Editing Workshop Guide
- Skyrocket Engagement with Youtube’s Powerful Featured Channels Strategy
- Disabling YouTube Shorts for Good A Simple Approach
- Enhance Your YT Summary Top-Notch Template Guides for 2024
- [New] Comprehensive but Concise Guide to Keyers' Techniques
- 2024 Approved Capturing Top-Notch Audio Without Microphone Dependency
- Streamlined Simplicity AYT's Quick Ways to Blur Background
- Precision Cinematography Ideal Lenses for Digital Storytellers
- 2024 Approved Enhancing Your YouTube Content Basic Premiere Pro Edits
- Charting Earnings From YouTube AdSense What You Can Expect per 1,000 Views for 2024
- Updated In 2024, 10 Charming Voice Alteration Methods to Lighten Up Telephone Dialogues
- New In 2024, Navigating Audio Segmentation Easy Ways to Split Your MP3s and AACs
- In 2024, Does Xiaomi 14 Ultra Have Find My Friends? | Dr.fone
- [New] Strategic Showcasing 10 Essential Tips to Improve Your Instagram Highlights for 2024
- [New] In 2024, Translate Speech to Text with Ultimate Accuracy, Thanks to Google
- New 2024 Approved Hone Your Creativity with These Top 8 No-Cost Audio FX Archives
- [New] A Detailed Guide to Crop Your Video for Instagram
- 2024 Approved Best Free WMV Video Combining Software
- In 2024, The Updated Method to Bypass Xiaomi Redmi Note 12R FRP
- Updated Sizing Up Success The Perfect Facebook Video Cover Formula for 2024
- [New] Win11 Screen Recording Leaderboard Top 15 Software (Best) for 2024
- How to Change Spotify Location After Moving to Another Country On Apple iPhone 6s | Dr.fone
- In 2024, Filmmaker’s Playbook for Dynamic TikTok Video Reactions via Filmora
- Title: "[New] Easy Tutorial Uploading YouTube Shorts Video via Computer & Phone"
- Author: Kevin
- Created at : 2024-05-25 16:04:02
- Updated at : 2024-05-26 16:04:02
- Link: https://youtube-videos.techidaily.com/new-easy-tutorial-uploading-youtube-shorts-video-via-computer-and-phone/
- License: This work is licensed under CC BY-NC-SA 4.0.
