
!["[New] Earnings Enlightenment Joshi and YouTube Success Stories"](https://www.lifewire.com/thmb/ir-tdkJhetInDNhHCkfbZa8f19M=/400x300/filters:no_upscale():max_bytes(150000):strip_icc():format(webp)/Flack-6b3c3167132c467db22bae39689c44ef.jpg)
"[New] Earnings Enlightenment Joshi and YouTube Success Stories"
Earnings Enlightenment: Joshi and YouTube Success Stories
YouTubers don’t only create fun vlogs, but they generate serious income from it, too. One such YouTuber is Sourav Joshi - quite popular in his niche.
If you’re curious about Sourav Joshi vlog income, this blog is the right place to get this secret information. From biography to monthly income to popular videos, you’re going to learn almost everything about Sourav and his YouTube channel.
And if you’re into producing content for YouTube, read on to find bonus tips.
Part 1: Who is Sourav Joshi?

An Indian YouTuber, Sourav started his first channel “Sourav Joshi Arts” on the Platform in September, 2015. You can find drawings of famous people, including Abraham Lincoln on his arts channel.
Later in February, 2019, Sourav started his vlogging channel “Sourav Joshi Vlogs.” And no doubt, he has been successful in his journey and has established himself as a popular YouTuber.
Sourav Joshi Biography
| Name | Sourav Joshi |
|---|---|
| Real Name | Sourav Joshi |
| Net Worth (2022) | $1 Million |
| Monthly Income & Salary | $30,000 - 45,000 |
| Yearly Income | Rs. 2.5 - 3 Crore |
| Age | 22 years |
| Gender | Male |
| Nationality | Indian |
| Height | 5 feet 7 inche |
| Profession | YouTuber, Content Creator |
| YouTube Channel | Sourav Joshi ArtsSourav Joshi Vlogs |
| Awards & Recognition | Silver & Gold Play Button |
Being creative and unique can help you go big on YouTube. With his art videos and fun vlogs, Saurav has proved it, too. Let’s explore how much Saurav Joshi earn from YouTube.
Part 2: Sourav Joshi YouTube Earnings and Stats
Now that you know who Sourav Joshi is and what he does to earn dollars from YouTube, see how YouTube calculates income.
Sourav Joshi YouTube Income
As an established YouTuber, Sourav makes money from affiliate marketing, sponsorships, paid partnerships, and Google AdSense.
Want to know Sourav Joshi’s income from YouTube? He’s known to earn $30,000 to $45,000 monthly, and has a current net worth, $1 million.
Sourav receives 320-350 million views monthly on his two YouTube videos that helped him elevate his net worth.
Sourav Joshi YouTube Stats
| Monthly Earnings | Rs. 35-50 lakh, $30,000 to $45,000 |
|---|---|
| Yearly Earnings | Rs. 2.5 - 3 Crore |
| Total Video Uploads | Sourav Joshi Vlogs - 1K VideosSourav Joshi Arts - 676 Videos |
| Subscribers | Sourav Joshi Vlogs - 17.2MSourav Joshi Arts - 3.75M |
| Video Views | Sourav Joshi Vlogs - 6,378,282,781Sourav Joshi Arts - 177,342,864 |
| Last 30-Day Views | Sourav Joshi Vlogs - 316.365M |
How Famous Sourav Joshi is?
The views on his videos show him as a popular Indian YouTuber. Not only this, he has made a record of 100 days 100 trending videos on the platform.
Sourav’s channel was the fastest growing one during the Covid-19 lockdown. Even his Instagram bio says “Most subscribed vlogger of India.”
The vlogger enjoys 3.7M followers on Instagram.
Part 3: Why is Sourav Joshi Trending on YouTube?
With two successful channels, net worth in million, luxury cars, and collaboration with music albums, Sourav is a well-known YouTuber among kids and adults.
The reasons for his success and popularity are:
Exclusive Personality

It’s no secret that with dedication and hard work Sourav has managed to create himself a successful YouTuber.
He also gives off humble vibes. Looking at his content, you’ll see and feel adoration he has for his brother and cousin brother. He seems like a genuine and fun guy, too.
Engaging and Interactive Content

Since he’s got two channels, both are great in terms of content. On his art channel, he’s drawn images of known people, such as Bollywood actor Tiger Shroff, Indian Cricketer MS Dhoni, and many more.
More so, on his vlog channel, he created daily-life vlogs which most people can relate to. From travel videos to surprises for family, you can see enjoyable content on Sourav’s vlog channel.
Most Viewed Vlogs/Videos
As an artist, Sourav has created some stunning portraits of popular people. But one video where he drew hair got the most views.

His “How I Draw Hairs | Step by Step” got around 13,353, 361 views.
How I Draw Hairs | Step by step
In this 8-minute video clip, you can see him draw hair with absolute perfection, making the final product look 100% realistic.

During the lockdown, Sourav vlogs got massive popularity. One such vlog was “Golgappa CHALLENGE WITH PIYUSH.”
Golgappa CHALLENGE WITH PIYUSH 馃槏馃構
This 13-minute vlog was fun, and viewers can see Sourav enjoying with his younger brother, too.

People love watching vlogs, especially when they’re relatable to their personal lives. Many viewers can relate to “Highway Pe Faas Gye” vlog while enjoying it.
Highway Pe Faas Gye 馃槄 Popat Hi Popat
This is one of the most-viewed vlogs by Sourav with 23,431,594 views.
Pro Tips: How to be a YouTuber and Make Videos Like Sourav Joshi
A fun 11-minute video requires a lot of efforts, including top-tier video editing. If you’re impressed with the work of Sourav, try Filmora to edit your next video.
Wondershare Filmora is an intuitive software that offers a series of features and templates, so you can edit and make your videos impressive, following only a few simple steps which can help you do the right job.
Step1 Import your Footage

The first step is to click on “import” to access the folder where you can browse the video clips you need to edit.
Step2 Drag your Footage to Timeline

Drag and drop your files from the media library to be used as the background in the first round. Then, drag and drop another video to be used on the top of that background in the second round.
Step3 Work on Speed and Duration Settings

In the duration settings, you can adjust the video duration. If there’s need for adding more video clips together, repeat the same process on several tracks, sharing the same frame.
Step4 Fix Size and Positioning of your Video

For this step, you can use editing interface, so you can work on your video’s position. Drag the sliders to the interface and change the size, position, and direction of your footage.
Step5 See Advance Editing Option
When it comes to making a video 10x impressive, use Filmora’s advance editing sounds like a great move.
Simply access the editing panel by double-clicking the video. After this, you can perform the following:
Motion effects

Adjustment of video tone

Color correction of the video

Options for audio

Apply masks to your video, they feature different shape and positions, so adjust them accordingly.

Step6 Use More Features from Library
The software comes with a vast library packed with stunning effects, elements, transitions, and stock video. Don’t hesitate to use them and make your video more visually interesting.
Effects

Find “effects” on the top menu, click, and choose from the list.
Stock Video

“Stock video” button is also located on the top menu. Click on it to find more eye-pleasing content for your footage.
Elements

Go to the top menu and find “elements.” You can add these elements to ensure your video appear interesting and engaging.
Transitions

Using various video clips in a single video? Use transitions, located on the top menu, to smooth out everything.
Step7 Save and Export your Footage

Once you’re satisfied with the end result, it’s time to save and export the video for actual usage.
Wrap Up
Becoming a content creator and earning in dollars seems like a dream job. But not everyone understands that it needs a lot of effort and patience to reach this level of success on YouTube.
Although the journey is unpredictable, it doesn’t hurt to try. See Sourav Joshi for an example. His art or creativity paved a way for him and made him a successful YouTuber in such a young age.
You can try creating a video for YouTube. And use Filmora to make your videos impressive and aesthetically pleasing.
Free Download For Win 7 or later(64-bit)
Free Download For macOS 10.14 or later
Part 1: Who is Sourav Joshi?
An Indian YouTuber, Sourav started his first channel “Sourav Joshi Arts” on the Platform in September, 2015. You can find drawings of famous people, including Abraham Lincoln on his arts channel.
Later in February, 2019, Sourav started his vlogging channel “Sourav Joshi Vlogs.” And no doubt, he has been successful in his journey and has established himself as a popular YouTuber.
Sourav Joshi Biography
| Name | Sourav Joshi |
|---|---|
| Real Name | Sourav Joshi |
| Net Worth (2022) | $1 Million |
| Monthly Income & Salary | $30,000 - 45,000 |
| Yearly Income | Rs. 2.5 - 3 Crore |
| Age | 22 years |
| Gender | Male |
| Nationality | Indian |
| Height | 5 feet 7 inche |
| Profession | YouTuber, Content Creator |
| YouTube Channel | Sourav Joshi ArtsSourav Joshi Vlogs |
| Awards & Recognition | Silver & Gold Play Button |
Being creative and unique can help you go big on YouTube. With his art videos and fun vlogs, Saurav has proved it, too. Let’s explore how much Saurav Joshi earn from YouTube.
Part 2: Sourav Joshi YouTube Earnings and Stats
Now that you know who Sourav Joshi is and what he does to earn dollars from YouTube, see how YouTube calculates income.
Sourav Joshi YouTube Income
As an established YouTuber, Sourav makes money from affiliate marketing, sponsorships, paid partnerships, and Google AdSense.
Want to know Sourav Joshi’s income from YouTube? He’s known to earn $30,000 to $45,000 monthly, and has a current net worth, $1 million.
Sourav receives 320-350 million views monthly on his two YouTube videos that helped him elevate his net worth.
Sourav Joshi YouTube Stats
| Monthly Earnings | Rs. 35-50 lakh, $30,000 to $45,000 |
|---|---|
| Yearly Earnings | Rs. 2.5 - 3 Crore |
| Total Video Uploads | Sourav Joshi Vlogs - 1K VideosSourav Joshi Arts - 676 Videos |
| Subscribers | Sourav Joshi Vlogs - 17.2MSourav Joshi Arts - 3.75M |
| Video Views | Sourav Joshi Vlogs - 6,378,282,781Sourav Joshi Arts - 177,342,864 |
| Last 30-Day Views | Sourav Joshi Vlogs - 316.365M |
How Famous Sourav Joshi is?
The views on his videos show him as a popular Indian YouTuber. Not only this, he has made a record of 100 days 100 trending videos on the platform.
Sourav’s channel was the fastest growing one during the Covid-19 lockdown. Even his Instagram bio says “Most subscribed vlogger of India.”
The vlogger enjoys 3.7M followers on Instagram.
Part 3: Why is Sourav Joshi Trending on YouTube?
With two successful channels, net worth in million, luxury cars, and collaboration with music albums, Sourav is a well-known YouTuber among kids and adults.
The reasons for his success and popularity are:
Exclusive Personality
It’s no secret that with dedication and hard work Sourav has managed to create himself a successful YouTuber.
He also gives off humble vibes. Looking at his content, you’ll see and feel adoration he has for his brother and cousin brother. He seems like a genuine and fun guy, too.
Engaging and Interactive Content
Since he’s got two channels, both are great in terms of content. On his art channel, he’s drawn images of known people, such as Bollywood actor Tiger Shroff, Indian Cricketer MS Dhoni, and many more.
More so, on his vlog channel, he created daily-life vlogs which most people can relate to. From travel videos to surprises for family, you can see enjoyable content on Sourav’s vlog channel.
Most Viewed Vlogs/Videos
As an artist, Sourav has created some stunning portraits of popular people. But one video where he drew hair got the most views.
His “How I Draw Hairs | Step by Step” got around 13,353, 361 views.
How I Draw Hairs | Step by step
In this 8-minute video clip, you can see him draw hair with absolute perfection, making the final product look 100% realistic.
During the lockdown, Sourav vlogs got massive popularity. One such vlog was “Golgappa CHALLENGE WITH PIYUSH.”
Golgappa CHALLENGE WITH PIYUSH 馃槏馃構
This 13-minute vlog was fun, and viewers can see Sourav enjoying with his younger brother, too.
People love watching vlogs, especially when they’re relatable to their personal lives. Many viewers can relate to “Highway Pe Faas Gye” vlog while enjoying it.
Highway Pe Faas Gye 馃槄 Popat Hi Popat
This is one of the most-viewed vlogs by Sourav with 23,431,594 views.
Pro Tips: How to be a YouTuber and Make Videos Like Sourav Joshi
A fun 11-minute video requires a lot of efforts, including top-tier video editing. If you’re impressed with the work of Sourav, try Filmora to edit your next video.
Wondershare Filmora is an intuitive software that offers a series of features and templates, so you can edit and make your videos impressive, following only a few simple steps which can help you do the right job.
Step1 Import your Footage
The first step is to click on “import” to access the folder where you can browse the video clips you need to edit.
Step2 Drag your Footage to Timeline
Drag and drop your files from the media library to be used as the background in the first round. Then, drag and drop another video to be used on the top of that background in the second round.
Step3 Work on Speed and Duration Settings
In the duration settings, you can adjust the video duration. If there’s need for adding more video clips together, repeat the same process on several tracks, sharing the same frame.
Step4 Fix Size and Positioning of your Video
For this step, you can use editing interface, so you can work on your video’s position. Drag the sliders to the interface and change the size, position, and direction of your footage.
Step5 See Advance Editing Option
When it comes to making a video 10x impressive, use Filmora’s advance editing sounds like a great move.
Simply access the editing panel by double-clicking the video. After this, you can perform the following:
Motion effects
Adjustment of video tone
Color correction of the video
Options for audio
Apply masks to your video, they feature different shape and positions, so adjust them accordingly.
Step6 Use More Features from Library
The software comes with a vast library packed with stunning effects, elements, transitions, and stock video. Don’t hesitate to use them and make your video more visually interesting.
Effects
Find “effects” on the top menu, click, and choose from the list.
Stock Video
“Stock video” button is also located on the top menu. Click on it to find more eye-pleasing content for your footage.
Elements
Go to the top menu and find “elements.” You can add these elements to ensure your video appear interesting and engaging.
Transitions
Using various video clips in a single video? Use transitions, located on the top menu, to smooth out everything.
Step7 Save and Export your Footage
Once you’re satisfied with the end result, it’s time to save and export the video for actual usage.
Wrap Up
Becoming a content creator and earning in dollars seems like a dream job. But not everyone understands that it needs a lot of effort and patience to reach this level of success on YouTube.
Although the journey is unpredictable, it doesn’t hurt to try. See Sourav Joshi for an example. His art or creativity paved a way for him and made him a successful YouTuber in such a young age.
You can try creating a video for YouTube. And use Filmora to make your videos impressive and aesthetically pleasing.
Free Download For Win 7 or later(64-bit)
Free Download For macOS 10.14 or later
Capture Clarity: High-Quality Screen Recordings for YouTubers (PC/Mac)
10 Record Screen and Upload to YouTube Tools [PC, Mac, Online]

Richard Bennett
Mar 27, 2024• Proven solutions
Recording the screen, including the audio, can help you introduce your gaming flow, show how to perform a task on the computer, or create a presentation. You can also upload the screen record to YouTube for free. There are several solutions if you want to record your screen and upload it to YouTube. You can record the screen with some screen recording software on your Mac or your Windows PC or with some online screen recording software or the screen recording feature built-in YouTube itself. In this article, we will show you how to to record screens and upload to YouTube on Windows and Mac with some screen recorders , some of which are free to use, or freemium, which are built in your computer. Check it out now.
- Part 1: Record Screen and Upload to YouTube Directly on PC
- Part 2: Record Screen and Upload to YouTube Online
- Part 3: Record Screen and Upload it to YouTube on Mac
Recommended YouTube Screen Recorders to Record Screen and Upload to YouTube Directly [Windows & Mac]
The following YouTube screen recording software can be used on both Windows and Mac computers. You can record the entire screen or a particular portion of the screen, record your own voiceover or add music to the recorded video and then upload it to YouTube directly.
Using Wondershare Filmora
Filmora is an easy-to-use yet powerful enough video editing software which features the Recording tools. Using Filmora, you can record the desktop screen , audio and webcam simultaneously. But compared with Filmora, the highest frame rates that Filmora can capture at 1 second is 60FPS.

Launch Wondershare Filmora and choose Full Feature mode to begin a project. Go to the Record tab and choose Record PC Screen. There are three types of screen recording to choose from – Target Window, Full Screen and Custom. You can also choose to record computer system audio or record from microphone. Click the icons to turn them off or on accordingly. Click Settings to see if there’s anything you need to adjust before recording.
 Download Mac Version ](https://tools.techidaily.com/wondershare/filmora/download/ )
The recorded footage will be loaded to the Media panel directly, you can then cut out imperfect frames, add some texts and titles, or apply transitions and filters to it. To upload the recorded screen video, click the Export in the main interface, and then switch to YouTube tab in the Export window.

Sign in your YouTube account and complete the video info accordingly and then click the Export button to upload the recorded video to YouTube directly.
If you are looking for more screen recorders which can run on Windows, Mac, Linux, Android, iOS or online for different purposes, you can check our picks of the best screen recorders for all platforms based on different purposes.
Part 1: How to Record Screen on Windows PC and Upload to YouTube Directly
1. Bandicam
To record screen using Bandicam, select “Screen Recording” and a green-edged rectangle window will appear. Adjust the rectangle window on the video then play the video.
Clicking the REC button will change the green-edged line of the rectangle window to red. Click the stop button to stop recording. To watch the recorded video, go to the “General” tab and click “Open.”
You can also upload your desired videos to YouTube from Bandicam by clicking the “Upload” button found under Bandicam’s “Output” tab.

2. Using Microsoft Expression Encoder 4
You can download Microsoft Expression Encoder 4 to record the screen of your device and upload it to YouTube. The software has a screen capture tool and encoder. Install the software as you would usually do. There’ll be 2 shortcuts in the start menu – Microsoft Expression Encoder 4 Screen Capture (used to capture the screen) and Microsoft Expression Encoder 4 (converts the screen into a video that can be uploaded to YouTube).
3. Using Ezvid
Ezvid can record screen and audio simultaneously. It can also capture the whole area of the screen, making it perfect for tutorial videos. Ezvid also has speech synthesis that translates text captions into artificial human language, so it can easily produce human sound with only a click of a button.
4. Using Smartpixel
Smartpixel is a screen recorder for Android and Windows. It has a user-friendly interface and different editing as well as recording functions. Smartpixel can export various video formats such as 3gp, MP4, wmv, avi and flv. It also allows you to upload videos to different online platforms like GoPlay and YouTube.
Part 2: How to Record Screen Online
1. Using YouTube
You can now also record desktop screen with the features in YouTube. To start recording the screen using YouTube, you just need to sign-in to the website using your Google Account. Click “Creator Studio”. Go to Live Streaming and choose “Events”. You’ll be directed to the “Create Event” page. Provide the title for your screencast video, set the video’s privacy to either Private or Unlisted.
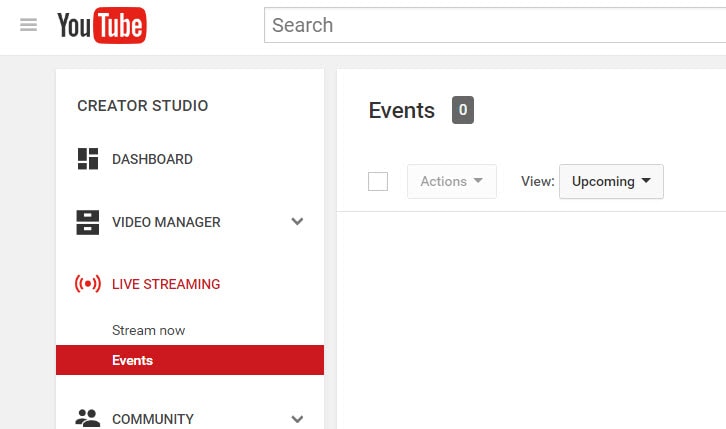
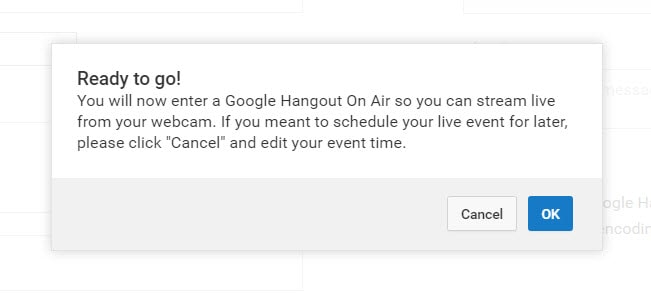
Click “Go Live Now” The Hangouts on Air page will open. Start the webcam from recording by clicking the camera icon. If you don’t want to record audio, you can just click the microphone icon.
Click “Screenshare” and choose a desktop window that you want to record for the screencast. Click “Start Screenshare” to share the screen then click the “Start Broadcast” button to begin recording the screen. When you’re done recording, just “Stop Broadcast” and go to the YouTube website. The new screencast video is stored in your YouTube video dashboard. You can share the video or download it to your Google Drive.
For more details, you can check How to record YouTube videos . If you’re looking for more online screen recorders for YouTube, you can check our picks of the 10 Best Free Online Screen Recorders .
2. Using FlexClip - Free Online Screen Recorder
FlexClip is a complete bundle of creativity. Why so? It is because it’s a web-based tool that helps you with image and video editing and post-production. It also offers a free online screen recording option.
FlexClip lets you record your webcam, screen, and audio with a simple click. Contrarily, you can also record simultaneous screens without a hitch! It can record almost anything that is being displayed on your computer screen. So be it gameplays, seminars, courses, presentations, or anything, you can always use this program to save your recording.
And once you’re done capturing the screen, FlexClip also allows you to edit your recording. You can add subtitles, highlights, overlays, and annotations to increase your video’s worth. So no wonder why FlexClip is one of the leading web-based software for free online screen capturing, especially if you want to make great YouTube videos.
The recording process is easy. All you need to do is visit the website and click the “Start Recording” button.
Then, choose your layout to start recording the screen and audio. When you’re finished, just hit the “Stop” button to end recording to edit the video in FlexClip’s built-in video editor. Lastly, download the screencast to upload it to your YouTube channel.
3. Using Apowersoft - Online Screen Recorder (Free)
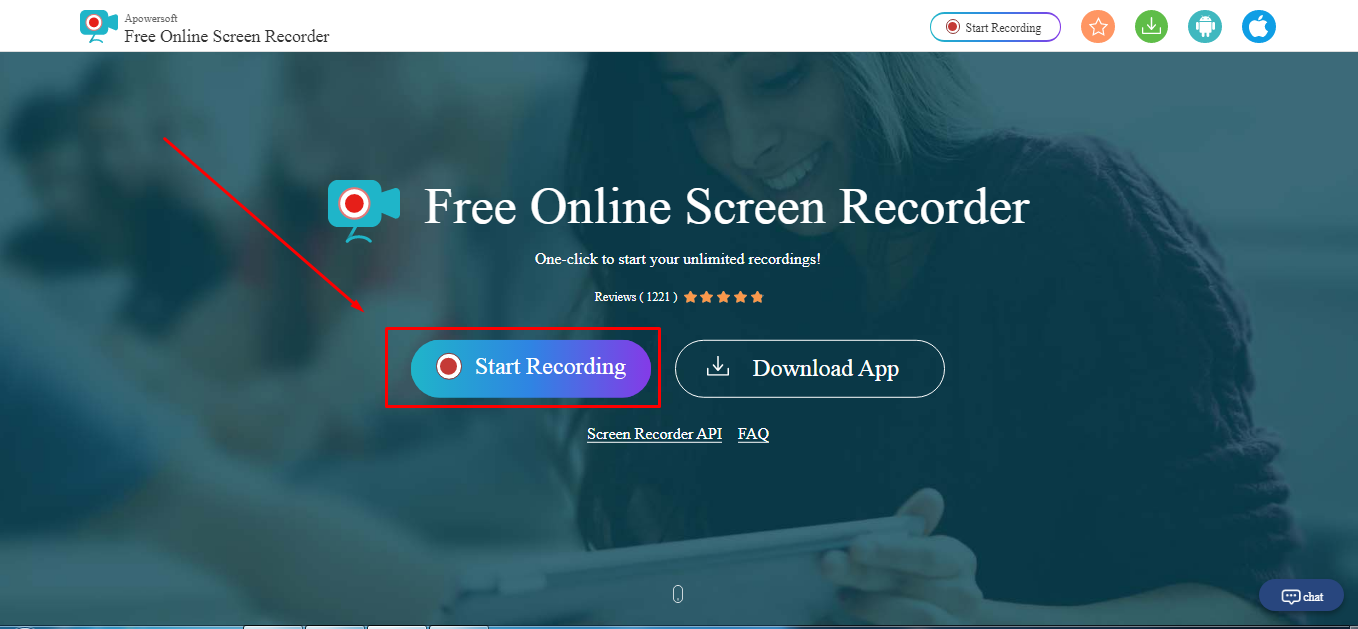
Apowersoft is a renowned company that creates digital products, including file compressors, watermark removers, and more. Since there’s a growing demand for screen recorders for YouTube, the Apowersoft creators have also launched a “Free Online Screen Recorder.” Yup! You’re reading the right name.
Apowersoft – Free Online Screen Recorder eases the screen recording process. While it’s an online tool, you can also download the app on your Mac or Windows OS.
It’s a free program with simple features, such as a screen and webcam recording with audio. So if your YouTube content doesn’t require overlays, subtitles, or other editing stuff, this software is ideal due to its simplicity.
You can click the “Start Recording” button to get started.
.
Then, select the screen you wish to record, and save the captured screen to your local disk or cloud so you can upload the videos later to your YouTube channel.
Part 3: How to Record Screen for YouTube with Free Screen Recorder on Mac
1. Using QuickTime Player
QuickTime Player can be used to record movies from your camera or the screen of your iPad, iPod touch or iPhone. It can also record your Mac’s screen or record audio from your microphone. To record the screen of your Pad, iPod touch or iPhone, you should use the movie-recording function. You can use it to record the screen for YouTube video, or you can also record the YouTube video and empower it with your creativity.
For more details of using QuickTime Player to record YouTube videos, check our guide: How to record videos with Quicktime.
2. Using Screen Flow
Screen Flow is our second pick for Mac. Although it’s paid software, you can still enjoy the blessings of this screen recorder through the trial version. It’s a very handy tool that allows Mac screen recording and all iOS devices, such as iPhones and iPad.
Okay! So what’s good about screen flow? Let’s uncover. Firstly, it’s an editor + screen recorder specifically made for YouTube. You can capture the screen and edit the footage before uploading it to your channel.
Secondly, this software allows you to record simultaneous screens and your webcam. Plus, you can also record your voice through its mic recording option.
Another great thing about Screen Flow is that it has numerous video filters and a customizable title library. It also permits you to save screen recordings on your Mac or directly share them to your YouTube channel, other social media accounts, websites, or cloud storage in a few clicks.
Here’s a video to help you get started with screen recording on your Mac using Screen Flow:
3. Using Vmaker
Vmaker is another authentic software to record screens for your YouTube videos. It’s a free program, but you can buy premium versions to unlock more features.
The tool is trusted by many software review websites, such as “crozdesk.” It is available on both Mac and Windows OS. However, it seems like this software performs well on Mac operating systems.
Vmaker allows you to record your screen, your favorite YouTube videos, and the audio – all together! You can record the entire Mac screen or a specific portion in HD quality. Moreover, the software allows you to pick resolutions up to 4K to record the media.
This program also offers editing features like adding subtitles, music, flip, blur, trim, and more to create an awesome video. All videos are saved to your cloud workspace once you finish recording. Then, you can share the recorded video screens on your YouTube.
The tool is ideal for making tutorials, courses, demos, and product review videos. All you need to do is download Vmaker on your Mac. Choose a webcam, screen, or both with audio for recording. Start recording in the highest quality. Edit your video and share it on your YouTube channel.
Conclusion
Above are some screen recorders that you can use to record YouTube videos or record the screen and webcam simultaneously to make a video and upload it it to YouTube. If you want to record a screen video and edit it further, you should try Wondershare Filmora video editor.
Download Mac Version ](https://tools.techidaily.com/wondershare/filmora/download/ )
FAQs
Q1. How do you record your screen on a Mac for YouTube?
There are some great tools for screen recording on Mac for YouTube. The most loved and enjoyed program is Filmora by Wondershare. It’s a professional tool for screen recording and video editing. Most importantly, it has a user-friendly interface and records your screen in high quality.
Another option is the Quick Time Player. This program also allows screen recording. Likewise, Screen Flow is also a great program for screen capturing for YouTube on Mac.
Q2. Can I screen-record and upload it to YouTube?
There are two ways to do it. First, you can download the free or paid screen recording software on your Windows or macOS. Second, you can look for online screen recorders like FlexClip or the built-in YouTube recorder and directly share the recorded video to your channel.
Some tools, like Apowersoft and Vmaker, save screen recordings to the cloud or local disk. And there’s no direct sharing of the recorded screens to your YouTube channel. So if you’re using such programs, you will need to sign in to your YouTube channel and upload the file from your computer hard drive.
Q3. How do I record my computer screen for 2022?
Some of the greatest video editing and screen recording tools like Filmora, Bandicam, and FlexClip allow you to record your computer screen. Depending on the software, you can directly share the video to your YouTube channel. Or, save the video on your computer and then upload it on your channel.
Richard Bennett
Richard Bennett is a writer and a lover of all things video.
Follow @Richard Bennett
Richard Bennett
Mar 27, 2024• Proven solutions
Recording the screen, including the audio, can help you introduce your gaming flow, show how to perform a task on the computer, or create a presentation. You can also upload the screen record to YouTube for free. There are several solutions if you want to record your screen and upload it to YouTube. You can record the screen with some screen recording software on your Mac or your Windows PC or with some online screen recording software or the screen recording feature built-in YouTube itself. In this article, we will show you how to to record screens and upload to YouTube on Windows and Mac with some screen recorders , some of which are free to use, or freemium, which are built in your computer. Check it out now.
- Part 1: Record Screen and Upload to YouTube Directly on PC
- Part 2: Record Screen and Upload to YouTube Online
- Part 3: Record Screen and Upload it to YouTube on Mac
Recommended YouTube Screen Recorders to Record Screen and Upload to YouTube Directly [Windows & Mac]
The following YouTube screen recording software can be used on both Windows and Mac computers. You can record the entire screen or a particular portion of the screen, record your own voiceover or add music to the recorded video and then upload it to YouTube directly.
Using Wondershare Filmora
Filmora is an easy-to-use yet powerful enough video editing software which features the Recording tools. Using Filmora, you can record the desktop screen , audio and webcam simultaneously. But compared with Filmora, the highest frame rates that Filmora can capture at 1 second is 60FPS.
Launch Wondershare Filmora and choose Full Feature mode to begin a project. Go to the Record tab and choose Record PC Screen. There are three types of screen recording to choose from – Target Window, Full Screen and Custom. You can also choose to record computer system audio or record from microphone. Click the icons to turn them off or on accordingly. Click Settings to see if there’s anything you need to adjust before recording.
Download Mac Version ](https://tools.techidaily.com/wondershare/filmora/download/ )
The recorded footage will be loaded to the Media panel directly, you can then cut out imperfect frames, add some texts and titles, or apply transitions and filters to it. To upload the recorded screen video, click the Export in the main interface, and then switch to YouTube tab in the Export window.
Sign in your YouTube account and complete the video info accordingly and then click the Export button to upload the recorded video to YouTube directly.
If you are looking for more screen recorders which can run on Windows, Mac, Linux, Android, iOS or online for different purposes, you can check our picks of the best screen recorders for all platforms based on different purposes.
Part 1: How to Record Screen on Windows PC and Upload to YouTube Directly
1. Bandicam
To record screen using Bandicam, select “Screen Recording” and a green-edged rectangle window will appear. Adjust the rectangle window on the video then play the video.
Clicking the REC button will change the green-edged line of the rectangle window to red. Click the stop button to stop recording. To watch the recorded video, go to the “General” tab and click “Open.”
You can also upload your desired videos to YouTube from Bandicam by clicking the “Upload” button found under Bandicam’s “Output” tab.
2. Using Microsoft Expression Encoder 4
You can download Microsoft Expression Encoder 4 to record the screen of your device and upload it to YouTube. The software has a screen capture tool and encoder. Install the software as you would usually do. There’ll be 2 shortcuts in the start menu – Microsoft Expression Encoder 4 Screen Capture (used to capture the screen) and Microsoft Expression Encoder 4 (converts the screen into a video that can be uploaded to YouTube).
3. Using Ezvid
Ezvid can record screen and audio simultaneously. It can also capture the whole area of the screen, making it perfect for tutorial videos. Ezvid also has speech synthesis that translates text captions into artificial human language, so it can easily produce human sound with only a click of a button.
4. Using Smartpixel
Smartpixel is a screen recorder for Android and Windows. It has a user-friendly interface and different editing as well as recording functions. Smartpixel can export various video formats such as 3gp, MP4, wmv, avi and flv. It also allows you to upload videos to different online platforms like GoPlay and YouTube.
Part 2: How to Record Screen Online
1. Using YouTube
You can now also record desktop screen with the features in YouTube. To start recording the screen using YouTube, you just need to sign-in to the website using your Google Account. Click “Creator Studio”. Go to Live Streaming and choose “Events”. You’ll be directed to the “Create Event” page. Provide the title for your screencast video, set the video’s privacy to either Private or Unlisted.
Click “Go Live Now” The Hangouts on Air page will open. Start the webcam from recording by clicking the camera icon. If you don’t want to record audio, you can just click the microphone icon.
Click “Screenshare” and choose a desktop window that you want to record for the screencast. Click “Start Screenshare” to share the screen then click the “Start Broadcast” button to begin recording the screen. When you’re done recording, just “Stop Broadcast” and go to the YouTube website. The new screencast video is stored in your YouTube video dashboard. You can share the video or download it to your Google Drive.
For more details, you can check How to record YouTube videos . If you’re looking for more online screen recorders for YouTube, you can check our picks of the 10 Best Free Online Screen Recorders .
2. Using FlexClip - Free Online Screen Recorder
FlexClip is a complete bundle of creativity. Why so? It is because it’s a web-based tool that helps you with image and video editing and post-production. It also offers a free online screen recording option.
FlexClip lets you record your webcam, screen, and audio with a simple click. Contrarily, you can also record simultaneous screens without a hitch! It can record almost anything that is being displayed on your computer screen. So be it gameplays, seminars, courses, presentations, or anything, you can always use this program to save your recording.
And once you’re done capturing the screen, FlexClip also allows you to edit your recording. You can add subtitles, highlights, overlays, and annotations to increase your video’s worth. So no wonder why FlexClip is one of the leading web-based software for free online screen capturing, especially if you want to make great YouTube videos.
The recording process is easy. All you need to do is visit the website and click the “Start Recording” button.
Then, choose your layout to start recording the screen and audio. When you’re finished, just hit the “Stop” button to end recording to edit the video in FlexClip’s built-in video editor. Lastly, download the screencast to upload it to your YouTube channel.
3. Using Apowersoft - Online Screen Recorder (Free)
Apowersoft is a renowned company that creates digital products, including file compressors, watermark removers, and more. Since there’s a growing demand for screen recorders for YouTube, the Apowersoft creators have also launched a “Free Online Screen Recorder.” Yup! You’re reading the right name.
Apowersoft – Free Online Screen Recorder eases the screen recording process. While it’s an online tool, you can also download the app on your Mac or Windows OS.
It’s a free program with simple features, such as a screen and webcam recording with audio. So if your YouTube content doesn’t require overlays, subtitles, or other editing stuff, this software is ideal due to its simplicity.
You can click the “Start Recording” button to get started.
.
Then, select the screen you wish to record, and save the captured screen to your local disk or cloud so you can upload the videos later to your YouTube channel.
Part 3: How to Record Screen for YouTube with Free Screen Recorder on Mac
1. Using QuickTime Player
QuickTime Player can be used to record movies from your camera or the screen of your iPad, iPod touch or iPhone. It can also record your Mac’s screen or record audio from your microphone. To record the screen of your Pad, iPod touch or iPhone, you should use the movie-recording function. You can use it to record the screen for YouTube video, or you can also record the YouTube video and empower it with your creativity.
For more details of using QuickTime Player to record YouTube videos, check our guide: How to record videos with Quicktime.
2. Using Screen Flow
Screen Flow is our second pick for Mac. Although it’s paid software, you can still enjoy the blessings of this screen recorder through the trial version. It’s a very handy tool that allows Mac screen recording and all iOS devices, such as iPhones and iPad.
Okay! So what’s good about screen flow? Let’s uncover. Firstly, it’s an editor + screen recorder specifically made for YouTube. You can capture the screen and edit the footage before uploading it to your channel.
Secondly, this software allows you to record simultaneous screens and your webcam. Plus, you can also record your voice through its mic recording option.
Another great thing about Screen Flow is that it has numerous video filters and a customizable title library. It also permits you to save screen recordings on your Mac or directly share them to your YouTube channel, other social media accounts, websites, or cloud storage in a few clicks.
Here’s a video to help you get started with screen recording on your Mac using Screen Flow:
3. Using Vmaker
Vmaker is another authentic software to record screens for your YouTube videos. It’s a free program, but you can buy premium versions to unlock more features.
The tool is trusted by many software review websites, such as “crozdesk.” It is available on both Mac and Windows OS. However, it seems like this software performs well on Mac operating systems.
Vmaker allows you to record your screen, your favorite YouTube videos, and the audio – all together! You can record the entire Mac screen or a specific portion in HD quality. Moreover, the software allows you to pick resolutions up to 4K to record the media.
This program also offers editing features like adding subtitles, music, flip, blur, trim, and more to create an awesome video. All videos are saved to your cloud workspace once you finish recording. Then, you can share the recorded video screens on your YouTube.
The tool is ideal for making tutorials, courses, demos, and product review videos. All you need to do is download Vmaker on your Mac. Choose a webcam, screen, or both with audio for recording. Start recording in the highest quality. Edit your video and share it on your YouTube channel.
Conclusion
Above are some screen recorders that you can use to record YouTube videos or record the screen and webcam simultaneously to make a video and upload it it to YouTube. If you want to record a screen video and edit it further, you should try Wondershare Filmora video editor.
Download Mac Version ](https://tools.techidaily.com/wondershare/filmora/download/ )
FAQs
Q1. How do you record your screen on a Mac for YouTube?
There are some great tools for screen recording on Mac for YouTube. The most loved and enjoyed program is Filmora by Wondershare. It’s a professional tool for screen recording and video editing. Most importantly, it has a user-friendly interface and records your screen in high quality.
Another option is the Quick Time Player. This program also allows screen recording. Likewise, Screen Flow is also a great program for screen capturing for YouTube on Mac.
Q2. Can I screen-record and upload it to YouTube?
There are two ways to do it. First, you can download the free or paid screen recording software on your Windows or macOS. Second, you can look for online screen recorders like FlexClip or the built-in YouTube recorder and directly share the recorded video to your channel.
Some tools, like Apowersoft and Vmaker, save screen recordings to the cloud or local disk. And there’s no direct sharing of the recorded screens to your YouTube channel. So if you’re using such programs, you will need to sign in to your YouTube channel and upload the file from your computer hard drive.
Q3. How do I record my computer screen for 2022?
Some of the greatest video editing and screen recording tools like Filmora, Bandicam, and FlexClip allow you to record your computer screen. Depending on the software, you can directly share the video to your YouTube channel. Or, save the video on your computer and then upload it on your channel.
Richard Bennett
Richard Bennett is a writer and a lover of all things video.
Follow @Richard Bennett
Also read:
- In 2024, An Intro to Discovering YouTube Studio Content Creator's Dreamland
- The Key to More Views Expert Backlink Methods for YouTubers
- [New] Capture Every Angle – How to Create Dynamic, Viewpoint-Driven Reaction Vids for YouTube Success
- 2024 Approved A Step-by-Step Aspect Ratio Guide for YouTube Creators
- Exploring the Depths of Video Talks on YouTube
- The Video Venture A Vlogger's Journey to Judicious Gains
- In 2024, Dive Into High-Quality Audio 7 Royalty-Free Selections
- In 2024, What Is the Difference Between YouTube and Dailymotion
- Maximizing Reach Strategies From Seasoned TubeBuddy Experts
- [New] Discover 7 Premium Android AdBlocking Tools
- Beat the Blank Screen Overcoming Top Vlogging Anxieties
- [New] Bridal Bliss Filmed Alike High-Quality 8 Marriage Videos Online
- In 2024, Best Alternative Top 10 FLV to YouTube Converter Apps
- Step-by-Step Integration Merging Your YouTube & TikTok Accounts Effortlessly
- Techniques for Selective YouTube Video Downloading
- Cutting Edge Editors Scouting the Ultimate Tools for YouTube Shorts
- [Updated] Best Practices for Sharing Videos on Mobile Devices
- In 2024, EditMaster Suite
- [New] Building a Solid Foundation for Authenticity in Design
- [New] Demystifying the Math of YouTube Ratio Perfection
- [New] Behind the Scenes Creating Successful YouTube Shorts Videos
- Crafting Your Own YouTube Subscribe Shortcut
- 2024 Approved Captivate Crowds Mastering Hashtag Use in High-Traffic Short Videos
- Real-Time Viewership Metering Devices
- From Conference Call to Online Showcase Google Meet on YouTube
- Navigating the Settings YouTube Comments Activation
- 2024 Approved Enhancing Your YouTube Projects A Compreayer of Visual Improvement
- Can a Brief Subscribe Boost Your Content Viewing, In 2024
- [New] 6 FREE YouTube Outros for Aspiring Filmmakers
- New 2024 Approved Unlock the Power of Screen Recording A Filmora Scrn Tutorial
- Clocking Down the Big Day 10 Best Mobile Apps Revealed
- Unlock Pro-Level Videos Top 10 Free Green Screen Apps for Mobile
- In 2024, A-List iPhone Video Recording Hacks
- Decoding the Best Timing Strategies for Instagram Posts
- [Updated] Streamline Your Videography with Mac Webcam - Top 5 Methods
- In 2024, How Can We Bypass Xiaomi 13T FRP?
- [New] 2024 Approved Navigate Nature Android’s Animated Adventure Series
- [Updated] 2024 Approved Unseen Story Access Top Anonymous Tools
- In 2024, Voice Recording Mastery with iPad Tools
- Title: "[New] Earnings Enlightenment Joshi and YouTube Success Stories"
- Author: Kevin
- Created at : 2024-05-25 16:03:49
- Updated at : 2024-05-26 16:03:49
- Link: https://youtube-videos.techidaily.com/new-earnings-enlightenment-joshi-and-youtube-success-stories/
- License: This work is licensed under CC BY-NC-SA 4.0.
