
!["[New] DIY GIF Making Transforming YouTube Videos Into Animated Forms"](https://www.lifewire.com/thmb/6xuM2EyQiLZhok9LAmw6JW0hXgU=/400x300/filters:no_upscale():max_bytes(150000):strip_icc()/Ai-Chatbot-6bb24727cd054dcd9339c6ed6f5da37e.jpg)
"[New] DIY GIF Making Transforming YouTube Videos Into Animated Forms"
DIY GIF Making: Transforming YouTube Videos Into Animated Forms
GIF editor: How to Make Animated GIF Images online from YouTube Video

Richard Bennett
Mar 27, 2024• Proven solutions
YouTube videos are fun and easy to access, they deliver a very good value and you will always have fun using them. But there are situations where these videos can integrate some interesting, funny moments and this is why creating a GIF out of them can be a good idea. You can make GIF from video if you want and all you need is a good GIF editor, which is very impressive to say the least.
You May Also Like:
Royalty free music for YouTube Videos >>
Best Screen Recorders for YouTube >>
It’s not a problem to use the GIF files as a way to express yourself so using a GIF editor to create the GIF you want is not only interesting, it can also bring in front a very good value and interesting options for sure. You should totally give it a shot if you can.
Tools that can help you make gif images from YouTube video
Lots of apps can help you do this and most of them are online based. This basically means that you can create a GIF from video without that much of a hassle. All you have to do is to find the right video and the best moments, edit it and then use this video to create the GIF you want. The process is easy and fun and it will provide you with a great value for sure.
1. imgur.com

This tool requires you to add in the YouTube link and then you press Enter. Once you do that the app will do its job on its own. It’s certainly a very interesting option and one that will deliver a lot of value for all kinds of users. It’s an exciting experience for sure just because you get so much value and incredible results without that much of a hassle. You can add captions to the app which is great.
2. likeyoyo.com

Using this app is simple, you paste the URL, press Enter and then the GIF is created automatically. They integrate some share buttons and a set of tools to help you move this, but it’s not that hard to use and it’s very user friendly to be honest.
3. makeagif.com
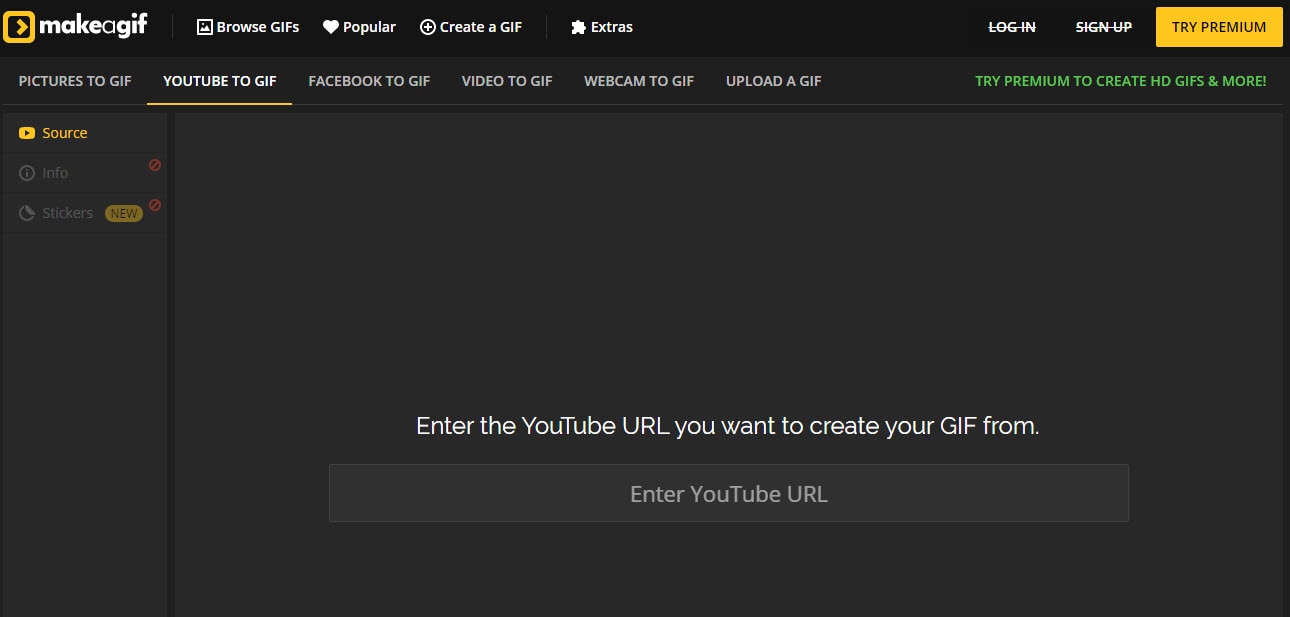
This is a great, easy to use online tool that just requires you to add in the video URL you want and then wait until it’s done. It’s certainly a great tool to use and one that will deliver a lot of value.
Add more fun on your GIF with Wondershare Filmora
Wondershare Filmora is a refined application that allows you to make GIF from video fast and with great results. It features an interesting set of tools, it’s very easy to modify and it does bring in front interesting options for sure. It’s designed with ease of use in mind and it does enable you to add in many animated effects which is always a major plus for this kind of tool.
However, if you want to make a GIF online, Filmora meme maker is your ultimate solution. It helps you make image, GIF and video memes directly without watermark. It is totally FREE to use and no sign up. You can change text size, color and position to create caption when you are editing. You can also put text inside or outside in GIF. Just with a few clicks, your GIF is done. Try it now!
 Download Mac Version ](https://tools.techidaily.com/wondershare/filmora/download/ )
How to use?
Using Wondershare Filmora is actually very easy and the process is designed in order to deliver lots of value to the user without making the experience complex or boring. In fact, you just have to use the following steps in order to get the best results:
- At first you will have to import your GIF file and it allows you to bring in front immense possibilities since you can edit GIF on the fly.
- Once you have the file imported, you will need to drag that file you want to edit to the timeline.
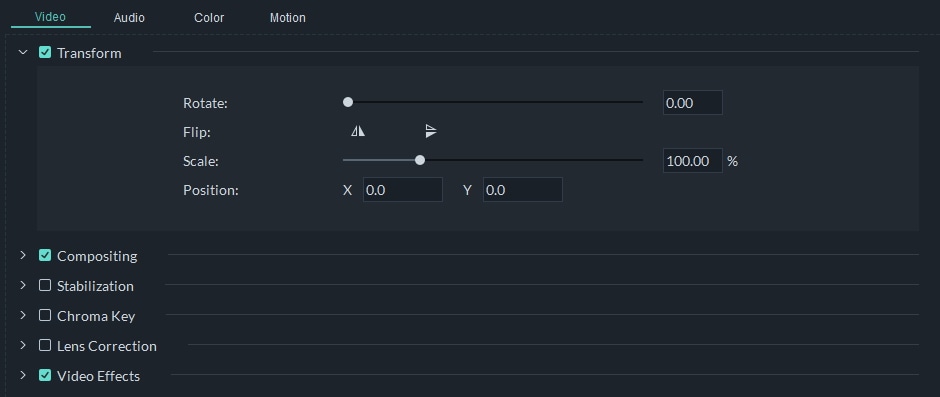
- Double clik on the clip in the timeline. You will be able to edit GIF, you can rotate, scale or flip which is very helpful.
- Although it’s not mandatory, you can try to add filter to the GIF in order to make the experience more interesting.

- Lastly, when you are done with the process you can export to format GIF. This is a very good value and it will provide you with a stellar experience.

Conclusion
Using Wondershare Filmora in order to edit GIF and create GIF from video is a very good idea. The app is designed to offer some amazing features and it’s also very easy to use. If you want to take on such a task, then Wondershare Filmora is certainly the tool for you so just give it a shot and you are bound to love it!

Richard Bennett
Richard Bennett is a writer and a lover of all things video.
Follow @Richard Bennett
Richard Bennett
Mar 27, 2024• Proven solutions
YouTube videos are fun and easy to access, they deliver a very good value and you will always have fun using them. But there are situations where these videos can integrate some interesting, funny moments and this is why creating a GIF out of them can be a good idea. You can make GIF from video if you want and all you need is a good GIF editor, which is very impressive to say the least.
You May Also Like:
Royalty free music for YouTube Videos >>
Best Screen Recorders for YouTube >>
It’s not a problem to use the GIF files as a way to express yourself so using a GIF editor to create the GIF you want is not only interesting, it can also bring in front a very good value and interesting options for sure. You should totally give it a shot if you can.
Tools that can help you make gif images from YouTube video
Lots of apps can help you do this and most of them are online based. This basically means that you can create a GIF from video without that much of a hassle. All you have to do is to find the right video and the best moments, edit it and then use this video to create the GIF you want. The process is easy and fun and it will provide you with a great value for sure.
1. imgur.com
This tool requires you to add in the YouTube link and then you press Enter. Once you do that the app will do its job on its own. It’s certainly a very interesting option and one that will deliver a lot of value for all kinds of users. It’s an exciting experience for sure just because you get so much value and incredible results without that much of a hassle. You can add captions to the app which is great.
2. likeyoyo.com
Using this app is simple, you paste the URL, press Enter and then the GIF is created automatically. They integrate some share buttons and a set of tools to help you move this, but it’s not that hard to use and it’s very user friendly to be honest.
3. makeagif.com
This is a great, easy to use online tool that just requires you to add in the video URL you want and then wait until it’s done. It’s certainly a great tool to use and one that will deliver a lot of value.
Add more fun on your GIF with Wondershare Filmora
Wondershare Filmora is a refined application that allows you to make GIF from video fast and with great results. It features an interesting set of tools, it’s very easy to modify and it does bring in front interesting options for sure. It’s designed with ease of use in mind and it does enable you to add in many animated effects which is always a major plus for this kind of tool.
However, if you want to make a GIF online, Filmora meme maker is your ultimate solution. It helps you make image, GIF and video memes directly without watermark. It is totally FREE to use and no sign up. You can change text size, color and position to create caption when you are editing. You can also put text inside or outside in GIF. Just with a few clicks, your GIF is done. Try it now!
Download Mac Version ](https://tools.techidaily.com/wondershare/filmora/download/ )
How to use?
Using Wondershare Filmora is actually very easy and the process is designed in order to deliver lots of value to the user without making the experience complex or boring. In fact, you just have to use the following steps in order to get the best results:
- At first you will have to import your GIF file and it allows you to bring in front immense possibilities since you can edit GIF on the fly.
- Once you have the file imported, you will need to drag that file you want to edit to the timeline.
- Double clik on the clip in the timeline. You will be able to edit GIF, you can rotate, scale or flip which is very helpful.
- Although it’s not mandatory, you can try to add filter to the GIF in order to make the experience more interesting.
- Lastly, when you are done with the process you can export to format GIF. This is a very good value and it will provide you with a stellar experience.
Conclusion
Using Wondershare Filmora in order to edit GIF and create GIF from video is a very good idea. The app is designed to offer some amazing features and it’s also very easy to use. If you want to take on such a task, then Wondershare Filmora is certainly the tool for you so just give it a shot and you are bound to love it!
Richard Bennett
Richard Bennett is a writer and a lover of all things video.
Follow @Richard Bennett
Enriching Slides: Video Incorporation From YouTube
Create High-Quality Video - Wondershare Filmora
An easy and powerful YouTube video editor
Numerous video and audio effects to choose from
Detailed tutorials provided by the official channel
Google Slide presentation is a powerful tool for creators to keep their audience engaged. This online platform lets you create and demonstrate your ideas. It will capture your viewers’ attention from the very beginning. It also doesn’t matter whatever learning style you engage. Adding YouTube videos to Google Slide will appeal to all levels of individuals.
More so, it is the best way to provide a break for both the audience and the creator. You can break Google Slide presentations with videos to offer some break. Viewers and the presenter get a breather in the process. The presenter can take a short break from speaking while the video plays. Let’s now dive into how to embed a YouTube video in Google Slides.

In this article
01 Why should we add a video to Google Slides?
02 How to add a YouTube video to Google Slide
03 How to choose the right video for your Slides?
Why should we add a video to Google Slides?
There is a great impact of adding video to Google Slides.
For attention
Videos will automatically awaken you, especially if your thoughts have started to sway during a presentation. A video has a direct way of showing creativity. The audience automatically connects the dots between the video and the presentation lines alike.
To stimulate discussion
A picture is worth a thousand words. There is a way that an added video will help the audience connect to the day’s topic. It will bring up several ideas and stir up discussion with the presenter.
Easy following
With videos embedded in Google Slide, viewers will find it easy to understand and digest. Videos automatically eliminate boredom and make any topic interesting.
How to add a YouTube video to Google Slide
Use these two methods to add a YouTube video to Google Slides. Via the Search and Direct link.
Method 1. Embed YouTube video to Google Slide by search and selection
Google has owned YouTube since the year 2006. You can, therefore, integrate Google’s products with YouTube easily.
Step 1. First, go to the slide where you want to embed your video.
Step 2. Then choose the “Insert” option from the menu bar and hit the “Video” option.

Step 3. It would be best if you now viewed the “YouTube” search bar to type in the video you want to embed. You can use keywords to search for the video in question and view instant search results.
Step 4. Then select the video you want to embed, and you’ll see it appear on the “Slide.”

Step 5. Format your video. Remember that the entire video will be embedded. You don’t necessarily need the whole video. It is time to select just a brief but relevant clip from the video to use. Then position your video to the right point using the axes from the exact starting point to the finished part you want the video to appear in.
Method 2. Embed YouTube video to Google Slide by direct link
You can engage this method if you want to include the entire video.
Step 1. Get the URL of the specific YouTube video that you want to use.

Step 2. Then go to your browser’s “Address bar” to copy the YouTube link.
Step 3. Next, open the “Presentation” slide to put your video to.
Step 4. Choose the “Insert” tab from the menu bar.
Step 5. Then hit on the “Video” option from the drop-down menu that appears.
Step 6. A new window will open automatically. Choose the “By URL” tab.
Step 7. Then paste the YouTube video URL in the “Paste YouTube URL Here” bar section.

Step 8. Wait for the video file to load and press the “Select” option. The video will immediately appear in the presentation slide. Just drag and drop the video in your preferred position.
Note: You can do a few edits inside the application. Set the timer when your video should start and when to stop. You can also adjust the video player size.
How to choose the right video for your Slides?
Not all videos will make an impact on your Google Slide. You need to use the best shot that adds value to your presentation. These guidelines will help you to settle on the best video.
Be Professional – choose the best video for your presentation. Remember that the video is part of the presentation and carries more weight. Settling for quality video will bring out the professionalism in you.
Relevant – how do you know that what you are showing your audience corresponds to the presentation piece? Ensure that the video you add has something to do with the Google Slide presentation topic. The two should naturally flow to make it easy to understand the whole concept.
Precise – your presentation is not about the video. The ideal length should not exceed 60 seconds. The longer the video, the greater the chance for your audience to lose track along the way.
Know every footage you are working with – this will help you pick the best shots for your presentation. So, learn every aspect of the video before settling down to use it.
Add new content – even though one content may suit several presentations, don’t rely on the same piece each time. Your audience will want to feel something fresh each time you are presenting. So, compose different videos for different scenarios to make that big impact.
Create an eye-catching video for your Slides with Filmora
The video quality matters when it comes to creating your Slides. The best video creator – Filmora – works in simple steps to give you an eye-catching video. It will create videos for all scenarios like marketing, tutorial, gaming, etc.
Key features of Filmora
- It offers you advanced video effects like filters, motion elements, etc
- You can multiply your fun with multiple screens with the Split Screen feature
- Easily change backgrounds using the Green Screen feature
- The speed control lets you fast forward or slow down a special moment
- Import your video clips to social media platforms
- You can also adjust the audio of your tracks using the Audio Mixer feature
Follow this guide to create a video for your slide with Filmora
Step 1. Launch Filmora
First, begin by downloading and installing Filmora on your computer device. Once installed, launch it and allow it to run. You can either create a new project or open an existing project to work on.
Step 2. Create a new project
Here, click on the “New Project” tab on the app’s welcome screen. The editor should load immediately. Then proceed to register the product. Just hit on the “Register” tab.
Step 3. Import video
Check the upper left corner of your screen to see the “Import” tab. Click on it and choose the “Import Media Files” option. Next, navigate to the location of your computer’s local list to select the clip or video you want to edit. Then, hit the “Import” button to add the video to the timeline for editing.
Step 4. Edit video
Drag and drop the raw footage to Filmora’s timeline to begin editing. Here, you can trim, add other video clips, merge, and add effects as you wish. Likewise, you can add opening titles, subtitles, and end credits to your video. More so, this tool offers different templates to use. Just drag and drop the templates you wish to use to a specific location on the timeline.
Step 5. Preview your file
Last but not least, you can preview your files. Click on the “Play” tab to start previewing your video clips. The main essence of this part is to allow you to make the necessary changes to your clips if there is a need.
Step 6. Export and Share
With Filmora, you can export your file to various social media platforms. But first, go to the “Output window” and select the video file format to use. This software supports several output formats to apply to any platform and device. Just click on the “Format” tab and choose the file format to use. Then also change the resolution and other parameters like frame rate and channel of your video in the “Settings” section. Finally, share your video to your YouTube channel and get ready to add the video to the Google Slide presentation.
For Win 7 or later (64-bit)
For macOS 10.12 or later
Conclusion
● You now know how to put a YouTube video in Google Slides the simple way. You can search for your YouTube videos or directly use the URL link. Whatever the case, remember that it’s the quality of your video that carries more weight. Thanks to the availability of third-party apps that you can use to create and improve the quality of your videos.
● Filmora is at your service to create high-resolution videos that you can export in any format to your YouTube channel. The tool is intuitive, and it won’t matter whether you haven’t tried it before. It is a perfect choice for both professionals and first-time users.
Google Slide presentation is a powerful tool for creators to keep their audience engaged. This online platform lets you create and demonstrate your ideas. It will capture your viewers’ attention from the very beginning. It also doesn’t matter whatever learning style you engage. Adding YouTube videos to Google Slide will appeal to all levels of individuals.
More so, it is the best way to provide a break for both the audience and the creator. You can break Google Slide presentations with videos to offer some break. Viewers and the presenter get a breather in the process. The presenter can take a short break from speaking while the video plays. Let’s now dive into how to embed a YouTube video in Google Slides.
In this article
01 Why should we add a video to Google Slides?
02 How to add a YouTube video to Google Slide
03 How to choose the right video for your Slides?
Why should we add a video to Google Slides?
There is a great impact of adding video to Google Slides.
For attention
Videos will automatically awaken you, especially if your thoughts have started to sway during a presentation. A video has a direct way of showing creativity. The audience automatically connects the dots between the video and the presentation lines alike.
To stimulate discussion
A picture is worth a thousand words. There is a way that an added video will help the audience connect to the day’s topic. It will bring up several ideas and stir up discussion with the presenter.
Easy following
With videos embedded in Google Slide, viewers will find it easy to understand and digest. Videos automatically eliminate boredom and make any topic interesting.
How to add a YouTube video to Google Slide
Use these two methods to add a YouTube video to Google Slides. Via the Search and Direct link.
Method 1. Embed YouTube video to Google Slide by search and selection
Google has owned YouTube since the year 2006. You can, therefore, integrate Google’s products with YouTube easily.
Step 1. First, go to the slide where you want to embed your video.
Step 2. Then choose the “Insert” option from the menu bar and hit the “Video” option.
Step 3. It would be best if you now viewed the “YouTube” search bar to type in the video you want to embed. You can use keywords to search for the video in question and view instant search results.
Step 4. Then select the video you want to embed, and you’ll see it appear on the “Slide.”
Step 5. Format your video. Remember that the entire video will be embedded. You don’t necessarily need the whole video. It is time to select just a brief but relevant clip from the video to use. Then position your video to the right point using the axes from the exact starting point to the finished part you want the video to appear in.
Method 2. Embed YouTube video to Google Slide by direct link
You can engage this method if you want to include the entire video.
Step 1. Get the URL of the specific YouTube video that you want to use.
Step 2. Then go to your browser’s “Address bar” to copy the YouTube link.
Step 3. Next, open the “Presentation” slide to put your video to.
Step 4. Choose the “Insert” tab from the menu bar.
Step 5. Then hit on the “Video” option from the drop-down menu that appears.
Step 6. A new window will open automatically. Choose the “By URL” tab.
Step 7. Then paste the YouTube video URL in the “Paste YouTube URL Here” bar section.
Step 8. Wait for the video file to load and press the “Select” option. The video will immediately appear in the presentation slide. Just drag and drop the video in your preferred position.
Note: You can do a few edits inside the application. Set the timer when your video should start and when to stop. You can also adjust the video player size.
How to choose the right video for your Slides?
Not all videos will make an impact on your Google Slide. You need to use the best shot that adds value to your presentation. These guidelines will help you to settle on the best video.
Be Professional – choose the best video for your presentation. Remember that the video is part of the presentation and carries more weight. Settling for quality video will bring out the professionalism in you.
Relevant – how do you know that what you are showing your audience corresponds to the presentation piece? Ensure that the video you add has something to do with the Google Slide presentation topic. The two should naturally flow to make it easy to understand the whole concept.
Precise – your presentation is not about the video. The ideal length should not exceed 60 seconds. The longer the video, the greater the chance for your audience to lose track along the way.
Know every footage you are working with – this will help you pick the best shots for your presentation. So, learn every aspect of the video before settling down to use it.
Add new content – even though one content may suit several presentations, don’t rely on the same piece each time. Your audience will want to feel something fresh each time you are presenting. So, compose different videos for different scenarios to make that big impact.
Create an eye-catching video for your Slides with Filmora
The video quality matters when it comes to creating your Slides. The best video creator – Filmora – works in simple steps to give you an eye-catching video. It will create videos for all scenarios like marketing, tutorial, gaming, etc.
Key features of Filmora
- It offers you advanced video effects like filters, motion elements, etc
- You can multiply your fun with multiple screens with the Split Screen feature
- Easily change backgrounds using the Green Screen feature
- The speed control lets you fast forward or slow down a special moment
- Import your video clips to social media platforms
- You can also adjust the audio of your tracks using the Audio Mixer feature
Follow this guide to create a video for your slide with Filmora
Step 1. Launch Filmora
First, begin by downloading and installing Filmora on your computer device. Once installed, launch it and allow it to run. You can either create a new project or open an existing project to work on.
Step 2. Create a new project
Here, click on the “New Project” tab on the app’s welcome screen. The editor should load immediately. Then proceed to register the product. Just hit on the “Register” tab.
Step 3. Import video
Check the upper left corner of your screen to see the “Import” tab. Click on it and choose the “Import Media Files” option. Next, navigate to the location of your computer’s local list to select the clip or video you want to edit. Then, hit the “Import” button to add the video to the timeline for editing.
Step 4. Edit video
Drag and drop the raw footage to Filmora’s timeline to begin editing. Here, you can trim, add other video clips, merge, and add effects as you wish. Likewise, you can add opening titles, subtitles, and end credits to your video. More so, this tool offers different templates to use. Just drag and drop the templates you wish to use to a specific location on the timeline.
Step 5. Preview your file
Last but not least, you can preview your files. Click on the “Play” tab to start previewing your video clips. The main essence of this part is to allow you to make the necessary changes to your clips if there is a need.
Step 6. Export and Share
With Filmora, you can export your file to various social media platforms. But first, go to the “Output window” and select the video file format to use. This software supports several output formats to apply to any platform and device. Just click on the “Format” tab and choose the file format to use. Then also change the resolution and other parameters like frame rate and channel of your video in the “Settings” section. Finally, share your video to your YouTube channel and get ready to add the video to the Google Slide presentation.
For Win 7 or later (64-bit)
For macOS 10.12 or later
Conclusion
● You now know how to put a YouTube video in Google Slides the simple way. You can search for your YouTube videos or directly use the URL link. Whatever the case, remember that it’s the quality of your video that carries more weight. Thanks to the availability of third-party apps that you can use to create and improve the quality of your videos.
● Filmora is at your service to create high-resolution videos that you can export in any format to your YouTube channel. The tool is intuitive, and it won’t matter whether you haven’t tried it before. It is a perfect choice for both professionals and first-time users.
Also read:
- 2024 Approved Crafting Stories Essential Tips for YouTube Video Editors
- 2024 Approved Cut Down Clutter How to Efficiently Handle Unwanted YouTube Content (PC/Mobile)
- [Updated] Audiovisual Experts' Choices The Ultimate Video Editing Gear
- [Updated] Essential Free Tools Convert YouTube Audio to MP3 on iPhone
- [New] Ensuring Profitability in YouTube with Correct Monetization
- Joyful Views Essential 15 Comical YouTubers to Relax With
- In 2024, Drafting Dynamic Denouements
- 2024 Approved Boost Your Video's Popularity on YouTube
- [Updated] 15 Inspiring YouTube Guides for Aspiring Singers and Instrumentalists
- [Updated] Channel Command Center Mastering Your Digital Domain
- [Updated] Elevate Your Experience in Sub4sub - Prioritize the Essentials First
- In 2024, Closing with Panache Free YouTube's #1 Six
- Transfer Tactics for YouTube to Dailymotion Success
- In 2024, Essential List 6 Free Online Platforms for YouTube Short Downloads
- Empowering Learning Through Educational Videos on YouTube
- [Updated] FREE Best YouTube Video Editor Apps for Android
- [Updated] Embrace Authenticity Your Style Journey Begins Here
- 2024 Approved Capturing Live Sounds Directly From YouTube Videos
- Essential Free Tools Convert YouTube Audio to MP3 on iPhone
- Maximizing Youtube Revenue Understanding AdSense Payments per Thousand Views
- Mobile's Ultimate List The Top 10 Video Apps Sans YouTube
- Boost Traffic with Effective Tools for YouTube Videos
- Elevate Your Content Incorporating Exact Timestamps in Videos
- Enhance Smarts with These Premier 15 Science YTs
- The Roadmap to Engaging YouTube Trailers Through Filmora
- 30 Must-Have YouTube Intros Tools for Beginners, All Free
- 2024 Approved Elevate Your Video Presentations with Top 30 Free Intra Makers
- Superior Mics for Video Blogging Professionals
- [Updated] Cutting-Edge Techniques Elevating Your YouTube Edits Using iMovie
- [Updated] Design Principles for Eye-Catching YT Previews
- Enable Quiet YouTube BGPlay for iPhone & Android
- In 2024, Enhancing Your YouTube Presence with Split-Screen Techniques
- [New] Elite 10 Audio Boosters for OS X, iOS, Android
- Elevating YouTube Productions with Effective Video Lighting
- Mastering Awesome Valorant Thumbnails for YouTube Content
- How to Size Your Videos YouTube's Best Practices Unveiled
- [Updated] Essential Guide to Aspect Ratios for Effective YouTube Engagement
- The Game Plan for Creating a Hit YouTube Introduction Trailer
- Converting Your Twitch Showcase Into a YouTube Hit
- In 2024, DJ Beats Unleashed High-Fidelity Templates Downloaded Easily
- [Updated] Efficient Broadcast Techniques Incorporating YouTube Loops on TV
- Boost YouTube Video Performance with Rapid Rendering Methods for 2024
- In 2024, A 20-Second Symphony Understanding Music's Compact Formats
- 2024 Approved Essential Tips for WireCast Live Streaming to Youtube
- In 2024, Bursting Boundaries, Breaking Barriers The Top Ten Reasons for Your YouTube Viewer Void
- 2024 Approved Cut-to-the-Chase 8 Simple YouTube Thumbnail Builders
- [New] Elevate Your Content's Reach in YouTube Shorts Formats
- Hashtags that Elevate Your Channels' Visibility & Value
- Low-Cost Leverage to YouTube Lore Sponsorship Hacks for Small Spheres
- Updated In 2024, Guide to Acquiring Realistic Bell Noise Samples
- [Updated] In 2024, How to Create a Facebook Account
- [New] Step-by-Step OBS Integration for YouTube & Twitch Viewers
- In 2024, The Ultimate Guide to Samsung Galaxy XCover 6 Pro Tactical Edition Pattern Lock Screen Everything You Need to Know
- Mute Audio and Add New Sound in Windows Movie Maker for 2024
- [New] 5 Elite Apps for Creating GIFs From TikTok Videos Quickly
- In 2024, Zombie Survival Quest - Top 8 Game Guide
- In 2024, A Quick Guide to Xiaomi Redmi 12 FRP Bypass Instantly
- Elite Streamer’s Guide for Secure Viewing for 2024
- [Updated] In 2024, Overcoming Connectivity Issues in Remote Recording
- Updated Unlock Animation Magic Top 8 Photo Animation Tools
- [Updated] Simple Screenshot Pro on Windows 10 for 2024
- [New] 2024 Approved The Complete Guide From Recording to Live on Facebook
- Updated A Detailed Guide to Making Your Pictures Speak
- How To Change Your Apple ID Password On your Apple iPhone XS Max | Dr.fone
- Updated Edit Videos for Free Top Software Without Watermarks This Year
- 2024 Approved Explore the Best 9 GIF Recorders for Windows Seamless Animation Saving
- Unlocking Xbox's Video Call Potential with Zoom
- [New] 2024 Approved TinyTake Screen Recorder Review
- New In 2024, Get Instagram Sounds as MP3 Easy Download Methods
- Spectra Adjustment Suite
- Mens Guide to Leading Female Voices with Technology for 2024
- Updated 2024 Approved 10 High-Quality Digital Aid for Men Desiring Female Speech Patterns
- Updated Free and Functional Video Editing Software for 32-Bit Windows
- Comprehensive Guide to Valheim Flora
- Updated How to Perform Mask Tracking Discovering the Best Methods for 2024
- Fix the Error of Unfortunately the Process.com.android.phone Has Stopped on Itel A05s | Dr.fone
- Title: "[New] DIY GIF Making Transforming YouTube Videos Into Animated Forms"
- Author: Kevin
- Created at : 2024-05-25 16:03:11
- Updated at : 2024-05-26 16:03:11
- Link: https://youtube-videos.techidaily.com/new-diy-gif-making-transforming-youtube-videos-into-animated-forms/
- License: This work is licensed under CC BY-NC-SA 4.0.
