
!["[New] Dive Into DIY The Beginner’s Guide to Eye-Catching Mac Videos"](https://www.lifewire.com/thmb/wqz29Cz8AyngxWXCaflN7goJny4=/400x300/filters:no_upscale():max_bytes(150000):strip_icc()/hero-44ba4dd7731143f4b7ba6398ab667dcb.jpg)
"[New] Dive Into DIY The Beginner’s Guide to Eye-Catching Mac Videos"
Dive Into DIY: The Beginner’s Guide to Eye-Catching Mac Videos
How do Beginners Make a Cool Video for YouTube on Mac

Shanoon Cox
Dec 14, 2023• Proven solutions
To get the right video editors to cut a video for YouTube on your Mac can be a bit of a problem for beginners. It is understandable that there will be a learning curve if you just want to get tons of subscribers on your channel – who doesn’t? Ultimately, in getting a standard video that will attract and sustain the interest of the viewers, you will need to employ certain strategies that will enhance your credibility.
Let’s tell each other the truth, no one wants to watch a video that is not aesthetically appealing even if it is a close friend. So, if you have got the relevant content and the video to pull traffic to your channel, what you will need is editing software that will help you make the correct adjustments to your video
Nobody wants a random viewer to comment “This video is a little bit tacky, touch-up properly”, that will definitely leave a sting. As such, understand the best technique that works for you as well as the software that meets your needs based on the current level of expertise. It is okay for you to grow.

Five Video Cutting Skills Youtubers Must Have
As much as the enthusiasm is brewing to get on your mac and upload the video you just shot, there are certain elements you need to implement to make a cool video for YouTube. Beginners sometimes feel their content is the best, the excitement of posting their very first series can be overwhelming. Sometimes, it blocks off other ideas for making the video better.
However, having amazing content dies not to exclude the need for the right editing technique. Here are five methods for editing your YouTube videos:
1.Control the video duration
The length of a particular scene can have different meanings depending on how long or short it is in a video. This means the duration can impact the message you are trying to pass across to your viewers, hence it is important to know what places to accelerate and cut in the video.
You can have a system where each part of the content is labeled in their order of importance such as A, B, C. This means from the most important to the least important. Consequently, you will be able to sieve through the content and make the appropriate changes while editing the video.
![]()
2.Customize the intro and end of the video
It is possible to grab the attention of the viewer in the intro and even more likely to lose someone once the opening montage comes in. Creating an intro that is captivating and appealing to drag the audience to your video is an important technique for editing your videos. Also, the end of the video, from the signing out to the closing montage has to appeal to the audience. You will be surprised by the number of people that love seeing end credits if the closing montage is good. Customize the intro and the end of the video so the audience is tuned all through.
You May Like: Best YouTube Banner Size and Channel Art Dimension (The Ultimate Guide)
You May Like: How to Add Logo or Watermark to YouTube Video
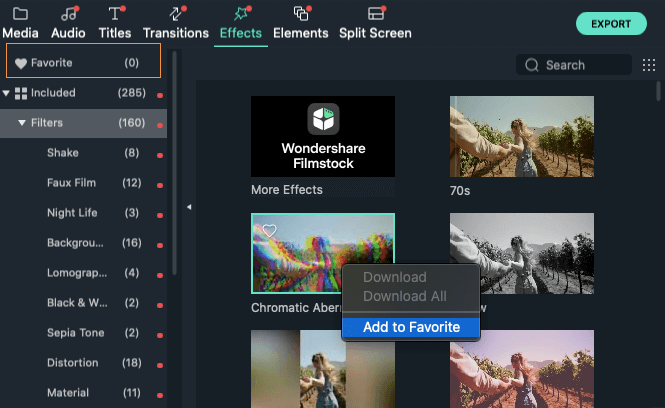
3.Use Cool transitions or filters
If there is anything the audience love to see, it is the way you move from different points in the vudeo. The ability to use transition that does not affect their attention but leaves them wanting more is very key. Use fanciful transitions that do noy hurt the eyes and allows for easy comprehension.
4.Match the cuts
Whatever you cut has to match the next phase of the video. You do not want to leave the audience behind as they will wonder how the last scene correlates with a new one. You need to ensure that all cuts match the next scenes.
5.Cutaway shots
This is very good in providing the audience context. You can take shots of the room or item that you are trying to discuss in your video. If people keep staring at a particular thing for long, they get bored, cutaway shots keep the excitement alive for the audience.
What Editing Software can Meet Your Needs?
As a beginner, it is important to use software that is easily adaptable to your needs. If you want to make a cool video for you be on your mac, getting software that allows you to be creative without confusion is key. Here are two software for making cool YouTube videos for your Mac;
Filmora X
This is one of the simplest yet powerful tools that is lightweight and apt for your Mac. One of the perks of using the Filmora X is the feature that allows you to upload the video directly to YouTube, saving you any extended hassles.


There are also 400+ transition effects as well as a stylish text editor that is fun to use. There is also a built-in music and sound effect feature that enables you to select sounds to match the video you are editing. This is if you do not have the music you want for the video already.
Other pros of Filmora are:
• It has fast rendering sped for your video
• The lifetime price is affordable.
However, there are some disadvantages to the usage of Filmora X, which are:
• The free version contains the Filmora X watermark
• The color grading tool is limited.
Blender
If you are looking for software for the model, game creating, and animation then opting for Blender will be a good fit. You can trim videos, insert filters, and add as many videos as you want.
Pros
- The 3D graphics make it suitable for editing YouTube videos.
- Composting system and node-based material
- It supports your Mac.
Cons:
- It could be slow when running
- Some think it might be a bit complicated.
Although there is other editing software for your Mac, Filmora X simplifies the whole process. If you are looking for quality wrapped in affordability and convenience, then Filmora X will be right for you. Start editing and enjoy the ride!
Learn More: YouTuber Skillshare: Essential Video Cutting Skills For YouTubers
Shanoon Cox
Shanoon Cox is a writer and a lover of all things video.
Follow @Shanoon Cox
Shanoon Cox
Dec 14, 2023• Proven solutions
To get the right video editors to cut a video for YouTube on your Mac can be a bit of a problem for beginners. It is understandable that there will be a learning curve if you just want to get tons of subscribers on your channel – who doesn’t? Ultimately, in getting a standard video that will attract and sustain the interest of the viewers, you will need to employ certain strategies that will enhance your credibility.
Let’s tell each other the truth, no one wants to watch a video that is not aesthetically appealing even if it is a close friend. So, if you have got the relevant content and the video to pull traffic to your channel, what you will need is editing software that will help you make the correct adjustments to your video
Nobody wants a random viewer to comment “This video is a little bit tacky, touch-up properly”, that will definitely leave a sting. As such, understand the best technique that works for you as well as the software that meets your needs based on the current level of expertise. It is okay for you to grow.
Five Video Cutting Skills Youtubers Must Have
As much as the enthusiasm is brewing to get on your mac and upload the video you just shot, there are certain elements you need to implement to make a cool video for YouTube. Beginners sometimes feel their content is the best, the excitement of posting their very first series can be overwhelming. Sometimes, it blocks off other ideas for making the video better.
However, having amazing content dies not to exclude the need for the right editing technique. Here are five methods for editing your YouTube videos:
1.Control the video duration
The length of a particular scene can have different meanings depending on how long or short it is in a video. This means the duration can impact the message you are trying to pass across to your viewers, hence it is important to know what places to accelerate and cut in the video.
You can have a system where each part of the content is labeled in their order of importance such as A, B, C. This means from the most important to the least important. Consequently, you will be able to sieve through the content and make the appropriate changes while editing the video.
![]()
2.Customize the intro and end of the video
It is possible to grab the attention of the viewer in the intro and even more likely to lose someone once the opening montage comes in. Creating an intro that is captivating and appealing to drag the audience to your video is an important technique for editing your videos. Also, the end of the video, from the signing out to the closing montage has to appeal to the audience. You will be surprised by the number of people that love seeing end credits if the closing montage is good. Customize the intro and the end of the video so the audience is tuned all through.
You May Like: Best YouTube Banner Size and Channel Art Dimension (The Ultimate Guide)
You May Like: How to Add Logo or Watermark to YouTube Video
3.Use Cool transitions or filters
If there is anything the audience love to see, it is the way you move from different points in the vudeo. The ability to use transition that does not affect their attention but leaves them wanting more is very key. Use fanciful transitions that do noy hurt the eyes and allows for easy comprehension.
4.Match the cuts
Whatever you cut has to match the next phase of the video. You do not want to leave the audience behind as they will wonder how the last scene correlates with a new one. You need to ensure that all cuts match the next scenes.
5.Cutaway shots
This is very good in providing the audience context. You can take shots of the room or item that you are trying to discuss in your video. If people keep staring at a particular thing for long, they get bored, cutaway shots keep the excitement alive for the audience.
What Editing Software can Meet Your Needs?
As a beginner, it is important to use software that is easily adaptable to your needs. If you want to make a cool video for you be on your mac, getting software that allows you to be creative without confusion is key. Here are two software for making cool YouTube videos for your Mac;
Filmora X
This is one of the simplest yet powerful tools that is lightweight and apt for your Mac. One of the perks of using the Filmora X is the feature that allows you to upload the video directly to YouTube, saving you any extended hassles.
There are also 400+ transition effects as well as a stylish text editor that is fun to use. There is also a built-in music and sound effect feature that enables you to select sounds to match the video you are editing. This is if you do not have the music you want for the video already.
Other pros of Filmora are:
• It has fast rendering sped for your video
• The lifetime price is affordable.
However, there are some disadvantages to the usage of Filmora X, which are:
• The free version contains the Filmora X watermark
• The color grading tool is limited.
Blender
If you are looking for software for the model, game creating, and animation then opting for Blender will be a good fit. You can trim videos, insert filters, and add as many videos as you want.
Pros
- The 3D graphics make it suitable for editing YouTube videos.
- Composting system and node-based material
- It supports your Mac.
Cons:
- It could be slow when running
- Some think it might be a bit complicated.
Although there is other editing software for your Mac, Filmora X simplifies the whole process. If you are looking for quality wrapped in affordability and convenience, then Filmora X will be right for you. Start editing and enjoy the ride!
Learn More: YouTuber Skillshare: Essential Video Cutting Skills For YouTubers
Shanoon Cox
Shanoon Cox is a writer and a lover of all things video.
Follow @Shanoon Cox
Monetizing Your YouTube Channels: Strategies for Success
How To Get Paid on YouTube - From AdSense to your Bank Account

Richard Bennett
Oct 26, 2023• Proven solutions
YouTube is more than a video sharing social network; here’s how to get paid on YouTube. Having an active YouTube channel with decent monthly views can earn you income through advertising. If your channel is set up properly, Google can place ads over your YouTube videos and you can earn money based on how many people see or click on (depends on the ad) those ads while watching your videos.
- The Requirements for YouTube Monetization
- How to Enable Monetization for Your YouTube Channel
- Linking Your Bank Account to Your AdSense Account
- Receiving Payments
Many vloggers receive direct bank deposits of their ad-based revenues every month. In this article, we’ll show you how to monetize your YouTube Channel and how to receive payments to your bank account.
Making Your YouTube Videos Better with Filmora
If you want to earn more money with YouTube videos, your video should be stand out. To achieve that, you should use a powerful video editing software as well. Here, I recommend Wondershare Filmora video editor . As one of the most widely used video editing software among YouTubers, Filmora provides lots of templates and effects which allows you to edit faster and better.
Part 1: The Requirements for YouTube Monetization
Meeting the minimum requirement for YouTube monetization is probably the hardest part of this whole process. About a month ago, you had to have 10,000 lifetime views on your YouTube channel to qualify for monetization. However, earlier this year, Google changed their eligibility requirements and made them even tougher.
As of February 20, 2018, YouTube channels need to have accumulated 4000 hours of ‘watch time’ over the past 12 months and no less than 1000 subscribers to qualify for monetization. If you do not meet these requirements you cannot join the YouTube Partner Program and monetize your YouTube channel.
So, the first step to successful monetization on YouTube is to actually grow your channel. You need to create videos that will attract viewers and engage your audience. You also need to get people to subscribe because this is really what will grow your YouTube channel over time.
Part 2: How To Enable Monetization for Your YouTube Channel
Here’s the step-by-step process for monetizing your YouTube Channel, for those who are qualified.
- Log in to your YouTube account.
- Find your account icon in the top right corner. Click it to find the ‘Creator Studio’ button.
- Click the ‘Creator Studio’ button.
- Click the ‘Channel’ option in the left side menu.
- You’ll see a drop-down menu under ‘Channel’. Click on ‘Status and Features’. This is actually the first option on the menu. It should open by default once you click the ‘Channel’ button.
- Look through the ‘Status and Features’ page and click the ‘Enable’ button beside monetization.

- Clicking the ‘Enable’ button should lead you to another page where the guidelines for monetization are explained. Take the time to read through the guidelines and understand the dos and don’ts of YouTube monetization.
- Once you’ve looked through the guidelines, click the ‘Enable my account’ button to proceed. This will lead you to a page where you’ll be prompted to join the YouTube Partner Program.
- Read through the YouTube Partner Program terms, check the appropriate boxes, and click the ‘accept’ button.
- You’ll be prompted to link an AdSense account.
- Connect an existing AdSense account if you have one or create a new one.
- Once you’re done linking an AdSense account, you’ll be redirected to YouTube. There, select the type of ads you want to run under ‘Monetization Preferences’.
- Click the submit button and wait to find out if your account is approved for monetization.
According to YouTube, it can take up to a week for a decision to be reached on your application.
YouTube will not review your monetization application until you’ve met their eligibility criteria. Even then, your application may be declined if your videos do not follow the community guidelines (i.e. channels which simply repost content from other channels will not be monetized).
Not all videos can be monetized. While there are legal ways to create videos consisting of imagery and footage belonging to others, be aware that such videos are not always eligible for monetization. YouTube will only monetize videos that you own. So, posting videos which do not belong to you or which include copyrighted content can cause your monetization application to be declined.
Part 3: Linking Your Bank Account To Your AdSense Account
AdSense offers a variety of payment options including mailed checks and Western Union transfers. However, these options may not be available to you depending on where you’re based. AdSense does make payments through electronic wire transfer (EFT – Electronic funds transfer) to virtually every country in the world, and this is the preferred payment option for most people.
To have your earnings deposited directly into your account through EFT, you’ll need to link your bank account to your AdSense account.
Here’s a step-by-step guide for linking your bank account to your AdSense account.
- Log in to AdSense via: www.google.com/adsense/start
- Click the ‘Settings’ button in the left panel menu
- Under ‘Settings’, click ‘Payments’.
- On the ‘Payments’ page, click ‘Manage payment options’.
- Click ‘Add payment method’.
- Next, you’ll be prompted to add your bank account details. In general, you will be asked to provide the following:
- Name on the account / account holder’s name
- Bank account number
- Bank name
- Bank SWIFT code
- Depending on where you are based, additional information may be required.
- Ensure that the name on your AdSense account matches the name on the bank account you provide. To edit your AdSense name, click the ‘Manage settings’ button also on the Payments page.
Part 4: Receiving Payments
To get paid by AdSense, you need to reach the $100 threshold. You may wish to set a higher threshold but as a rule, earnings below the $100 will not be processed for payment (you will still receive the money, it will just keep adding up until it gets to $100 and then you’ll be paid).
Also, bear in mind that AdSense follows a monthly payment cycle. This means that a month’s earnings (assuming they meet the threshold requirement) will be paid next month. Usually, direct deposit payments will be processed between the 21st and 26th of every month. That said, it can take up to 10 days for electronic wire payments to be received.
In addition to reaching the payment threshold, be sure that you have no payment hold on your AdSense account. A payment hold can cause your earnings to be withheld even if it has reached the payment threshold.
To avoid a payment hold, be sure to provide the necessary tax information, verify your identity and your address, make sure the bank account linked to your AdSense is verified, and make sure you have not violated any of YouTube’s guidelines and community rules.
Conclusion
Depending on your vlogging skills and the nature of your content (some types of videos get more attention than others), it can take a while for you to be eligible for monetization. And even when you’ve successfully monetized your channel, getting enough views to reach the payment threshold can be tough.
Don’t let this discourage you from working towards earning income from your YouTube channel. Just focus on creating a YouTube channel people will want to watch. That’s how to get paid on YouTube - be sticking with your channel long enough for it to grow.
Richard Bennett
Richard Bennett is a writer and a lover of all things video.
Follow @Richard Bennett
Richard Bennett
Oct 26, 2023• Proven solutions
YouTube is more than a video sharing social network; here’s how to get paid on YouTube. Having an active YouTube channel with decent monthly views can earn you income through advertising. If your channel is set up properly, Google can place ads over your YouTube videos and you can earn money based on how many people see or click on (depends on the ad) those ads while watching your videos.
- The Requirements for YouTube Monetization
- How to Enable Monetization for Your YouTube Channel
- Linking Your Bank Account to Your AdSense Account
- Receiving Payments
Many vloggers receive direct bank deposits of their ad-based revenues every month. In this article, we’ll show you how to monetize your YouTube Channel and how to receive payments to your bank account.
Making Your YouTube Videos Better with Filmora
If you want to earn more money with YouTube videos, your video should be stand out. To achieve that, you should use a powerful video editing software as well. Here, I recommend Wondershare Filmora video editor . As one of the most widely used video editing software among YouTubers, Filmora provides lots of templates and effects which allows you to edit faster and better.
Part 1: The Requirements for YouTube Monetization
Meeting the minimum requirement for YouTube monetization is probably the hardest part of this whole process. About a month ago, you had to have 10,000 lifetime views on your YouTube channel to qualify for monetization. However, earlier this year, Google changed their eligibility requirements and made them even tougher.
As of February 20, 2018, YouTube channels need to have accumulated 4000 hours of ‘watch time’ over the past 12 months and no less than 1000 subscribers to qualify for monetization. If you do not meet these requirements you cannot join the YouTube Partner Program and monetize your YouTube channel.
So, the first step to successful monetization on YouTube is to actually grow your channel. You need to create videos that will attract viewers and engage your audience. You also need to get people to subscribe because this is really what will grow your YouTube channel over time.
Part 2: How To Enable Monetization for Your YouTube Channel
Here’s the step-by-step process for monetizing your YouTube Channel, for those who are qualified.
- Log in to your YouTube account.
- Find your account icon in the top right corner. Click it to find the ‘Creator Studio’ button.
- Click the ‘Creator Studio’ button.
- Click the ‘Channel’ option in the left side menu.
- You’ll see a drop-down menu under ‘Channel’. Click on ‘Status and Features’. This is actually the first option on the menu. It should open by default once you click the ‘Channel’ button.
- Look through the ‘Status and Features’ page and click the ‘Enable’ button beside monetization.
- Clicking the ‘Enable’ button should lead you to another page where the guidelines for monetization are explained. Take the time to read through the guidelines and understand the dos and don’ts of YouTube monetization.
- Once you’ve looked through the guidelines, click the ‘Enable my account’ button to proceed. This will lead you to a page where you’ll be prompted to join the YouTube Partner Program.
- Read through the YouTube Partner Program terms, check the appropriate boxes, and click the ‘accept’ button.
- You’ll be prompted to link an AdSense account.
- Connect an existing AdSense account if you have one or create a new one.
- Once you’re done linking an AdSense account, you’ll be redirected to YouTube. There, select the type of ads you want to run under ‘Monetization Preferences’.
- Click the submit button and wait to find out if your account is approved for monetization.
According to YouTube, it can take up to a week for a decision to be reached on your application.
YouTube will not review your monetization application until you’ve met their eligibility criteria. Even then, your application may be declined if your videos do not follow the community guidelines (i.e. channels which simply repost content from other channels will not be monetized).
Not all videos can be monetized. While there are legal ways to create videos consisting of imagery and footage belonging to others, be aware that such videos are not always eligible for monetization. YouTube will only monetize videos that you own. So, posting videos which do not belong to you or which include copyrighted content can cause your monetization application to be declined.
Part 3: Linking Your Bank Account To Your AdSense Account
AdSense offers a variety of payment options including mailed checks and Western Union transfers. However, these options may not be available to you depending on where you’re based. AdSense does make payments through electronic wire transfer (EFT – Electronic funds transfer) to virtually every country in the world, and this is the preferred payment option for most people.
To have your earnings deposited directly into your account through EFT, you’ll need to link your bank account to your AdSense account.
Here’s a step-by-step guide for linking your bank account to your AdSense account.
- Log in to AdSense via: www.google.com/adsense/start
- Click the ‘Settings’ button in the left panel menu
- Under ‘Settings’, click ‘Payments’.
- On the ‘Payments’ page, click ‘Manage payment options’.
- Click ‘Add payment method’.
- Next, you’ll be prompted to add your bank account details. In general, you will be asked to provide the following:
- Name on the account / account holder’s name
- Bank account number
- Bank name
- Bank SWIFT code
- Depending on where you are based, additional information may be required.
- Ensure that the name on your AdSense account matches the name on the bank account you provide. To edit your AdSense name, click the ‘Manage settings’ button also on the Payments page.
Part 4: Receiving Payments
To get paid by AdSense, you need to reach the $100 threshold. You may wish to set a higher threshold but as a rule, earnings below the $100 will not be processed for payment (you will still receive the money, it will just keep adding up until it gets to $100 and then you’ll be paid).
Also, bear in mind that AdSense follows a monthly payment cycle. This means that a month’s earnings (assuming they meet the threshold requirement) will be paid next month. Usually, direct deposit payments will be processed between the 21st and 26th of every month. That said, it can take up to 10 days for electronic wire payments to be received.
In addition to reaching the payment threshold, be sure that you have no payment hold on your AdSense account. A payment hold can cause your earnings to be withheld even if it has reached the payment threshold.
To avoid a payment hold, be sure to provide the necessary tax information, verify your identity and your address, make sure the bank account linked to your AdSense is verified, and make sure you have not violated any of YouTube’s guidelines and community rules.
Conclusion
Depending on your vlogging skills and the nature of your content (some types of videos get more attention than others), it can take a while for you to be eligible for monetization. And even when you’ve successfully monetized your channel, getting enough views to reach the payment threshold can be tough.
Don’t let this discourage you from working towards earning income from your YouTube channel. Just focus on creating a YouTube channel people will want to watch. That’s how to get paid on YouTube - be sticking with your channel long enough for it to grow.
Richard Bennett
Richard Bennett is a writer and a lover of all things video.
Follow @Richard Bennett
Also read:
- Mirrorless Innovation Taking Over DSLR in Videos?
- Free Online Offer Enjoy a Gallery of 50 YouTube Banners Now
- In 2024, Achieve a Millennium of Subscriber Milestones
- [New] Channel Transformation Through Strategic Use of YouTube Outros
- Loop & Relish YouTube Videos, Double the Delight on Tv
- In 2024, Escaping YouTube Ranked List of 27 Alternative Streaming Services
- From Dull Scenes to Dynamic Sports Highlights
- [New] Breakthrough YouTube Success Essential Tips From Creator Studio Guide
- [Updated] Crafting an Inviting Subscribe Icon for YouTube Videographers
- In 2024, A Quick Tutorial On How To Convert Image To YouTube Thumbnail
- [New] Editing Engine Room
- AJay The Creative Content Creator's Profitable Venture on YouTube for 2024
- [Updated] AudioHarmony Editor for Professional PC Users
- Perfecting Audio on iPhone Select the Best 6 Free Software Choices
- Navigating Common YouTube Short Glitches
- How to Add Logo/Watermark to YouTube Video
- 5-Star Channel Cutting Long URLs Down for YouTube Videos
- In 2024, Earning Potential for Videos Amassing 1 Million Views
- Get Your Digital Dough Worthy With These 50 No-Cost YouTube Promo Tools
- Updated In 2024, FCPX Power User Unlock 40 Time-Saving Keyboard Shortcuts
- Updated In 2024, Demystifying HD Video Pixel Size, Aspect Ratio, and Beyond
- 5 Tutorials on How to Transfer Photos From Apple iPhone 11 Pro to New iPhone | Dr.fone
- Eliminate the Shake Pro-Level Video Stabilization Techniques in FCPX for 2024
- 2024 Approved Reddit Experts Briefly Meet at Snapchat
- In 2024, Disabling iPhone 11 Pro Max Parental Restrictions With/Without Password
- 2024 Approved The Ultimate List of Quotes for TikTok Stars
- In 2024, Top 4 Ways to Trace Samsung Galaxy A54 5G Location | Dr.fone
- [Updated] Practical Ways to Archive Online Discussions for 2024
- In 2024, Which Pokémon can Evolve with a Moon Stone For Oppo Find X7? | Dr.fone
- Title: "[New] Dive Into DIY The Beginner’s Guide to Eye-Catching Mac Videos"
- Author: Kevin
- Created at : 2024-05-25 16:03:02
- Updated at : 2024-05-26 16:03:02
- Link: https://youtube-videos.techidaily.com/new-dive-into-diy-the-beginners-guide-to-eye-catching-mac-videos/
- License: This work is licensed under CC BY-NC-SA 4.0.
