
!["[New] Discover YouTube's Frame Advantage - Five Free Tools"](https://www.lifewire.com/thmb/7ePnXCF2gFQ8xyq1Udqo8WJNlDQ=/400x300/filters:no_upscale():max_bytes(150000):strip_icc()/the-8-best-free-skype-alternatives-of-2020-4842385-2c96b5f9805b4882b777cbbc1533d151.jpg)
"[New] Discover YouTube's Frame Advantage - Five Free Tools"
Discover YouTube’s Frame Advantage - Five Free Tools
How to Go Frame by Frame on YouTube Video? [5 Methods]

Richard Bennett
Mar 27, 2024• Proven solutions
It’s always a handy process to be able to move the frame one by one if you binge-watch YouTube videos. Be it as complex as time-lapse or as simple as makeup tutorial, viewing YouTube video frame-by-frame is never an underestimated process.
To be able to achieve this, you ought to master the methods to move frame-by-frame using a frame by a frame video editor or frame by the frame video player.
But this might make you wonder which one would be best for you?
Then here are some methods to move a video frame-by-frame that may come handy for you.
Option 1: Frame-By-Frame Editing and Watching Video Offline
If you are looking for how to edit frame by frame on YouTube or how to go frame by frame on YouTube then you may use a variety of offline applications.
Below are the 2 highlighting benefits of making use of offline video editors instead of online ones:
- You are not required to have a fast and smooth internet connection once the targeted video has been downloaded and will have full liberty to edit or video vide while staying offline.
- You are granted with the full editing facilities whilst staying offline. You can trim, cut or do any video alterations using offline video editors.
If you don’t know how to download a YouTube video easily and quickly, check this guide on How to Download YouTube Videos without Any Software .
Beneath are some of the efficient offline video editors you can work with for editing and viewing videos of YouTube frame by frame.
How to Go Frame by Frame in YouTube Video Using Filmora
Filmora is a great video editor designed for those who are interested in video editing but lack professional experience. It’s very easy to use. Filmora is free to download. You can choose version that is compatible with your operating system.
Compatibility: Windows and Mac


Step 1: Tap on “New Project”.
Step 2: In “project settings” select the desired ratio rate.
Step 3: You can import files by clicking the “import” tab or drag-drop the desired file to this tool.

Step 4: Drag the file to the timeline.
Step 5: You can separate frames from video by hovering the mouse over the first desired frame and complete it by hovering mouse all the way to the end of the frame.
Step 6: Perform editing operations.
Step 7: Save the file by clicking “export” by selecting the desired format under the “format” option and set parameters in “advanced settings” or directly upload the final product to YouTube.

How to Move Frame by Frame in YouTube Video Using Movie Maker
Compatibility: windows
This video editing tool gives you enough option to perform basic editing. With its timeline option, one can edit the videos frame-by-frame which can be performed as guided below:
Step 1: The first step is to download the desired YouTube video.
Step 2: Import that video to movie maker.
Step 3: You have the facility to skip the video frame-by-frame and can also edit it by selecting a specific portion from the timeline.
Step 4: Tap on “edit” beneath video tools after selecting the targeted portion.
Step 5: You will have numerous editing options like transition, add texts, split, music, etc. for each of the frames one by one.
You may also like: YouTube to WAV File: 4 Best Free Convert Solutions >>
How to Advance Frame by Frame in YouTube Video Using iMovie
Compatibility: Mac
This is a free editing tool with a bundle of editing features. The steps are given below:
Step 1: Click “file”, then “new project” followed by “create” option
Step 2: Click “Import” to import video
Step 3: Tap on “edit” followed by the “play head” option to segregate the desired portion of the video to edit.
Step 4: Now apply editing features on the portion of the video given in this tool
Step 5: Press “share” and “export” option once done with editing.
Option 2: Frame-By-Frame Advancement Using YouTube Player
Why even bother ourselves to get a third-party program for the purpose of moving a video frame-by-frame when the YouTube player provides you the same facility within itself. Following are the steps to guide you about how to skip frame by frame on YouTube by using YouTube frame by frame hotkey:
Step 1: Make the video pause.
Step 2: To answer the query regarding how to go frame by frame on YouTube editor, you can make use of 2 keys on the keyboard which are basically used as a shortcut process for the sake of forwarding video frame-by-frame.
You can press “<” in order to skip a frame backward or you could either use a comma as well for the same purpose. For moving the frame forwards, you need to press “>” key or a full stop key will serve you with the same operation.
This is how to move frame by frame on YouTube.

Option 3: Go Frame-By-Frame In YouTube Video Using Online Application
If your work requires intricate analysis of the video where you have to view the view very closely then you may make use of an online external application for this purpose.
The following are the steps to show you how to advance frame by frame on YouTube using this online tool.
Step 1: Into the URL bar of the browser, paste the link www.watchframebyframe.com there where you will be redirected to the online tool which has quite an easy interface with several controls provided built-in.
Step 2: Tap on “Enter Video URL” box and paste the copied URL of a targeted YouTube video
Step 3: The video will get loaded after hitting enter. At the bottom, buttons are given to control accordingly for skipping the frame forwards and backward respectively.
Step 4: You can also personalize the frame skipping setting with the option given beside the forwards and backward button where you can customize fps (frame per second) setting and also adjust the number of frames to be skipped upon clicking forwards and backward button.
An application granting such diverse options gives precise accuracy level which would help make the learning process easier and accurate.

Where Will Need to Go Frame by Frame on YouTube?
- Viewing time-lapse:
Capturing minor details in a video having time-lapse is such a complicated task. It often becomes harder even after slowing the video down. Therefore, a frame-by-frame view is the perfect yet only way out to this problem.
- Viewing how-to video:
The main purpose of a learning video is to get the sound and thorough details of the process and hence can be made not only possible but easier through frame-by-frame scrolling.
- Video sharing or editing:
Clean editing or cropping from a particular position is an intricate process and becomes easier to pause at the desired moment by frame-by-frame forwarding.
- Learning tutorial
Learning needs an in-depth and clear delivery of the content which is made easier by the feature of frame-by-frame skipping of the video.
YouTube studio is the basement for YouTubers to upload and track their videos. To some newbies, they might don’t know how to use the YouTube Manager. If you happen to be one of them, check this article to get: Everything You Need to Know about YouTube Video Manager >>
Conclusion
The precise control over separate frames as well as set of frames, diverse OS support, and liberty to use a variety of editing features make Wondershare Filmora stand out among all other tools. But depending upon the suitability with respect to one’s available resources, any of the above tool will help you watch and edit YouTube video frame by frame.
Richard Bennett
Richard Bennett is a writer and a lover of all things video.
Follow @Richard Bennett
Richard Bennett
Mar 27, 2024• Proven solutions
It’s always a handy process to be able to move the frame one by one if you binge-watch YouTube videos. Be it as complex as time-lapse or as simple as makeup tutorial, viewing YouTube video frame-by-frame is never an underestimated process.
To be able to achieve this, you ought to master the methods to move frame-by-frame using a frame by a frame video editor or frame by the frame video player.
But this might make you wonder which one would be best for you?
Then here are some methods to move a video frame-by-frame that may come handy for you.
Option 1: Frame-By-Frame Editing and Watching Video Offline
If you are looking for how to edit frame by frame on YouTube or how to go frame by frame on YouTube then you may use a variety of offline applications.
Below are the 2 highlighting benefits of making use of offline video editors instead of online ones:
- You are not required to have a fast and smooth internet connection once the targeted video has been downloaded and will have full liberty to edit or video vide while staying offline.
- You are granted with the full editing facilities whilst staying offline. You can trim, cut or do any video alterations using offline video editors.
If you don’t know how to download a YouTube video easily and quickly, check this guide on How to Download YouTube Videos without Any Software .
Beneath are some of the efficient offline video editors you can work with for editing and viewing videos of YouTube frame by frame.
How to Go Frame by Frame in YouTube Video Using Filmora
Filmora is a great video editor designed for those who are interested in video editing but lack professional experience. It’s very easy to use. Filmora is free to download. You can choose version that is compatible with your operating system.
Compatibility: Windows and Mac
Step 1: Tap on “New Project”.
Step 2: In “project settings” select the desired ratio rate.
Step 3: You can import files by clicking the “import” tab or drag-drop the desired file to this tool.
Step 4: Drag the file to the timeline.
Step 5: You can separate frames from video by hovering the mouse over the first desired frame and complete it by hovering mouse all the way to the end of the frame.
Step 6: Perform editing operations.
Step 7: Save the file by clicking “export” by selecting the desired format under the “format” option and set parameters in “advanced settings” or directly upload the final product to YouTube.
How to Move Frame by Frame in YouTube Video Using Movie Maker
Compatibility: windows
This video editing tool gives you enough option to perform basic editing. With its timeline option, one can edit the videos frame-by-frame which can be performed as guided below:
Step 1: The first step is to download the desired YouTube video.
Step 2: Import that video to movie maker.
Step 3: You have the facility to skip the video frame-by-frame and can also edit it by selecting a specific portion from the timeline.
Step 4: Tap on “edit” beneath video tools after selecting the targeted portion.
Step 5: You will have numerous editing options like transition, add texts, split, music, etc. for each of the frames one by one.
You may also like: YouTube to WAV File: 4 Best Free Convert Solutions >>
How to Advance Frame by Frame in YouTube Video Using iMovie
Compatibility: Mac
This is a free editing tool with a bundle of editing features. The steps are given below:
Step 1: Click “file”, then “new project” followed by “create” option
Step 2: Click “Import” to import video
Step 3: Tap on “edit” followed by the “play head” option to segregate the desired portion of the video to edit.
Step 4: Now apply editing features on the portion of the video given in this tool
Step 5: Press “share” and “export” option once done with editing.
Option 2: Frame-By-Frame Advancement Using YouTube Player
Why even bother ourselves to get a third-party program for the purpose of moving a video frame-by-frame when the YouTube player provides you the same facility within itself. Following are the steps to guide you about how to skip frame by frame on YouTube by using YouTube frame by frame hotkey:
Step 1: Make the video pause.
Step 2: To answer the query regarding how to go frame by frame on YouTube editor, you can make use of 2 keys on the keyboard which are basically used as a shortcut process for the sake of forwarding video frame-by-frame.
You can press “<” in order to skip a frame backward or you could either use a comma as well for the same purpose. For moving the frame forwards, you need to press “>” key or a full stop key will serve you with the same operation.
This is how to move frame by frame on YouTube.
Option 3: Go Frame-By-Frame In YouTube Video Using Online Application
If your work requires intricate analysis of the video where you have to view the view very closely then you may make use of an online external application for this purpose.
The following are the steps to show you how to advance frame by frame on YouTube using this online tool.
Step 1: Into the URL bar of the browser, paste the link www.watchframebyframe.com there where you will be redirected to the online tool which has quite an easy interface with several controls provided built-in.
Step 2: Tap on “Enter Video URL” box and paste the copied URL of a targeted YouTube video
Step 3: The video will get loaded after hitting enter. At the bottom, buttons are given to control accordingly for skipping the frame forwards and backward respectively.
Step 4: You can also personalize the frame skipping setting with the option given beside the forwards and backward button where you can customize fps (frame per second) setting and also adjust the number of frames to be skipped upon clicking forwards and backward button.
An application granting such diverse options gives precise accuracy level which would help make the learning process easier and accurate.
Where Will Need to Go Frame by Frame on YouTube?
- Viewing time-lapse:
Capturing minor details in a video having time-lapse is such a complicated task. It often becomes harder even after slowing the video down. Therefore, a frame-by-frame view is the perfect yet only way out to this problem.
- Viewing how-to video:
The main purpose of a learning video is to get the sound and thorough details of the process and hence can be made not only possible but easier through frame-by-frame scrolling.
- Video sharing or editing:
Clean editing or cropping from a particular position is an intricate process and becomes easier to pause at the desired moment by frame-by-frame forwarding.
- Learning tutorial
Learning needs an in-depth and clear delivery of the content which is made easier by the feature of frame-by-frame skipping of the video.
YouTube studio is the basement for YouTubers to upload and track their videos. To some newbies, they might don’t know how to use the YouTube Manager. If you happen to be one of them, check this article to get: Everything You Need to Know about YouTube Video Manager >>
Conclusion
The precise control over separate frames as well as set of frames, diverse OS support, and liberty to use a variety of editing features make Wondershare Filmora stand out among all other tools. But depending upon the suitability with respect to one’s available resources, any of the above tool will help you watch and edit YouTube video frame by frame.
Richard Bennett
Richard Bennett is a writer and a lover of all things video.
Follow @Richard Bennett
Mastering the Art of Attention Retention on YouTube with These 6 Tactics
6 Ways To Increase Audience Retention on YouTube
Richard Bennett
Mar 27, 2024• Proven solutions
Audience retention is one of your most important stats on YouTube. It is even more important than your view count. Your view count really only tells you how many people are finding and clicking on your videos, not whether they are actually watching them. Audience retention refers to how much of a video a viewer watches before clicking away, which is very useful information to have. If you know when people are leaving your videos then you know what you need to work on.
You May Also Like: How to analyse your and your competitors’ YouTube Channel >>
How to structure a YouTube video >>
- Part 1: What is Audience Retention?
- Part 2: How to See Your Audience Retention Report in YouTube?
- Part 3: What is a Good Audience Retention Rate on YouTube?
- Part 4: 6 Ways to Increase YouTube Audience Retention
Part 1: What is Audience Retention?
To put it in simple terms, YouTube audience retention is about how much of each video your viewers watch. It’s usually expressed as a percentage, so if your viewer gets half way through, they will have a retention of 50 per cent.
For YouTube analytics, audience retention is taken as a mean of the retention figures for each of your viewers. For example, if you post a ten-minute video and half your viewers get to the five-minute mark, that’s a retention of 50 per cent. If the other half watch it right to the end, that’s a retention of 100 per cent. The mean of these two figures is 75 per cent, and that’s what YouTube will use as your audience retention figure.
This retention rate affects how highly your video is ranked on YouTube, with videos boasting higher audience retention rates appearing higher in the search results than those which do not. This is because both YouTube and Google are highly focussed on customer satisfaction, and a long watch time means a very happy customer was watching that video. For this reason, it’s well worth considering how to increase YouTube audience retention as it demonstrates that you’re making great content as well as helping you get more viewers.
Part 2: How to See Your Audience Retention Report in YouTube?
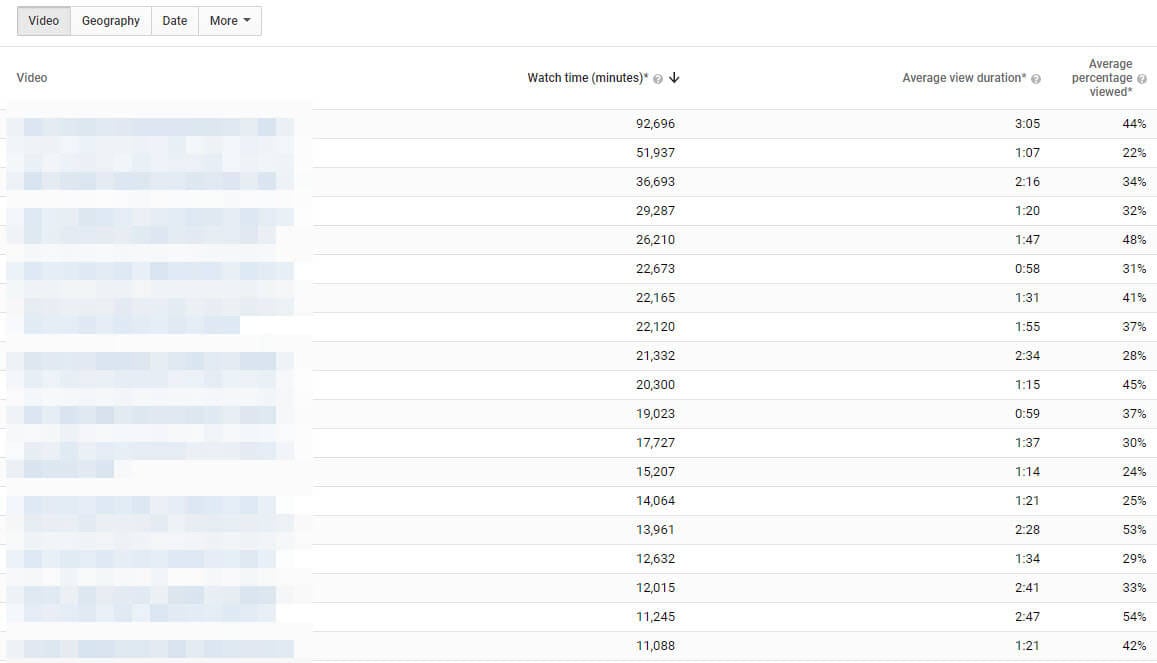
YouTube will produce reports to help you keep track of your audience retention. There are two types of audience retention reports; absolute and relative. Absolute allows you to view a graph of your video’s retention and see when people might be clicking away, or if they are skipping to later parts of your video. If you lose a lot of viewers in the first 15 seconds of your videos then that is a clear indication that your content is not what the viewers who find your videos really want. The relative report is where your video is compared to the average retention of similar videos.
Note that by ‘similar videos’, YouTube means videos of a similar length. There is no way to compare your videos only to other videos in your genre. The relative report will always be somewhat skewed because your videos will be measured against very different content.
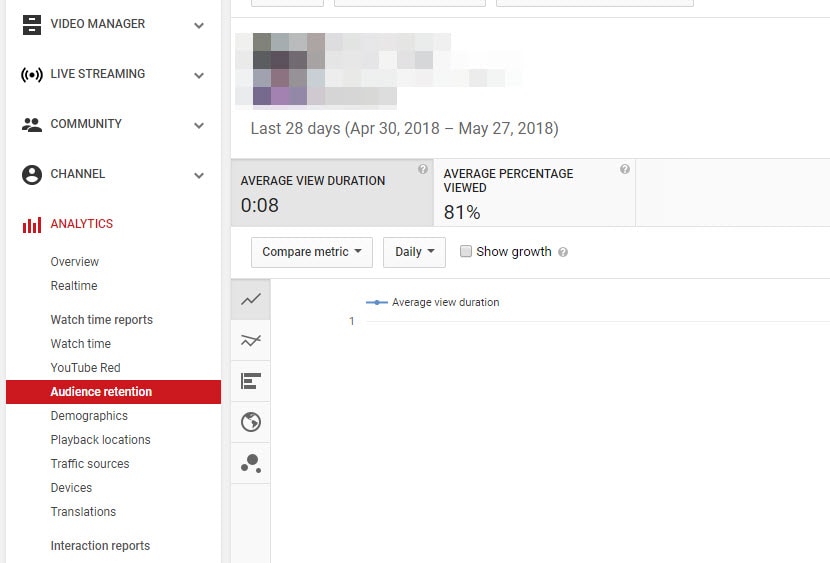
To see an audience retention report log into your YouTube account and go to yourCreator Studio. There, selectAudience RetentionunderAnalytics.
Part 3: What is a Good Audience Retention Rate on YouTube?
When you’re considering how to increase YouTube audience retention, it can be good to have a goal in mind. Obviously 100 per cent is going to be the Holy Grail of retention rates, but how many videos are actually going to achieve that? It only takes for one person to ‘accidentally’ click on your video and rapidly click away, or for someone to have to stop for outside reasons, to drag your average down.
According to the YouTube community, a good goal to aim for is around 50 per cent, but as there is a lot which can affect your retention rate, that number may be different for you. Low view numbers sometimes get higher retention rates because it’s mainly subscribers watching, whereas channels with millions of views may suffer due to more people abandoning. Rather than setting yourself a golden number, focus instead on increasing your retention rate from wherever it is now, and celebrate your own success instead of measuring yourself against others.
Part 4: 6 Ways to Increase YouTube Audience Retention
If you’re serious about learning how to increase YouTube audience retention, here are five of the best ideas for you:
1. Compare your videos
Investigating your audience retention report will highlight the videos where you achieved maximum success. Think about what you did here, and work to replicate that technique. Perhaps you were talking about a product, or maybe your structured your video slightly differently. It’s up to you to dissect your video and find out what it was that kept people watching for longer, so that you can repeat this success in the future. You can also use some influencer marketing platform such as InflueNex to take a look at the videos in your similar channels, and learn the popular videos on their channels.
2. Get on with it
Research shows that YouTube viewers have an incredibly short attention span. Depending on who you believe, you could have as much as six seconds or as little as just three to grab their attention and compel them to carry on watching. If you want to improve your audience retention, coming in with an engaging, attention grabbing statement right at the start is crucial to your success. Nobody wants to waste their time watching someone waffle on for ages about their granny or their favorite hobbies, so get right down to it straight away, by telling them what’s in store.
3. Make it visually engaging
Perhaps all you’ve got is a presentation to make. You’re not a gamer, you’re not showing clips of your cat and you’re not doing a makeup tutorial, so surely all you need is a camera, good lighting and your face, right? Wrong. Viewers like to see the visual content changing, and videos which have a range of scenes are usually far more successful than those where it’s just a person talking to camera. Think about how you can insert cutaways, pop up text, different footage and other graphics to keep it interesting for your viewers.
4. Make it shorter
This one is a no brainer really. If you make a one-minute video, how hard is it going to be to keep viewers watching to the end compared to a 20-minute marathon. However, going too short can be negative too, unless you really do have something very quick and simple to showcase. Long videos work well for YouTubers in the gaming niche, in particular, because viewers want to know the end result, but for most of us, these sorts of viewing statistics are hard to reach.
If you consider a viewer who watches three minutes of your content, would you rather they watched three minutes of a ten-minute video and then clicked away bored, or would you rather they finished an entire video that was only three minutes long? Both in terms of audience retention and of your own reputation, having a viewer finish a short video is much more valuable to you than losing someone half way through a long one. That person probably enjoyed your content to the end and will more than likely watch another one of your videos. Conversely, the one you lost half way through was bored enough to stop watching and will probably not bother viewing any other videos of yours in future.
5. Keep them hooked
Think carefully about your YouTube video structure. Ideally, you will tell them at the very start that you’ve got something amazing to share with them later on. This could be a tip, a tutorial, a new product reveal or even something funny. Whatever it is, tell them they’re going to love it from the start, and keep reminding them to watch from the end to get this gift. That doesn’t mean you shouldn’t give them great content all the way through, just that you should save a carrot for the end of the ride to reward those loyal viewers.
So, now you know how to increase YouTube audience retention, what are you going to do about it? Have a go at modifying your videos to boost the numbers who will watch to the end and let us know how you got on.
6. Use an Excellent Video Editor
Content is the king. It is necessary to use a powerful video editor to help you edit videos. With an excellent video editor like Filmora, you can custom stunning videos effortlessly.
Richard Bennett
Richard Bennett is a writer and a lover of all things video.
Follow @Richard Bennett
Richard Bennett
Mar 27, 2024• Proven solutions
Audience retention is one of your most important stats on YouTube. It is even more important than your view count. Your view count really only tells you how many people are finding and clicking on your videos, not whether they are actually watching them. Audience retention refers to how much of a video a viewer watches before clicking away, which is very useful information to have. If you know when people are leaving your videos then you know what you need to work on.
You May Also Like: How to analyse your and your competitors’ YouTube Channel >>
How to structure a YouTube video >>
- Part 1: What is Audience Retention?
- Part 2: How to See Your Audience Retention Report in YouTube?
- Part 3: What is a Good Audience Retention Rate on YouTube?
- Part 4: 6 Ways to Increase YouTube Audience Retention
Part 1: What is Audience Retention?
To put it in simple terms, YouTube audience retention is about how much of each video your viewers watch. It’s usually expressed as a percentage, so if your viewer gets half way through, they will have a retention of 50 per cent.
For YouTube analytics, audience retention is taken as a mean of the retention figures for each of your viewers. For example, if you post a ten-minute video and half your viewers get to the five-minute mark, that’s a retention of 50 per cent. If the other half watch it right to the end, that’s a retention of 100 per cent. The mean of these two figures is 75 per cent, and that’s what YouTube will use as your audience retention figure.
This retention rate affects how highly your video is ranked on YouTube, with videos boasting higher audience retention rates appearing higher in the search results than those which do not. This is because both YouTube and Google are highly focussed on customer satisfaction, and a long watch time means a very happy customer was watching that video. For this reason, it’s well worth considering how to increase YouTube audience retention as it demonstrates that you’re making great content as well as helping you get more viewers.
Part 2: How to See Your Audience Retention Report in YouTube?
YouTube will produce reports to help you keep track of your audience retention. There are two types of audience retention reports; absolute and relative. Absolute allows you to view a graph of your video’s retention and see when people might be clicking away, or if they are skipping to later parts of your video. If you lose a lot of viewers in the first 15 seconds of your videos then that is a clear indication that your content is not what the viewers who find your videos really want. The relative report is where your video is compared to the average retention of similar videos.
Note that by ‘similar videos’, YouTube means videos of a similar length. There is no way to compare your videos only to other videos in your genre. The relative report will always be somewhat skewed because your videos will be measured against very different content.
To see an audience retention report log into your YouTube account and go to yourCreator Studio. There, selectAudience RetentionunderAnalytics.
Part 3: What is a Good Audience Retention Rate on YouTube?
When you’re considering how to increase YouTube audience retention, it can be good to have a goal in mind. Obviously 100 per cent is going to be the Holy Grail of retention rates, but how many videos are actually going to achieve that? It only takes for one person to ‘accidentally’ click on your video and rapidly click away, or for someone to have to stop for outside reasons, to drag your average down.
According to the YouTube community, a good goal to aim for is around 50 per cent, but as there is a lot which can affect your retention rate, that number may be different for you. Low view numbers sometimes get higher retention rates because it’s mainly subscribers watching, whereas channels with millions of views may suffer due to more people abandoning. Rather than setting yourself a golden number, focus instead on increasing your retention rate from wherever it is now, and celebrate your own success instead of measuring yourself against others.
Part 4: 6 Ways to Increase YouTube Audience Retention
If you’re serious about learning how to increase YouTube audience retention, here are five of the best ideas for you:
1. Compare your videos
Investigating your audience retention report will highlight the videos where you achieved maximum success. Think about what you did here, and work to replicate that technique. Perhaps you were talking about a product, or maybe your structured your video slightly differently. It’s up to you to dissect your video and find out what it was that kept people watching for longer, so that you can repeat this success in the future. You can also use some influencer marketing platform such as InflueNex to take a look at the videos in your similar channels, and learn the popular videos on their channels.
2. Get on with it
Research shows that YouTube viewers have an incredibly short attention span. Depending on who you believe, you could have as much as six seconds or as little as just three to grab their attention and compel them to carry on watching. If you want to improve your audience retention, coming in with an engaging, attention grabbing statement right at the start is crucial to your success. Nobody wants to waste their time watching someone waffle on for ages about their granny or their favorite hobbies, so get right down to it straight away, by telling them what’s in store.
3. Make it visually engaging
Perhaps all you’ve got is a presentation to make. You’re not a gamer, you’re not showing clips of your cat and you’re not doing a makeup tutorial, so surely all you need is a camera, good lighting and your face, right? Wrong. Viewers like to see the visual content changing, and videos which have a range of scenes are usually far more successful than those where it’s just a person talking to camera. Think about how you can insert cutaways, pop up text, different footage and other graphics to keep it interesting for your viewers.
4. Make it shorter
This one is a no brainer really. If you make a one-minute video, how hard is it going to be to keep viewers watching to the end compared to a 20-minute marathon. However, going too short can be negative too, unless you really do have something very quick and simple to showcase. Long videos work well for YouTubers in the gaming niche, in particular, because viewers want to know the end result, but for most of us, these sorts of viewing statistics are hard to reach.
If you consider a viewer who watches three minutes of your content, would you rather they watched three minutes of a ten-minute video and then clicked away bored, or would you rather they finished an entire video that was only three minutes long? Both in terms of audience retention and of your own reputation, having a viewer finish a short video is much more valuable to you than losing someone half way through a long one. That person probably enjoyed your content to the end and will more than likely watch another one of your videos. Conversely, the one you lost half way through was bored enough to stop watching and will probably not bother viewing any other videos of yours in future.
5. Keep them hooked
Think carefully about your YouTube video structure. Ideally, you will tell them at the very start that you’ve got something amazing to share with them later on. This could be a tip, a tutorial, a new product reveal or even something funny. Whatever it is, tell them they’re going to love it from the start, and keep reminding them to watch from the end to get this gift. That doesn’t mean you shouldn’t give them great content all the way through, just that you should save a carrot for the end of the ride to reward those loyal viewers.
So, now you know how to increase YouTube audience retention, what are you going to do about it? Have a go at modifying your videos to boost the numbers who will watch to the end and let us know how you got on.
6. Use an Excellent Video Editor
Content is the king. It is necessary to use a powerful video editor to help you edit videos. With an excellent video editor like Filmora, you can custom stunning videos effortlessly.
Richard Bennett
Richard Bennett is a writer and a lover of all things video.
Follow @Richard Bennett
Also read:
- Guide YouTube to MP4 - Ensuring Data Security
- Leveraging YouTube Top 5 Digital Strategies for Brand Success
- In 2024, 1 Ranked YouTube to Text Online Service
- 10 Tips to Make Your YouTube Shorts Channels Stand Out
- Navigating the World of Social Media with a Focused Brand
- [Updated] Breakthrough Vids The Titans of 100 Million YouTube Views
- 2024 Approved Decoding the Best of Beauty YouTube's Elite Artists Showcased
- In 2024, Ace's Top 10 List Choosing Superior Capture Cards
- 2024 Approved Building Inspiring Lifestyle Content for Viewers
- Unleashing Revenue with Review Videos of Household Items
- Skyrocket Your Video Discovery with These Essential YouTube SEO Insights
- Access the Archived Unique Methods for Viewing Old YouTube
- [New] Audio Alchemy Free, Perfectly Crafted DJ Template Videos
- Transfer Tactics for Seamless Online Video Sharing
- Cutting Down Complexity The Simplified Guide to Youtube 4K Submissions
- 2024 Approved Cutting-Edge Techniques for iOS Users Uploading Videos to YouTube
- [Updated] Audio Visual Caption Builder
- Dynamic, Animated, and Personalized Filmora Subscribe Button for YouTube for 2024
- [New] Blitzing Sharing Easy YouTube Playlist Methods
- Dive Into the Do's and Don'ts of YouTube Beauty Channels for 2024
- Masterclass Crafting Cinematic YouTube Videos with Adobe Premiere
- In 2024, Effortless Audio Transfer on iPhone Pick Top 6 Tools to Convert YouTube
- [Updated] Rhythm Rulers Elevating Instagram Posts with Songs for 2024
- [New] 'PixelPress' Mastering the Art of Screen Recording
- [Updated] Infusing Personality Into Instagram Stories with Unique Icons for 2024
- [Updated] Tips & Tricks for Adding Media in Instagram
- Edit and Send Fake Location on Telegram For your Infinix Note 30 in 3 Ways | Dr.fone
- Free digital signature for PDF v1.1 document
- In 2024, Here are Some of the Best Pokemon Discord Servers to Join On Oppo F23 5G | Dr.fone
- [Updated] Expert 8 Download for FB Movies for 2024
- Audiophile's Guide to the Premier 8 4K Blu-Rays for 2024
- [New] 5 Easy Steps to Record Voice on Your Windows 11 PC
- [Updated] From Boring to Breathtaking Insta Video Tips for 2024
- New Amplify Animated Photo with Acoustic Elements via Win 10/11 for 2024
- [Updated] SoundCheck Summary for 2024
- The Ultimate Guide to Uniform Focus in Teamblend Calls
- In 2024, Navigating Instagram’s Question Marker Magic
- In 2024, Is Fake GPS Location Spoofer a Good Choice On Tecno Spark Go (2023)? | Dr.fone
- [Updated] Proven Methods for Crafting Big Head Effects in TikTok (3 Approaches)
- Title: "[New] Discover YouTube's Frame Advantage - Five Free Tools"
- Author: Kevin
- Created at : 2024-05-25 16:02:28
- Updated at : 2024-05-26 16:02:28
- Link: https://youtube-videos.techidaily.com/new-discover-youtubes-frame-advantage-five-free-tools/
- License: This work is licensed under CC BY-NC-SA 4.0.
