
![[New] Direct Twitch Stream Transfer to YouTube Playback](https://www.lifewire.com/thmb/jevn_ZQZhYjRiW3CTTFu74aAcbY=/400x300/filters:no_upscale():max_bytes(150000):strip_icc()/why-car-battery-keeps-dying-4125506-a2fbb3e180be4fcfb8bdf42bd8ae1bb6.png)
[New] Direct Twitch Stream Transfer to YouTube Playback
Direct Twitch Stream Transfer to YouTube Playback
Create High-Quality Video - Wondershare Filmora
An easy and powerful YouTube video editor
Numerous video and audio effects to choose from
Detailed tutorials provided by the official channel
Amidst many online applications is Twitch. This live streaming platform takes your experience to another level. You can use it to make crafts, play games, attract broadcasters, and many more. Twitch was launched in 2011, and since then, it has attracted millions of users, managing a database of about 4 million broadcasters by early 2020. With it, users can stream their activities as others watch in real-time. Just browse a category to find a stream.
You can also follow streamers that you like on the platform and get updates and notifications immediately after they are posted. But how do you start a career on a platform like Twitch? You need to broadcast and gather a large following. You can use built-in audiences from other platforms like Facebook. Let’s dive into the core of the matter and look at how to upload Twitch streams to YouTube and build your platform.

In this article
02 What is the benefit of uploading your Twitch Streams to YouTube
03 How to upload your Twitch Streams to YouTube
What is Twitch VOD?
Twitch Video on Demand (VOD) is a recording of previously streamed content. It provides briefings if you missed catching the Twitch live stream. Just watch the VOD from your favorite streamer and be engaged the best way possible. However, VODs don’t last forever. They are removed after two weeks of broadcast. But streamers with Partner Status can have their VODs last up to 60 days.
- How to enable Twitch VOD?
VODs are the best form to archive streams that your fans missed. Even though they are not enabled by default, you can manually enable them and not let your fans miss any important event from your channel. They’ll find it under the “Videos” tab on any Twitch channel. Follow these steps to enable VOD on your channel.
Step 1. Go to your profile icon in the top right corner of Twitch
Check in the “Channel & Video” section and locate the “Stream Key & Preferences” menu.

Step 2. Click on “Creator Dashboard”
Remember, you can enable VODs from your creator dashboard. Just go under the “Settings” tab and click on the “Stream section” of the creator dashboard. Check under the subtitle “VOD Settings” and get the option to store past broadcasts. You can also toggle the slider to store your past broadcasts.

Step 3 Click on the “Settings” tab on the left-hand side and go to Stream
You’ll get various drop-down menu options. Click on the “Settings” tab and choose the “Stream” option. The system will navigate to a new page, thus setting your preferences for VODs and clips.
Step 4. Go to “VOD Settings” and toggle on the “Store Past Broadcast.”
Ensure you have the toggle option turned ON under the “VOD Settings.” If it’s “ON,” you’ll realize the toggle will be purple, with a checkmark in it. Twitch will be confirmed to be enabled if it’s purple.

- Frequently Asked Question about Twitch VOD
These are some questions frequently asked by Twitch users.
1. How long will Twitch store my VOD
Your Twitch can either be stored for 14 or 60 days, depending on your level. For Twitch Prime, Twitch Partner or a Twitch Turbo user has their past broadcasts automatically saved for 60 days before deletion. But if you are not connected to these three options, your past broadcasts will be saved for only 14 days before deletion.
Since your past broadcasts cannot be live for more than 60 days, you have the option to download the video to your computer before the validity days expire and Twitch deletes it. You can use an External Hard drive to save the past broadcast content. Likewise, it is possible to turn your past broadcast content into Highlight and, in turn, permanently store them on Twitch.
2. What is the difference between Twitch VOD, Highlights, and Clips
Twitch VOD is a previously saved video of your live stream content. You choose to save either part or the entire content of your previously streamed content. More so, you don’t need any additional requirements to use VOD.
Highlights are short videos that have been edited from your past broadcast content. You can save them on Twitch permanently. Streamers majorly use highlights to save video game achievements. Unlike VOD Twitch that can be saved up to 60 days, Highlights usually lasts no more than 3 minutes.
- To make Highlights on Twitch, first, navigate to your Dashboard.
- Then scroll down and click on “Content” > “Video Producer.
- Next, press on “All Videos” to change them to “Past Broadcasts.”
- Now press the “Highlight” button, and Twitch will immediately open a new tab for “Twitch Highlighter Tool.”
- Then select the video part to include as “Highlight” and press the “Create Highlights” button.
- Wait a while for the process to be completed, and Voila! You have your Highlights created.
When it comes to Twitch Clip, you can capture special moments in a stream you are currently watching. On the same note, you can share clips with friends and other users on social media platforms. Such shared clips contain a link where others view the source or video from.
The clips you create will automatically be saved on the streamer’s channel on the “Clips” page, where other viewers can see them too. Nonetheless, you can download “clips” to your computer and, in turn, upload them whenever you want to. And note that you can help your stream grow via “Clips” by letting your viewers clip and share your stream moments.
- To create “Clips” on Twitch, identify which Streamers channel you wish to create a clip from.
- Then click on the “Clapper board” icon. Next, edit your clip between 5 and 60 seconds long.
- Finally, create a title and publish your Clip. You’ll also enjoy the privilege to share your clip’s link to other social media networks.
What is the benefit of uploading your Twitch Streams to YouTube
You stand to gain a lot when you upload your Twitch Streams to YouTube.
1) To enlighten your followers
Your followers will see your streams and make the best decisions. Viewers can check out your recordings and other highlights from past streams. It will help them decide whether they like what they see and probably join your live streams.
2) Twitch provides content for you to share and monetize on YouTube
Since Twitch streaming is more popular nowadays, many people throng it for content. It is not wise to rely entirely on Twitch to discover as a Twitch Streamer. Posting to YouTube will make it known within a short time. You would have announced your streams most nobly and kept your followers up to date, attracting new ones as well.
3) To keep your followers engaged even when you are offline
Even though live streaming is important, some viewers may not attend the live sessions due to different time zones or other commitments. In this regard, when uploaded to YouTube, Twitch will give them a chance to watch your content just whenever they log in. They, therefore, have the option to watch a Twitch VOD of the live stream they missed.
How to upload your Twitch Streams to YouTube
Check how to upload Twitch streams to YouTube from the Twitch website.
Step 1. Identify the little arrow next to your name on the Twitch website and click on it. Then click on the “Video Producer” to take you to a list of your Twitch videos.

Step 2. Check out and click on the “three-dots” on the video you wish to upload to YouTube. Click on the “Export” tab.
Step 3. A menu will then pop up. Here, you can fill in the description, title, and tags that you would like to appear on the YouTube video. There is an option for Twitch to split your video automatically. If you wish so, then tick the “Checkbox” to enable it. Then click on the “Start Export” option to export your Twitch streams to YouTube.

Bouns! Edit Your Twitch Video with Filmora
The quality of your video matters when it comes to uploading Twitch Streams to YouTube. Using a third-party tool to edit your video is the first step in ensuring your videos communicate meaningful content. Filmora comes in handy to bring your imaginations to life. Use it for simple creation without limits, even for beginners.
- Use it to track moving objects in video clips
- Easily match any image of the selected clip
- Its powerful tools let you edit your video by cropping, splitting, adjusting speed, etc
- The video keyframe easily indicates the beginning and end of the parameters
For Win 7 or later (64-bit)
For macOS 10.12 or later
Conclusion
● Don’t just focus on how to upload Twitch streams to YouTube but also consider the quality of video you are posting to YouTube. Remember, your video quality will speak much more of you than any other description. So, strive to produce quality videos using the best tool, Filmora. The app is easy to use and will elevate your views and imaginations through your video in the most impactful way.
Amidst many online applications is Twitch. This live streaming platform takes your experience to another level. You can use it to make crafts, play games, attract broadcasters, and many more. Twitch was launched in 2011, and since then, it has attracted millions of users, managing a database of about 4 million broadcasters by early 2020. With it, users can stream their activities as others watch in real-time. Just browse a category to find a stream.
You can also follow streamers that you like on the platform and get updates and notifications immediately after they are posted. But how do you start a career on a platform like Twitch? You need to broadcast and gather a large following. You can use built-in audiences from other platforms like Facebook. Let’s dive into the core of the matter and look at how to upload Twitch streams to YouTube and build your platform.
In this article
02 What is the benefit of uploading your Twitch Streams to YouTube
03 How to upload your Twitch Streams to YouTube
What is Twitch VOD?
Twitch Video on Demand (VOD) is a recording of previously streamed content. It provides briefings if you missed catching the Twitch live stream. Just watch the VOD from your favorite streamer and be engaged the best way possible. However, VODs don’t last forever. They are removed after two weeks of broadcast. But streamers with Partner Status can have their VODs last up to 60 days.
- How to enable Twitch VOD?
VODs are the best form to archive streams that your fans missed. Even though they are not enabled by default, you can manually enable them and not let your fans miss any important event from your channel. They’ll find it under the “Videos” tab on any Twitch channel. Follow these steps to enable VOD on your channel.
Step 1. Go to your profile icon in the top right corner of Twitch
Check in the “Channel & Video” section and locate the “Stream Key & Preferences” menu.
Step 2. Click on “Creator Dashboard”
Remember, you can enable VODs from your creator dashboard. Just go under the “Settings” tab and click on the “Stream section” of the creator dashboard. Check under the subtitle “VOD Settings” and get the option to store past broadcasts. You can also toggle the slider to store your past broadcasts.
Step 3 Click on the “Settings” tab on the left-hand side and go to Stream
You’ll get various drop-down menu options. Click on the “Settings” tab and choose the “Stream” option. The system will navigate to a new page, thus setting your preferences for VODs and clips.
Step 4. Go to “VOD Settings” and toggle on the “Store Past Broadcast.”
Ensure you have the toggle option turned ON under the “VOD Settings.” If it’s “ON,” you’ll realize the toggle will be purple, with a checkmark in it. Twitch will be confirmed to be enabled if it’s purple.
- Frequently Asked Question about Twitch VOD
These are some questions frequently asked by Twitch users.
1. How long will Twitch store my VOD
Your Twitch can either be stored for 14 or 60 days, depending on your level. For Twitch Prime, Twitch Partner or a Twitch Turbo user has their past broadcasts automatically saved for 60 days before deletion. But if you are not connected to these three options, your past broadcasts will be saved for only 14 days before deletion.
Since your past broadcasts cannot be live for more than 60 days, you have the option to download the video to your computer before the validity days expire and Twitch deletes it. You can use an External Hard drive to save the past broadcast content. Likewise, it is possible to turn your past broadcast content into Highlight and, in turn, permanently store them on Twitch.
2. What is the difference between Twitch VOD, Highlights, and Clips
Twitch VOD is a previously saved video of your live stream content. You choose to save either part or the entire content of your previously streamed content. More so, you don’t need any additional requirements to use VOD.
Highlights are short videos that have been edited from your past broadcast content. You can save them on Twitch permanently. Streamers majorly use highlights to save video game achievements. Unlike VOD Twitch that can be saved up to 60 days, Highlights usually lasts no more than 3 minutes.
- To make Highlights on Twitch, first, navigate to your Dashboard.
- Then scroll down and click on “Content” > “Video Producer.
- Next, press on “All Videos” to change them to “Past Broadcasts.”
- Now press the “Highlight” button, and Twitch will immediately open a new tab for “Twitch Highlighter Tool.”
- Then select the video part to include as “Highlight” and press the “Create Highlights” button.
- Wait a while for the process to be completed, and Voila! You have your Highlights created.
When it comes to Twitch Clip, you can capture special moments in a stream you are currently watching. On the same note, you can share clips with friends and other users on social media platforms. Such shared clips contain a link where others view the source or video from.
The clips you create will automatically be saved on the streamer’s channel on the “Clips” page, where other viewers can see them too. Nonetheless, you can download “clips” to your computer and, in turn, upload them whenever you want to. And note that you can help your stream grow via “Clips” by letting your viewers clip and share your stream moments.
- To create “Clips” on Twitch, identify which Streamers channel you wish to create a clip from.
- Then click on the “Clapper board” icon. Next, edit your clip between 5 and 60 seconds long.
- Finally, create a title and publish your Clip. You’ll also enjoy the privilege to share your clip’s link to other social media networks.
What is the benefit of uploading your Twitch Streams to YouTube
You stand to gain a lot when you upload your Twitch Streams to YouTube.
1) To enlighten your followers
Your followers will see your streams and make the best decisions. Viewers can check out your recordings and other highlights from past streams. It will help them decide whether they like what they see and probably join your live streams.
2) Twitch provides content for you to share and monetize on YouTube
Since Twitch streaming is more popular nowadays, many people throng it for content. It is not wise to rely entirely on Twitch to discover as a Twitch Streamer. Posting to YouTube will make it known within a short time. You would have announced your streams most nobly and kept your followers up to date, attracting new ones as well.
3) To keep your followers engaged even when you are offline
Even though live streaming is important, some viewers may not attend the live sessions due to different time zones or other commitments. In this regard, when uploaded to YouTube, Twitch will give them a chance to watch your content just whenever they log in. They, therefore, have the option to watch a Twitch VOD of the live stream they missed.
How to upload your Twitch Streams to YouTube
Check how to upload Twitch streams to YouTube from the Twitch website.
Step 1. Identify the little arrow next to your name on the Twitch website and click on it. Then click on the “Video Producer” to take you to a list of your Twitch videos.
Step 2. Check out and click on the “three-dots” on the video you wish to upload to YouTube. Click on the “Export” tab.
Step 3. A menu will then pop up. Here, you can fill in the description, title, and tags that you would like to appear on the YouTube video. There is an option for Twitch to split your video automatically. If you wish so, then tick the “Checkbox” to enable it. Then click on the “Start Export” option to export your Twitch streams to YouTube.
Bouns! Edit Your Twitch Video with Filmora
The quality of your video matters when it comes to uploading Twitch Streams to YouTube. Using a third-party tool to edit your video is the first step in ensuring your videos communicate meaningful content. Filmora comes in handy to bring your imaginations to life. Use it for simple creation without limits, even for beginners.
- Use it to track moving objects in video clips
- Easily match any image of the selected clip
- Its powerful tools let you edit your video by cropping, splitting, adjusting speed, etc
- The video keyframe easily indicates the beginning and end of the parameters
For Win 7 or later (64-bit)
For macOS 10.12 or later
Conclusion
● Don’t just focus on how to upload Twitch streams to YouTube but also consider the quality of video you are posting to YouTube. Remember, your video quality will speak much more of you than any other description. So, strive to produce quality videos using the best tool, Filmora. The app is easy to use and will elevate your views and imaginations through your video in the most impactful way.
Curating the Perfect Mix: A Youtube Playlist Manual
How to Create a Playlist on YouTube

Richard Bennett
Mar 27, 2024• Proven solutions
Want to watch the missed-out episodes of your favorite serial? As well know it irritates to find out every single episode on order? But why to worry when YouTube has a separate playlist on your famous tv-series. Want to watch new trending music of 2020? YouTube has a playlist for it. Missing comedy videos from the favorite show on TV? YouTube has a playlist on it. Need to know different ideas about marketing on improving your brand? Yes, you got my point. There is a playlist on YouTube for that as well.

Although it isn’t the latest one on the Internet, it is still the unbeatable application that brings everything in a single screen from trending tunes, entertaining videos, industry backgrounds, and the latest news to your notice that happens every second. Especially if you are an individual with a marketing background or a brand developer, YouTube playlists can do a lot from its side? Need to know what are its benefits and how to create a playlist on YouTube? You are in the right spot.
- Part 1: What is a YouTube Playlist?
- Part 2: YouTube Channel vs. YouTube Playlist
- Part 3: Benefits of Creating a playlist on YouTube
- Part 4: How to Make a YouTube Playlist?
- Part 5: Tips to Improve Your Video SEO
What is a YouTube Playlist?
Irritated from surfing over the Internet for videos related to your concept or topic you are searching for? Else are you a party-hard person who needs continuously playing of fantastic music to keeping the fun going? YouTube playlists are the better option: a collection of videos that keep playing in order, sequentially, and play one after another automatically unless you change it manually.
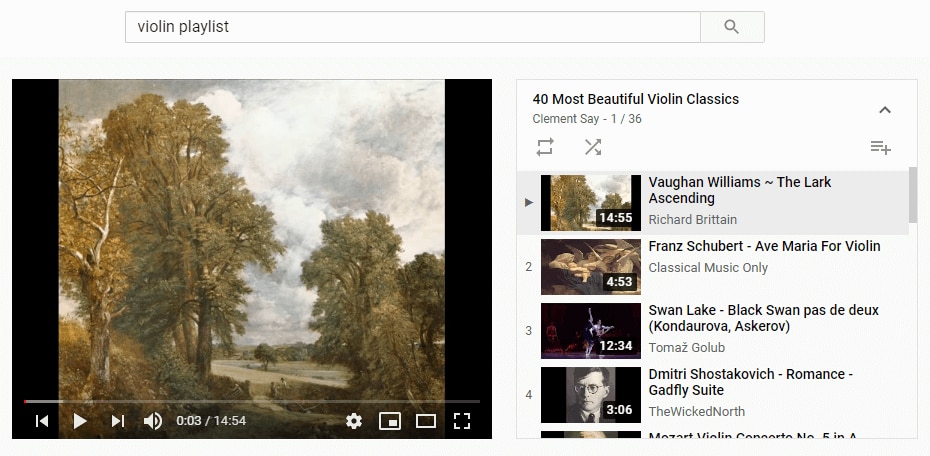
It is closely related to the music playlists like the ones we find in Spotify and Apple music. Different playlists on YouTube are available in all genres, like entertainment, fun, relaxation, thrilling, and educational niches. Do you have a monotonous routine at the office? Let’s play something crazy and fun-filled like the comedy series or bloopers? Need some workout ideas? Check out the compilation of different custom fitness workouts as a playlist on YouTube. Whatever you want, you can find everything in YouTube playlists.
It is a fantastic app that can do wonders that one could think. Besides being used for the fun-filled purposes, they are content curation tools that can be used by marketers as a platform to attract customers and engage with them with various product videos under a single roof called playlists.
If you are a tricky person who has a changing mindset and different mood-offs, you can create your playlists that combine all your favorite videos from varied niches.
Difference between a Channel and a Playlist on YouTube
There are times where one gets confused with the YouTube channels and playlists. While some say they are similar, the fact is both are different. A person with a specific name creates a channel, and it is the place where the person posts all the videos or uploads them for his/her subscribers to get likes and more audience.
But YouTube playlists are auto-generated contents that consist of videos from different channels but with the same content concept. For example, a PewDiePie channel will have his uploaded videos. Still, PewDiePie playlists will have all his videos and the ones similar to his stream but off the channel. Likewise, self-created playlists will have videos that you have saved to see them later or often.
What are the benefits of a playlist on YouTube?
There are various YouTube and video creators who have undervalued playlists’ importance, and hence the hidden benefits are often off-screen. So, we have listed the top 5 reasons why YouTube playlists are essential and how a YouTuber can benefit from playlists.
1. YouTube playlists help you organize videos in order
YouTube these days appears scattered with numerous information where some are important at the critical instances of time. You also have some playlists that are the effective ones grouped based on a common theme. Suppose your company focuses on selling musical equipment. In that case, you can make separate playlists for a guitar or pianos so that viewers can come across different equipment styles, available variants allowing them to navigate through various parts in your channel. Alongside this, you can tell your viewers what the YouTube channel or the organization is all about at first glance as the first impression is the best expression!
2. Increase the rank of your video
If your video gets added to a playlist, there are high chances for it to be in the YouTube watchlist even it is less popular but related to the ones that the audience prefers. In turn, this act raises your video’s rank as the “total watch time” is a vital factor that drives your video to the highly ranked video list.
3. Playlists account to discoverability and improve visibility on search engines
Apart from being enlisted as single videos, individual videos indexed in playlists get opportunities to appear on the search engines based on the keywords. Playlists are bread slices packed with jam as keywords providing likelihood to emerge on multiple times. But to catch the gain of this method, one has to enrich the video with an outstanding keyword, titles, or description and optimize the video with remarkable SEO techniques.
4. Get more views
When your video comes under a theme and is categorized, the YouTube algorithm places it over with the other related to each other. The next time, your video will appear on the right sidebar below the “related videos.” As the video plays automatically, one after the other, the number of views increases. “Amazing playlists can make viewers watch it longer!”
5. Playlists are best for video SEO
Such playlists can boost and help one to reach your YouTube channel. Especially when it comes to educators or artists, they provide value and save time. Playlists get ranked for keywords that help your audience in reaching you on YouTube.
How to Make a YouTube Playlist?
Surprised to know that a simple playlist has handy benefits that you weren’t aware of still now? Are you excited and eager to create your playlists on YouTube? Here is a step-by-step guide that will guide you on how to make a playlist on YouTube.
1. Open your channel page on YouTube
To start with, open your YouTube channel page and tap the “Customize Channel” button.
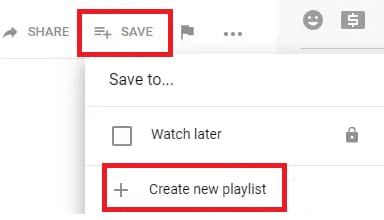
2. Create your YouTube playlist
Now, find or select the video you wish to add to the playlist. To save it, click on the “Plus” icon. You can click on “Watch later” that will add the video to your already created playlist from the drop-down.
3. Give the playlist a name
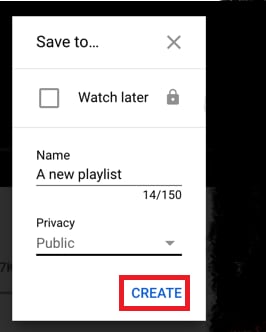
Name your new YouTube playlist and make sure it fulfills the criteria of a maximum of 150 characters. Specify the privacy level and make it to the public so that anyone can view it. Once satisfied, tap the “Create” option.
4. Your YouTube playlist is now live
You have successfully made the playlist and added the video to find by clicking on the “Library” option.
Tips to Improve Your Video SEO
As said before, to improve your video playlist and bring it to rank, optimizing your playlists with SEO is mandatory.
1. Make use of appealing titles and depiction
While many viewers don’t prefer reading through the entire description, the title and the Metadata are the major factors that attract viewers at first glance. Hence, pay attention and spend time to build and craft an appealing title. Give importance to the thumbnail image and ensure that it is engaging.
2. Concentrate on keywords
Surf through the various playlists and find keywords used in popular videos related to your niche. Remember, keywords can be included in your titles and increase the chances of increasing the ranking of the video.
3. Prefer the optimal video hosting platform
Set a goal and choose a wise video hosting platform to gain traffic and generate new leads. Before deciding with the right one, consider making trails or find a review from the Internet.
Conclusion
So, now you know every nook and corner on the answers to how to make YouTube playlists and create them through a simple guide yourself. Besides using it for product marketing or brand deliverance, you can use it to make your YouTube channel a popular one. Yes, do you have a collection of videos to showcase the world? Upload them on YouTube as a playlist and optimize it with SEO tips discussed today. Maybe it is an ASMR video or a vlogging one. It can help in reaching your YouTube target audience for sure!
Richard Bennett
Richard Bennett is a writer and a lover of all things video.
Follow @Richard Bennett
Richard Bennett
Mar 27, 2024• Proven solutions
Want to watch the missed-out episodes of your favorite serial? As well know it irritates to find out every single episode on order? But why to worry when YouTube has a separate playlist on your famous tv-series. Want to watch new trending music of 2020? YouTube has a playlist for it. Missing comedy videos from the favorite show on TV? YouTube has a playlist on it. Need to know different ideas about marketing on improving your brand? Yes, you got my point. There is a playlist on YouTube for that as well.
Although it isn’t the latest one on the Internet, it is still the unbeatable application that brings everything in a single screen from trending tunes, entertaining videos, industry backgrounds, and the latest news to your notice that happens every second. Especially if you are an individual with a marketing background or a brand developer, YouTube playlists can do a lot from its side? Need to know what are its benefits and how to create a playlist on YouTube? You are in the right spot.
- Part 1: What is a YouTube Playlist?
- Part 2: YouTube Channel vs. YouTube Playlist
- Part 3: Benefits of Creating a playlist on YouTube
- Part 4: How to Make a YouTube Playlist?
- Part 5: Tips to Improve Your Video SEO
What is a YouTube Playlist?
Irritated from surfing over the Internet for videos related to your concept or topic you are searching for? Else are you a party-hard person who needs continuously playing of fantastic music to keeping the fun going? YouTube playlists are the better option: a collection of videos that keep playing in order, sequentially, and play one after another automatically unless you change it manually.
It is closely related to the music playlists like the ones we find in Spotify and Apple music. Different playlists on YouTube are available in all genres, like entertainment, fun, relaxation, thrilling, and educational niches. Do you have a monotonous routine at the office? Let’s play something crazy and fun-filled like the comedy series or bloopers? Need some workout ideas? Check out the compilation of different custom fitness workouts as a playlist on YouTube. Whatever you want, you can find everything in YouTube playlists.
It is a fantastic app that can do wonders that one could think. Besides being used for the fun-filled purposes, they are content curation tools that can be used by marketers as a platform to attract customers and engage with them with various product videos under a single roof called playlists.
If you are a tricky person who has a changing mindset and different mood-offs, you can create your playlists that combine all your favorite videos from varied niches.
Difference between a Channel and a Playlist on YouTube
There are times where one gets confused with the YouTube channels and playlists. While some say they are similar, the fact is both are different. A person with a specific name creates a channel, and it is the place where the person posts all the videos or uploads them for his/her subscribers to get likes and more audience.
But YouTube playlists are auto-generated contents that consist of videos from different channels but with the same content concept. For example, a PewDiePie channel will have his uploaded videos. Still, PewDiePie playlists will have all his videos and the ones similar to his stream but off the channel. Likewise, self-created playlists will have videos that you have saved to see them later or often.
What are the benefits of a playlist on YouTube?
There are various YouTube and video creators who have undervalued playlists’ importance, and hence the hidden benefits are often off-screen. So, we have listed the top 5 reasons why YouTube playlists are essential and how a YouTuber can benefit from playlists.
1. YouTube playlists help you organize videos in order
YouTube these days appears scattered with numerous information where some are important at the critical instances of time. You also have some playlists that are the effective ones grouped based on a common theme. Suppose your company focuses on selling musical equipment. In that case, you can make separate playlists for a guitar or pianos so that viewers can come across different equipment styles, available variants allowing them to navigate through various parts in your channel. Alongside this, you can tell your viewers what the YouTube channel or the organization is all about at first glance as the first impression is the best expression!
2. Increase the rank of your video
If your video gets added to a playlist, there are high chances for it to be in the YouTube watchlist even it is less popular but related to the ones that the audience prefers. In turn, this act raises your video’s rank as the “total watch time” is a vital factor that drives your video to the highly ranked video list.
3. Playlists account to discoverability and improve visibility on search engines
Apart from being enlisted as single videos, individual videos indexed in playlists get opportunities to appear on the search engines based on the keywords. Playlists are bread slices packed with jam as keywords providing likelihood to emerge on multiple times. But to catch the gain of this method, one has to enrich the video with an outstanding keyword, titles, or description and optimize the video with remarkable SEO techniques.
4. Get more views
When your video comes under a theme and is categorized, the YouTube algorithm places it over with the other related to each other. The next time, your video will appear on the right sidebar below the “related videos.” As the video plays automatically, one after the other, the number of views increases. “Amazing playlists can make viewers watch it longer!”
5. Playlists are best for video SEO
Such playlists can boost and help one to reach your YouTube channel. Especially when it comes to educators or artists, they provide value and save time. Playlists get ranked for keywords that help your audience in reaching you on YouTube.
How to Make a YouTube Playlist?
Surprised to know that a simple playlist has handy benefits that you weren’t aware of still now? Are you excited and eager to create your playlists on YouTube? Here is a step-by-step guide that will guide you on how to make a playlist on YouTube.
1. Open your channel page on YouTube
To start with, open your YouTube channel page and tap the “Customize Channel” button.
2. Create your YouTube playlist
Now, find or select the video you wish to add to the playlist. To save it, click on the “Plus” icon. You can click on “Watch later” that will add the video to your already created playlist from the drop-down.
3. Give the playlist a name
Name your new YouTube playlist and make sure it fulfills the criteria of a maximum of 150 characters. Specify the privacy level and make it to the public so that anyone can view it. Once satisfied, tap the “Create” option.
4. Your YouTube playlist is now live
You have successfully made the playlist and added the video to find by clicking on the “Library” option.
Tips to Improve Your Video SEO
As said before, to improve your video playlist and bring it to rank, optimizing your playlists with SEO is mandatory.
1. Make use of appealing titles and depiction
While many viewers don’t prefer reading through the entire description, the title and the Metadata are the major factors that attract viewers at first glance. Hence, pay attention and spend time to build and craft an appealing title. Give importance to the thumbnail image and ensure that it is engaging.
2. Concentrate on keywords
Surf through the various playlists and find keywords used in popular videos related to your niche. Remember, keywords can be included in your titles and increase the chances of increasing the ranking of the video.
3. Prefer the optimal video hosting platform
Set a goal and choose a wise video hosting platform to gain traffic and generate new leads. Before deciding with the right one, consider making trails or find a review from the Internet.
Conclusion
So, now you know every nook and corner on the answers to how to make YouTube playlists and create them through a simple guide yourself. Besides using it for product marketing or brand deliverance, you can use it to make your YouTube channel a popular one. Yes, do you have a collection of videos to showcase the world? Upload them on YouTube as a playlist and optimize it with SEO tips discussed today. Maybe it is an ASMR video or a vlogging one. It can help in reaching your YouTube target audience for sure!
Richard Bennett
Richard Bennett is a writer and a lover of all things video.
Follow @Richard Bennett
Also read:
- 2024 Approved Become a Shorts Connoisseur Must-Know Facts
- [New] Boost Engagement with Effortless Youtube Thumbnail Tips
- 2024 Approved 10 Unique Video Reaction Strategies for Online Enthusiasts
- Elevate Your Sound Experience Subscribe to 20 YouTube Sounds for 2024
- Explore 10 YouTube Creators Accelerating Their Popularity
- Elevating Engagement The Pillars of YouTube Rankings
- [New] Boost Visibility with a Bespoke YouTube Channel URL
- In 2024, Ace's Top 10 List Choosing Superior Capture Cards
- Solving Shorts Thumbnail Absence on YouTube
- [Updated] Crafting Content that Captures Audiences' Hearts
- Guidelines for Effective Use of CC Licenses
- Best Practices for YouTube Thumbnail Dimensions for 2024
- DIY Digital Storytelling Making Moving Pictures on Your Smartphone for 2024
- 10 Best ASMR Recorders for Exceptional Audio Quality
- Elevate Your Videography Insights on YouTube Studio Editor for 2024
- In 2024, Earnings Expertise in Streams A Comparative Study
- [Updated] Channel Character A Comprehensive Guide to Templates
- [New] Elevate Your Video Presentations with Top 30 Free Intra Makers
- Avoid Blandness in Your Vids Top Recommended YouTube Thumbnail Heights for 2024
- In 2024, Capturing Quality Lens Recommendations for Content Makers
- Strategic Branding Techniques for Higher YouTube Followings
- [New] 24/7 Real-Time Follower Analysis
- 2024 Approved A Comprehensible Explanation of YouTube's Viewership Puzzle
- The Ultimate Explanation of YouTube Keyword Optimization
- [Updated] Compilation World's Leading YouTube Mp3 Downloaders
- Uncover the 10 Best Makeup Experts on YouTube You Can't Ignore
- [New] Enhancing Your Video's Final Impression
- [New] Effortless Keyword Harvesting Explore the Best 7 No-Fee Tag Extractors
- [New] Comprehensive Directory Extracting Youtube Intros
- Optimizing Income A Trifecta Methodology for YouTube Earnings Assessment
- [New] Efficiency at Fingertips Swiftly Upload Videos From iPhone/iPad to YouTube
- 2024 Approved Ban Unwanted YouTube Recommended Titles
- [New] Demystifying Mukbang A Comprehensive Production Guide
- Charting Innovative Territory with Youtubers’ Best Ad Work
- 2024 Approved Become a YT Hub Pro Complete Guide Revealed
- 2024 Approved Charting the Upward Momentum Top 8 Skyrocketing YouTube Sites
- The Art of Initiating Your YouTube Content Compellingly
- 15 Best Funny YouTube Channels to Watch When You're Bored
- [New] Beginning Your Journey to Digital Creation
- In 2024, Digital Dominance YouTube's Best Female Gamers
- [New] 2024 Approved Comprehensive Guide to Enhancing TikToks Adding Texts Professionally
- [New] 2024 Approved Top 5 Android Games for True PS2 Virtual Gaming Adventures
- New Unleashing the Power of XML in Final Cut Pro X for 2024
- [New] The Alchemy of Animation in Snapchat Videos
- [Updated] 2024 Approved Crafting Captivating Narratives on Snapchat A Treasury of Over a Hundred Ideas for Stories
- Life360 Circle Everything You Need to Know On Oppo Find N3 Flip | Dr.fone
- How to Bypass FRP on Oppo Reno 10 5G?
- [New] Pro Tips for Capturing Stunning IGTV Content on Mobile & DSLR
- Smartphone/DSLR Cameras's Optimal Gimbals Uncovered #1-#10
- New Make a DVD From Your Videos A Tutorial for Windows and Mac Users
- New In 2024, Best Song Embedding Services The Top 15 Sites & Applications for Adding Music to Media Projects
- [Updated] Unmatched Top 10 Tools for Making Stellar TikTok Videos (Windows) for 2024
- Title: [New] Direct Twitch Stream Transfer to YouTube Playback
- Author: Kevin
- Created at : 2024-05-25 16:01:55
- Updated at : 2024-05-26 16:01:55
- Link: https://youtube-videos.techidaily.com/new-direct-twitch-stream-transfer-to-youtube-playback/
- License: This work is licensed under CC BY-NC-SA 4.0.
