
!["[New] Cutting Through the Clutter YouTube's Copyright Evolution"](https://www.lifewire.com/thmb/Pb5zO1GNPyBGQRr3Uny72CPxxAc=/400x300/filters:no_upscale():max_bytes(150000):strip_icc()/004-how-to-see-everyone-on-google-meet-5088410-3eeb6cb239b84b20a4eb9c000cf45dd7.jpg)
"[New] Cutting Through the Clutter YouTube's Copyright Evolution"
Cutting Through the Clutter: YouTube’s Copyright Evolution
The Ultimate Guide to YouTube Copyright

Richard Bennett
Nov 01, 2022• Proven solutions
One of the trickiest terrains for new YouTubers to navigate is the land of copyright rules.
We get it, it’s confusing and stressful, especially when what you want to focus on is making videos, but instead, you are worried about getting your account terminated or being sued.
Can you or can’t you use that song or that clip from the movie? That’s all you want to know.
In this article, we are going to address the key areas that YouTubers need to understand when it comes to YouTube copyright. What is okay and what isn’t? What may be considered risky or what would be worth taking a chance?
Remember that everything discussed in this article is only best practices and shouldn’t be taken as definitive legal advice.
Now that we are set, let’s dive in:
Part 1: What is Fair Use?
When we talk about YouTube copyright, we have to talk about fair use.
Without fair use, there wouldn’t be any flexibility for creators. There wouldn’t be mashups, parodies, or lip dubs. Without fair use, any video with copyright content such as music in the background or a reference to a scene from a famous movie will require approval from the content owner and can be removed. Because of fair use, you can publish a video with copyrighted material in it and not have to ask anyone.
Think of fair use as exceptions to copyright rules.
Part 2: What YouTube Considers Fair Use
There are a few aspects YouTube looks at when it comes to determining whether creators are using copyrighted content that meets the fair use exceptions.
- Is the copyrighted content being creatively or purposefully used?
- Are there more original content used than copyrighted content in the video?
- Will your video benefit the original copyrighted content?
Part 3: Types of Content That Meet Fair Use
Some acceptable styles of videos that allow you to exercise fair use are:
Critiques and Reviews: You can use clips of a movie that you review or play a chorus from a song that you are analyzing in a video and it will be okay to use because it’s serving a purpose of educating the viewer.
Tutorials and Commentary: A YouTube gamer streaming the video games and making comments throughout, that is within fair use, because it can be said that it is giving the video game exposure. Additionally, anything that can be classified as tutorials can also fall under fair use. If you have a video teaching people how to play a famous song, like The Beatles’ Let It Be , on piano, that’s fine!
Mashups: Mashups tend to be built entirely out of copyrighted material, but when done well this style of videos are very creative and often serve to promote the original work as opposed to replacing it.
There couldn’t be two more different movies than Toy Story and Fight Club, but somehow thanks the the creativity of a YouTube creator, there is a now a mashup of it. Some might call it an abomination, but this type of recycled art takes skills and planning, and it wouldn’t exist without fair use.
Parody: Imitation for comedic or dramatic effect is an artistic pursuit as long as it is done in a transformative manner. What does transformative mean? It means in some way, the original is being examined.
In this example from The Hillywood Show, we see a parody of both BBC’s Sherlock Holmes and Macklemore & Ryan Lewis’s Thrift Shop. The nuisance of the show and song recreated are there, but nobody who enjoys the originals will sit down and appreciate it in the same way. A parody is in no way trying to replace the original, but rather using the subject, structure, and style of the original as a vessel to another creative work.
Part 4: What To Do When You Get a YouTube Copyright Strike
If you are reading this, you may have already gotten a YouTube copyright strike.
This may have surprised you. Don’t be too concerned. If it was a mistake, the copyright strike merely acts as a warning, letting you know that the content in your video is copyrighted material.
However, if you were to get 3 copyright strikes in 90 days, you may be penalized by:
- Having all your accounts and videos removed
- Not being able to create a new channel
So what should you do? Here are the steps to take after you receive a copyright strike:
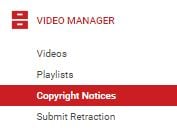
- Review the copyright strike by going into Creator Studio > Video Manager > Copyright notice
- Click on the “Copyright Strike” link beside the flagged video to see details
- Decide how to respond to the strike:
- Allow the strike to expire after 90 days and complete the YouTube’s copyright school
- Contact the person who reported your video and get the claim retracted
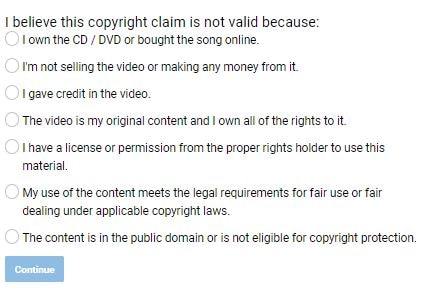
- Dispute the claim with a counter notification
Part 5: 5 Ways to Avoid Copyright Strike
It’s not always clear what YouTube deems fair use, but there are a few things you can do to improve your chances of meeting the qualification.
1. Use non-fictional copyright content instead of creative and fictional copyrighted content. You’ll have a better chance of meeting fair use if you use footages from a news broadcast than you would from a movie or television show.
The intent is clear when using non-fictional copyright content, such as in Bad Lip Reading. They aren’t trying to rebroadcast the Mark Zuckerberg integration, they are parodying it. The easier it is for the public to recognize that the content is from a source, and understand that the creator isn’t trying to take credit for it, the more likely it’ll pass the fair use qualification.
However, if Bad Lip Reading posted the content without lip dubbing, then one can argue that they are taking views away from the original news sources and that wouldn’t be fair use.
2. Make sure your video with copyrighted content isn’t replacing the original one. Only use enough of the source material to get your point across and ensure you are not negatively affecting the original through views and sales.
In this example from Screen Prism, we see scenes from Wes Anderson movies all through the video, however, it is not replacing any of the original films. In fact, you can say that because of this video, people will be motivated to go and watch a Wes Anderson movie, those benefiting the original creator.
3. The copyrighted material is essential to your video. Whether the copyrighted content is needed in order to illustrate a point or if that one moment from a well-recognized movie helps tie together the message, as long as the copyrighted material is serving the video in some significant way, then it will be consider fair use.
4. Give the original creator credit. Just because you give the original creator credit doesn’t mean you can rightfully use their content, however, it does give you a better chance at avoiding copyright strike. Most often, the original creators simply want credit for their work. If they see that you have noted that the content was made by them, it will only give them more exposure.
5. Keep it short. There is no precise number of seconds or ratio of copyrighted to original footage you should have in your video to qualify as fair use. But generally, if the copyrighted clip is short and/or broken up, then it stands a better chance at being approved by YouTube.
Part 6: What to Do When Other YouTubers Are Copying Your Content
As a new YouTuber, it’s a little freaky to think that someone is taking your content and republishing it or using your creations in their video without your permission.
If you ever notice that your content is being copied without your approval — if they have duplicated your video completely or is using your video without giving credit — and it is not benefiting your channel in any way, don’t worry, YouTube is designed to protect you.
Steps to Report Copyright Infringements on YouTube
- View the video that contains your copyrighted material.
- Click on “Report”
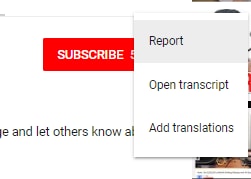
- Select “Infringes my rights” in the pop up window and click “infringes my copyright” in the dropdown options.

- Supply additional information to the report form, including the URL of the video infringing your copyrighted content and the URL of your own video.
- Submit report and wait for an email confirmation that the infringing content has been removed.
Part 7: YouTube Copyright Match
In 2018, YouTube launched a new feature called Copyright Match Tool, which automatically finds videos that are very similar or the same as the ones you’ve created. This gives you the power to determine what to do once you know the video exist.
- You can choose to do nothing.
- You can contact the publisher.
- You can report the video to YouTube for removal.
Key Takeaways
I hope this article has clarified what you can and cannot do with copyrighted content. Here is a quick summary of what we touched on in this post:
- Avoid having 3 copyright strikes on your channel at all costs.
- When using copyrighted material, ensure it is essential to the video and you are not overdoing it.
- Make sure that the copyrighted content does not take views and sales away from the original source.
- Strive to use the copyrighted content in a transformative way, as a parody or a commentary, to educate or inform.
- Give the original creator credit or have it benefit the original by giving more publicity.
- Report any creator that is infringing on your content.
Got any questions on YouTube copyright? Leave a comment below and we’ll help you answer it.
Richard Bennett
Richard Bennett is a writer and a lover of all things video.
Follow @Richard Bennett
Richard Bennett
Nov 01, 2022• Proven solutions
One of the trickiest terrains for new YouTubers to navigate is the land of copyright rules.
We get it, it’s confusing and stressful, especially when what you want to focus on is making videos, but instead, you are worried about getting your account terminated or being sued.
Can you or can’t you use that song or that clip from the movie? That’s all you want to know.
In this article, we are going to address the key areas that YouTubers need to understand when it comes to YouTube copyright. What is okay and what isn’t? What may be considered risky or what would be worth taking a chance?
Remember that everything discussed in this article is only best practices and shouldn’t be taken as definitive legal advice.
Now that we are set, let’s dive in:
Part 1: What is Fair Use?
When we talk about YouTube copyright, we have to talk about fair use.
Without fair use, there wouldn’t be any flexibility for creators. There wouldn’t be mashups, parodies, or lip dubs. Without fair use, any video with copyright content such as music in the background or a reference to a scene from a famous movie will require approval from the content owner and can be removed. Because of fair use, you can publish a video with copyrighted material in it and not have to ask anyone.
Think of fair use as exceptions to copyright rules.
Part 2: What YouTube Considers Fair Use
There are a few aspects YouTube looks at when it comes to determining whether creators are using copyrighted content that meets the fair use exceptions.
- Is the copyrighted content being creatively or purposefully used?
- Are there more original content used than copyrighted content in the video?
- Will your video benefit the original copyrighted content?
Part 3: Types of Content That Meet Fair Use
Some acceptable styles of videos that allow you to exercise fair use are:
Critiques and Reviews: You can use clips of a movie that you review or play a chorus from a song that you are analyzing in a video and it will be okay to use because it’s serving a purpose of educating the viewer.
Tutorials and Commentary: A YouTube gamer streaming the video games and making comments throughout, that is within fair use, because it can be said that it is giving the video game exposure. Additionally, anything that can be classified as tutorials can also fall under fair use. If you have a video teaching people how to play a famous song, like The Beatles’ Let It Be , on piano, that’s fine!
Mashups: Mashups tend to be built entirely out of copyrighted material, but when done well this style of videos are very creative and often serve to promote the original work as opposed to replacing it.
There couldn’t be two more different movies than Toy Story and Fight Club, but somehow thanks the the creativity of a YouTube creator, there is a now a mashup of it. Some might call it an abomination, but this type of recycled art takes skills and planning, and it wouldn’t exist without fair use.
Parody: Imitation for comedic or dramatic effect is an artistic pursuit as long as it is done in a transformative manner. What does transformative mean? It means in some way, the original is being examined.
In this example from The Hillywood Show, we see a parody of both BBC’s Sherlock Holmes and Macklemore & Ryan Lewis’s Thrift Shop. The nuisance of the show and song recreated are there, but nobody who enjoys the originals will sit down and appreciate it in the same way. A parody is in no way trying to replace the original, but rather using the subject, structure, and style of the original as a vessel to another creative work.
Part 4: What To Do When You Get a YouTube Copyright Strike
If you are reading this, you may have already gotten a YouTube copyright strike.
This may have surprised you. Don’t be too concerned. If it was a mistake, the copyright strike merely acts as a warning, letting you know that the content in your video is copyrighted material.
However, if you were to get 3 copyright strikes in 90 days, you may be penalized by:
- Having all your accounts and videos removed
- Not being able to create a new channel
So what should you do? Here are the steps to take after you receive a copyright strike:
- Review the copyright strike by going into Creator Studio > Video Manager > Copyright notice
- Click on the “Copyright Strike” link beside the flagged video to see details
- Decide how to respond to the strike:
- Allow the strike to expire after 90 days and complete the YouTube’s copyright school
- Contact the person who reported your video and get the claim retracted
- Dispute the claim with a counter notification
Part 5: 5 Ways to Avoid Copyright Strike
It’s not always clear what YouTube deems fair use, but there are a few things you can do to improve your chances of meeting the qualification.
1. Use non-fictional copyright content instead of creative and fictional copyrighted content. You’ll have a better chance of meeting fair use if you use footages from a news broadcast than you would from a movie or television show.
The intent is clear when using non-fictional copyright content, such as in Bad Lip Reading. They aren’t trying to rebroadcast the Mark Zuckerberg integration, they are parodying it. The easier it is for the public to recognize that the content is from a source, and understand that the creator isn’t trying to take credit for it, the more likely it’ll pass the fair use qualification.
However, if Bad Lip Reading posted the content without lip dubbing, then one can argue that they are taking views away from the original news sources and that wouldn’t be fair use.
2. Make sure your video with copyrighted content isn’t replacing the original one. Only use enough of the source material to get your point across and ensure you are not negatively affecting the original through views and sales.
In this example from Screen Prism, we see scenes from Wes Anderson movies all through the video, however, it is not replacing any of the original films. In fact, you can say that because of this video, people will be motivated to go and watch a Wes Anderson movie, those benefiting the original creator.
3. The copyrighted material is essential to your video. Whether the copyrighted content is needed in order to illustrate a point or if that one moment from a well-recognized movie helps tie together the message, as long as the copyrighted material is serving the video in some significant way, then it will be consider fair use.
4. Give the original creator credit. Just because you give the original creator credit doesn’t mean you can rightfully use their content, however, it does give you a better chance at avoiding copyright strike. Most often, the original creators simply want credit for their work. If they see that you have noted that the content was made by them, it will only give them more exposure.
5. Keep it short. There is no precise number of seconds or ratio of copyrighted to original footage you should have in your video to qualify as fair use. But generally, if the copyrighted clip is short and/or broken up, then it stands a better chance at being approved by YouTube.
Part 6: What to Do When Other YouTubers Are Copying Your Content
As a new YouTuber, it’s a little freaky to think that someone is taking your content and republishing it or using your creations in their video without your permission.
If you ever notice that your content is being copied without your approval — if they have duplicated your video completely or is using your video without giving credit — and it is not benefiting your channel in any way, don’t worry, YouTube is designed to protect you.
Steps to Report Copyright Infringements on YouTube
- View the video that contains your copyrighted material.
- Click on “Report”
- Select “Infringes my rights” in the pop up window and click “infringes my copyright” in the dropdown options.
- Supply additional information to the report form, including the URL of the video infringing your copyrighted content and the URL of your own video.
- Submit report and wait for an email confirmation that the infringing content has been removed.
Part 7: YouTube Copyright Match
In 2018, YouTube launched a new feature called Copyright Match Tool, which automatically finds videos that are very similar or the same as the ones you’ve created. This gives you the power to determine what to do once you know the video exist.
- You can choose to do nothing.
- You can contact the publisher.
- You can report the video to YouTube for removal.
Key Takeaways
I hope this article has clarified what you can and cannot do with copyrighted content. Here is a quick summary of what we touched on in this post:
- Avoid having 3 copyright strikes on your channel at all costs.
- When using copyrighted material, ensure it is essential to the video and you are not overdoing it.
- Make sure that the copyrighted content does not take views and sales away from the original source.
- Strive to use the copyrighted content in a transformative way, as a parody or a commentary, to educate or inform.
- Give the original creator credit or have it benefit the original by giving more publicity.
- Report any creator that is infringing on your content.
Got any questions on YouTube copyright? Leave a comment below and we’ll help you answer it.
Richard Bennett
Richard Bennett is a writer and a lover of all things video.
Follow @Richard Bennett
Maximizing Mobile Media Posts: IOS and YouTube Techniques
Create High-Quality Video - Wondershare Filmora
An easy and powerful YouTube video editor
Numerous video and audio effects to choose from
Detailed tutorials provided by the official channel
Initially, iOS users had the option to load videos directly to YouTube via the tap-to-upload feature. However, this option is missing in the recent iOS devices versions. Therefore, many users search for possible ways to post a video on YouTube from iPhone. For this, you have to put some considerations into place before moving on. The video title length should not exceed 100 characters, while the description is maintained at 5,000 characters. Also, ensure the video length doesn’t exceed 15 minutes. Let’s roll out the best ways to upload your videos and make that big catch on subscribers.

In this article
01 [ How to upload a video to YouTube from iPhone or iPad](#Part 1)
02 [Why your phone doesn’t post videos to YouTube](#Part 2)
03 [Make your YouTube video better with Filmora](#Part 3)
How to upload a video to YouTube from iPhone or iPad
Are you ready to start on that big adventure and share your videos on YouTube? Follow these steps to learn how to upload a video to YouTube from your iPhone.
Method 1: Upload using the YouTube iOS app
Using the YouTube app is the simplest way to upload your YouTube videos. The YouTube app should be installed on your iOS device.
Step 1. Launch the YouTube app on your device, then sign in to your account. If you don’t have an account yet, you will need to “Sign up” for a new one before continuing the upload process.
Step 2. Click on the “+” icon found at the bottom of the screen.
Step 3. Then choose the “Upload a video” option from the populated list of options.
Step 4. Check out the pop-up that appears and “Allow access” to it.
Step 5. Edit your video to your preference by trimming or cropping as you desire. Then click on the “Next” option.

Step 6. Add “title and description” to your video. Remember, the title should contain less than 100 characters and the description no more than 500 characters.
Step 7. Then set the visibility mode as “Public” to enable you to share your video over the internet.
Step 8. Click on the “Upload” button to finally upload your video to YouTube.

Method 2: Upload using Photo App
The Photo App has a “Share” option that you can use to upload your videos to YouTube. Here is the guide.
Step 1. Go to your iOS device and tap on the “Photos” app.
Step 2. Then tap on the “Videos Folder” to locate the video you wish to upload to YouTube.

Step 3. Next, tap on the video that you want to upload.
Step 4. Then tap on the “Share” icon located at the bottom left of your iOS device screen.
Step 5. You’ll then access a “Share” menu from where you have various share options for your video.
Step 6. Choose the “YouTube” option to continue to share your video there. At this juncture, ensure you have logged in to your Google Account.

Step 7. You need to provide a “Title” and “Description” of your video. Then go to the “Privacy” Options and make your video “Public.”
Step 8. Finally, tap on the “Publish” tab found at the top-right corner of your screen to make your video viewable by the public.

Method 3: Upload video to YouTube using Safari
Safari is another alternative method to upload a video to YouTube.
Step 1. First, go to “youtube.com” on Safari and sign in.

Step 2. Then tap on the “account” icon at the top right side of the screen.
Step 3. Hit on the “Upload” icon and wait to be redirected to the YouTube Studio desktop site.
Step 4. Click on the “Select Files” option.
Step 5. Choose the video you wish to add to YouTube from the “Photo” library and tap on the “Add” button.

Step 6. Add your video’s “title and description” and hit the “Next” button.
Step 7. Tap on the “Next” button once more to go to the “Visibility” page.
Step 8. Select the “Public” option to upload your video to the public.
Why your phone doesn’t post videos to YouTube
Despite learning how to upload to YouTube from iPhone, you may be perplexed to realize that your phone refuses to post videos to YouTube. What could be the reason?
1) YouTube issues
In most cases, the problem doesn’t arise from your phone but from YouTube. This streaming app may also experience some hitches along the way. Remember that even if your phone sync with your YouTube account to upload videos from the “Camera Roll,” YouTube isn’t managed from the Camera Roll but the YouTube app directly. You can solve the issue by signing out of your YouTube account and signing back in.
2) Connection Strength
Some videos may appear quite large and cause a time-out during the upload process. Check your Wi-Fi or internet connection strength to determine if it needs a boost or wait until the streaming strength is strong for a quick upload. Test your internet speed by searching “internet test speed” on Google. Then click the “Run Speed Test” in the search box. A window will open and give you an estimate of the Mbps that your connection is operating at. If too low, switch to other alternatives.
3) Verify your YouTube account
Verifying your account will help you to enjoy YouTube’s full features. It’s then that you’ll manage to upload videos without any drawbacks. Also, that’s when you’ll manage to upload longer videos that go beyond the 15-minute duration.
4) Pay attention to the video size
There is a limit for videos to post to YouTube. If it is too large or long, the upload will cancel before completion.
5) Be patient
YouTube can save your partial upload for 24 hours. So, you can continue to upload from where you left. Learn to be patient as there could be a surge of user traffic, especially during evenings.
Make your YouTube video better with Filmora
Good video quality will make you go miles ahead of your marketing gig. You can use Filmora mobile application to make your videos look better before uploading them to YouTube. This intuitive video editing app has advanced features and several ways to compose creative videos.
- Stunning video effects that let you add animated text to video
- Easily record your voice-overs with its perfect sound effects
- Split functionality that allows you to slice your video footage into two or more separate video clips
- Playback your clips in reverse and adjust the speed for fast or slow motion
- Select the best aspect ratio for your video
- Advanced camera to create emoji selfies and other video beautification
- Directly share your videos to social media sites like YouTube and Facebook.
Check out the steps to edit your video with Filmora on your iOS device
Step 1. Download and install Filmora
For iOS devices, go to the “Apple Store” to download and install the app. Also, allow it to access your videos, camera, and pictures in the process.
Step 2. Import video
You may already have a video in your library that you wish to upload to YouTube. Nonetheless, you can shoot a video afresh to add. To shoot one, you need to settle on a topic before recording and downloading other images you may need. Ensure you watch what you are filming and use adequate lighting during the shooting process.
Next, begin to import your video file. Just open the application and select the “Create new video” option. Then choose the “Video” icon and select a folder that contains the video to be added. Hit the “Add” button from the bottom right corner.
Step 3. Edit video
Filmora has several editing features to make your video better. Use the “Edit tools” feature to turn your video into an impeccable piece. Easily add filters, adjust the speed, or create subtitles, among other functions. You can also split, trim, or delete the unwanted clip parts.
It is important to add a title and description to your video. Just use the “Titles” button to add the title. Other precepts that you can add include transitions, sound like voice-over,
Step 4. Export and share
You’ve just finished creating and editing your video. Click on the “Save” tab and let the application export your video. Then select the “Save to Camera Roll” option to save the video to your iPhone. Finally, you can upload and share the video directly to your YouTube account.
Conclusion
● However, it appears to be a difficult task; you must have found relief after going through these procedures. You don’t need prior knowledge on how to upload a video to YouTube from your iPhone. Several options are at your disposal. You can use the Safari, YouTube app, or the Photo app to upload your videos. The better part is that you can create top-notch videos with Filmora. This mobile video editing app has a lot to offer, ensuring quality content.
Initially, iOS users had the option to load videos directly to YouTube via the tap-to-upload feature. However, this option is missing in the recent iOS devices versions. Therefore, many users search for possible ways to post a video on YouTube from iPhone. For this, you have to put some considerations into place before moving on. The video title length should not exceed 100 characters, while the description is maintained at 5,000 characters. Also, ensure the video length doesn’t exceed 15 minutes. Let’s roll out the best ways to upload your videos and make that big catch on subscribers.
In this article
01 [ How to upload a video to YouTube from iPhone or iPad](#Part 1)
02 [Why your phone doesn’t post videos to YouTube](#Part 2)
03 [Make your YouTube video better with Filmora](#Part 3)
How to upload a video to YouTube from iPhone or iPad
Are you ready to start on that big adventure and share your videos on YouTube? Follow these steps to learn how to upload a video to YouTube from your iPhone.
Method 1: Upload using the YouTube iOS app
Using the YouTube app is the simplest way to upload your YouTube videos. The YouTube app should be installed on your iOS device.
Step 1. Launch the YouTube app on your device, then sign in to your account. If you don’t have an account yet, you will need to “Sign up” for a new one before continuing the upload process.
Step 2. Click on the “+” icon found at the bottom of the screen.
Step 3. Then choose the “Upload a video” option from the populated list of options.
Step 4. Check out the pop-up that appears and “Allow access” to it.
Step 5. Edit your video to your preference by trimming or cropping as you desire. Then click on the “Next” option.
Step 6. Add “title and description” to your video. Remember, the title should contain less than 100 characters and the description no more than 500 characters.
Step 7. Then set the visibility mode as “Public” to enable you to share your video over the internet.
Step 8. Click on the “Upload” button to finally upload your video to YouTube.
Method 2: Upload using Photo App
The Photo App has a “Share” option that you can use to upload your videos to YouTube. Here is the guide.
Step 1. Go to your iOS device and tap on the “Photos” app.
Step 2. Then tap on the “Videos Folder” to locate the video you wish to upload to YouTube.
Step 3. Next, tap on the video that you want to upload.
Step 4. Then tap on the “Share” icon located at the bottom left of your iOS device screen.
Step 5. You’ll then access a “Share” menu from where you have various share options for your video.
Step 6. Choose the “YouTube” option to continue to share your video there. At this juncture, ensure you have logged in to your Google Account.
Step 7. You need to provide a “Title” and “Description” of your video. Then go to the “Privacy” Options and make your video “Public.”
Step 8. Finally, tap on the “Publish” tab found at the top-right corner of your screen to make your video viewable by the public.
Method 3: Upload video to YouTube using Safari
Safari is another alternative method to upload a video to YouTube.
Step 1. First, go to “youtube.com” on Safari and sign in.
Step 2. Then tap on the “account” icon at the top right side of the screen.
Step 3. Hit on the “Upload” icon and wait to be redirected to the YouTube Studio desktop site.
Step 4. Click on the “Select Files” option.
Step 5. Choose the video you wish to add to YouTube from the “Photo” library and tap on the “Add” button.
Step 6. Add your video’s “title and description” and hit the “Next” button.
Step 7. Tap on the “Next” button once more to go to the “Visibility” page.
Step 8. Select the “Public” option to upload your video to the public.
Why your phone doesn’t post videos to YouTube
Despite learning how to upload to YouTube from iPhone, you may be perplexed to realize that your phone refuses to post videos to YouTube. What could be the reason?
1) YouTube issues
In most cases, the problem doesn’t arise from your phone but from YouTube. This streaming app may also experience some hitches along the way. Remember that even if your phone sync with your YouTube account to upload videos from the “Camera Roll,” YouTube isn’t managed from the Camera Roll but the YouTube app directly. You can solve the issue by signing out of your YouTube account and signing back in.
2) Connection Strength
Some videos may appear quite large and cause a time-out during the upload process. Check your Wi-Fi or internet connection strength to determine if it needs a boost or wait until the streaming strength is strong for a quick upload. Test your internet speed by searching “internet test speed” on Google. Then click the “Run Speed Test” in the search box. A window will open and give you an estimate of the Mbps that your connection is operating at. If too low, switch to other alternatives.
3) Verify your YouTube account
Verifying your account will help you to enjoy YouTube’s full features. It’s then that you’ll manage to upload videos without any drawbacks. Also, that’s when you’ll manage to upload longer videos that go beyond the 15-minute duration.
4) Pay attention to the video size
There is a limit for videos to post to YouTube. If it is too large or long, the upload will cancel before completion.
5) Be patient
YouTube can save your partial upload for 24 hours. So, you can continue to upload from where you left. Learn to be patient as there could be a surge of user traffic, especially during evenings.
Make your YouTube video better with Filmora
Good video quality will make you go miles ahead of your marketing gig. You can use Filmora mobile application to make your videos look better before uploading them to YouTube. This intuitive video editing app has advanced features and several ways to compose creative videos.
- Stunning video effects that let you add animated text to video
- Easily record your voice-overs with its perfect sound effects
- Split functionality that allows you to slice your video footage into two or more separate video clips
- Playback your clips in reverse and adjust the speed for fast or slow motion
- Select the best aspect ratio for your video
- Advanced camera to create emoji selfies and other video beautification
- Directly share your videos to social media sites like YouTube and Facebook.
Check out the steps to edit your video with Filmora on your iOS device
Step 1. Download and install Filmora
For iOS devices, go to the “Apple Store” to download and install the app. Also, allow it to access your videos, camera, and pictures in the process.
Step 2. Import video
You may already have a video in your library that you wish to upload to YouTube. Nonetheless, you can shoot a video afresh to add. To shoot one, you need to settle on a topic before recording and downloading other images you may need. Ensure you watch what you are filming and use adequate lighting during the shooting process.
Next, begin to import your video file. Just open the application and select the “Create new video” option. Then choose the “Video” icon and select a folder that contains the video to be added. Hit the “Add” button from the bottom right corner.
Step 3. Edit video
Filmora has several editing features to make your video better. Use the “Edit tools” feature to turn your video into an impeccable piece. Easily add filters, adjust the speed, or create subtitles, among other functions. You can also split, trim, or delete the unwanted clip parts.
It is important to add a title and description to your video. Just use the “Titles” button to add the title. Other precepts that you can add include transitions, sound like voice-over,
Step 4. Export and share
You’ve just finished creating and editing your video. Click on the “Save” tab and let the application export your video. Then select the “Save to Camera Roll” option to save the video to your iPhone. Finally, you can upload and share the video directly to your YouTube account.
Conclusion
● However, it appears to be a difficult task; you must have found relief after going through these procedures. You don’t need prior knowledge on how to upload a video to YouTube from your iPhone. Several options are at your disposal. You can use the Safari, YouTube app, or the Photo app to upload your videos. The better part is that you can create top-notch videos with Filmora. This mobile video editing app has a lot to offer, ensuring quality content.
Also read:
- [Updated] Discover Sub4Sub Essential Tips Before Diving In
- Editing Excellence Sports Videos That Stand Out for 2024
- [New] Enjoy Every Frame Best Free Download Apps for Mobile Devices
- Crafting an Efficient YouTube Subscription Path
- Procure No-Cost Visual Aids From Prominent 4 Youtube Feeds
- Tapping Into Trending Topics for Videography Ideas via Google
- The Ultimate Palette of Creative Ideas From 6 Graphic Websites
- The Blueprint of Tomorrow Eco-Friendly Urban Strategies
- 2024 Approved Effortless Calls Combining YouTube & Green Screens
- 2024 Approved Dynamic Topic Suggestions for Streamers
- Leverage Social Blade's Platform for In-Depth Video Analytics
- Achieve Video Perfection YouTube Studio Edition Tips & Tricks for 2024
- [New] Effective Visual Branding Crafting Compelling YouTube Logos
- YouTube Visual Impact Mastering Thumbnail Dimensions
- YouTube Movie Maker Unveiled Your Path to Video Mastery
- Download Mastery 11 Key YouTube Extractors
- Repeat Revelry Televised Looping of Online Media Content
- 7 Top-Rated Free Mobile Apps for Video Downloads for 2024
- Optimize Your Online Presence YouTube to Dailymotion Video Migration
- In 2024, Essential Tips for FREE YouTube Video Transcriptions
- In 2024, Elevate Your Content with These Top Keyword Discovery Tools
- Unlock YouTube's Potential Key Strategies From Creator Studio Manual
- Blueprint for Creating Viral Trailers in the World of YouTube
- [Updated] Beats & Bands How to Upload Music Online
- Making Money with Media Mastery of Merchandise Musings
- Harnessing iMovie's Capabilities for YouTube Video Perfection
- [Updated] Cut Beyond Youtube Unveiling the Top 5 Video Editor Options
- YouTube Revenue Demystified
- Affordable Cameras for Effective Vloggers for 2024
- Top Picks 7 Royalty-Free Audios for Video Editing
- In 2024, Decoding Your YouTube's View-Zero Dilemma 10 Insights
- Should You Opt for a Compreayer Package on YouTube with Premium Features?
- [New] Affiliate Advancements How Small Channels Thrive Financially
- Animating Elegance Self-Designed Tricks & Effects
- Charting New Territory YouTube's Revised Policies for 2024
- Unlocking Video Dominance Hashtag Hacks Exposed
- [New] Dive Into the Deep End - Your Guide to the Best Free Movies on YouTube
- The Essentials Everyone Needs to Know About YouTube TV Services
- Channel Success Stories Earning While You Edit
- Deciphering the Innovative World of YouTube Studio for 2024
- [Updated] Earning Edge Exploiting YouTube Studio for Global Viewers
- Easy and Inexpensive Techniques for YouTube Cards
- Making Everyday Moments Memorable on YouTube
- In 2024, Cutting-Edge Content Sharing Your Guide to YouTube+TikTok Linkup
- YouTube Masterclass Beginners Kit Free Courses Collection
- Elevating Channels Exposure on YouTube The Featured Channel Methodology
- [Updated] Craft Your Vision Best Cameras for Video Creators
- Unleashing Video Popularity Leading Trackers for YouTube
- In 2024, Ways to trade pokemon go from far away On Apple iPhone 8 Plus? | Dr.fone
- How To Upgrade or Downgrade iPhone 6s Without Losing Anything? | Dr.fone
- [Updated] Amazon Prime Viewers - Who to Follow on Twitter, Now
- 5 Quick Methods to Bypass Itel S23 FRP
- Mastering Final Cut Pro Reversing Video Footage with Ease for 2024
- New In 2024, The Ultimate List of Guitar-Friendly Sound Recorders
- 2024 Approved How to Make Strobe Light Text Effect?
- In 2024, The Best iSpoofer Alternative to Try On Samsung Galaxy F04 | Dr.fone
- Your Guide to Premium-Costless Audio Streaming Platforms on Smartphones
- [New] How To Record YouTube Live Stream On Any Device for 2024
- Additional Tips About Sinnoh Stone For Meizu 21 | Dr.fone
- [Updated] 2024 Approved Mastering Your DiscoVoice Experience 2023'S Leading Tools Reviewed
- [New] Optimal 4K Video Recording Tools Compilation for 2024
- [Updated] In 2024, Stop Screen Blackouts with OBS Game Recordings
- In 2024, Top 7 Phone Number Locators To Track Realme C55 Location | Dr.fone
- [New] A Gamer's Guide to Seamless PS4 Recording and Streaming via OBS
- [Updated] 2024 Approved Lost Your TikTok Progress? Refresh Reversed
- Updated 2024 Approved Useful Resources to Listen or Download Soft Background Music
- How To Add Chapters To A YouTube Video
- Clear Vision Through Stillness Control for 2024
- [New] Aerial Cutting Edge The Ultimate Drone Editing Comparison
- Updated Top Video Editing Software for Windows 10 for 2024
- [New] In 2024, Key Strategies for Efficient Screenshare Experience with Discord
- Top 6 Zoom-Compatible Vocal Modifiers Amplify Your Personality on Video Calls
- Title: "[New] Cutting Through the Clutter YouTube's Copyright Evolution"
- Author: Kevin
- Created at : 2024-05-25 16:00:32
- Updated at : 2024-05-26 16:00:32
- Link: https://youtube-videos.techidaily.com/new-cutting-through-the-clutter-youtubes-copyright-evolution/
- License: This work is licensed under CC BY-NC-SA 4.0.
