
!["[New] Crafting Cross-Social Media Content Strategy with YouTube & FB"](https://www.lifewire.com/thmb/ZfXDt5cUhFXvIGt8owm9r2kbia4=/400x300/filters:no_upscale():max_bytes(150000):strip_icc()/set-top-dvr-1130767-f2aa7f11e3d2442b966d53b8aa2d25fd.png)
"[New] Crafting Cross-Social Media Content Strategy with YouTube & FB"
Crafting Cross-Social Media Content Strategy with YouTube & FB
Create High-Quality Video - Wondershare Filmora
An easy and powerful YouTube video editor
Numerous video and audio effects to choose from
Detailed tutorials provided by the official channel
YouTube reports that Facebook is the most utilized platform fans use to watch online content. More so, up to 40% of those who watch the content do share links with their friends online – this then makes it quick to promote YouTube content on Facebook. Simply by making your new YouTube content visible on your Facebook page, and you’ll be certain that thousands of viewers will have a glimpse of it. You must already be scratching your head for ways on how to post a YouTube video on a Facebook page. Well, we bring you several ways to go through that and make your YouTube content accessible on Facebook.
In this article
01 How to Post YouTube video on Facebook?
02 Extra Tip: Facebook Video Tips for more Views and Shares
03 Frequently Asked Question about Facebook video
How to Post YouTube video on Facebook?
Since Facebook is easily accessible, many users have more access to it than other social media platforms. More so, the page allows you to communicate with your audience via photos, videos, graphics, text, among many other multimedia contents. You don’t even need any programming skills to operate it. Here are ways to post YouTube content to Facebook.
How to share a YouTube video on Facebook using a computer
If you have a stationary point of work, i.e., a computer, it is possible to share your YouTube video through it.
Step 1. First, visit the YouTube site at https://www.youtube.com . It can launch from any web browser.
Step 2. Choose from among your videos on YouTube the one you wish to share on Facebook.
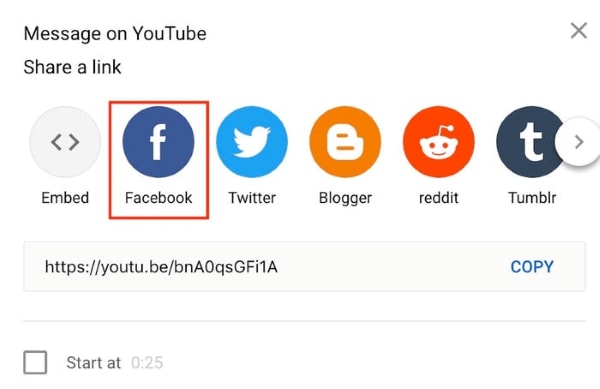
Step 3. Then find the “Share” icon located directly under the video you want to share. Click on the video and hit the “Share” button below the video.
Step 4. Choose “Facebook” from the sharing options that pop up.
Step 5. Next, sign in to “Facebook” on your desktop. Then select the destination point you want your video to land in by using the drop-down menu at the top of your desktop screen. Select the “Share to News Feed” or perhaps the share to “Story.”
Step 6. Finally, click the “Post to Facebook” tab to share your YouTube content with Facebook.
How to share a YouTube video on Facebook using a mobile device
Are you on the go and want your Facebook fans to know what content you have on your YouTube channel? Here are the simple steps on how to post a YouTube video on Facebook right from the palm of your hands – a mobile device.
Step 1. Use any browser on your mobile device to launch the YouTube app from the official website.
Step 2. Peruse through your YouTube videos and choose the one you wish to share on Facebook.
Step 3. Check below the video and click on the “Share” icon.
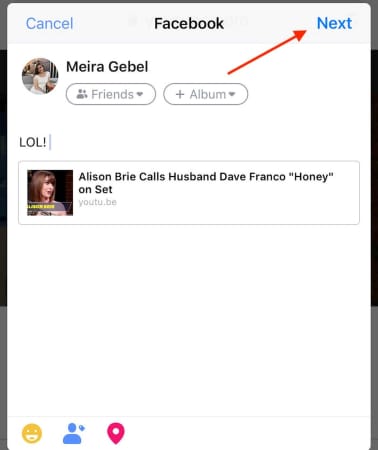
Step 4. Search through the app’s options and choose Facebook. Also, ensure that the “Facebook” app is installed on your mobile device to make your videos sharable.
Step 5. Click on the “Next” option in the upper right-hand corner of your mobile screen. It will enable video sharing.
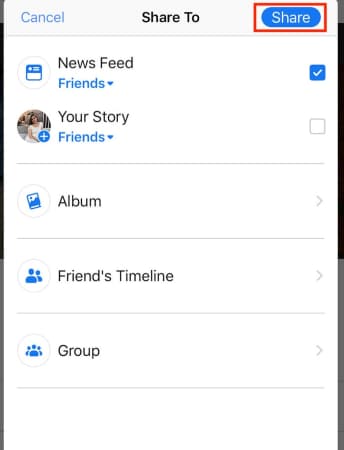
Step 6. Then choose the YouTube video’s post destination to your Facebook. It could be shared on your timeline, story, or a Facebook group’s page.
Step 7. Finally, click on the “Share” tab to make your video viewable on Facebook.
How to post a YouTube video on Facebook
Easily post your YouTube video on Facebook and let viewers access them directly from your Facebook feed. By this, your fans don’t have to click on other tabs but will access the videos directly.
Step 1. Copy the YouTube video’s link
First, go to your YouTube channel and copy the video link that you want to post to Facebook. You can as well copy the embed code.
Step 2. Embed the video link you copied
This link should be embedded into a Facebook post. Do this by first logging into your Facebook account. Then go to the top of your “Facebook News Feed” and click the “What’s on your mind” box.
Step 3. Paste your link
Right-click on the “What’s on your mind” box, then select the “Paste” option.
Step 4. Preview video
Facebook will let you preview the video you just posted. Check whether you have pasted the right video before you post it.
Step 5. Post your video
Now, scroll down and click on the “Post” tab. You can also add a message to your post. Just place a cursor after the video URL and hit the “Enter” key on your keyboard. Finally, scroll down and hit the “Post” tab to make your video public on Facebook.
Extra Tip: Facebook Video Tips for more Views and Shares
You have to play your cards well when it comes to posting and sharing your videos on Facebook. These tips are all you need.
- Catch viewer’s attention within the shortest time possible
Here, your main aim is to convince your viewers. So, don’t let them spend so much time before you catch their attention. You can bring up a point about some latest news or adventures that let your viewers connect immediately.
- Add captions to the video
It is not necessarily possible that viewers will watch your videos with the sound on. Some like it when it’s silent and might disable the sound auto-play. Add some captions so that viewers will understand your video, even on silent mode.
- Emphasize on one key-point
Focus on one key point so that your viewers are not swayed away. Your video is highly sharable if it is easy to understand.
- Add a Call To Action
Including a call-to-action will encourage your viewers to subscribe to your channel. Ensure you include it at the end of your video to tell viewers what to do next. You could also include a link to your blog post to let your viewers read and find more content from your other channels.
- Facebook ads can make a great difference
Facebook is a great place for running ads that reach a wider audience. Adverts are great ways to target a specific audience. They explain your products and services more straightforwardly.
- Embed your videos on blog posts
Numerous people get to access guest posts and blog posts. You can embed your Facebook videos on such posts to reach more people. Just get the embed code from your video, then copy and paste it to a guest or blog post.
Frequently Asked Question about Facebook video
Both viewers and content creators have a few concerns about YouTube and Facebook videos. Here are some frequently asked questions that will be of benefit to you.
1) Is it legal to share YouTube videos?
YouTube is just one platform where content creators showcase their productions. Yes, it is legal to share your content on other forums like Facebook, Twitter, Instagram, etc.
2) What is the best time to post to your Facebook page?
The best time to post on a Facebook page depends on your time zone. Generally, viewers access Facebook late in the evening and early in the night. Perhaps they are off work and now want to relax by checking the day’s updates.
3) What are Facebook business accounts and personal accounts?
Facebook business accounts are designed for users who want to use Facebook to administer their pages and advert campaigns. This account cannot be found in searching or receiving friend request apps. Nonetheless, personal accounts are used at basic and casual levels. You can search for friends and send requests. Personal accounts are also easy to manage.
4) Can I mobilize people to share my posted content on Facebook?
Yes, it is possible to let others share what you have posted. Just ensure they know your intention by constant reminders. Some popular ways that are proven to be effective include the use of “Call to Action,” using an image or video with your Facebook status update and offering some incentive to your fans for sharing.
5) Does the quality of my YouTube content drop when I share it with Facebook?
Of course not! What you pull from your YouTube channel is the kind of video that will be watched from Facebook. The quality cannot deteriorate. However, it is good to ensure you compose quality videos on YouTube before sharing them. Several video editing apps like Filmora can help you compose quality videos with high resolution.
Conclusion
● Facebook is a great platform that is accessed by a wide audience. More so, you can share your content from other platforms easily. The article has covered how to share YouTube videos on Facebook and hook your audience. You can use your computer or share directly from your mobile device in simple steps. It is also better to play some tricks on your effort to reach a wider audience. These include a CTA, embedding your Facebook videos to blogs posts, among other options.
YouTube reports that Facebook is the most utilized platform fans use to watch online content. More so, up to 40% of those who watch the content do share links with their friends online – this then makes it quick to promote YouTube content on Facebook. Simply by making your new YouTube content visible on your Facebook page, and you’ll be certain that thousands of viewers will have a glimpse of it. You must already be scratching your head for ways on how to post a YouTube video on a Facebook page. Well, we bring you several ways to go through that and make your YouTube content accessible on Facebook.
In this article
01 How to Post YouTube video on Facebook?
02 Extra Tip: Facebook Video Tips for more Views and Shares
03 Frequently Asked Question about Facebook video
How to Post YouTube video on Facebook?
Since Facebook is easily accessible, many users have more access to it than other social media platforms. More so, the page allows you to communicate with your audience via photos, videos, graphics, text, among many other multimedia contents. You don’t even need any programming skills to operate it. Here are ways to post YouTube content to Facebook.
How to share a YouTube video on Facebook using a computer
If you have a stationary point of work, i.e., a computer, it is possible to share your YouTube video through it.
Step 1. First, visit the YouTube site at https://www.youtube.com . It can launch from any web browser.
Step 2. Choose from among your videos on YouTube the one you wish to share on Facebook.
Step 3. Then find the “Share” icon located directly under the video you want to share. Click on the video and hit the “Share” button below the video.
Step 4. Choose “Facebook” from the sharing options that pop up.
Step 5. Next, sign in to “Facebook” on your desktop. Then select the destination point you want your video to land in by using the drop-down menu at the top of your desktop screen. Select the “Share to News Feed” or perhaps the share to “Story.”
Step 6. Finally, click the “Post to Facebook” tab to share your YouTube content with Facebook.
How to share a YouTube video on Facebook using a mobile device
Are you on the go and want your Facebook fans to know what content you have on your YouTube channel? Here are the simple steps on how to post a YouTube video on Facebook right from the palm of your hands – a mobile device.
Step 1. Use any browser on your mobile device to launch the YouTube app from the official website.
Step 2. Peruse through your YouTube videos and choose the one you wish to share on Facebook.
Step 3. Check below the video and click on the “Share” icon.
Step 4. Search through the app’s options and choose Facebook. Also, ensure that the “Facebook” app is installed on your mobile device to make your videos sharable.
Step 5. Click on the “Next” option in the upper right-hand corner of your mobile screen. It will enable video sharing.
Step 6. Then choose the YouTube video’s post destination to your Facebook. It could be shared on your timeline, story, or a Facebook group’s page.
Step 7. Finally, click on the “Share” tab to make your video viewable on Facebook.
How to post a YouTube video on Facebook
Easily post your YouTube video on Facebook and let viewers access them directly from your Facebook feed. By this, your fans don’t have to click on other tabs but will access the videos directly.
Step 1. Copy the YouTube video’s link
First, go to your YouTube channel and copy the video link that you want to post to Facebook. You can as well copy the embed code.
Step 2. Embed the video link you copied
This link should be embedded into a Facebook post. Do this by first logging into your Facebook account. Then go to the top of your “Facebook News Feed” and click the “What’s on your mind” box.
Step 3. Paste your link
Right-click on the “What’s on your mind” box, then select the “Paste” option.
Step 4. Preview video
Facebook will let you preview the video you just posted. Check whether you have pasted the right video before you post it.
Step 5. Post your video
Now, scroll down and click on the “Post” tab. You can also add a message to your post. Just place a cursor after the video URL and hit the “Enter” key on your keyboard. Finally, scroll down and hit the “Post” tab to make your video public on Facebook.
Extra Tip: Facebook Video Tips for more Views and Shares
You have to play your cards well when it comes to posting and sharing your videos on Facebook. These tips are all you need.
- Catch viewer’s attention within the shortest time possible
Here, your main aim is to convince your viewers. So, don’t let them spend so much time before you catch their attention. You can bring up a point about some latest news or adventures that let your viewers connect immediately.
- Add captions to the video
It is not necessarily possible that viewers will watch your videos with the sound on. Some like it when it’s silent and might disable the sound auto-play. Add some captions so that viewers will understand your video, even on silent mode.
- Emphasize on one key-point
Focus on one key point so that your viewers are not swayed away. Your video is highly sharable if it is easy to understand.
- Add a Call To Action
Including a call-to-action will encourage your viewers to subscribe to your channel. Ensure you include it at the end of your video to tell viewers what to do next. You could also include a link to your blog post to let your viewers read and find more content from your other channels.
- Facebook ads can make a great difference
Facebook is a great place for running ads that reach a wider audience. Adverts are great ways to target a specific audience. They explain your products and services more straightforwardly.
- Embed your videos on blog posts
Numerous people get to access guest posts and blog posts. You can embed your Facebook videos on such posts to reach more people. Just get the embed code from your video, then copy and paste it to a guest or blog post.
Frequently Asked Question about Facebook video
Both viewers and content creators have a few concerns about YouTube and Facebook videos. Here are some frequently asked questions that will be of benefit to you.
1) Is it legal to share YouTube videos?
YouTube is just one platform where content creators showcase their productions. Yes, it is legal to share your content on other forums like Facebook, Twitter, Instagram, etc.
2) What is the best time to post to your Facebook page?
The best time to post on a Facebook page depends on your time zone. Generally, viewers access Facebook late in the evening and early in the night. Perhaps they are off work and now want to relax by checking the day’s updates.
3) What are Facebook business accounts and personal accounts?
Facebook business accounts are designed for users who want to use Facebook to administer their pages and advert campaigns. This account cannot be found in searching or receiving friend request apps. Nonetheless, personal accounts are used at basic and casual levels. You can search for friends and send requests. Personal accounts are also easy to manage.
4) Can I mobilize people to share my posted content on Facebook?
Yes, it is possible to let others share what you have posted. Just ensure they know your intention by constant reminders. Some popular ways that are proven to be effective include the use of “Call to Action,” using an image or video with your Facebook status update and offering some incentive to your fans for sharing.
5) Does the quality of my YouTube content drop when I share it with Facebook?
Of course not! What you pull from your YouTube channel is the kind of video that will be watched from Facebook. The quality cannot deteriorate. However, it is good to ensure you compose quality videos on YouTube before sharing them. Several video editing apps like Filmora can help you compose quality videos with high resolution.
Conclusion
● Facebook is a great platform that is accessed by a wide audience. More so, you can share your content from other platforms easily. The article has covered how to share YouTube videos on Facebook and hook your audience. You can use your computer or share directly from your mobile device in simple steps. It is also better to play some tricks on your effort to reach a wider audience. These include a CTA, embedding your Facebook videos to blogs posts, among other options.
Frontier Visionaries Merging Media Triad
People capture loads of photos of the places they visit and the events they attend for social media and future memories. If you check the online trend, users are shifting from static photos to short videos for a better visual experience. That is why you can consider creating videos out of the photos you have captured and adding suitable music in the background to make your memories visually pleasing.
All you need is a video maker with music and pictures. There is no dearth of video makers, but not all live up to the expectation. There are online video markers as well as video maker software applications available. In this article, we have picked the best video maker with photos and music and illustrated how to make a video with music and photos. We have also listed the popular video makers for your consideration.
Part 1. Best Video maker with music and pictures
We recommend Wondershare Filmora as the best video maker with photos and music. Filmora is considered one of the best video makers and editors in the world. Filmora allows you to import photos of different file formats so that you can make slideshow-like video. There are loads of transitions as well as effects available that you can place in between the photos so that the transition becomes eye-pleasing.
Similarly, you can import any audio or music file. Besides, there are stock music files available that you can apply to your slideshow video. You can even add colourful titles and graphical elements to enhance the video content. Here are the steps on how to make a video with your photos and music.
For Win 7 or later (64-bit)
For macOS 10.12 or later
Step 1: Install Filmora and Start Your Project
Download and install Wondershare Filmora as per your operating system. Filmora is available for Windows and Mac. Launch Filmora and click on New Project. Drag and drop your photos on Project Media folder.
Step 2: Import Photos and Arrange Them in Order
Drag and drop the photos on the timeline as per your sequence you want in your slideshow video. You can change the order of the photos as well as stretch durations of photos in the video from the timeline. You have to arrange the photos side by side without any gap so that there is no black screen in between the transition.

Step 3: Add Transition Effects
After arranging the photos side by side, you have to apply transition effects so that the change from one photo to another is eye-soothing. There are loads of transitions available and you can get them from Transition option located at the top bar.
Go through the different categories of transitions. Drag and drop the transition you want on to the photo after which you want the transition effect to play. Do the same for all photos except the last one. You can apply different transitions effects for different photos as per your preference.

Step 4: Add Background Music
Now it is time to add a background music to the entire video. You can drag and drop any music file from your hard drive to Filmora Project Media. Thereafter, you can drag and drop the audio file on the audio timeline below the photo timeline. You can also add audio effects from the top bar if required.

Step 5: Export Your Video
Once you are done adding photos, transitions, and music, you should play the video on Filmora and make adjustments wherever required. Thereafter, click on Export button and save the video file on your hard drive in your desired file format.

Part 2. Popular video makers with photos and music
Here is the list of the popular premium and free video maker with music and pictures that you can consider for making slideshow videos.
1. Invideo
Invideo is a popular online video maker with music and pictures along with 5000 customizable templates. These templates help users to transform photos into videos with background music in a few minutes. Besides, the platform offers a wide range of stock media files. You can create videos in more than 70 languages, and the editor is user-friendly for users of all ages.
All you need to do is select a template and customize it if required. Thereafter, you need to import the photos, add text effects, and finally add music. There are options for trimming, cropping, and adding stickers, texts and transitions. The free version lets you export 60 videos per month but with a watermark. Here are the top features of Invideo.
- 5000+ customizable templates for all video types.
- 9+ million stocks videos, photos, and audio files.
- Add transitions, stickers, animations, and texts to videos.
- Trim and crop videos and audio files.
- Add voiceover as well as fade-in and fade-out effects.
- Work in collaboration with team members.

2. Icecream slideshow maker
Icecream slideshow maker is a free video maker with music and pictures for Windows users only. The software is compatible with Windows 10, 8, 7 and XP. You can create a high-quality video from your photos with music instantly. There is no need for any prior experience to use the video maker. There are beautiful transitions available that will enhance the video quality and make your presentation stand out. The free version allows up to 10 slides per video and saving the video in Webm file format. You can upgrade to Pro version to get rid of the limitations.
You can change photo and transition duration as per requirements. The software supports various audio file formats that you can import for your video. You can also add animations to texts so that they can shine in your video. The software allows sharing the video directly to YouTube. Besides, you can save it on Google Drive and Dropbox. Here are all the features of Icecream slideshow maker that you should be aware of.
- Super intuitive user interface for all users.
- Add colourful text, transitions, and animations.
- Save and resume project work as per time availability.
- Pro version allows saving video in 4K resolution.
- Video output in MP4, AVI, MOV and WEBM formats.
- Suitable for low-end computers.

3. PhotoStage Slideshow
PhotoStage Slideshow by NCH Software is another video maker software for Windows users. The software comes with an easy and automated wizard for users to transform photos with a video instantly. There is also an image editor available to adjust different parameters of your photos before making a video out of them.
Besides, there are various transitions available to apply and you can add captions and narration as per your requirements. In fact, along with photos, you can add video clips to create the ultimate video. Moreover, there are tools available to edit your audio and music file and add different effects. Here are the top features of PhotoStage Slideshow Software.
- Supports Full HD and 4K video resolution.
- Edit and fine-tune photos and add captions.
- Wide range of eye-catching and popular transitions.
- Edit audio and music file and add different effects.
- Save video file in MOV, MP4, GIF, AVI, 3GP and more.
- Directly share on YouTube, Vimeo, Flickr, HTML5.

4. Clideo video maker
Clideo Video Maker is a free online video maker with song. All you need to do is upload photos from your hard drive and choose a preset depending on the online platform where you want to upload the video. Thereafter, add audio and trim it as per video length. Then add smooth transitions and the video will be ready to export on your hard drive or cloud storage.
The online video maker supports different video and audio file format for importing and exporting. You can use the editor on any device starting from Windows and Mac to Android and iPhone. The user interface is very simple to use and it does not store video files for more than a day. Here are all the features of Clideo video maker.
- Upload photos from hard drive, and cloud storage.
- Presets for Instagram, Stories, YouTube, and Facebook videos.
- Add different photos, audio, and video clips to make videos.
- Zoom & crop option along with image duration elongation.
- Suitable for computer and mobile phone users.

5. Movavi Slideshow Maker
Movavi Slideshow Maker is available for both Windows and Mac users. The software comes with a wizard to allow users to create video from photos. However, advanced users can create video from photos manually as well. You get to add photos, audio files and video clips of different file formats. Most importantly, there are various templates available to create professional-quality videos.
There are loads of effects, filters, titles, and stickers available to apply on your video. The free version is limited to seven days usage. The output video will have watermark on it and you can purchase the premium version to avoid all limitations. Here are the top features of Movavi Slideshow Maker.
- Slideshow wizard for fast and easy video creation.
- Manual mode for advanced users to create customized video.
- Supports different types of media file formats.
- Different types of templates for instant video making.
- Wide ranges of transitions, filters, titles, and stickers.

Conclusion
If you are making a video from your photos, you can use an online video maker with photos and music free. If you are someone who wants to make professional-quality videos from photos, a premium video maker is best for you. If you are going to upload your slideshow videos on social media and video streaming platforms, we recommend Wondershare Filmora as the best video maker with music and pictures.
For macOS 10.12 or later
Step 1: Install Filmora and Start Your Project
Download and install Wondershare Filmora as per your operating system. Filmora is available for Windows and Mac. Launch Filmora and click on New Project. Drag and drop your photos on Project Media folder.
Step 2: Import Photos and Arrange Them in Order
Drag and drop the photos on the timeline as per your sequence you want in your slideshow video. You can change the order of the photos as well as stretch durations of photos in the video from the timeline. You have to arrange the photos side by side without any gap so that there is no black screen in between the transition.
Step 3: Add Transition Effects
After arranging the photos side by side, you have to apply transition effects so that the change from one photo to another is eye-soothing. There are loads of transitions available and you can get them from Transition option located at the top bar.
Go through the different categories of transitions. Drag and drop the transition you want on to the photo after which you want the transition effect to play. Do the same for all photos except the last one. You can apply different transitions effects for different photos as per your preference.
Step 4: Add Background Music
Now it is time to add a background music to the entire video. You can drag and drop any music file from your hard drive to Filmora Project Media. Thereafter, you can drag and drop the audio file on the audio timeline below the photo timeline. You can also add audio effects from the top bar if required.
Step 5: Export Your Video
Once you are done adding photos, transitions, and music, you should play the video on Filmora and make adjustments wherever required. Thereafter, click on Export button and save the video file on your hard drive in your desired file format.
Part 2. Popular video makers with photos and music
Here is the list of the popular premium and free video maker with music and pictures that you can consider for making slideshow videos.
1. Invideo
Invideo is a popular online video maker with music and pictures along with 5000 customizable templates. These templates help users to transform photos into videos with background music in a few minutes. Besides, the platform offers a wide range of stock media files. You can create videos in more than 70 languages, and the editor is user-friendly for users of all ages.
All you need to do is select a template and customize it if required. Thereafter, you need to import the photos, add text effects, and finally add music. There are options for trimming, cropping, and adding stickers, texts and transitions. The free version lets you export 60 videos per month but with a watermark. Here are the top features of Invideo.
- 5000+ customizable templates for all video types.
- 9+ million stocks videos, photos, and audio files.
- Add transitions, stickers, animations, and texts to videos.
- Trim and crop videos and audio files.
- Add voiceover as well as fade-in and fade-out effects.
- Work in collaboration with team members.
2. Icecream slideshow maker
Icecream slideshow maker is a free video maker with music and pictures for Windows users only. The software is compatible with Windows 10, 8, 7 and XP. You can create a high-quality video from your photos with music instantly. There is no need for any prior experience to use the video maker. There are beautiful transitions available that will enhance the video quality and make your presentation stand out. The free version allows up to 10 slides per video and saving the video in Webm file format. You can upgrade to Pro version to get rid of the limitations.
You can change photo and transition duration as per requirements. The software supports various audio file formats that you can import for your video. You can also add animations to texts so that they can shine in your video. The software allows sharing the video directly to YouTube. Besides, you can save it on Google Drive and Dropbox. Here are all the features of Icecream slideshow maker that you should be aware of.
- Super intuitive user interface for all users.
- Add colourful text, transitions, and animations.
- Save and resume project work as per time availability.
- Pro version allows saving video in 4K resolution.
- Video output in MP4, AVI, MOV and WEBM formats.
- Suitable for low-end computers.
3. PhotoStage Slideshow
PhotoStage Slideshow by NCH Software is another video maker software for Windows users. The software comes with an easy and automated wizard for users to transform photos with a video instantly. There is also an image editor available to adjust different parameters of your photos before making a video out of them.
Besides, there are various transitions available to apply and you can add captions and narration as per your requirements. In fact, along with photos, you can add video clips to create the ultimate video. Moreover, there are tools available to edit your audio and music file and add different effects. Here are the top features of PhotoStage Slideshow Software.
- Supports Full HD and 4K video resolution.
- Edit and fine-tune photos and add captions.
- Wide range of eye-catching and popular transitions.
- Edit audio and music file and add different effects.
- Save video file in MOV, MP4, GIF, AVI, 3GP and more.
- Directly share on YouTube, Vimeo, Flickr, HTML5.
4. Clideo video maker
Clideo Video Maker is a free online video maker with song. All you need to do is upload photos from your hard drive and choose a preset depending on the online platform where you want to upload the video. Thereafter, add audio and trim it as per video length. Then add smooth transitions and the video will be ready to export on your hard drive or cloud storage.
The online video maker supports different video and audio file format for importing and exporting. You can use the editor on any device starting from Windows and Mac to Android and iPhone. The user interface is very simple to use and it does not store video files for more than a day. Here are all the features of Clideo video maker.
- Upload photos from hard drive, and cloud storage.
- Presets for Instagram, Stories, YouTube, and Facebook videos.
- Add different photos, audio, and video clips to make videos.
- Zoom & crop option along with image duration elongation.
- Suitable for computer and mobile phone users.
5. Movavi Slideshow Maker
Movavi Slideshow Maker is available for both Windows and Mac users. The software comes with a wizard to allow users to create video from photos. However, advanced users can create video from photos manually as well. You get to add photos, audio files and video clips of different file formats. Most importantly, there are various templates available to create professional-quality videos.
There are loads of effects, filters, titles, and stickers available to apply on your video. The free version is limited to seven days usage. The output video will have watermark on it and you can purchase the premium version to avoid all limitations. Here are the top features of Movavi Slideshow Maker.
- Slideshow wizard for fast and easy video creation.
- Manual mode for advanced users to create customized video.
- Supports different types of media file formats.
- Different types of templates for instant video making.
- Wide ranges of transitions, filters, titles, and stickers.
Conclusion
If you are making a video from your photos, you can use an online video maker with photos and music free. If you are someone who wants to make professional-quality videos from photos, a premium video maker is best for you. If you are going to upload your slideshow videos on social media and video streaming platforms, we recommend Wondershare Filmora as the best video maker with music and pictures.
Also read:
- Investing $5 Yields Hundreds of New Viewers Now
- Cross-Platform Dimensions Titling for YTB Shorts & Beyond for 2024
- [New] DIY Unleashing Creative Power in Animation Effects
- [Updated] Crafting Engaging Vids with Template Magic
- In 2024, Essential List 6 Free Online Platforms for YouTube Short Downloads
- Scaling Success The Tactics for Increasing YouTube Audiences
- 2024 Approved Economical Mic Options for YouTube Vloggers
- In 2024, Audiences on the Rise Gauge
- 2024 Approved 10 Top-Ranked YouTube News Entities
- [Updated] Cultivate Creativity 10+ Channel-Driven Video Suggestions
- Best Practices for YouTube Thumbnail Dimensions
- 2024 Approved Dive Into High-Quality Audio 7 Royalty-Free Selections
- [New] Crafting Splitscreen YouTube Videos A Guide to Creativity
- [Updated] Crafting a Dynamic YouTube Subscriber Shortcut
- [New] Bring Playlists Down to YouTube The 5 Best Conversion Resources
- 2024 Approved Discovering Synergistic Partnerships on YouTube Platforms
- Your Pathway to Successful YouTube Beginnings (Techniques 1 & 2)
- Improve Your YouTube Description Using Amazing Templates
- 2024 Approved Comparing YouTube and Dailymotion Notable Contrasts
- [Updated] Create a Unique Identity Personalize Your YouTube URL Today
- 10 Best Mobile Edits YouTube Shorts Clips on iOS/Android
- [Updated] Break the Ice - How to Make a Hit YouTube Reaction in Just 15 Minutes or Less
- Essential Insights for Crafting YouTube Intros A+B Methods
- 2024 Approved Essential Mobile Media Apps for High-Quality Photography/Videography
- Bites of Wisdom YouTube TV's Unique Selling Points
- The Leading 10 Online History Educators on Youtube
- Effective YouTube Banners Pros and Cons to Avoid for 2024
- [New] Cutting-Edge Techniques in YouTube Ad Design
- How to Make the Most of Your YouTube Watches GIF Magic for Devices
- Elevate Your YouTube Content SEO Methods Revealed
- Creative Video Ends Top 6 Budget-Friendly Options
- [New] Customizing Your Channel Icon, Banner & Thumbnail Ideas
- Navigating Creative Commons Rights Step-by-Step Tutorial
- [Updated] Deleted History Uncovered Your Guide to Online Video Retrieval
- [New] Comprehensive Guide to Crafting Engaging YouTube Outros
- New Animated Photos Made Easy The 9 Best Tools and Apps
- In 2024, 9 Best Free Android Monitoring Apps to Monitor Phone Remotely For your Lava Yuva 3 | Dr.fone
- Updated In 2024, Top 10+ Best Free Online Audio Cutters
- [Updated] 2024 Approved Maximizing Moolah How to Monetize Videos on the Social Network Giant
- The Updated Method to Bypass Samsung Galaxy A14 4G FRP
- [Updated] 2024 Approved Crafting Engaging Content for Facebook Live
- In 2024, Additional Tips About Sinnoh Stone For Honor 70 Lite 5G | Dr.fone
- [Updated] Crafting Conversational Magic How to Write Podcast Scripts
- In 2024, Unlocking Made Easy The Best 10 Apps for Unlocking Your Poco F5 Pro 5G Device
- In 2024, What Is an AI Presentation Maker?
- [Updated] 2024 Approved From Audience to Advocate Strategies for Powerful FB Covers
- New 2024 Approved Get Your Final Cut Pro 90 Days FREE Trial Here
- Invitation Video Creation Made Easy 10 Free Online Tools
- Digital Domain Dominance Selecting Top 2024 Cloud Providers
- How to Bypass FRP from Vivo Y200e 5G?
- In 2024, How To Stream Anything From Tecno Spark 10 4G to Apple TV | Dr.fone
- In 2024, Troubleshooting Error Connecting to the Apple ID Server On Apple iPhone 12 mini
- How To Transfer WhatsApp From iPhone 11 Pro to others devices? | Dr.fone
- In 2024, How to Track Nokia C210 Location by Number | Dr.fone
- Updated In 2024, Straightforward Speech Modification Software Overview, Principles, & Comparable Alternatives
- [Updated] Elevate Your Virtual Meetings Mastering Zoom Filter Tech for 2024
- In 2024, Easy Fixes How To Recover Forgotten iCloud Password From your Apple iPhone 13 Pro Max
- Creative Edge Best 10 No-Cost Editors for Windows & Mac Users
- Rapid TikTok Video Loading A Guide for 2024
- UltraFine A Deep Dive Into LG's Elite 4K Display Features
- IPhone's Blueprint for Extended Frame Mastery
- Mastering Slow Motion Photography Techniques for Instagram Posts for 2024
- Avoiding Ambiguity Clear Dating of Digital Pics for 2024
- Title: "[New] Crafting Cross-Social Media Content Strategy with YouTube & FB"
- Author: Kevin
- Created at : 2024-05-25 15:58:53
- Updated at : 2024-05-26 15:58:53
- Link: https://youtube-videos.techidaily.com/new-crafting-cross-social-media-content-strategy-with-youtube-and-fb/
- License: This work is licensed under CC BY-NC-SA 4.0.
