
!["[New] Converting YouTube Journeys Into Animated Expressions A Comprehensive Guide for Mobile/Desktop Users"](https://www.lifewire.com/thmb/1dejI3qVnuwrOlvxJZ6twafZ1e0=/540x405/filters:no_upscale():max_bytes(150000):strip_icc()/GettyImages-157187140-37e3901e6d024481b1ea394bff30cd84.jpg)
"[New] Converting YouTube Journeys Into Animated Expressions A Comprehensive Guide for Mobile/Desktop Users"
Converting YouTube Journeys Into Animated Expressions: A Comprehensive Guide for Mobile/Desktop Users
How to Create GIFs from YouTube Videos

Shanoon Cox
Mar 27, 2024• Proven solutions
Who doesn’t love Gifs? They are one of the most entertaining means to communicate on the internet. But have you tried creating a GIF from YouTube videos? Generally, GIFs use humorous or relevant scenes from movies or shows to make them relatable to the situation. If you’re someone who wants to create GIFs from YouTube, this is for you.
The article below will show you how to create GIFs from YouTube videos on the desktop computers and mobile devices with some free online GIF makers and apps.
Part 1: How to Create GIFs from a YouTube Video on the Computer?
1. FreeGifMAKER.me
FreeGifMaker is a simple online tool that allows the creation of animated Gifs free of cost. A minimum of two pictures has to be uploaded out of ten. It’s super easy and takes a couple of minutes to make a GIF from a YouTube video.
Find out how to create GIFs using FreeGifMaker.me using these steps.
- Open the website on your desktop by typing http://freegifmaker.me/youtube-to-gif/
- Go to YouTube and copy the URL of the video you want to make a GIF. Paste it on the above-mentioned website.
- Click on “Load YouTube Video” below the URL space and wait for a few seconds while the tool checks the video source.
- After the YouTube video is loaded, finally enter the gif duration, start time and click on the “Make a GIF button” and it will redirect you to the result page.
2. VEED.IO
VEED is another easy way to make GIFs from YouTube videos. VEED allows you to copy a YouTube video link of your choice and paste it on VEED without any difficulty. VEED not only creates GIFs from YouTube videos but also gives few more facilities like trimming, adding text, cropping to the clip which helps in creating super-cool GIFs. VEED has both free and Pro versions and is a perfect browser software.
How to use VEED only in 3 steps, know about it below:
- First, you need to copy the link to the YouTube video of your choice and paste it into VEED. From there the software will start importing the video into its project editor and you can start creating the GIF from there.
- For the editing part, you need to trim the part of the video in which you want to make the GIF and crop the GIF. You can easily do that by choosing the canvas size menu available. After that, you can add text, font style, color, and size to your GIF.
- In the last step, you just have to download the GIF which you have made in VEED.
3. Kapwing
Kapwing is a great stage for creating GIFs as well as videos and images. Kapwing is one of the most used and liked online video editors available. It provides one single step for all the things to do while creating a GIF – upload, editing, and sharing the file.
To create unique GIFs with Kapwing, follow these easy steps.
- First, you need to open Kapwing video editor and copy the URL of the YouTube video of your choice and paste it on Kapwing to create your GIF from the video. Any video which is shorter than 30 minutes and less than 500 MB is supported by Kapwing.
- Once you have uploaded the video, you will find the video appearing in the timeline. The section of the video that you want to make the GIF of needs to be cut with the sliders which are available at the end. A GIF can be usually of any length but to maintain good resolution, it is always advised to not make the segment more than 10 seconds.
- You can preview the GIF you created after trimming the video which will allow you to see how the final output would be like. Other edits such as cropping, adding text, and experimenting with the speed can be done on Kapwing as well.
- In the last and final step, you just need to export the GIF which you will find in the dropdown arrow available just beside the red “Export Video” button. Then click on the dropdown button and choose the option “Export as GIF”.
After processing the GIF, you need to save it by downloading it.
4. File-converter-online.com
This online free video editor can convert videos into GIF without any watermark and the maximum length of the GIF from the video clip can be 20 seconds, which can be set by you as needed. It provides a simple and free GIF maker that again offers special effects as well such as setting up the speed of the video.
You can create your desirable GIF from YouTube video in 3 easy steps.
- First, provide the specific link of the YouTube video which you want to create the GIF of in the space given.
- Apply the start time of the video by sliding with the given slider and then set the desirable duration of the GIF which is available in the next “Duration (seconds)” by sliding the seconds.
- Next, you can choose the speed of the video which is optional, and then set the resolution from higher to lower as per your choice.
- The final step involves creating the GIF which you can do by clicking on the red button “Create GIF from the video” available below the resolution option and finally the downloading will start after a short waiting on the next page.
5. Clideo
Clideo is one of the most reliable video converters available online. It can create an animated GIF from YouTube videos without much complication.
You can make GIF on your own by following the 3 easy steps mentioned below.
- First, you need to copy your YouTube video that you want to create a GIF with. Come back on Clideo and you will find a dropdown menu beside “Choose file”, there paste the link that you have copied earlier in the URL space. You can also select Google Drive or Dropbox for the same.
- After pasting the URL, you have to choose the ‘infinity sign’ given on the right side which will create an endless GIF without sound. Click on the ‘loop’ button available just below the panel on the right side.
- After completing the steps, you can watch the preview of the GIF and go back to editing if you need to change anything. Else save the output on your PC or Mobile phone.
Part 2: How to Make a GIF from a YouTube Video on the Android and iPhone?
1. GIF Toaster – GIF Maker
Gif Toaster is one of the video editing apps which makes the work of creating Gif from YouTube video super-easy. It can convert photos, panoramas and, videos into GIFs easily. You just need to download the app to make GIFs of your own choice.

You need to follow a few simple steps to create GIFs on your own.
- It is accessible on the iOS App Store and the Google Play for free so you need to install GIF Toaster on your device. Once done, tap the “Make GIF” option available below, you can also click “Combine GIFs” to combine more than one video. After completing, scroll down the dropdown menu beside “Video>GIF” and select the video which you want to convert into GIF.
- Once the selection is done, you will be provided with various options like “Basic Option”, “Direction Option”, “Effect Option” where you can control the playback speed, range along with other options available. You also get the option to choose “Filters” for making the GIF.
- After selecting the options of your choice, you have to scroll back to the top again and press “Convert” to quickly convert the video into GIF.
- Once the GIF is ready, you will be able to see the final result and you just need to ‘Save’ the file.
Part 3: Bonus: How to Create GIFS from YouTube video on iPhone without installing any app?
It is now possible to convert YouTube videos into GIFs by using the 5SecondsApp available for iOS. To make this possible you just require few things in your iPhone – the device should be iOS 11 or more, YouTube in the browser or app, and the 5SecondsApp already available in the App store.
First, you need to find a video that is not more than 10 seconds then begin the screen recording on the iOS recording feature and go back to YouTube to play the video and record the portion you need. To make the GIF you have to launch the app and tap the plus option there. Later, trim the video as you see fit. After you’re done, crop the video with the help of the crop tool and finally save it.
Part 4: Why Should You Use GIFs?
1. GIFs don’t prevent web pages from loading quickly
GIFs which are animated becomes more popular for any website as it gives meaning compacted in a small video the website uses to boost its chances of getting more views. While GIF does not make a website much slow but for better performance, it can be converted into lossy optimizations which do not make a huge difference in front of the human eyes or it can also be converted into HTML5 videos which makes the GIF 95% smaller in size.
2. GIF is an integral part of communicating on social media
Using GIFs makes any communication bright and friendly. It delivers great messages through short animated videos and has become the spotlight for communication in the past few years. Almost everyone using social media is using GIF for communicating with their friends and family.
Final Thoughts
There are many apps and video editors available today available free of cost. You can easily make GIFs from your most-liked video on YouTube. It is smooth to create GIFs on your own with the help of these editors mentioned above. Each one of them is having a free version and easy to handle so do not forget to try them next time you are making a GIF from YouTube videos.
Shanoon Cox
Shanoon Cox is a writer and a lover of all things video.
Follow @Shanoon Cox
Shanoon Cox
Mar 27, 2024• Proven solutions
Who doesn’t love Gifs? They are one of the most entertaining means to communicate on the internet. But have you tried creating a GIF from YouTube videos? Generally, GIFs use humorous or relevant scenes from movies or shows to make them relatable to the situation. If you’re someone who wants to create GIFs from YouTube, this is for you.
The article below will show you how to create GIFs from YouTube videos on the desktop computers and mobile devices with some free online GIF makers and apps.
Part 1: How to Create GIFs from a YouTube Video on the Computer?
1. FreeGifMAKER.me
FreeGifMaker is a simple online tool that allows the creation of animated Gifs free of cost. A minimum of two pictures has to be uploaded out of ten. It’s super easy and takes a couple of minutes to make a GIF from a YouTube video.
Find out how to create GIFs using FreeGifMaker.me using these steps.
- Open the website on your desktop by typing http://freegifmaker.me/youtube-to-gif/
- Go to YouTube and copy the URL of the video you want to make a GIF. Paste it on the above-mentioned website.
- Click on “Load YouTube Video” below the URL space and wait for a few seconds while the tool checks the video source.
- After the YouTube video is loaded, finally enter the gif duration, start time and click on the “Make a GIF button” and it will redirect you to the result page.
2. VEED.IO
VEED is another easy way to make GIFs from YouTube videos. VEED allows you to copy a YouTube video link of your choice and paste it on VEED without any difficulty. VEED not only creates GIFs from YouTube videos but also gives few more facilities like trimming, adding text, cropping to the clip which helps in creating super-cool GIFs. VEED has both free and Pro versions and is a perfect browser software.
How to use VEED only in 3 steps, know about it below:
- First, you need to copy the link to the YouTube video of your choice and paste it into VEED. From there the software will start importing the video into its project editor and you can start creating the GIF from there.
- For the editing part, you need to trim the part of the video in which you want to make the GIF and crop the GIF. You can easily do that by choosing the canvas size menu available. After that, you can add text, font style, color, and size to your GIF.
- In the last step, you just have to download the GIF which you have made in VEED.
3. Kapwing
Kapwing is a great stage for creating GIFs as well as videos and images. Kapwing is one of the most used and liked online video editors available. It provides one single step for all the things to do while creating a GIF – upload, editing, and sharing the file.
To create unique GIFs with Kapwing, follow these easy steps.
- First, you need to open Kapwing video editor and copy the URL of the YouTube video of your choice and paste it on Kapwing to create your GIF from the video. Any video which is shorter than 30 minutes and less than 500 MB is supported by Kapwing.
- Once you have uploaded the video, you will find the video appearing in the timeline. The section of the video that you want to make the GIF of needs to be cut with the sliders which are available at the end. A GIF can be usually of any length but to maintain good resolution, it is always advised to not make the segment more than 10 seconds.
- You can preview the GIF you created after trimming the video which will allow you to see how the final output would be like. Other edits such as cropping, adding text, and experimenting with the speed can be done on Kapwing as well.
- In the last and final step, you just need to export the GIF which you will find in the dropdown arrow available just beside the red “Export Video” button. Then click on the dropdown button and choose the option “Export as GIF”.
After processing the GIF, you need to save it by downloading it.
4. File-converter-online.com
This online free video editor can convert videos into GIF without any watermark and the maximum length of the GIF from the video clip can be 20 seconds, which can be set by you as needed. It provides a simple and free GIF maker that again offers special effects as well such as setting up the speed of the video.
You can create your desirable GIF from YouTube video in 3 easy steps.
- First, provide the specific link of the YouTube video which you want to create the GIF of in the space given.
- Apply the start time of the video by sliding with the given slider and then set the desirable duration of the GIF which is available in the next “Duration (seconds)” by sliding the seconds.
- Next, you can choose the speed of the video which is optional, and then set the resolution from higher to lower as per your choice.
- The final step involves creating the GIF which you can do by clicking on the red button “Create GIF from the video” available below the resolution option and finally the downloading will start after a short waiting on the next page.
5. Clideo
Clideo is one of the most reliable video converters available online. It can create an animated GIF from YouTube videos without much complication.
You can make GIF on your own by following the 3 easy steps mentioned below.
- First, you need to copy your YouTube video that you want to create a GIF with. Come back on Clideo and you will find a dropdown menu beside “Choose file”, there paste the link that you have copied earlier in the URL space. You can also select Google Drive or Dropbox for the same.
- After pasting the URL, you have to choose the ‘infinity sign’ given on the right side which will create an endless GIF without sound. Click on the ‘loop’ button available just below the panel on the right side.
- After completing the steps, you can watch the preview of the GIF and go back to editing if you need to change anything. Else save the output on your PC or Mobile phone.
Part 2: How to Make a GIF from a YouTube Video on the Android and iPhone?
1. GIF Toaster – GIF Maker
Gif Toaster is one of the video editing apps which makes the work of creating Gif from YouTube video super-easy. It can convert photos, panoramas and, videos into GIFs easily. You just need to download the app to make GIFs of your own choice.
You need to follow a few simple steps to create GIFs on your own.
- It is accessible on the iOS App Store and the Google Play for free so you need to install GIF Toaster on your device. Once done, tap the “Make GIF” option available below, you can also click “Combine GIFs” to combine more than one video. After completing, scroll down the dropdown menu beside “Video>GIF” and select the video which you want to convert into GIF.
- Once the selection is done, you will be provided with various options like “Basic Option”, “Direction Option”, “Effect Option” where you can control the playback speed, range along with other options available. You also get the option to choose “Filters” for making the GIF.
- After selecting the options of your choice, you have to scroll back to the top again and press “Convert” to quickly convert the video into GIF.
- Once the GIF is ready, you will be able to see the final result and you just need to ‘Save’ the file.
Part 3: Bonus: How to Create GIFS from YouTube video on iPhone without installing any app?
It is now possible to convert YouTube videos into GIFs by using the 5SecondsApp available for iOS. To make this possible you just require few things in your iPhone – the device should be iOS 11 or more, YouTube in the browser or app, and the 5SecondsApp already available in the App store.
First, you need to find a video that is not more than 10 seconds then begin the screen recording on the iOS recording feature and go back to YouTube to play the video and record the portion you need. To make the GIF you have to launch the app and tap the plus option there. Later, trim the video as you see fit. After you’re done, crop the video with the help of the crop tool and finally save it.
Part 4: Why Should You Use GIFs?
1. GIFs don’t prevent web pages from loading quickly
GIFs which are animated becomes more popular for any website as it gives meaning compacted in a small video the website uses to boost its chances of getting more views. While GIF does not make a website much slow but for better performance, it can be converted into lossy optimizations which do not make a huge difference in front of the human eyes or it can also be converted into HTML5 videos which makes the GIF 95% smaller in size.
2. GIF is an integral part of communicating on social media
Using GIFs makes any communication bright and friendly. It delivers great messages through short animated videos and has become the spotlight for communication in the past few years. Almost everyone using social media is using GIF for communicating with their friends and family.
Final Thoughts
There are many apps and video editors available today available free of cost. You can easily make GIFs from your most-liked video on YouTube. It is smooth to create GIFs on your own with the help of these editors mentioned above. Each one of them is having a free version and easy to handle so do not forget to try them next time you are making a GIF from YouTube videos.
Shanoon Cox
Shanoon Cox is a writer and a lover of all things video.
Follow @Shanoon Cox
Instantly Professional: Masterful Thumbnails Created Fast
As a content creator on YouTube, you know how important it is to have a strong thumbnail that stands out from the competition. Not only does a thumbnail help attract viewers to your video, but it’s also the first thing people see when they come across your content on the platform. That’s why it’s crucial to put effort into designing an eye-catching thumbnail that accurately represents your video.
When creating a thumbnail for your Valorant video, it’s important to remember that the recommended size is 1280 x 720 pixels. This will ensure that your thumbnail looks clear and professional on all devices. In addition to size, it’s also essential to consider the composition of your thumbnail. In this article, we’ll provide tips and tricks for creating professional Valorant thumbnails that will help boost your views and engagement.

What Is Valorant?
Valorant is a free-to-play tactical first-person shooter video game developed and published by Riot Games. The game was released in June 2020 and has quickly gained popularity due to its high-stakes, team-based gameplay and unique characters.
In Valorant, players choose from a roster of agents, each with their abilities and playstyle, and compete in 5v5 objective-based matches. The game has a variety of game modes, including the popular “Spike Rush” mode, which features a shorter round time and special abilities for all players. Valorant is available on Microsoft Windows and will soon be available on other platforms.

Why Create Thumbnails for Your Valorant YouTube Videos?
Creating a thumbnail for your Valorant YouTube video is an important step in the video creation process. A thumbnail is a visual representation of your video and can help attract viewers to your content.
When someone comes across your video in their feed, the thumbnail is often the first thing they see, so it’s crucial to make it as eye-catching and compelling as possible. A strong thumbnail can help increase your views and engagement and establish your brand as a content creator. By putting effort into designing a professional and relevant thumbnail, you can set your video apart from the competition and entice viewers to click and watch.
How To Make a Valorant Thumbnail for Free?
If you want to create a Valorant thumbnail for your YouTube videos but don’t want to spend any money, you still have plenty of options. One way to create a thumbnail for free is by using a free online design tool or thumbnail maker. Or, you can try Wondershare Filmora .
Free Download For Win 7 or later(64-bit)
Free Download For macOS 10.14 or later
Not only is Filmora a powerful video editing software, and it has a range of features and tools that make it easy to design and create custom thumbnails. Even better, you can use the trial version of Filmora to create a thumbnail for free. You need to download the trial version and start experimenting with the various design tools and templates to create a thumbnail that reflects your style and brand.
Creating a Valorant thumbnail for YouTube using Filmora can be very easy. Just follow these steps:
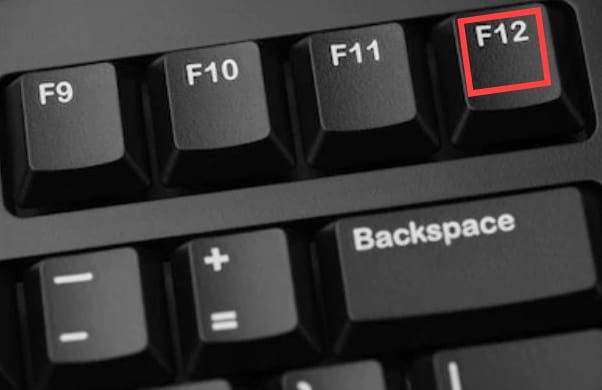
Step1 Take a screenshot of your gameplay by pressing the “F12“ key on your keyboard while in the game. This will save the screenshot to your computer.
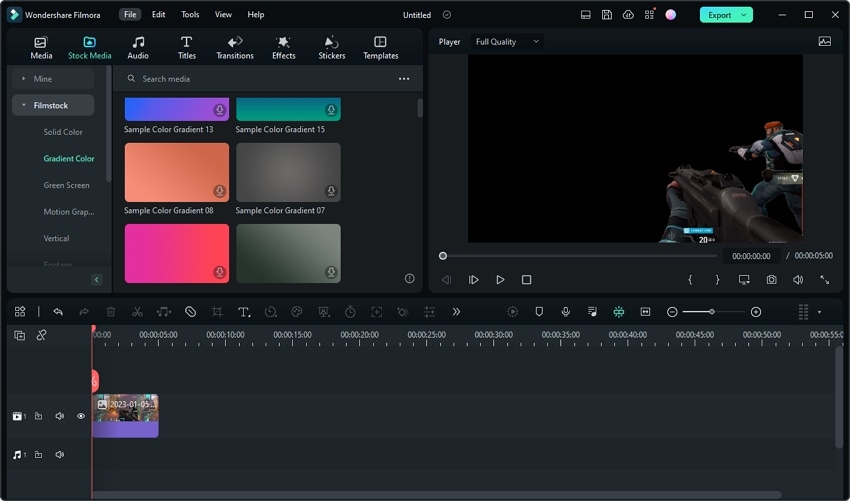
Step2 Launch Filmora and create a new project.

Step3 Import the screenshot into the media library by clicking the “Import“ button.

Step4 Drag the screenshot from the media library into the timeline.

Step5 Use the “Smart Cutout“ feature to select and cut out specific elements from the screenshot.

Step6 Choose the elements of the screenshot that you want to keep.

Step7 Remove any parts of the screenshot that you do not want to include in the thumbnail.

Step8 Extract the selected elements from the screenshot. You can resize the elements as desired.
Step9 Add a background to the track below the screenshot by dragging a background image from the media library into the timeline. Alternatively, you can import your image as a background by clicking the “Import“ button and selecting the image file from your computer.

Step10 Add an effect, such as a gun effect, by searching for the desired effect in the “Effects“ tab and dragging it into the timeline.

Step11 Adjust the opacity of the effect as desired.

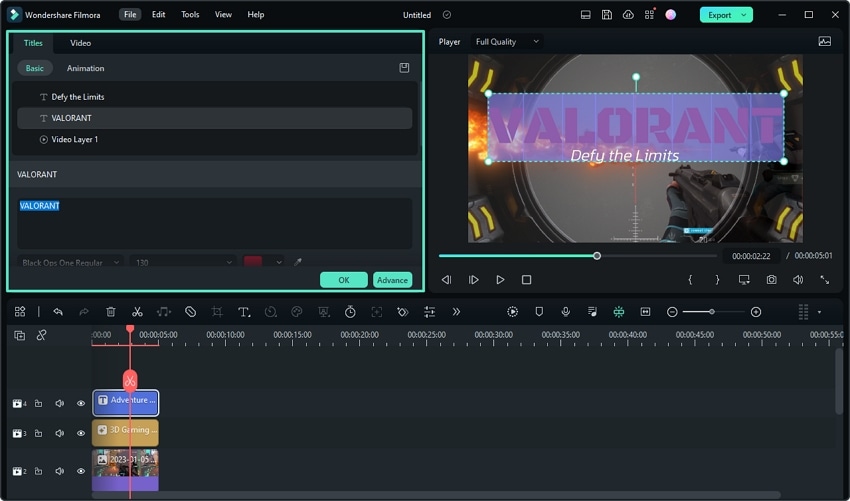
Step12 Add some titles and texts for your thumbnail.

Step13 Customize the appearance and rotation of the fire effect as desired.
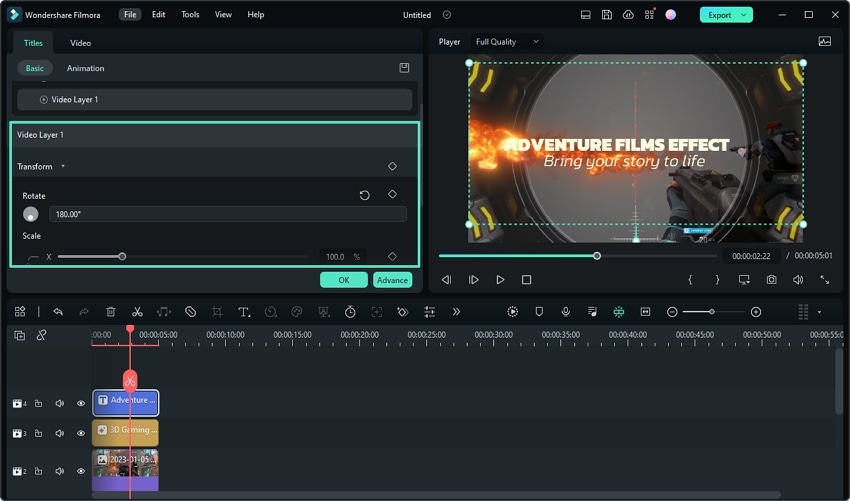
Step14 Edit the texts and adjust the appearance of the texts in the Titles window.
Step15 Choose a still frame that you like and take a snapshot of it.

Step16 Select the snapshot format and storage path. The snapshot will appear in the media library.

Step17 Right-click on the snapshot and select “Reveal in Explorer“ to find the file on your computer. You can now use it as your Valorant thumbnail.

Please note that while using the trial version of Filmora, a watermark will be added to the exported video. However, the watermark will not be added to the snapshot, so you can use the snapshot as your Valorant thumbnail without any issues.

Tips for Making Awesome Thumbnails for Your YouTube Valorant Videos
By following these tips, you can create an eye-catching and effective thumbnail for your Valorant YouTube videos that will help boost your views and engagement.
- Use high-quality images and graphics: A thumbnail with low-quality or pixelated images will not be as effective as a thumbnail with clear, high-resolution graphics.
- Use bold, eye-catching colors: Bright colors can help your thumbnail stand out in a crowded feed.
- Include relevant text: Use text to give viewers an idea of what to expect from your video and to entice them to click.
- Use clear, legible fonts: Make sure the text on your thumbnail is easy to read and doesn’t distract from the overall design.
- Keep it simple: Avoid overcrowding your thumbnail with too many elements or text. A clean, simple design is often more effective.
- Make it relevant: Your thumbnail should accurately represent the content of your video.
- Test different designs: Be bold and experiment with design elements and layouts to find what works best for your brand.
Want To Be a Valorant YouTuber? Learn From These 5 Ones
If you’re interested in becoming a Valorant YouTuber, there are many successful content creators in the Valorant community whom you can learn from. Here are five Valorant YouTubers that are worth checking out:
1. Shroud – Well-Known Valorant YouTuber With 6.8M Subscribers
Shroud is a well-known and respected content creator and player in the Valorant community. He has a strong background in professional CS:GO and has continued to thrive in the competitive Valorant scene despite being older than many other eSports players.
He is known for his gameplay videos and relaxed, easygoing personality, contributing to his widespread popularity and admiration among fans. In addition to his professional gameplay, Shroud is highly skilled and continues to compete at a high level, further solidifying his reputation as a top Valorant player.

2. TenZ – Popular Valorant Player With 1.6M Subscribers
TenZ is a highly skilled and popular Valorant player and content creator known for his exceptional ability in the game. He has achieved a high level of success and has been recognized as one of the best Valorant players in the world.
In addition to his full matches and 1v1 videos, TenZ also produces educational content, providing tips and tricks to his viewers. Despite facing some challenges and setbacks, TenZ has remained a prominent figure in the Valorant community and continues to be highly respected for his skills and contributions.

3. n0ted – Prolific Valorant YouTuber With 614k Subscribers
n0ted is a dedicated and prolific Valorant content creator, consistently uploading new videos to his YouTube channel daily. He offers a wide range of content, including gameplay highlights, funny moments, helpful tips, and updates on the latest happenings in the Valorant community.
His channel is a reliable source for those looking for consistently fresh and diverse Valorant content on YouTube. Whether you’re interested in learning new strategies, having a few laughs, or staying up to date with the latest developments in the game, n0ted’s channel has something for everyone.

4. Hiko - Valorant Content Creator With 382k YouTube Subscrbers
Hiko is a well-known Valorant content creator and former player of Counter-Strike: Global Offensive (CS:GO). He is known for his skill in first-person shooter games and his expertise in Valorant, which he shares through tips and gameplay videos on his channels on Twitch and YouTube.
Hiko is currently a content creator for 100 Thieves, a gaming organization he represents in various tournaments and competitions. He is a reliable source of high-quality Valorant content and regularly uploads new videos for his followers.

5. C9 meL – Professional Valorant Player With 33.6K YouTube Subscribers
C9 meL is a highly respected professional Valorant player and leader of the team Cloud 9 White. She is known for her sense of humor, helpful tips, and Agent tutorials and montages. As the in-game leader for her team, MeL has developed exceptional game sense and strategic skills, making her a valuable teacher and resource for other players.
In addition to her instructional content, MeL’s videos often feature a mix of comedy and skill, making them enjoyable for entertainment and improvement purposes. Overall, MeL is a talented and well-respected member of the Valorant community.

Conclusion
Creating a Valorant thumbnail for your YouTube videos can be important for promoting and attracting views to your content. Using Filmora, you can easily create a thumbnail for free by following the steps outlined in this article.
Additionally, there are many successful Valorant YouTubers who offer a range of content and can serve as inspiration for those interested in starting their channel. Creating visually appealing and engaging thumbnails ensures that your videos stand out and draw in viewers.
Free Download For macOS 10.14 or later
Not only is Filmora a powerful video editing software, and it has a range of features and tools that make it easy to design and create custom thumbnails. Even better, you can use the trial version of Filmora to create a thumbnail for free. You need to download the trial version and start experimenting with the various design tools and templates to create a thumbnail that reflects your style and brand.
Creating a Valorant thumbnail for YouTube using Filmora can be very easy. Just follow these steps:
Step1 Take a screenshot of your gameplay by pressing the “F12“ key on your keyboard while in the game. This will save the screenshot to your computer.
Step2 Launch Filmora and create a new project.
Step3 Import the screenshot into the media library by clicking the “Import“ button.
Step4 Drag the screenshot from the media library into the timeline.
Step5 Use the “Smart Cutout“ feature to select and cut out specific elements from the screenshot.
Step6 Choose the elements of the screenshot that you want to keep.
Step7 Remove any parts of the screenshot that you do not want to include in the thumbnail.
Step8 Extract the selected elements from the screenshot. You can resize the elements as desired.
Step9 Add a background to the track below the screenshot by dragging a background image from the media library into the timeline. Alternatively, you can import your image as a background by clicking the “Import“ button and selecting the image file from your computer.
Step10 Add an effect, such as a gun effect, by searching for the desired effect in the “Effects“ tab and dragging it into the timeline.
Step11 Adjust the opacity of the effect as desired.
Step12 Add some titles and texts for your thumbnail.
Step13 Customize the appearance and rotation of the fire effect as desired.
Step14 Edit the texts and adjust the appearance of the texts in the Titles window.
Step15 Choose a still frame that you like and take a snapshot of it.
Step16 Select the snapshot format and storage path. The snapshot will appear in the media library.
Step17 Right-click on the snapshot and select “Reveal in Explorer“ to find the file on your computer. You can now use it as your Valorant thumbnail.
Please note that while using the trial version of Filmora, a watermark will be added to the exported video. However, the watermark will not be added to the snapshot, so you can use the snapshot as your Valorant thumbnail without any issues.
Tips for Making Awesome Thumbnails for Your YouTube Valorant Videos
By following these tips, you can create an eye-catching and effective thumbnail for your Valorant YouTube videos that will help boost your views and engagement.
- Use high-quality images and graphics: A thumbnail with low-quality or pixelated images will not be as effective as a thumbnail with clear, high-resolution graphics.
- Use bold, eye-catching colors: Bright colors can help your thumbnail stand out in a crowded feed.
- Include relevant text: Use text to give viewers an idea of what to expect from your video and to entice them to click.
- Use clear, legible fonts: Make sure the text on your thumbnail is easy to read and doesn’t distract from the overall design.
- Keep it simple: Avoid overcrowding your thumbnail with too many elements or text. A clean, simple design is often more effective.
- Make it relevant: Your thumbnail should accurately represent the content of your video.
- Test different designs: Be bold and experiment with design elements and layouts to find what works best for your brand.
Want To Be a Valorant YouTuber? Learn From These 5 Ones
If you’re interested in becoming a Valorant YouTuber, there are many successful content creators in the Valorant community whom you can learn from. Here are five Valorant YouTubers that are worth checking out:
1. Shroud – Well-Known Valorant YouTuber With 6.8M Subscribers
Shroud is a well-known and respected content creator and player in the Valorant community. He has a strong background in professional CS:GO and has continued to thrive in the competitive Valorant scene despite being older than many other eSports players.
He is known for his gameplay videos and relaxed, easygoing personality, contributing to his widespread popularity and admiration among fans. In addition to his professional gameplay, Shroud is highly skilled and continues to compete at a high level, further solidifying his reputation as a top Valorant player.
2. TenZ – Popular Valorant Player With 1.6M Subscribers
TenZ is a highly skilled and popular Valorant player and content creator known for his exceptional ability in the game. He has achieved a high level of success and has been recognized as one of the best Valorant players in the world.
In addition to his full matches and 1v1 videos, TenZ also produces educational content, providing tips and tricks to his viewers. Despite facing some challenges and setbacks, TenZ has remained a prominent figure in the Valorant community and continues to be highly respected for his skills and contributions.
3. n0ted – Prolific Valorant YouTuber With 614k Subscribers
n0ted is a dedicated and prolific Valorant content creator, consistently uploading new videos to his YouTube channel daily. He offers a wide range of content, including gameplay highlights, funny moments, helpful tips, and updates on the latest happenings in the Valorant community.
His channel is a reliable source for those looking for consistently fresh and diverse Valorant content on YouTube. Whether you’re interested in learning new strategies, having a few laughs, or staying up to date with the latest developments in the game, n0ted’s channel has something for everyone.
4. Hiko - Valorant Content Creator With 382k YouTube Subscrbers
Hiko is a well-known Valorant content creator and former player of Counter-Strike: Global Offensive (CS:GO). He is known for his skill in first-person shooter games and his expertise in Valorant, which he shares through tips and gameplay videos on his channels on Twitch and YouTube.
Hiko is currently a content creator for 100 Thieves, a gaming organization he represents in various tournaments and competitions. He is a reliable source of high-quality Valorant content and regularly uploads new videos for his followers.
5. C9 meL – Professional Valorant Player With 33.6K YouTube Subscribers
C9 meL is a highly respected professional Valorant player and leader of the team Cloud 9 White. She is known for her sense of humor, helpful tips, and Agent tutorials and montages. As the in-game leader for her team, MeL has developed exceptional game sense and strategic skills, making her a valuable teacher and resource for other players.
In addition to her instructional content, MeL’s videos often feature a mix of comedy and skill, making them enjoyable for entertainment and improvement purposes. Overall, MeL is a talented and well-respected member of the Valorant community.
Conclusion
Creating a Valorant thumbnail for your YouTube videos can be important for promoting and attracting views to your content. Using Filmora, you can easily create a thumbnail for free by following the steps outlined in this article.
Additionally, there are many successful Valorant YouTubers who offer a range of content and can serve as inspiration for those interested in starting their channel. Creating visually appealing and engaging thumbnails ensures that your videos stand out and draw in viewers.
Also read:
- 15 Premier Sci-Tech Vloggers for Enlightened Learning
- Unlock Your Potential 50 FREE, High-Impact Banners at Your Disposal!
- In 2024, Bridging App Dimensions with YouTube Shorts
- Simple Guide YouTube to MP3 on Mac
- 20 Must-Watch YouTube Music Bands
- Beginning with YouTube Essential Steps to Create Your Space for 2024
- Enhance Videos Seamlessly Using YouTube Studio Editor for 2024
- Unleash Your YouTube Potential with Easy Techniques
- [Updated] Earnings Explorer What You Get for Watching One Million Videos?
- In 2024, Designing a Trailer Blueprint to Amplify Channel Income
- [Updated] Enhancing Beauty on Streams via Color Grading
- [New] Decoding the Best of Beauty YouTube's Elite Artists Showcased
- In 2024, Emulate Video Success Gaining YouTube Confidence Skills
- Elevate Your Content The Secrets to Increased Subscribers for 2024
- Easing Into Your YouTube Watches 3 Methods (50 Chars)
- 2024 Approved Boosting Channel Traffic with YouTube Backlink Tactics
- In 2024, Content Creation in Today’s Revenue Landscape
- 2024 Approved Charting the Course of YouTube Success Through Social Blade Analysis
- Bite-Sized Video Lessons, Clearly for 2024
- In 2024, Enhance YouTube Livestreams Webcam Selection Mastery
- In 2024, Engaging Your Audience with Optimal Video Concepts
- [New] Are There Risks to Influencing View Counts Financially?
- Convert Your Streaming Top Free Video to Audio Tools for 2024
- Sparkle up Video Previews Thin Neon Lines Add
- In 2024, Deciphering the Art of Personalized Playlist Curation for YouTube
- Elevate Engagement with These 10 Premier YouTube SEO Instruments for 2024
- [New] Climbing to YouTube Zenith A Step-by-Step Guide to Creative Studio Mastery
- In 2024, A Filmmaker's Dream The 8 Best No-Fee Video Editors on the Market
- Creating a Custom URL for YouTube Autosub
- Joining Forces with YouTube The 2024 Partner Program Journey
- Downloading Your YouTube Watch Lists Step by Step for 2024
- In 2024, Breaking the Mold High-Fidelity Sound without a Microphone
- [New] 10 Strategies to Make Money on YouTube Shorts Easily
- Cut the Cost on Downloads Exclusive Access to This List of 23 Affordable Extractors for 2024
- Maximize Creativity with No Investment Explore These 8 Video Editors
- Leading Linux Editors Top 8 Video Cutters
- [Updated] Earnings Expertise on Streaming Services The Ultimate Guide
- 9 Innovative Workout Challenges for Dynamic Viewers for 2024
- Taking Photos Steadily on One Leg?
- The Power of Perception Transforming Thumbnails with Captivating BGs & FX
- A Pro's Handbook to YouTube Income Multiplatform Use
- [New] Amplify Your Storytelling Seamlessly Insert Music Into YouTube Videos
- Kitchen Kings & Queens Crown Your Channel With a Name
- 2024 Approved Best 9 Free YouTube Logo Makers
- Streamline Your Vlog's Sound with Effective Tips
- The Aesthetic Almanac Makeup, Hair & More on YouTube
- Tunes on Demand Picks of 6 Top-Ranked Free Android Apps for YouTube
- Principles of Crafting Compelling YouTube Introduction Vids
- Ensure Flawless Playback How to Set YouTube Video Size Right
- Forgotten The Voicemail Password Of Realme 12 Pro 5G? Try These Fixes
- [New] In 2024, Mastering the Art of Visual Communication An Essential Guide to Using GIFs on Discord
- New Free Adobe Premiere Pro CS6 for Mac - No Subscription Required
- [New] Key 10 TikTok Filter Techniques For Memorable Videos for 2024
- Action Sequence Showdown Hero5 Black Versus Hero4 Silver for 2024
- Learn the Fastest Way to Retrieve GIFs Directly From Social Platforms Like FB
- In 2024, Downloading SamFw FRP Tool 3.0 for Vivo X100
- AndroVid Video Editor – Complete Review for 2024
- Locate the Wolf Whistle Ambiance for 2024
- [Updated] In 2024, 63 Chuckle Factory on TikTok
- Title: "[New] Converting YouTube Journeys Into Animated Expressions A Comprehensive Guide for Mobile/Desktop Users"
- Author: Kevin
- Created at : 2024-05-25 15:58:10
- Updated at : 2024-05-26 15:58:10
- Link: https://youtube-videos.techidaily.com/new-converting-youtube-journeys-into-animated-expressions-a-comprehensive-guide-for-mobiledesktop-users/
- License: This work is licensed under CC BY-NC-SA 4.0.
