
!["[New] Chrome to iPhone A Guide to Stripping YouTube Ads"](https://www.lifewire.com/thmb/U4MhHoz9AdQJe4tEoeV-ONBuCas=/360x240/filters:no_upscale():max_bytes(150000):strip_icc():format(webp)/sony-ps5-d3975e63d2ff47e6ac4e81768b79801c.jpg)
"[New] Chrome to iPhone A Guide to Stripping YouTube Ads"
Chrome to iPhone: A Guide to Stripping YouTube Ads
How to Block YouTube Ads on Chrome/Firefox/Android/iPhone

Richard Bennett
Mar 27, 2024• Proven solutions
YouTube is unquestionably the world’s most popular video-sharing platform with a massive 2 billion active monthly users. With such a large audience, advertisers are pouring a lot of funds into Google’s video platform that makes up a big portion of the company’s advertising revenue. Unfortunately, according to the BI Intelligence Digital Trust Survey , YouTube serves up the most annoying ads with 43 percent of the respondents considering YouTube ads most irksome.
Every now and then you’ll get annoyed with the obtrusive ads and ask how to block YouTube ads. Getting away with the un-skippable and plagued 30-second ads during the playback or the onscreen pop-up ads that come suddenly on the playing screen will make your life miserable when watching a show or practicing a dance move. To help you escape the forced ads on YouTube we’ll go through the YouTube ad blocking techniques available. You will learn:
- Part 1: How to block YouTube ads on the computer (Chrome & Firefox)
- Part 2: How to block YouTube ads on the mobile phone (Android & iPhone)
Here is the video guide to help you block Youtube ads on the computer and mobile phone


Part 1: How to block YouTube ads on the computer (Chrome & Firefox)
In case you care about and want to support content creators on YouTube, you can buy the YouTube Premium which will also give you access to exclusive shows and will eliminate ads from your YouTube life.
However, as most of us won’t like the idea of paying for a free service, there are possible solutions of how to block YouTube ads in Chrome or Firefox. You will need to install a third-party browser extension proficient in blocking the annoying YouTube ads in Google Chrome or Mozilla Firefox.
1.Google Chrome
Chrome allows you to have extensions to enhance the browser features and interact more with the content presented to you. These third-party extensions or sometimes called Add-ons can help prevent the irritating YouTube ads to show up on the site. To install them, follow the steps.
- 1. Open Google Chrome browser and go to Menu.
- 2. In the Menu look for “More Tools” and in there tap the “Extensions”.
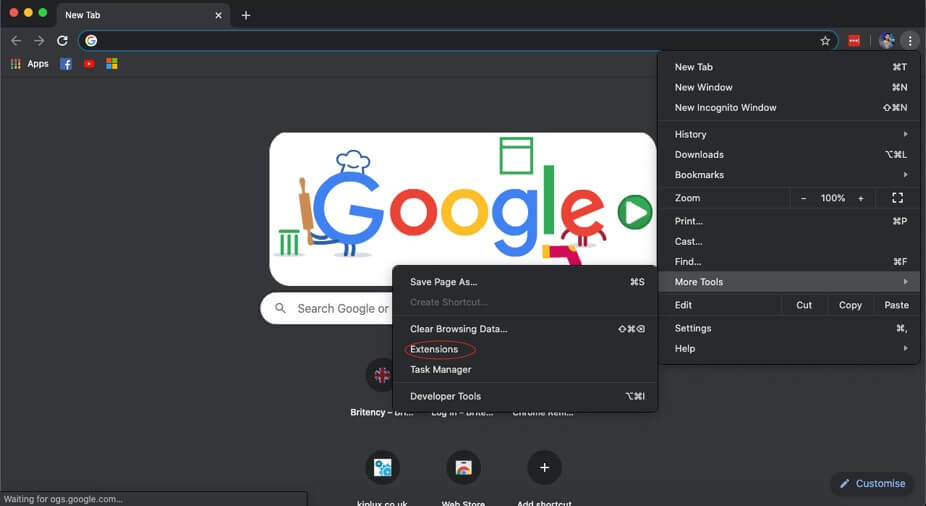
- 3. In the Extensions tap the “Main menu” at the left-hand side. It will show the menu here open the Chrome Web Store. Or you can simply open Chrome Web Store
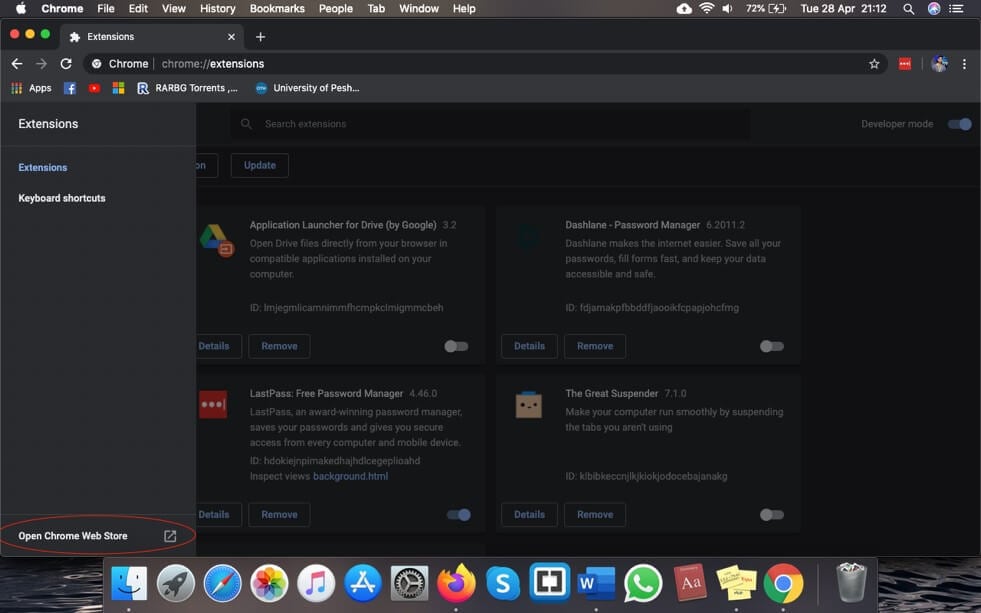
- 4. You will need to sign in with your Google account if you’re not already signed in.
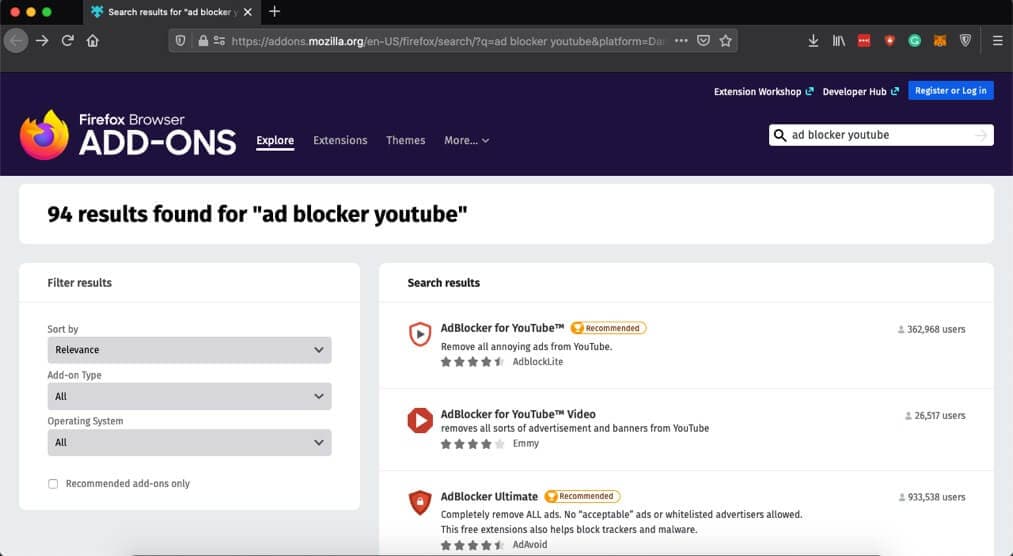
- 5. In the search box type “ad blocker YouTube” and tap enter. You’ll see a list of ad blockers available for chrome.
- 6. You will adblocker’s specifically for YouTube ads. Select whichever you like and it will block the YouTube ads on Chrome.

2.Mozilla Firefox
You can also install third-party extensions to block YouTube ads from popping up in the middle of the playback. To install the extensions, follow the steps.
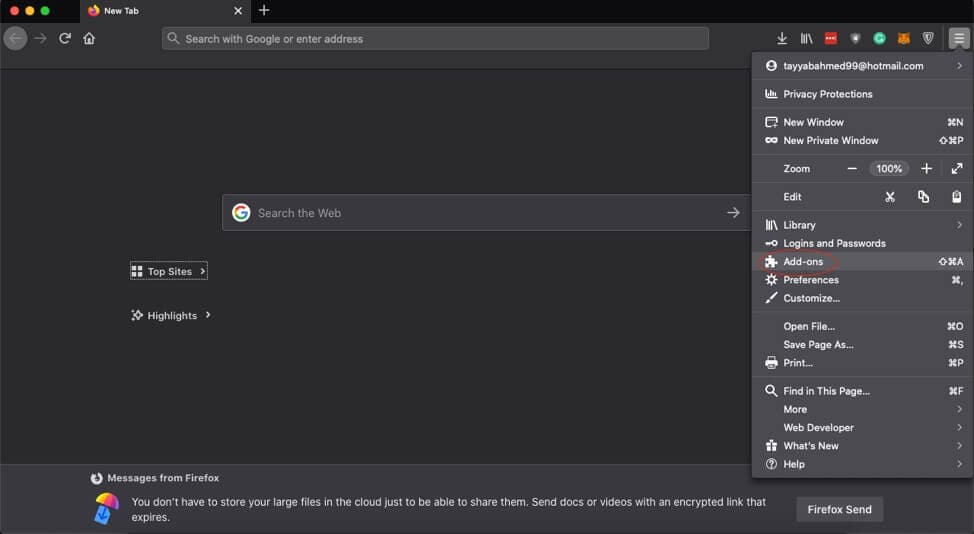
- 1. Tap the Hamburger Menu on Firefox at the top-right corner and select Add-ons.
- 2. In the search bar “Find more extensions” type “ad blocker YouTube” and press enter.
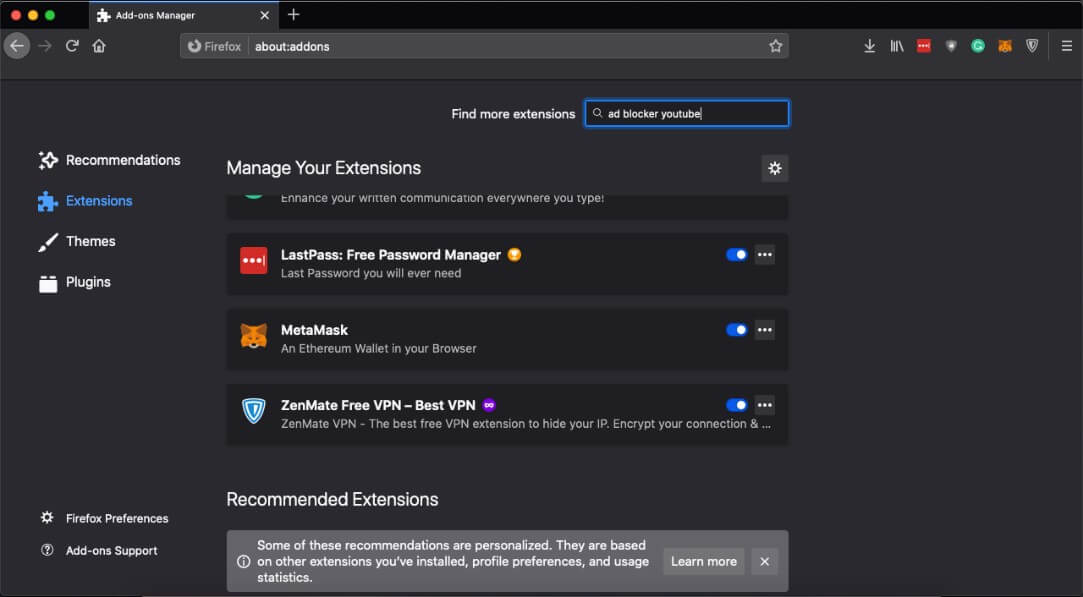
- 3. Select an appropriate ad blocker and it will protect you from the irritating ads.
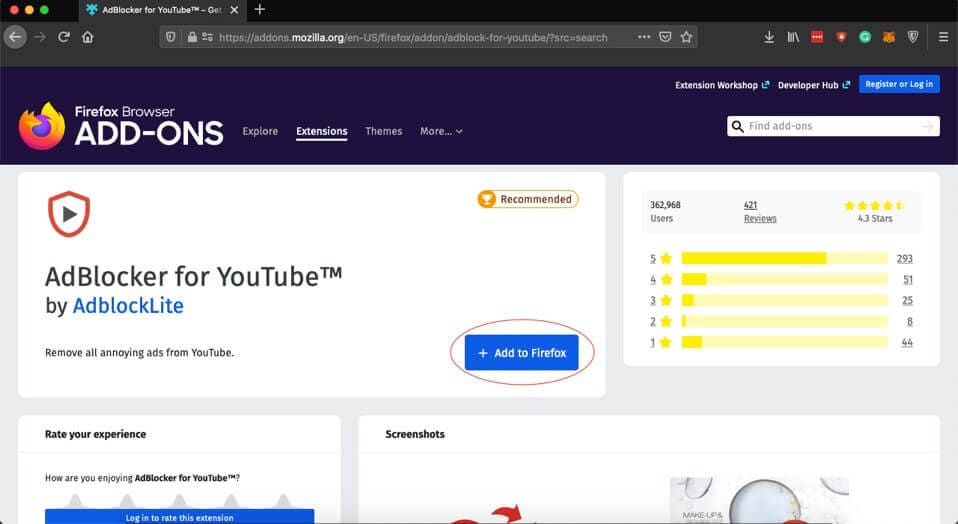
- 4. Tap the “Add to Firefox” to download the extension.
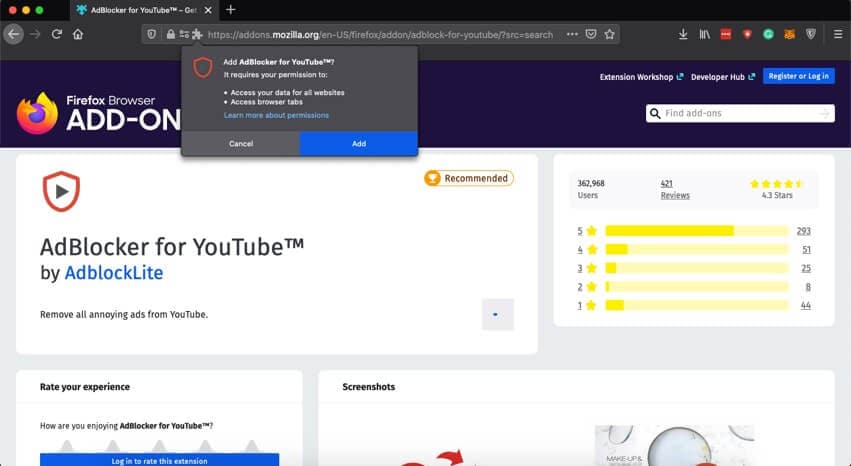
- 5. It will ask for permission, press “Add” again to grant the permissions.
Part 2: How to block YouTube ads on the mobile phone (Android & iPhone)
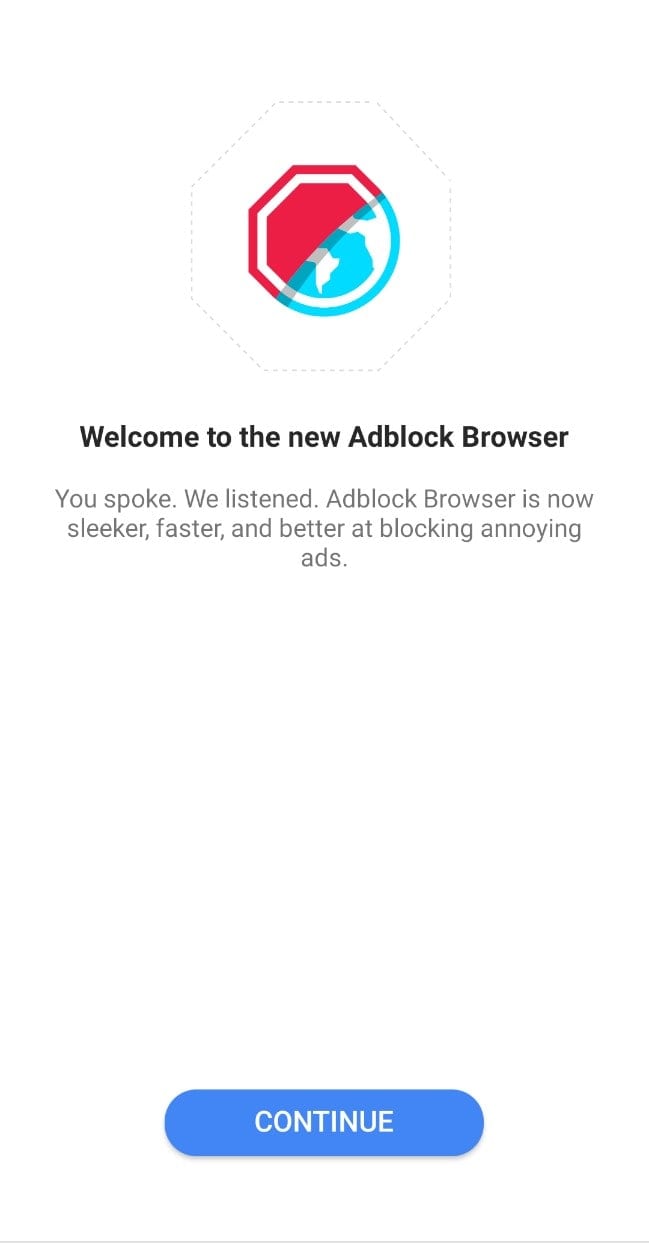
Ads can cause inconvenience and make YouTube watching a sour experience. To protect yourself from the constant nagging ads on mobile platforms both Android and iPhone you can utilize the numerous ad-blocking apps for Android and iOS. Though the simplest method of blocking the ads and watch YouTube content without ads is to use the Adblock Browser available both for both devices at Google Play Store and Apple Store. This technique won’t require you to root your Android phone or jailbreak the iPhone for watching ad-free YouTube videos.
1.Android
Android is pretty flexible and allows you to add many feature-rich third-party apps. Though there might be other options available to get rid of the irksome YouTube ads, the easiest and single app solution to remove ads is downloading an Adblock browser app that will act as your default browser when you try to want to watch YouTube videos. The steps to set up your Android to block YouTube ads are down here.
- 1. Click Here to install Adblock Browser on your Android device.
- 2. It is a full-fledged browser and can act as your primary browser for YouTube playback.

- 3. After installing the Adblock Browser your Android device may still try to play videos in the YouTube app.
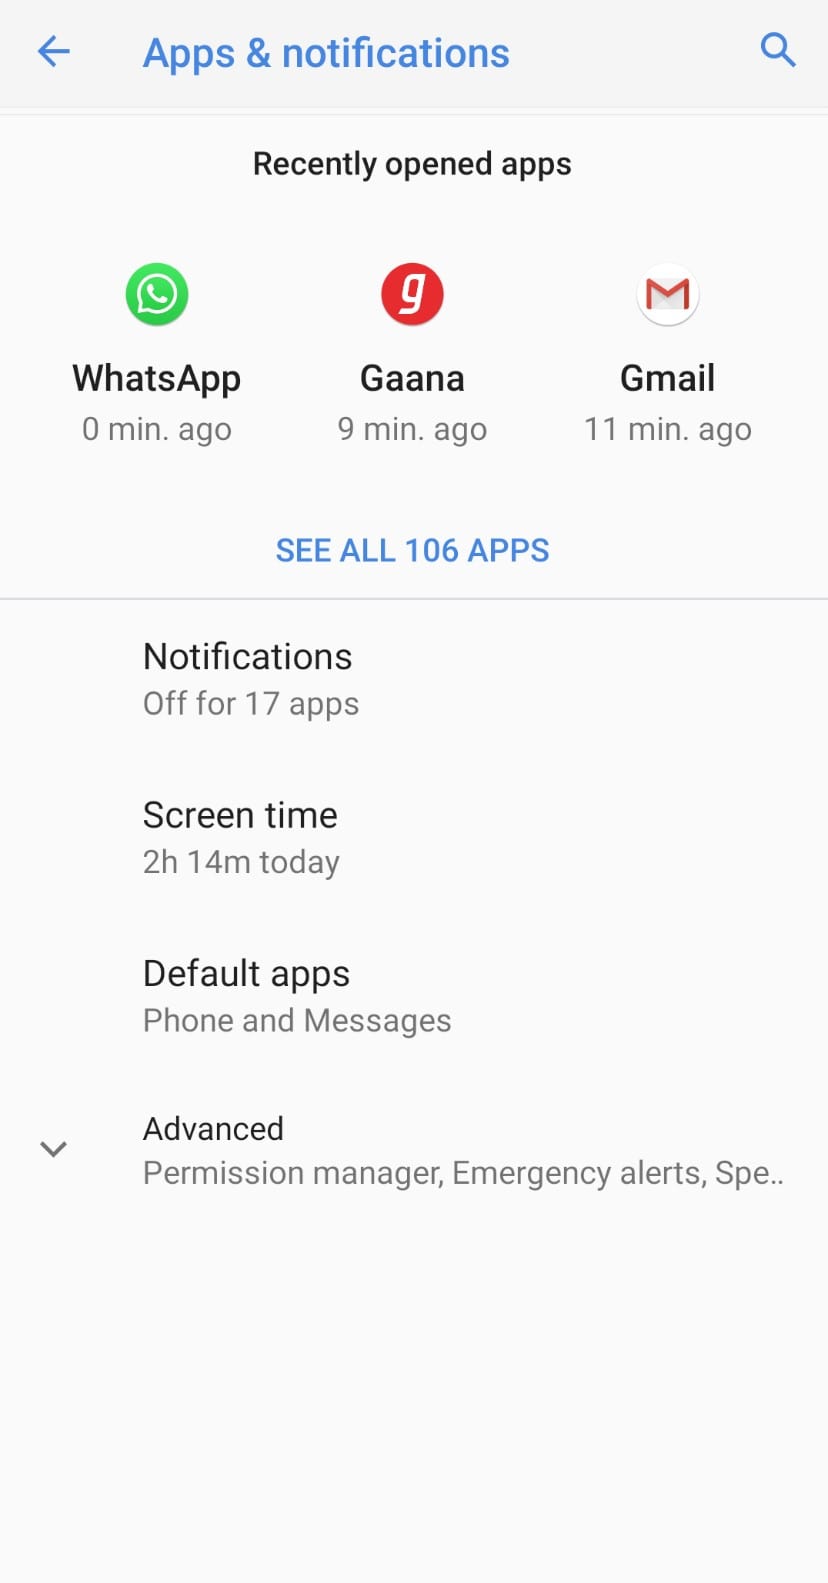
- 4. To current that, open the “Settings” on your Android and go to “Apps & notifications” and press See all. In the apps find YouTube, tap in to see app info.
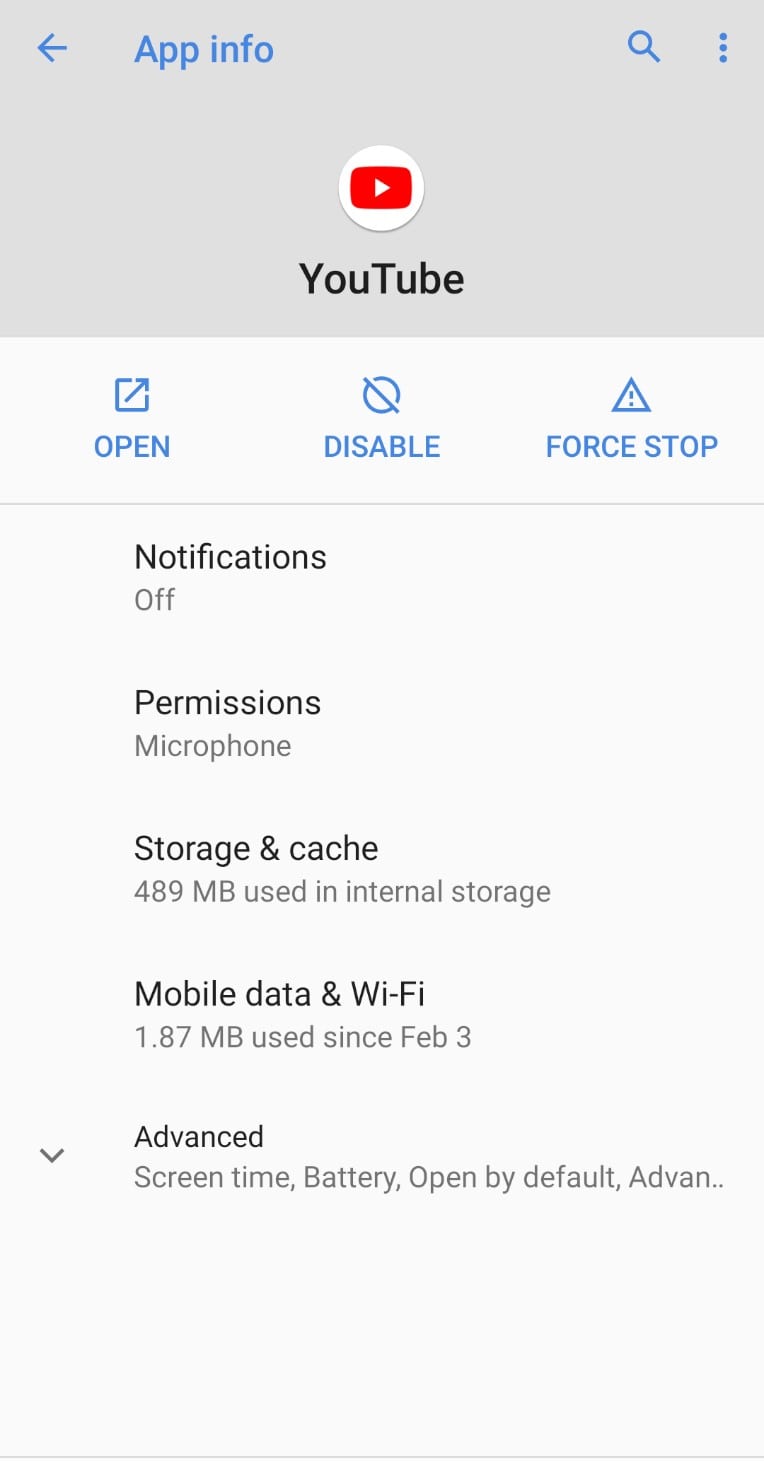
- 5. In the App info screen click “Storage & cache”.
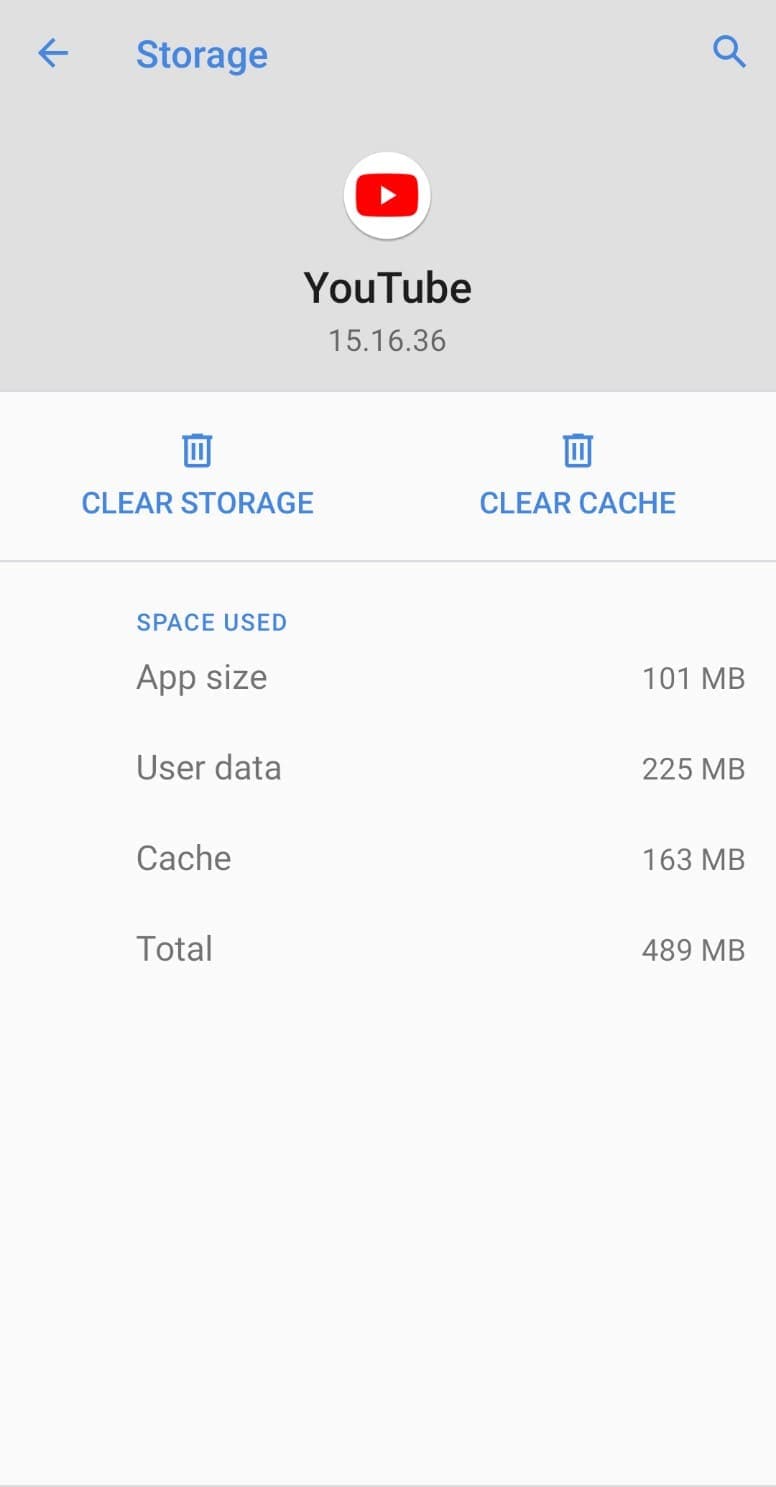
- 6. Tap on “Clear storage”. This will clear all the cache and data of the app from the operating system.
- 7. Now your YouTube videos will be played in the Adblock Browser.
2.iPhone
On iOS, you can keep using the default iOS browser and still be able to block YouTube ads in the Safari browser app. You can add third-party ad blocker apps to disable YouTube ads on your iPhone and link it as the Content Blocker in the Safari settings. To activate the ad blocking feature, follow the steps.
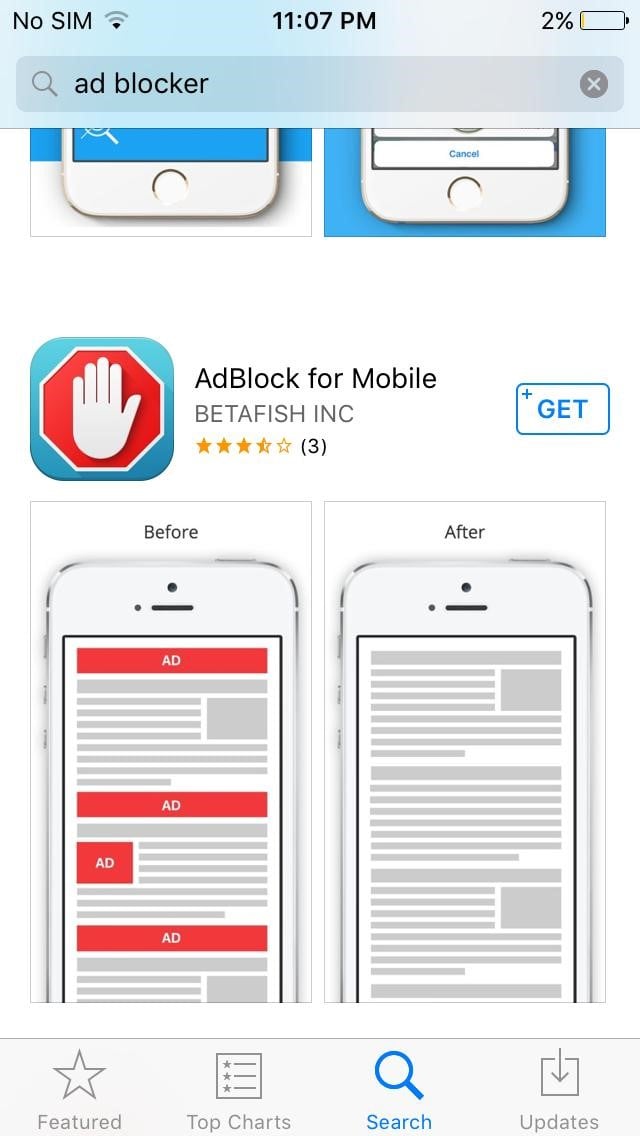
- 1. Open Apple Store and download any ad blocker app you like.
- 2. Now come to the iPhone device Settings and go to Safari.
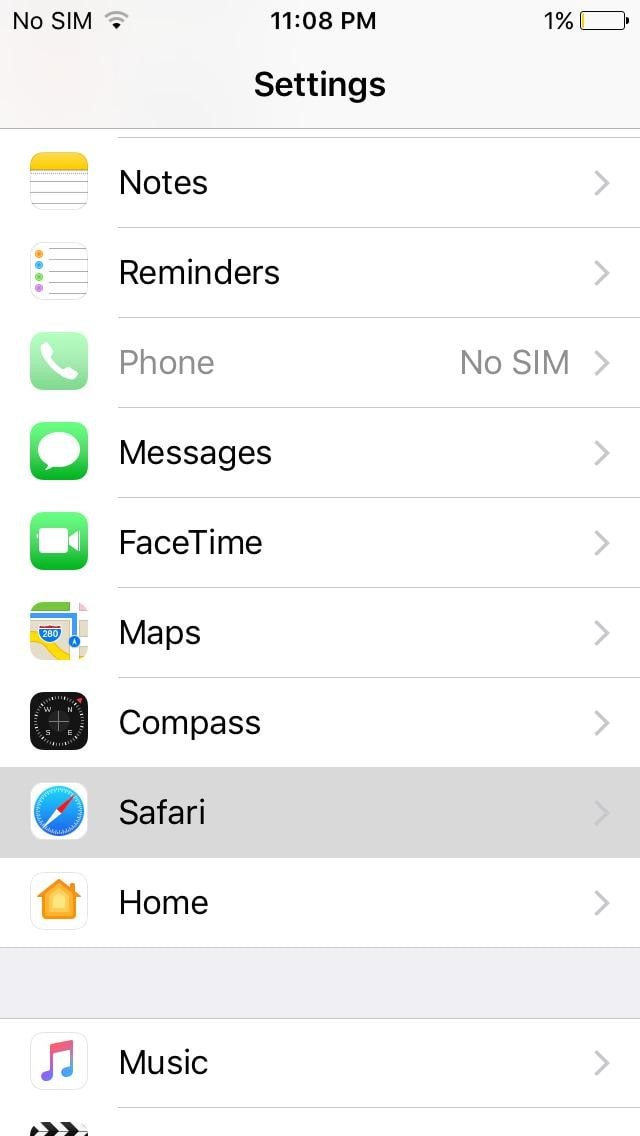
- 3. In the Safari settings, you will find a “Block Pop-ups” toggle button, activate it.
- 4. Right below the toggle button, you’ll see the “Content Blockers” tap to configure it.
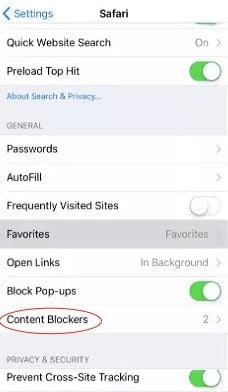
- 5. The ad blocker app you just downloaded will be displaying under Allow these content blockers, enable it with the toggle button.
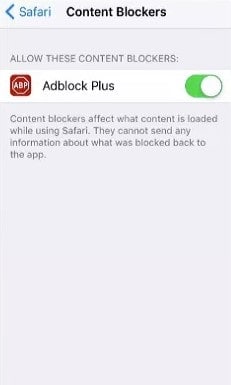
- 6. Now your Safari browser will block all YouTube ads during playback.
Conclusion
Ads can be annoying and time-wasting if you are being forced to watch them every other minute. YouTube is as addictive as its active userbase depict and during that addiction, anyone will not accept an interruption. To do away with the disruptive adds and block YouTube ads on any of your devices from PC to Mac, or mobile devices you need to have an adblocker application that will disable YouTube ads and make your video viewing experience smooth and relishing.
Richard Bennett
Richard Bennett is a writer and a lover of all things video.
Follow @Richard Bennett
Richard Bennett
Mar 27, 2024• Proven solutions
YouTube is unquestionably the world’s most popular video-sharing platform with a massive 2 billion active monthly users. With such a large audience, advertisers are pouring a lot of funds into Google’s video platform that makes up a big portion of the company’s advertising revenue. Unfortunately, according to the BI Intelligence Digital Trust Survey , YouTube serves up the most annoying ads with 43 percent of the respondents considering YouTube ads most irksome.
Every now and then you’ll get annoyed with the obtrusive ads and ask how to block YouTube ads. Getting away with the un-skippable and plagued 30-second ads during the playback or the onscreen pop-up ads that come suddenly on the playing screen will make your life miserable when watching a show or practicing a dance move. To help you escape the forced ads on YouTube we’ll go through the YouTube ad blocking techniques available. You will learn:
- Part 1: How to block YouTube ads on the computer (Chrome & Firefox)
- Part 2: How to block YouTube ads on the mobile phone (Android & iPhone)
Here is the video guide to help you block Youtube ads on the computer and mobile phone
Part 1: How to block YouTube ads on the computer (Chrome & Firefox)
In case you care about and want to support content creators on YouTube, you can buy the YouTube Premium which will also give you access to exclusive shows and will eliminate ads from your YouTube life.
However, as most of us won’t like the idea of paying for a free service, there are possible solutions of how to block YouTube ads in Chrome or Firefox. You will need to install a third-party browser extension proficient in blocking the annoying YouTube ads in Google Chrome or Mozilla Firefox.
1.Google Chrome
Chrome allows you to have extensions to enhance the browser features and interact more with the content presented to you. These third-party extensions or sometimes called Add-ons can help prevent the irritating YouTube ads to show up on the site. To install them, follow the steps.
- 1. Open Google Chrome browser and go to Menu.
- 2. In the Menu look for “More Tools” and in there tap the “Extensions”.
- 3. In the Extensions tap the “Main menu” at the left-hand side. It will show the menu here open the Chrome Web Store. Or you can simply open Chrome Web Store
- 4. You will need to sign in with your Google account if you’re not already signed in.
- 5. In the search box type “ad blocker YouTube” and tap enter. You’ll see a list of ad blockers available for chrome.
- 6. You will adblocker’s specifically for YouTube ads. Select whichever you like and it will block the YouTube ads on Chrome.
2.Mozilla Firefox
You can also install third-party extensions to block YouTube ads from popping up in the middle of the playback. To install the extensions, follow the steps.
- 1. Tap the Hamburger Menu on Firefox at the top-right corner and select Add-ons.
- 2. In the search bar “Find more extensions” type “ad blocker YouTube” and press enter.
- 3. Select an appropriate ad blocker and it will protect you from the irritating ads.
- 4. Tap the “Add to Firefox” to download the extension.
- 5. It will ask for permission, press “Add” again to grant the permissions.
Part 2: How to block YouTube ads on the mobile phone (Android & iPhone)
Ads can cause inconvenience and make YouTube watching a sour experience. To protect yourself from the constant nagging ads on mobile platforms both Android and iPhone you can utilize the numerous ad-blocking apps for Android and iOS. Though the simplest method of blocking the ads and watch YouTube content without ads is to use the Adblock Browser available both for both devices at Google Play Store and Apple Store. This technique won’t require you to root your Android phone or jailbreak the iPhone for watching ad-free YouTube videos.
1.Android
Android is pretty flexible and allows you to add many feature-rich third-party apps. Though there might be other options available to get rid of the irksome YouTube ads, the easiest and single app solution to remove ads is downloading an Adblock browser app that will act as your default browser when you try to want to watch YouTube videos. The steps to set up your Android to block YouTube ads are down here.
- 1. Click Here to install Adblock Browser on your Android device.
- 2. It is a full-fledged browser and can act as your primary browser for YouTube playback.
- 3. After installing the Adblock Browser your Android device may still try to play videos in the YouTube app.
- 4. To current that, open the “Settings” on your Android and go to “Apps & notifications” and press See all. In the apps find YouTube, tap in to see app info.
- 5. In the App info screen click “Storage & cache”.
- 6. Tap on “Clear storage”. This will clear all the cache and data of the app from the operating system.
- 7. Now your YouTube videos will be played in the Adblock Browser.
2.iPhone
On iOS, you can keep using the default iOS browser and still be able to block YouTube ads in the Safari browser app. You can add third-party ad blocker apps to disable YouTube ads on your iPhone and link it as the Content Blocker in the Safari settings. To activate the ad blocking feature, follow the steps.
- 1. Open Apple Store and download any ad blocker app you like.
- 2. Now come to the iPhone device Settings and go to Safari.
- 3. In the Safari settings, you will find a “Block Pop-ups” toggle button, activate it.
- 4. Right below the toggle button, you’ll see the “Content Blockers” tap to configure it.
- 5. The ad blocker app you just downloaded will be displaying under Allow these content blockers, enable it with the toggle button.
- 6. Now your Safari browser will block all YouTube ads during playback.
Conclusion
Ads can be annoying and time-wasting if you are being forced to watch them every other minute. YouTube is as addictive as its active userbase depict and during that addiction, anyone will not accept an interruption. To do away with the disruptive adds and block YouTube ads on any of your devices from PC to Mac, or mobile devices you need to have an adblocker application that will disable YouTube ads and make your video viewing experience smooth and relishing.
Richard Bennett
Richard Bennett is a writer and a lover of all things video.
Follow @Richard Bennett
Elevate Your YouTube Presence with Custom Animated Subscription Buttons in Filmora
How to Make Your YouTube Animated Subscribe Button Easily With Filmora
Richard Bennett
Mar 27, 2024• Proven solutions
The main goal of every content creator is to increase its audience to expand its reach and views. To do so, it’s essential to provide something unique and different to the viewer. Without providing them the content they are looking for, it is impossible to grow your channel and reach. Once your content is ready and you are getting many views, it is essential to make these potential viewers your permanent viewers. The animated subscribe button will help you achieve this goal. While your viewers are watching your videos, you must remind them about subscribing to your channel for receiving such incredible content in the future. Subscribe animation plays a vital role in converting your viewers into subscribers.
There are so many platforms on the internet from where you can get Youtube subscribe button animation free, and you can also purchase these subscribe png gifs. But creating your own animated subscribe button can make you stand out from the crowd and make your videos unique and exclusive. Because it enables you to design it the way you want according to your brand, so, let’s create your own subscribe animation using Wondershare Filmora .
Step-By-Step guide
Step 1: To get started,open Filmora X. On your upper left corner, click on the “Sample Colors,” select the Green color and drag it to Video Track into the timeline. We are using a Green background to easily remove it using the green screen feature in Filmora to use it in our future projects after exporting it, without creating it again. Adjust the duration of this track according to your requirement. In my case, I am trying to make an animated subscribe button of 5 seconds.
Step 2: Lock this track by clicking on the lock icon to work on subscribe animation without disturbing the background easily.
Step 3: Now it’s time to design the subscribe png gif. Go to the Sample colors again and drag the red color into the time above the green background.
Step 4: Double click on the red color in the timeline and adjust its size. Make it look like a subscribe button that is a rectangle and place it at the bottom center of the background. You can put it anywhere you want it to appear in your future videos.
Step 5: Now, let’s add Subscribe text into the button. Go to the Title and select any style that you like. “Basic 6” will work perfectly fine for this purpose. Drag and drop it into the timeline above all tracks.
Step 6: Double click on the Title on the timeline and edit it with “Subscribe” and place it under the red rectangle and click OK.
Step 7: We have put a cursor that can click on the animated subscribe button. You can use Google Search to find a transparent cursor. Make sure to save it in png format. Download it and import it into Filmora.
Step 8: Drag and drop the cursor into the timeline and place it above all the other three tracks to make it prominent. Adjust the size of the cursor place it on the Subscribe button where you want it to appear.
Step 9: Now, it’s time to animate the design using keyframes. First of all, let’s animate the red rectangle. Double click on the red color on the timeline. Go to the ‘Animation’ tab and then click ‘Customize.’ Move to the 1 second in the timeline and click ‘Add.’
Step 10: Now go back to the beginning in the timeline and adjust the scale to 0%. It will make the rectangle pop up when you play the clip.
Step 11: Text needs to be animated as well to match it with the rectangle. Double click on the text in the timeline and click ‘ADVANCED.’
Step 12: In this Advance text editor, go to the ‘Animation’ tab and select any animation that you like. On the timeline under the preview screen, adjusts the dark areas according to the time you set on the rectangle, which was 1 second. We want the text to appear on the screen in 1 second, like the rectangle. Also, adjust the ending time when you want the text to disappear again. We have set it on 4 seconds. Which means it will start to fade after 4 seconds.
Step 13: Now, to animate the mouse cursor, we will use the same process we used for a rectangle that is key framing. Double click on the cursor track on the timeline and move the time on your timeline to a point when you want the cursor to appear. Now add a key frame by clicking ‘Add’.
Step 14: Now jump back to a point in your timeline, when the cursor will start appearing from outside the screen. Move the cursor outside the screen from where you want it to start moving toward the subscribe animation.
Step 15: To animate the click of the cursor, move ahead a little bit into your timeline and scale down the cursor to around 70%. Move it a little further and scale it up to 100%.
Step 16: You can add the sound of mouse click to make it more realistic. You can find this sound anywhere on the internet. Download it and import it into Filmora. Now place it into the timeline where it can match the movement of the cursor.
Step 17: Now it’s time to make this subscribe animation button disappear. Move forward into the time to the end, at around 4 seconds. Double click on the red button in the timeline and add a key frame at its actual scale.
Step 18: After that, move further in the timeline to the end and make its scale 0. It will make it disappear.
Step 19: Do the same with the cursor. Double click on the cursor in the time and add a key frame at its actual position.
Step 20: Move ahead when you want it to disappear. Move the cursor out of the screen and click ‘OK’.
Step 21: Your Subscribe png gif is ready to be exported and used in your videos. Click on export and choose from various formats and options to choose from while exporting it.
You may also like: How to Get People to Subscribe Channel
Conclusion:Your own Animated Subscribe Button is ready to be used in your future videos and projects. This is a ready-to-use subscribe button that can be easily used using the green screen effect in Filmora. Just import the clip, remove the green screen, and you are good to go. You can also customize this Subscribe Animation using your channel and more. Keep experimenting with new things using Filmora.
Richard Bennett
Richard Bennett is a writer and a lover of all things video.
Follow @Richard Bennett
Richard Bennett
Mar 27, 2024• Proven solutions
The main goal of every content creator is to increase its audience to expand its reach and views. To do so, it’s essential to provide something unique and different to the viewer. Without providing them the content they are looking for, it is impossible to grow your channel and reach. Once your content is ready and you are getting many views, it is essential to make these potential viewers your permanent viewers. The animated subscribe button will help you achieve this goal. While your viewers are watching your videos, you must remind them about subscribing to your channel for receiving such incredible content in the future. Subscribe animation plays a vital role in converting your viewers into subscribers.
There are so many platforms on the internet from where you can get Youtube subscribe button animation free, and you can also purchase these subscribe png gifs. But creating your own animated subscribe button can make you stand out from the crowd and make your videos unique and exclusive. Because it enables you to design it the way you want according to your brand, so, let’s create your own subscribe animation using Wondershare Filmora .
Step-By-Step guide
Step 1: To get started,open Filmora X. On your upper left corner, click on the “Sample Colors,” select the Green color and drag it to Video Track into the timeline. We are using a Green background to easily remove it using the green screen feature in Filmora to use it in our future projects after exporting it, without creating it again. Adjust the duration of this track according to your requirement. In my case, I am trying to make an animated subscribe button of 5 seconds.
Step 2: Lock this track by clicking on the lock icon to work on subscribe animation without disturbing the background easily.
Step 3: Now it’s time to design the subscribe png gif. Go to the Sample colors again and drag the red color into the time above the green background.
Step 4: Double click on the red color in the timeline and adjust its size. Make it look like a subscribe button that is a rectangle and place it at the bottom center of the background. You can put it anywhere you want it to appear in your future videos.
Step 5: Now, let’s add Subscribe text into the button. Go to the Title and select any style that you like. “Basic 6” will work perfectly fine for this purpose. Drag and drop it into the timeline above all tracks.
Step 6: Double click on the Title on the timeline and edit it with “Subscribe” and place it under the red rectangle and click OK.
Step 7: We have put a cursor that can click on the animated subscribe button. You can use Google Search to find a transparent cursor. Make sure to save it in png format. Download it and import it into Filmora.
Step 8: Drag and drop the cursor into the timeline and place it above all the other three tracks to make it prominent. Adjust the size of the cursor place it on the Subscribe button where you want it to appear.
Step 9: Now, it’s time to animate the design using keyframes. First of all, let’s animate the red rectangle. Double click on the red color on the timeline. Go to the ‘Animation’ tab and then click ‘Customize.’ Move to the 1 second in the timeline and click ‘Add.’
Step 10: Now go back to the beginning in the timeline and adjust the scale to 0%. It will make the rectangle pop up when you play the clip.
Step 11: Text needs to be animated as well to match it with the rectangle. Double click on the text in the timeline and click ‘ADVANCED.’
Step 12: In this Advance text editor, go to the ‘Animation’ tab and select any animation that you like. On the timeline under the preview screen, adjusts the dark areas according to the time you set on the rectangle, which was 1 second. We want the text to appear on the screen in 1 second, like the rectangle. Also, adjust the ending time when you want the text to disappear again. We have set it on 4 seconds. Which means it will start to fade after 4 seconds.
Step 13: Now, to animate the mouse cursor, we will use the same process we used for a rectangle that is key framing. Double click on the cursor track on the timeline and move the time on your timeline to a point when you want the cursor to appear. Now add a key frame by clicking ‘Add’.
Step 14: Now jump back to a point in your timeline, when the cursor will start appearing from outside the screen. Move the cursor outside the screen from where you want it to start moving toward the subscribe animation.
Step 15: To animate the click of the cursor, move ahead a little bit into your timeline and scale down the cursor to around 70%. Move it a little further and scale it up to 100%.
Step 16: You can add the sound of mouse click to make it more realistic. You can find this sound anywhere on the internet. Download it and import it into Filmora. Now place it into the timeline where it can match the movement of the cursor.
Step 17: Now it’s time to make this subscribe animation button disappear. Move forward into the time to the end, at around 4 seconds. Double click on the red button in the timeline and add a key frame at its actual scale.
Step 18: After that, move further in the timeline to the end and make its scale 0. It will make it disappear.
Step 19: Do the same with the cursor. Double click on the cursor in the time and add a key frame at its actual position.
Step 20: Move ahead when you want it to disappear. Move the cursor out of the screen and click ‘OK’.
Step 21: Your Subscribe png gif is ready to be exported and used in your videos. Click on export and choose from various formats and options to choose from while exporting it.
You may also like: How to Get People to Subscribe Channel
Conclusion:Your own Animated Subscribe Button is ready to be used in your future videos and projects. This is a ready-to-use subscribe button that can be easily used using the green screen effect in Filmora. Just import the clip, remove the green screen, and you are good to go. You can also customize this Subscribe Animation using your channel and more. Keep experimenting with new things using Filmora.
Richard Bennett
Richard Bennett is a writer and a lover of all things video.
Follow @Richard Bennett
Also read:
- [New] Ensuring Effective Monetization Strategies for YT Channels
- [New] Ban Unwanted YouTube Recommended Titles
- From Raw Footage to Riveting Content The Ultimate Guide to YT Video Edits
- Breaking Down YouTube Revenue per Million Views
- Earnings Explosion How to Maximize Income on YouTube Shorts
- [New] Digital Fortune Makers Top Earning YouTubers
- The Complete Guide to YouTube's Movie Maker Features
- [New] Cutting-Edge Video Edits Without Spending Navigate Through The 8 Tools
- Channel Expansion via YouTube Outros Maximizing Visibility for 2024
- [New] Decoding Hashtags' Role in Elevating Your YouTube Gaming Experience
- 2024 Approved Engage More, Dissuade Less Top 6 Ways to Increase Watch Time and Stayers
- 2024 Approved Discovering Synergistic Partnerships on YouTube Platforms
- Key Conduct Criteria in the YouTube Sphere
- 2024 Approved Analyzing TSeries’ Income via Subscriber Engagement on YouTube
- 2024 Approved Essential Free Apps for YouTube to WAV Transformation
- [Updated] Cutting-Edge Tools Free YouTube Intro Creators
- 2024 Approved Effective Visual Brand Strategies for Your YouTube Logo
- Irreversible Termination of YouTube’s Brevity Mode
- Perfect Harmony Strategies for Top-Tier Audio Recording
- Pro Video Editing The Ultimate List of 10 Cutter Apps
- Express Yourself Incorporating Emojis Into YT Feedback
- 2024 Approved Dominating Discussion Topics in the Social Space
- Channel Creation Made Simple YouTube's Top Business Channels Listed
- [New] Discover the Best 12 Cameras to Elevate Your Vlogs
- 2024 Approved Crafting Engaging, Extended Videos A YouTube Expert's Guide
- In 2024, Achieving Precise YouTube Content Extraction
- Achieving Peak Performance in Video Submissions on YouTube for 2024
- In 2024, Channel Transformation Optimal Video Concepts to Elevate Creativity
- Vlog Glow Achieving Professional Video Setup
- Access All Subtitles Top 10 Free Tools for YouTube Videos
- Rethinking Online Videos with These iPhone/Android Apps
- The Ultimate Checklist Top Video Trimming Tools Reviewed
- 2024 Approved Delving Into T-Series' Revenue Generation on Video Platforms
- [New] Compre Points for a Smooth and Compliant 4K Youtube File Transfer
- Rise to Editing Greatness with Our Top 10 YouTube Tips
- Sneaky Soundtrack Watching YouTube Unobtrusively
- The Golden Threshold of YouTube's Monetization
- Channeling Success The Essential Elements for Profitable Video Trailers for 2024
- Visual Storytelling Editing Techniques for Educators
- 2024 Approved Top Tools for Silencing Unwanted Sound in Podcasts and Recordings
- [Updated] Eliminate Hurdle Video Playback Issue in Chrome
- All About Factory Reset, What Is It and What It Does to Your OnePlus Nord CE 3 5G? | Dr.fone
- [New] A Comprehensive Look at FFPM Your PIP Guide
- Updated Demystifying Rap Breaking Down Genres, Subgenres, and Iconic Moments
- [New] In 2024, Avoiding Obscured Games Fixes for OBS Black Screen Issues
- In 2024, Apple ID Unlock On iPhone 8 Plus? How to Fix it?
- New 2024 Approved 6 Tips for Your First Facebook Ads
- Does Vivo S18 Pro Have Find My Friends? | Dr.fone
- [Updated] Maximizing Memories The Ultimate Guide for Overwatch Players
- [New] In 2024, The Best Hash Tracking Apps on Major Platforms Like FB, Tweet & Insta
- In 2024, Full Guide on Mirroring Your Tecno Spark 10 Pro to Your PC/Mac | Dr.fone
- [New] In 2024, Live-Streaming Capture Services
- DJI Aerial Artistry Sample 20 Color Filters For Free
- New In 2024, 15 Must-Use Gifs Editors
- Hard Reset Honor 90 Pro in 3 Efficient Ways | Dr.fone
- Updated 2024 Approved Smooth Operator 3 Techniques to Steady Unstable Footage in AE
- [Updated] Profile Persona Painting Crafting an Animated Imagery
- [Updated] Rising Stars Top 10 TikTok Reaction Clips
- [Updated] Canva Expertise Ditching Image Backdrops with Ease
- Unlocking the Power to Preserve Instagram's Live Features for 2024
- 2024 Approved Navigating Skype Recordings on Windows & Mac - Free vs Paid Guide
- [Updated] In 2024, Effortlessly Download Every TikTok Video
- The Essential Collection Selecting From 6 Superior Automatic Transcribers for 2024
- Title: "[New] Chrome to iPhone A Guide to Stripping YouTube Ads"
- Author: Kevin
- Created at : 2024-05-25 15:57:00
- Updated at : 2024-05-26 15:57:00
- Link: https://youtube-videos.techidaily.com/new-chrome-to-iphone-a-guide-to-stripping-youtube-ads/
- License: This work is licensed under CC BY-NC-SA 4.0.
