
![[New] Charting a Course Through YouTube's Copyright Maze](https://www.lifewire.com/thmb/EfVcCvt847EIyGogkSGXl-6NCV8=/400x300/filters:no_upscale():max_bytes(150000):strip_icc():format(webp)/GettyImages-1139785112-76d1d0f975934233883a19f33b8cd813.jpg)
[New] Charting a Course Through YouTube's Copyright Maze
Charting a Course Through YouTube’s Copyright Maze
The Ultimate Guide to YouTube Copyright

Richard Bennett
Nov 01, 2022• Proven solutions
One of the trickiest terrains for new YouTubers to navigate is the land of copyright rules.
We get it, it’s confusing and stressful, especially when what you want to focus on is making videos, but instead, you are worried about getting your account terminated or being sued.
Can you or can’t you use that song or that clip from the movie? That’s all you want to know.
In this article, we are going to address the key areas that YouTubers need to understand when it comes to YouTube copyright. What is okay and what isn’t? What may be considered risky or what would be worth taking a chance?
Remember that everything discussed in this article is only best practices and shouldn’t be taken as definitive legal advice.
Now that we are set, let’s dive in:
Part 1: What is Fair Use?
When we talk about YouTube copyright, we have to talk about fair use.
Without fair use, there wouldn’t be any flexibility for creators. There wouldn’t be mashups, parodies, or lip dubs. Without fair use, any video with copyright content such as music in the background or a reference to a scene from a famous movie will require approval from the content owner and can be removed. Because of fair use, you can publish a video with copyrighted material in it and not have to ask anyone.
Think of fair use as exceptions to copyright rules.
Part 2: What YouTube Considers Fair Use
There are a few aspects YouTube looks at when it comes to determining whether creators are using copyrighted content that meets the fair use exceptions.
- Is the copyrighted content being creatively or purposefully used?
- Are there more original content used than copyrighted content in the video?
- Will your video benefit the original copyrighted content?
Part 3: Types of Content That Meet Fair Use
Some acceptable styles of videos that allow you to exercise fair use are:
Critiques and Reviews: You can use clips of a movie that you review or play a chorus from a song that you are analyzing in a video and it will be okay to use because it’s serving a purpose of educating the viewer.
Tutorials and Commentary: A YouTube gamer streaming the video games and making comments throughout, that is within fair use, because it can be said that it is giving the video game exposure. Additionally, anything that can be classified as tutorials can also fall under fair use. If you have a video teaching people how to play a famous song, like The Beatles’ Let It Be , on piano, that’s fine!
Mashups: Mashups tend to be built entirely out of copyrighted material, but when done well this style of videos are very creative and often serve to promote the original work as opposed to replacing it.
There couldn’t be two more different movies than Toy Story and Fight Club, but somehow thanks the the creativity of a YouTube creator, there is a now a mashup of it. Some might call it an abomination, but this type of recycled art takes skills and planning, and it wouldn’t exist without fair use.
Parody: Imitation for comedic or dramatic effect is an artistic pursuit as long as it is done in a transformative manner. What does transformative mean? It means in some way, the original is being examined.
In this example from The Hillywood Show, we see a parody of both BBC’s Sherlock Holmes and Macklemore & Ryan Lewis’s Thrift Shop. The nuisance of the show and song recreated are there, but nobody who enjoys the originals will sit down and appreciate it in the same way. A parody is in no way trying to replace the original, but rather using the subject, structure, and style of the original as a vessel to another creative work.
Part 4: What To Do When You Get a YouTube Copyright Strike
If you are reading this, you may have already gotten a YouTube copyright strike.
This may have surprised you. Don’t be too concerned. If it was a mistake, the copyright strike merely acts as a warning, letting you know that the content in your video is copyrighted material.
However, if you were to get 3 copyright strikes in 90 days, you may be penalized by:
- Having all your accounts and videos removed
- Not being able to create a new channel
So what should you do? Here are the steps to take after you receive a copyright strike:
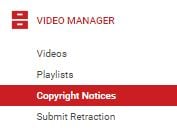
- Review the copyright strike by going into Creator Studio > Video Manager > Copyright notice
- Click on the “Copyright Strike” link beside the flagged video to see details
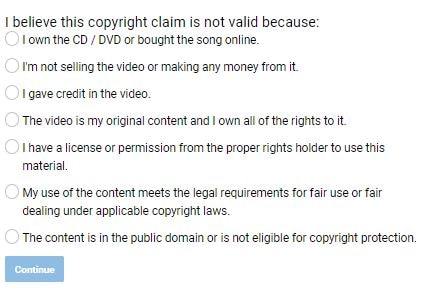
- Decide how to respond to the strike:
- Allow the strike to expire after 90 days and complete the YouTube’s copyright school
- Contact the person who reported your video and get the claim retracted
- Dispute the claim with a counter notification
Part 5: 5 Ways to Avoid Copyright Strike
It’s not always clear what YouTube deems fair use, but there are a few things you can do to improve your chances of meeting the qualification.
1. Use non-fictional copyright content instead of creative and fictional copyrighted content. You’ll have a better chance of meeting fair use if you use footages from a news broadcast than you would from a movie or television show.
The intent is clear when using non-fictional copyright content, such as in Bad Lip Reading. They aren’t trying to rebroadcast the Mark Zuckerberg integration, they are parodying it. The easier it is for the public to recognize that the content is from a source, and understand that the creator isn’t trying to take credit for it, the more likely it’ll pass the fair use qualification.
However, if Bad Lip Reading posted the content without lip dubbing, then one can argue that they are taking views away from the original news sources and that wouldn’t be fair use.
2. Make sure your video with copyrighted content isn’t replacing the original one. Only use enough of the source material to get your point across and ensure you are not negatively affecting the original through views and sales.
In this example from Screen Prism, we see scenes from Wes Anderson movies all through the video, however, it is not replacing any of the original films. In fact, you can say that because of this video, people will be motivated to go and watch a Wes Anderson movie, those benefiting the original creator.
3. The copyrighted material is essential to your video. Whether the copyrighted content is needed in order to illustrate a point or if that one moment from a well-recognized movie helps tie together the message, as long as the copyrighted material is serving the video in some significant way, then it will be consider fair use.
4. Give the original creator credit. Just because you give the original creator credit doesn’t mean you can rightfully use their content, however, it does give you a better chance at avoiding copyright strike. Most often, the original creators simply want credit for their work. If they see that you have noted that the content was made by them, it will only give them more exposure.
5. Keep it short. There is no precise number of seconds or ratio of copyrighted to original footage you should have in your video to qualify as fair use. But generally, if the copyrighted clip is short and/or broken up, then it stands a better chance at being approved by YouTube.
Part 6: What to Do When Other YouTubers Are Copying Your Content
As a new YouTuber, it’s a little freaky to think that someone is taking your content and republishing it or using your creations in their video without your permission.
If you ever notice that your content is being copied without your approval — if they have duplicated your video completely or is using your video without giving credit — and it is not benefiting your channel in any way, don’t worry, YouTube is designed to protect you.
Steps to Report Copyright Infringements on YouTube
- View the video that contains your copyrighted material.
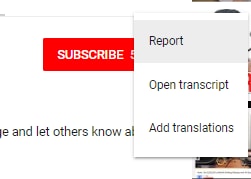
- Click on “Report”
- Select “Infringes my rights” in the pop up window and click “infringes my copyright” in the dropdown options.

- Supply additional information to the report form, including the URL of the video infringing your copyrighted content and the URL of your own video.
- Submit report and wait for an email confirmation that the infringing content has been removed.
Part 7: YouTube Copyright Match
In 2018, YouTube launched a new feature called Copyright Match Tool, which automatically finds videos that are very similar or the same as the ones you’ve created. This gives you the power to determine what to do once you know the video exist.
- You can choose to do nothing.
- You can contact the publisher.
- You can report the video to YouTube for removal.
Key Takeaways
I hope this article has clarified what you can and cannot do with copyrighted content. Here is a quick summary of what we touched on in this post:
- Avoid having 3 copyright strikes on your channel at all costs.
- When using copyrighted material, ensure it is essential to the video and you are not overdoing it.
- Make sure that the copyrighted content does not take views and sales away from the original source.
- Strive to use the copyrighted content in a transformative way, as a parody or a commentary, to educate or inform.
- Give the original creator credit or have it benefit the original by giving more publicity.
- Report any creator that is infringing on your content.
Got any questions on YouTube copyright? Leave a comment below and we’ll help you answer it.
Richard Bennett
Richard Bennett is a writer and a lover of all things video.
Follow @Richard Bennett
Richard Bennett
Nov 01, 2022• Proven solutions
One of the trickiest terrains for new YouTubers to navigate is the land of copyright rules.
We get it, it’s confusing and stressful, especially when what you want to focus on is making videos, but instead, you are worried about getting your account terminated or being sued.
Can you or can’t you use that song or that clip from the movie? That’s all you want to know.
In this article, we are going to address the key areas that YouTubers need to understand when it comes to YouTube copyright. What is okay and what isn’t? What may be considered risky or what would be worth taking a chance?
Remember that everything discussed in this article is only best practices and shouldn’t be taken as definitive legal advice.
Now that we are set, let’s dive in:
Part 1: What is Fair Use?
When we talk about YouTube copyright, we have to talk about fair use.
Without fair use, there wouldn’t be any flexibility for creators. There wouldn’t be mashups, parodies, or lip dubs. Without fair use, any video with copyright content such as music in the background or a reference to a scene from a famous movie will require approval from the content owner and can be removed. Because of fair use, you can publish a video with copyrighted material in it and not have to ask anyone.
Think of fair use as exceptions to copyright rules.
Part 2: What YouTube Considers Fair Use
There are a few aspects YouTube looks at when it comes to determining whether creators are using copyrighted content that meets the fair use exceptions.
- Is the copyrighted content being creatively or purposefully used?
- Are there more original content used than copyrighted content in the video?
- Will your video benefit the original copyrighted content?
Part 3: Types of Content That Meet Fair Use
Some acceptable styles of videos that allow you to exercise fair use are:
Critiques and Reviews: You can use clips of a movie that you review or play a chorus from a song that you are analyzing in a video and it will be okay to use because it’s serving a purpose of educating the viewer.
Tutorials and Commentary: A YouTube gamer streaming the video games and making comments throughout, that is within fair use, because it can be said that it is giving the video game exposure. Additionally, anything that can be classified as tutorials can also fall under fair use. If you have a video teaching people how to play a famous song, like The Beatles’ Let It Be , on piano, that’s fine!
Mashups: Mashups tend to be built entirely out of copyrighted material, but when done well this style of videos are very creative and often serve to promote the original work as opposed to replacing it.
There couldn’t be two more different movies than Toy Story and Fight Club, but somehow thanks the the creativity of a YouTube creator, there is a now a mashup of it. Some might call it an abomination, but this type of recycled art takes skills and planning, and it wouldn’t exist without fair use.
Parody: Imitation for comedic or dramatic effect is an artistic pursuit as long as it is done in a transformative manner. What does transformative mean? It means in some way, the original is being examined.
In this example from The Hillywood Show, we see a parody of both BBC’s Sherlock Holmes and Macklemore & Ryan Lewis’s Thrift Shop. The nuisance of the show and song recreated are there, but nobody who enjoys the originals will sit down and appreciate it in the same way. A parody is in no way trying to replace the original, but rather using the subject, structure, and style of the original as a vessel to another creative work.
Part 4: What To Do When You Get a YouTube Copyright Strike
If you are reading this, you may have already gotten a YouTube copyright strike.
This may have surprised you. Don’t be too concerned. If it was a mistake, the copyright strike merely acts as a warning, letting you know that the content in your video is copyrighted material.
However, if you were to get 3 copyright strikes in 90 days, you may be penalized by:
- Having all your accounts and videos removed
- Not being able to create a new channel
So what should you do? Here are the steps to take after you receive a copyright strike:
- Review the copyright strike by going into Creator Studio > Video Manager > Copyright notice
- Click on the “Copyright Strike” link beside the flagged video to see details
- Decide how to respond to the strike:
- Allow the strike to expire after 90 days and complete the YouTube’s copyright school
- Contact the person who reported your video and get the claim retracted
- Dispute the claim with a counter notification
Part 5: 5 Ways to Avoid Copyright Strike
It’s not always clear what YouTube deems fair use, but there are a few things you can do to improve your chances of meeting the qualification.
1. Use non-fictional copyright content instead of creative and fictional copyrighted content. You’ll have a better chance of meeting fair use if you use footages from a news broadcast than you would from a movie or television show.
The intent is clear when using non-fictional copyright content, such as in Bad Lip Reading. They aren’t trying to rebroadcast the Mark Zuckerberg integration, they are parodying it. The easier it is for the public to recognize that the content is from a source, and understand that the creator isn’t trying to take credit for it, the more likely it’ll pass the fair use qualification.
However, if Bad Lip Reading posted the content without lip dubbing, then one can argue that they are taking views away from the original news sources and that wouldn’t be fair use.
2. Make sure your video with copyrighted content isn’t replacing the original one. Only use enough of the source material to get your point across and ensure you are not negatively affecting the original through views and sales.
In this example from Screen Prism, we see scenes from Wes Anderson movies all through the video, however, it is not replacing any of the original films. In fact, you can say that because of this video, people will be motivated to go and watch a Wes Anderson movie, those benefiting the original creator.
3. The copyrighted material is essential to your video. Whether the copyrighted content is needed in order to illustrate a point or if that one moment from a well-recognized movie helps tie together the message, as long as the copyrighted material is serving the video in some significant way, then it will be consider fair use.
4. Give the original creator credit. Just because you give the original creator credit doesn’t mean you can rightfully use their content, however, it does give you a better chance at avoiding copyright strike. Most often, the original creators simply want credit for their work. If they see that you have noted that the content was made by them, it will only give them more exposure.
5. Keep it short. There is no precise number of seconds or ratio of copyrighted to original footage you should have in your video to qualify as fair use. But generally, if the copyrighted clip is short and/or broken up, then it stands a better chance at being approved by YouTube.
Part 6: What to Do When Other YouTubers Are Copying Your Content
As a new YouTuber, it’s a little freaky to think that someone is taking your content and republishing it or using your creations in their video without your permission.
If you ever notice that your content is being copied without your approval — if they have duplicated your video completely or is using your video without giving credit — and it is not benefiting your channel in any way, don’t worry, YouTube is designed to protect you.
Steps to Report Copyright Infringements on YouTube
- View the video that contains your copyrighted material.
- Click on “Report”
- Select “Infringes my rights” in the pop up window and click “infringes my copyright” in the dropdown options.
- Supply additional information to the report form, including the URL of the video infringing your copyrighted content and the URL of your own video.
- Submit report and wait for an email confirmation that the infringing content has been removed.
Part 7: YouTube Copyright Match
In 2018, YouTube launched a new feature called Copyright Match Tool, which automatically finds videos that are very similar or the same as the ones you’ve created. This gives you the power to determine what to do once you know the video exist.
- You can choose to do nothing.
- You can contact the publisher.
- You can report the video to YouTube for removal.
Key Takeaways
I hope this article has clarified what you can and cannot do with copyrighted content. Here is a quick summary of what we touched on in this post:
- Avoid having 3 copyright strikes on your channel at all costs.
- When using copyrighted material, ensure it is essential to the video and you are not overdoing it.
- Make sure that the copyrighted content does not take views and sales away from the original source.
- Strive to use the copyrighted content in a transformative way, as a parody or a commentary, to educate or inform.
- Give the original creator credit or have it benefit the original by giving more publicity.
- Report any creator that is infringing on your content.
Got any questions on YouTube copyright? Leave a comment below and we’ll help you answer it.
Richard Bennett
Richard Bennett is a writer and a lover of all things video.
Follow @Richard Bennett
The Definitive Guide to Professional-Level YouTube Video Edits
How To Edit YouTube Videos
Richard Bennett
Oct 26, 2023• Proven solutions
YouTube videos have a certain look and feel that many viewers have come to expect and enjoy. Much of the aesthetics of YouTube videos developed as a result of the biggest YouTubers having to quickly and efficiently edit videos together on a daily basis. Below is our list of some of the most common video editing techniques used by famous YouTubers.
Part 1: Introduction
1. Start Big
“I’m doing something really exciting… within the first ten seconds of this video. That way you stay here.” – Liza Koshy (How To Be A YouTuber 101!! | Lizzza)
In the same way that a teaser or trailer builds anticipation for a full film, many YouTubers start with a preview of the most high-energy part of their video.
In Jake Paul’s prank vlog (above), Jake shows his brother, Logan, chasing and beating him up as Jake screams for help at the top of his lungs. The already high-energy scene is even more intensified by the epic music playing in the background. This seven-second clip, which resurfaces halfway through the video, is enough to entice many viewers to continue watching. It very effectively leaves enough room for viewers to wonder, “How did Logan’s room actually look in the end?” “What was Logan’s initial reaction before he started chasing Jake?” By creating curiosity gaps like these, you can incentivize your viewers to close these gaps by watching longer.
2. Opening Title Introduction
Just as TV episodes begin with opening credits and theme music, quite similarly, some YouTubers start their YouTube videos with an intro.
Greg from “How To Drink” has an effective twenty-second intro (above). In this video, he shows you who he is and what his videos are generally about. Since these two things don’t change so much for him from video to video, he can start many of his videos off with this same intro.
Below is a video tutorial about how to add text and titles to video in Filmora, hope that helps you in creating your own YouTube video texts and titles.


For more information on intros, check out our post on How to Make a YouTube Intro?
Part 2: Cuts
1. Jump Cut
A jump cut is a simple and straightforward type of video editing cutting technique that “jumps” from one section of a clip to a later section of a clip, cutting out whatever happened in the middle. Some of the middle parts you might want to remove may include mistakes, long silent pauses, and filler words (umm, like, etc.).
Although the use of jump cuts to remove these parts had been discouraged for a long time in the film world, its extensive use by so many YouTubers has established it as its own style that many viewers have come to expect and enjoy. The jumpiness that comes from jump cuts can be effective in keeping your audience’s attention in a shock-inducing manner.
Jump cuts can also be used to show a passage of time in a creative way or make objects magically appear on-screen.
Zack King (above) makes a toy taxi magically appear in his hands using this video editing technique. Filmora allows you to do jump cut easily, you can watch the tutorial below and learn more jump cut tips and tricks .
2. Associative Cut
Not everyone in your audience may recognize the cultural or historical references you make in your videos. It can, therefore, be helpful (and also quite enjoyable) to show the original clip of the reference you are making.
In the same vlog that Jake Paul gets chased down by his brother (above), twenty-eight seconds into the video, Jake expresses his desire to go fast in his car. Right after he says “I want to go fast,” Jake cuts into a scene from the movie Talladega Nights. In that scene, Ricky Bobby, Will Ferrell’s character, also says that he wants to go fast.

Part 3: Transform
1. Zoom
Many YouTubers digitally adjust the zoom of their talking head shots in order to create additional emphasis or suspense. When zoom is used very slowly and smoothly, this technique can be effective in building up suspense and drawing a viewer deeper into the speaker’s message. When a drastic zoom is used suddenly, it can be effective in emphasizing a particular spoken line.
RiceGum is one YouTuber who uses zoom video editing effects extensively in his talking head videos. Want to pan and zoom your video footage too? Check our guide to getting Ken Burns Effect on Videos .
2. Camera Shake
Camera shake is a video effect that makes the original clip appear like it was filmed during a violent earthquake. Many YouTubers use this effect to emphasize their voice when they are talking about something erratic or out of control.
3. Color/Level Adjustment
A lot of comedy YouTubers change the color and levels of their videos in order to emphasize different moods. One common thing YouTubers do when they talk about anything slightly sad is to gradually fade out the colors in their talking head shots. In a cheesy way, the black and white look can emphasize a feeling of emptiness. For his “sad” reactions, PewDiePie often jump cuts into a black and white, slowed down clip of his sad face while playing some sad music in the background. To emphasize a darker message, some YouTubers increase the amount of shadows in their video. In the video below, while his daughter is delivering a darker message from 0:32 to 0:50, La Guardia Cross gradually adds more shadows around his daughter’s face through what appears to be a vignette effect.
Part 4: Transitions
1. Wipe
Many YouTubers transition from one scene into the next using a wipe transition. In a wipe transition, the next clip that you want to transition into slides into the frame horizontally or vertically until it completely covers the first clip. For additional wiping effect, many YouTubers also use a fast, high pitched “woosh” sound effect with this transition.
2. Zoom
The zoom transition is quite similar to the wipe transition, except it uses a zoom effect. Many of the top YouTubers combine this transition with a lower-pitched “woosh” sound effect.
Part 5: Visual Elements
In other genres of film, the only appropriate visual elements filmmakers can tastefully add to their footage seem to be clean looking, seamlessly integrated text and motion graphics. YouTube, on the other hand, is another world with much more room to get outrageous. Many of the top YouTubers add a lot of visual elements (emojis , images, filters, explosions) to their videos to emphasize their jokes, play-on-words, historical or cultural references, and mood.
1. Call-To-Action Visuals
Whether they’re prompting you to subscribe, like, comment, or check out their purchasable merchandise, many YouTubers include visuals to strengthen their calls-to-action.
Part 6: Time Manipulation
1. Timelapse
“The staple of any Casey Neistat vlog is the timelapse, which he uses both to further the narrative or set the time of day.” -@omgurheadsgone
A lot of cameras now come with a timelapse/hyperlapse function, requiring no further video editing. To achieve the kind of timelapses that Casey Neistat makes, though, you’ll have to film real-time footage and then manipulate the speed of it in post. Since sped up ambient sound is hardly ever pleasing to the ear, a lot of YouTubers replace the audio with music that enhances the mood of the timelapse.
2. Slow Motion
Slowing down footage is another way YouTubers like to manipulate the passage of time. This technique can draw the audience’s attention into the intricacies of a movement captured on film. But if you stretch your video clip digitally in order to achieve this look, your video may not look so smooth – your software will need to create extra frames of footage based on your existing footage. The solution around this problem is to make sure to record your video at a very high frame rate.

Part 7: Audio
1. Censor
The traditional practice for censoring out explicit language in television has been to replace profanity with a high pitched “bleep” sound effect . YouTubers, however, have popularized the use of animal sound effects to censor out explicit language. Epic Meal Time frequently uses the “caw” of a crow for this purpose.
2. Sound Effects
Whether it is pouring water into a cup or drinking a glass of water, adding louder sound effects can enhance your viewer’s experience of the action that is taking place on camera.
3. Background Music
Music is very effective in helping people feel all kinds of emotions. It is no wonder so many of the top YouTubers make gratuitous use of music in their videos. Some even add background music to every single clip of their entire YouTube video and only drop the music when the following technique (below) is used.
4. Muting Background Music
A lot of YouTubers who talk over background music abruptly mute the music when they want their audience to focus their attention on whatever it is that they have to say at that very moment. Isolating one’s speech in this way can be a very effective way to emphasize something serious or emphasize a punchline to a joke.
5. Voice-Over
Adding additional recorded verbal commentary is another technique used by many of the top YouTubers. This technique can be helpful when the visuals of your footage do not sufficiently communicate the full message you want to get across to your audience.
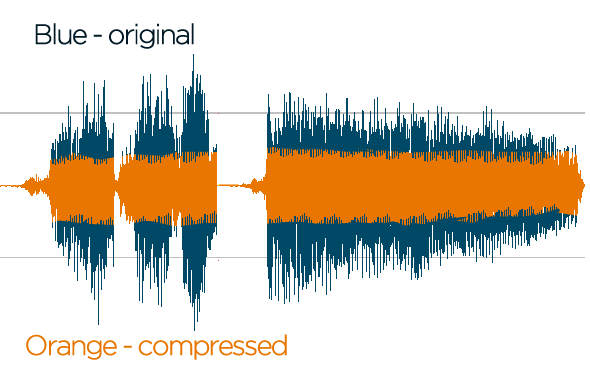
6. Compressor
A lot of video editing software programs give you the option to add compression to your video’s audio. Compression lessens the dynamic range between the softest and loudest parts of your audio. This technique can help your speech sound more uniform in volume.
For those who want to make their YouTube videos better, I recommend Wondershare Filmora for editing YouTube videos . Filmora video editor allows you to create and edit a YouTube video easily with plentiful templates and effects pre-programmed.
Richard Bennett
Richard Bennett is a writer and a lover of all things video.
Follow @Richard Bennett
Richard Bennett
Oct 26, 2023• Proven solutions
YouTube videos have a certain look and feel that many viewers have come to expect and enjoy. Much of the aesthetics of YouTube videos developed as a result of the biggest YouTubers having to quickly and efficiently edit videos together on a daily basis. Below is our list of some of the most common video editing techniques used by famous YouTubers.
Part 1: Introduction
1. Start Big
“I’m doing something really exciting… within the first ten seconds of this video. That way you stay here.” – Liza Koshy (How To Be A YouTuber 101!! | Lizzza)
In the same way that a teaser or trailer builds anticipation for a full film, many YouTubers start with a preview of the most high-energy part of their video.
In Jake Paul’s prank vlog (above), Jake shows his brother, Logan, chasing and beating him up as Jake screams for help at the top of his lungs. The already high-energy scene is even more intensified by the epic music playing in the background. This seven-second clip, which resurfaces halfway through the video, is enough to entice many viewers to continue watching. It very effectively leaves enough room for viewers to wonder, “How did Logan’s room actually look in the end?” “What was Logan’s initial reaction before he started chasing Jake?” By creating curiosity gaps like these, you can incentivize your viewers to close these gaps by watching longer.
2. Opening Title Introduction
Just as TV episodes begin with opening credits and theme music, quite similarly, some YouTubers start their YouTube videos with an intro.
Greg from “How To Drink” has an effective twenty-second intro (above). In this video, he shows you who he is and what his videos are generally about. Since these two things don’t change so much for him from video to video, he can start many of his videos off with this same intro.
Below is a video tutorial about how to add text and titles to video in Filmora, hope that helps you in creating your own YouTube video texts and titles.
For more information on intros, check out our post on How to Make a YouTube Intro?
Part 2: Cuts
1. Jump Cut
A jump cut is a simple and straightforward type of video editing cutting technique that “jumps” from one section of a clip to a later section of a clip, cutting out whatever happened in the middle. Some of the middle parts you might want to remove may include mistakes, long silent pauses, and filler words (umm, like, etc.).
Although the use of jump cuts to remove these parts had been discouraged for a long time in the film world, its extensive use by so many YouTubers has established it as its own style that many viewers have come to expect and enjoy. The jumpiness that comes from jump cuts can be effective in keeping your audience’s attention in a shock-inducing manner.
Jump cuts can also be used to show a passage of time in a creative way or make objects magically appear on-screen.
Zack King (above) makes a toy taxi magically appear in his hands using this video editing technique. Filmora allows you to do jump cut easily, you can watch the tutorial below and learn more jump cut tips and tricks .
2. Associative Cut
Not everyone in your audience may recognize the cultural or historical references you make in your videos. It can, therefore, be helpful (and also quite enjoyable) to show the original clip of the reference you are making.
In the same vlog that Jake Paul gets chased down by his brother (above), twenty-eight seconds into the video, Jake expresses his desire to go fast in his car. Right after he says “I want to go fast,” Jake cuts into a scene from the movie Talladega Nights. In that scene, Ricky Bobby, Will Ferrell’s character, also says that he wants to go fast.
Part 3: Transform
1. Zoom
Many YouTubers digitally adjust the zoom of their talking head shots in order to create additional emphasis or suspense. When zoom is used very slowly and smoothly, this technique can be effective in building up suspense and drawing a viewer deeper into the speaker’s message. When a drastic zoom is used suddenly, it can be effective in emphasizing a particular spoken line.
RiceGum is one YouTuber who uses zoom video editing effects extensively in his talking head videos. Want to pan and zoom your video footage too? Check our guide to getting Ken Burns Effect on Videos .
2. Camera Shake
Camera shake is a video effect that makes the original clip appear like it was filmed during a violent earthquake. Many YouTubers use this effect to emphasize their voice when they are talking about something erratic or out of control.
3. Color/Level Adjustment
A lot of comedy YouTubers change the color and levels of their videos in order to emphasize different moods. One common thing YouTubers do when they talk about anything slightly sad is to gradually fade out the colors in their talking head shots. In a cheesy way, the black and white look can emphasize a feeling of emptiness. For his “sad” reactions, PewDiePie often jump cuts into a black and white, slowed down clip of his sad face while playing some sad music in the background. To emphasize a darker message, some YouTubers increase the amount of shadows in their video. In the video below, while his daughter is delivering a darker message from 0:32 to 0:50, La Guardia Cross gradually adds more shadows around his daughter’s face through what appears to be a vignette effect.
Part 4: Transitions
1. Wipe
Many YouTubers transition from one scene into the next using a wipe transition. In a wipe transition, the next clip that you want to transition into slides into the frame horizontally or vertically until it completely covers the first clip. For additional wiping effect, many YouTubers also use a fast, high pitched “woosh” sound effect with this transition.
2. Zoom
The zoom transition is quite similar to the wipe transition, except it uses a zoom effect. Many of the top YouTubers combine this transition with a lower-pitched “woosh” sound effect.
Part 5: Visual Elements
In other genres of film, the only appropriate visual elements filmmakers can tastefully add to their footage seem to be clean looking, seamlessly integrated text and motion graphics. YouTube, on the other hand, is another world with much more room to get outrageous. Many of the top YouTubers add a lot of visual elements (emojis , images, filters, explosions) to their videos to emphasize their jokes, play-on-words, historical or cultural references, and mood.
1. Call-To-Action Visuals
Whether they’re prompting you to subscribe, like, comment, or check out their purchasable merchandise, many YouTubers include visuals to strengthen their calls-to-action.
Part 6: Time Manipulation
1. Timelapse
“The staple of any Casey Neistat vlog is the timelapse, which he uses both to further the narrative or set the time of day.” -@omgurheadsgone
A lot of cameras now come with a timelapse/hyperlapse function, requiring no further video editing. To achieve the kind of timelapses that Casey Neistat makes, though, you’ll have to film real-time footage and then manipulate the speed of it in post. Since sped up ambient sound is hardly ever pleasing to the ear, a lot of YouTubers replace the audio with music that enhances the mood of the timelapse.
2. Slow Motion
Slowing down footage is another way YouTubers like to manipulate the passage of time. This technique can draw the audience’s attention into the intricacies of a movement captured on film. But if you stretch your video clip digitally in order to achieve this look, your video may not look so smooth – your software will need to create extra frames of footage based on your existing footage. The solution around this problem is to make sure to record your video at a very high frame rate.
Part 7: Audio
1. Censor
The traditional practice for censoring out explicit language in television has been to replace profanity with a high pitched “bleep” sound effect . YouTubers, however, have popularized the use of animal sound effects to censor out explicit language. Epic Meal Time frequently uses the “caw” of a crow for this purpose.
2. Sound Effects
Whether it is pouring water into a cup or drinking a glass of water, adding louder sound effects can enhance your viewer’s experience of the action that is taking place on camera.
3. Background Music
Music is very effective in helping people feel all kinds of emotions. It is no wonder so many of the top YouTubers make gratuitous use of music in their videos. Some even add background music to every single clip of their entire YouTube video and only drop the music when the following technique (below) is used.
4. Muting Background Music
A lot of YouTubers who talk over background music abruptly mute the music when they want their audience to focus their attention on whatever it is that they have to say at that very moment. Isolating one’s speech in this way can be a very effective way to emphasize something serious or emphasize a punchline to a joke.
5. Voice-Over
Adding additional recorded verbal commentary is another technique used by many of the top YouTubers. This technique can be helpful when the visuals of your footage do not sufficiently communicate the full message you want to get across to your audience.
6. Compressor
A lot of video editing software programs give you the option to add compression to your video’s audio. Compression lessens the dynamic range between the softest and loudest parts of your audio. This technique can help your speech sound more uniform in volume.
For those who want to make their YouTube videos better, I recommend Wondershare Filmora for editing YouTube videos . Filmora video editor allows you to create and edit a YouTube video easily with plentiful templates and effects pre-programmed.
Richard Bennett
Richard Bennett is a writer and a lover of all things video.
Follow @Richard Bennett
Also read:
- [Updated] Beyond Borders Blurring Techniques for Global Audienes
- A Comprehensive Guide to Earnings From YouTube Short Videos for 2024
- [Updated] Dominance in Video Landscape Mirrorless vs DSLR Cameras
- [Updated] Captioning Techniques for Professional YouTube Content
- [Updated] Cutting-Edge Design Top 5 3D Intro Makers
- Streamline Your Online Experience Blocking Youtube Channels Effectively
- Charting the Course for YouTube Keyword Mastery
- Stand Out in the Stream Top Name Generators Reviewed
- Unlock Your YouTube Potential Idea Generation Guide
- 2024 Approved Consistent Viewing Automatic YouTube Video Playback on TV
- Essential Steps for Online Gamers' Banner Use for 2024
- 2024 Approved Accelerate YT Growth Strategies for 1K+ Subscribers
- Contrasting Copyright Clauses in Youtube & the Freedom of CC for 2024
- Evaluating Whether Your Video Consumption Needs a Subscription Boost
- Turn Video to Sound YouTube to MP3 with AppleOS
- 2024 Approved Amplify Content with Free Audio Samples
- In 2024, Building Your Digital Identity Start a YouTube Channel Today
- Top 5 YouTube Link Shortener You Must Try
- [Updated] How to Add Neon Border to YouTube Thumbnail [3 Ways]
- [Updated] Breakout 8 Channel Visionaries Amplifying Impact
- [New] Digital Deception Steering Clear From Buying Non-Existent Followers
- Deception Navigating False Subscriber Sells
- [Updated] Copycat Chronicles The Science of Satire
- [New] Essential Strategies for Memorable YouTube Closings
- In 2024, Increase Your Content Reach Top 7 Tools for TikTok Excellence
- In 2024, How to Come up With the Best Pokemon Team On Honor 90 GT? | Dr.fone
- [New] Unlocking Instagram's Potential Elevating Content Impact
- Mobile Methods Download GIFs From Twitter on Devices for 2024
- In 2024, Unlock Your Boost Mobile iPhone 14 Before the Plan Expires
- The Best 8 Places for High-Quality Royalty Free Gifs (Paid and Free) for 2024
- [Updated] Ultimate Learning Sound Snatchers for 2024
- New 2024 Approved Quickly Adjust Video Aspect Ratio Easy Methods
- Updated Say Goodbye to Hiss Effective Background Noise Removal in Final Cut Pro X
- In 2024, How to Screen Mirroring Honor 90 GT? | Dr.fone
- Title: [New] Charting a Course Through YouTube's Copyright Maze
- Author: Kevin
- Created at : 2024-05-25 15:56:36
- Updated at : 2024-05-26 15:56:36
- Link: https://youtube-videos.techidaily.com/new-charting-a-course-through-youtubes-copyright-maze/
- License: This work is licensed under CC BY-NC-SA 4.0.
