![[New] Boosting Your Youtube Shorts Profits Key Requirements & Earning Potential](https://thmb.techidaily.com/f47c079fa1fce90a8221b9c2c003a393b4231e2fbb42dbd4e99eb8971ba63ab6.jpg)
"[New] Boosting Your Youtube Shorts Profits Key Requirements & Earning Potential"
Boosting Your Youtube Shorts Profits: Key Requirements & Earning Potential
YouTube Shorts have grown in popularity since the launch of the platform in 2021. At first, they offered a way for creators to share their content in a vertical format. However, YouTube Shorts monetization is also a great way for creators to earn money. When you monetize YouTube shorts, you increase the potential of earning more income on the platform. In this article, we explore what entails monetized YouTube shorts and how to increase your YT shorts earnings.
YouTube Shorts Monetization A cross-platform offers useful features for making your YouTube videos stand out to earn more revenue!
Free Download Free Download Learn More

Part 1. YouTube Shorts Monetization: Eligibility Criteria
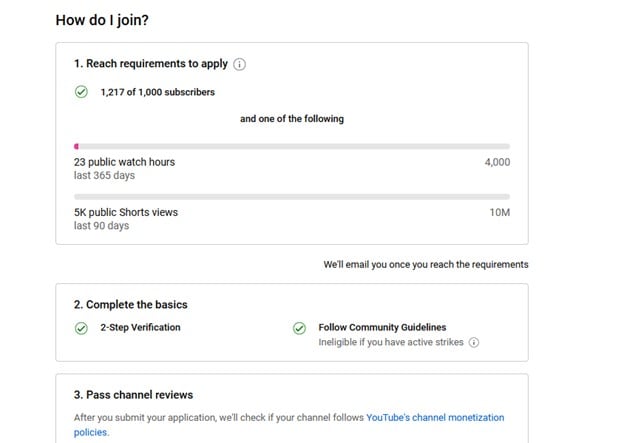
With short monetization options, you can monetize your short-firm content by joining the YouTube Partner Program (YPP). Being a member of this program gives you access to all tools for making money on YouTube. This includes the ability to place ads on your videos or make money directly from your audience through fan funding.
Eligibility Requirements for Monetizing Shorts
The easiest way to monetize Shorts on YouTube is to access the fan-funding program. This program gives you access to special tools that you can use to generate revenue by interacting with views. This is a great option for creators who primarily make short-form videos. The requirements for this option are as follows:
- At least 500 subscribers to your channels
- At least 3 public video uploads in the last 90 days
- At least 3,000 public watch hours in the last 365 days, or
- At least 3 million public Shorts views in the last 90 days

Eligibility for Monetizing Shorts and Videos
The other way you can monetize shorts is by accessing ad revenue and fan-funding. With this option, you will generate income from ads that appear between Shorts in addition to interacting with viewers. This is a great option for creators who make long and short videos. The requirements for this include:
- At least 1,000 subscribers to your channels
- At least 4,000 public watch hours in the last 365 days, or
- At least 10 million valid public Shorts views in the last 90 days
Additional Guidelines for Creators
Once you meet the eligibility criteria, you will be required to follow certain guidelines or policies to continue earning. The additional guidelines include:
- Follow YouTube’s Advertiser-Friendly Content Guidelines
- Make sure your channel does not have active Community Guidelines Strikes
- Live in a region where the program is available
- Avoid uploading another creator’s content by transforming the content or adding a new perspective to it
- Avoid using unedited clips from TV shows or movies that you don’t have rights to
- Don’t pay for fake or automated views
- Turn on 2-Step verification for your Google Account
- Have an active AdSense account
- Have access to advanced YouTube features by verifying your identity
Part 2. Monetizing YouTube Shorts: Step-by-Step Guide
Can you monetize YouTube shorts? Yes, in more than one way. The easiest is through the ad-revenue sharing model. Follow these steps to become part of the YPP and start monetizing your Shorts on YouTube:
Step 1Sign in to YouTube

Step 2Select YouTube Studio
In the top right of the YouTube page, click on your profile picture. From the pop-up menu that appears, select YouTube Studio.

Step 3In the left menu, Click on Earn

Step 4
If you are eligible for the YPP, you will see an Apply Click on it to go to the next step. If you are not yet eligible, click the Get Notified button to be notified once your channel becomes eligible. That’s when you will have the opportunity to finish the application process.
Step 5
Click Start to review and accept YouTube’s Base terms.

Step 6
Link your existing AdSense account if you have one. If not. Click Start to set up a new one.

Step 7
Wait for YouTube to review and approve your application. The process will normally take a month. Once you are approved for the YPP, go to the Earn section in YouTube Studio. Then accept the Shorts Monetization Module. This will allow you to access ads and other money-making tools on YouTube.

The instructions shared above are for applying for the YPP using a computer or desktop. You will still follow the same steps when using a mobile device, but you will do so using the YouTube Studio app.
The money-making feature monetizes Shorts in exciting ways. To start monetizing with Super Thanks fan funding, click Supers on the Earn tab in YouTube Studio. Then click Get Started, and follow the presented prompts. The same process is applicable for Channel Memberships, and other fan-funding options.
Part 3. YouTube Shorts Monetization: A Realistic Look at Earnings Potential
Monetizing YouTube Shorts has the potential to make decent earnings. Although the amount is not as much as a long-form videos, it is a great way of making money on YouTube quickly. Most YouTube Shorts creators agree that the revenue per thousand views (RPM) for short-form content is currently around $0.05 - $0.07. This means that for a million Shorts views, you will make $50 - $70.
Factors That Influence Earnings
The amount of money you make on YouTube Shorts is not fixed. It will depend on several factors, including the revenue channel and your interactions with viewers
- Ad revenue: A higher view count on Shorts increases ad revenue from the ads that are between Shorts on the platform.
- Viewer engagement: Viewer engagement brings in additional revenue through features like Super Thanks.
- Number of monetized Shorts: Monetizing most of your short-form videos will increase the revenue generated.
- Shopping Revenue: How well you promote your products and the set price point of the products will determine the shopping revenue generated.
Examples of Creators Who Have Earned from Shorts
The revenue-sharing program is the easiest way for creators to earn money on YouTube. Since monetizing their Shorts, these creators earned some decent bonus amounts:
- Hassan Khadair (2.1 million subscribers) - Earned $872.14 in ads from 22 million Shorts views
- Riley Lemon (84,000 subscribers) - Earned $76.23 in ads from 1.9 million Shorts views
- James Seo (573,000 subscribers) - Earned $445.09 in ads from 10.3 million Shorts views
- Matthew King (212,000 subscribers) - Earned $163.73 in ads from 4.2 million Shorts views
Part 4. Editing YouTube Shorts with WonderShare to Boost Revenue Potential
The best way to reap big from Shorts YouTube monetization is to make quality videos that will go viral easily. Videos that generate more views will earn you more revenue and increase the number of subscribers within a short time. With Wondershare Filmora, making such videos is easy. The video editing software offers useful features for making your videos stand out. From jaw-dropping sports videos to cinema-like production, the choice of options is endless.
Free Download For Win 7 or later(64-bit)
Free Download For macOS 10.14 or later
The choice of Filmora features you use on your editing projects will depend on your goals. Here are a few favorites to get you started:
1. Auto Reframe
Before uploading a short-form video on YouTube, you want to make sure it is of the right resolution. The Auto Reframe feature on Filmora allows you to instantly resize your videos while keeping all the important details. You only need to record one video for all platforms, and edit to fit with auto reframe.
2. Text to Speech
Narration is an important aspect of YouTube Shorts. You can tell what is happening in the clip in the simplest way for your audience to understand. The Text to Speech (TTS) feature on Filmora allows you to convert your text files to voice-over. This makes your Shorts video more entertaining and enriched with more elements.
3. AI Portrait
Just like other vertical social media videos, Shorts require some bit of personalization. You may want to add a bit of elements or filters. The AI Portrait feature automatically removes background with high accuracy to further enhance your videos. It also comes with over 70 portrait and sticker effects to bring out the mood you are going after. Automatically recognize the faces of your subjects and add AR stickers on the go.
Conclusion
YouTube Shorts have become immensely popular. They tend to have a higher ROI and receive more engagement compared to long-form video content. This makes vertical short-form videos more important and lucrative for content creators. When it comes to YouTube short video monetization, posting quality videos is the key ingredient. We recommend using Wondershare FIlmora to edit your videos. This will make sure they are more entertaining and keep more people engaged.
Free Download Free Download Learn More
Part 1. YouTube Shorts Monetization: Eligibility Criteria
With short monetization options, you can monetize your short-firm content by joining the YouTube Partner Program (YPP). Being a member of this program gives you access to all tools for making money on YouTube. This includes the ability to place ads on your videos or make money directly from your audience through fan funding.
Eligibility Requirements for Monetizing Shorts
The easiest way to monetize Shorts on YouTube is to access the fan-funding program. This program gives you access to special tools that you can use to generate revenue by interacting with views. This is a great option for creators who primarily make short-form videos. The requirements for this option are as follows:
- At least 500 subscribers to your channels
- At least 3 public video uploads in the last 90 days
- At least 3,000 public watch hours in the last 365 days, or
- At least 3 million public Shorts views in the last 90 days
Eligibility for Monetizing Shorts and Videos
The other way you can monetize shorts is by accessing ad revenue and fan-funding. With this option, you will generate income from ads that appear between Shorts in addition to interacting with viewers. This is a great option for creators who make long and short videos. The requirements for this include:
- At least 1,000 subscribers to your channels
- At least 4,000 public watch hours in the last 365 days, or
- At least 10 million valid public Shorts views in the last 90 days
Additional Guidelines for Creators
Once you meet the eligibility criteria, you will be required to follow certain guidelines or policies to continue earning. The additional guidelines include:
- Follow YouTube’s Advertiser-Friendly Content Guidelines
- Make sure your channel does not have active Community Guidelines Strikes
- Live in a region where the program is available
- Avoid uploading another creator’s content by transforming the content or adding a new perspective to it
- Avoid using unedited clips from TV shows or movies that you don’t have rights to
- Don’t pay for fake or automated views
- Turn on 2-Step verification for your Google Account
- Have an active AdSense account
- Have access to advanced YouTube features by verifying your identity
Part 2. Monetizing YouTube Shorts: Step-by-Step Guide
Can you monetize YouTube shorts? Yes, in more than one way. The easiest is through the ad-revenue sharing model. Follow these steps to become part of the YPP and start monetizing your Shorts on YouTube:
Step 1Sign in to YouTube
Step 2Select YouTube Studio
In the top right of the YouTube page, click on your profile picture. From the pop-up menu that appears, select YouTube Studio.
Step 3In the left menu, Click on Earn
Step 4
If you are eligible for the YPP, you will see an Apply Click on it to go to the next step. If you are not yet eligible, click the Get Notified button to be notified once your channel becomes eligible. That’s when you will have the opportunity to finish the application process.
Step 5
Click Start to review and accept YouTube’s Base terms.
Step 6
Link your existing AdSense account if you have one. If not. Click Start to set up a new one.
Step 7
Wait for YouTube to review and approve your application. The process will normally take a month. Once you are approved for the YPP, go to the Earn section in YouTube Studio. Then accept the Shorts Monetization Module. This will allow you to access ads and other money-making tools on YouTube.
The instructions shared above are for applying for the YPP using a computer or desktop. You will still follow the same steps when using a mobile device, but you will do so using the YouTube Studio app.
The money-making feature monetizes Shorts in exciting ways. To start monetizing with Super Thanks fan funding, click Supers on the Earn tab in YouTube Studio. Then click Get Started, and follow the presented prompts. The same process is applicable for Channel Memberships, and other fan-funding options.
Part 3. YouTube Shorts Monetization: A Realistic Look at Earnings Potential
Monetizing YouTube Shorts has the potential to make decent earnings. Although the amount is not as much as a long-form videos, it is a great way of making money on YouTube quickly. Most YouTube Shorts creators agree that the revenue per thousand views (RPM) for short-form content is currently around $0.05 - $0.07. This means that for a million Shorts views, you will make $50 - $70.
Factors That Influence Earnings
The amount of money you make on YouTube Shorts is not fixed. It will depend on several factors, including the revenue channel and your interactions with viewers
- Ad revenue: A higher view count on Shorts increases ad revenue from the ads that are between Shorts on the platform.
- Viewer engagement: Viewer engagement brings in additional revenue through features like Super Thanks.
- Number of monetized Shorts: Monetizing most of your short-form videos will increase the revenue generated.
- Shopping Revenue: How well you promote your products and the set price point of the products will determine the shopping revenue generated.
Examples of Creators Who Have Earned from Shorts
The revenue-sharing program is the easiest way for creators to earn money on YouTube. Since monetizing their Shorts, these creators earned some decent bonus amounts:
- Hassan Khadair (2.1 million subscribers) - Earned $872.14 in ads from 22 million Shorts views
- Riley Lemon (84,000 subscribers) - Earned $76.23 in ads from 1.9 million Shorts views
- James Seo (573,000 subscribers) - Earned $445.09 in ads from 10.3 million Shorts views
- Matthew King (212,000 subscribers) - Earned $163.73 in ads from 4.2 million Shorts views
Part 4. Editing YouTube Shorts with WonderShare to Boost Revenue Potential
The best way to reap big from Shorts YouTube monetization is to make quality videos that will go viral easily. Videos that generate more views will earn you more revenue and increase the number of subscribers within a short time. With Wondershare Filmora, making such videos is easy. The video editing software offers useful features for making your videos stand out. From jaw-dropping sports videos to cinema-like production, the choice of options is endless.
Free Download For Win 7 or later(64-bit)
Free Download For macOS 10.14 or later
The choice of Filmora features you use on your editing projects will depend on your goals. Here are a few favorites to get you started:
1. Auto Reframe
Before uploading a short-form video on YouTube, you want to make sure it is of the right resolution. The Auto Reframe feature on Filmora allows you to instantly resize your videos while keeping all the important details. You only need to record one video for all platforms, and edit to fit with auto reframe.
2. Text to Speech
Narration is an important aspect of YouTube Shorts. You can tell what is happening in the clip in the simplest way for your audience to understand. The Text to Speech (TTS) feature on Filmora allows you to convert your text files to voice-over. This makes your Shorts video more entertaining and enriched with more elements.
3. AI Portrait
Just like other vertical social media videos, Shorts require some bit of personalization. You may want to add a bit of elements or filters. The AI Portrait feature automatically removes background with high accuracy to further enhance your videos. It also comes with over 70 portrait and sticker effects to bring out the mood you are going after. Automatically recognize the faces of your subjects and add AR stickers on the go.
Conclusion
YouTube Shorts have become immensely popular. They tend to have a higher ROI and receive more engagement compared to long-form video content. This makes vertical short-form videos more important and lucrative for content creators. When it comes to YouTube short video monetization, posting quality videos is the key ingredient. We recommend using Wondershare FIlmora to edit your videos. This will make sure they are more entertaining and keep more people engaged.
Flavorful Footage: Kitchen Film-Making 101
How to Make a Cooking Video in Steps - an Ultimate Guide

Richard Bennett
Mar 27, 2024• Proven solutions
Cooking and food-oriented videos are among the most outreaching and popular categories of content to publish online, notably, on YouTube, Facebook, or Instagram. So if you are a cooking aficionado, you have excellent potential to gain positive attention and a loyal audience. But to create engaging videos, you’d need a lot more than excellent culinary skills. This article aims to enlighten aspiring food and recipe vloggers about the essentials of video making straight out of the oven, to create enriched content that’s professional, neat, and viral-worthy.
- Part 1: What to Prepare Before Making a Recipe Video?
- Part 2: Make a Cooking Video with Filmora: a Step-by-Step Guide
- Part 3: Tips to Make Your Cooking Videos Stand Out
- Part 4: How to Promote Your Cooking Channel on YouTube?
What to Prepare Before Making a Recipe Video
While you would know best about the prep work needed for the recipes, the prep work for making a video starts with a plan. What goes into the plan?
Brainstorm this equation - Main Content + Duration + Light + Sound + Camera + Camera Angle, Shots & Transition.
The main content is how you picture the finished video. Ask yourself - Do you want an intro gig? Are you going to talk in the video or show only hands and the cooking with a piece of background music? How do you wish to present the ingredients? Would there be additional tips? At what platform are you going to publish your content? How long should be your clippings? Consider all these questions to chalk out a basic framework of your video
The camera is a pivotal element. Whether it is a smartphone or a hi-fidelity digital camera, it is worthwhile to familiarise the best positions and light orientations and the capacity of the device to produce the best quality picture.
How is your sound going to be like? If you are going to talk in the video, it is recommended that you use a microphone. Or else, you can also use background sound. But to mix sound with the video, you’d need an excellent sound editing tool.
Finally, comes the editing and finishing part. Eventually, you’ll need purposive video-editing software to help you work out the video transitions, sound, and visual effects.Choose a toolkit that is easy to learn and that you can get comfortable with so that the job of video editing doesn’t take the focus away from the main task of cooking.

Now, once you have all the essential ingredients to create your video, start practicing. Remember that it is the most natural thing for the first videos to appear amateurish or inept. And that is part of the plan. Don’t be disheartened and keep going.
Make a Cooking Video with Filmora: a Step-by-Step Guide
As one of the easiest-to-use video editing tools, the full-featured Filmora is the right choice considering it can fit most of your needs. Moreover, you’d be delighted to know that the software also has a series of features and functions and even tutorial videos dedicated to cooking videos.


Step 1: Filming the Video
Whether you are going to present a traditional cook-with-me style video or feature the contemporary “jump-cut” style focusing on speedy short videos, you need to prepare all the equipment and ingredients to suit the frame by frame shots. Consider spills, drops, overcooking, etc. as part of the process, so keep adequate substitutes to continue with your project unwaveringly. If you are using a phone, keep it fully charged up. And have a plan beforehand about what you should do when you get an urgent call while shooting. Also, consider doing a site investigation of the shooting spot for any fragile items, pointy corners, slippery areas, curious pets, etc. to avoid trips and falls in the middle of the filming, especially when working with a cameraman who’s following your movement. If you are using a tripod, and floor-standing lights, remember to secure the equipment with plenty of adhesive tapes, lest they bump into an expensive trip or fall.
Step 2: mport Your Video In Filmora
You need to sync the device that you used to film the video with the computer that has Filmora installed. It may be a phone or a camcorder. Once the devices are synced, you should launch the Filmora software and go the “Media” button at the top right toolbar. There you will find the “Import” button. You will get a pop-up message asking you to choose the type of device. Select the right one, and your video will be imported in the Filmora interface.
Step 3: Edit Video Pace: Time-Lapse, Jump Cut, Slow Motion
To create crisp, fast-paced videos, you don’t have to gobble up the content eyeing at the duration. Think smart when you have the resources of a tool like Filmora. Here are the three best features that help you create fast-paced yet well-defined recipes.
Time-Lapse: The time-lapse feature allows you to adjust the speed of the video from slow-motion to 10x faster. To use this, double click on a specific clip in your imported video and open the custom speed settings. Use the adjusting meter beside speed to make your clip as fast or slow as you want. You may use the same feature to introduce the slow-motion effects in certain areas of the video.
Now, when you are using either the fast-forward or slow-motion effects, it is best to have stable video footage with consistent lighting and a static background. There are also the options of Reverse Speed that can play the clip backward, as in flash-back. The Ripple edit feature allows you to cut short a long clip seamlessly.
Jump Cut: The Jump Cut is about snipping unwanted areas in the clip. It may sound like the Ripple edit mentioned above, but the ripple edit is more functional for cutting short a continuous video so that the viewer won’t realize the snip. For the Jump Cut, it doesn’t have to be a constant clip. You can get to the next frame or scene with an abracadabra move.
To use Jump Cut, place the cursor over the starting of the clip that you want to cut, and right-click on it and select “Split” (the “scissors” feature on the toolbar does the same thing). To make this look neat, preview the portion of the clip once again and delete the cuts between two clips with the same right-click.
Step 4: Understanding Transitions on Filmora
Transitions make your video more interactive and help you segregate the video from frame-to-frame with effects like dissolve, fade, flash, etc. there are numerous transition options available within the Filmora suit.
The best way to do this drag and drop the clips on the timeline is to trim parts of the clip to shorten it. Once you have all the clips in place, go to the “Transitions” options at the top toolbar to apply it on the end or start of each clip.
Step 5: Audio, Playback & Sound Edits
There are plenty of options that you can remove background noise, add voiceover, add music, and detach audio from video. Refer to the Audios section from your toolbar.
Step 6: Save to Drive/ Emport/ Publish
Once you are satisfied with your content, then go to Export. Choose the format of the video, MOV, MP4, MPG, etc. and whether you wish to publish directly or save to drive.
Tips to Make Your Cooking Videos Stand Out
- Lighting is your best friend. Invest in some quality spotlights or use the best of daylight.
- Mind your video duration. Short and Simple videos get the most views, but your content should not look incomplete. It is not a fact that long and elaborate videos do not get a place on the table; it is all about the relevance of your content. So don’t stop till you get enough.
- If you appear in the video, keep yourself always look good.
- Keep your video titles relevant and prominent, so that people looking for it can readily find it.
- Have a scrumptious custom thumbnail.
How to Promote Your Cooking Channel on YouTube
- Create an inventory before publishing videos. YouTube vlogging is valued for consistency. If you have a list of 10, 15, 20 videos, then you can have enough time in hand to film your next videos.
- Have a consistent style to create brand recognition. Do you think branding is not for Vlogs? Well, I suppose you might be wrong. Branding is for anyone who uses it.
- Share the link of your YouTube videos on other platforms like Twitter and Facebook.
- Encourage your viewers to comment on the video.
- Explore the different YouTube SEO strategies and use the accurate keywords in your video descriptions with hashtags.
With prior planning and practicing, you are bent on developing more confident moves and camera angles. Once you have that, follow this step by step guide to gain speed and prowess and also enjoy the whole adventure.
Richard Bennett
Richard Bennett is a writer and a lover of all things video.
Follow @Richard Bennett
Richard Bennett
Mar 27, 2024• Proven solutions
Cooking and food-oriented videos are among the most outreaching and popular categories of content to publish online, notably, on YouTube, Facebook, or Instagram. So if you are a cooking aficionado, you have excellent potential to gain positive attention and a loyal audience. But to create engaging videos, you’d need a lot more than excellent culinary skills. This article aims to enlighten aspiring food and recipe vloggers about the essentials of video making straight out of the oven, to create enriched content that’s professional, neat, and viral-worthy.
- Part 1: What to Prepare Before Making a Recipe Video?
- Part 2: Make a Cooking Video with Filmora: a Step-by-Step Guide
- Part 3: Tips to Make Your Cooking Videos Stand Out
- Part 4: How to Promote Your Cooking Channel on YouTube?
What to Prepare Before Making a Recipe Video
While you would know best about the prep work needed for the recipes, the prep work for making a video starts with a plan. What goes into the plan?
Brainstorm this equation - Main Content + Duration + Light + Sound + Camera + Camera Angle, Shots & Transition.
The main content is how you picture the finished video. Ask yourself - Do you want an intro gig? Are you going to talk in the video or show only hands and the cooking with a piece of background music? How do you wish to present the ingredients? Would there be additional tips? At what platform are you going to publish your content? How long should be your clippings? Consider all these questions to chalk out a basic framework of your video
The camera is a pivotal element. Whether it is a smartphone or a hi-fidelity digital camera, it is worthwhile to familiarise the best positions and light orientations and the capacity of the device to produce the best quality picture.
How is your sound going to be like? If you are going to talk in the video, it is recommended that you use a microphone. Or else, you can also use background sound. But to mix sound with the video, you’d need an excellent sound editing tool.
Finally, comes the editing and finishing part. Eventually, you’ll need purposive video-editing software to help you work out the video transitions, sound, and visual effects.Choose a toolkit that is easy to learn and that you can get comfortable with so that the job of video editing doesn’t take the focus away from the main task of cooking.
Now, once you have all the essential ingredients to create your video, start practicing. Remember that it is the most natural thing for the first videos to appear amateurish or inept. And that is part of the plan. Don’t be disheartened and keep going.
Make a Cooking Video with Filmora: a Step-by-Step Guide
As one of the easiest-to-use video editing tools, the full-featured Filmora is the right choice considering it can fit most of your needs. Moreover, you’d be delighted to know that the software also has a series of features and functions and even tutorial videos dedicated to cooking videos.
Step 1: Filming the Video
Whether you are going to present a traditional cook-with-me style video or feature the contemporary “jump-cut” style focusing on speedy short videos, you need to prepare all the equipment and ingredients to suit the frame by frame shots. Consider spills, drops, overcooking, etc. as part of the process, so keep adequate substitutes to continue with your project unwaveringly. If you are using a phone, keep it fully charged up. And have a plan beforehand about what you should do when you get an urgent call while shooting. Also, consider doing a site investigation of the shooting spot for any fragile items, pointy corners, slippery areas, curious pets, etc. to avoid trips and falls in the middle of the filming, especially when working with a cameraman who’s following your movement. If you are using a tripod, and floor-standing lights, remember to secure the equipment with plenty of adhesive tapes, lest they bump into an expensive trip or fall.
Step 2: mport Your Video In Filmora
You need to sync the device that you used to film the video with the computer that has Filmora installed. It may be a phone or a camcorder. Once the devices are synced, you should launch the Filmora software and go the “Media” button at the top right toolbar. There you will find the “Import” button. You will get a pop-up message asking you to choose the type of device. Select the right one, and your video will be imported in the Filmora interface.
Step 3: Edit Video Pace: Time-Lapse, Jump Cut, Slow Motion
To create crisp, fast-paced videos, you don’t have to gobble up the content eyeing at the duration. Think smart when you have the resources of a tool like Filmora. Here are the three best features that help you create fast-paced yet well-defined recipes.
Time-Lapse: The time-lapse feature allows you to adjust the speed of the video from slow-motion to 10x faster. To use this, double click on a specific clip in your imported video and open the custom speed settings. Use the adjusting meter beside speed to make your clip as fast or slow as you want. You may use the same feature to introduce the slow-motion effects in certain areas of the video.
Now, when you are using either the fast-forward or slow-motion effects, it is best to have stable video footage with consistent lighting and a static background. There are also the options of Reverse Speed that can play the clip backward, as in flash-back. The Ripple edit feature allows you to cut short a long clip seamlessly.
Jump Cut: The Jump Cut is about snipping unwanted areas in the clip. It may sound like the Ripple edit mentioned above, but the ripple edit is more functional for cutting short a continuous video so that the viewer won’t realize the snip. For the Jump Cut, it doesn’t have to be a constant clip. You can get to the next frame or scene with an abracadabra move.
To use Jump Cut, place the cursor over the starting of the clip that you want to cut, and right-click on it and select “Split” (the “scissors” feature on the toolbar does the same thing). To make this look neat, preview the portion of the clip once again and delete the cuts between two clips with the same right-click.
Step 4: Understanding Transitions on Filmora
Transitions make your video more interactive and help you segregate the video from frame-to-frame with effects like dissolve, fade, flash, etc. there are numerous transition options available within the Filmora suit.
The best way to do this drag and drop the clips on the timeline is to trim parts of the clip to shorten it. Once you have all the clips in place, go to the “Transitions” options at the top toolbar to apply it on the end or start of each clip.
Step 5: Audio, Playback & Sound Edits
There are plenty of options that you can remove background noise, add voiceover, add music, and detach audio from video. Refer to the Audios section from your toolbar.
Step 6: Save to Drive/ Emport/ Publish
Once you are satisfied with your content, then go to Export. Choose the format of the video, MOV, MP4, MPG, etc. and whether you wish to publish directly or save to drive.
Tips to Make Your Cooking Videos Stand Out
- Lighting is your best friend. Invest in some quality spotlights or use the best of daylight.
- Mind your video duration. Short and Simple videos get the most views, but your content should not look incomplete. It is not a fact that long and elaborate videos do not get a place on the table; it is all about the relevance of your content. So don’t stop till you get enough.
- If you appear in the video, keep yourself always look good.
- Keep your video titles relevant and prominent, so that people looking for it can readily find it.
- Have a scrumptious custom thumbnail.
How to Promote Your Cooking Channel on YouTube
- Create an inventory before publishing videos. YouTube vlogging is valued for consistency. If you have a list of 10, 15, 20 videos, then you can have enough time in hand to film your next videos.
- Have a consistent style to create brand recognition. Do you think branding is not for Vlogs? Well, I suppose you might be wrong. Branding is for anyone who uses it.
- Share the link of your YouTube videos on other platforms like Twitter and Facebook.
- Encourage your viewers to comment on the video.
- Explore the different YouTube SEO strategies and use the accurate keywords in your video descriptions with hashtags.
With prior planning and practicing, you are bent on developing more confident moves and camera angles. Once you have that, follow this step by step guide to gain speed and prowess and also enjoy the whole adventure.
Richard Bennett
Richard Bennett is a writer and a lover of all things video.
Follow @Richard Bennett
Also read:
- [New] 2024 Approved Broadview Networks Navigating MCN Choices
- [New] In 2024, Demystifying Screen Record Snapchat A Beginner's Handbook
- [Updated] Boosting Views Mastering Hashtags in FreeFire Vids
- 2024 Approved Incorporate Soundscape Into Visual Discussions
- Does Rapid Subscription Improve Video Watching for 2024
- DVD Auf macOS Kopieren: Schritt-Für-Schritt-Anleitung
- Guide Eradicating Pending Videos on Your YouTube Queue
- How to Easily Add Subtitles and Closed Captions to YouTube Video for 2024
- Resolved: How to Fix Slowdowns in Dying Light Gameplay
- Run a Zero-Cost, Locally Accessible GPT on Your PC – Use GPT4All
- Streaming Giants' Rivalry Facebook Vs. YouTube & Spaces
- Title: [New] Boosting Your Youtube Shorts Profits Key Requirements & Earning Potential
- Author: Kevin
- Created at : 2024-12-18 16:31:51
- Updated at : 2024-12-25 16:30:08
- Link: https://youtube-videos.techidaily.com/new-boosting-your-youtube-shorts-profits-key-requirements-and-earning-potential/
- License: This work is licensed under CC BY-NC-SA 4.0.