![[New] Behind the Screen A Strategic Approach for Secret YouTube Videos](https://thmb.techidaily.com/c62b5284641027dfddd7dff7e86c9bcc06523e51b87668f0c388f2d39f0ecdca.jpg)
"[New] Behind the Screen A Strategic Approach for Secret YouTube Videos"
Behind the Screen: A Strategic Approach for Secret YouTube Videos
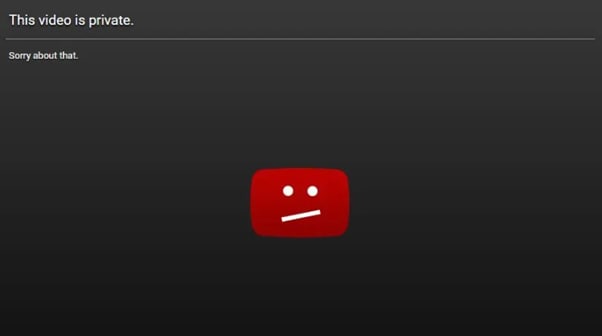
You may have noticed that some videos in your YouTube playlist are unavailable. This is because the platform allows content creators to categorize their videos into public, private, or unlisted based on their preferences.
To help you uncover the content that you otherwise wouldn’t have access to, we’ve compiled a detailed guide to show you how to find YouTube hidden videos. We’ve also explained why so many unlisted videos are now labeled as private.
So, let’s get started with our guide without any further delay!
4 Types of Videos on YouTube
Firstly, let’s learn about the background of the types of YouTube videos. YouTube videos fall into the following four broad categories:
Public Videos: YouTube contains videos on many themes and topics. It makes it impossible to watch all uploaded content under a specific category.
So, whenever you search for a video or theme, a list of content is displayed in the search result: “Public Videos.” It means that they are visible to everyone around the globe (depending on the terms and conditions). Moreover, you can share, like, unlike, download, or add these videos to your playlists for later watching.
Private Videos: Private videos on YouTube can only be seen by people invited by the person who uploaded the video. This means that only those with access to the video’s shareable link can watch it.
Private videos are not visible to the public or to people who are not logged into YouTube. Hence, it is a great way to share sensitive or personal information with a select group.
Unlisted Video Unlisted videos on YouTube are not publicly visible on the site. They can only be seen by people who have the URL. This category works as a bridge between private and public videos. It is accessible only through sharable links without appealing in any YouTube public playlist or search result.
You might upload an unlisted video to YouTube if you do not want everyone to see it. However, you still want to share it with specific people, like your friends or family. You might also use an unlisted video to test out a new idea before making it public on the video-sharing platform.
Age-Restricted Videos: Age-restricted videos on YouTube are not suitable for all audiences. It may contain content that includes violence, profanity, sexual content, and other inappropriate material. YouTube requires that users be at least 18 years old to view these types of videos.
If you search on YouTube and come across an age-restricted video, you will be asked to confirm your age before viewing its content.

How To Find Unlisted YouTube Videos
Now that we’ve learned about the four types of YouTube content, let’s discuss how you can find unlisted YouTube videos:
How To Find Other People’s Unlisted YouTube Videos?
Since unavailable videos in YouTube playlists are hidden from general public viewers, you cannot find them on YouTube or Google search results.
However, the following workaround can help you watch these YouTube videos without facing much trouble:
Step 1: First, open a browser on your PC and visit the Unlisted Videos website. This platform contains over 600,000 unlisted YouTube videos from 2016 and earlier. You can also submit your unlisted video on the site.

Step 2: Use the search bar at the top of your screen to search for other people’s YouTube playlists. You can also click the “All Video” or “Random Videos” option to find the hidden content of a user.
How To See Unlisted Videos on My YouTube Channel?
To see your unlisted videos on your YouTube channel, do the following steps in sequence:
Step 1: In the first step, install the YouTube Studio app on your mobile device or visit its website using a browser on your computer. Next, launch the app and sign in to your channel’s account using your email and password.
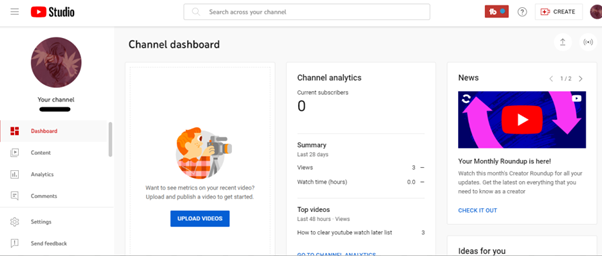
Step 2: In the next step, tap/ click the “Content” tab and tap/click the “Funnel” icon at the top of the video list to access the visibility options.
Step 3:
- Now, choose the “Visibility” option.
- Select “Unlisted” to change the visibility.
- Click the “Save” option to apply changes.
- See the hidden videos on your channel.

Since YouTube has marked the videos uploaded before 2017 as private as of July 2021, you can find your old unlisted videos under the “Private” list. To access it, choose “Private” as the visibility option.
How To Find Unlisted YouTube Videos with Google
Sometimes, unlisted YouTube videos appear on Google when someone shares the link to them on a public forum or website.
To confirm this, open a browser on your computer or a mobile device, head to the Google website, and search for your query. With some luck, you can find these unlisted YouTube videos in the search results.
You May Want to Know: Why Are So Many Unlisted Videos Now Private?
All unlisted videos uploaded to YouTube before January 2017 were switched to private. Therefore, if you have any older unlisted videos added to your Playlist or embedded on your website, you won’t be able to access them now.
However, the channel’s owner can restore access to the video by switching it back to unlisted or public. If now, the video will be labeled as “Private” indefinitely or until its settings are changed.
Conclusion
In this detailed guide, we’ve explored the four types of videos on YouTube and how to find YouTube hidden videos in three different ways. We’ve also explained why so many videos are now listed as “Private” and inaccessible.
Hopefully, you’ve found this article helpful and can now access the unlisted videos on YouTube without hassle.
You may have noticed that some videos in your YouTube playlist are unavailable. This is because the platform allows content creators to categorize their videos into public, private, or unlisted based on their preferences.
To help you uncover the content that you otherwise wouldn’t have access to, we’ve compiled a detailed guide to show you how to find YouTube hidden videos. We’ve also explained why so many unlisted videos are now labeled as private.
So, let’s get started with our guide without any further delay!
4 Types of Videos on YouTube
Firstly, let’s learn about the background of the types of YouTube videos. YouTube videos fall into the following four broad categories:
Public Videos: YouTube contains videos on many themes and topics. It makes it impossible to watch all uploaded content under a specific category.
So, whenever you search for a video or theme, a list of content is displayed in the search result: “Public Videos.” It means that they are visible to everyone around the globe (depending on the terms and conditions). Moreover, you can share, like, unlike, download, or add these videos to your playlists for later watching.
Private Videos: Private videos on YouTube can only be seen by people invited by the person who uploaded the video. This means that only those with access to the video’s shareable link can watch it.
Private videos are not visible to the public or to people who are not logged into YouTube. Hence, it is a great way to share sensitive or personal information with a select group.
Unlisted Video Unlisted videos on YouTube are not publicly visible on the site. They can only be seen by people who have the URL. This category works as a bridge between private and public videos. It is accessible only through sharable links without appealing in any YouTube public playlist or search result.
You might upload an unlisted video to YouTube if you do not want everyone to see it. However, you still want to share it with specific people, like your friends or family. You might also use an unlisted video to test out a new idea before making it public on the video-sharing platform.
Age-Restricted Videos: Age-restricted videos on YouTube are not suitable for all audiences. It may contain content that includes violence, profanity, sexual content, and other inappropriate material. YouTube requires that users be at least 18 years old to view these types of videos.
If you search on YouTube and come across an age-restricted video, you will be asked to confirm your age before viewing its content.
How To Find Unlisted YouTube Videos
Now that we’ve learned about the four types of YouTube content, let’s discuss how you can find unlisted YouTube videos:
How To Find Other People’s Unlisted YouTube Videos?
Since unavailable videos in YouTube playlists are hidden from general public viewers, you cannot find them on YouTube or Google search results.
However, the following workaround can help you watch these YouTube videos without facing much trouble:
Step 1: First, open a browser on your PC and visit the Unlisted Videos website. This platform contains over 600,000 unlisted YouTube videos from 2016 and earlier. You can also submit your unlisted video on the site.
Step 2: Use the search bar at the top of your screen to search for other people’s YouTube playlists. You can also click the “All Video” or “Random Videos” option to find the hidden content of a user.
How To See Unlisted Videos on My YouTube Channel?
To see your unlisted videos on your YouTube channel, do the following steps in sequence:
Step 1: In the first step, install the YouTube Studio app on your mobile device or visit its website using a browser on your computer. Next, launch the app and sign in to your channel’s account using your email and password.
Step 2: In the next step, tap/ click the “Content” tab and tap/click the “Funnel” icon at the top of the video list to access the visibility options.
Step 3:
- Now, choose the “Visibility” option.
- Select “Unlisted” to change the visibility.
- Click the “Save” option to apply changes.
- See the hidden videos on your channel.
Since YouTube has marked the videos uploaded before 2017 as private as of July 2021, you can find your old unlisted videos under the “Private” list. To access it, choose “Private” as the visibility option.
How To Find Unlisted YouTube Videos with Google
Sometimes, unlisted YouTube videos appear on Google when someone shares the link to them on a public forum or website.
To confirm this, open a browser on your computer or a mobile device, head to the Google website, and search for your query. With some luck, you can find these unlisted YouTube videos in the search results.
You May Want to Know: Why Are So Many Unlisted Videos Now Private?
All unlisted videos uploaded to YouTube before January 2017 were switched to private. Therefore, if you have any older unlisted videos added to your Playlist or embedded on your website, you won’t be able to access them now.
However, the channel’s owner can restore access to the video by switching it back to unlisted or public. If now, the video will be labeled as “Private” indefinitely or until its settings are changed.
Conclusion
In this detailed guide, we’ve explored the four types of videos on YouTube and how to find YouTube hidden videos in three different ways. We’ve also explained why so many videos are now listed as “Private” and inaccessible.
Hopefully, you’ve found this article helpful and can now access the unlisted videos on YouTube without hassle.
Channel Upgrade: The Beginner’s Roadmap to Video Mastery
YouTube Video Editing Tips for Beginner Editors

Marion Dubois
Oct 26, 2023• Proven solutions
Creating good-quality videos regularly can be difficult, especially when you are a beginner. The most crucial part of making a video is editing. This is the part where you have to look at every intricate detail. This is the part where you remove unwanted footage and place useful shots in their position. Every creator has their editing style by which they put their mark on their videos.
Editing can be a long and tedious process. It takes time, patience, and an immense amount of creativity to create a video good enough to impress the viewers. Here are few tips that will make your editing process easier and cut your editing time in half.
Top 10 Video Editing Tips for YouTube Beginners
The following will not tell you how to edit your YouTube videos, but will surely make editing a little more convenient.
1. Choose a Good Video Editor
One of the first things you have to do is make sure that you have chosen a video editor that is best for you.
Using either too complicated or too basic a video editor can only create problems for you. An advanced video editor may create very high-end, professional videos, but it will take months just to get the hang of the software. Whereas a free basic video editor may not give as many options as you’d need to edit your videos properly.
2. Use Fast Computers
Being a video creator, you’ll have to store numerous huge files on your computer. To improve your current PC, you can invest in an SSD, which is a lot faster than the traditional hard disk.
SSD will not only improve your export, loading, and rendering time but it will allow you to access files and editing software much faster. Another improvement you can make to make your editing process faster is to increase the RAM of your computer (it should be at least 8 GB). Also, make sure to get the recommended video card and processor for your video editor.
3. Invest Your Time in Video Editing Tutorials
You can watch video editing tutorials to learn and perfect the art of video editing. You can easily find free tutorials online, visiting websites like Skillshare and Red Giant tutorials to access free video editing tutorials. Search for tutorials that are specific to the editing software you use. You can also search for tutorials that will help improve your content.
4. Use Keyboard Shortcuts
Learn the keyboard shortcuts for various functions in the software, especially the ones that are usually repeated throughout the process like undo, redo, delete, etc.
You can also invest in an Editing keyboard, they are software specific and already have keyboard shortcut icons in them.
5. Add Good Music
Another important tip to keep your audience all ears is to add good music to your videos. Whether it is background music or a soundtrack in between shots, it has to pair well with your video.
If you are on a budget and don’t want to spend money on music, there are royalty-free options available. But, know that good music only comes at a price.
6. Add Text, Titles, and Graphics
You can choose from a wide variety of text and titles. You’ll also have tools to enhance the graphics of your video. When you have so many options, choosing the right one can be difficult. It is better to keep the font of the text simple.
You can also use video editors to add flashy motion graphics to your videos. You can either create your graphics by hand or you can also choose from a variety of ready-made graphics templates.
7. Don’t Forget to Color Correction
Not color correcting your videos may render them looking dull and lifeless. Color is one of the major elements that play a crucial part in setting the mood of your video. Depending upon the type of content you’re portraying in the video, you can use a color scheme to highlight specific aspects or to evoke certain emotions in the audience.
Color correction is used to make your video appear consistent throughout the scenes. Whereas color grading is used to make videos stand out. Both are essential to differentiate certain scenes from others.
8. Learn Important Terms
Learn the terms commonly used in video editing. It will help you become proficient with the software and the process of editing. Some common terms used in the editing sphere are:
- Cutaways
- Jump Cuts
- Match Cuts/Match-Action Montage
- J and L Cuts
- Cutting on Action
9. Store Your Video Files on an External Drive
Storing your huge video files on an external drive will free up a lot of space on your computer. This will help speed up your device so you don’t have to worry about slow rendering.
10. Make Copies of Your Files
Always make more than two copies of your files. You can use the 321 rule. The rule is to make 3 copies of your files, store them in two different places, where one place should be physically separate from the other.
The Best YouTube Video Editing Software for Beginners
There are many video editing software available in the video editing market, but Wondershare Filmora is the best video editor for beginners and professionals alike. It has a beginner-friendly interface, contains advanced editing tools, and is available at a reasonable price.


Here is a list of few features offered by Wondershare Filmora.
1. AI Portrait
It helps make your videos vibrant and colorful
2. Visual and Audio Effects
Visual and audio effects can be added to improve the image and sound quality of the video
3. Audio Ducking
You can layer one sound on top of the other.
4. Cool Texts
You can add cool texts and titles from the library.
5. Screen Recording
You can record the screen activity of your device.
Final Word
As a beginner, the time and effort required to make a good video can be reduced to half if you follow a few simple tricks that professionals use daily. It’s all about working smart and not hard. You can save time by learning the editing term and keyboard shortcuts. You can save your files in an external drive to save storage and make backup in case of any mishaps. Remember to color grade, add cool texts and good music to make your videos distinct.
Marion Dubois
Marion Dubois is a writer and a lover of all things video.
Follow @Marion Dubois
Marion Dubois
Oct 26, 2023• Proven solutions
Creating good-quality videos regularly can be difficult, especially when you are a beginner. The most crucial part of making a video is editing. This is the part where you have to look at every intricate detail. This is the part where you remove unwanted footage and place useful shots in their position. Every creator has their editing style by which they put their mark on their videos.
Editing can be a long and tedious process. It takes time, patience, and an immense amount of creativity to create a video good enough to impress the viewers. Here are few tips that will make your editing process easier and cut your editing time in half.
Top 10 Video Editing Tips for YouTube Beginners
The following will not tell you how to edit your YouTube videos, but will surely make editing a little more convenient.
1. Choose a Good Video Editor
One of the first things you have to do is make sure that you have chosen a video editor that is best for you.
Using either too complicated or too basic a video editor can only create problems for you. An advanced video editor may create very high-end, professional videos, but it will take months just to get the hang of the software. Whereas a free basic video editor may not give as many options as you’d need to edit your videos properly.
2. Use Fast Computers
Being a video creator, you’ll have to store numerous huge files on your computer. To improve your current PC, you can invest in an SSD, which is a lot faster than the traditional hard disk.
SSD will not only improve your export, loading, and rendering time but it will allow you to access files and editing software much faster. Another improvement you can make to make your editing process faster is to increase the RAM of your computer (it should be at least 8 GB). Also, make sure to get the recommended video card and processor for your video editor.
3. Invest Your Time in Video Editing Tutorials
You can watch video editing tutorials to learn and perfect the art of video editing. You can easily find free tutorials online, visiting websites like Skillshare and Red Giant tutorials to access free video editing tutorials. Search for tutorials that are specific to the editing software you use. You can also search for tutorials that will help improve your content.
4. Use Keyboard Shortcuts
Learn the keyboard shortcuts for various functions in the software, especially the ones that are usually repeated throughout the process like undo, redo, delete, etc.
You can also invest in an Editing keyboard, they are software specific and already have keyboard shortcut icons in them.
5. Add Good Music
Another important tip to keep your audience all ears is to add good music to your videos. Whether it is background music or a soundtrack in between shots, it has to pair well with your video.
If you are on a budget and don’t want to spend money on music, there are royalty-free options available. But, know that good music only comes at a price.
6. Add Text, Titles, and Graphics
You can choose from a wide variety of text and titles. You’ll also have tools to enhance the graphics of your video. When you have so many options, choosing the right one can be difficult. It is better to keep the font of the text simple.
You can also use video editors to add flashy motion graphics to your videos. You can either create your graphics by hand or you can also choose from a variety of ready-made graphics templates.
7. Don’t Forget to Color Correction
Not color correcting your videos may render them looking dull and lifeless. Color is one of the major elements that play a crucial part in setting the mood of your video. Depending upon the type of content you’re portraying in the video, you can use a color scheme to highlight specific aspects or to evoke certain emotions in the audience.
Color correction is used to make your video appear consistent throughout the scenes. Whereas color grading is used to make videos stand out. Both are essential to differentiate certain scenes from others.
8. Learn Important Terms
Learn the terms commonly used in video editing. It will help you become proficient with the software and the process of editing. Some common terms used in the editing sphere are:
- Cutaways
- Jump Cuts
- Match Cuts/Match-Action Montage
- J and L Cuts
- Cutting on Action
9. Store Your Video Files on an External Drive
Storing your huge video files on an external drive will free up a lot of space on your computer. This will help speed up your device so you don’t have to worry about slow rendering.
10. Make Copies of Your Files
Always make more than two copies of your files. You can use the 321 rule. The rule is to make 3 copies of your files, store them in two different places, where one place should be physically separate from the other.
The Best YouTube Video Editing Software for Beginners
There are many video editing software available in the video editing market, but Wondershare Filmora is the best video editor for beginners and professionals alike. It has a beginner-friendly interface, contains advanced editing tools, and is available at a reasonable price.
Here is a list of few features offered by Wondershare Filmora.
1. AI Portrait
It helps make your videos vibrant and colorful
2. Visual and Audio Effects
Visual and audio effects can be added to improve the image and sound quality of the video
3. Audio Ducking
You can layer one sound on top of the other.
4. Cool Texts
You can add cool texts and titles from the library.
5. Screen Recording
You can record the screen activity of your device.
Final Word
As a beginner, the time and effort required to make a good video can be reduced to half if you follow a few simple tricks that professionals use daily. It’s all about working smart and not hard. You can save time by learning the editing term and keyboard shortcuts. You can save your files in an external drive to save storage and make backup in case of any mishaps. Remember to color grade, add cool texts and good music to make your videos distinct.
Marion Dubois
Marion Dubois is a writer and a lover of all things video.
Follow @Marion Dubois
Also read:
- [New] Constructing Captivating Conclusions
- [New] Elite Gaming Setup Essentials Revealed
- [New] In 2024, Dynamic Font Movement Packs
- [Updated] Standout Book Trailer Highlights for 2024
- 2024 Approved Comprehensive Strategies for Tracking YT Traffic and Gains
- Exquisite Couple Clips The Best Weddings Online (8 Picks)
- In 2024, How to Change Your Nokia G22 Location on life360 Without Anyone Knowing? | Dr.fone
- In 2024, Leading Add-Ons to Improve Sea Camera Shots
- In 2024, The Art of Plating on Camera Food Video Production Guide
- In 2024, Voice-Over Strategies for PowerPoint Success Stories
- Streaming Success Latest Updates on Earnings Guidelines
- The Right Way to Dry Out Your Soaked iPhone According to Apple | Avoid the Age-Old Rice Trick
- Top 10 Editing Wizards FCP's Must-Have Plugins
- YouTube Profile Picture Templates – Free Downloads
- Title: [New] Behind the Screen A Strategic Approach for Secret YouTube Videos
- Author: Kevin
- Created at : 2024-12-24 16:18:36
- Updated at : 2024-12-25 16:19:44
- Link: https://youtube-videos.techidaily.com/new-behind-the-screen-a-strategic-approach-for-secret-youtube-videos/
- License: This work is licensed under CC BY-NC-SA 4.0.