
!["[New] Augment Your VFX Arsenal - Explore These Top 8 Sites for Free Eco-Backgrounds"](https://www.lifewire.com/thmb/M6RqwXYKRKXknyDHSnVV_p-NdUQ=/400x300/filters:no_upscale():max_bytes(150000):strip_icc()/GettyImages-1047108570-cbefd6798c804163ba75bbe7f0173e2f.jpg)
"[New] Augment Your VFX Arsenal - Explore These Top 8 Sites for Free Eco-Backgrounds"
Augment Your VFX Arsenal - Explore These Top 8 Sites for Free Eco-Backgrounds
Top 8 Sites to Get Free Green Screen Backgrounds and Footage

Richard Bennett
Mar 27, 2024• Proven solutions
Green screen or also known as chroma key is used when you swap the background of a video with another background. It provides you the opportunity to create fancy YouTube videos without forming an expensive set or going to a distant location and will reduce your cost! You can shoot your video at any place, at any time you want and then you can just swap the background with a fancy animation!
In this article, we are going to show you 8 sites to download green screen footage and how to make green screen videos for free.
- Part1: Top 8 site for free green screen background videos
- Part2: How to make and apply a green screen background video
- Part3: How to use the green screen in video
The best video editor for YouTubers - Wondershare Filmora , not only allows you to cut, crop, rotate, reverse videos, but also offers advanced features like PIP, Green Screen , or audio mixing. What’s more, you can find lots of effects on Fashion, gaming, education, tutorial, sports, etc. Check this article to know more.
In the video tutorial below, we will walk you through the steps to transforming your video into a cinematic marvel. With a few simple clicks and adjustments, you can take your audience to another world.
 Download Mac Version ](https://tools.techidaily.com/wondershare/filmora/download/ )
Part 1: Top 8 sites to get free green screen videos
With the latest release, you can now download video effects, video footage, stock image, and royalty-free sound effect and music from the effects store Wondershare Filmstock .

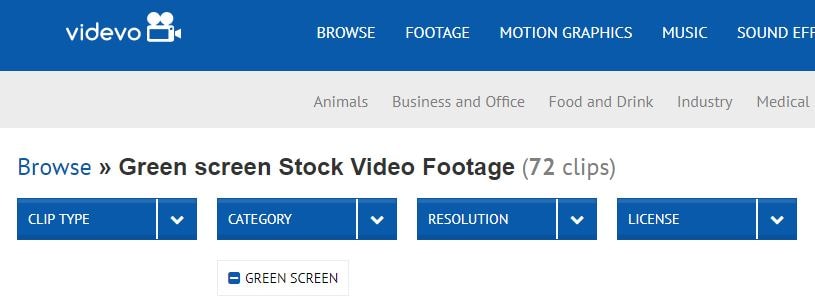
1. Videvo
Get amazing and high-quality videos that are free of the copyright at Videvo. It is a free stock website for videos that also offers free stock motion graphics that can be used in any projects you want. There are 4 segments that are clip-type, category, resolution, and license with further sub-categories for you to choose from. Only the videos with the Creative Commons license 3.0 must be given credit to the original creator.
The features of Videvo include-
- Use video clips free of charge.
- Offers free stock videos and motion graphics.
- Use the video for any types of production, personal or commercial.
- You may browse free green screen background videos.
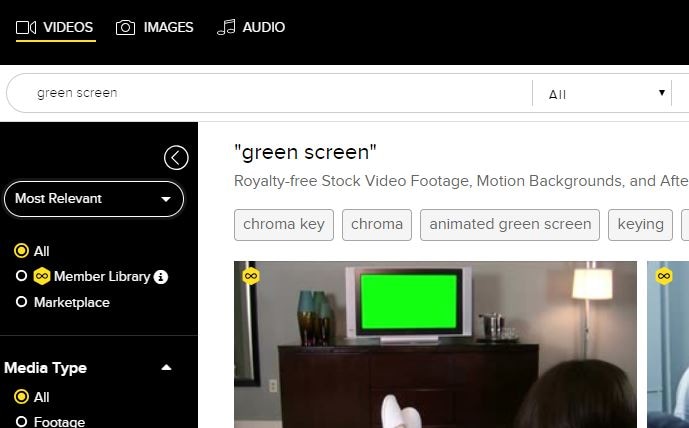
2. VideoBlocks
Download high-quality free stock video at VideoBlocks. Started in the year 2009, VideoBlocks offers animated free green screen background to 4k videos and after-effect templates.
The features are-
- Offers royalty-free stock video footages.
- Choose from the background, after-effects, and collections.
- From Chroma key to blue screen and touchscreen gestures.
- Come in 3 types of pricing plans basic, unlimited, and enterprise.
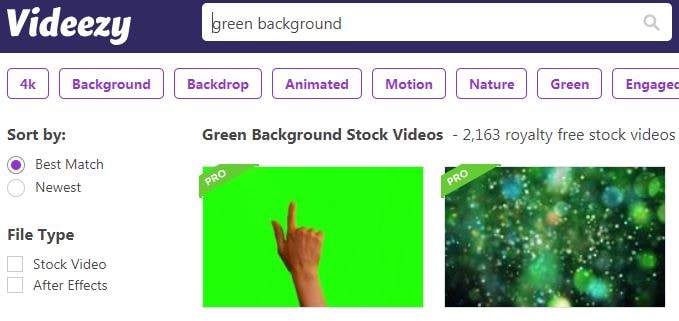
3. Videezy
From sharing HD quality videos to free green screen backgrounds and amazingly cool video footages, Videezy is a platform with numerous free stock video clips, backgrounds and more.
The features of Videezy include-
- All videos on this platform are licensed CC0.
- Share free green screen backgrounds.
- Offer ultra HD resolution.
- A range of themes.
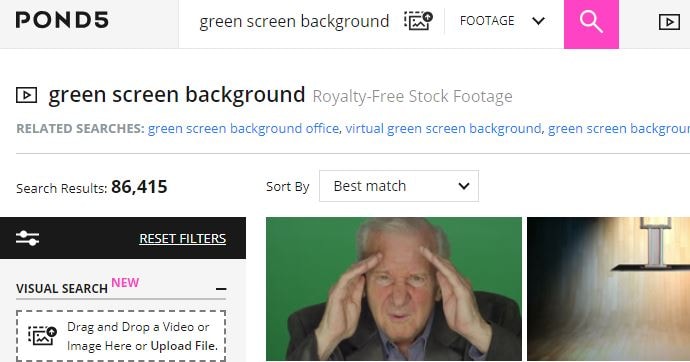
4. Pond5
You can now license your videos with Pond5 which is an international community of brands and media creators. It is a website with more than 60000 contributors of content from about 150 countries. Over 10000 videos are uploaded on Pond5 each day.
The features of Pond5 include-
- Browse more than 700k royalty-free video production tracks.
- Discover HD and 4K clips from filmmakers renowned globally.
- Easy visual search with drag and drop video feature.
- Free green screen background with animated HD videos.
- Several filters to present your green background video amazingly.
5. iStock
If you wish to search for millions of premium quality images, try iStock that handpicks and maintains the leading stock content globally.
The features of iStock include-
- From the green background to blue and orange backgrounds, iStock offers all.
- Find HD Video and 4K footage with green screen background at a nominal price just for the video and not the size.
- Pricing is flexible.

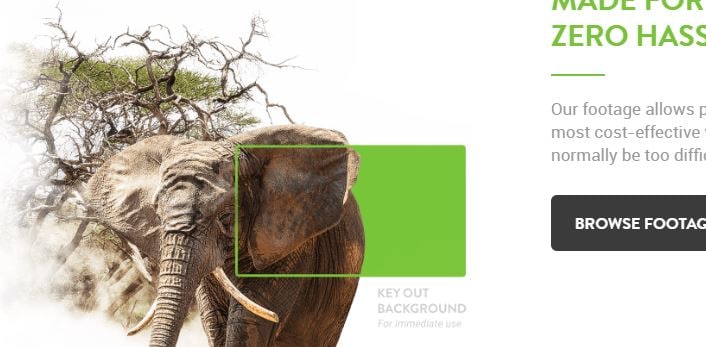
6. Green Screen Animals
The animals are truly difficult to capture. With the Green Screen Animals, you get the easiest and cost-effective access to high-quality video clips of domestic and exotic animals on a free green screen background.
The features are-
- Offers ultra HD 6k resolution video footage.
- You get access to any format as per your requirement.
- Use 3D chimpanzee models in your project with the green screen background.
- Getting performance from the animals can be a tough call, Green Screen Animals makes it easy.
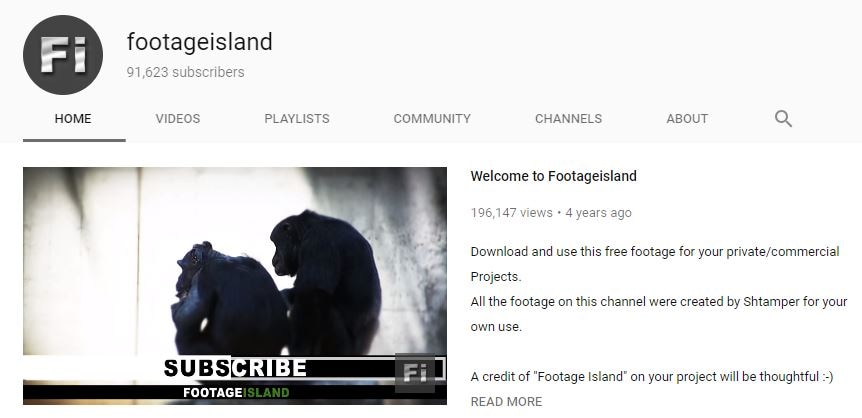
7. Footage Island
Get video footage for both private and commercial use completely free. You just need to give credit to Footage Island and use the content free.
- Free green screen background footages available.
- Free download for both personal and commercial use with just credits to the channel.
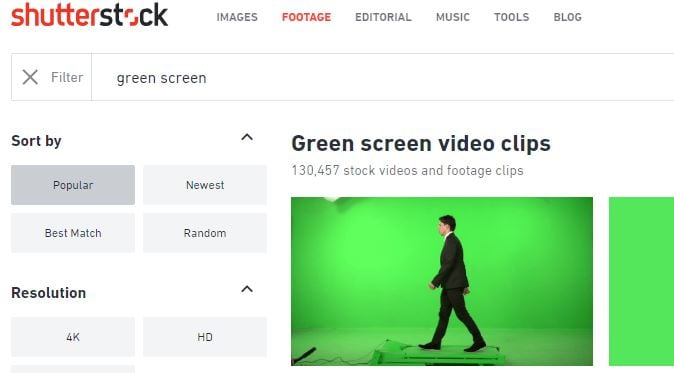
8. Shutterstock
You can sort green screen videos from shutterstock using various search options like popular, latest, best match, and random. You may also select SD, 4k or HD resolution, choose a character from people, animals or abstract, categories and more.
The features include-
- Over 1 lakh stock videos and video clips.
- Curated video collection.
- Categories like entertainment, news, sports, royalty.
- Add music to your free green screen background video.
- Easy editing tools for a great video.
Part 2: How to make and apply a green screen background
In our last article, we have shared with you how to make and use green screen footage .
While, in this article, we won’t repeat it but just share with you some tips for making and applying green screen footage in video editings.
The core objective is to have a smooth one colored background which is easy to replace in post-production. Since the green screen is employed in the film industry on a mega scale, professional green screen kits are quite expensive. Hence it is much more feasible that a DIY solution is employed for the required results.
For a good quality result from a DIY green screen, you need to take care of the following items:
1. Screen Quality
Green screens can be wall painted with a chroma key, a large sheet of cloth hung without any creases, or a portable setup canvas that can cover the given area.
2. Lightning
The most important thing to be kept in mind is that your background should be lit evenly. Any shadows on the background should be avoided. The distance of the subject should be at least ten feet from the background, to minimize any kind of shadow.
You may also like: >> Blue Screen VS Green Screen: All You Need to Know
Part 3: How to composite green screen video footage
The next step is to utilize the downloaded free green screen footage with your video.
The best green screen software for personal and semi-professional use is Filmora. It allows you to import and work on videos shot in any format (AVI, MPEG, MKV, MP4, etc.) and seamlessly integrate your video with the background.
We have already demonstrated the steps of compositing and editing green screen videos at the beginning of the article. While in the video tutorial below, you can check the samples of using Filmora to compositing downloaded free green screen footage.
You can edit a video with green screen using Filmora easily. Check the below video to learn how to manage it.
Download Mac Version ](https://tools.techidaily.com/wondershare/filmora/download/ )
Richard Bennett
Richard Bennett is a writer and a lover of all things video.
Follow @Richard Bennett
Richard Bennett
Mar 27, 2024• Proven solutions
Green screen or also known as chroma key is used when you swap the background of a video with another background. It provides you the opportunity to create fancy YouTube videos without forming an expensive set or going to a distant location and will reduce your cost! You can shoot your video at any place, at any time you want and then you can just swap the background with a fancy animation!
In this article, we are going to show you 8 sites to download green screen footage and how to make green screen videos for free.
- Part1: Top 8 site for free green screen background videos
- Part2: How to make and apply a green screen background video
- Part3: How to use the green screen in video
The best video editor for YouTubers - Wondershare Filmora , not only allows you to cut, crop, rotate, reverse videos, but also offers advanced features like PIP, Green Screen , or audio mixing. What’s more, you can find lots of effects on Fashion, gaming, education, tutorial, sports, etc. Check this article to know more.
In the video tutorial below, we will walk you through the steps to transforming your video into a cinematic marvel. With a few simple clicks and adjustments, you can take your audience to another world.
Download Mac Version ](https://tools.techidaily.com/wondershare/filmora/download/ )
Part 1: Top 8 sites to get free green screen videos
With the latest release, you can now download video effects, video footage, stock image, and royalty-free sound effect and music from the effects store Wondershare Filmstock .
1. Videvo
Get amazing and high-quality videos that are free of the copyright at Videvo. It is a free stock website for videos that also offers free stock motion graphics that can be used in any projects you want. There are 4 segments that are clip-type, category, resolution, and license with further sub-categories for you to choose from. Only the videos with the Creative Commons license 3.0 must be given credit to the original creator.
The features of Videvo include-
- Use video clips free of charge.
- Offers free stock videos and motion graphics.
- Use the video for any types of production, personal or commercial.
- You may browse free green screen background videos.
2. VideoBlocks
Download high-quality free stock video at VideoBlocks. Started in the year 2009, VideoBlocks offers animated free green screen background to 4k videos and after-effect templates.
The features are-
- Offers royalty-free stock video footages.
- Choose from the background, after-effects, and collections.
- From Chroma key to blue screen and touchscreen gestures.
- Come in 3 types of pricing plans basic, unlimited, and enterprise.
3. Videezy
From sharing HD quality videos to free green screen backgrounds and amazingly cool video footages, Videezy is a platform with numerous free stock video clips, backgrounds and more.
The features of Videezy include-
- All videos on this platform are licensed CC0.
- Share free green screen backgrounds.
- Offer ultra HD resolution.
- A range of themes.
4. Pond5
You can now license your videos with Pond5 which is an international community of brands and media creators. It is a website with more than 60000 contributors of content from about 150 countries. Over 10000 videos are uploaded on Pond5 each day.
The features of Pond5 include-
- Browse more than 700k royalty-free video production tracks.
- Discover HD and 4K clips from filmmakers renowned globally.
- Easy visual search with drag and drop video feature.
- Free green screen background with animated HD videos.
- Several filters to present your green background video amazingly.
5. iStock
If you wish to search for millions of premium quality images, try iStock that handpicks and maintains the leading stock content globally.
The features of iStock include-
- From the green background to blue and orange backgrounds, iStock offers all.
- Find HD Video and 4K footage with green screen background at a nominal price just for the video and not the size.
- Pricing is flexible.
6. Green Screen Animals
The animals are truly difficult to capture. With the Green Screen Animals, you get the easiest and cost-effective access to high-quality video clips of domestic and exotic animals on a free green screen background.
The features are-
- Offers ultra HD 6k resolution video footage.
- You get access to any format as per your requirement.
- Use 3D chimpanzee models in your project with the green screen background.
- Getting performance from the animals can be a tough call, Green Screen Animals makes it easy.
7. Footage Island
Get video footage for both private and commercial use completely free. You just need to give credit to Footage Island and use the content free.
- Free green screen background footages available.
- Free download for both personal and commercial use with just credits to the channel.
8. Shutterstock
You can sort green screen videos from shutterstock using various search options like popular, latest, best match, and random. You may also select SD, 4k or HD resolution, choose a character from people, animals or abstract, categories and more.
The features include-
- Over 1 lakh stock videos and video clips.
- Curated video collection.
- Categories like entertainment, news, sports, royalty.
- Add music to your free green screen background video.
- Easy editing tools for a great video.
Part 2: How to make and apply a green screen background
In our last article, we have shared with you how to make and use green screen footage .
While, in this article, we won’t repeat it but just share with you some tips for making and applying green screen footage in video editings.
The core objective is to have a smooth one colored background which is easy to replace in post-production. Since the green screen is employed in the film industry on a mega scale, professional green screen kits are quite expensive. Hence it is much more feasible that a DIY solution is employed for the required results.
For a good quality result from a DIY green screen, you need to take care of the following items:
1. Screen Quality
Green screens can be wall painted with a chroma key, a large sheet of cloth hung without any creases, or a portable setup canvas that can cover the given area.
2. Lightning
The most important thing to be kept in mind is that your background should be lit evenly. Any shadows on the background should be avoided. The distance of the subject should be at least ten feet from the background, to minimize any kind of shadow.
You may also like: >> Blue Screen VS Green Screen: All You Need to Know
Part 3: How to composite green screen video footage
The next step is to utilize the downloaded free green screen footage with your video.
The best green screen software for personal and semi-professional use is Filmora. It allows you to import and work on videos shot in any format (AVI, MPEG, MKV, MP4, etc.) and seamlessly integrate your video with the background.
We have already demonstrated the steps of compositing and editing green screen videos at the beginning of the article. While in the video tutorial below, you can check the samples of using Filmora to compositing downloaded free green screen footage.
You can edit a video with green screen using Filmora easily. Check the below video to learn how to manage it.
Download Mac Version ](https://tools.techidaily.com/wondershare/filmora/download/ )
Richard Bennett
Richard Bennett is a writer and a lover of all things video.
Follow @Richard Bennett
Sparkle up Video Previews: Thin Neon Lines Add
Your YouTube video, or any other clip published on any forum, gets a larger number of hits if it has an attractive thumbnail. And, the fact is, a thumbnail becomes 10x more attractive when the main character that the image has have a neon border around it.
With that said, in the following sections, you will learn a couple of methods on how to add a YouTube thumbnail border around the main characters and/or objects that are significant to the clip.
In this article
01 Add Glowing Neon Border to YouTube Thumbnail with Filmora
02 Add a Glowing Neon Border in YouTube Thumbnail with Canva
03 Outline a Person in a YouTube Thumbnail with Photoshop
Part 1: How to Add Neon Border to YouTube Thumbnail for Free with Filmora
Being one of the most versatile and intuitive post-production tools available in the market today, Wondershare Filmora X allows you to add a neon border to a YouTube thumbnail quite conveniently. You can learn how to get this done on Windows or Mac by following the steps given below.
For Win 7 or later (64-bit)
For macOS 10.12 or later
Step 1: Define Project Settings and Add Image to the Timeline
Launch Wondershare Filmora X on your PC (a MacBook Pro M1 is used here), ensure that the project aspect ratio is set to 16:9 (Widescreen) on the splash screen, and click New Project. On the main interface, click the Preview quality and display settings icon from the upper-right area of the Timeline, click Change Project Aspect Ratio, click to select 1280 x 720 (HD) from the Resolution menu of the Project Settings box, and click OK to save the custom project settings.

Then select My Media from the menu bar if not already selected, click Project Media from the navigation pane, and click Import from the Media box to select and import the image of the main character or object that you want to use in the thumbnail.

Now, drag the image from the Media box to the Timeline at the bottom.

Step 2: Clear Image Background, Add Border, and Add Custom Background
Go to Effects from the menu bar, click to select the Default tab and then AI Portrait from the navigation pane, and click and drag the Human Segmentation preset from the right box, and place it over the image track in the Timeline.

Double-click the image layer, scroll down the upper-left box to the Video Effects section, and use the Edge Thickness and Edge Feather sliders to adjust the character’s edges to make them as realistic as possible. Click OK when done.

Next, click and drag the Human Border preset over the image track in the Timeline, and follow the same procedure to customize the border. This will give the character a neon border effect.

Now, use the method explained earlier to import a custom image for the background, and drag and place it under the previous track in the Timeline.

If you are running the latest version of Filmora, you will find there are some neon light effects available under AI Portrait as well.

Step 3: Add Titles to Thumbnail
Go to Titles from the menu bar, click to select the Default tab and then Lower 3rds from the navigation pane, and click and drag your preferred lower-third preset from the right window to a separate layer in the Timeline. Double-click the lower-third layer, and use the available options in the upper-left window to change the text, its color, etc., and drag the textbox to place it to your preferred position on the image as well. Click OK to save the changes.
Next, click to select Titles from the navigation pane, and drag your preferred title from the right window to the upper-most track in the Timeline. Now use the method explained earlier to edit the text, its color, position, etc. to make it look professional.

For more tips and tricks for creating YouTube thumbnail, you can check this You Tube thumbnail creating guide.
Step 4: Get the Neon Border Thumbnail
Click the Snapshot (Camera) icon from the upper-right area of the Timeline, go to My Media from the menu bar, right-click the thumbnail of the screenshot you captured, and click Reveal in Finder (on Mac) or Reveal in Explorer (on Windows) to get to the folder the YouTube thumbnail border is saved in.

Part 2: How to Add a Glowing Neon Border in Your YouTube Thumbnail with Canva
Canva is another intuitive editing program that works on the web interface rather than having you download and install an app on your PC. You can add a neon border for YouTube thumbnails using Canva by following the instructions given below:
Step 1: Define Project Settings and Add a Background
After signing in to your Canva account, click Create a design from the top-right corner of the page, click Custom size from the bottom, define 1280 and 720 in the Width and Height fields on the box that appears respectively, and click Create new design.

Now, click to select Background from the navigation bar on the left (if the Background tool is not visible, click More and then choose Background from the expanded list), and click to select a background from the images available in the center pane.

Step 2: Upload an Image and Add Effects
Click Uploads from the navigation bar, click the More icon from the right of the Upload media button present at the top of the center pane, choose your preferred method to upload the image (with the transparent background) that you want to use, upload the image, and drag it from the center pane to the Canvas.
Note: You can use any of the tools available online to remove the background from your image for free.

To add a YouTube thumbnail border, make sure that the image that you added to the Canvas is selected, click the Duplicate icon from the upper-right area, and use the scaling handles of the copy of the image to increase its size a bit. Reposition the image back to its original location as well.
Then, click Edit image from the upper-left corner of the Canvas, click Duotone from the Edit image pane at the center, if need be, click See all, choose your preferred duotone effect to apply on the image, choose your preferred highlight and shadow colors from the box that appears next, and click Back from the top of the pane.

Next, click See all next to the Adjust section from the center pane, and drag the Blur slider to the right to increase the blur effect on the image.

Step 3: Position the Layers
While keeping the duplicate image selected, click the Position button from the upper-right area of the Canvas, and click Background to send the second image behind the first one to get the neon border effect for the photo.

Part 3: How to Outline a Person in a YouTube Thumbnail with Photoshop
Because YouTube thumbnails are nothing but static images, creating YouTube thumbnail border with Adobe Photoshop is comparatively easier. The process of doing this is given below:
Step 1: Define Document Preferences and Import an Image
Launch Adobe Photoshop on your PC, click Create new, and on the New Document customization box, define the width and height values to 1280 and 720 pixels respectively. Select Transparent from the Background Contents menu as well if not already selected. Click Create from the bottom to create a new Photoshop document with the specified document settings. Next, open the folder that contains the source image, drag the photo to Photoshop, and press Enter to place the photo.

Step 2: Remove Background from the Image
Make sure that the image layer is selected in the Layers panel on the right, go to Select from the menu bar at the top, and click Subject. From the bottom of the Layers panel, click the Add a mask icon to get rid of the background, leaving only the human on the Canvas.

Step 3: Add a Custom Background and an Outline Around the Subject
Use the method explained earlier to import a background image of your choice to Photoshop. Drag the background image layer to the bottom in the Layers panel. Double-click the masked layer, click to select Stroke from the left pane of the Layer Style box, and use the options available on the right to manage the size, color, position, etc. of the stroke that has been added around the human subject. Click OK when done, and then export the image normally to use it as a YouTube thumbnail border.

Summary
It is important to know that the default resolution of a YouTube thumbnail is 1280 x 720 pixels that is usually written and referred to as 720p. While adding a YouTube thumbnail border, it is also imperative to have a good sense of color combination and fonts. Furthermore, a decent tool like Wondershare Filmora X must be used to add an appealing neon border around the main subject in the thumbnail image easily and quickly.
02 Add a Glowing Neon Border in YouTube Thumbnail with Canva
03 Outline a Person in a YouTube Thumbnail with Photoshop
Part 1: How to Add Neon Border to YouTube Thumbnail for Free with Filmora
Being one of the most versatile and intuitive post-production tools available in the market today, Wondershare Filmora X allows you to add a neon border to a YouTube thumbnail quite conveniently. You can learn how to get this done on Windows or Mac by following the steps given below.
For Win 7 or later (64-bit)
For macOS 10.12 or later
Step 1: Define Project Settings and Add Image to the Timeline
Launch Wondershare Filmora X on your PC (a MacBook Pro M1 is used here), ensure that the project aspect ratio is set to 16:9 (Widescreen) on the splash screen, and click New Project. On the main interface, click the Preview quality and display settings icon from the upper-right area of the Timeline, click Change Project Aspect Ratio, click to select 1280 x 720 (HD) from the Resolution menu of the Project Settings box, and click OK to save the custom project settings.
Then select My Media from the menu bar if not already selected, click Project Media from the navigation pane, and click Import from the Media box to select and import the image of the main character or object that you want to use in the thumbnail.
Now, drag the image from the Media box to the Timeline at the bottom.
Step 2: Clear Image Background, Add Border, and Add Custom Background
Go to Effects from the menu bar, click to select the Default tab and then AI Portrait from the navigation pane, and click and drag the Human Segmentation preset from the right box, and place it over the image track in the Timeline.
Double-click the image layer, scroll down the upper-left box to the Video Effects section, and use the Edge Thickness and Edge Feather sliders to adjust the character’s edges to make them as realistic as possible. Click OK when done.
Next, click and drag the Human Border preset over the image track in the Timeline, and follow the same procedure to customize the border. This will give the character a neon border effect.
Now, use the method explained earlier to import a custom image for the background, and drag and place it under the previous track in the Timeline.
If you are running the latest version of Filmora, you will find there are some neon light effects available under AI Portrait as well.
Step 3: Add Titles to Thumbnail
Go to Titles from the menu bar, click to select the Default tab and then Lower 3rds from the navigation pane, and click and drag your preferred lower-third preset from the right window to a separate layer in the Timeline. Double-click the lower-third layer, and use the available options in the upper-left window to change the text, its color, etc., and drag the textbox to place it to your preferred position on the image as well. Click OK to save the changes.
Next, click to select Titles from the navigation pane, and drag your preferred title from the right window to the upper-most track in the Timeline. Now use the method explained earlier to edit the text, its color, position, etc. to make it look professional.
For more tips and tricks for creating YouTube thumbnail, you can check this You Tube thumbnail creating guide.
Step 4: Get the Neon Border Thumbnail
Click the Snapshot (Camera) icon from the upper-right area of the Timeline, go to My Media from the menu bar, right-click the thumbnail of the screenshot you captured, and click Reveal in Finder (on Mac) or Reveal in Explorer (on Windows) to get to the folder the YouTube thumbnail border is saved in.
Part 2: How to Add a Glowing Neon Border in Your YouTube Thumbnail with Canva
Canva is another intuitive editing program that works on the web interface rather than having you download and install an app on your PC. You can add a neon border for YouTube thumbnails using Canva by following the instructions given below:
Step 1: Define Project Settings and Add a Background
After signing in to your Canva account, click Create a design from the top-right corner of the page, click Custom size from the bottom, define 1280 and 720 in the Width and Height fields on the box that appears respectively, and click Create new design.
Now, click to select Background from the navigation bar on the left (if the Background tool is not visible, click More and then choose Background from the expanded list), and click to select a background from the images available in the center pane.
Step 2: Upload an Image and Add Effects
Click Uploads from the navigation bar, click the More icon from the right of the Upload media button present at the top of the center pane, choose your preferred method to upload the image (with the transparent background) that you want to use, upload the image, and drag it from the center pane to the Canvas.
Note: You can use any of the tools available online to remove the background from your image for free.
To add a YouTube thumbnail border, make sure that the image that you added to the Canvas is selected, click the Duplicate icon from the upper-right area, and use the scaling handles of the copy of the image to increase its size a bit. Reposition the image back to its original location as well.
Then, click Edit image from the upper-left corner of the Canvas, click Duotone from the Edit image pane at the center, if need be, click See all, choose your preferred duotone effect to apply on the image, choose your preferred highlight and shadow colors from the box that appears next, and click Back from the top of the pane.
Next, click See all next to the Adjust section from the center pane, and drag the Blur slider to the right to increase the blur effect on the image.
Step 3: Position the Layers
While keeping the duplicate image selected, click the Position button from the upper-right area of the Canvas, and click Background to send the second image behind the first one to get the neon border effect for the photo.
Part 3: How to Outline a Person in a YouTube Thumbnail with Photoshop
Because YouTube thumbnails are nothing but static images, creating YouTube thumbnail border with Adobe Photoshop is comparatively easier. The process of doing this is given below:
Step 1: Define Document Preferences and Import an Image
Launch Adobe Photoshop on your PC, click Create new, and on the New Document customization box, define the width and height values to 1280 and 720 pixels respectively. Select Transparent from the Background Contents menu as well if not already selected. Click Create from the bottom to create a new Photoshop document with the specified document settings. Next, open the folder that contains the source image, drag the photo to Photoshop, and press Enter to place the photo.
Step 2: Remove Background from the Image
Make sure that the image layer is selected in the Layers panel on the right, go to Select from the menu bar at the top, and click Subject. From the bottom of the Layers panel, click the Add a mask icon to get rid of the background, leaving only the human on the Canvas.
Step 3: Add a Custom Background and an Outline Around the Subject
Use the method explained earlier to import a background image of your choice to Photoshop. Drag the background image layer to the bottom in the Layers panel. Double-click the masked layer, click to select Stroke from the left pane of the Layer Style box, and use the options available on the right to manage the size, color, position, etc. of the stroke that has been added around the human subject. Click OK when done, and then export the image normally to use it as a YouTube thumbnail border.
Summary
It is important to know that the default resolution of a YouTube thumbnail is 1280 x 720 pixels that is usually written and referred to as 720p. While adding a YouTube thumbnail border, it is also imperative to have a good sense of color combination and fonts. Furthermore, a decent tool like Wondershare Filmora X must be used to add an appealing neon border around the main subject in the thumbnail image easily and quickly.
Also read:
- Increasing YouTube Views Through Consistency in Creative Commons Compliance
- Cost-Effective Growth Tactic for YouTube Fanbases for 2024
- [New] Earning Edge Reached for Subscribers Above 500
- Multi-Platform Mastery Delivering Content to YouTube & Others
- 2024 Approved Essential Techniques for Splendid Lyric Videos, Lyric Video Maker Edition
- Enhancing Video Impact Interpreting YouTube Metrics Wisely
- In 2024, Configure YouTube's Audience Options with Ease
- 7 Comedy YouTube Video Ideas That Funny People Can Try for 2024
- Beginner’s Essential Guide to YouTube Video Editing Magic for 2024
- [New] Elevate Your YouTube Gaming Content With Key FreeFire Hashtags
- Google Account Integration for Private YouTube Video Sharing
- In 2024, A Complete Guide to Upload Longer Videos on YouTube
- [New] Cross-Platform Titling Guidelines for Mobile & Social Apps
- Keep Your Digital Life Streamlined Blocking Youtube Channels Smartly
- [New] 10 Strategies to Make Money on YouTube Shorts Easily
- [Updated] Earning at Age Ten The Extraordinary Financial Rise of Ryan Kaji
- Master Your Content Essential Trimmer Tools for YouTube
- [Updated] Conciseness in Content Editing Your YouTube Videos Smartly
- Enhance Well-Being & Flexibility with These Outstanding Channels
- Stable Shootings - Top Brands for Online Filmmaking
- Mastering Awesome Valorant Thumbnails for YouTube Content
- In 2024, Elevate Your Content's Visibility Strategic Use of Imagery in Video Thumbnails
- In 2024, A Filmmaker's Guide to Mastering Green Screen Technology
- AdSense Profits on YouTube Earnings per Thousand Video Watchers for 2024
- [New] Creating Compelling Content with Personalized Video Setups
- 2024 Approved A Novice's Roadmap to YouTube Traffic Success
- [New] Digging Through YouTube Conversations
- [Updated] A Step-by-Step Strategy for Merging Your YouTube & TikTok Presence
- 2024 Approved Elite Recording Devices for Livestream Producers
- Rise of the Channels Crafting Your Digital Empire
- In 2024, 5 Best Sites for Quick Templates on YouTube
- A Comprehensive Guide to Earnings From YouTube Short Videos for 2024
- Amplify Your iMovie with YouTube Audio Streams for 2024
- 2024 Approved Beyond the Box 27 Premium Videostreaming Alternatives
- Skyrocket Your Income on Youtube The Power of 500 Loyal Fans
- Versatile Viewing Cycle and Catch Up with YouTube Videos on TV
- In 2024, Capture Attention YT Imagery and Its Dimension Magic
- 2024 Approved Command the Stage of YouTube with Studio Skills
- 2024 Approved Elevating Business & Personal Visibility with YouTube, Mobile Edition
- Integral Rulebook Ensuring Harmonious Video Sharing
- Optimizing Channels with TubeBuddy Expertise
- Navigating the World of YouTube Editing Using FinalCut Pro
- Unlock Video Potential Leading Tools Turning YouTubes to Avis
- The Blueprint of Tomorrow Eco-Friendly Urban Strategies
- Vlogging Vs. Micro-Video Which Outperforms? YouTubes Shorts or TikToks?
- Expert Guide to Video-to-Audio #10 Best Tools Reviewed
- [New] Elevate Video Quality From YouTube to Crisp Avis Format
- Different Methods To Unlock Your Apple iPhone SE | Dr.fone
- Dynamic IGTV Covers Design & Update Strategies for 2024
- 2024 Approved 8 Prime Vocal Tracking & Editing Apps Suitable for Mac and Windows Devices
- 2 Ways to Transfer Text Messages from Oppo Find X6 Pro to iPhone 15/14/13/12/11/X/8/ | Dr.fone
- Premier Low-Cost Time Tracking Tools
- [New] Advanced Techniques in Zoom Sessions Capture
- 2024 Approved Discover the Top Educational Animation Platforms
- TopEightUnleashed Cutting-Edge 4K Blu-Ray Systems
- In 2024, Network Locked SIM Card Inserted On Your Oppo Reno 8T Phone? Unlock It Now
- In 2024, How Can I Use a Fake GPS Without Mock Location On Apple iPhone 8? | Dr.fone
- In 2024, How to Transfer Contacts from Motorola Moto G13 to Other Android Devices Using Bluetooth? | Dr.fone
- In 2024, Full Guide to Bypass Tecno Pop 8 FRP
- [New] Comical Creations No Cost Memes Available
- [Updated] Asgard Reborn The Ragnarök Chronicles for 2024
- 2024 Approved Unveiling Top 5 Mac Snippet Applications
- Solved Warning Camera Failed on Meizu 21 | Dr.fone
- Reinstall hardware drivers with Device Manager on Windows 10
- 8 Workable Fixes to the SIM not provisioned MM#2 Error on Xiaomi Redmi Note 13 Pro+ 5G | Dr.fone
- Step-by-Step on Hosting Webinars A Beginner's Guide to Zoom
- In 2024, Is Fake GPS Location Spoofer a Good Choice On Honor 70 Lite 5G? | Dr.fone
- [New] Perfect Pair 5 Sleek Webcams with Built-In Microphones for 2024
- Updated 7 Free Online Audio Trimmers to Trim Audio Easily for 2024
- Updated 2024 Approved Get Rid of Camera Shake Top Free Video Stabilizers for Smooth Footage
- [Updated] Earn Big, Stay Safe Top 5 Income Boosting Posts for 2024
- [New] Capture the Moment Premium Snapchat Lenses on Display
- Uniting Viewers Facebook Live on the Big Screen for 2024
- [New] All About IO Screen Capture Mastery Guidebook for 2024
- Best TikTok PFP Ideas to Make Your TikTok Profile Stand Out
- [Updated] In 2024, Leveraging Skype for Interactive Home Office Video Conferencing
- [New] 2024 Approved The Blue Bands Promise Tips for Longevity
- In 2024, Pokemon Go No GPS Signal? Heres Every Possible Solution On Realme Narzo N55 | Dr.fone
- In 2024, The Best Android Unlock Software For Oppo A79 5G Device Top 5 Picks to Remove Android Locks
- Easy steps to recover deleted music from GT Neo 5
- In 2024, 5 Ways to Transfer Music from Tecno Spark 10 4G to Other Android Devices Easily | Dr.fone
- Troubleshooting Error Connecting to the Apple ID Server On iPhone 6 Plus
- [New] In 2024, Elevate Your Playthroughs Secrets of PS3 Video Capture
- 2024 Approved Mastering In-Game Vocal Alterations Top Pick Recommendations
- In 2024, How To Fix Apple iPhone 13 Pro Could Not Be Activated/Reached Issue
- Thinking About Changing Your Netflix Region Without a VPN On Poco C55? | Dr.fone
- Does find my friends work on Honor Play 7T | Dr.fone
- 2024 Approved Peeling Away at ShareX Comparative Views & Substitutes
- Title: "[New] Augment Your VFX Arsenal - Explore These Top 8 Sites for Free Eco-Backgrounds"
- Author: Kevin
- Created at : 2024-05-25 15:52:02
- Updated at : 2024-05-26 15:52:02
- Link: https://youtube-videos.techidaily.com/new-augment-your-vfx-arsenal-explore-these-top-8-sites-for-free-eco-backgrounds/
- License: This work is licensed under CC BY-NC-SA 4.0.
