![[New] Achieving Perfect Reproduction Tips for Exceptional Sound Capture](https://thmb.techidaily.com/8ad1313081653043389b0ec9ab2777fbe6983525a9b9183de9916f4cf1facd61.jpg)
"[New] Achieving Perfect Reproduction Tips for Exceptional Sound Capture"
Achieving Perfect Reproduction: Tips for Exceptional Sound Capture
10 Recording Tips for Recording Audio with High Quality

Richard Bennett
Oct 26, 2023• Proven solutions
Getting the best sound for your recording is not as simplistic as buying an expensive microphone. There are many different things you can do to record your audio more clearly. Here are 10 recording tips to record high-quality audio.
1. Silence everything you don’t want your microphone to record
2. Put your mobile phone in airplane mode
3. Minimize echo
4. Block wind from reaching your microphone
5. Upgrade your microphone
6. Adjust your levels
7. Start with a sound cue if you’re planning to do some syncing in post
8. Get close to the sound
9. ADR
10. Record Ambient Sound
Bonus Tip-Record Your Audio with Wondershare Filmora
Wondershare Filmora has great recording features that enable you to record screen , voiceover, and webcam. Just connect the recording device to your computer, and start the recording in Wondershare Filmora and you will get high-quality audio. And you can also easily pick a song from the royalty-free music library on Wondershare Filmora. These audio features on Filmora are rare and very simple to use, you only need to click a few times and your video will have a new sound and background song.


1. Silence everything you don’t want your microphone to record
When you’re recording audio, you have to be more aware of the subtle sounds that drone on in your background. These sounds may include humming from machines with fans, buzzing from lights, and jingling from your pet’s collar. Observe your recording space and find ways to silence everything that you don’t want in your audio recording.
2. Put your mobile phone in airplane mode
Although it may be quite obvious to turn your phone’s ring tone off when you’re recording, it may not be as obvious to put your phone in airplane mode. When phones receive calls or perform searches as part of their background processes, they emit signals that can get picked up by your recording system. Avoid ruining good takes with unwanted sounds of phone signals by putting your phones in airplane mode.
3. Minimize echo
If you are recording yourself talk or sing, make sure to set up your recording space in a way where the sound projected from your voice bounces minimally off the walls and back to your microphone. Bare walls and hardwood floors will cause a lot of bouncing. Make use of materials that will absorb your sound rather than bounce it, like a thick rug or a comforter. If you want your voice to echo, that’s something you should do in post-production.
4. Block wind from reaching your microphone
Although it might not sound so loud and distracting to the naked ear, wind sounds terribly loud through a microphone recording and can cause your audio to clip (distortion of waveform due to output of sound exceeding maximum capacity or 0 dB point). This includes the “wind” that comes out of your mouth when you pronounce words starting with the letter “p.” Use pop filters, windscreens, and deadcats to block wind from reaching your microphone.
5. Upgrade your microphone
As much as you try to control all the noise in your surroundings, your greatest recording limitation will come from the hardware that you use. Improve your recordings by plugging in an external microphone into your camera’s microphone jack or record audio completely separately with a professional microphone.
Need help with deciding on a microphone to buy? Check out our recommended list of microphones.
6. Adjust your levels
Before pressing the record button, see how loudly your microphone picks up the sound you wish to record. Adjust your levels (sensitivity of your microphone) until the sound sits in between -6 dBs and -12dBs. This range gives the source of your sound some room to get louder without the recorded audio getting clipped. When you first listen to audio recorded within this range, it may sound very quiet. No need to worry though because you can increase the volume later in editing.
7. Start with a sound cue if you’re planning to do some syncing in post
If you’re recording separate audio that you plan to sync to your video later in editing, start your recording with a short and loud sound cue like a clap or a high pitched “beep” tone. Later, when you’re editing, it’ll be much easier for you to find the section where your video and additional audio match.
8. Get close to the sound
Unless you’re aiming to record ambient sound, bring your microphone close to the source of sound you are wanting to record. The closer your microphone is to the source of sound, the lower your sensitivity setting can be on your microphone. As a result of lowering your levels, sounds you are not meaning to record will also sound fainter.
9. ADR
When you need to record a scene in a loud setting where you have very little control over the noise, record additional vocals later and replace the original vocals through a process called automated dialogue replacement.
10. Record Ambient Sound
Remember to record ambient sound or “room tone.” You can use these recordings to fill in the blanks if you run out of audio and also smooth out parts of your audio where you hear pops, clicks, and other unwanted noise.
Richard Bennett
Richard Bennett is a writer and a lover of all things video.
Follow @Richard Bennett
Richard Bennett
Oct 26, 2023• Proven solutions
Getting the best sound for your recording is not as simplistic as buying an expensive microphone. There are many different things you can do to record your audio more clearly. Here are 10 recording tips to record high-quality audio.
1. Silence everything you don’t want your microphone to record
2. Put your mobile phone in airplane mode
3. Minimize echo
4. Block wind from reaching your microphone
5. Upgrade your microphone
6. Adjust your levels
7. Start with a sound cue if you’re planning to do some syncing in post
8. Get close to the sound
9. ADR
10. Record Ambient Sound
Bonus Tip-Record Your Audio with Wondershare Filmora
Wondershare Filmora has great recording features that enable you to record screen , voiceover, and webcam. Just connect the recording device to your computer, and start the recording in Wondershare Filmora and you will get high-quality audio. And you can also easily pick a song from the royalty-free music library on Wondershare Filmora. These audio features on Filmora are rare and very simple to use, you only need to click a few times and your video will have a new sound and background song.
1. Silence everything you don’t want your microphone to record
When you’re recording audio, you have to be more aware of the subtle sounds that drone on in your background. These sounds may include humming from machines with fans, buzzing from lights, and jingling from your pet’s collar. Observe your recording space and find ways to silence everything that you don’t want in your audio recording.
2. Put your mobile phone in airplane mode
Although it may be quite obvious to turn your phone’s ring tone off when you’re recording, it may not be as obvious to put your phone in airplane mode. When phones receive calls or perform searches as part of their background processes, they emit signals that can get picked up by your recording system. Avoid ruining good takes with unwanted sounds of phone signals by putting your phones in airplane mode.
3. Minimize echo
If you are recording yourself talk or sing, make sure to set up your recording space in a way where the sound projected from your voice bounces minimally off the walls and back to your microphone. Bare walls and hardwood floors will cause a lot of bouncing. Make use of materials that will absorb your sound rather than bounce it, like a thick rug or a comforter. If you want your voice to echo, that’s something you should do in post-production.
4. Block wind from reaching your microphone
Although it might not sound so loud and distracting to the naked ear, wind sounds terribly loud through a microphone recording and can cause your audio to clip (distortion of waveform due to output of sound exceeding maximum capacity or 0 dB point). This includes the “wind” that comes out of your mouth when you pronounce words starting with the letter “p.” Use pop filters, windscreens, and deadcats to block wind from reaching your microphone.
5. Upgrade your microphone
As much as you try to control all the noise in your surroundings, your greatest recording limitation will come from the hardware that you use. Improve your recordings by plugging in an external microphone into your camera’s microphone jack or record audio completely separately with a professional microphone.
Need help with deciding on a microphone to buy? Check out our recommended list of microphones.
6. Adjust your levels
Before pressing the record button, see how loudly your microphone picks up the sound you wish to record. Adjust your levels (sensitivity of your microphone) until the sound sits in between -6 dBs and -12dBs. This range gives the source of your sound some room to get louder without the recorded audio getting clipped. When you first listen to audio recorded within this range, it may sound very quiet. No need to worry though because you can increase the volume later in editing.
7. Start with a sound cue if you’re planning to do some syncing in post
If you’re recording separate audio that you plan to sync to your video later in editing, start your recording with a short and loud sound cue like a clap or a high pitched “beep” tone. Later, when you’re editing, it’ll be much easier for you to find the section where your video and additional audio match.
8. Get close to the sound
Unless you’re aiming to record ambient sound, bring your microphone close to the source of sound you are wanting to record. The closer your microphone is to the source of sound, the lower your sensitivity setting can be on your microphone. As a result of lowering your levels, sounds you are not meaning to record will also sound fainter.
9. ADR
When you need to record a scene in a loud setting where you have very little control over the noise, record additional vocals later and replace the original vocals through a process called automated dialogue replacement.
10. Record Ambient Sound
Remember to record ambient sound or “room tone.” You can use these recordings to fill in the blanks if you run out of audio and also smooth out parts of your audio where you hear pops, clicks, and other unwanted noise.
Richard Bennett
Richard Bennett is a writer and a lover of all things video.
Follow @Richard Bennett
Top Tips to Mastering the Art of Hashtag Creation on YouTube
What is YouTube Tag and How to Find Great Tags For Your Videos?
Richard Bennett
Oct 26, 2023• Proven solutions
There are a huge number of videos uploaded to YouTube every day, and that is why it is so important to make sure your videos are sorted properly by the site using YouTube tags. If you don’t, potential viewers will miss out on the chance to discover and enjoy your videos.
Instead of forcing yourself through a painful brainstorming session, it can be easier to identify the best tags using these techniques that experienced content managers use to populate their tag lists.
In this article, I will show you how to find great tags for your YouTube videos as well as some answers to the frequently asked questions about YouTube Tags.
Part 1: How to Find YouTube Tags [3 Effective Ways]
1. Use YouTube’s Auto-Suggest Tool to Get Tags
YouTube’s search engine can be your best ally on the quest for great tags. This tool was created to aid users who are looking for content on the platform, and content creators can benefit from it as well. By typing the general topic of your video, or a few words vaguely related to your video, into the search bar on YouTube you can see suggestions that reflect what viewers are searching for and take some of those suggestions into consideration for your tags. With every new phrase (and even every additional character you type), new options will appear. By playing around with this tool you will gain valuable insight into the searching habits of YouTube viewers.
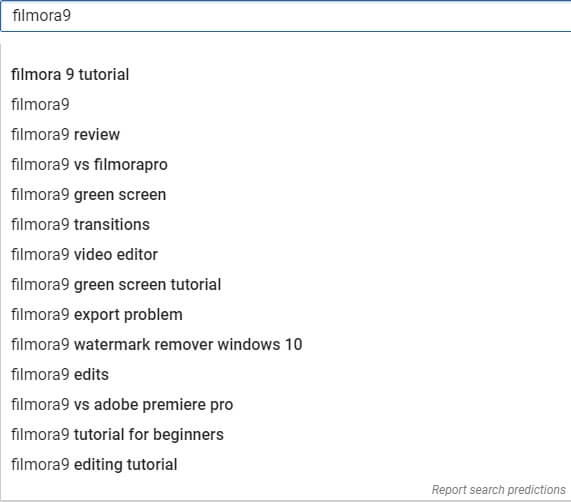
This method may not be too precise, but the idea is to quickly gather information and perhaps get some inspiration for more creative or complex tags. Most of the suggestions will be logical, but there can be a few unexpected combinations you’d never think of. Be very careful when translating the findings to your own situation, since the fact that some terms are popular doesn’t mean they are relevant for your video. Another problem is that slightly altered terminology can significantly change the effectiveness of the tag, so you should ideally use the suggested phrases in the exact form as you found them or not at all. If you do make adjustments, you should test the new tag through the same auto-complete tool and see how it fares.
2. Try YouTube Tag Generators
If you’d like to dig a little deeper, there are multiple dedicated tools that can assist you in picking the most suitable YouTube tags for every video you upload. Let’s examine a few of them in greater detail:
#1. Keyword Tool
A very simple and reliable web-based tag generator that provides you with 750 frequently searched keywords that would be suitable for your video. The keyword list is based on YouTube’s search tool in a way similar to what we described in the previous chapter. However, since the analysis is automated with the Keyword Tool, you can get a huge list in just a few seconds. This generator is especially useful when you are looking for long-tail keywords that attract niche audiences.
#2. Rapid Tags
This tool is a bit more sophisticated and includes some analytic features on top of tag generating capacities, allowing you to manage your channel more effectively. It’s completely automated, so you won’t have to do any heavy lifting on your own. Just type the URL of your video into the appropriate field and let Rapid Tags do the rest. You can easily switch between the Generator, Analyzer, Ranker, and Tracker tools, so you can acquire a complete picture of the suitability of each tag and a better understanding of the projected performance of your video.
Want more tools to generate YouTube tags? Check our picks of the best YouTube video tag generators .
#3. BetterWaytoWeb
While this free-to-use tool has a very simple interface and won’t require any background knowledge to use, it still provides valuable information. It can suggest suitable tags for your new video based on the main keyword you provide, speeding up your research considerably. It can also analyze the tags placed on an existing YouTube video, which is important for deducing how other authors working in the same category are optimizing their content.
3. Study Your YouTube Rivals’ Tags
YouTube content authors can learn a lot by analyzing their top competitors. No matter what your videos are about, there are probably countless other creators that want to attract the same audiences as you. Only a tiny percentage of them will manage to gain significant viewership, and those are the ones you should be researching in detail.
If you are able to locate the most successful videos with content similar to yours you are already halfway to your goal, but one obstacle still remains. You can’t even see your competitor’s tags them when you click on their videos on YouTube. This type of information is not displayed, but some specialized solutions are able to reveal it upon request. Here is one YouTube certified analytic tool capable of doing that:
1. VidIQ
Currently used to manage more than 30,000 YouTube channels, this powerful video marketing suite can also help with tag selection. It can enlarge your tag library by a factor of 10, and provide you with a direct comparison with your chief competitors. In addition to increasing your views, this app can help you monitor your visibility on social networks, and track detailed statistics that describe the performance of your video. In other words, this is a comprehensive package that will help you manage your channel in a professional way.
What’s your YouTube tag strategy?
Part 2: YouTube Tag FAQs
1. What is YouTube Tag?
YouTube tag is a keyword that you added to help Google and YouTube understand your video context, which is an important ranking factor in YouTube searching. Basically, the better you tag your video, the more views you can get. But you should keep in mind that adding excessive tags to your video description is against YouTube policy.
2. How Many Tags Should You Use on YouTube?
Though there is no restriction about the numbers of the YouTube tags, you should keep the total characters of all tags within 400 characters. In most cases, 5-8 tags are appreciated for a YouTube video. It is recommended to add as many relevant tags as you can, such as brand-specific tags, YouTube auto-suggest tags, or tags created with some tag generator.
3. Do Tags on YouTube Get More Views?
The short answer is Yes. Since Google is encouraging people to use tags to help them understand your video content, then it can recommend the videos to relevant users accordingly. With tags, YouTube can categorize your videos and make them discoverable easier. For example, when you search tag #FilmoraSchoolStory in YouTube, you can see all the videos with the tag in the search result. allowing viewers to find your content more easily.
Retouch YouTube Videos with Filmora
There are lots of filters, overlays and effects pre-programmed in Wondershare Filmora video editor , you can improve YouTube videos without costing any extra fees if you’ve subscribed to Filmora.
Richard Bennett
Richard Bennett is a writer and a lover of all things video.
Follow @Richard Bennett
Richard Bennett
Oct 26, 2023• Proven solutions
There are a huge number of videos uploaded to YouTube every day, and that is why it is so important to make sure your videos are sorted properly by the site using YouTube tags. If you don’t, potential viewers will miss out on the chance to discover and enjoy your videos.
Instead of forcing yourself through a painful brainstorming session, it can be easier to identify the best tags using these techniques that experienced content managers use to populate their tag lists.
In this article, I will show you how to find great tags for your YouTube videos as well as some answers to the frequently asked questions about YouTube Tags.
Part 1: How to Find YouTube Tags [3 Effective Ways]
1. Use YouTube’s Auto-Suggest Tool to Get Tags
YouTube’s search engine can be your best ally on the quest for great tags. This tool was created to aid users who are looking for content on the platform, and content creators can benefit from it as well. By typing the general topic of your video, or a few words vaguely related to your video, into the search bar on YouTube you can see suggestions that reflect what viewers are searching for and take some of those suggestions into consideration for your tags. With every new phrase (and even every additional character you type), new options will appear. By playing around with this tool you will gain valuable insight into the searching habits of YouTube viewers.
This method may not be too precise, but the idea is to quickly gather information and perhaps get some inspiration for more creative or complex tags. Most of the suggestions will be logical, but there can be a few unexpected combinations you’d never think of. Be very careful when translating the findings to your own situation, since the fact that some terms are popular doesn’t mean they are relevant for your video. Another problem is that slightly altered terminology can significantly change the effectiveness of the tag, so you should ideally use the suggested phrases in the exact form as you found them or not at all. If you do make adjustments, you should test the new tag through the same auto-complete tool and see how it fares.
2. Try YouTube Tag Generators
If you’d like to dig a little deeper, there are multiple dedicated tools that can assist you in picking the most suitable YouTube tags for every video you upload. Let’s examine a few of them in greater detail:
#1. Keyword Tool
A very simple and reliable web-based tag generator that provides you with 750 frequently searched keywords that would be suitable for your video. The keyword list is based on YouTube’s search tool in a way similar to what we described in the previous chapter. However, since the analysis is automated with the Keyword Tool, you can get a huge list in just a few seconds. This generator is especially useful when you are looking for long-tail keywords that attract niche audiences.
#2. Rapid Tags
This tool is a bit more sophisticated and includes some analytic features on top of tag generating capacities, allowing you to manage your channel more effectively. It’s completely automated, so you won’t have to do any heavy lifting on your own. Just type the URL of your video into the appropriate field and let Rapid Tags do the rest. You can easily switch between the Generator, Analyzer, Ranker, and Tracker tools, so you can acquire a complete picture of the suitability of each tag and a better understanding of the projected performance of your video.
Want more tools to generate YouTube tags? Check our picks of the best YouTube video tag generators .
#3. BetterWaytoWeb
While this free-to-use tool has a very simple interface and won’t require any background knowledge to use, it still provides valuable information. It can suggest suitable tags for your new video based on the main keyword you provide, speeding up your research considerably. It can also analyze the tags placed on an existing YouTube video, which is important for deducing how other authors working in the same category are optimizing their content.
3. Study Your YouTube Rivals’ Tags
YouTube content authors can learn a lot by analyzing their top competitors. No matter what your videos are about, there are probably countless other creators that want to attract the same audiences as you. Only a tiny percentage of them will manage to gain significant viewership, and those are the ones you should be researching in detail.
If you are able to locate the most successful videos with content similar to yours you are already halfway to your goal, but one obstacle still remains. You can’t even see your competitor’s tags them when you click on their videos on YouTube. This type of information is not displayed, but some specialized solutions are able to reveal it upon request. Here is one YouTube certified analytic tool capable of doing that:
1. VidIQ
Currently used to manage more than 30,000 YouTube channels, this powerful video marketing suite can also help with tag selection. It can enlarge your tag library by a factor of 10, and provide you with a direct comparison with your chief competitors. In addition to increasing your views, this app can help you monitor your visibility on social networks, and track detailed statistics that describe the performance of your video. In other words, this is a comprehensive package that will help you manage your channel in a professional way.
What’s your YouTube tag strategy?
Part 2: YouTube Tag FAQs
1. What is YouTube Tag?
YouTube tag is a keyword that you added to help Google and YouTube understand your video context, which is an important ranking factor in YouTube searching. Basically, the better you tag your video, the more views you can get. But you should keep in mind that adding excessive tags to your video description is against YouTube policy.
2. How Many Tags Should You Use on YouTube?
Though there is no restriction about the numbers of the YouTube tags, you should keep the total characters of all tags within 400 characters. In most cases, 5-8 tags are appreciated for a YouTube video. It is recommended to add as many relevant tags as you can, such as brand-specific tags, YouTube auto-suggest tags, or tags created with some tag generator.
3. Do Tags on YouTube Get More Views?
The short answer is Yes. Since Google is encouraging people to use tags to help them understand your video content, then it can recommend the videos to relevant users accordingly. With tags, YouTube can categorize your videos and make them discoverable easier. For example, when you search tag #FilmoraSchoolStory in YouTube, you can see all the videos with the tag in the search result. allowing viewers to find your content more easily.
Retouch YouTube Videos with Filmora
There are lots of filters, overlays and effects pre-programmed in Wondershare Filmora video editor , you can improve YouTube videos without costing any extra fees if you’ve subscribed to Filmora.
Richard Bennett
Richard Bennett is a writer and a lover of all things video.
Follow @Richard Bennett
Also read:
- 'Battle for Neighborville': A Hilariously Satisfying Plants Vs. Zombies Shooter - Game Review
- [New] 2024 Approved Top Picks Crafting MC Villages' Abodes
- [Updated] Crafting Engaging YouTube Thumbnails A Step-by-Step Guide
- 2024 Approved How to Download IGTV Videos on Windows PC/Mac? [5 Ways]
- Bring Imagination to Life Self-Animated Artistry for 2024
- Building a Successful Online Presence WireCast Streaming to Youtube
- Clubbing Essentials Top-Rated DJ Template Vids
- Crafting Success in YouTube's Creator Hub
- Expert Analysis of the RCA Video Doorbell: High-Performance Camera Evaluation
- Harnessing AI for Smart Device Symphony: ChatGPT's Influence
- In 2024, Digital Detective Finding and Watching YT Archives
- In 2024, Downloading YouTube Playlists Made Simple & Easy
- Master the Art of Participating in Twitter Chats: A Detailed How-To
- New Fix Avidemux Audio Issues Step-by-Step Guide
- Next-Gen Cuts Select Best 6 Video Editing Apps for Mac Big Sur for 2024
- The Ultimate Creator Toolkit Commanding Video Kingdoms
- Ultimate Guide: Resolving Issues with Call Functionality on Your Android Device
- Wrap-Up Wisdom for Media Masters
- Your Pin Library Top 5 Free Downloader Software Online for 2024
- Title: [New] Achieving Perfect Reproduction Tips for Exceptional Sound Capture
- Author: Kevin
- Created at : 2024-12-24 16:34:56
- Updated at : 2024-12-25 16:17:38
- Link: https://youtube-videos.techidaily.com/new-achieving-perfect-reproduction-tips-for-exceptional-sound-capture/
- License: This work is licensed under CC BY-NC-SA 4.0.