
!["[New] Achieve Seamless Transitions Premiere Videos on YouTube"](https://www.lifewire.com/thmb/AEsXzHaxic-Kctx5LPnCrnuznAc=/400x300/filters:no_upscale():max_bytes(150000):strip_icc()/GettyImages-951122364-5bb18ecb46e0fb0026e9b92b.jpg)
"[New] Achieve Seamless Transitions Premiere Videos on YouTube"
Achieve Seamless Transitions: Premiere Videos on YouTube
How Do I Use Adobe Premiere To Upload YouTube Videos?

Benjamin Arango
Mar 27, 2024• Proven solutions
Whilst getting the editing and post work just right on any project is what we all aim for, the ultimate aim is for other people to see our creations, and the most popular way to achieve that is YouTube . Chances are, if you are producing video, you will be putting some of it on YouTube at some point, so let’s have a look at the most efficient way to get your work from Premiere to YouTube.
Check if your computer meet the Premiere System Requirements >>
This is a basic tutorial about Adobe Premiere, professional video editing software. However, if video editing is new to you, consider Wondershare Filmora , which is a powerful but easy-to-use tool for users just starting out. Download the free trial version below.
 Download Mac Version ](https://tools.techidaily.com/wondershare/filmora/download/ )
How Do I Use Adobe Premiere To Upload YouTube Videos
1. Master Copy
Before exporting your work, it is important to first create a master copy of your project that is ‘as is’, in that it reflects the settings and codecs used in the original footage.
To do this you simply select the sequence within the Timeline or in the Project Panel, and go through the menu tree via File > Export > Media to bring up the export dialogue.

To create your Master Copy, simply select the first option of ‘Match Sequence Settings’, this exports a file that is of the same quality as your original footage, essentially producing a digital copy of the work for archiving before anything else is done.
With you work safe and secure it is now time to look at ensuring the project is suitable for YouTube. With our sequence selected in the Timeline or Project Panel again, we go through the same File > Export > Media path to bring up the media export dialogue as before.
2. Container
The first option we have to consider is the file format that our finished video needs to be in. Here you should refer to YouTube for its guidelines, whilst they do accept a number of file formats, digging through the YouTube help system to find the settings for highest quality we find that they recommend MPEG4 as the container, using the codec.

We can also see further recommended settings in this screenshot that will be covered later.
The good news is that Premiere automatically selects the appropriate container for us when we select our codec, however it is worth knowing the file type YouTube is expecting just to check yourself.
3. Video Codec
So having established that YouTube recommends the MPEG4 container using the codec, the first option we need to look for in the media export dialogue is to select the appropriate Format.
This is the first drop down in the dialogue box, and in this case we simply select from the list.

Once you select you can check the ‘output name’ field and see that premiere is automatically set the output file to .mp4 which is exactly what we need.
4. Preset
The next field we come to is the ‘Preset’ dropdown menu. This is a major help to most people, as Adobe have very kindly included large numbers of presets to quickly adapt video settings to suit specific uses. They vary depending on the exact version of Premiere you are using, and each format type does have its own list of presets, as we can see has a large number for YouTube, but also has many presets for specific devices (presets for iPad, Kindle, Nook, various other tablets and phones, Vimeo and a host of others) to make getting the right settings that bit easier for us.

It is important here to select the correct preset from the various YouTube options. You want to select the resolution and frame rate that match your source file, for the best results. So, if your source file is 1080p with a frame rate of 29.97 fps then that is the YouTube setting you would select.
Once a preset is selected a summary of the settings is displayed below, normally these will be well suited to your project, however you can fine tune anything you wish by selecting the video or audio tabs at the bottom which give you the chance to adjust each parameter individually. If you do this, you can save these changes as a custom preset by clicking the button at the side of the Preset dropdown menu and simply use it on later projects by selecting it from the list the same as any other, a great time saving tool.

5. Rendering
Once you are satisfied with the settings, either from the Preset alone or if you have adjusted anything yourself, you are nearly ready to render the file and export it.
For YouTube it is recommended you select the ‘Use Maximum Render Quality’ option to maintain the best output you can, it does add time to the render process but if you value the quality of your work it is worthwhile.
Finally you can choose a suitable filename and the destination of the file by clicking on the ‘Output Name’ field.
I normally use a filename that includes the destination medium so I can differentiate between different versions of a project and know which one to upload where, in this case I include ‘youtube’, but if I were planning on uploading clips of the project to vimeo as well for instance there may be a cut of the project with ‘vimeo’ in the name too. The destination is personal preference, because I do use filenames to differentiate versions I can put the various iterations into a single project file, others have folder structures for each type of file , so all YouTube output goes into a single folder and so on, how you organize is entirely dependent on how you work.

Once those are selected clicking ‘Export’ starts the rendering process, and eventually (how long depends on the speed of your computer and the size and type of file involved), you will end up with your YouTube optimized video in the location you chose.
Here I created 4 key frames that let the ‘Animation’ object move around the ‘Demo Text’ Object and finally come to rest below it. Whilst this type of effect does look very effective on screen, such is the ease of use of After Effects it really is just a few minutes work to achieve.
Learn more details about How to add text in Premiere >>
6. Uploading
Now you have your file, the next step is to go to your YouTube account and log in if you need to.
On the top of your homepage on the right is the upload button, selecting that brings up the select file menu as below.

You can either drag your file into the window or click on it to open a standard file browser to locate the desired file, click and the upload will begin. The dropdown underneath allows you to set the video as Public, Unlisted or Private. You can change this at any time once the video is uploaded as well.
This opens the upload progress window, where you can add in a name, description and tags as well as add the video to a playlist or adjust the privacy settings as the video is uploading.

Once the upload as finished, you can do final adjustments to settings and choose a thumbnail for the video. The final step is to click the ‘Publish’ button and your video will be processed and go live.

Benjamin Arango
Benjamin Arango is a writer and a lover of all things video.
Follow @Benjamin Arango
Benjamin Arango
Mar 27, 2024• Proven solutions
Whilst getting the editing and post work just right on any project is what we all aim for, the ultimate aim is for other people to see our creations, and the most popular way to achieve that is YouTube . Chances are, if you are producing video, you will be putting some of it on YouTube at some point, so let’s have a look at the most efficient way to get your work from Premiere to YouTube.
Check if your computer meet the Premiere System Requirements >>
This is a basic tutorial about Adobe Premiere, professional video editing software. However, if video editing is new to you, consider Wondershare Filmora , which is a powerful but easy-to-use tool for users just starting out. Download the free trial version below.
Download Mac Version ](https://tools.techidaily.com/wondershare/filmora/download/ )
How Do I Use Adobe Premiere To Upload YouTube Videos
1. Master Copy
Before exporting your work, it is important to first create a master copy of your project that is ‘as is’, in that it reflects the settings and codecs used in the original footage.
To do this you simply select the sequence within the Timeline or in the Project Panel, and go through the menu tree via File > Export > Media to bring up the export dialogue.
To create your Master Copy, simply select the first option of ‘Match Sequence Settings’, this exports a file that is of the same quality as your original footage, essentially producing a digital copy of the work for archiving before anything else is done.
With you work safe and secure it is now time to look at ensuring the project is suitable for YouTube. With our sequence selected in the Timeline or Project Panel again, we go through the same File > Export > Media path to bring up the media export dialogue as before.
2. Container
The first option we have to consider is the file format that our finished video needs to be in. Here you should refer to YouTube for its guidelines, whilst they do accept a number of file formats, digging through the YouTube help system to find the settings for highest quality we find that they recommend MPEG4 as the container, using the codec.
We can also see further recommended settings in this screenshot that will be covered later.
The good news is that Premiere automatically selects the appropriate container for us when we select our codec, however it is worth knowing the file type YouTube is expecting just to check yourself.
3. Video Codec
So having established that YouTube recommends the MPEG4 container using the codec, the first option we need to look for in the media export dialogue is to select the appropriate Format.
This is the first drop down in the dialogue box, and in this case we simply select from the list.
Once you select you can check the ‘output name’ field and see that premiere is automatically set the output file to .mp4 which is exactly what we need.
4. Preset
The next field we come to is the ‘Preset’ dropdown menu. This is a major help to most people, as Adobe have very kindly included large numbers of presets to quickly adapt video settings to suit specific uses. They vary depending on the exact version of Premiere you are using, and each format type does have its own list of presets, as we can see has a large number for YouTube, but also has many presets for specific devices (presets for iPad, Kindle, Nook, various other tablets and phones, Vimeo and a host of others) to make getting the right settings that bit easier for us.
It is important here to select the correct preset from the various YouTube options. You want to select the resolution and frame rate that match your source file, for the best results. So, if your source file is 1080p with a frame rate of 29.97 fps then that is the YouTube setting you would select.
Once a preset is selected a summary of the settings is displayed below, normally these will be well suited to your project, however you can fine tune anything you wish by selecting the video or audio tabs at the bottom which give you the chance to adjust each parameter individually. If you do this, you can save these changes as a custom preset by clicking the button at the side of the Preset dropdown menu and simply use it on later projects by selecting it from the list the same as any other, a great time saving tool.
5. Rendering
Once you are satisfied with the settings, either from the Preset alone or if you have adjusted anything yourself, you are nearly ready to render the file and export it.
For YouTube it is recommended you select the ‘Use Maximum Render Quality’ option to maintain the best output you can, it does add time to the render process but if you value the quality of your work it is worthwhile.
Finally you can choose a suitable filename and the destination of the file by clicking on the ‘Output Name’ field.
I normally use a filename that includes the destination medium so I can differentiate between different versions of a project and know which one to upload where, in this case I include ‘youtube’, but if I were planning on uploading clips of the project to vimeo as well for instance there may be a cut of the project with ‘vimeo’ in the name too. The destination is personal preference, because I do use filenames to differentiate versions I can put the various iterations into a single project file, others have folder structures for each type of file , so all YouTube output goes into a single folder and so on, how you organize is entirely dependent on how you work.
Once those are selected clicking ‘Export’ starts the rendering process, and eventually (how long depends on the speed of your computer and the size and type of file involved), you will end up with your YouTube optimized video in the location you chose.
Here I created 4 key frames that let the ‘Animation’ object move around the ‘Demo Text’ Object and finally come to rest below it. Whilst this type of effect does look very effective on screen, such is the ease of use of After Effects it really is just a few minutes work to achieve.
Learn more details about How to add text in Premiere >>
6. Uploading
Now you have your file, the next step is to go to your YouTube account and log in if you need to.
On the top of your homepage on the right is the upload button, selecting that brings up the select file menu as below.
You can either drag your file into the window or click on it to open a standard file browser to locate the desired file, click and the upload will begin. The dropdown underneath allows you to set the video as Public, Unlisted or Private. You can change this at any time once the video is uploaded as well.
This opens the upload progress window, where you can add in a name, description and tags as well as add the video to a playlist or adjust the privacy settings as the video is uploading.
Once the upload as finished, you can do final adjustments to settings and choose a thumbnail for the video. The final step is to click the ‘Publish’ button and your video will be processed and go live.
Benjamin Arango
Benjamin Arango is a writer and a lover of all things video.
Follow @Benjamin Arango
Illuminating the Path to YouTube Success: Keyword Research
Improve Your YouTube Video Performance with Wondershare Filmora
An easy and powerful video editor for YouTube Video
Numerous video and audio effects to choose from
Detailed tutorials provided by the official channel
With more than 1 billion hours of video watched every day, YouTube is the world’s second-largest search engine. That means you should optimize your videos for YouTube, so they rank well on Google and show up in YouTube searches.
YouTube keywords are the words you include in your video title, description, and anywhere that will help YouTube’s algorithm know what your video is about and what it entails. Keep reading to learn more about YouTube keyword research.
In this article
Why Do We Need to Research YouTube Keywords?
How to Research Keywords on YouTube?
Why Do We Need to Research YouTube Keywords?
Researching YouTube keywords is essential to your success. Here are three reasons why you might want to consider YouTube keyword research.
Helps You Know What Your Audience Is Searching for
Keyword research allows you to understand what people search for when they are on YouTube. In turn, this helps you know what your potential customers are seeking. You’ll then include these terms on your content to increase the chances of your audience finding you on YouTube.
It Helps You Rank Higher
You can use YouTube videos to promote brand awareness and market your product. Having high-ranking videos is a cost-effective way to push your target audience through the sales funnel.
When creating YouTube videos, you need to ensure you are reaching your target audience. And that is why researching keywords is crucial.
Once you have performed YouTube keyword research and determined the most suitable keywords for your topic, you can now use them to create target content for your audience. In turn, this will help you increase the number of subscribers on your YouTube channel. Your chances of your video showing up on YouTube will increase, which will bring traffic to your business.
It’s the Cheapest Way to Market Your Products or Services
Video marketing is expensive, and that is why you have to find every possible edge for your video marketing if you want to lower your costs and increase your ROI. For this reason, keyword research will ensure your audience finds you without spending loads of money that you could have used on services like Google Ads.
Because keyword research allows your target audience to find you, this means more opportunities for you. Most of the users will share entertaining videos.
How to Research Keywords on YouTube?
There are several ways of conducting keyword research for YouTube to find out what people are searching for and determine the content in your video. They include:
1. Using YouTube Search

Although this method doesn’t provide all available search options, it’s still good for getting an idea of the type of keyword with which you’re dealing.
You can start your research by typing the keywords into YouTube’s search bar and reviewing the displayed results. It might be helpful to check out similar videos or video playlists. If your search seems too wide, you can enter several keywords at once (separated by commas), which will help you find better results.
2. Using Google’s Keyword Planner Tool

This tool is helpful for keyword difficulty and monthly searches volume assessment. If you only want to know the number of organic visits a given keyword gets, Google Keyword Planner might be helpful. The tool allows you to create lists consisting of related keywords and provides information about CPC (cost per click) and potential traffic in general.
3. Using YouTube Suggestions
What makes YouTube unique is its ability to suggest content based on your location, subscription, and watch history. You can use this method to find keyword ideas if you have subscribed to relevant channels. Also, you can rely on YouTube suggestions to find out whether a topic is popular or not.
4. Using YouTube Analytics
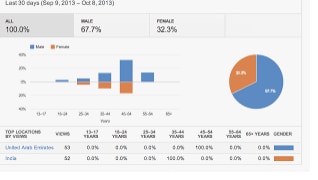
YouTube has a built-in Keyword Tool that is extremely helpful for researching the best keywords to use in your video titles, descriptions, and tags. This method allows you to see video search keywords with which users are finding your content. It is possible to review top organic keywords together with the respective engagement metrics, including bounce rate and average view duration.
5. Using Third-Party YouTube Keyword Tools
Last but not least, there are several third-party tools available on the market that provide both keyword difficulty and organic traffic estimation data for YouTube keywords. Some of these tools also offer similar features, including recommendations based on your existing subscriptions. Let’s look at some of the popular YouTube tools that you can use.
vidIQ
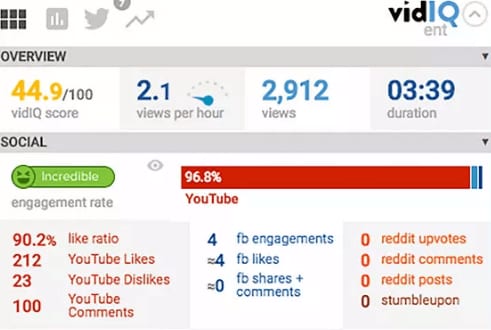
Designed to boost YouTube views, vidIQ is an effective SEO tool. The tool recommends keywords, descriptions, and titles that will help you to get more views and subscribers.
Performing vidIQ keyword research that relates to your video is a breeze. With just a few clicks, you will know what people are searching for and create content that they want to watch.
The tool allows you to enable inline keywords to know the tags your competitors use on search results. Use them to help you generate ideas relevant to your content. vidIQ also suggests ideal keywords like YouTube.
TubeBuddy

You can also use TubeBuddy to find and evaluate a range of YouTube keywords. You can do TubeBuddy keyword research on its mobile app or browser extension. The tool also shows how often people click on the results and how often users search a keyword.
Keyword Keg
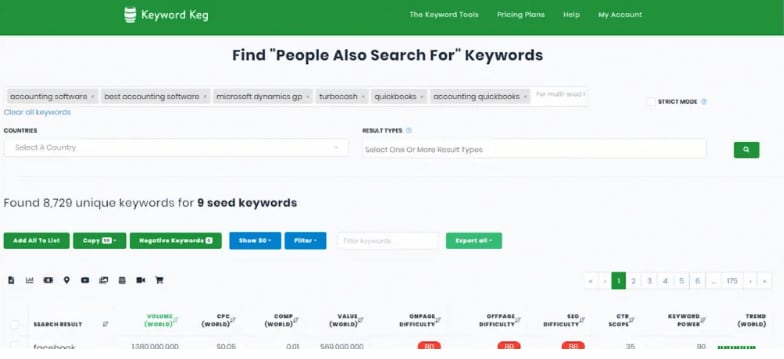
Using the YouTube suggest API, Keyword Keg shows you the terms users search most and the monthly number of searches. You’ll also see what other people are paying for CPC (cost per click). You can use this data to determine the best keywords for your YouTube videos.
Qusetion: Are keywords and Tags the Same Thing?
Answer: The main difference between tags and keywords is where you will place them. Keywords describe the content in your video to help search engines and YouTube’s algorithm find your video. Tags describe what the content in your video is about and how it’s connected.
Make Great YouTube Videos with Filmora
Having high-quality videos can make you stand out from your competitors. Filmora is a video editing software that allows you to create amazing YouTube videos. It has powerful editing tools that will enhance the quality of your videos.
You can also add over 800 cool effects and filters to your videos to make them fun to watch. With just a single click, you can add opacity and speed ramp effects as well as infinite zoom effects.
Additionally, you can adjust the dynamic range and white balance of Your YouTube videos. Furthermore, you can fine-tune the audio of your video to make it crisp and eliminate camera shake.
The best part is: Filmora is compatible with macOS X 10.12 or later and Windows 7, 8, and 10. It also supports all popular standard HD videos, audio, and image file formats.
Conclusion
Now that you know the importance of YouTube keyword research and how to perform keyword research, your target audience can find you easily.
With more than 1 billion hours of video watched every day, YouTube is the world’s second-largest search engine. That means you should optimize your videos for YouTube, so they rank well on Google and show up in YouTube searches.
YouTube keywords are the words you include in your video title, description, and anywhere that will help YouTube’s algorithm know what your video is about and what it entails. Keep reading to learn more about YouTube keyword research.
In this article
Why Do We Need to Research YouTube Keywords?
How to Research Keywords on YouTube?
Why Do We Need to Research YouTube Keywords?
Researching YouTube keywords is essential to your success. Here are three reasons why you might want to consider YouTube keyword research.
Helps You Know What Your Audience Is Searching for
Keyword research allows you to understand what people search for when they are on YouTube. In turn, this helps you know what your potential customers are seeking. You’ll then include these terms on your content to increase the chances of your audience finding you on YouTube.
It Helps You Rank Higher
You can use YouTube videos to promote brand awareness and market your product. Having high-ranking videos is a cost-effective way to push your target audience through the sales funnel.
When creating YouTube videos, you need to ensure you are reaching your target audience. And that is why researching keywords is crucial.
Once you have performed YouTube keyword research and determined the most suitable keywords for your topic, you can now use them to create target content for your audience. In turn, this will help you increase the number of subscribers on your YouTube channel. Your chances of your video showing up on YouTube will increase, which will bring traffic to your business.
It’s the Cheapest Way to Market Your Products or Services
Video marketing is expensive, and that is why you have to find every possible edge for your video marketing if you want to lower your costs and increase your ROI. For this reason, keyword research will ensure your audience finds you without spending loads of money that you could have used on services like Google Ads.
Because keyword research allows your target audience to find you, this means more opportunities for you. Most of the users will share entertaining videos.
How to Research Keywords on YouTube?
There are several ways of conducting keyword research for YouTube to find out what people are searching for and determine the content in your video. They include:
1. Using YouTube Search
Although this method doesn’t provide all available search options, it’s still good for getting an idea of the type of keyword with which you’re dealing.
You can start your research by typing the keywords into YouTube’s search bar and reviewing the displayed results. It might be helpful to check out similar videos or video playlists. If your search seems too wide, you can enter several keywords at once (separated by commas), which will help you find better results.
2. Using Google’s Keyword Planner Tool
This tool is helpful for keyword difficulty and monthly searches volume assessment. If you only want to know the number of organic visits a given keyword gets, Google Keyword Planner might be helpful. The tool allows you to create lists consisting of related keywords and provides information about CPC (cost per click) and potential traffic in general.
3. Using YouTube Suggestions
What makes YouTube unique is its ability to suggest content based on your location, subscription, and watch history. You can use this method to find keyword ideas if you have subscribed to relevant channels. Also, you can rely on YouTube suggestions to find out whether a topic is popular or not.
4. Using YouTube Analytics
YouTube has a built-in Keyword Tool that is extremely helpful for researching the best keywords to use in your video titles, descriptions, and tags. This method allows you to see video search keywords with which users are finding your content. It is possible to review top organic keywords together with the respective engagement metrics, including bounce rate and average view duration.
5. Using Third-Party YouTube Keyword Tools
Last but not least, there are several third-party tools available on the market that provide both keyword difficulty and organic traffic estimation data for YouTube keywords. Some of these tools also offer similar features, including recommendations based on your existing subscriptions. Let’s look at some of the popular YouTube tools that you can use.
vidIQ
Designed to boost YouTube views, vidIQ is an effective SEO tool. The tool recommends keywords, descriptions, and titles that will help you to get more views and subscribers.
Performing vidIQ keyword research that relates to your video is a breeze. With just a few clicks, you will know what people are searching for and create content that they want to watch.
The tool allows you to enable inline keywords to know the tags your competitors use on search results. Use them to help you generate ideas relevant to your content. vidIQ also suggests ideal keywords like YouTube.
TubeBuddy
You can also use TubeBuddy to find and evaluate a range of YouTube keywords. You can do TubeBuddy keyword research on its mobile app or browser extension. The tool also shows how often people click on the results and how often users search a keyword.
Keyword Keg
Using the YouTube suggest API, Keyword Keg shows you the terms users search most and the monthly number of searches. You’ll also see what other people are paying for CPC (cost per click). You can use this data to determine the best keywords for your YouTube videos.
Qusetion: Are keywords and Tags the Same Thing?
Answer: The main difference between tags and keywords is where you will place them. Keywords describe the content in your video to help search engines and YouTube’s algorithm find your video. Tags describe what the content in your video is about and how it’s connected.
Make Great YouTube Videos with Filmora
Having high-quality videos can make you stand out from your competitors. Filmora is a video editing software that allows you to create amazing YouTube videos. It has powerful editing tools that will enhance the quality of your videos.
You can also add over 800 cool effects and filters to your videos to make them fun to watch. With just a single click, you can add opacity and speed ramp effects as well as infinite zoom effects.
Additionally, you can adjust the dynamic range and white balance of Your YouTube videos. Furthermore, you can fine-tune the audio of your video to make it crisp and eliminate camera shake.
The best part is: Filmora is compatible with macOS X 10.12 or later and Windows 7, 8, and 10. It also supports all popular standard HD videos, audio, and image file formats.
Conclusion
Now that you know the importance of YouTube keyword research and how to perform keyword research, your target audience can find you easily.
Also read:
- [Updated] Easy Steps to Directly Share Videos From iPhone/iPad
- A Comprehensive Guide to Maximizing Channels' Earnings Through Trailers
- 9 Premier Apps for Extracting and Saving YouTube Videos on Android
- A Comprehensive List of the Best 10 Low-Cost Video Production Schools on YouTube
- [Updated] Audio Artists' Almanac Your Guide to Video Submission
- [Updated] Crafting Viral Videos How to Excel in Youtubers' Music Reactions
- Harvesting Hits and Heads How to Profit From Your YouTube Presence Without Ads
- Streamlining Revenue AdSense Tips for YouTubers
- In 2024, Building Blocks of a Well-Structured YouTube Video
- A Guide to Gathering Gold From Guided Goods' Gazes Online
- [New] Beauty's Brightest Stars YouTube Personalities to Follow
- [Updated] Decode and Resolve YouTube Short Errors
- [Updated] Addressed Hidden Shorters, Now Visible
- 2024 Approved Enhance Content Categorization Top Picks for the 7 Cheapest Youtube Taggification Apps
- In 2024, Boost Your Content Reach The Expert Guide to Youtube's Featured Channels
- 15 Best Funny YouTube Channels to Watch When You're Bored
- [New] DIY Video Mastery 10 Straightforward Concepts Everyone Should Try
- In 2024, Affordable MCB Theme Images for Channels
- Shorts Fixed - Ready to Stream and Share
- 2024 Approved Boosting Traffic with Smart YouTube Title & Tag Use
- Dissecting YouTube’s Strategy to Empower Short-Form Content Makers for 2024
- A Deep-Dive Into Digital Platform Wealth Dailymotion & YouTube Comparison for 2024
- [New] Crafting Collabs that Attract and Retain Viewers
- In 2024, Creative Command Center Studio for YouTubers
- In 2024, Enjoy Uninterrupted Viewing Top 20 YouTube Download Apps
- Easy & Fast Convert YouTube Music Into MP3, Mac Version for 2024
- In 2024, A Step-by-Step Approach to Crafting Your Video' Market Standouts
- [New] Channel-Building Gear A Quick Start Guide
- In 2024, Crafting Compelling YouTube Profile Definitions
- Curating Historical Wisdom The Ultimate Student-Friendly Channel List (#1-10) for 2024
- Download Your Favorite Shows Anytime, Everywhere with These Apps for 2024
- Checking Credentials on YouTube
- Essential YouTube Marketing Techniques – Ranked From Best to Worst for 2024
- 2024 Approved Dissecting YouTube's Operational Model Post-Upload
- Trendsetting Hashes Optimizing Hashtags to Amplify Short Video Impact
- In 2024, Comic Crafting Mastering 7 Cheeky Content Strategies
- 2024 Approved Charting Your Course in the Realm of YouTube Shorts
- AZ Screen Recorder Review Series
- Effortless Video Ratio Conversion A Quick Start
- [New] High-Definition Dominance Leading Monitors for PS5 (HDMI 2.1)
- [Updated] Easy Guide to Converting MOV Files to Different Formats on Win 11
- In 2024, How To Remove Phone Number From Your Apple ID from Your Apple iPhone 12 Pro?
- Exploring the Best Digital Audio Workstations for Your PC and Mac
- Speedy Strategies Capturing Your Screen in a Flash (Dell) for 2024
- [New] In 2024, Cutting-Edge ScreenRecord A Compreraniary Examination
- New Best Video Editing Software for Adding Music and Soundtracks for 2024
- 2024 Approved Ultimate Eco-Conscious Cinematography Setups Guide
- [Updated] 2024 Approved Complete Examination ScreenFlow Full Features for Mac
- Spur the Playback of Vimeo Media for 2024
- New How to Crop a Video in Windows Media Player
- In 2024, How To Use Special Features - Virtual Location On Vivo V27e? | Dr.fone
- Life360 Learn How Everything Works On Asus ROG Phone 8 Pro | Dr.fone
- In 2024, Cutting-Edge Techniques to Boost Your Facebook Stories' Reach and Engagement
- Google Play Services Wont Update? 12 Fixes are Here on Oppo Reno 11 Pro 5G | Dr.fone
- In 2024, How to Unlock Apple iPhone 12 Online? Here are 6 Easy Ways
- 2024 Approved 10 Must-Know iPhone Photography Tips Today
- [New] Downloading and Archiving Facebook GIFs A Unified Approach for 2024
- [New] 2024 Approved The Definitive Guide IOS Screenshots & Recording (2Inas 2023)
- [Updated] How to Amend Blurry Mobile Streaming on Social Platforms
- New VirtualDub MPEG2 The Secret to Smaller, Faster Video Files
- New In 2024, Elevating Your Music Video Game Advanced Editing Techniques
- [New] Behind-The-Scenes to the Best FREE Meme Designs
- How to Unlock Motorola Moto G34 5G Bootloader Easily
- Here are Some Pro Tips for Pokemon Go PvP Battles On Apple iPhone 8 Plus | Dr.fone
- In 2024, Unlock Your Realme C53 Phone with Ease The 3 Best Lock Screen Removal Tools
- [New] Streamline Content Management Twitter Vids to Insta Feed for 2024
- Undeleted lost videos from Gionee F3 Pro
- How to Transfer Photos From Lenovo ThinkPhone to Samsung Galaxy S21 Ultra | Dr.fone
- [Updated] Beats & Brilliance Creating Soundtracked Instagram Feeds
- Title: "[New] Achieve Seamless Transitions Premiere Videos on YouTube"
- Author: Kevin
- Created at : 2024-05-25 15:50:42
- Updated at : 2024-05-26 15:50:42
- Link: https://youtube-videos.techidaily.com/new-achieve-seamless-transitions-premiere-videos-on-youtube/
- License: This work is licensed under CC BY-NC-SA 4.0.
