
!["[New] A Step-by-Step Guide How To Record, Save & Share YouTube Video for No Cost"](https://thmb.techidaily.com/228e79977939cec81e9b9a3337281ae057b8c153534fece429948183b0ad342f.png)
"[New] A Step-by-Step Guide How To Record, Save & Share YouTube Video for No Cost"
A Step-by-Step Guide: How To Record, Save & Share YouTube Video for No Cost
How To Record Screencast From YouTube For Free

Max Wales
Mar 27, 2024• Proven solutions
Screencasting is a simple task anyone can do it with ease. All that you need to do is download a software program, press the record button and soon all movements on your device screen video will be recorded. Crazy video gamers do the same thing to share their interesting game videos on YouTube channels.
There is a wide range of software tools that can assists you with screencasting needs. Even YouTube itself has the ability to capture device screens without the need for additional software tool. If you are interested to know how it can be done, simply go through the details below.
Note: We resolutely oppose all forms of copyright-infringing downloads. This tutorial is only for downloading YouTube videos/audio materials from your own channel.
![]()

The All-in-One Screen Recorder & Video Editor
- Record desktop screen, voiceover, and webcam simultaneously
- Edit recorded clips quickly with a wide range of professional tools
- Built-in plentiful templates and effects
- Export to MP4, MOV, MKV, GIF and multiple formats
For Win 7 or later (64-bit)
For macOS 10.12 or later
 Secure Download
Recording Screencast Video with YouTube
Step 1: Open YouTube on your computer and sign by using your Google Account. On the top left corner, you will find the Upload button, press it and go to live streaming section and choose events from the drop-down menu. When you are doing this for the very first time, YouTube will ask your phone number to verify the streaming process. You can also click here to get to the Livestreaming page directly.
Step 2: On the create an event page, add a title for your screencast video; set privacy terms and then hit “Go Live Now” option.

Step 3: The Hangout on Air page will get opened. It will allow you to select-deselect webcam recording as well as mic recording.
Step 4: Hit the screen share button from the left toolbox and choose the desktop window that you wish to record. Now press start the Broadcast button to start screen recording. Note that it is a private session that cannot be watched by anyone else.
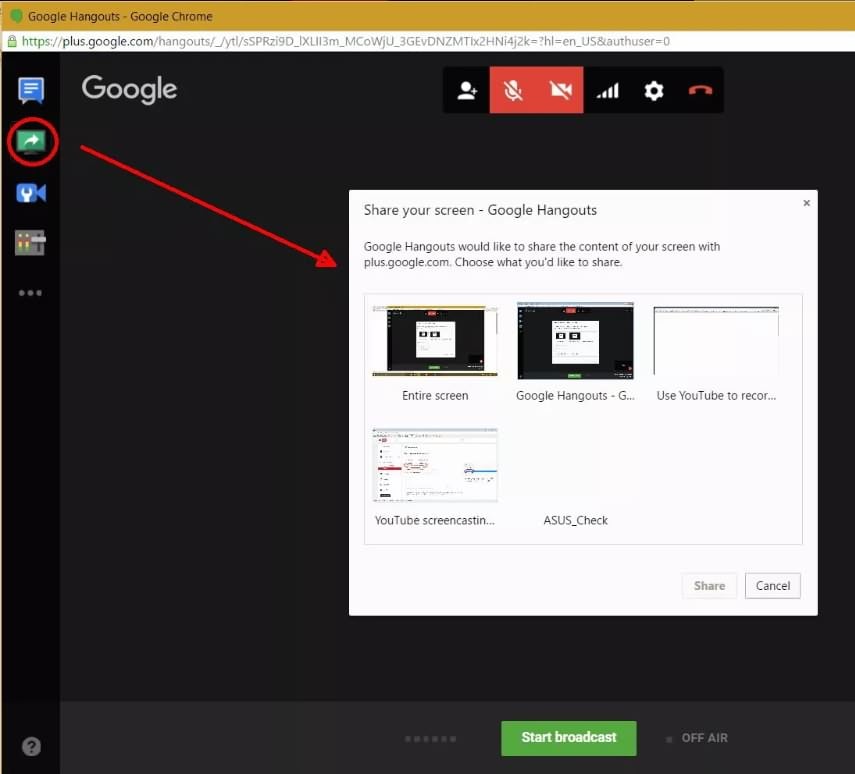
Step 5: When your video is ready to go to YouTube video dashboard and choose your recent screencast video. Download it to Google Drive and share it with the world.
A better way to record Screencast and Upload to YouTube
For those who are interested in capturing screencast with high-quality videos and need an easy to use the built-in editor to customize these videos; it is good to look for some dedicated screencast tools. Experts recommend using Wondershare Filmora due to its advanced features and interactive software platform.


Top Features
- Filmora is one of the most interactive software tools that works perfectly on Windows and Mac platforms.
- It supports more than 50 media file formats.
- Filmora allows users to record with Webcam and PC simultaneously.
- It is possible to record audio from mic input and internal computer audio as well.
- With Filmora users can record high paced videos at 120fps.
- Add markers to important frames during recording.
There are so many benefits of using Filmora for YouTube screencast video recordings. The biggest trouble with YouTube based recording is that when you try it for the very first time, YouTube will take 24 hours to verify your account for the live streaming. But by using Filmora, you can do this task instantly at any hour of the day. Another great news is that Fillmore Scrn comes with a built-in video editor that allows users to customize videos with ease. Once your videos are ready, you can share them directly to social media platforms including YouTube, Facebook, Twitch, and Vimeo etc.
Let’s watch the video below to check how to record your screen with Filmora and upload the recorded video to YouTube.
Conclusion
With all impressive features, there is no doubt to say that Filmora can serve your screencasting needs in the best possible manner. Whether you are a crazy gamer interested to share your adventure videos with the world or want to create useful tutorials for your audience, Filmora is your best companion for all your needs.
Max Wales
Max Wales is a writer and a lover of all things video.
Follow @Max Wales
Max Wales
Mar 27, 2024• Proven solutions
Screencasting is a simple task anyone can do it with ease. All that you need to do is download a software program, press the record button and soon all movements on your device screen video will be recorded. Crazy video gamers do the same thing to share their interesting game videos on YouTube channels.
There is a wide range of software tools that can assists you with screencasting needs. Even YouTube itself has the ability to capture device screens without the need for additional software tool. If you are interested to know how it can be done, simply go through the details below.
Note: We resolutely oppose all forms of copyright-infringing downloads. This tutorial is only for downloading YouTube videos/audio materials from your own channel.
![]()
The All-in-One Screen Recorder & Video Editor
- Record desktop screen, voiceover, and webcam simultaneously
- Edit recorded clips quickly with a wide range of professional tools
- Built-in plentiful templates and effects
- Export to MP4, MOV, MKV, GIF and multiple formats
For Win 7 or later (64-bit)
For macOS 10.12 or later
Secure Download
Recording Screencast Video with YouTube
Step 1: Open YouTube on your computer and sign by using your Google Account. On the top left corner, you will find the Upload button, press it and go to live streaming section and choose events from the drop-down menu. When you are doing this for the very first time, YouTube will ask your phone number to verify the streaming process. You can also click here to get to the Livestreaming page directly.
Step 2: On the create an event page, add a title for your screencast video; set privacy terms and then hit “Go Live Now” option.
Step 3: The Hangout on Air page will get opened. It will allow you to select-deselect webcam recording as well as mic recording.
Step 4: Hit the screen share button from the left toolbox and choose the desktop window that you wish to record. Now press start the Broadcast button to start screen recording. Note that it is a private session that cannot be watched by anyone else.
Step 5: When your video is ready to go to YouTube video dashboard and choose your recent screencast video. Download it to Google Drive and share it with the world.
A better way to record Screencast and Upload to YouTube
For those who are interested in capturing screencast with high-quality videos and need an easy to use the built-in editor to customize these videos; it is good to look for some dedicated screencast tools. Experts recommend using Wondershare Filmora due to its advanced features and interactive software platform.
Top Features
- Filmora is one of the most interactive software tools that works perfectly on Windows and Mac platforms.
- It supports more than 50 media file formats.
- Filmora allows users to record with Webcam and PC simultaneously.
- It is possible to record audio from mic input and internal computer audio as well.
- With Filmora users can record high paced videos at 120fps.
- Add markers to important frames during recording.
There are so many benefits of using Filmora for YouTube screencast video recordings. The biggest trouble with YouTube based recording is that when you try it for the very first time, YouTube will take 24 hours to verify your account for the live streaming. But by using Filmora, you can do this task instantly at any hour of the day. Another great news is that Fillmore Scrn comes with a built-in video editor that allows users to customize videos with ease. Once your videos are ready, you can share them directly to social media platforms including YouTube, Facebook, Twitch, and Vimeo etc.
Let’s watch the video below to check how to record your screen with Filmora and upload the recorded video to YouTube.
Conclusion
With all impressive features, there is no doubt to say that Filmora can serve your screencasting needs in the best possible manner. Whether you are a crazy gamer interested to share your adventure videos with the world or want to create useful tutorials for your audience, Filmora is your best companion for all your needs.
Max Wales
Max Wales is a writer and a lover of all things video.
Follow @Max Wales
Affordable & Accessible: The Definitive Guide to 9 Budget-Friendly Editors
9 Best Free and Easy Editing Apps You Should Know

Richard Bennett
Dec 14, 2023• Proven solutions
Have you ever made a video 100% on your phone using a mobile video editing app?
If you’ve just started off on YouTube, there’s a good chance your main camera is the one in your phone. Actually, there’s a good chance of that even if you’ve been making YouTube videos for a while now.
Since you’re shooting videos on your phone, why shouldn’t you edit them there too? Here are 9 free video editing apps you can use for YouTube.
Note: This is not a ranked list. The apps will appear in alphabetical order.
- Adobe Premiere Clip (Android or iOS)
- Cameo (iOS)
- Clips (iOS)
- Filmora (Android or iOS)
- Funimate (Android or iOS)
- iMovie (iOS)
- Movie Maker Filmmaker by Alive (Android or iOS)
- PowerDirector (Android)
- Vlogit (Android or iOS)
Adobe Premiere Clip ( Android

Key Points:
- Automatic using clips. Times them to music
- Guides you with pop-up tips
- No text/title overlays
- Exports directly to YouTube
Adobe Premiere Pro is a professional-grade desktop editor, and Adobe Premiere Clip lives up to the quality standards set by its big-brother software. It is missing some features you might want for YouTube videos, like title effects, but it does have some bells and whistles. There’s a good selection of filters.

Making changes to your picture, like adjusting the exposure or the prevalence of highlights or shadows, is just a matter of sliding bars. The tools for splitting and duplicating clips are easy to find too. You just toggle between the two icons right above your video – the one that looks like a shutter and the one that looks like adjustment bars – to switch between the picture tools and the other tools.

You cannot add what you might normally think of as a title effect in Adobe Premiere Clip, so it’ll be hard to fully complete your video. You can add text cards to put in-between your video clips, but you can’t overlay the title on top of a clip.
You can share your video directly to YouTube when you export.
Cameo

Key Points:
- Easy-to-apply themes
- Customizable titles
- Limited features
- Exports to 4K (if your clips are 4K)
Vimeo is a video sharing site with more of a ‘filmmaker’ focus than YouTube, so it isn’t a surprise that their mobile editing app Cameo can export high-quality 4K videos.
Like some of the other apps on this list, Cameo does not have a huge variety of functions. You can reorder your clips, trim them, add titles, and apply themes (essentially filter and title combos).
There are three icons on the main interface: Scissors, a Music Note, and Filters.
The Scissors will take you to the trimming screen, where you can make your clip shorter or longer.

You can also add a title in the trimming screen, but you will not be able to change the font style or color until you are in the Filter screen.
In the Filter screen (tap the overlapping filters icon on the main interface) you will be able to adjust the color of your text by tapping on the circle with the A in it. Tapping where it says ‘Font’ will change your font style.

You can also tap on Themes and choose a premade style.

Here’s what ‘Crush’ looks like applied:

My font was changed, and there’s also a filter now. In order to apply a filter, you must start with a theme.
Clips

Key Points:
- Great selection of stickers
- Lacks some basic tools
- Simple interface
Clips is an intuitive app with a lot of options for decorating your videos. It is lacking in some of the more basic editings features you might expect (i.e. you cannot split clips or do any color correction), but it has a lot of fun features like stickers and emojis that could make up for that depending on your needs.

There are also more traditional effects, like filters and titles. There are a wide range of title options in styles that are popular on YouTube, and a fairly standard filter selection.

While you cannot split clips in this app, but trimming and reordering them is easy. For trimming, you just select the clip and then Trim to open a screen where you can drag the start and end points of the clip.
To rearrange your clips, just tap the clip you want to move and hold down. You’ll be able to drag it to a new location.
It’d be hard to rely on Clips exclusively as your YouTube video editor, but it’s well suited for Instagram or for making quick ‘on-the-go’ videos.
Filmora ( Android

Key Points:
- Export directly to YouTube
- 16:9 or 1:1 for Instagram
- Includes effects like transitions, filters, and overlays
- End-roll logo
You can make a complete video easily just by tapping and dragging in Filmora, and there are even effects like filters, transitions, and overlays you can add to make your video more polished.
After importing your media into Filmora (you can import videos and photos saved on your phone, or media which has been uploaded to a social media account like Facebook or Instagram) you can change the order of your clips by tapping one, pressing down for a moment, and then dragging your clips where you want them.
Trimming a clip is as simple as tapping on it and then Duration. You’ll get this screen where you can adjust the length easily by dragging the markers to beginning or endpoints.

Cropping and zooming are simple too.

Filmora comes with pre-made themes you can apply which include titles, filters, and other effects. These might not be ideal if you already have branding you like to use for YouTube, but in some situations, they can make video creation a lot faster.

Filmora comes loaded with music, or you can even import your own music from your phone.
Once you’re done, tap ‘save’ in the top right corner of your screen to export your video. From the save screen, you’ll be able to export your video directly to YouTube.

One potential drawback is that Filmora will add its own logo to the end of your exported video. This logo will not distract from your video content since it is added at the end and never overlaps any of your clips, but it still might not be ideal for all creators.
Funimate ( Android

Key Points:
- Easily add text and shapes
- Rainbow doodling
- Shake effects
- Small ‘Funimate’ watermark in videos from the free version
Funimate is lives up to the ‘fun’ promise in its name. It’s designed mostly for music videos/Musical.ly and while it is missing a lot of more typical editing options, there are a few free tools in Funimate that other apps just don’t have.
For example, there are shake and distortion effects available through Funimate that you usually only find in desktop software.
You can also draw rainbow designs on your video with your finger – no other app on this list can do that.
The text tool in Funimate is easy to use, and there are cool looking glow effects you can apply in the color selection screen. Those options are also available when you’re adding shapes, likes stars and sparkles.
Funimate is not built for typical editing, which is both its strength and its weakness. Trimming your clips is its own stage which you must complete before you start adding effects, and you cannot split clips or add multiple clips.
The free version of Funimate does add a small watermark to your videos in the bottom-right corner, but it is subtle enough that I almost missed it completely while reviewing the app.
iMovie

Key Points:
- Trailer templates
- Themes
- Limited tools and resources
iMovie’s mobile app is designed for ease and includes things like ‘trailer templates’ and themes that allow you to make a video quickly and with minimal effort.
This streamlined app is limited in its features. Other apps on this list have left out color correction tools or clip splitting tools and instead loaded up on decorative features like stickers, emojis, and overlays. iMovie has left out these tools and does not have an abundance of decorative features either.
There are filters, themes, and titles, however.
The titles are simple but polished, and you’ll find all the standard types of filters.
The themes include a variety of graphics and are applied to your entire video, not individual clips. You can also apply one filter to your entire video.
iMovie also includes a decent selection of transitions, which you can apply easily by tapping the area between two clips.
Movie Maker Filmmaker by Alive ( Android

Key Points:
- Good title tool
- Stickers
- Change clip duration
- 16:9 or 1:1
Movie Maker Filmmaker (the app will be labeled ‘Alive’ in on your phone) has a lot of features that will help you put together a fun YouTube video. There’s a great selection of stickers, filters, and overlays and they’re all easy to apply. You just click on what you want and resize/reposition it in the player.

This app is missing a lot of basic editing features, however. You cannot adjust things like brightness or saturation. This won’t be a problem if you’re happy with your clips as-is, but it’s a bit odd to not have those options.
There is a text tool and while it is fairly basic, it is also flexible. There is a good selection of fonts to choose from, and you can also choose whether or not you want a colored background, and if your text should have a shadow.
Once you’ve decided on the look of your text you can drag it, resize it, and tilt it however you want in the preview screen.
A slightly odd feature of this app is that it doesn’t save your video to your phone or export it directly to YouTube. Instead, it saves it – and shares it – within the app and gives you the option of sharing it with YouTube after.
Power Director

Key Points:
- A timeline like desktop software
- All the basic editing features
- Lots of transitions
- Videos from the free version will be watermarked
The first thing you’ll notice when you open up Power Director is that the interface looks a lot like the interface of a lot of desktop editors with a very classic timeline. This familiarity could make it easy to jump into if you’re used to editing on your laptop.
However, Power Director is a bit less intuitive than most of the other apps on this list. I wouldn’t go so far as to say it’s difficult to use – it isn’t, it’s much easier than a lot of desktop software – but among mobile apps designed for streamlined efficiency it does stand out as being a bit harder to dive into.
That is partly because there’s a lot you can do with it. It has the tools you would expect in an editor. You can split and trim clips, and you have all the standard color tools including some that most mobile apps leave out.
A lot of apps have Brightness, Contrast, and Saturation, but PowerDirector also has Color Temperature and Tint.
In addition to editing tools, PowerDirector has bells and whistles like filters –
- and a ton of great transitions.
One drawback of PowerDirector is that the free version will watermark your videos. This watermark is not intrusive, but it isn’t as subtle as the Funimate one either.
You can export videos from PowerDirector directly to YouTube.
Vlogit ( Android

Key Points:
- Easy thumbnail maker
- Export directly to YouTube
- Animated stickers
Vlogit is also an app from the creators of the Filmora Video Editor. It isn’t quite as intuitive as Filmora, but the major benefit of Vlogit for YouTube creators is that it was designed with you in mind. It has features like animated stickers, emojis, and a thumbnail maker which were included specifically because YouTubers and vloggers need them.
All the usual adjustments you might want to make, like saturation or sharpness, are easy in Vlogit. So are adjustments to the length or crop of clips.
After you save your video you’ll have the option of creating a thumbnail using a screenshot from your video. You can add a colored border, text, emojis, and more!
Once you’re done, you can export directly to YouTube. Like Filmora, Vlogit does have a post-video logo roll.
Have you ever used a free mobile app to edit one of your YouTube videos? What did you use, and were you happy with the results?
Richard Bennett
Richard Bennett is a writer and a lover of all things video.
Follow @Richard Bennett
Richard Bennett
Dec 14, 2023• Proven solutions
Have you ever made a video 100% on your phone using a mobile video editing app?
If you’ve just started off on YouTube, there’s a good chance your main camera is the one in your phone. Actually, there’s a good chance of that even if you’ve been making YouTube videos for a while now.
Since you’re shooting videos on your phone, why shouldn’t you edit them there too? Here are 9 free video editing apps you can use for YouTube.
Note: This is not a ranked list. The apps will appear in alphabetical order.
- Adobe Premiere Clip (Android or iOS)
- Cameo (iOS)
- Clips (iOS)
- Filmora (Android or iOS)
- Funimate (Android or iOS)
- iMovie (iOS)
- Movie Maker Filmmaker by Alive (Android or iOS)
- PowerDirector (Android)
- Vlogit (Android or iOS)
Adobe Premiere Clip ( Android
Key Points:
- Automatic using clips. Times them to music
- Guides you with pop-up tips
- No text/title overlays
- Exports directly to YouTube
Adobe Premiere Pro is a professional-grade desktop editor, and Adobe Premiere Clip lives up to the quality standards set by its big-brother software. It is missing some features you might want for YouTube videos, like title effects, but it does have some bells and whistles. There’s a good selection of filters.
Making changes to your picture, like adjusting the exposure or the prevalence of highlights or shadows, is just a matter of sliding bars. The tools for splitting and duplicating clips are easy to find too. You just toggle between the two icons right above your video – the one that looks like a shutter and the one that looks like adjustment bars – to switch between the picture tools and the other tools.
You cannot add what you might normally think of as a title effect in Adobe Premiere Clip, so it’ll be hard to fully complete your video. You can add text cards to put in-between your video clips, but you can’t overlay the title on top of a clip.
You can share your video directly to YouTube when you export.
Cameo
Key Points:
- Easy-to-apply themes
- Customizable titles
- Limited features
- Exports to 4K (if your clips are 4K)
Vimeo is a video sharing site with more of a ‘filmmaker’ focus than YouTube, so it isn’t a surprise that their mobile editing app Cameo can export high-quality 4K videos.
Like some of the other apps on this list, Cameo does not have a huge variety of functions. You can reorder your clips, trim them, add titles, and apply themes (essentially filter and title combos).
There are three icons on the main interface: Scissors, a Music Note, and Filters.
The Scissors will take you to the trimming screen, where you can make your clip shorter or longer.
You can also add a title in the trimming screen, but you will not be able to change the font style or color until you are in the Filter screen.
In the Filter screen (tap the overlapping filters icon on the main interface) you will be able to adjust the color of your text by tapping on the circle with the A in it. Tapping where it says ‘Font’ will change your font style.
You can also tap on Themes and choose a premade style.
Here’s what ‘Crush’ looks like applied:
My font was changed, and there’s also a filter now. In order to apply a filter, you must start with a theme.
Clips
Key Points:
- Great selection of stickers
- Lacks some basic tools
- Simple interface
Clips is an intuitive app with a lot of options for decorating your videos. It is lacking in some of the more basic editings features you might expect (i.e. you cannot split clips or do any color correction), but it has a lot of fun features like stickers and emojis that could make up for that depending on your needs.
There are also more traditional effects, like filters and titles. There are a wide range of title options in styles that are popular on YouTube, and a fairly standard filter selection.
While you cannot split clips in this app, but trimming and reordering them is easy. For trimming, you just select the clip and then Trim to open a screen where you can drag the start and end points of the clip.
To rearrange your clips, just tap the clip you want to move and hold down. You’ll be able to drag it to a new location.
It’d be hard to rely on Clips exclusively as your YouTube video editor, but it’s well suited for Instagram or for making quick ‘on-the-go’ videos.
Filmora ( Android
Key Points:
- Export directly to YouTube
- 16:9 or 1:1 for Instagram
- Includes effects like transitions, filters, and overlays
- End-roll logo
You can make a complete video easily just by tapping and dragging in Filmora, and there are even effects like filters, transitions, and overlays you can add to make your video more polished.
After importing your media into Filmora (you can import videos and photos saved on your phone, or media which has been uploaded to a social media account like Facebook or Instagram) you can change the order of your clips by tapping one, pressing down for a moment, and then dragging your clips where you want them.
Trimming a clip is as simple as tapping on it and then Duration. You’ll get this screen where you can adjust the length easily by dragging the markers to beginning or endpoints.
Cropping and zooming are simple too.
Filmora comes with pre-made themes you can apply which include titles, filters, and other effects. These might not be ideal if you already have branding you like to use for YouTube, but in some situations, they can make video creation a lot faster.
Filmora comes loaded with music, or you can even import your own music from your phone.
Once you’re done, tap ‘save’ in the top right corner of your screen to export your video. From the save screen, you’ll be able to export your video directly to YouTube.
One potential drawback is that Filmora will add its own logo to the end of your exported video. This logo will not distract from your video content since it is added at the end and never overlaps any of your clips, but it still might not be ideal for all creators.
Funimate ( Android
Key Points:
- Easily add text and shapes
- Rainbow doodling
- Shake effects
- Small ‘Funimate’ watermark in videos from the free version
Funimate is lives up to the ‘fun’ promise in its name. It’s designed mostly for music videos/Musical.ly and while it is missing a lot of more typical editing options, there are a few free tools in Funimate that other apps just don’t have.
For example, there are shake and distortion effects available through Funimate that you usually only find in desktop software.
You can also draw rainbow designs on your video with your finger – no other app on this list can do that.
The text tool in Funimate is easy to use, and there are cool looking glow effects you can apply in the color selection screen. Those options are also available when you’re adding shapes, likes stars and sparkles.
Funimate is not built for typical editing, which is both its strength and its weakness. Trimming your clips is its own stage which you must complete before you start adding effects, and you cannot split clips or add multiple clips.
The free version of Funimate does add a small watermark to your videos in the bottom-right corner, but it is subtle enough that I almost missed it completely while reviewing the app.
iMovie
Key Points:
- Trailer templates
- Themes
- Limited tools and resources
iMovie’s mobile app is designed for ease and includes things like ‘trailer templates’ and themes that allow you to make a video quickly and with minimal effort.
This streamlined app is limited in its features. Other apps on this list have left out color correction tools or clip splitting tools and instead loaded up on decorative features like stickers, emojis, and overlays. iMovie has left out these tools and does not have an abundance of decorative features either.
There are filters, themes, and titles, however.
The titles are simple but polished, and you’ll find all the standard types of filters.
The themes include a variety of graphics and are applied to your entire video, not individual clips. You can also apply one filter to your entire video.
iMovie also includes a decent selection of transitions, which you can apply easily by tapping the area between two clips.
Movie Maker Filmmaker by Alive ( Android
Key Points:
- Good title tool
- Stickers
- Change clip duration
- 16:9 or 1:1
Movie Maker Filmmaker (the app will be labeled ‘Alive’ in on your phone) has a lot of features that will help you put together a fun YouTube video. There’s a great selection of stickers, filters, and overlays and they’re all easy to apply. You just click on what you want and resize/reposition it in the player.
This app is missing a lot of basic editing features, however. You cannot adjust things like brightness or saturation. This won’t be a problem if you’re happy with your clips as-is, but it’s a bit odd to not have those options.
There is a text tool and while it is fairly basic, it is also flexible. There is a good selection of fonts to choose from, and you can also choose whether or not you want a colored background, and if your text should have a shadow.
Once you’ve decided on the look of your text you can drag it, resize it, and tilt it however you want in the preview screen.
A slightly odd feature of this app is that it doesn’t save your video to your phone or export it directly to YouTube. Instead, it saves it – and shares it – within the app and gives you the option of sharing it with YouTube after.
Power Director
Key Points:
- A timeline like desktop software
- All the basic editing features
- Lots of transitions
- Videos from the free version will be watermarked
The first thing you’ll notice when you open up Power Director is that the interface looks a lot like the interface of a lot of desktop editors with a very classic timeline. This familiarity could make it easy to jump into if you’re used to editing on your laptop.
However, Power Director is a bit less intuitive than most of the other apps on this list. I wouldn’t go so far as to say it’s difficult to use – it isn’t, it’s much easier than a lot of desktop software – but among mobile apps designed for streamlined efficiency it does stand out as being a bit harder to dive into.
That is partly because there’s a lot you can do with it. It has the tools you would expect in an editor. You can split and trim clips, and you have all the standard color tools including some that most mobile apps leave out.
A lot of apps have Brightness, Contrast, and Saturation, but PowerDirector also has Color Temperature and Tint.
In addition to editing tools, PowerDirector has bells and whistles like filters –
- and a ton of great transitions.
One drawback of PowerDirector is that the free version will watermark your videos. This watermark is not intrusive, but it isn’t as subtle as the Funimate one either.
You can export videos from PowerDirector directly to YouTube.
Vlogit ( Android
Key Points:
- Easy thumbnail maker
- Export directly to YouTube
- Animated stickers
Vlogit is also an app from the creators of the Filmora Video Editor. It isn’t quite as intuitive as Filmora, but the major benefit of Vlogit for YouTube creators is that it was designed with you in mind. It has features like animated stickers, emojis, and a thumbnail maker which were included specifically because YouTubers and vloggers need them.
All the usual adjustments you might want to make, like saturation or sharpness, are easy in Vlogit. So are adjustments to the length or crop of clips.
After you save your video you’ll have the option of creating a thumbnail using a screenshot from your video. You can add a colored border, text, emojis, and more!
Once you’re done, you can export directly to YouTube. Like Filmora, Vlogit does have a post-video logo roll.
Have you ever used a free mobile app to edit one of your YouTube videos? What did you use, and were you happy with the results?
Richard Bennett
Richard Bennett is a writer and a lover of all things video.
Follow @Richard Bennett
Also read:
- Mini-Mic Marvels Affordable Sound for YouTube Creators
- Avoid Shaky Footage Proper Tripod Usage Techniques in Vlog Creation for 2024
- Essential 5 Gaming Earbuds for Video Creators for 2024
- [New] Audio Visual Synopsis Creator
- In 2024, Diving Into Mr. Beast's Cash Flow
- Elevate Your Content YouTube's Keyword Strategies Exposed
- Unraveling the Mystery of Downloading YouTube Playlists
- In 2024, How to Make ASMR Videos All You Need to Know
- [Updated] Boosting YouTube Ad Revenue Keeping CC Active
- Turn Any YouTube Experience Into a Fun, Animated GIF on Devices
- DIY YouTube Openers Technique One & Technique Two for 2024
- 2024 Approved Cutting-Edge Techniques for Incorporating Soundtracks in YouTube Creations
- Channel Branding Hacks 10 Must-Use Online Tools
- 2024 Approved Channel Elevation Reach YouTube Affiliate Level with 10K Views
- [Updated] Elevate Your Presence The Best 5 Practices for Max Viewers
- [New] Digital Alchemy Unveiling the Best Edits
- Easy Entrance to Follow Creating a User-Friendly Subscribe Link
- [Updated] Charisma in Characters Two Ways to Enliven Text
- Diving Deep The Intricacies of the Mukbang Phenomenon for 2024
- 29 Cost-Free YouTube Sound Extractors Free YouTube Audio Downloads
- Step-by-Step Guide to Dynamic Sports Filmmaking
- 2024 Approved Escalate Your Channel's Popularity to 1K+
- Win & Mac MP3 Converter Unlock Your Music From YouTube
- Key 10 Acoustic Amplifiers for Android, iOS
- Explore the Top 5 Alternative Video Streaming for iOS, Android
- Bite-Sized Script Producer
- In 2024, Eco-Effect Filmmaking YouTube's Guide to Green Magic
- Step-by-Step Techniques for Seamless YouTube Subtitling & Captions
- Optimize Your YouTube Stream Choosing Superior Webcams
- In 2024, Amplify Your Channel Effortless Tactics for More Views
- Your Ultimate Guide to Profit From Youtube Videos (2E 2024)
- [New] Crafting Prime Valorant Video Thumbnails on YouTube
- From Project Board to Public Display IMovie on YouTube
- Elevated Engagement Awards on Video Realms for 2024
- Engaging Video Credits The Best Fonts for Thumbnails for 2024
- 2024 Approved Enhance Video Popularity with Strategic Timestamps
- [New] Boosting Your YouTube Earnings on Mobile Devices - A Comprehensive Guide
- In 2024, Avoiding Files, Enjoying Animated GIFs YouTube Video Mastery
- Secrets of Hosting No-Cost Seminars on the World’s Largest Video Platform
- [Updated] Direct Download of YouTube Videos
- [Updated] A Peek Into the Heart of YouTube's Video Operations
- [Updated] Cutting-Edge Gadgets for Elite Gamers
- CarryMinati's Income Evolution with Ajey Nagar for 2024
- 2024 Approved A Quick Tutorial On How To Convert Image To YouTube Thumbnail
- Nurture Harmony & Well-Being - The Finest Yogic Channels Alive
- Reno 11 Pro 5G Music Recovery - Recover Deleted Music from Reno 11 Pro 5G
- Mastering Audio Extraction From Video IMovie Techniques for Mac Users
- [Updated] Instantly Post Photos/Videos to Twitter, Skipping Retweets for 2024
- Updated There Are Several Video Players that You Can Use to Watch Videos on Your PC. To Have a Better Experience Viewing Videos and Enhancing Them Across a Similar Platform, You Can Try Out VLC Media Player for PC
- In 2024, Pattern Locks Are Unsafe Secure Your Realme C67 4G Phone Now with These Tips
- [New] Feast Frenzy 10 Viral Gastronomic Delights on TikTok for 2024
- Sony's Blu-Ray Revolution S6700 Updates
- [New] PixelHalve Critique for 2024
- How to Restore Deleted C51 Pictures An Easy Method Explained.
- Rhythm & Reel Incorporating Tunes on Instagram
- Fix the Error of Unfortunately the Process.com.android.phone Has Stopped on Vivo X100 | Dr.fone
- [Updated] 2024 Approved Tunefab Screen Recorder Review
- How to Unlock Vivo Y78 5G Bootloader Easily
- New Top 10 Video Rotation Tools for a Dynamic Online Presence
- Srgb Standardization Versus Classic Rgb Model
- Mastering GIF A Step-by-Step Guide
- New 2024 Approved Unbeatable Free Video Editors for Gaming Content Creators
- [Updated] Investigating Instagram's Videography Cap for 2024
- [Updated] 2024 Approved Broadcasting with a History LIVE Transmission of Pre-Recorded Videos
- Streamlining Your Live Broadcast PS4 Recording via OBS Studio for 2024
- My Videos Arent Playing on Poco C55 – What Can I Do? | Dr.fone
- [Updated] In 2024, Enhancing FB Video Content with Streamlined Captioning Tactics
- [Updated] A Compreenas Guide to Leveraging PS Background Erasure for Professional Results
- [New] 2024 Approved Tips and Tricks for Capturing Faces on Camera
- In 2024, How to Unlock Poco C51 Phone Password Without Factory Reset?
- Guide on How To Erase Apple iPhone 12 Devices Entirely | Dr.fone
- [New] 2024 Approved Making Memorable Content A MacOS Approach to OOTDs
- In 2024, 5 Ways To Teach You To Transfer Files from Xiaomi Redmi Note 13 Pro 5G to Other Android Devices Easily | Dr.fone
- [Updated] From Ordinary to Spectacular Making Wow-Worthy TikTok Videos with Templates
- Revolutionize Visual Narratives Using Prime Text Extensions
- Apple ID is Greyed Out From iPhone 6s Plus How to Bypass?
- 2024 Approved Perfect Pitch Control The Ultimate Strategy for Uniform Sound Amplitude in Videos
- Updated 2024 Approved The Best Kept Secrets Top Mac Speech Recognition Software That Wont Cost You a Dime No Download Required
- Turning Off Two Factor Authentication From iPhone 14 Plus? 5 Tips You Must Know
- Get Your Favorite Tunes A Simple Guide to YouTube Audio Download
- [New] 2024 Approved Unlock Additional Instagram Filters A Step-by-Step Guide
- [Updated] In 2024, Digital Dexterity Quick, Quality Trimming of Vimeo Videos (5 Ways)
- [New] In 2024, How to Screen Capture Google Meet Quick Mobile Guide
- In 2024, A How-To Guide on Bypassing the Apple iPhone 7 iCloud Lock
- Updated In This Article, You Will Learn About the Top 5 Editors for Windows, Top 5 Editors for iPhone/Android, and Top 5 Editors for Animated GIF Editing for 2024
- [Updated] Behind the Scenes with Viral Image Memes & Stories
- Navigating Spatial Audio Management A Guide to Efficient Ducking in Video Production for 2024
- [New] Guide to Share IGTV with Minimal Hassle
- Title: "[New] A Step-by-Step Guide How To Record, Save & Share YouTube Video for No Cost"
- Author: Kevin
- Created at : 2024-06-18 20:20:18
- Updated at : 2024-06-19 20:20:18
- Link: https://youtube-videos.techidaily.com/new-a-step-by-step-guide-how-to-record-save-and-share-youtube-video-for-no-cost/
- License: This work is licensed under CC BY-NC-SA 4.0.
