
:max_bytes(150000):strip_icc():format(webp)/5-things-to-consider-before-buying-a-graphics-card-5225912-e71513f30b90445e8c0702a87db6fcdc.jpg)
"Neon Borders on YouTube Thumbnails Step by Step Guide"
Neon Borders on YouTube Thumbnails: Step by Step Guide
Your YouTube video, or any other clip published on any forum, gets a larger number of hits if it has an attractive thumbnail. And, the fact is, a thumbnail becomes 10x more attractive when the main character that the image has have a neon border around it.
With that said, in the following sections, you will learn a couple of methods on how to add a YouTube thumbnail border around the main characters and/or objects that are significant to the clip.
In this article
01 Add Glowing Neon Border to YouTube Thumbnail with Filmora
02 Add a Glowing Neon Border in YouTube Thumbnail with Canva
03 Outline a Person in a YouTube Thumbnail with Photoshop
Part 1: How to Add Neon Border to YouTube Thumbnail for Free with Filmora
Being one of the most versatile and intuitive post-production tools available in the market today, Wondershare Filmora X allows you to add a neon border to a YouTube thumbnail quite conveniently. You can learn how to get this done on Windows or Mac by following the steps given below.
For Win 7 or later (64-bit)
For macOS 10.12 or later
Step 1: Define Project Settings and Add Image to the Timeline
Launch Wondershare Filmora X on your PC (a MacBook Pro M1 is used here), ensure that the project aspect ratio is set to 16:9 (Widescreen) on the splash screen, and click New Project. On the main interface, click the Preview quality and display settings icon from the upper-right area of the Timeline, click Change Project Aspect Ratio, click to select 1280 x 720 (HD) from the Resolution menu of the Project Settings box, and click OK to save the custom project settings.

Then select My Media from the menu bar if not already selected, click Project Media from the navigation pane, and click Import from the Media box to select and import the image of the main character or object that you want to use in the thumbnail.

Now, drag the image from the Media box to the Timeline at the bottom.

Step 2: Clear Image Background, Add Border, and Add Custom Background
Go to Effects from the menu bar, click to select the Default tab and then AI Portrait from the navigation pane, and click and drag the Human Segmentation preset from the right box, and place it over the image track in the Timeline.

Double-click the image layer, scroll down the upper-left box to the Video Effects section, and use the Edge Thickness and Edge Feather sliders to adjust the character’s edges to make them as realistic as possible. Click OK when done.

Next, click and drag the Human Border preset over the image track in the Timeline, and follow the same procedure to customize the border. This will give the character a neon border effect.

Now, use the method explained earlier to import a custom image for the background, and drag and place it under the previous track in the Timeline.

If you are running the latest version of Filmora, you will find there are some neon light effects available under AI Portrait as well.

Step 3: Add Titles to Thumbnail
Go to Titles from the menu bar, click to select the Default tab and then Lower 3rds from the navigation pane, and click and drag your preferred lower-third preset from the right window to a separate layer in the Timeline. Double-click the lower-third layer, and use the available options in the upper-left window to change the text, its color, etc., and drag the textbox to place it to your preferred position on the image as well. Click OK to save the changes.
Next, click to select Titles from the navigation pane, and drag your preferred title from the right window to the upper-most track in the Timeline. Now use the method explained earlier to edit the text, its color, position, etc. to make it look professional.

For more tips and tricks for creating YouTube thumbnail, you can check this You Tube thumbnail creating guide.
Step 4: Get the Neon Border Thumbnail
Click the Snapshot (Camera) icon from the upper-right area of the Timeline, go to My Media from the menu bar, right-click the thumbnail of the screenshot you captured, and click Reveal in Finder (on Mac) or Reveal in Explorer (on Windows) to get to the folder the YouTube thumbnail border is saved in.

Part 2: How to Add a Glowing Neon Border in Your YouTube Thumbnail with Canva
Canva is another intuitive editing program that works on the web interface rather than having you download and install an app on your PC. You can add a neon border for YouTube thumbnails using Canva by following the instructions given below:
Step 1: Define Project Settings and Add a Background
After signing in to your Canva account, click Create a design from the top-right corner of the page, click Custom size from the bottom, define 1280 and 720 in the Width and Height fields on the box that appears respectively, and click Create new design.

Now, click to select Background from the navigation bar on the left (if the Background tool is not visible, click More and then choose Background from the expanded list), and click to select a background from the images available in the center pane.

Step 2: Upload an Image and Add Effects
Click Uploads from the navigation bar, click the More icon from the right of the Upload media button present at the top of the center pane, choose your preferred method to upload the image (with the transparent background) that you want to use, upload the image, and drag it from the center pane to the Canvas.
Note: You can use any of the tools available online to remove the background from your image for free.

To add a YouTube thumbnail border, make sure that the image that you added to the Canvas is selected, click the Duplicate icon from the upper-right area, and use the scaling handles of the copy of the image to increase its size a bit. Reposition the image back to its original location as well.
Then, click Edit image from the upper-left corner of the Canvas, click Duotone from the Edit image pane at the center, if need be, click See all, choose your preferred duotone effect to apply on the image, choose your preferred highlight and shadow colors from the box that appears next, and click Back from the top of the pane.

Next, click See all next to the Adjust section from the center pane, and drag the Blur slider to the right to increase the blur effect on the image.

Step 3: Position the Layers
While keeping the duplicate image selected, click the Position button from the upper-right area of the Canvas, and click Background to send the second image behind the first one to get the neon border effect for the photo.

Part 3: How to Outline a Person in a YouTube Thumbnail with Photoshop
Because YouTube thumbnails are nothing but static images, creating YouTube thumbnail border with Adobe Photoshop is comparatively easier. The process of doing this is given below:
Step 1: Define Document Preferences and Import an Image
Launch Adobe Photoshop on your PC, click Create new, and on the New Document customization box, define the width and height values to 1280 and 720 pixels respectively. Select Transparent from the Background Contents menu as well if not already selected. Click Create from the bottom to create a new Photoshop document with the specified document settings. Next, open the folder that contains the source image, drag the photo to Photoshop, and press Enter to place the photo.

Step 2: Remove Background from the Image
Make sure that the image layer is selected in the Layers panel on the right, go to Select from the menu bar at the top, and click Subject. From the bottom of the Layers panel, click the Add a mask icon to get rid of the background, leaving only the human on the Canvas.

Step 3: Add a Custom Background and an Outline Around the Subject
Use the method explained earlier to import a background image of your choice to Photoshop. Drag the background image layer to the bottom in the Layers panel. Double-click the masked layer, click to select Stroke from the left pane of the Layer Style box, and use the options available on the right to manage the size, color, position, etc. of the stroke that has been added around the human subject. Click OK when done, and then export the image normally to use it as a YouTube thumbnail border.

Summary
It is important to know that the default resolution of a YouTube thumbnail is 1280 x 720 pixels that is usually written and referred to as 720p. While adding a YouTube thumbnail border, it is also imperative to have a good sense of color combination and fonts. Furthermore, a decent tool like Wondershare Filmora X must be used to add an appealing neon border around the main subject in the thumbnail image easily and quickly.
02 Add a Glowing Neon Border in YouTube Thumbnail with Canva
03 Outline a Person in a YouTube Thumbnail with Photoshop
Part 1: How to Add Neon Border to YouTube Thumbnail for Free with Filmora
Being one of the most versatile and intuitive post-production tools available in the market today, Wondershare Filmora X allows you to add a neon border to a YouTube thumbnail quite conveniently. You can learn how to get this done on Windows or Mac by following the steps given below.
For Win 7 or later (64-bit)
For macOS 10.12 or later
Step 1: Define Project Settings and Add Image to the Timeline
Launch Wondershare Filmora X on your PC (a MacBook Pro M1 is used here), ensure that the project aspect ratio is set to 16:9 (Widescreen) on the splash screen, and click New Project. On the main interface, click the Preview quality and display settings icon from the upper-right area of the Timeline, click Change Project Aspect Ratio, click to select 1280 x 720 (HD) from the Resolution menu of the Project Settings box, and click OK to save the custom project settings.
Then select My Media from the menu bar if not already selected, click Project Media from the navigation pane, and click Import from the Media box to select and import the image of the main character or object that you want to use in the thumbnail.
Now, drag the image from the Media box to the Timeline at the bottom.
Step 2: Clear Image Background, Add Border, and Add Custom Background
Go to Effects from the menu bar, click to select the Default tab and then AI Portrait from the navigation pane, and click and drag the Human Segmentation preset from the right box, and place it over the image track in the Timeline.
Double-click the image layer, scroll down the upper-left box to the Video Effects section, and use the Edge Thickness and Edge Feather sliders to adjust the character’s edges to make them as realistic as possible. Click OK when done.
Next, click and drag the Human Border preset over the image track in the Timeline, and follow the same procedure to customize the border. This will give the character a neon border effect.
Now, use the method explained earlier to import a custom image for the background, and drag and place it under the previous track in the Timeline.
If you are running the latest version of Filmora, you will find there are some neon light effects available under AI Portrait as well.
Step 3: Add Titles to Thumbnail
Go to Titles from the menu bar, click to select the Default tab and then Lower 3rds from the navigation pane, and click and drag your preferred lower-third preset from the right window to a separate layer in the Timeline. Double-click the lower-third layer, and use the available options in the upper-left window to change the text, its color, etc., and drag the textbox to place it to your preferred position on the image as well. Click OK to save the changes.
Next, click to select Titles from the navigation pane, and drag your preferred title from the right window to the upper-most track in the Timeline. Now use the method explained earlier to edit the text, its color, position, etc. to make it look professional.
For more tips and tricks for creating YouTube thumbnail, you can check this You Tube thumbnail creating guide.
Step 4: Get the Neon Border Thumbnail
Click the Snapshot (Camera) icon from the upper-right area of the Timeline, go to My Media from the menu bar, right-click the thumbnail of the screenshot you captured, and click Reveal in Finder (on Mac) or Reveal in Explorer (on Windows) to get to the folder the YouTube thumbnail border is saved in.
Part 2: How to Add a Glowing Neon Border in Your YouTube Thumbnail with Canva
Canva is another intuitive editing program that works on the web interface rather than having you download and install an app on your PC. You can add a neon border for YouTube thumbnails using Canva by following the instructions given below:
Step 1: Define Project Settings and Add a Background
After signing in to your Canva account, click Create a design from the top-right corner of the page, click Custom size from the bottom, define 1280 and 720 in the Width and Height fields on the box that appears respectively, and click Create new design.
Now, click to select Background from the navigation bar on the left (if the Background tool is not visible, click More and then choose Background from the expanded list), and click to select a background from the images available in the center pane.
Step 2: Upload an Image and Add Effects
Click Uploads from the navigation bar, click the More icon from the right of the Upload media button present at the top of the center pane, choose your preferred method to upload the image (with the transparent background) that you want to use, upload the image, and drag it from the center pane to the Canvas.
Note: You can use any of the tools available online to remove the background from your image for free.
To add a YouTube thumbnail border, make sure that the image that you added to the Canvas is selected, click the Duplicate icon from the upper-right area, and use the scaling handles of the copy of the image to increase its size a bit. Reposition the image back to its original location as well.
Then, click Edit image from the upper-left corner of the Canvas, click Duotone from the Edit image pane at the center, if need be, click See all, choose your preferred duotone effect to apply on the image, choose your preferred highlight and shadow colors from the box that appears next, and click Back from the top of the pane.
Next, click See all next to the Adjust section from the center pane, and drag the Blur slider to the right to increase the blur effect on the image.
Step 3: Position the Layers
While keeping the duplicate image selected, click the Position button from the upper-right area of the Canvas, and click Background to send the second image behind the first one to get the neon border effect for the photo.
Part 3: How to Outline a Person in a YouTube Thumbnail with Photoshop
Because YouTube thumbnails are nothing but static images, creating YouTube thumbnail border with Adobe Photoshop is comparatively easier. The process of doing this is given below:
Step 1: Define Document Preferences and Import an Image
Launch Adobe Photoshop on your PC, click Create new, and on the New Document customization box, define the width and height values to 1280 and 720 pixels respectively. Select Transparent from the Background Contents menu as well if not already selected. Click Create from the bottom to create a new Photoshop document with the specified document settings. Next, open the folder that contains the source image, drag the photo to Photoshop, and press Enter to place the photo.
Step 2: Remove Background from the Image
Make sure that the image layer is selected in the Layers panel on the right, go to Select from the menu bar at the top, and click Subject. From the bottom of the Layers panel, click the Add a mask icon to get rid of the background, leaving only the human on the Canvas.
Step 3: Add a Custom Background and an Outline Around the Subject
Use the method explained earlier to import a background image of your choice to Photoshop. Drag the background image layer to the bottom in the Layers panel. Double-click the masked layer, click to select Stroke from the left pane of the Layer Style box, and use the options available on the right to manage the size, color, position, etc. of the stroke that has been added around the human subject. Click OK when done, and then export the image normally to use it as a YouTube thumbnail border.
Summary
It is important to know that the default resolution of a YouTube thumbnail is 1280 x 720 pixels that is usually written and referred to as 720p. While adding a YouTube thumbnail border, it is also imperative to have a good sense of color combination and fonts. Furthermore, a decent tool like Wondershare Filmora X must be used to add an appealing neon border around the main subject in the thumbnail image easily and quickly.
The Definitive Guide to iOS & Android Maker Tools
FREE 10 Best Intro Maker Apps for iPhone and Android

Ollie Mattison
Mar 27, 2024• Proven solutions
For Win 7 or later (64-bit)
 Secure Download
For macOS 10.14 or later
Secure Download
Click here to get Filmora for PC by email
or Try Filmora App for mobile >>>
download filmora app for ios ](https://app.adjust.com/b0k9hf2%5F4bsu85t ) download filmora app for android ](https://app.adjust.com/b0k9hf2%5F4bsu85t )
Smartphone cameras can capture footage in high resolutions, but that doesn’t mean that your videos are going to become an instant hit on social media just because they are recorded in 4K or HD resolution. The opening of a video requires special attention because you only have a short period of time to capture the viewer’s attention.
An intro maker app can help you create perfect openings for the videos you shoot with your iPhone or Android phone. So in this article, we are going to take you through some of the best intro maker apps for iPhones and Androids that may help you improve the quality of the video content you’re sharing on social media.
- Part 1: 5 Best Intro Maker Apps for Android Phones
- Part 2: 5 Apps for Making Intros for YouTube Videos on iPhone
- Part 3: How to Make Intros with iMovie
Part 1: 5 Best Intro Maker Apps for Android Phones
The Google Play Store offers a diverse selection of intro maker apps that are equipped with a broad range of tools you can use to create eye-catching intros. What’s more, you don’t need to have advanced video editing skills in order to use any of the intro maker apps we included in this article. Let’s take a look at what the best intro maker apps for Android phones have to offer.
1. Intro Maker – Outro Maker – Video Ad Creator
Price: Free, but offers in-app purchases
Rating: 4.1
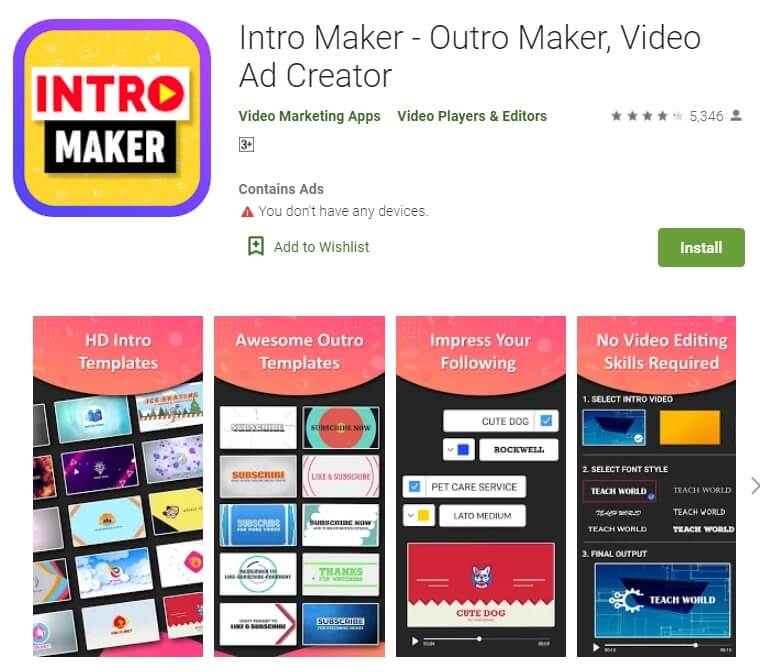
Making an intro for a YouTube video with this app won’t take more than 5 minutes of your time. This intro maker features a huge collection of fully customizable intro templates, while it also allows you to make a new intro from scratch.
All you need to do in order to start making an intro is pick a template, then upload the video and audio footage as well as logos or other images you want to use and then export your project. The app has powerful social sharing capabilities, which enables you to post the intros you create to the social network you choose directly from the app. However, the free version of this intro and outro maker gives you access to a limited selection of templates and it displays ads.
Pros
- Creating an intro doesn’t take a lot of time
- Equipped with a huge template library
- Allows users to add images and audio files to intros
- Excellent social media sharing capabilities
Cons
- You must upgrade to the pro version to remove ads
- A limited selection of video editing tools
2. Legend – Text Animated Maker
Price: Free, but contains ads
Rating: 4.1
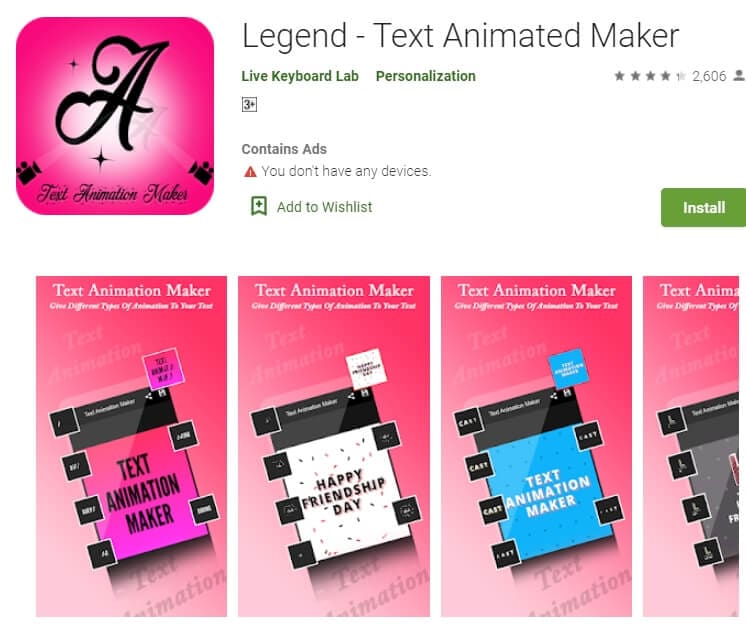
If you are looking for a simple way of adding text to a video , then Legend Text Animated Maker may be the right choice for you. This app is designed to help users create awesome text animations and turn them into GIFs or videos.
Making a text animation with Legend is a straightforward process that can be completed in just a few easy steps. You just have to create an editor page, insert the text or pick one of the quotes the app offers, and then select the style of the animation, font, text color, or the background. When done you can proceed to save your creation as a video or GIF file before sharing it on social media or sending it to a friend. The only downside is that the Legend app doesn’t have any video intro or outro options.
Pros
- Offers more than 25 styles of text animations
- Great selection of built-in quotes
- Text animations can be saved as GIF or video files
- No previous experience with animation is required
Cons
- Prone to crashes
- No video editing options
3. Into Maker – Music Intro Video Editor
Price: Free, but offers in-app purchases
Rating: 4.6
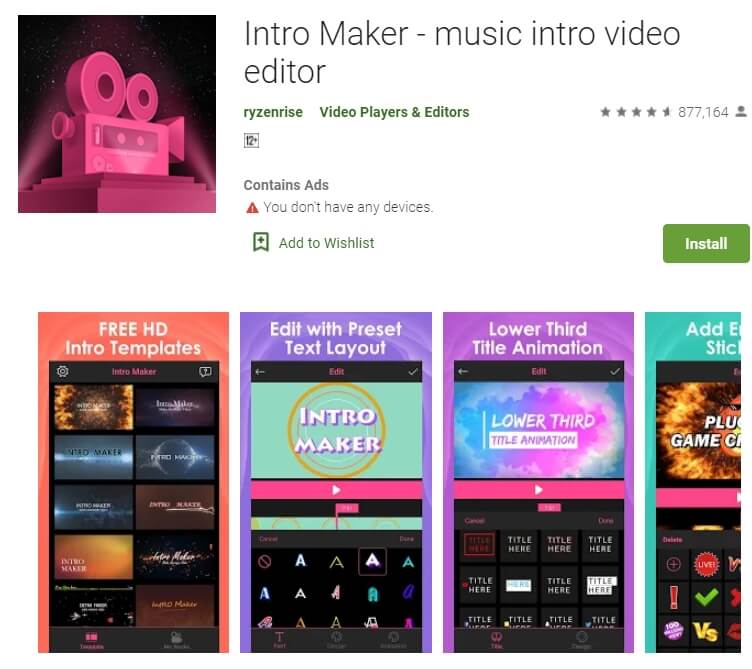
With the selection of more than 4000 fully customizable templates, Intro Maker- Music Intro Video Editor is easily one of the best intro makers for Android devices. Themes are organized into categories like Timelapse, Nature, or Love, while you can also choose from a broad range of visual styles including glitch, cartoon, or 3D.
In addition, Intro Maker – Music Intro Video Editor has an audio library that contains hundreds of royalty-free songs and sound effects that can be easily added to all projects you’re working on. Animating text or choosing a font, text color, and adding shadows to the text are just a few among numerous text editing options this app provides.
What’s more, you can choose from more than 140 stickers and emojis that can be added to the intro you’re working on with a single tap.
Pros
- All intro templates are easily customizable
- The Lower Thirds feature makes it easier to add titles and logos to intros
- Rich audio library
- Excellent text animation features
Cons
- All intros produced with the free version of the app are watermarked
- Finding intro templates can be difficult
4. Quik – Free Video Editor for Photos, Clips, Music
Price: Free
Rating: 4.7
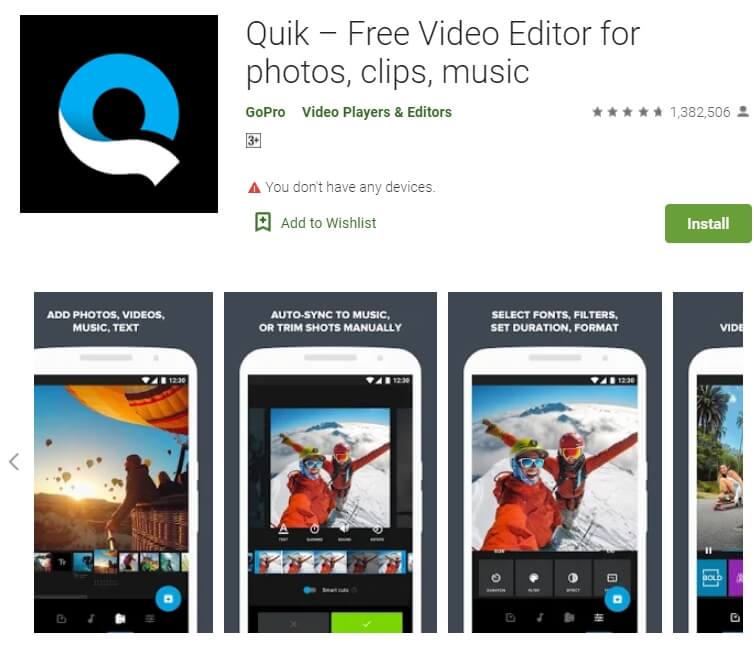
Despite being primarily a video editing app for videos recorded with GoPro cameras , Quik also lets you edit videos you recorded with your Android phone. The app is equipped with 23 customizable templates that can also be used to create intros for videos you share on social media.
Moreover, the app lets you arrange video clips in any way you like, while the Smart Cuts feature makes cuts between shots automatically. Quik switches on the audio after it detects a voice and it lets you use songs from its royalty-free music library or upload songs from your collection to create a soundtrack. All videos you edit with this app can be exported in 1080p or 720p resolution and shared to social media directly from Quik.
Pros
- Syncs transitions to the beat automatically
- Offers a wide variety of video templates
- Support nearly all common audio and video file formats
- Videos edited with Quik can be exported in Full HD resolution
Cons
- The app can be too complex to use for inexperienced video editors
5. Videoshop
Price: Free, but offers in-app purchases
Rating: 4.7
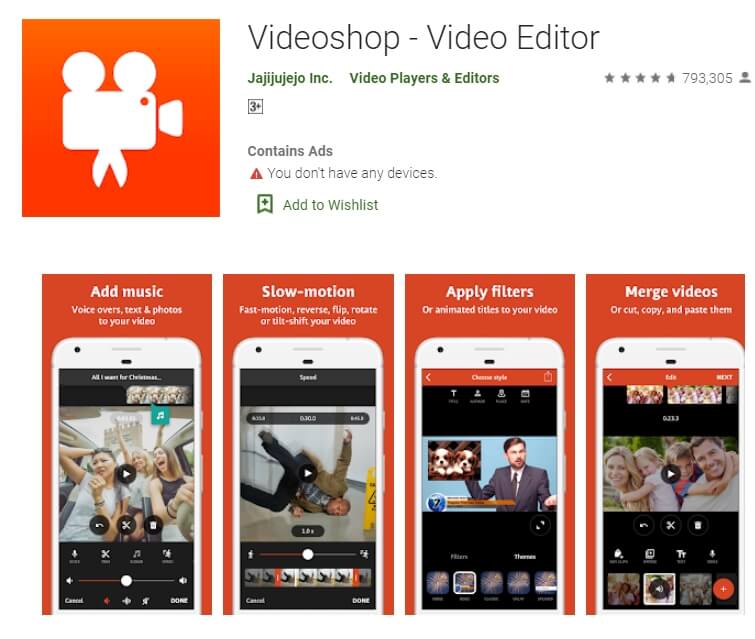
Creating an intro or editing an entire video with Videoshop is a fun process that is not going to take much more than a few moments of your time. This video editing app lets you remove all parts of videos you don’t want to include in the project you are working on, while you can also control the playback speed of all videos you edit and create slow-motion or fast-forward videos with ease.
Moreover, you can merge multiple clips into a single video and adjust their brightness, contrast, or saturation. The app also lets you record voiceovers and combine them with the songs or sound effects from the stock library. Videoshop also offers a great selection of animated titles that can make your intros more dynamic and entertaining.
Pros
- No previous video editing experience required
- Excellent audio and video editing options
- A wide selection of animated titles
- Great file-sharing capabilities
Cons
- No automatic editing features
- The app crashes easily
Below is a simple comparison table about the intro make apps for Android mentioned above.
| No. | Intro Maker App | User Rating | Links on Google Play |
|---|---|---|---|
| 1 | Intro Maker - Outro Maker, Video Ad Creator | 4.1 | https://play.google.com/store/apps/details?id=com.oneintro.intromaker&hl=en |
| 2 | Legend - Text Animated Maker | 4.1 | https://play.google.com/store/apps/details?id=com.textonvideo.animated.animatedtext&hl=en |
| 3 | Intro Maker - music intro video editor | 4.6 | https://play.google.com/store/apps/details?id=com.ryzenrise.intromaker&hl=en |
| 4 | Quik - Free Video Editor for photos, clips, music | 4.7 | https://play.google.com/store/apps/details?id=com.stupeflix.replay |
| 5 | Videoshop - Video Editor | 4.7 | https://play.google.com/store/apps/details?id=com.videoshop.app |
Part 2: Apps for Making Intros for YouTube Videos You Should Try on iPhone
The videos your record with your iPhone can be turned into impressive intros for the videos you share on YouTube and other social networks with the help of an intro maker app. We’ve shortlisted some of the best iPhone apps you can use to create an intro, so let’s take a closer look at their features.
1. Intro Maker for YouTube Studio
Price: Free, but offers in-app purchases
Rating: 4.0
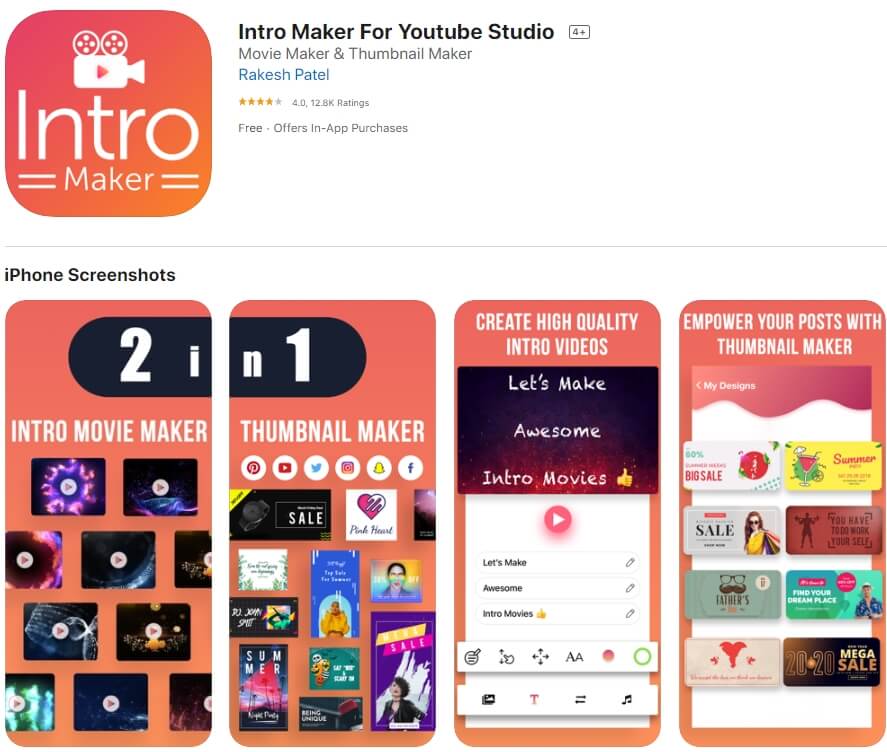
YouTubers who want to produce intros at a professional level from their iPhones can benefit from installing the Intro Maker for YouTube Studio. The app offers thousands of customizable intro templates that fit a broad range of video styles.
You can also add text to each template and select the font, size or adjust its position with ease. In addition, the app offers a variety of visual effects you can use to enhance the footage you included in an intro. The audio library offers a rich selection of royalty-free music you can use for the soundtrack, but you can also import your audio files and use them as a soundtrack for your intro. All videos you create with the free version of this app are going to be watermarked, while the number of intros you can create on a monthly level is going to be limited unless you purchase a monthly or annual subscription.
Pros
- The simple intro creation process
- Excellent text customization capabilities
- Short audio and video upload times
- A rich selection of intro templates
Cons
- The free version of the app watermarks intros
- Limited file sharing options
2. Intro Music Video Movie Maker
Price: Free, but offers in-app purchases
Rating: 4.1

This intro maker grants you access to all tools you are going to need to create a stunning intro that will grab the viewer’s attention. You can choose if you want to create an intro from scratch or customize one of the available intro templates.
Furthermore, the app lets you apply transitions between shots and add text layers to each video clip you want to include in your intro. Creating a soundtrack from the music you import to a project or from the songs featured in the app’s sound library is easy, and it won’t take more than a few minutes of your time. However, you must purchase the annual subscription if you want to create intros with this app on a constant basis.
Pros
- Users can create intros from scratch
- Good audio editing options
- Intro templates can be customized
- Easy to use
Cons
- More expensive than most intro makers
- Limited video editing options
3. Intro Designer Lite – Create Videos for iMovie
Price: Free
Rating: 4.5

Anyone, regardless of how much video editing experience they have can create an intro with Intro Designer Lite. The app works best when used with a video editing app like iMovie since it doesn’t offer any video editing features.
All you need to do in order to make an intro with this app is to select one of the eight available templates, add the footage, customize the text, and export the video. The app lets you export intros in HD quality and share them to Facebook, Instagram, and other popular online destinations or send them via email. Furthermore, you can save all projects you created in Intro Designer Lite and use them to create intros for different videos. The tutorial mode provides support throughout the intro creation process to users who don’t have a lot of video editing experience.
Pros
- All templates are fully customizable
- Equipped with the vector technology that eliminates pixelation of text animations
- Real-time preview
- Intros can be exported in HD resolution
Cons
- No audio editing options
- There are only 8 intro templates to choose from
4. Intro Tube: Vlog Video Maker
Price: Free, but offers in-app purchases
Rating: 4.5
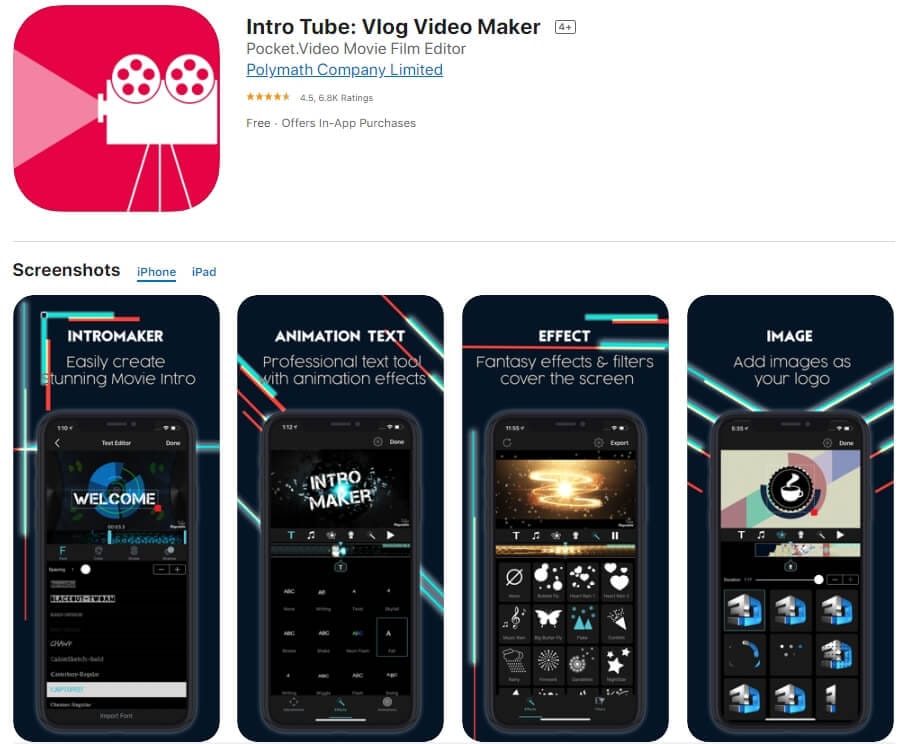
In case you are looking for an app that enables you to create professionally-looking intros in minutes, then Intro Tube: Vlog Video Maker may be the right choice for you. There are more than a thousand intro templates to choose from so that you can create intros that match the style of your vlogs or videos perfectly.
What’s more, the app features an impressive collection of over 700 motion stickers that can be added to your intro with a single tap. The huge selection of titles makes creating text layers easy and you can customize their duration or even apply transitions between two titles. All intros you create with this app can be saved on your iPhone’s camera roll and imported in the video editing app you’re using to create your blog. However, you won’t have access to all of the app’s features if you decide to use its free version.
Pros
- Grants users access to more than a thousand intro templates
- Unlimited title selection
- Offers voiceover recording features
- All templates can be exported in high resolution
Cons
- No social media sharing options
- Accessing all of the app’s features is only possible if you purchase the monthly subscription
5. T-Jam Live Intro Movie Maker
Price: Free, but offers in-app purchases
Rating: 4.5
All you need to do to start making an intro with T-Jam Live is to select a template and insert the text, and the app will do all the heavy lifting for you. The best part is that you can upload your music so that you can match the intro’s soundtrack with the rest of the video.
The app’s Layouter makes customizing the text a simple task since it allows you to choose the font or the size of the text or change its on-screen position. All intros you create with T-Jam can be exported in HD resolution and imported in iMovie or any other video editing app you’re using to edit videos from your iPhone. However, you must upgrade to T-Jam Pro if you want to have access to all features this app has to offer.
Pros
- Powerful 3D text motion graphics
- Offers a wide range of gestures
- The video files you create with T-Jam can be imported in any iOS-based video editing app
- Quick intro template customization process
Cons
- Upgrading to the pro version is necessary if you want to create videos with this app on a regular basis
- Audio editing options can be better
Below is a simple comparison table about the intro make apps for iPhones.
| No. | Intro Maker App | User Rating | Links on App Store |
|---|---|---|---|
| 1 | Intro Designer Lite - Create Intros for iMovie | 4.5 | https://apps.apple.com/us/app/intro-designer-lite-create-intros-for-imovie/id488748114 |
| 2 | Intro Tube: Vlog Video Maker | 4.5 | https://apps.apple.com/us/app/intro-tube-vlog-video-maker/id1358216337 |
| 3 | Intro Music Video, Movie Maker | 4.1 | https://apps.apple.com/us/app/intro-music-video-movie-maker/id1187893193 |
| 4 | Intro Maker For Youtube Studio | 4 | https://apps.apple.com/us/app/intro-maker-for-youtube-studio/id1434300554 |
| 5 | T-Jam Live Intro Movie Maker | 4.5 | https://apps.apple.com/us/app/t-jam-live-intro-movie-maker/id1348641765 |
Part 3: How to Make Intros with iMovie on iPhone
YouTubers who don’t want to install any third-party intro maker on their iPhones can create an intro for their video with iMovie. However, the process can be a bit technical while the results you are going to get may not be visually impressive.
The first thing you will need to do is create a new project, and select a photo you are going to use as a background. Once you place the photo onto the timeline and set its duration you can proceed to export it as a video.
You can skip this step if you want to use a video file you recorded with on your own as the background for the intro. In either case, you will have to import the video files you want to use to make an intro into a project you’re working on and place them on the timeline.
You can then proceed to create a text box and insert the text you want to appear in the intro. Optionally you can apply transitions between the video clips you included in your intro or add music that matches the intro’s style. Preview the intro to make sure that you like the final result and continue working on other parts of your video.
You can also check the guide to know how to create video trailers in iMovie .
Conclusion
An intro can slowly introduce the topic the video covers and it can spark the viewer’s attention. Fortunately, there are so many different intro makers you can use to create awesome action-packed intros that are fun to watch.
Moreover, you don’t need to be a seasoned video editor in order to use any of the intro maker apps we mentioned in this article since they offer easily customizable templates that enable you to create intros in minutes. Which of the intro maker apps for iPhones and Androids are you going to choose? Leave a comment and let us know.
For Win 7 or later (64-bit)
Secure Download
For macOS 10.14 or later
Secure Download
Click here to get Filmora for PC by email
or Try Filmora App for mobile >>>
download filmora app for ios ](https://app.adjust.com/b0k9hf2%5F4bsu85t ) download filmora app for android ](https://app.adjust.com/b0k9hf2%5F4bsu85t )
Ollie Mattison
Ollie Mattison is a writer and a lover of all things video.
Follow @Ollie Mattison
Ollie Mattison
Mar 27, 2024• Proven solutions
For Win 7 or later (64-bit)
Secure Download
For macOS 10.14 or later
Secure Download
Click here to get Filmora for PC by email
or Try Filmora App for mobile >>>
download filmora app for ios ](https://app.adjust.com/b0k9hf2%5F4bsu85t ) download filmora app for android ](https://app.adjust.com/b0k9hf2%5F4bsu85t )
Smartphone cameras can capture footage in high resolutions, but that doesn’t mean that your videos are going to become an instant hit on social media just because they are recorded in 4K or HD resolution. The opening of a video requires special attention because you only have a short period of time to capture the viewer’s attention.
An intro maker app can help you create perfect openings for the videos you shoot with your iPhone or Android phone. So in this article, we are going to take you through some of the best intro maker apps for iPhones and Androids that may help you improve the quality of the video content you’re sharing on social media.
- Part 1: 5 Best Intro Maker Apps for Android Phones
- Part 2: 5 Apps for Making Intros for YouTube Videos on iPhone
- Part 3: How to Make Intros with iMovie
Part 1: 5 Best Intro Maker Apps for Android Phones
The Google Play Store offers a diverse selection of intro maker apps that are equipped with a broad range of tools you can use to create eye-catching intros. What’s more, you don’t need to have advanced video editing skills in order to use any of the intro maker apps we included in this article. Let’s take a look at what the best intro maker apps for Android phones have to offer.
1. Intro Maker – Outro Maker – Video Ad Creator
Price: Free, but offers in-app purchases
Rating: 4.1
Making an intro for a YouTube video with this app won’t take more than 5 minutes of your time. This intro maker features a huge collection of fully customizable intro templates, while it also allows you to make a new intro from scratch.
All you need to do in order to start making an intro is pick a template, then upload the video and audio footage as well as logos or other images you want to use and then export your project. The app has powerful social sharing capabilities, which enables you to post the intros you create to the social network you choose directly from the app. However, the free version of this intro and outro maker gives you access to a limited selection of templates and it displays ads.
Pros
- Creating an intro doesn’t take a lot of time
- Equipped with a huge template library
- Allows users to add images and audio files to intros
- Excellent social media sharing capabilities
Cons
- You must upgrade to the pro version to remove ads
- A limited selection of video editing tools
2. Legend – Text Animated Maker
Price: Free, but contains ads
Rating: 4.1
If you are looking for a simple way of adding text to a video , then Legend Text Animated Maker may be the right choice for you. This app is designed to help users create awesome text animations and turn them into GIFs or videos.
Making a text animation with Legend is a straightforward process that can be completed in just a few easy steps. You just have to create an editor page, insert the text or pick one of the quotes the app offers, and then select the style of the animation, font, text color, or the background. When done you can proceed to save your creation as a video or GIF file before sharing it on social media or sending it to a friend. The only downside is that the Legend app doesn’t have any video intro or outro options.
Pros
- Offers more than 25 styles of text animations
- Great selection of built-in quotes
- Text animations can be saved as GIF or video files
- No previous experience with animation is required
Cons
- Prone to crashes
- No video editing options
3. Into Maker – Music Intro Video Editor
Price: Free, but offers in-app purchases
Rating: 4.6
With the selection of more than 4000 fully customizable templates, Intro Maker- Music Intro Video Editor is easily one of the best intro makers for Android devices. Themes are organized into categories like Timelapse, Nature, or Love, while you can also choose from a broad range of visual styles including glitch, cartoon, or 3D.
In addition, Intro Maker – Music Intro Video Editor has an audio library that contains hundreds of royalty-free songs and sound effects that can be easily added to all projects you’re working on. Animating text or choosing a font, text color, and adding shadows to the text are just a few among numerous text editing options this app provides.
What’s more, you can choose from more than 140 stickers and emojis that can be added to the intro you’re working on with a single tap.
Pros
- All intro templates are easily customizable
- The Lower Thirds feature makes it easier to add titles and logos to intros
- Rich audio library
- Excellent text animation features
Cons
- All intros produced with the free version of the app are watermarked
- Finding intro templates can be difficult
4. Quik – Free Video Editor for Photos, Clips, Music
Price: Free
Rating: 4.7
Despite being primarily a video editing app for videos recorded with GoPro cameras , Quik also lets you edit videos you recorded with your Android phone. The app is equipped with 23 customizable templates that can also be used to create intros for videos you share on social media.
Moreover, the app lets you arrange video clips in any way you like, while the Smart Cuts feature makes cuts between shots automatically. Quik switches on the audio after it detects a voice and it lets you use songs from its royalty-free music library or upload songs from your collection to create a soundtrack. All videos you edit with this app can be exported in 1080p or 720p resolution and shared to social media directly from Quik.
Pros
- Syncs transitions to the beat automatically
- Offers a wide variety of video templates
- Support nearly all common audio and video file formats
- Videos edited with Quik can be exported in Full HD resolution
Cons
- The app can be too complex to use for inexperienced video editors
5. Videoshop
Price: Free, but offers in-app purchases
Rating: 4.7
Creating an intro or editing an entire video with Videoshop is a fun process that is not going to take much more than a few moments of your time. This video editing app lets you remove all parts of videos you don’t want to include in the project you are working on, while you can also control the playback speed of all videos you edit and create slow-motion or fast-forward videos with ease.
Moreover, you can merge multiple clips into a single video and adjust their brightness, contrast, or saturation. The app also lets you record voiceovers and combine them with the songs or sound effects from the stock library. Videoshop also offers a great selection of animated titles that can make your intros more dynamic and entertaining.
Pros
- No previous video editing experience required
- Excellent audio and video editing options
- A wide selection of animated titles
- Great file-sharing capabilities
Cons
- No automatic editing features
- The app crashes easily
Below is a simple comparison table about the intro make apps for Android mentioned above.
| No. | Intro Maker App | User Rating | Links on Google Play |
|---|---|---|---|
| 1 | Intro Maker - Outro Maker, Video Ad Creator | 4.1 | https://play.google.com/store/apps/details?id=com.oneintro.intromaker&hl=en |
| 2 | Legend - Text Animated Maker | 4.1 | https://play.google.com/store/apps/details?id=com.textonvideo.animated.animatedtext&hl=en |
| 3 | Intro Maker - music intro video editor | 4.6 | https://play.google.com/store/apps/details?id=com.ryzenrise.intromaker&hl=en |
| 4 | Quik - Free Video Editor for photos, clips, music | 4.7 | https://play.google.com/store/apps/details?id=com.stupeflix.replay |
| 5 | Videoshop - Video Editor | 4.7 | https://play.google.com/store/apps/details?id=com.videoshop.app |
Part 2: Apps for Making Intros for YouTube Videos You Should Try on iPhone
The videos your record with your iPhone can be turned into impressive intros for the videos you share on YouTube and other social networks with the help of an intro maker app. We’ve shortlisted some of the best iPhone apps you can use to create an intro, so let’s take a closer look at their features.
1. Intro Maker for YouTube Studio
Price: Free, but offers in-app purchases
Rating: 4.0
YouTubers who want to produce intros at a professional level from their iPhones can benefit from installing the Intro Maker for YouTube Studio. The app offers thousands of customizable intro templates that fit a broad range of video styles.
You can also add text to each template and select the font, size or adjust its position with ease. In addition, the app offers a variety of visual effects you can use to enhance the footage you included in an intro. The audio library offers a rich selection of royalty-free music you can use for the soundtrack, but you can also import your audio files and use them as a soundtrack for your intro. All videos you create with the free version of this app are going to be watermarked, while the number of intros you can create on a monthly level is going to be limited unless you purchase a monthly or annual subscription.
Pros
- The simple intro creation process
- Excellent text customization capabilities
- Short audio and video upload times
- A rich selection of intro templates
Cons
- The free version of the app watermarks intros
- Limited file sharing options
2. Intro Music Video Movie Maker
Price: Free, but offers in-app purchases
Rating: 4.1
This intro maker grants you access to all tools you are going to need to create a stunning intro that will grab the viewer’s attention. You can choose if you want to create an intro from scratch or customize one of the available intro templates.
Furthermore, the app lets you apply transitions between shots and add text layers to each video clip you want to include in your intro. Creating a soundtrack from the music you import to a project or from the songs featured in the app’s sound library is easy, and it won’t take more than a few minutes of your time. However, you must purchase the annual subscription if you want to create intros with this app on a constant basis.
Pros
- Users can create intros from scratch
- Good audio editing options
- Intro templates can be customized
- Easy to use
Cons
- More expensive than most intro makers
- Limited video editing options
3. Intro Designer Lite – Create Videos for iMovie
Price: Free
Rating: 4.5
Anyone, regardless of how much video editing experience they have can create an intro with Intro Designer Lite. The app works best when used with a video editing app like iMovie since it doesn’t offer any video editing features.
All you need to do in order to make an intro with this app is to select one of the eight available templates, add the footage, customize the text, and export the video. The app lets you export intros in HD quality and share them to Facebook, Instagram, and other popular online destinations or send them via email. Furthermore, you can save all projects you created in Intro Designer Lite and use them to create intros for different videos. The tutorial mode provides support throughout the intro creation process to users who don’t have a lot of video editing experience.
Pros
- All templates are fully customizable
- Equipped with the vector technology that eliminates pixelation of text animations
- Real-time preview
- Intros can be exported in HD resolution
Cons
- No audio editing options
- There are only 8 intro templates to choose from
4. Intro Tube: Vlog Video Maker
Price: Free, but offers in-app purchases
Rating: 4.5
In case you are looking for an app that enables you to create professionally-looking intros in minutes, then Intro Tube: Vlog Video Maker may be the right choice for you. There are more than a thousand intro templates to choose from so that you can create intros that match the style of your vlogs or videos perfectly.
What’s more, the app features an impressive collection of over 700 motion stickers that can be added to your intro with a single tap. The huge selection of titles makes creating text layers easy and you can customize their duration or even apply transitions between two titles. All intros you create with this app can be saved on your iPhone’s camera roll and imported in the video editing app you’re using to create your blog. However, you won’t have access to all of the app’s features if you decide to use its free version.
Pros
- Grants users access to more than a thousand intro templates
- Unlimited title selection
- Offers voiceover recording features
- All templates can be exported in high resolution
Cons
- No social media sharing options
- Accessing all of the app’s features is only possible if you purchase the monthly subscription
5. T-Jam Live Intro Movie Maker
Price: Free, but offers in-app purchases
Rating: 4.5
All you need to do to start making an intro with T-Jam Live is to select a template and insert the text, and the app will do all the heavy lifting for you. The best part is that you can upload your music so that you can match the intro’s soundtrack with the rest of the video.
The app’s Layouter makes customizing the text a simple task since it allows you to choose the font or the size of the text or change its on-screen position. All intros you create with T-Jam can be exported in HD resolution and imported in iMovie or any other video editing app you’re using to edit videos from your iPhone. However, you must upgrade to T-Jam Pro if you want to have access to all features this app has to offer.
Pros
- Powerful 3D text motion graphics
- Offers a wide range of gestures
- The video files you create with T-Jam can be imported in any iOS-based video editing app
- Quick intro template customization process
Cons
- Upgrading to the pro version is necessary if you want to create videos with this app on a regular basis
- Audio editing options can be better
Below is a simple comparison table about the intro make apps for iPhones.
| No. | Intro Maker App | User Rating | Links on App Store |
|---|---|---|---|
| 1 | Intro Designer Lite - Create Intros for iMovie | 4.5 | https://apps.apple.com/us/app/intro-designer-lite-create-intros-for-imovie/id488748114 |
| 2 | Intro Tube: Vlog Video Maker | 4.5 | https://apps.apple.com/us/app/intro-tube-vlog-video-maker/id1358216337 |
| 3 | Intro Music Video, Movie Maker | 4.1 | https://apps.apple.com/us/app/intro-music-video-movie-maker/id1187893193 |
| 4 | Intro Maker For Youtube Studio | 4 | https://apps.apple.com/us/app/intro-maker-for-youtube-studio/id1434300554 |
| 5 | T-Jam Live Intro Movie Maker | 4.5 | https://apps.apple.com/us/app/t-jam-live-intro-movie-maker/id1348641765 |
Part 3: How to Make Intros with iMovie on iPhone
YouTubers who don’t want to install any third-party intro maker on their iPhones can create an intro for their video with iMovie. However, the process can be a bit technical while the results you are going to get may not be visually impressive.
The first thing you will need to do is create a new project, and select a photo you are going to use as a background. Once you place the photo onto the timeline and set its duration you can proceed to export it as a video.
You can skip this step if you want to use a video file you recorded with on your own as the background for the intro. In either case, you will have to import the video files you want to use to make an intro into a project you’re working on and place them on the timeline.
You can then proceed to create a text box and insert the text you want to appear in the intro. Optionally you can apply transitions between the video clips you included in your intro or add music that matches the intro’s style. Preview the intro to make sure that you like the final result and continue working on other parts of your video.
You can also check the guide to know how to create video trailers in iMovie .
Conclusion
An intro can slowly introduce the topic the video covers and it can spark the viewer’s attention. Fortunately, there are so many different intro makers you can use to create awesome action-packed intros that are fun to watch.
Moreover, you don’t need to be a seasoned video editor in order to use any of the intro maker apps we mentioned in this article since they offer easily customizable templates that enable you to create intros in minutes. Which of the intro maker apps for iPhones and Androids are you going to choose? Leave a comment and let us know.
For Win 7 or later (64-bit)
Secure Download
For macOS 10.14 or later
Secure Download
Click here to get Filmora for PC by email
or Try Filmora App for mobile >>>
download filmora app for ios ](https://app.adjust.com/b0k9hf2%5F4bsu85t ) download filmora app for android ](https://app.adjust.com/b0k9hf2%5F4bsu85t )
Ollie Mattison
Ollie Mattison is a writer and a lover of all things video.
Follow @Ollie Mattison
Also read:
- Earning Power Through Engagement Ajay’s Success on YouTube Monetization for 2024
- In 2024, Deciphering Digital Marketing The Power of YouTube Keywords
- In 2024, Earnings Expansion The Significance of 500 Subs Club
- How to Optimize YouTube Submissions for Extended Films
- Melodic Minutes Streamlined Strategies for Viral Music on YouTub
- [New] Directing the Flow of Digital Storytelling Through Youtube Fusion
- 2024 Approved Elevating Your Vlog Through Proper Lighting
- [Updated] Creating a Lasting Impression The Ultimate YouTube Live Thumbnail Guide
- Elevate Your YouTube Presence with These 8 Free Courses for 2024
- In 2024, Amplify Your Video's Impact 7 Royalty-Free Sounds
- [Updated] Essential List 5 Leading YouTube Shortened URL Services
- [Updated] Discovering Your Curated Collection of Tunes in YouTube's Depths
- [New] Enhancing Video Content Through Effective Use of Cards/Annotations
- Essential List 6 Free Online Platforms for YouTube Short Downloads for 2024
- Seamless Streaming Experience A YouTube Playlist Creation Guide
- The Ultimate Guide to Beauty Channels Your Step-By-Step Blueprint
- In 2024, Enhance Interaction Share Your Custom YouTube Playlist
- Journey Journaling Paving Your Way in the World of Travel Vlogging
- A Beginner's Guide to YouTube Shorts Nuances
- [Updated] Affordable Methods to Craft Your Own YouTube Intros
- 2024 Approved Overcoming Obstacles Restoring Your TikTok Status
- Broadcast Success Master the Art of Monitor Sharing on FB for 2024
- Updated Trim Videos for Free 7 Watermark-Free Editors for 2024
- How to Remove Apple ID from Apple iPhone X without Password?
- In 2024, How To Use Allshare Cast To Turn On Screen Mirroring On Poco C55 | Dr.fone
- [Updated] In 2024, Ultimate Guide Non-Jittery Screen Recording Software
- How to Unlock Vivo X90S Pattern Lock if Forgotten? 6 Ways
- Exploring the Best of Android Does PickUp Lead Photo Editing Tools?
- [New] 2024 Approved Essential Insights for Capturing Online Meeting Transcripts
- The Best Methods to Unlock the iPhone Locked to Owner for iPhone SE (2020)
- In 2024, 9 Mind-Blowing Tricks to Hatch Eggs in Pokemon Go Without Walking On Samsung Galaxy S24+ | Dr.fone
- How To Update or Downgrade Apple iPhone 7? | Dr.fone
- In 2024, How To Open Your Apple iPhone 15 Pro Max Without a Home Button
- [Updated] Expert Advice How to Share Your iMovie Videos on Vimeo for 2024
- In 2024, How To Remove iCloud From iPhone 13 Smoothly
- In 2024, How to Track Samsung Galaxy F34 5G by Phone Number | Dr.fone
- In 2024, 3 Ways to Track Samsung Galaxy A15 4G without Them Knowing | Dr.fone
- All Things You Need to Know about Wipe Data/Factory Reset For Tecno Spark 10 4G | Dr.fone
- Cheapest Cosmic Storage Service Large Files on the Low for 2024
- Updated Revolutionizing Music Production A Look at the Leading Audio Editing Suites for 2024
- Title: "Neon Borders on YouTube Thumbnails Step by Step Guide"
- Author: Kevin
- Created at : 2024-05-25 15:48:48
- Updated at : 2024-05-26 15:48:48
- Link: https://youtube-videos.techidaily.com/neon-borders-on-youtube-thumbnails-step-by-step-guide/
- License: This work is licensed under CC BY-NC-SA 4.0.
