
"Navigating the World of Webcams for High-Quality Streams"
Navigating the World of Webcams for High-Quality Streams
Best Webcams for YouTube Livestreaming 
Max Wales
Mar 27, 2024• Proven solutions
Broadcasting videos in real time on social media can be a great way to share some of the best moments of your life with your friends or to reach new customers for the products your company offers. YouTube is the world’s biggest video sharing platform that already allows its users to stream live videos through third-party applications such as Wirecast Play or OBS. Less than a month ago, YouTube has finally made possible live streaming directly from a computer’s webcam. The option is currently only available on Chrome browsers, but the company claims that more browsers will start offering this feature soon.
In this article, we are going to provide you with all the information you’ll need to create seamless live streams using a webcam and introduce you to some of the best webcam models in 2021.
Best webcams for YouTube Livestreaming in 2021
The quality of the video recording you intend to broadcast live is essential for the success of your live streams. Most built-in laptop webcams produce low-quality videos, and for that reason using an external webcam that captures high-resolution videos can help you create live streams that attract a lot of attention from YouTube’s community.
How to choose the right webcam for live streaming on YouTube?
Compatability: Even the best webcams on the market are completely useless if they are not compatible with your computer. Finding a webcam that works with a PC or a Mac shouldn’t be too difficult because both Windows and iOS platforms offer support for a wide range of models.
Video Resolution: YouTubers that just want to produce simple live streams don’t have to pay a lot of attention to the video resolution, because their videos don’t show too many details. Vloggers and gamers, on the other hand, should consider using webcams that produce 4K or HD footage since lower-priced options have a hard time realistically depicting colors. The quality of the video output a webcam produces can increase its price significantly, so there’s no reason investing in it if you don’t have the intention of utilizing its features to the fullest.
Sound Quality: Besides the video features, you should also look into the webcam’s audio options, because no one wants to watch a video with a terrible sound. Buying an external microphone is probably the best solution to this issue, but if you can’t afford one, then purchasing a webcam with decent audio recording features is the second best option.
Adjustable Location: Although the angle from which you are recording a stream may not seem important, poorly framed live streams are more likely to go unnoticed. A webcam that is easily adjustable can grant you the freedom of choosing your shots on every live stream you share online and it will enable you to control each and every detail in the video.
![]()

The All-in-One Screen Recorder & Video Editor
- Record desktop screen, voiceover, and webcam simultaneously
- Edit recorded clips quickly with a wide range of professional tools
- Built-in plentiful templates and effects
- Export to MP4, MOV, MKV, GIF and multiple formats
For Win 7 or later (64-bit)
For macOS 10.12 or later  Secure Download
4 Best Webcams for YouTube Live streaming in 2021
There are thousands of different webcams you can use to record a live stream, but the models featured below are some of the very best currently available on the market.
1. Logitech 4K Pro webcam
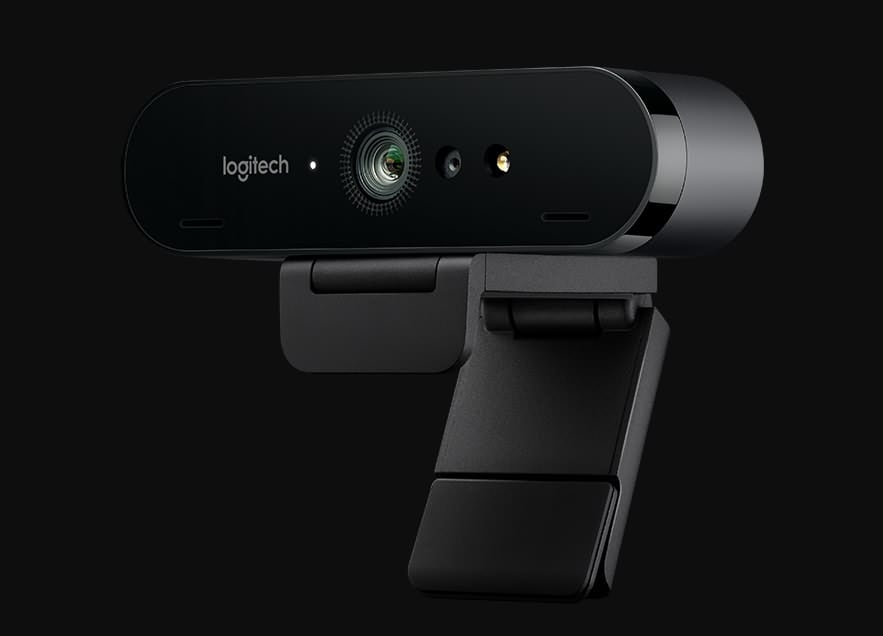
OS: Windows, macOS, Chrome OS
Price: $199
This is currently the only webcam on the market that supports 4K video recording, which makes it a forerunner of innovation and change. Besides the 4K option, the webcam’s features include a 5X digital zoom, infrared facial recognition and the amazing Right Light with HDR option that helps users record videos even under difficult light conditions.
The webcam can perform basic functions, like Skype calls, without the aid of third-party apps, which means that you can use it to create live streams on YouTube even if you don’t have a broadcasting software. The webcam’s stand is designed to fit almost any surface, so mounting the Logitech 4K Pro webcam to a laptop or monitor is quick and simple. The background replacement feature this Logitech’s webcam model offers can be quite useful if you want to use a different background in your YouTube live stream.
Pros:
- Produces incredibly clear and sharp images
- Superb background replacement options
- Expansive field of view
Cons:
- Poor audio recording options
- Internal software is basic
- A limited number of programs can capture 4K footage
2. Logitech HD Pro C920
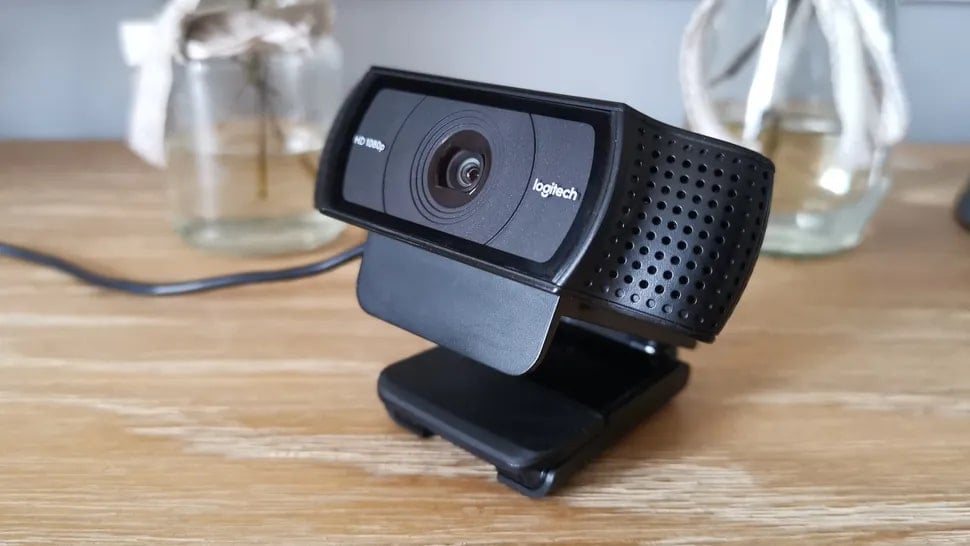
OS: macOS, Windows
Price: $99,99
Vloggers and all other YouTubers who care about video resolution will love using this webcam. Besides being capable of producing crystal clear videos in 1080p or HD 720 resolution at 30 or 60 fps, Logitech HD Pro C922 is also optimized for live streaming, which makes it a perfect webcam for live streaming on YouTube and all other video sharing platforms.
The webcam is equipped with two omnidirectional microphones that can record clear audio, but they pick up background noises easily, so using an external microphone for your live stream is still a much better option. The automatic low-light correction feature is designed to detect flickering lights in a video or increase visibility when streaming from a dimmed location. A foldable stand makes mounting the webcam easy, and you can also use a tripod if you want to record a live stream from an unusual perspective.
Pros:
- Produces 1080p and 720p resolution videos at 30 and 60 fps
- Allows users to integrate live images into their live streams
- Very easy to use
Cons
- Below average audio recording features
- Pricey
- Works only with OBS and XSplit broadcasting software
3. Logitech C922 Pro Stream webcam
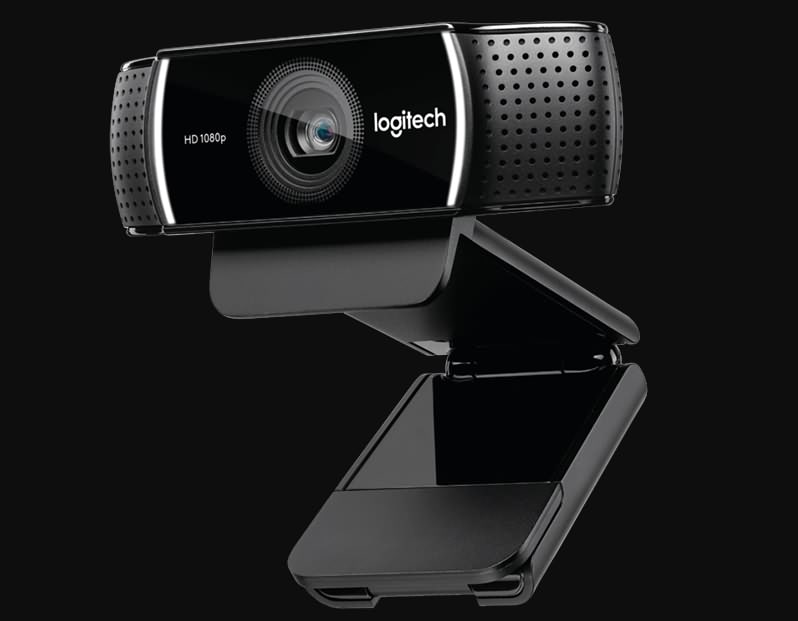
OS: Windows, macOS, Xbox, Chrome OS, Android 5.0 or above
Price: $99,99
Professional streamers, who want to capture impeccable live streams, should look no further. Logitech C922 Pro Stream webcam is the premier option for anyone who wants to be regarded as a professional streamer. This Logitech’s webcam lets you capture live streams in 1080p at 30 fps or 720p at 60 fps, while also providing the background removal feature for live streams on Twitch and YouTube. The video compression ensures that your live streams don’t take up too much of your network’s resources.
The webcam’s microphones enable users to record clear audio and reduce the need to use an external mic on every live stream you make. The Logitech C922 Pro Stream webcam delivers stunning performances in low light conditions, and it also has a 78-degree field of view lens. The webcam’s mounting options are somewhat limited, which can have a negative effect on the visual appeal of your YouTube live streams.
Pros:
- Offers a solid support for audio recording
- Delivers stunning picture quality
- Compatible with a wide range of operating systems
Cons:
- Limited mounting options
- Not plug-and-play friendly on Mac devices
- More expensive than webcams with similar capabilities
4. Microsoft LifeCam Studio
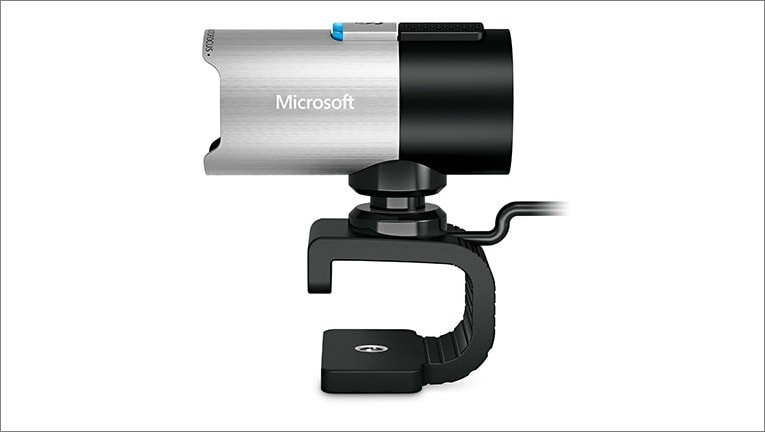
OS: Windows
Price: $99,95
The high-precision glass element lens this webcam features produces clear and sharp images. The Microsoft LifeCam Studio webcam has a 1080p HD sensor and it offers 720p HD video chat option. In addition to these remarkable features, the webcam is also equipped with TrueColor technology with face tracking that automatically adjusts the camera’s exposure to the environment and ensures that your live streams are always bright and colorful.
The Microsoft LifeCam Studio has a wide angle lens and an autofocus feature that guarantees that all live streams are always in focus. The webcam is Skype certified which means that it performs best when used with this software. Audio recording features exceed all expectations since the webcam can record natural audio recordings with no background noises. However, the limited compatibility narrows down the spectrum of its potential users.
Pros:
- Excellent video recording features.
- Crystal clear audio
- Great mounting options
Cons:
- Available only on Windows OS
- Demanding system requirements
- Not optimized for live streaming.
How to live stream from a webcam on YouTube in 2020
Although producing your own live stream on YouTube is easy, there are still a few steps you will have to take before you can start streaming from the webcam on your computer. If you don’t have a YouTube channel, you must make one, in order to be able to create your first live steam.
Step 1
Go to youtube.com/webcam , then complete the channel verification process and make sure that your channel doesn’t have any live streaming restrictions in the last 90 days. Head over to your channel, click on the Create a Video or Post icon in the upper right corner of the web page and select the GoLive option.
Afterward, you should give Chrome permission to access your webcam and the microphone you intend on using to record audio.
Step 2
Immediately after, the platform will ask you to give a title to your stream and it will let you choose whether or not you want the stream to be public or unlisted. It may be a good idea to create a few unlisted streams before you go public if you are still trying to figure out how this feature works.
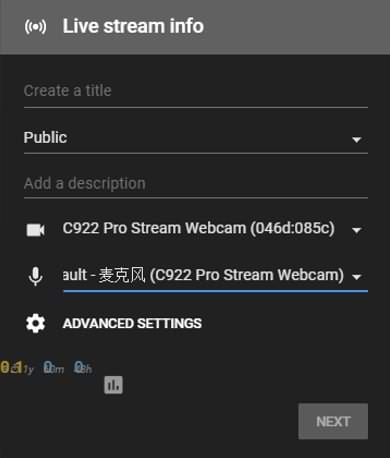
Proceed to select the camera and the microphone you intend to use to record the live stream, and you can also click on the Advanced Settings icon if you want to disable chat during the session or to specify that the live stream includes paid promotions.
Step 3
Once you’ve finished fine-tuning the advanced settings, you should click on the Next button. The platform will offer you to take or upload a thumbnail for your live stream.
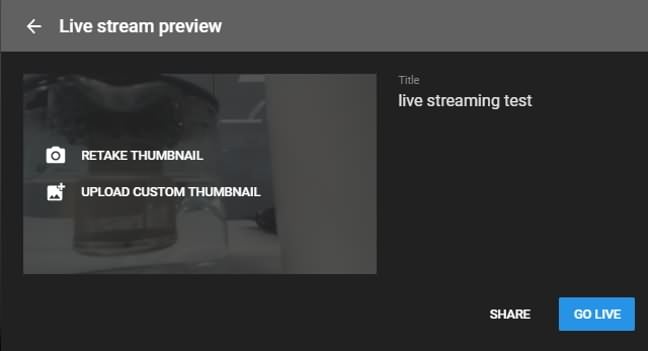
Clicking on the Share icon will enable you to share a live stream on social media, copy the link or access the embed code. Using the Share option is a great way to check if your live stream is functioning properly and to make sure that you are all set to begin the streaming session.
Step 4
Start your live stream by hitting the Go Live button. During the stream, you’ll be able to see and reply to comments people posted, the duration of the stream as well as the number of people following your live stream. If you haven’t shared your live stream before you started a new session you can do so while you are live. Click on the End Stream button to finish your webcam live stream on YouTube.
Step 5
After each live streaming session, YouTube will display some important statistics like the total and average watch time for the particular stream, the number of new subscribers or the number of playbacks of your live stream. The stream will be available for review in YouTube’s Creator Studio in the Events menu.

Max Wales
Max Wales is a writer and a lover of all things video.
Follow @Max Wales
Max Wales
Mar 27, 2024• Proven solutions
Broadcasting videos in real time on social media can be a great way to share some of the best moments of your life with your friends or to reach new customers for the products your company offers. YouTube is the world’s biggest video sharing platform that already allows its users to stream live videos through third-party applications such as Wirecast Play or OBS. Less than a month ago, YouTube has finally made possible live streaming directly from a computer’s webcam. The option is currently only available on Chrome browsers, but the company claims that more browsers will start offering this feature soon.
In this article, we are going to provide you with all the information you’ll need to create seamless live streams using a webcam and introduce you to some of the best webcam models in 2021.
Best webcams for YouTube Livestreaming in 2021
The quality of the video recording you intend to broadcast live is essential for the success of your live streams. Most built-in laptop webcams produce low-quality videos, and for that reason using an external webcam that captures high-resolution videos can help you create live streams that attract a lot of attention from YouTube’s community.
How to choose the right webcam for live streaming on YouTube?
Compatability: Even the best webcams on the market are completely useless if they are not compatible with your computer. Finding a webcam that works with a PC or a Mac shouldn’t be too difficult because both Windows and iOS platforms offer support for a wide range of models.
Video Resolution: YouTubers that just want to produce simple live streams don’t have to pay a lot of attention to the video resolution, because their videos don’t show too many details. Vloggers and gamers, on the other hand, should consider using webcams that produce 4K or HD footage since lower-priced options have a hard time realistically depicting colors. The quality of the video output a webcam produces can increase its price significantly, so there’s no reason investing in it if you don’t have the intention of utilizing its features to the fullest.
Sound Quality: Besides the video features, you should also look into the webcam’s audio options, because no one wants to watch a video with a terrible sound. Buying an external microphone is probably the best solution to this issue, but if you can’t afford one, then purchasing a webcam with decent audio recording features is the second best option.
Adjustable Location: Although the angle from which you are recording a stream may not seem important, poorly framed live streams are more likely to go unnoticed. A webcam that is easily adjustable can grant you the freedom of choosing your shots on every live stream you share online and it will enable you to control each and every detail in the video.
![]()
The All-in-One Screen Recorder & Video Editor
- Record desktop screen, voiceover, and webcam simultaneously
- Edit recorded clips quickly with a wide range of professional tools
- Built-in plentiful templates and effects
- Export to MP4, MOV, MKV, GIF and multiple formats
For Win 7 or later (64-bit)
For macOS 10.12 or later Secure Download
4 Best Webcams for YouTube Live streaming in 2021
There are thousands of different webcams you can use to record a live stream, but the models featured below are some of the very best currently available on the market.
1. Logitech 4K Pro webcam
OS: Windows, macOS, Chrome OS
Price: $199
This is currently the only webcam on the market that supports 4K video recording, which makes it a forerunner of innovation and change. Besides the 4K option, the webcam’s features include a 5X digital zoom, infrared facial recognition and the amazing Right Light with HDR option that helps users record videos even under difficult light conditions.
The webcam can perform basic functions, like Skype calls, without the aid of third-party apps, which means that you can use it to create live streams on YouTube even if you don’t have a broadcasting software. The webcam’s stand is designed to fit almost any surface, so mounting the Logitech 4K Pro webcam to a laptop or monitor is quick and simple. The background replacement feature this Logitech’s webcam model offers can be quite useful if you want to use a different background in your YouTube live stream.
Pros:
- Produces incredibly clear and sharp images
- Superb background replacement options
- Expansive field of view
Cons:
- Poor audio recording options
- Internal software is basic
- A limited number of programs can capture 4K footage
2. Logitech HD Pro C920
OS: macOS, Windows
Price: $99,99
Vloggers and all other YouTubers who care about video resolution will love using this webcam. Besides being capable of producing crystal clear videos in 1080p or HD 720 resolution at 30 or 60 fps, Logitech HD Pro C922 is also optimized for live streaming, which makes it a perfect webcam for live streaming on YouTube and all other video sharing platforms.
The webcam is equipped with two omnidirectional microphones that can record clear audio, but they pick up background noises easily, so using an external microphone for your live stream is still a much better option. The automatic low-light correction feature is designed to detect flickering lights in a video or increase visibility when streaming from a dimmed location. A foldable stand makes mounting the webcam easy, and you can also use a tripod if you want to record a live stream from an unusual perspective.
Pros:
- Produces 1080p and 720p resolution videos at 30 and 60 fps
- Allows users to integrate live images into their live streams
- Very easy to use
Cons
- Below average audio recording features
- Pricey
- Works only with OBS and XSplit broadcasting software
3. Logitech C922 Pro Stream webcam
OS: Windows, macOS, Xbox, Chrome OS, Android 5.0 or above
Price: $99,99
Professional streamers, who want to capture impeccable live streams, should look no further. Logitech C922 Pro Stream webcam is the premier option for anyone who wants to be regarded as a professional streamer. This Logitech’s webcam lets you capture live streams in 1080p at 30 fps or 720p at 60 fps, while also providing the background removal feature for live streams on Twitch and YouTube. The video compression ensures that your live streams don’t take up too much of your network’s resources.
The webcam’s microphones enable users to record clear audio and reduce the need to use an external mic on every live stream you make. The Logitech C922 Pro Stream webcam delivers stunning performances in low light conditions, and it also has a 78-degree field of view lens. The webcam’s mounting options are somewhat limited, which can have a negative effect on the visual appeal of your YouTube live streams.
Pros:
- Offers a solid support for audio recording
- Delivers stunning picture quality
- Compatible with a wide range of operating systems
Cons:
- Limited mounting options
- Not plug-and-play friendly on Mac devices
- More expensive than webcams with similar capabilities
4. Microsoft LifeCam Studio
OS: Windows
Price: $99,95
The high-precision glass element lens this webcam features produces clear and sharp images. The Microsoft LifeCam Studio webcam has a 1080p HD sensor and it offers 720p HD video chat option. In addition to these remarkable features, the webcam is also equipped with TrueColor technology with face tracking that automatically adjusts the camera’s exposure to the environment and ensures that your live streams are always bright and colorful.
The Microsoft LifeCam Studio has a wide angle lens and an autofocus feature that guarantees that all live streams are always in focus. The webcam is Skype certified which means that it performs best when used with this software. Audio recording features exceed all expectations since the webcam can record natural audio recordings with no background noises. However, the limited compatibility narrows down the spectrum of its potential users.
Pros:
- Excellent video recording features.
- Crystal clear audio
- Great mounting options
Cons:
- Available only on Windows OS
- Demanding system requirements
- Not optimized for live streaming.
How to live stream from a webcam on YouTube in 2020
Although producing your own live stream on YouTube is easy, there are still a few steps you will have to take before you can start streaming from the webcam on your computer. If you don’t have a YouTube channel, you must make one, in order to be able to create your first live steam.
Step 1
Go to youtube.com/webcam , then complete the channel verification process and make sure that your channel doesn’t have any live streaming restrictions in the last 90 days. Head over to your channel, click on the Create a Video or Post icon in the upper right corner of the web page and select the GoLive option.
Afterward, you should give Chrome permission to access your webcam and the microphone you intend on using to record audio.
Step 2
Immediately after, the platform will ask you to give a title to your stream and it will let you choose whether or not you want the stream to be public or unlisted. It may be a good idea to create a few unlisted streams before you go public if you are still trying to figure out how this feature works.
Proceed to select the camera and the microphone you intend to use to record the live stream, and you can also click on the Advanced Settings icon if you want to disable chat during the session or to specify that the live stream includes paid promotions.
Step 3
Once you’ve finished fine-tuning the advanced settings, you should click on the Next button. The platform will offer you to take or upload a thumbnail for your live stream.
Clicking on the Share icon will enable you to share a live stream on social media, copy the link or access the embed code. Using the Share option is a great way to check if your live stream is functioning properly and to make sure that you are all set to begin the streaming session.
Step 4
Start your live stream by hitting the Go Live button. During the stream, you’ll be able to see and reply to comments people posted, the duration of the stream as well as the number of people following your live stream. If you haven’t shared your live stream before you started a new session you can do so while you are live. Click on the End Stream button to finish your webcam live stream on YouTube.
Step 5
After each live streaming session, YouTube will display some important statistics like the total and average watch time for the particular stream, the number of new subscribers or the number of playbacks of your live stream. The stream will be available for review in YouTube’s Creator Studio in the Events menu.
Max Wales
Max Wales is a writer and a lover of all things video.
Follow @Max Wales
Premium Changing Voices Technology for YouTube Artists
Are you looking for the best voice-changing app for your YouTube channel?
Creating a YouTube video with professional output is straightforward, but many people find it challenging because they do not have the right vlogging tools at their disposal. There are countless vlogging tools and one of them is the voice changer.
With a voice-changing app, you can create multiple voices for one video clip with complete ease. Voice changer supports several background sound effects that you can import to spice up your content before uploading it on YouTube. The app makes your videos fun and interesting to watch that then drives traffic to your channel.
Presently, there is an array of YouTube voice-changers available online. While some are top-notch, others are nothing to write about. In this article, we will share with you some top-level YouTube voice-changers recommended by experts in the industry. Without further ado, let’s dive in.
For Win 7 or later (64-bit)
For macOS 10.12 or later
Part 1. Best Voice Changers for YouTubers
Here are the top 7 YouTube voice-changing apps available on the global market today:
1. AthTek [Online & Free]
AthTek is one the world-leading voice-changing apps suitable for Windows operating systems. This simple yet powerful app is well-customized with powerful features such as pitch and speed enhancer. The app allows you to edit your audio recordings easily and quickly.
It provides you with a comprehensive user interface that lets you switch your voice without stress. Compared to other voice-changers, AthTek stands out. The app integrates perfectly with platforms like Skype, etc.
AthTek is a fantastic voice changer, however, it isn’t without its dark sides. AthTek is not a real-time voice-changing app. Hence, you can only use it with ready-made sound recordings.
How to Use AthTek YouTube Voice Changer
Follow the procedure below to use the AthTek voice changing app on your YouTube channel:
Step1 Download AthTek from the official website. Follow the on-screen instructions to install the app, and launch it. When AthTek opens, the interface below will appear on your display screen:

Locate the Browse button beside File Path, and click on it. AthTek will automatically direct you to your local storage.

Step2 Choose your desired audio file from the list available on your computer, and tap the Open button. AthTek will immediately upload the audio file on its interface. The page below will come up on your screen:

Step3 Now move to the Change Parameter section and make the necessary adjustments. Once that’s set, click on the Play button to preview the audio file. If satisfied, tap on Export, choose a destination path and click on Save.

2. Voicechanger.io
Voicechanger.io is a cloud-based program that enables you to upload and edit audio files conveniently without distorting the quality. The program also allows you to record your voice, and add effects with complete ease. It’s an easy-to-use voice changer with no operating system limitations. Aside from voice changing, Voicechanger.io supports speech-to-text. Thus, you can convert speech to text without stress.
How to Use Voicechanger.io
Step1 With the help of an internet-enabled computer system, navigate to the official webpage for Voicechanger.io. The page below will come up if all goes well:

Step2 Choose your preferred audio input method to proceed. Should you select Upload audio, you will be directed to your local drive where your recordings are stored. Choose an audio file, and click on Open.

However, should you pick the Use microphone option, you will be prompted to grant access to the mic. Click on the appropriate key to complete this step.

3. Voxal Voice Changer
Voxal Voice Changer is another quality app mostly used by Mac owners to manipulate audio recordings. It’s also suitable for editing real-time chat audio recordings. The app provides you with several preset voices that you can select from to make your sound recordings fun to listen to.
Additionally, you have the privilege to customize the background effects that you could be used at any time. Voxal Voice Changer is a simple app with zero restrictions in the free version. It also offers paid versions with additional features for professional YouTubers. Besides editing ready-made audio, the app does allow you to create voice recordings.
How to Use Voxal Voice Changer
Here is the detailed procedure to use the Voxal Voice Changer app:
Step1 From the official website for Voxal, download and install a compatible version of the app on your computer system. Wait until the installation is successful and launch the app for usage.

When the interface above appears, locate the Menu drop-down menu at the top left corner of your display screen. Select File > Import Voice. Your local storage will automatically appear.
Step2 Choose an audio recording or voice to import on the Voxal Voice Changer interface, and tap on Open. After uploading the file, select a voice effect on the left sidebar.

Step3 Now click on the green Preview button at the top menubar. Listen to the audio file with the chosen effect. If satisfied, export the file to your preferred storage path.
4. Skype Voice Changer
As the name implies, this app is built for you to conceal your voice when using Skype social media platform. It can also serve as a voice changer for YouTube content creators. This app permits you to transform your audio recordings into interesting sounds easily and quickly.
Skype Voice Changer offers free and paid services to its end-users. However, the majority of its features are locked in the paid version. The app provides a clean voice editing interface so end-users, including those who aren’t conversant with information technology, can navigate easily.
How to Use Skype Voice Changer
Here is the set of instructions to use Skype Voice Changer:
Step1 Install the Skype Voice Changer app on your PC, and launch it for operation by clicking on the appropriate button.


A window with several easy-to-use options will come up just as below:

Click on the Effects button at the top menu bar.
Step2 Select a voice effect on the left panel of the Skype Voice Changer interface. Once that is set, click on Preview at the lower right corner of your screen.
Now speak into a microphone, and listen to your voice.
5. AV Voice Changer Diamond
AV Voice Changer Diamond is another wonderful voice-changing app with several entertaining effects that you can choose from to pimp your audio recordings or voice. The app provides you with several preset options, so you have control over your output. It’s one of the most versatile apps for YouTubers.
This voice changer offers an easy-to-manage user interface so beginners in the tech space can easily find their way without involving a third party. AV Voice Changer Diamond works perfectly with all VoIP programs and social media platforms like Skype, Viber, YouTube, and more. One challenge you may experience with this app is the very long installation process.
How to Use AV Voice Changer Diamond
Go to the AV Voice Changer Diamond website to install the latest version of the app on your computer system, and follow the steps below to use it:
Step1 Open the app on your Windows or Mac operating system. You will find the interface below on your screen:

Locate the Nickvoices at the top toolbar. Click on it, and a couple of voice effect options will pop up.

Step2 Select from the list to proceed. Alternatively, you could click on Custom on the list to customize a voice effect. However, mind you, you must subscribe to a premium package to create a voice effect.
Step3 On completing the step above, locate the Record button and click on it. A new window will come up. Follow the on-screen instructions to record your voice.

6. Voice Changer HD
If you are looking for a voice-changing app that you can use to modify your YouTube audio tracks at a zero-cost fee, Voice Changer HD is the perfect tool to use. The app allows you to turn boring audio recordings into enjoyable ones with the lovely effects it supports.
In addition to the audio editing features, Voice Changer HD lets end-users create sounds from texts. Thus, it supports text-to-speech. The app comes with an easy-to-manage user interface. It has over 25 preset voices tucked into it.
How to Use Voice Changer HD
Using Voice Changer HD isn’t difficult. Apply the stepwise guide below:
Step1 Download, install, and open Voice Changer HD on your computer. Once it opens, click on the appropriate button to record your voice.
Step2 Click on the Stop button to end the recording. Voice Changer HD will automatically load an interface with several voice effects. Select one to design your recorded file.

Step3 Next, click on Share to send the file to friends and relatives.

Part 2. Best Voice Editors for YouTubers
1. Filmora

Filmora is an industry-leading audio editing software well-designed with an interactive user interface that allows you to edit YouTube recordings before uploading them on the net. This multipurpose software is customized with endless audio editing features. It supports audio ducking, audio visualizer, auto synchronization, speech-to-text, text-to-speech, and lots more.
Free Download For Win 7 or later(64-bit)
Free Download For macOS 10.14 or later
Additionally, end-users can easily detect silence in an audio or video file via the Wondershare Filmora software. Besides audio editing, this software is capable of video editing. It enables you to modify/adjust videos without compromising the quality. This software permits you to add effects, transitions, detach audio, remove background, etc.
Wondershare Filmora has all you need in a video and audio editor as it integrates with several platforms, including YouTube and other social media apps. This audio editing solution is suitable for Windows and Mac operating systems.
2. Adobe Audition

Designed by the first PDF editing platform developer, Adobe Audition is another software you can count on to edit audio tracks with quality output. It edits all audio types, including MP3, WAV, and more, with zero limitations. The software sits at the second position on our list because of the rich editing features it holds. Adobe Audition allows you to mix sounds easily and quickly- a vital reason Disc Jerkers (DJs) use the software. Another feature you stand to enjoy when using this software is the freedom to design sound effects.
Part 3. FAQs
Q1. Can I change my voice for YouTube videos?
Yes!
With voice-changing apps, you can quickly change your voice for YouTube videos. These apps come with lots of incredible sound effects that you need to pimp your audio tracks on YouTube. Some of the top-rated voice changers available in the market presently have been introduced above. Check them out.
Q2. What voice changers do YouTubers use?
As earlier stated, there are countless voice-changing apps for YouTubers. Depending on the sound effect you need, you may need to try two or more. You can select one from the ones mentioned in the article.
Conclusion
Now you have the top 7 voice changers for YouTubers, select one of them and use it in your next project. All voice-changing apps are simple to use, fast and reliable. However, we advise that you consider the pricing before investing in it. If you need an audio/video editing software program, Filmora is the right tool to use. The software is well-known for excellent results.
For Win 7 or later (64-bit)
For macOS 10.12 or later
Part 1. Best Voice Changers for YouTubers
Here are the top 7 YouTube voice-changing apps available on the global market today:
1. AthTek [Online & Free]
AthTek is one the world-leading voice-changing apps suitable for Windows operating systems. This simple yet powerful app is well-customized with powerful features such as pitch and speed enhancer. The app allows you to edit your audio recordings easily and quickly.
It provides you with a comprehensive user interface that lets you switch your voice without stress. Compared to other voice-changers, AthTek stands out. The app integrates perfectly with platforms like Skype, etc.
AthTek is a fantastic voice changer, however, it isn’t without its dark sides. AthTek is not a real-time voice-changing app. Hence, you can only use it with ready-made sound recordings.
How to Use AthTek YouTube Voice Changer
Follow the procedure below to use the AthTek voice changing app on your YouTube channel:
Step1 Download AthTek from the official website. Follow the on-screen instructions to install the app, and launch it. When AthTek opens, the interface below will appear on your display screen:
Locate the Browse button beside File Path, and click on it. AthTek will automatically direct you to your local storage.
Step2 Choose your desired audio file from the list available on your computer, and tap the Open button. AthTek will immediately upload the audio file on its interface. The page below will come up on your screen:
Step3 Now move to the Change Parameter section and make the necessary adjustments. Once that’s set, click on the Play button to preview the audio file. If satisfied, tap on Export, choose a destination path and click on Save.
2. Voicechanger.io
Voicechanger.io is a cloud-based program that enables you to upload and edit audio files conveniently without distorting the quality. The program also allows you to record your voice, and add effects with complete ease. It’s an easy-to-use voice changer with no operating system limitations. Aside from voice changing, Voicechanger.io supports speech-to-text. Thus, you can convert speech to text without stress.
How to Use Voicechanger.io
Step1 With the help of an internet-enabled computer system, navigate to the official webpage for Voicechanger.io. The page below will come up if all goes well:
Step2 Choose your preferred audio input method to proceed. Should you select Upload audio, you will be directed to your local drive where your recordings are stored. Choose an audio file, and click on Open.
However, should you pick the Use microphone option, you will be prompted to grant access to the mic. Click on the appropriate key to complete this step.
3. Voxal Voice Changer
Voxal Voice Changer is another quality app mostly used by Mac owners to manipulate audio recordings. It’s also suitable for editing real-time chat audio recordings. The app provides you with several preset voices that you can select from to make your sound recordings fun to listen to.
Additionally, you have the privilege to customize the background effects that you could be used at any time. Voxal Voice Changer is a simple app with zero restrictions in the free version. It also offers paid versions with additional features for professional YouTubers. Besides editing ready-made audio, the app does allow you to create voice recordings.
How to Use Voxal Voice Changer
Here is the detailed procedure to use the Voxal Voice Changer app:
Step1 From the official website for Voxal, download and install a compatible version of the app on your computer system. Wait until the installation is successful and launch the app for usage.
When the interface above appears, locate the Menu drop-down menu at the top left corner of your display screen. Select File > Import Voice. Your local storage will automatically appear.
Step2 Choose an audio recording or voice to import on the Voxal Voice Changer interface, and tap on Open. After uploading the file, select a voice effect on the left sidebar.
Step3 Now click on the green Preview button at the top menubar. Listen to the audio file with the chosen effect. If satisfied, export the file to your preferred storage path.
4. Skype Voice Changer
As the name implies, this app is built for you to conceal your voice when using Skype social media platform. It can also serve as a voice changer for YouTube content creators. This app permits you to transform your audio recordings into interesting sounds easily and quickly.
Skype Voice Changer offers free and paid services to its end-users. However, the majority of its features are locked in the paid version. The app provides a clean voice editing interface so end-users, including those who aren’t conversant with information technology, can navigate easily.
How to Use Skype Voice Changer
Here is the set of instructions to use Skype Voice Changer:
Step1 Install the Skype Voice Changer app on your PC, and launch it for operation by clicking on the appropriate button.
A window with several easy-to-use options will come up just as below:
Click on the Effects button at the top menu bar.
Step2 Select a voice effect on the left panel of the Skype Voice Changer interface. Once that is set, click on Preview at the lower right corner of your screen.
Now speak into a microphone, and listen to your voice.
5. AV Voice Changer Diamond
AV Voice Changer Diamond is another wonderful voice-changing app with several entertaining effects that you can choose from to pimp your audio recordings or voice. The app provides you with several preset options, so you have control over your output. It’s one of the most versatile apps for YouTubers.
This voice changer offers an easy-to-manage user interface so beginners in the tech space can easily find their way without involving a third party. AV Voice Changer Diamond works perfectly with all VoIP programs and social media platforms like Skype, Viber, YouTube, and more. One challenge you may experience with this app is the very long installation process.
How to Use AV Voice Changer Diamond
Go to the AV Voice Changer Diamond website to install the latest version of the app on your computer system, and follow the steps below to use it:
Step1 Open the app on your Windows or Mac operating system. You will find the interface below on your screen:
Locate the Nickvoices at the top toolbar. Click on it, and a couple of voice effect options will pop up.
Step2 Select from the list to proceed. Alternatively, you could click on Custom on the list to customize a voice effect. However, mind you, you must subscribe to a premium package to create a voice effect.
Step3 On completing the step above, locate the Record button and click on it. A new window will come up. Follow the on-screen instructions to record your voice.
6. Voice Changer HD
If you are looking for a voice-changing app that you can use to modify your YouTube audio tracks at a zero-cost fee, Voice Changer HD is the perfect tool to use. The app allows you to turn boring audio recordings into enjoyable ones with the lovely effects it supports.
In addition to the audio editing features, Voice Changer HD lets end-users create sounds from texts. Thus, it supports text-to-speech. The app comes with an easy-to-manage user interface. It has over 25 preset voices tucked into it.
How to Use Voice Changer HD
Using Voice Changer HD isn’t difficult. Apply the stepwise guide below:
Step1 Download, install, and open Voice Changer HD on your computer. Once it opens, click on the appropriate button to record your voice.
Step2 Click on the Stop button to end the recording. Voice Changer HD will automatically load an interface with several voice effects. Select one to design your recorded file.
Step3 Next, click on Share to send the file to friends and relatives.
Part 2. Best Voice Editors for YouTubers
1. Filmora
Filmora is an industry-leading audio editing software well-designed with an interactive user interface that allows you to edit YouTube recordings before uploading them on the net. This multipurpose software is customized with endless audio editing features. It supports audio ducking, audio visualizer, auto synchronization, speech-to-text, text-to-speech, and lots more.
Free Download For Win 7 or later(64-bit)
Free Download For macOS 10.14 or later
Additionally, end-users can easily detect silence in an audio or video file via the Wondershare Filmora software. Besides audio editing, this software is capable of video editing. It enables you to modify/adjust videos without compromising the quality. This software permits you to add effects, transitions, detach audio, remove background, etc.
Wondershare Filmora has all you need in a video and audio editor as it integrates with several platforms, including YouTube and other social media apps. This audio editing solution is suitable for Windows and Mac operating systems.
2. Adobe Audition
Designed by the first PDF editing platform developer, Adobe Audition is another software you can count on to edit audio tracks with quality output. It edits all audio types, including MP3, WAV, and more, with zero limitations. The software sits at the second position on our list because of the rich editing features it holds. Adobe Audition allows you to mix sounds easily and quickly- a vital reason Disc Jerkers (DJs) use the software. Another feature you stand to enjoy when using this software is the freedom to design sound effects.
Part 3. FAQs
Q1. Can I change my voice for YouTube videos?
Yes!
With voice-changing apps, you can quickly change your voice for YouTube videos. These apps come with lots of incredible sound effects that you need to pimp your audio tracks on YouTube. Some of the top-rated voice changers available in the market presently have been introduced above. Check them out.
Q2. What voice changers do YouTubers use?
As earlier stated, there are countless voice-changing apps for YouTubers. Depending on the sound effect you need, you may need to try two or more. You can select one from the ones mentioned in the article.
Conclusion
Now you have the top 7 voice changers for YouTubers, select one of them and use it in your next project. All voice-changing apps are simple to use, fast and reliable. However, we advise that you consider the pricing before investing in it. If you need an audio/video editing software program, Filmora is the right tool to use. The software is well-known for excellent results.
Also read:
- Best YouTube Video to Text Converters On-Line
- Optimizing Video Income on Youtube A Practical Guide
- Creative Teaching Incorporating YouTube Into Your Curriculum
- Video Platform Profiles Vimeo vs YouTube Comparison
- Achieve Sharpness Camera Tips Without a Tripod for 2024
- [New] Defining Your Visual and Stylistic Identity [High Relevance]
- [Updated] Direct Link Between Spotify and YouTube The Top Tools for Music Sharing
- From Video Views to Vault Closure Income Insights for Youtubers
- Want to Try Sub4sub? Check This Guide First!
- [New] Boost Engagement with Creative Video Titling and Tagging Techniques
- [New] Enrich Your Brain with These 15 Ultimate Science Youtubes
- 2024 Approved Essential Steps for Seamlessly Clearing YouTube Feedback
- [New] Discovering 6 Distinct Icon and Logo Providers
- Mastering Sharing Your Privacy-Guarded YT Clip via Gmail Pro
- YouTube Audio, Made Simple for iMovie Editors
- Vlogging Hurdles How to Triumph Over Ten Common Obstacles
- Boosting YouTube Popularity Two Simple Strategies for 2024
- 2024 Approved Elevate Your FreeFire Gameplay on YouTube Channels
- 2024 Approved Discover The Tricks to Recording & Screencasting Your YouTube Views without Cash
- Streaming Giants' Rivalry Facebook Vs. YouTube & Spaces
- Master's Choice The Ultimate Collection of Downloader Tools
- Speed Masterclass Turning Images Into Attention-Grabbing YouTube Thumbnails
- 2024 Approved Download Mastery 11 Key YouTube Extractors
- How-To Wipe Out Your YouTube Buffered Videos
- [Updated] Beginner's Guide Adding Text Overlays on YouTube
- Transform Your Vision – YouTube's Innovative Green Screen Solutions
- [New] Elevating Engagement Optimal Size & Ratio on YouTube
- Professional-Level Content Structure with Expert Templates
- [Updated] Anime in the Sunshine The Best YouTubers for Positivity [Top 15]
- Mastering Reach Without Money YouTube Video Advancement Strategies
- 2024 Approved Cutting to a Consensus in News Endings
- In 2024, Designing a Trailer Blueprint to Amplify Channel Income
- [New] Cutting Edge MP4 Utilities Choosing the Right One for Mac
- Updated Unleash Your Creativity The Top 5 AVCHD Video Editing Software
- Possible solutions to restore deleted messages from Oppo A59 5G
- Issues playing H.265 HEVC video on Xiaomi Redmi Note 12 Pro 4G
- Updated The Ultimate Nikon Video Editing Tutorial for Beginners and Pros
- In 2024, How To Unlock iPhone 12 Pro Official Method to Unlock Your iPhone 12 Pro
- [Updated] In 2024, Discord Spoiler Tag All You Need to Know
- In 2024, Unleash VRecorder Download Steps
- Deciphering the Impact of LUTs on Your Photography Craft
- 2024 Approved The Ultimate Selection of Inexpensive Web Explorers for Remote Work
- [Updated] Pure Pitch Perception Recording in Mac Studios for 2024
- New 2024 Approved What Is an AI Text Generator?
- Leading 6 Virtual Venues Propelling Professional Connections
- In 2024, Fixing Foneazy MockGo Not Working On Samsung Galaxy A25 5G | Dr.fone
- In 2024, ClearView Screenshot Perfect Windows/Mac Imaging
- New 2024 Approved Updated 10 Best 2D Animation Software Free/Paid
- How to Cast Samsung Galaxy M14 5G Screen to PC Using WiFi | Dr.fone
- How to Resolve Tecno Phantom V Flip Screen Not Working | Dr.fone
- [New] Tackling Unresponsive TikTok Quick Fixes for Chrome Too
- In 2024, Unova Stone Pokémon Go Evolution List and How Catch Them For Samsung Galaxy S24 | Dr.fone
- In 2024, How to Remove and Reset Face ID on iPhone 12 mini | Dr.fone
- [New] A Deep Dive Into Panasonic's HX-A1 Camera Features
- Title: "Navigating the World of Webcams for High-Quality Streams"
- Author: Kevin
- Created at : 2024-06-26 14:16:54
- Updated at : 2024-06-27 14:16:54
- Link: https://youtube-videos.techidaily.com/navigating-the-world-of-webcams-for-high-quality-streams/
- License: This work is licensed under CC BY-NC-SA 4.0.
