
:max_bytes(150000):strip_icc()/GettyImages-535970955-5b0ef2cca474be003791023e.jpg)
Navigating the World of Time Stamps in YouTube Links (Desktop/Mobile)
Navigating the World of Time Stamps in YouTube Links (Desktop/Mobile)
How to Add Timestamps on YouTube Video Link?

Richard Bennett
Mar 27, 2024• Proven solutions
It is a well-known fact that internet users have a short interest span, about just eight seconds. This attention span applies to all internet platforms including YouTube. YouTube is the second largest and most visited search engine after Google. It provides users with information through engaging and eye-catchy videos. However, certain videos are longer where only a particular section of the video holds the important information. Viewers tend to skip the long videos and if you do not want this to happen to you, you can link to that specific part on your video adding value for your channel viewers with a link known as the YouTube Timestamp link.
When you have a Timestamp link on your video, you can help your viewers directly reach the specific time in the video. This helps avoid the viewers from losing interest or to search for the key part in your video themselves.
Here in this article, we will explain Timestamp links, how to add Timestamp to YouTube video links, and what are the benefits of Timestamp.
- Part 1: YouTube Timestamp Links Introduction
- Part 2: Adding a Timestamp to YouTube Video Link on Desktop
- Part 3: How to Share Specific Parts of YouTube Video
- part 4: Getting YouTube Timestamp Link on Mobile
- Part 5: FAQ About YouTube Timestamps
Part 1: What is YouTube Timestamp Links
In this fast-paced world where viewers have limited time at hand, YouTube Timestamp links are extremely helpful. These links are anchor text or video hyperlinks found either in the description beneath the video or at the video link end.

The Timestamps links allow you to put a link to a key moment in your YouTube video allowing the viewers and subscribers to view the video at the precise time specified. Your YouTube video maybe half an hour long or maybe your users do not have the time now or forget to later watch your video, but when you add Timestamp to the YouTube link, you provide them ways to get to the content quickly enhancing the user experience.
In addition to this, you can even provide a reference in minutes and hours where necessary. The YouTube Timestamp link acts as a guide that directs viewers to the part of the video, which is most relevant to them without having to watch the entire video.
Part 2: How to Add a Timestamp to YouTube Video Link on Desktop?
In the following section, I will show you how to add timestamp to YouTube video link in several ways.
Use YouTube’s Share Feature
Using YouTube’s share feature is the simplest way to add Timestamp to YouTube videos. Here are easy steps to follow to do this.
- Open the YouTube video on your desktop that you want to share.
- Play the video or navigate the timeline and stop at the key moment you wish to apply the timestamp to.
- Now click on the Share button, a pop-up will appear. Under the URL, you will see a small box indicating Start at. The Timestamp is generated automatically, but you can adjust it.

- Copy the updated URL with Timestamp to share the video or click on the social sharing icons to do so.
- When your viewers click on this URL, the video will begin at the specified Timestamp.
Use the Browser URL to add Timestamp manually
You can add Timestamp manually as well. Follow the step-by-step guide below to add a Timestamp manually.
- Open your YouTube video in a browser on your desktop and then find the URL in the browser’s address bar.
- Enter the specific time you want the viewers to watch the video from at the end of the video URL.
You can add time manually in two ways depending on the URL.
?t=As or
&t=As
“youtu.be/” Format
If your YouTube video link is a youtu.be format, then just add ?t=As at the end of the video link. The A denotes the seconds at which you want the viewer to watch your video. The time can also be specified in minutes and seconds and when you want to do that just add ?t=AmBs. For instance, ?t=2m40s.
“youtube.com/” Format
When your YouTube video link has a youtube.com format, the adjustment starts with an ampersand. &t=As or &t=AmBs is what you can use. If you are looking to add the Timestamp at 2m40s, just add “&t=2m40s at the end of the video URL.
Whenever anybody uses the URL with Timestamp, the video will start from the specified time.
However, when adding a Timestamp manually, always leave include whole numbers. For example, if the time starts at 4m, use 4 and not 04.
Copy video URL at current time
You can use YouTube’s built-in feature to share the key parts of your YouTube video. Follow the steps here.
- Visit YouTube and open the video you want to add Timestamp link to.
- Play the video or navigate the timeline to reach the specific part you like to use in Timestamp.
- Now either press Ctrl + click or right-click anywhere on the video. A pop-up opens where you can see various texts, click on the Copy video URL at current time and share the link.

- Anyone who clicks on this link will be instantly transported to the exact segment of your YouTube video.
Part 3: How to Share Specific Parts of Videos with Vibby and Get YouTube Link with Timestamp
The above-mentioned methods to add and send YouTube link with timestamp are quick and easy, but they have a few limitations. If you need more control and share highlighted parts of YouTube video without cutting the video, you need to use a third-party tool known as Vibby.
Vibby allows you to not only share specific parts of videos from YouTube but other platforms as well like Vimeo and Twitch. With the tool, you can clip multiple sections of the video and share them with others.
- To get started, signup either with mail, Google, Twitter, Facebook, or Twitch account.
- Once signed in, go to Create vib at the top left corner and then paste the URL of the YouTube video you would like to share and then click on the Start button.

- Your video will load in the Vibby editor, now click on Highlight the parts to share.
- Here you will see the Start highlight button, jump 5-sec option, option to switch between HD and SD video quality, and volume control button. Navigate to the part you want to share and click on Start highlight.

- When you reach the end of the part, click on Finish highlight. Repeat the process to highlight multiple parts of the video. All the highlighted parts will appear in a list on the right side of the screen.
- Add a description to each part and format it, you have the option to preview before hitting the Save vib button.
- Name the vib and assign a category and then publish it to Vibby or make it a private vib.
- You get a dedicated link to your vib with the ability to embed it on your website or blog.
In this way, you can share the highlights of the YouTube video or Vimeo video easily.
Part 4: How to Get YouTube Timestamp Link on iPhone and Android?
Linking to specific YouTube Timestamp Link is straightforward on both iPhone and Android.
- Go to YouTube and select the video you want to share.
- Move through the progress bar of the video to reach the key part and click on the Share button.
- A pop-up menu appears, highlight the URL and click on the Copy button.
- Paste the URL and manually add the Timestamp using the steps mentioned in add a Timestamp manually.
Part 5: Is Timestamp Beneficial for your Video?
Timestamping your YouTube videos may decrease the watch time, but it enhances the user experience, and they want to see more of your videos. Apart from this, adding Timestamps to your videos make your videos discoverable through Google search. YouTube and Google will reward you for the videos in form of a high search engine ranking.
Bonus: How to Add YouTube Timestamp Link in YouTube Video Description
Adding a YouTube Timestamp link in your video description is easy. Here are the steps to do so.
- Go to your YouTube channel and select the video you want to add Timestamp to and then navigate to the description below it.
- Edit the description by clicking on the Edit Video button.
- You are redirected to the Video Details page. Here write 0:00 at the first part of the timecode, and then continue with the time of the key part of the video you want to add the Timestamp to in 2:40 format. You can add more Timestamp as well and then click on the Save button.

- Reload the video page and you will see auto-generated Timestamp Links at the specific time you provided in the description.
Note: You need to add at least three timestamps which are 10 seconds or longer in order to add timestamps successfully.
Conclusion
As much as possible YouTubers want to make videos short and to the point. However, if a video needs to be longer, you can still help users navigate through to find what is important to them by adding Timestamp to YouTube link or Timestamp the YouTube descriptions. This can help your viewers jump straight to the interesting part in the video, rather than viewing the entire video saving their time and boost user experience.
Richard Bennett
Richard Bennett is a writer and a lover of all things video.
Follow @Richard Bennett
Richard Bennett
Mar 27, 2024• Proven solutions
It is a well-known fact that internet users have a short interest span, about just eight seconds. This attention span applies to all internet platforms including YouTube. YouTube is the second largest and most visited search engine after Google. It provides users with information through engaging and eye-catchy videos. However, certain videos are longer where only a particular section of the video holds the important information. Viewers tend to skip the long videos and if you do not want this to happen to you, you can link to that specific part on your video adding value for your channel viewers with a link known as the YouTube Timestamp link.
When you have a Timestamp link on your video, you can help your viewers directly reach the specific time in the video. This helps avoid the viewers from losing interest or to search for the key part in your video themselves.
Here in this article, we will explain Timestamp links, how to add Timestamp to YouTube video links, and what are the benefits of Timestamp.
- Part 1: YouTube Timestamp Links Introduction
- Part 2: Adding a Timestamp to YouTube Video Link on Desktop
- Part 3: How to Share Specific Parts of YouTube Video
- part 4: Getting YouTube Timestamp Link on Mobile
- Part 5: FAQ About YouTube Timestamps
Part 1: What is YouTube Timestamp Links
In this fast-paced world where viewers have limited time at hand, YouTube Timestamp links are extremely helpful. These links are anchor text or video hyperlinks found either in the description beneath the video or at the video link end.
The Timestamps links allow you to put a link to a key moment in your YouTube video allowing the viewers and subscribers to view the video at the precise time specified. Your YouTube video maybe half an hour long or maybe your users do not have the time now or forget to later watch your video, but when you add Timestamp to the YouTube link, you provide them ways to get to the content quickly enhancing the user experience.
In addition to this, you can even provide a reference in minutes and hours where necessary. The YouTube Timestamp link acts as a guide that directs viewers to the part of the video, which is most relevant to them without having to watch the entire video.
Part 2: How to Add a Timestamp to YouTube Video Link on Desktop?
In the following section, I will show you how to add timestamp to YouTube video link in several ways.
Use YouTube’s Share Feature
Using YouTube’s share feature is the simplest way to add Timestamp to YouTube videos. Here are easy steps to follow to do this.
- Open the YouTube video on your desktop that you want to share.
- Play the video or navigate the timeline and stop at the key moment you wish to apply the timestamp to.
- Now click on the Share button, a pop-up will appear. Under the URL, you will see a small box indicating Start at. The Timestamp is generated automatically, but you can adjust it.
- Copy the updated URL with Timestamp to share the video or click on the social sharing icons to do so.
- When your viewers click on this URL, the video will begin at the specified Timestamp.
Use the Browser URL to add Timestamp manually
You can add Timestamp manually as well. Follow the step-by-step guide below to add a Timestamp manually.
- Open your YouTube video in a browser on your desktop and then find the URL in the browser’s address bar.
- Enter the specific time you want the viewers to watch the video from at the end of the video URL.
You can add time manually in two ways depending on the URL.
?t=As or
&t=As
“youtu.be/” Format
If your YouTube video link is a youtu.be format, then just add ?t=As at the end of the video link. The A denotes the seconds at which you want the viewer to watch your video. The time can also be specified in minutes and seconds and when you want to do that just add ?t=AmBs. For instance, ?t=2m40s.
“youtube.com/” Format
When your YouTube video link has a youtube.com format, the adjustment starts with an ampersand. &t=As or &t=AmBs is what you can use. If you are looking to add the Timestamp at 2m40s, just add “&t=2m40s at the end of the video URL.
Whenever anybody uses the URL with Timestamp, the video will start from the specified time.
However, when adding a Timestamp manually, always leave include whole numbers. For example, if the time starts at 4m, use 4 and not 04.
Copy video URL at current time
You can use YouTube’s built-in feature to share the key parts of your YouTube video. Follow the steps here.
- Visit YouTube and open the video you want to add Timestamp link to.
- Play the video or navigate the timeline to reach the specific part you like to use in Timestamp.
- Now either press Ctrl + click or right-click anywhere on the video. A pop-up opens where you can see various texts, click on the Copy video URL at current time and share the link.
- Anyone who clicks on this link will be instantly transported to the exact segment of your YouTube video.
Part 3: How to Share Specific Parts of Videos with Vibby and Get YouTube Link with Timestamp
The above-mentioned methods to add and send YouTube link with timestamp are quick and easy, but they have a few limitations. If you need more control and share highlighted parts of YouTube video without cutting the video, you need to use a third-party tool known as Vibby.
Vibby allows you to not only share specific parts of videos from YouTube but other platforms as well like Vimeo and Twitch. With the tool, you can clip multiple sections of the video and share them with others.
- To get started, signup either with mail, Google, Twitter, Facebook, or Twitch account.
- Once signed in, go to Create vib at the top left corner and then paste the URL of the YouTube video you would like to share and then click on the Start button.
- Your video will load in the Vibby editor, now click on Highlight the parts to share.
- Here you will see the Start highlight button, jump 5-sec option, option to switch between HD and SD video quality, and volume control button. Navigate to the part you want to share and click on Start highlight.
- When you reach the end of the part, click on Finish highlight. Repeat the process to highlight multiple parts of the video. All the highlighted parts will appear in a list on the right side of the screen.
- Add a description to each part and format it, you have the option to preview before hitting the Save vib button.
- Name the vib and assign a category and then publish it to Vibby or make it a private vib.
- You get a dedicated link to your vib with the ability to embed it on your website or blog.
In this way, you can share the highlights of the YouTube video or Vimeo video easily.
Part 4: How to Get YouTube Timestamp Link on iPhone and Android?
Linking to specific YouTube Timestamp Link is straightforward on both iPhone and Android.
- Go to YouTube and select the video you want to share.
- Move through the progress bar of the video to reach the key part and click on the Share button.
- A pop-up menu appears, highlight the URL and click on the Copy button.
- Paste the URL and manually add the Timestamp using the steps mentioned in add a Timestamp manually.
Part 5: Is Timestamp Beneficial for your Video?
Timestamping your YouTube videos may decrease the watch time, but it enhances the user experience, and they want to see more of your videos. Apart from this, adding Timestamps to your videos make your videos discoverable through Google search. YouTube and Google will reward you for the videos in form of a high search engine ranking.
Bonus: How to Add YouTube Timestamp Link in YouTube Video Description
Adding a YouTube Timestamp link in your video description is easy. Here are the steps to do so.
- Go to your YouTube channel and select the video you want to add Timestamp to and then navigate to the description below it.
- Edit the description by clicking on the Edit Video button.
- You are redirected to the Video Details page. Here write 0:00 at the first part of the timecode, and then continue with the time of the key part of the video you want to add the Timestamp to in 2:40 format. You can add more Timestamp as well and then click on the Save button.
- Reload the video page and you will see auto-generated Timestamp Links at the specific time you provided in the description.
Note: You need to add at least three timestamps which are 10 seconds or longer in order to add timestamps successfully.
Conclusion
As much as possible YouTubers want to make videos short and to the point. However, if a video needs to be longer, you can still help users navigate through to find what is important to them by adding Timestamp to YouTube link or Timestamp the YouTube descriptions. This can help your viewers jump straight to the interesting part in the video, rather than viewing the entire video saving their time and boost user experience.
Richard Bennett
Richard Bennett is a writer and a lover of all things video.
Follow @Richard Bennett
Extract Your Favorites: Best Playlist Tools Reviewed and Rated
11 FREE YouTube Playlist Downloaders [Online/PC/Android/iOS]

Shanoon Cox
Mar 27, 2024• Proven solutions
Plenty of people spends all kinds of time on YouTube organizing their favorite playlists filled to the brim with the songs they love. YouTube has become one of the top destinations for music lovers to check out their favorite artists, but what do you want to do when you want to take those playlists that you’ve painstakingly edited on the go with you?
This is where you might need to think about a YouTube playlist downloader, which is a computer or mobile application that allows you to download a YouTube playlist so you can take them anywhere.
- Part 1: Top 11 Best YouTube Playlist Downloaders
- Bonus Tip: The Best YouTube Video Editor - Wondershare Filmora - [Free to Use]
Top 11 Best YouTube Playlist Downloaders 2024
When you’re ready to convert a YouTube playlist to MP3 format for portable, simple listening anywhere you go on your computer, smartphone, or tablet, then you are going to need a software application to give you a hand. There are plenty of good options out there for Windows, macOS, Linux, Android, and iOS, but how do you narrow down the best of the best?
It’s simple! Use this handy list to find some of the very best YouTube playlist downloader apps to make downloading your favorite playlists for offline use really simple.
Note: We resolutely oppose all forms of copyright-infringing downloads. This tutorial is only for downloading YouTube videos/audio materials from your own channel.
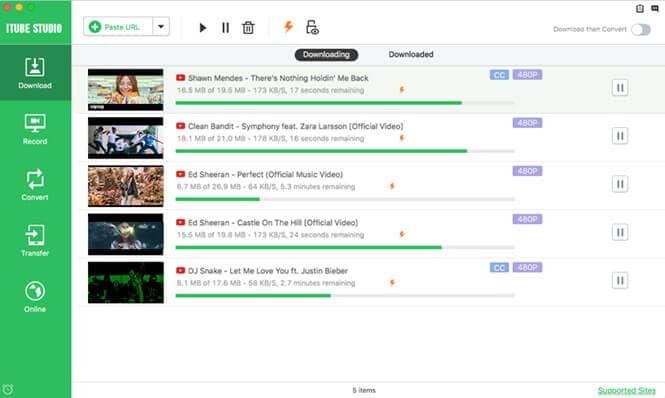
1. Filmora YouTube Playlist Downloader
Filmora YouTube Playlist Downloader offers the best way to record YouTube playlists, videos or audios in the highest quality. You only need 2 steps to get the downloaded YouTube files. Plus, Filmora owns plenty of AI editing tools to help you re-edit or create YouTube videos.
Download Playlist from YouTube
For Win 7 or later (64-bit)
 Secure Download
Download Playlist from YouTube
For macOS 10.14 or later
Secure Download


Step 1: First, download Filmora YouTube Download Software from the button above and launch it. Open the YouTube playlist that you want to download for. Then click the ‘Screen Recorder‘ feature from the launch interface to record the screen. And now, play the YouTube playlist till it ends.
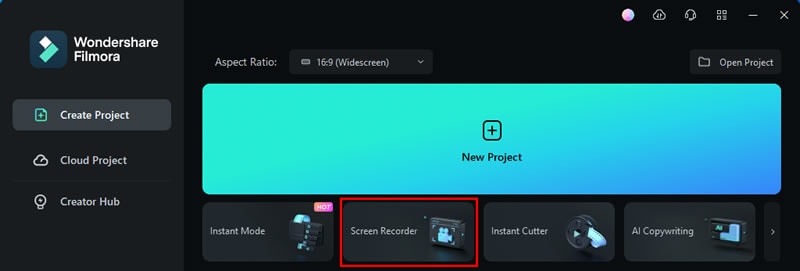
Step 2: You can now save the recorded YouTube playlist in different format diretly, or you can drag-and-drop the downloaded file to the timeline to get rid of the slicence part of the video by using the ‘Slience Detection ‘ function.

Want to Edit Videos with Ease and Share Them on YouTube Directly? Try This Out!
Filmora YouTube Video Editor makes it easy to create and edit videos with handy functions. You can create Youtube video script using ChatGPT , then make your creative ideas realize and share them on YouTube or other social media directly!
Create & Edit YouTube Videos Create & Edit YouTube Videos Learn More >
2. Ddownr (Web)
Ddownr is a super simple to use online platform that allows you to download your favorite independent YouTube videos or even entire playlists for free. All you need to do is visit Ddownr’s website, paste in the URL to the video or playlist you want to download, and the website will take care of the rest for you.
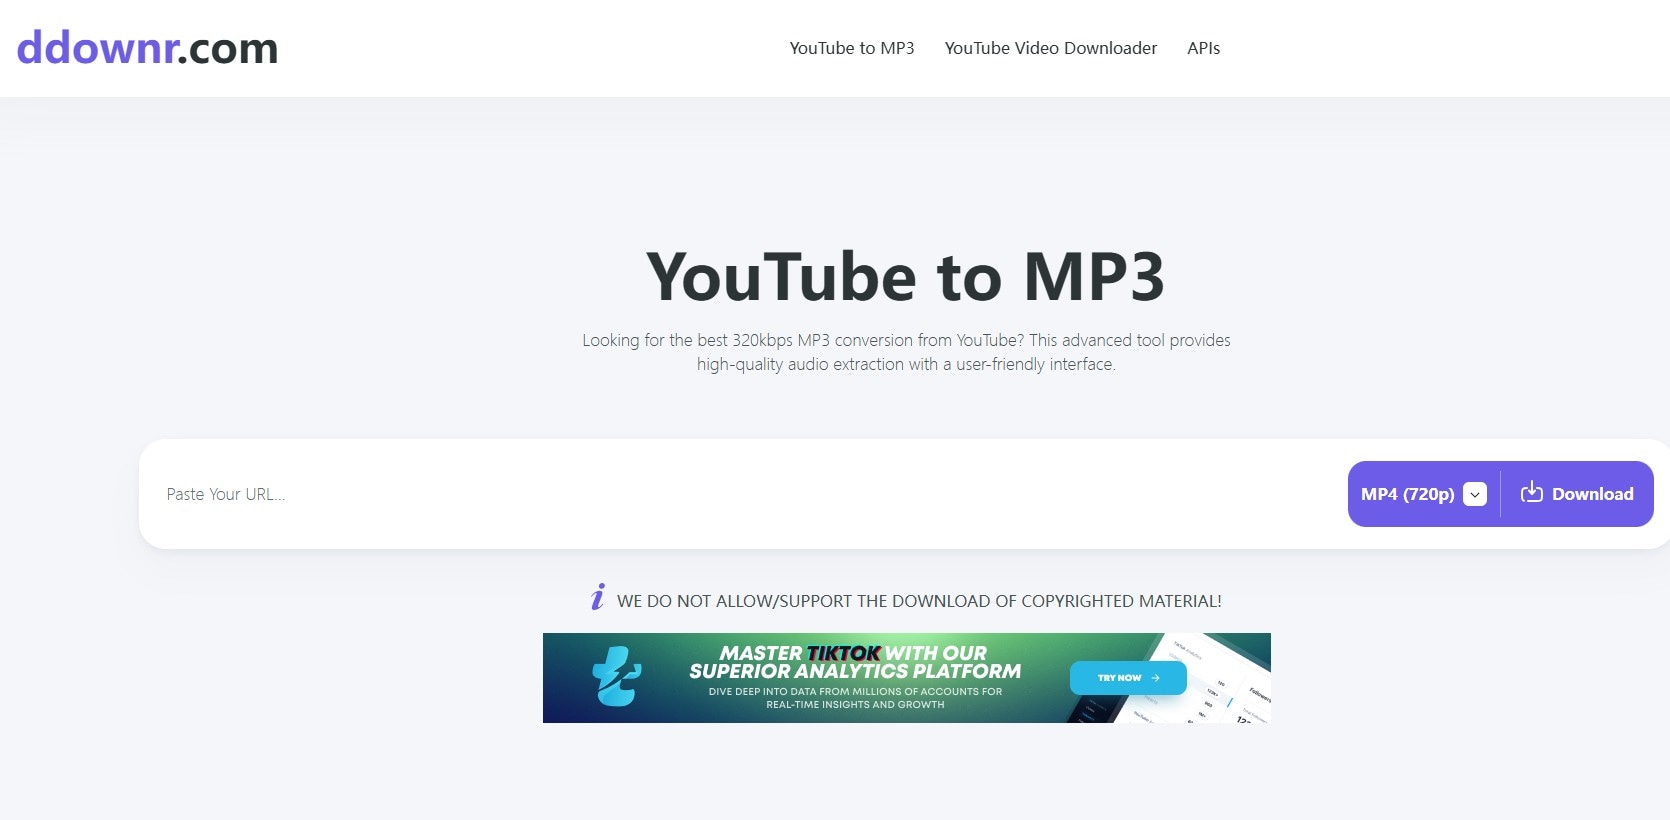
Once finished, it will present your download to you so you can easily save it to your device. The best part is that since Ddownr is online, you don’t need to worry about downloading an application for a specific operating system. Simply visit the website, put in the link to your favorite video or playlist, and let the download commence.
3. 4K Video Downloader (Windows, macOS, Linux)
4K Video Downloader is an application for Windows, macOS, and Linux that allows you to download entire videos and playlists to watch or listen to later offline. This isn’t just for audio, either – you can download entire videos in any quality, all the way up to 4k.
Want to enjoy that awesome video you were checking out without sacrificing the quality? 4K Video Downloader is going to be one of the best options to choose if video quality matters to you. What’s best is that you can download your favorite videos and playlists on your computer and then move them over to your phone to enjoy on the go, if you’d like.
YouTube Video Downloader & Editor
Filmora YouTube Playlist Downloader & Editor
• Free to screen record every videos, audio, playlist from YouTube.
• Edit YouTube video with popular video templates and effects.
• Change video ratio to match YouTube channel or YouTube shorts.
• Cross-platform supported - (Windows, Mac, iOS, Android)
YouTube Playlist Download YouTube Playlist Download YouTube Playlist Download Learn More >
4. Loader.to (Web)
Loader.to really couldn’t make it any easier to get the video or playlist you would like to download in almost any format you can think of, without even worrying about downloading yet another software application. Like Ddownr, Loader.to is completely based online, so you can access it from anywhere you’d like, on any device.
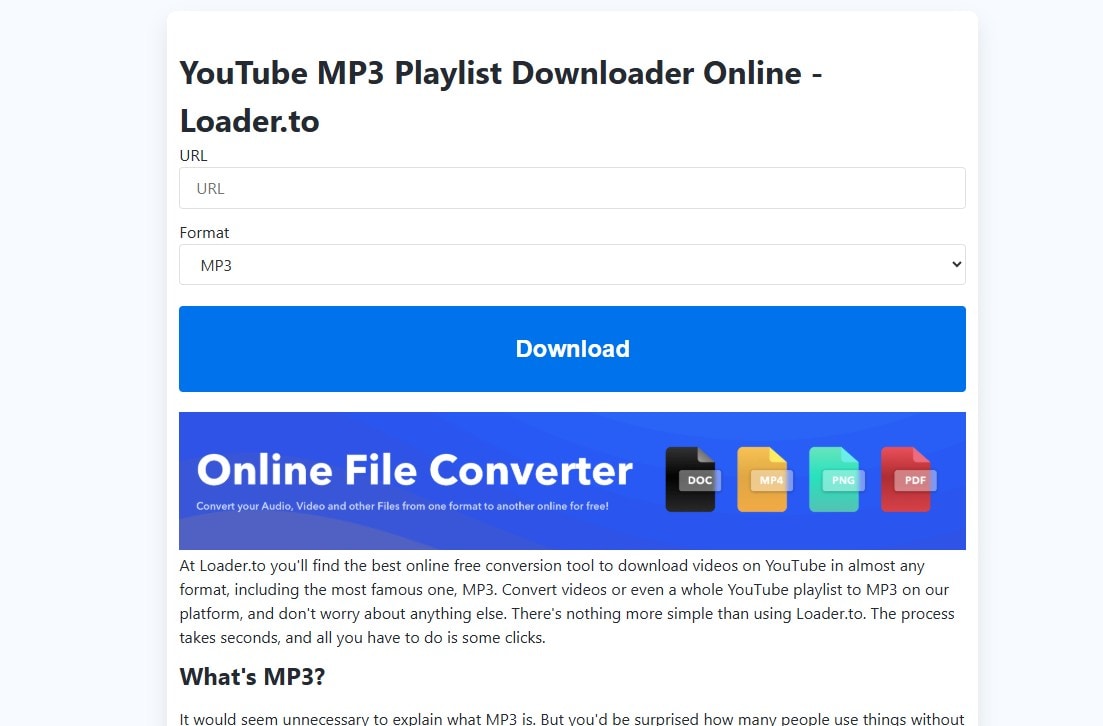
When you reach the homepage, you will be greeted with a menu allowing you to choose your format for audio and video and the URL to the video or playlist you would like to download. That is it – it couldn’t be simpler. For folks looking for a quick and easy-to-use way to download a YouTube playlist online, this is one of the best places to start.
5. By Click Downloader (Windows)
By Click Downloader is a software application for Windows computers that allows you to download full high-definition videos or audio from YouTube. You can choose to keep the whole video or convert it to audio-only formats such as .mp3 to listen to later on.

The software is completely free to use but limited to being available on only one platform. If you are coming from macOS, Linux, or a smartphone OS, you will need to look elsewhere. For Windows users, however, By Click Downloader is a solid YouTube playlist downloader that anyone can use and understand.
6. Snapdownloader (Windows)
Snapdownloader is another downloader software application that is only for Windows, which could limit some users. However, for the Windows-faithful out there, you have a great option to grab your favorite videos and playlists from YouTube for later viewing and listening. It supports more than just YouTube downloads, too – you can grab videos from Facebook and other sites in many different qualities, all the way up to 8k.
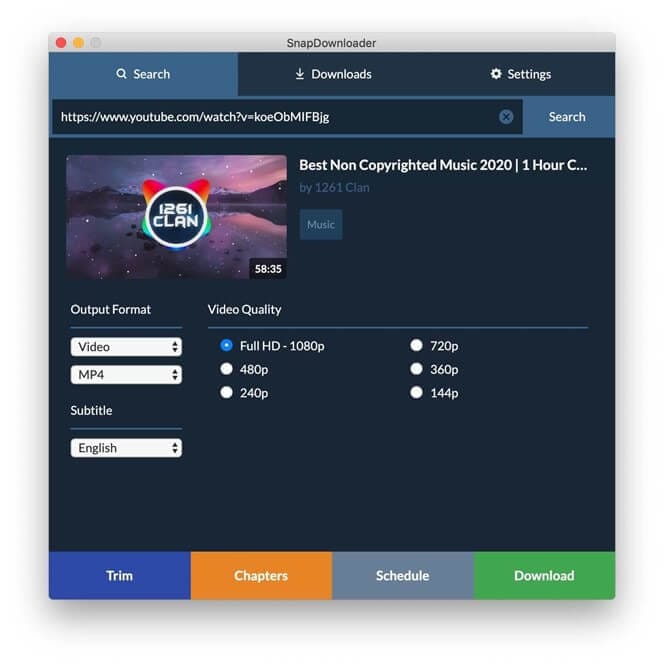
To make things even easier for you, the application has a built-in video editor of sorts that allows you to trim your videos as you see fit, so if you need to make them a little smaller for simpler storage on low-capacity hard drives, this might be the best option for you to grab those YouTube playlists you love.
Try Filmora to Download YouTube Playlists & Videos and Edit for Free!
Filmora helps to download YouTube playlists without ads and watermark attached, it also possesses with comprehensive editing tools for creating YouTube videos. You can use the AI helpers to add trendy visual effects and popular emojis to re-edit and polish your video.
Download and Edit YouTube Videos Download and Edit YouTube Videos Learn More >
7. iTubeGo (Windows, macOS, Android)
iTubeGo is a family of software applications that take things beyond simply downloading YouTube videos. Supported on Windows, macOS, and Android, you can quickly download playlists and videos from YouTube and thousands of other sites that host videos.
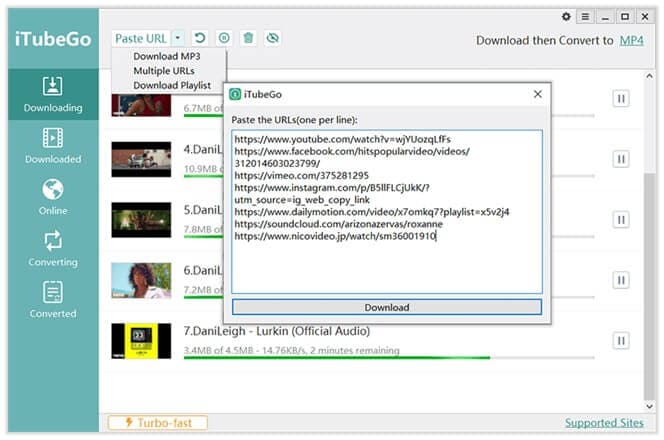
Not only can you download your favorite videos and playlists, but you can also convert them into your favorite audio formats for simple listening at any time you’d like.
8. Videoder (Windows, Android)
Videoder supports Windows and Android and is capable of downloading any of your favorite YouTube videos and playlists quickly and easily. The app sets itself apart with its own built-in web browser and ad blocker, so you can enjoy those videos with fewer annoying commercials.
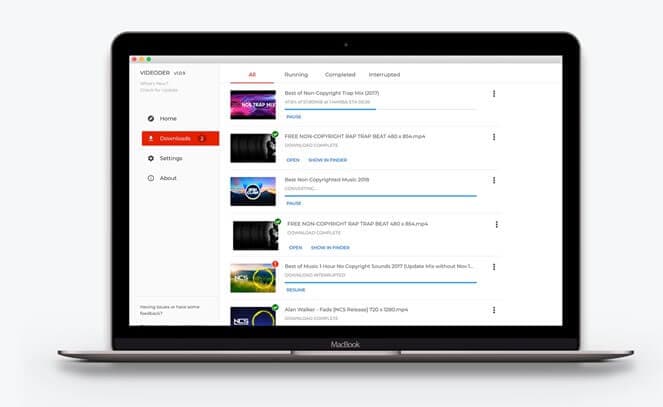
What’s more, Videoder claims to handle video downloads up to 4 times faster than competing YouTube playlist downloader applications.
9. DVDVideoSoft (Windows, macOS)
DVDVideoSoft is a freeware application for Windows and macOS that allows users to download their favorite YouTube playlists and videos to convert them to any audio format of their choosing or view the entire video if they would like. Similar to Snapdownloader, this application also has a built-in miniature video editor so you can conveniently edit your downloaded playlists and videos to your liking.
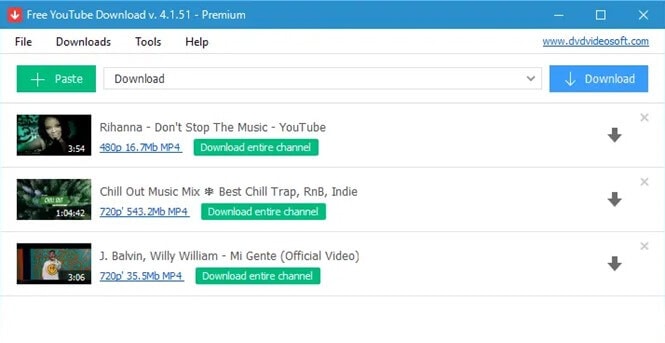
To make things even better, the developers of the software have placed a handy FAQ and support page on their website, so you always have a resource you can head to if you have any questions.
10. iTube HD Video Downloader (macOS)
When you want to scoop up those HD videos to watch later on, you want to make sure you use quality software to get it done. With iTube HD Video Downloader , you can grab those playlists and videos up to 3 times faster than some other YouTube downloader applications, and you can be sure that you can enjoy them in high-definition, anytime you’d like.
This application is available for users of macOS.
11. YouTubePlaylist.cc (Web)
YouTubePlaylist.cc is one of the top destinations on the internet to download YouTube playlists and convert them directly into your favorite audio format before adding it to your phone or computer. This is a web-based platform, so you can be sure that you can easily download all of your favorite playlists without having to download a specialized application for the occasion.
Bonus Tip: The Best YouTube Video Editor - Wondershare Filmora
Filmora is a great software application by Wondershare that allows you to edit your YouTube videos with absolute ease. You don’t even need to be a video editing pro to get started because with Filmora’s expert documentation and simple onboarding, anyone can pick it up and start editing videos as soon as they would like.
Filmora owns a lot of AI tools to help you make videos more intelligent! Watch the video to know more.
For Win 7 or later (64-bit)
Secure Download
For macOS 10.14 or later
Secure Download
Filmora own some new features to make video editing easier for you. Let’s have a look at the new features.
- Effect Plugins: Cooperate with NewBlue & Boris, you can apply Hollywood-style effects to your videos.
- Stock Media: Find the media suitable for your video from Giphy, Pixabay, Unsplash in Filmora.
- Speed Raming: Freely adjust the speed of your video.
- Wondershare Drive: Upload your projects to Wondeshare Drives and share them with your friends or colleagues.
Anyone with a Windows or macOS computer can get started using Filmora right now to edit their YouTube videos to their liking and start racking up the views.
Which YouTube Playlist Downloader Will You Pick?
Now that you know some of the very best YouTube playlist downloader applications around, you are all set to begin downloading your favorite videos and playlists so you can watch or listen to them at any point you would like when you are offline or on the go.
Enjoy your favorite music, shows, and more with the ability to download YouTube playlists anytime, and enjoy being able to take your songs on the go thanks to the YouTube playlist to mp3 conversion feature offered by so many of these applications. It has never been easier to get your hands on the videos and tracks of your choice with the wide selection of downloader apps available today, so pick your favorite and jump on downloading all of your favorite playlists.
Youtube Playlist Downloader Software
For Win 7 or later (64-bit)
Secure Download
Youtube Playlist Downloader Software
For macOS 10.14 or later
Secure Download
Shanoon Cox
Shanoon Cox is a writer and a lover of all things video.
Follow @Shanoon Cox
Shanoon Cox
Mar 27, 2024• Proven solutions
Plenty of people spends all kinds of time on YouTube organizing their favorite playlists filled to the brim with the songs they love. YouTube has become one of the top destinations for music lovers to check out their favorite artists, but what do you want to do when you want to take those playlists that you’ve painstakingly edited on the go with you?
This is where you might need to think about a YouTube playlist downloader, which is a computer or mobile application that allows you to download a YouTube playlist so you can take them anywhere.
- Part 1: Top 11 Best YouTube Playlist Downloaders
- Bonus Tip: The Best YouTube Video Editor - Wondershare Filmora - [Free to Use]
Top 11 Best YouTube Playlist Downloaders 2024
When you’re ready to convert a YouTube playlist to MP3 format for portable, simple listening anywhere you go on your computer, smartphone, or tablet, then you are going to need a software application to give you a hand. There are plenty of good options out there for Windows, macOS, Linux, Android, and iOS, but how do you narrow down the best of the best?
It’s simple! Use this handy list to find some of the very best YouTube playlist downloader apps to make downloading your favorite playlists for offline use really simple.
Note: We resolutely oppose all forms of copyright-infringing downloads. This tutorial is only for downloading YouTube videos/audio materials from your own channel.
1. Filmora YouTube Playlist Downloader
Filmora YouTube Playlist Downloader offers the best way to record YouTube playlists, videos or audios in the highest quality. You only need 2 steps to get the downloaded YouTube files. Plus, Filmora owns plenty of AI editing tools to help you re-edit or create YouTube videos.
Download Playlist from YouTube
For Win 7 or later (64-bit)
Secure Download
Download Playlist from YouTube
For macOS 10.14 or later
Secure Download
Step 1: First, download Filmora YouTube Download Software from the button above and launch it. Open the YouTube playlist that you want to download for. Then click the ‘Screen Recorder‘ feature from the launch interface to record the screen. And now, play the YouTube playlist till it ends.
Step 2: You can now save the recorded YouTube playlist in different format diretly, or you can drag-and-drop the downloaded file to the timeline to get rid of the slicence part of the video by using the ‘Slience Detection ‘ function.
Want to Edit Videos with Ease and Share Them on YouTube Directly? Try This Out!
Filmora YouTube Video Editor makes it easy to create and edit videos with handy functions. You can create Youtube video script using ChatGPT , then make your creative ideas realize and share them on YouTube or other social media directly!
Create & Edit YouTube Videos Create & Edit YouTube Videos Learn More >
2. Ddownr (Web)
Ddownr is a super simple to use online platform that allows you to download your favorite independent YouTube videos or even entire playlists for free. All you need to do is visit Ddownr’s website, paste in the URL to the video or playlist you want to download, and the website will take care of the rest for you.
Once finished, it will present your download to you so you can easily save it to your device. The best part is that since Ddownr is online, you don’t need to worry about downloading an application for a specific operating system. Simply visit the website, put in the link to your favorite video or playlist, and let the download commence.
3. 4K Video Downloader (Windows, macOS, Linux)
4K Video Downloader is an application for Windows, macOS, and Linux that allows you to download entire videos and playlists to watch or listen to later offline. This isn’t just for audio, either – you can download entire videos in any quality, all the way up to 4k.
Want to enjoy that awesome video you were checking out without sacrificing the quality? 4K Video Downloader is going to be one of the best options to choose if video quality matters to you. What’s best is that you can download your favorite videos and playlists on your computer and then move them over to your phone to enjoy on the go, if you’d like.
YouTube Video Downloader & Editor
Filmora YouTube Playlist Downloader & Editor
• Free to screen record every videos, audio, playlist from YouTube.
• Edit YouTube video with popular video templates and effects.
• Change video ratio to match YouTube channel or YouTube shorts.
• Cross-platform supported - (Windows, Mac, iOS, Android)
YouTube Playlist Download YouTube Playlist Download YouTube Playlist Download Learn More >
4. Loader.to (Web)
Loader.to really couldn’t make it any easier to get the video or playlist you would like to download in almost any format you can think of, without even worrying about downloading yet another software application. Like Ddownr, Loader.to is completely based online, so you can access it from anywhere you’d like, on any device.
When you reach the homepage, you will be greeted with a menu allowing you to choose your format for audio and video and the URL to the video or playlist you would like to download. That is it – it couldn’t be simpler. For folks looking for a quick and easy-to-use way to download a YouTube playlist online, this is one of the best places to start.
5. By Click Downloader (Windows)
By Click Downloader is a software application for Windows computers that allows you to download full high-definition videos or audio from YouTube. You can choose to keep the whole video or convert it to audio-only formats such as .mp3 to listen to later on.
The software is completely free to use but limited to being available on only one platform. If you are coming from macOS, Linux, or a smartphone OS, you will need to look elsewhere. For Windows users, however, By Click Downloader is a solid YouTube playlist downloader that anyone can use and understand.
6. Snapdownloader (Windows)
Snapdownloader is another downloader software application that is only for Windows, which could limit some users. However, for the Windows-faithful out there, you have a great option to grab your favorite videos and playlists from YouTube for later viewing and listening. It supports more than just YouTube downloads, too – you can grab videos from Facebook and other sites in many different qualities, all the way up to 8k.
To make things even easier for you, the application has a built-in video editor of sorts that allows you to trim your videos as you see fit, so if you need to make them a little smaller for simpler storage on low-capacity hard drives, this might be the best option for you to grab those YouTube playlists you love.
Try Filmora to Download YouTube Playlists & Videos and Edit for Free!
Filmora helps to download YouTube playlists without ads and watermark attached, it also possesses with comprehensive editing tools for creating YouTube videos. You can use the AI helpers to add trendy visual effects and popular emojis to re-edit and polish your video.
Download and Edit YouTube Videos Download and Edit YouTube Videos Learn More >
7. iTubeGo (Windows, macOS, Android)
iTubeGo is a family of software applications that take things beyond simply downloading YouTube videos. Supported on Windows, macOS, and Android, you can quickly download playlists and videos from YouTube and thousands of other sites that host videos.
Not only can you download your favorite videos and playlists, but you can also convert them into your favorite audio formats for simple listening at any time you’d like.
8. Videoder (Windows, Android)
Videoder supports Windows and Android and is capable of downloading any of your favorite YouTube videos and playlists quickly and easily. The app sets itself apart with its own built-in web browser and ad blocker, so you can enjoy those videos with fewer annoying commercials.
What’s more, Videoder claims to handle video downloads up to 4 times faster than competing YouTube playlist downloader applications.
9. DVDVideoSoft (Windows, macOS)
DVDVideoSoft is a freeware application for Windows and macOS that allows users to download their favorite YouTube playlists and videos to convert them to any audio format of their choosing or view the entire video if they would like. Similar to Snapdownloader, this application also has a built-in miniature video editor so you can conveniently edit your downloaded playlists and videos to your liking.
To make things even better, the developers of the software have placed a handy FAQ and support page on their website, so you always have a resource you can head to if you have any questions.
10. iTube HD Video Downloader (macOS)
When you want to scoop up those HD videos to watch later on, you want to make sure you use quality software to get it done. With iTube HD Video Downloader , you can grab those playlists and videos up to 3 times faster than some other YouTube downloader applications, and you can be sure that you can enjoy them in high-definition, anytime you’d like.
This application is available for users of macOS.
11. YouTubePlaylist.cc (Web)
YouTubePlaylist.cc is one of the top destinations on the internet to download YouTube playlists and convert them directly into your favorite audio format before adding it to your phone or computer. This is a web-based platform, so you can be sure that you can easily download all of your favorite playlists without having to download a specialized application for the occasion.
Bonus Tip: The Best YouTube Video Editor - Wondershare Filmora
Filmora is a great software application by Wondershare that allows you to edit your YouTube videos with absolute ease. You don’t even need to be a video editing pro to get started because with Filmora’s expert documentation and simple onboarding, anyone can pick it up and start editing videos as soon as they would like.
Filmora owns a lot of AI tools to help you make videos more intelligent! Watch the video to know more.
For Win 7 or later (64-bit)
Secure Download
For macOS 10.14 or later
Secure Download
Filmora own some new features to make video editing easier for you. Let’s have a look at the new features.
- Effect Plugins: Cooperate with NewBlue & Boris, you can apply Hollywood-style effects to your videos.
- Stock Media: Find the media suitable for your video from Giphy, Pixabay, Unsplash in Filmora.
- Speed Raming: Freely adjust the speed of your video.
- Wondershare Drive: Upload your projects to Wondeshare Drives and share them with your friends or colleagues.
Anyone with a Windows or macOS computer can get started using Filmora right now to edit their YouTube videos to their liking and start racking up the views.
Which YouTube Playlist Downloader Will You Pick?
Now that you know some of the very best YouTube playlist downloader applications around, you are all set to begin downloading your favorite videos and playlists so you can watch or listen to them at any point you would like when you are offline or on the go.
Enjoy your favorite music, shows, and more with the ability to download YouTube playlists anytime, and enjoy being able to take your songs on the go thanks to the YouTube playlist to mp3 conversion feature offered by so many of these applications. It has never been easier to get your hands on the videos and tracks of your choice with the wide selection of downloader apps available today, so pick your favorite and jump on downloading all of your favorite playlists.
Youtube Playlist Downloader Software
For Win 7 or later (64-bit)
Secure Download
Youtube Playlist Downloader Software
For macOS 10.14 or later
Secure Download
Shanoon Cox
Shanoon Cox is a writer and a lover of all things video.
Follow @Shanoon Cox
Also read:
- Brief Basslines Video Music Mosaics
- [New] Elevate Engagement Crafting Effective YouTube Shorts
- Crafting Universal Streams for YouTube & Beyond Networks
- In 2024, Crafting Charismatic Videos with DIY Camera Setups
- [Updated] Auto-Play YouTube - Keep It Hidden, Stay Connected
- Innovative Nomadism How To Stand Out as A Modern Travel Videographer
- 9 Premier Apps for Extracting and Saving YouTube Videos on Android
- Proven Tactics Top 10 Secrets for Novice Vloggers' Success
- [New] Evaluating Best YouTube Extractors Available on Android
- [New] Comprehensive Directory Extracting YT Template Videos Online
- Enhance Creativity With 6 Premium and Complimentary Video Downloaders for 2024
- [Updated] Elevate Your Content's Visibility with These Gadgets
- [New] Audiovisual Harmony Merging Audio and Visual Elements on YouTube
- Crafting Motivational Life Vlogs for Fan Engagement for 2024
- Accolades Across Platforms for Video Creators for 2024
- Deciphering Content Control YouTube Vs. Creative Commons License
- In 2024, Easy Steps How to Master the Best of 9 Free YouTube Logomakers
- Finding Legal Music A Producer's Manual
- Elevate Video Playback Embrace the Power of AV1 in YouTube
- The Art of Self-Recording Improving Your YouTube Presence
- Navigating the Markets YouTube's Top Picks
- [Updated] Deciphering YouTube's Featured Comment Selection
- Unlock Flawless Video Thumbnails Instantly
- In 2024, Essential Guide to Creating Popularity with YouTube Opens
- [New] Achieve Financial Insight The Simple Three Steps To Assess YouTube Earning Potential
- The Leading 8 YouTube Entities Experiencing Unprecedented Growth
- Sparkle up Video Previews Thin Neon Lines Add
- The Initial Stages of Joining YouTube as a Chanel Owner
- Essential Edits Best 8 Tools for Linux Users
- Youtube's Exclusive Club Festivities After VidCon
- Comprehensive Guide The Triad Technique for Assessing YouTube Revenue Streams for 2024
- In 2024, Enjoy Pure Browsing Our Selections of 7 Top Android AdBlockers
- [New] Channel Success Metrics Subscriber & Play Buttons
- Crafting a Unique Online Presence YouTube Edition
- Craft Your Channel's Moniker YouTube Naming Tools and Tips
- Cutting-Edge Computers Optimal Machines for Media Creation for 2024
- 10 Best Mobile Edits YouTube Shorts Clips on iOS/Android for 2024
- How to Remove Black Bars From YouTube Videos
- [New] Cost-Effective Audio Equipment for Newcomers
- [Updated] 1K Fans on YT Your Strategic Playbook for Success
- 2024 Approved Accelerating or Slowing Down YouTube Videos Playback
- Where to Buy a Monetized YouTube Channel A Complete Guide
- [New] Digital Arena 100+ Titles for the True Gamer
- Content Delivery Comparison Vimeo vs YouTube vs Dailymotion for 2024
- Unending Suspension How to Erase YouTube Shorts
- Exploring Income Derived From Each Watch on Video Platforms
- Amass 1,000 Supporters for Your Channel
- Channeling Success Emulating Top Video Bloggers' Techniques for 2024
- Uncover These Ten YouTube Sources with the Fastest Growth Rates
- Revamp Your Channel's Image, Amplify Your Subscription Count
- A Step-by-Step Guide on Using ADB and Fastboot to Remove FRP Lock from your Realme C33 2023
- How to Update iPhone 13 Pro without iTunes? | Dr.fone
- [Updated] 2024 Approved Revolutionary Bio Blueprint Essential Strategies for Maximum Viewership on TikTok-Filmora Platforms
- 2024 Approved How to Install Linux on Chromebook
- Updated Rotate Videos in a Flash A Step-by-Step Guide for 2024
- New In 2024, Troubleshooting Guide Stop Final Cut Pro X From Crashing
- Lava Yuva 3 Camera Not Working Unexpected Error? Fix It Now | Dr.fone
- [Updated] Quick Guide Converting Vimeo Footage to Eye-Catching GIFs for 2024
- Tuning Into Emotion Background Melodies in Film
- 3 Facts You Need to Know about Screen Mirroring Vivo X100 Pro | Dr.fone
- [Updated] Directly Connect Tweeting with Videos on WhatsApp for 2024
- [New] A Practical Approach to Scheduling on Zoom Platforms
- 2024 Approved 10 Premier Choices for No-Cost Screen Recording Tools
- In 2024, Apple ID is Greyed Out From iPhone 14 Pro Max How to Bypass?
- 2024 Approved Edit MOV Files for Free Top 6 Cutting Tools Reviewed
- [Updated] Dynamic Streaming Secrets to Effortless Monitor Sharing on FB
- Title: Navigating the World of Time Stamps in YouTube Links (Desktop/Mobile)
- Author: Kevin
- Created at : 2024-05-25 15:48:21
- Updated at : 2024-05-26 15:48:21
- Link: https://youtube-videos.techidaily.com/navigating-the-world-of-time-stamps-in-youtube-links-desktopmobile/
- License: This work is licensed under CC BY-NC-SA 4.0.
