
:max_bytes(150000):strip_icc():format(webp)/tiktok-messages-889fef4cdfac41babb84770288f32cf2.jpg)
"Minute-by-Minute Mastery The Top Ten on YouTube Daily"
Minute-by-Minute Mastery: The Top Ten on YouTube Daily
Create High-Quality Video - Wondershare Filmora
An easy and powerful YouTube video editor
Numerous video and audio effects to choose from
Detailed tutorials provided by the official channel
Over the last ten years, YouTube views have skyrocketed. The top ten most watched YouTube video in 24 hours consists of musicians who managed to bring in millions of views within a few hours. As fans of these artists anxiously await new releases, they often jump at the opportunity of being among the first people to watch the latest video from their favorite artist.
In this article
01 Top 10 Most Watched YouTube Video in 24 Hours
02 Common Things About the Top 10 Most Watched YouTube Video in 24 Hours
03 How to Get as Many Views as Possible?
Top 10 Most Watched YouTube Video in 24 Hours
Music videos get the most views in 24 hours YouTube because fans of these artists can repeatedly play the songs. Here are ten YouTube videos that had the most views in a day.
1) Butter - BTS
With 108 million views in one day, Butter by BTS is undoubtedly the video with the most YouTube views in 24 hours. It is also the fastest YouTube video, as it reached 30 million views in 2 hours 20 minutes.
In the video, the superstar septet — Jin, Jimin, V, Jung Kook, J-Hope, Suga, and RM — appear in black-and-white, and they are wearing slick suits before it changes to color. They are rapping, singing, and dancing, with each one taking a turn to groove in an elevator. They also dance in a gymnasium and appear together on stage under pulsating lights.
2) Dynamite - BTS
Released on August 21, 2020, Dynamite by BTS hit 101.1 million views in 24 hours. That makes it the second most watched YouTube video in 24 hours. This upbeat disco-pop track has soul and funk elements inspired by the Seventies and Eighties. And this theme echoes in the vintage-inspired outfits the members are wearing and the nostalgic settings in the music video.
In the background, viewers will see a warmly-lit record store and poster-studded bedroom that has tributes to The Beatles and David Bowie. The choreography includes shoutouts to Michael Jackson and Elvis Presley and easy-to-follow freestyle dance moves that correspond well with the music.
3) How You Like That - Blackpink
How You Like That is one of the videos that had the most views in 24 hours YouTube, as it managed to get 86.3 million views in 24 hours. In the beginning scene of the videos, the four artists sit like queens atop steps. They dance in several positions, including the Arctic, a trapezoidal hall, and a jungle.
The quartet is united in a dance break inside a grand domed hall at the end of this colorful music video. Here, the backup dancers surround the South Korean girl group.
4) Ice Cream - Black Wink Ft Selena Gomez
Ice Cream by Blackpink and Selena Gomez is another video with the most YouTube views in 24 hours. It hit 79 million views on YouTube in 24 hours.
The video shows Blackpink and Gomes in several colorful outfits and sets. It starts with the scene of Gomez wearing a candy-striped bikini with a white sailor hat and gold hoop earrings; she is driving an ice cream truck packed with Serendipity Ice Cream. The members of Blackpink then appear and pop up smiling behind cardboard cutouts.
For the second post-chorus, the quartet appears in a pink ice cream parlor, and they are wearing black-and-white outfits and holding ice cream.
5) BTS and Halsey’s Boy With Luv
Boy With Luv had hit 74.6 million views on YouTube within 24 hours of its release. When the music video was released in 2019, it became the fastest-viewed and liked YouTube video, reaching 3 million likes in just 2 hours.
The music video features brightly-hued scenes with retro-feeling looks from the Bangtan Boys. These include fedoras, feathered blazers, and bright pink smoking jackets. It also emphasizes the group’s past through signage with phrases like Love and Persona.
6) Lalisa - Lisa
Lalisa by the Thai singer and rapper Lisa reached 73.6 million views on YouTube the day of its release. The visual includes multiple costume changes, including a detailed ensemble inspired by traditional Thai culture. The musician is seen sitting on an elaborately-sculpted throne wearing a tall pointed headdress, a golden beaded dress with a cape, and ear cuffs with golden jasmine.
7) Permission to Dance - BTS
This video had 72.3 million views on YouTube within 24 hours of release and became the 6th most watched YouTube video in 24 hours. Permission to Dance topped the charts in 5 countries, reaching the top ten in 10 other territories. In the video, BTS appears dancing in numerous settings. These include a patio, laundromat, and sunny locale.
8) Life Goes on - BTS
This video was released on November 19, 2020, and it quickly gained 71.6 million views in 24 hours. Life Goes on by BTS became the fifth most watched YouTube video in 24 hours on its release. In the music video, members of the group appear to be lazing around their dorm. V then drives them around, and they later watch films and go to an empty stadium where they perform the song.
9) Nain Bengali - Guru Randhawa
Nain Bengali is the first Indian music video to earn 71.4 million views on YouTube within 24 hours of its release. The music video shows Randhawa in a chick look. The artist experimented with a different look by dying his spike gray. Additionally, his confidence adds more elegance to his appearance. Guru also choreographed his moves in the video.
10) Me! - Taylor Swift and Brendon Urie
When Me! was released on April 26, 2019, it amassed 65.2 million YouTube views in 24 hours and broke the record previously held by Thank U, Next by Ariana Grande. The video also surpassed Taylor’s record set in 2017 with the music video Look What You Made Me Do.
The video is set in a chrysalis, and it opens with a scene of a snake slithering on a floor; it explodes into colorful butterflies to show the end of Taylor’s previous era. The video pans up to Urie and Taylor engaging in an argument. Taylor is donning a beautiful black and white tule dress that has floral accents.
Common Things About the Top 10 Most Watched YouTube Video in 24 Hours
Videos with the most YouTube views in 24 hours are all high-quality. The content is also engaging and innovative. Therefore, when viewers watch the videos, they repeat them several times.
Additionally, the channels where these videos have been posted have loads of subscribers. What’s more? The top ten videos with the most views in 24 hours have attention-grabbing thumbnails.
How to Get as Many Views as Possible?
If you want your YouTube videos to get lots of views, here are a few hacks you might want to consider.
- Make Eye-catching Videos with Filmora
You need to create high-quality, engaging videos to earn more views on YouTube. Luckily, you can use Filmora to make HD and attention-grabbing videos that will keep your viewers watching. This software allows you to add effects and filters to your videos to make them eye-catching. What’s more? You can use the tool to increase the brightness and adjust tone, white balance, saturation, and more. Your videos will look professional, and they will get more views when you upload them on your YouTube channel.

For Win 7 or later (64-bit)
For macOS 10.12 or later
- Actively Engage with Your Followers
Because YouTube’s algorithm heavily bases its rankings on clicks and comments, you need to engage with your audience and open the doors for more people to watch your video. Interaction with your audience also builds a strong following. You can nurture a community by responding to comments, particularly if one of the viewers asks a direct question. Other viewers will most likely comment on your videos when they are sure you will respond.

- Use Other Social Channels to Get More Views
Let the followers on your other social channels know every time you upload new video on your YouTube channel. You use a short teaser video to do this. People will see the teaser video and click the link you have provided to watch the video. You can also embed the videos in relevant blogs and web pages on your site.

- Optimize the Titles of Your Videos
Because YouTube is a search engine, SEO is crucial if you want people to find your videos and increase your views. As such, you need to conduct keyword research and include the primary keyword in your titles and video descriptions.
Conclusion
● Now that you know which videos have the most YouTube views in 24 hours and what they have in common, you can make a video that will get tons of views. Filmora helps you create videos that your audience will like and share. In turn, more people will watch your videos and subscribe to your channel.
Over the last ten years, YouTube views have skyrocketed. The top ten most watched YouTube video in 24 hours consists of musicians who managed to bring in millions of views within a few hours. As fans of these artists anxiously await new releases, they often jump at the opportunity of being among the first people to watch the latest video from their favorite artist.
In this article
01 Top 10 Most Watched YouTube Video in 24 Hours
02 Common Things About the Top 10 Most Watched YouTube Video in 24 Hours
03 How to Get as Many Views as Possible?
Top 10 Most Watched YouTube Video in 24 Hours
Music videos get the most views in 24 hours YouTube because fans of these artists can repeatedly play the songs. Here are ten YouTube videos that had the most views in a day.
1) Butter - BTS
With 108 million views in one day, Butter by BTS is undoubtedly the video with the most YouTube views in 24 hours. It is also the fastest YouTube video, as it reached 30 million views in 2 hours 20 minutes.
In the video, the superstar septet — Jin, Jimin, V, Jung Kook, J-Hope, Suga, and RM — appear in black-and-white, and they are wearing slick suits before it changes to color. They are rapping, singing, and dancing, with each one taking a turn to groove in an elevator. They also dance in a gymnasium and appear together on stage under pulsating lights.
2) Dynamite - BTS
Released on August 21, 2020, Dynamite by BTS hit 101.1 million views in 24 hours. That makes it the second most watched YouTube video in 24 hours. This upbeat disco-pop track has soul and funk elements inspired by the Seventies and Eighties. And this theme echoes in the vintage-inspired outfits the members are wearing and the nostalgic settings in the music video.
In the background, viewers will see a warmly-lit record store and poster-studded bedroom that has tributes to The Beatles and David Bowie. The choreography includes shoutouts to Michael Jackson and Elvis Presley and easy-to-follow freestyle dance moves that correspond well with the music.
3) How You Like That - Blackpink
How You Like That is one of the videos that had the most views in 24 hours YouTube, as it managed to get 86.3 million views in 24 hours. In the beginning scene of the videos, the four artists sit like queens atop steps. They dance in several positions, including the Arctic, a trapezoidal hall, and a jungle.
The quartet is united in a dance break inside a grand domed hall at the end of this colorful music video. Here, the backup dancers surround the South Korean girl group.
4) Ice Cream - Black Wink Ft Selena Gomez
Ice Cream by Blackpink and Selena Gomez is another video with the most YouTube views in 24 hours. It hit 79 million views on YouTube in 24 hours.
The video shows Blackpink and Gomes in several colorful outfits and sets. It starts with the scene of Gomez wearing a candy-striped bikini with a white sailor hat and gold hoop earrings; she is driving an ice cream truck packed with Serendipity Ice Cream. The members of Blackpink then appear and pop up smiling behind cardboard cutouts.
For the second post-chorus, the quartet appears in a pink ice cream parlor, and they are wearing black-and-white outfits and holding ice cream.
5) BTS and Halsey’s Boy With Luv
Boy With Luv had hit 74.6 million views on YouTube within 24 hours of its release. When the music video was released in 2019, it became the fastest-viewed and liked YouTube video, reaching 3 million likes in just 2 hours.
The music video features brightly-hued scenes with retro-feeling looks from the Bangtan Boys. These include fedoras, feathered blazers, and bright pink smoking jackets. It also emphasizes the group’s past through signage with phrases like Love and Persona.
6) Lalisa - Lisa
Lalisa by the Thai singer and rapper Lisa reached 73.6 million views on YouTube the day of its release. The visual includes multiple costume changes, including a detailed ensemble inspired by traditional Thai culture. The musician is seen sitting on an elaborately-sculpted throne wearing a tall pointed headdress, a golden beaded dress with a cape, and ear cuffs with golden jasmine.
7) Permission to Dance - BTS
This video had 72.3 million views on YouTube within 24 hours of release and became the 6th most watched YouTube video in 24 hours. Permission to Dance topped the charts in 5 countries, reaching the top ten in 10 other territories. In the video, BTS appears dancing in numerous settings. These include a patio, laundromat, and sunny locale.
8) Life Goes on - BTS
This video was released on November 19, 2020, and it quickly gained 71.6 million views in 24 hours. Life Goes on by BTS became the fifth most watched YouTube video in 24 hours on its release. In the music video, members of the group appear to be lazing around their dorm. V then drives them around, and they later watch films and go to an empty stadium where they perform the song.
9) Nain Bengali - Guru Randhawa
Nain Bengali is the first Indian music video to earn 71.4 million views on YouTube within 24 hours of its release. The music video shows Randhawa in a chick look. The artist experimented with a different look by dying his spike gray. Additionally, his confidence adds more elegance to his appearance. Guru also choreographed his moves in the video.
10) Me! - Taylor Swift and Brendon Urie
When Me! was released on April 26, 2019, it amassed 65.2 million YouTube views in 24 hours and broke the record previously held by Thank U, Next by Ariana Grande. The video also surpassed Taylor’s record set in 2017 with the music video Look What You Made Me Do.
The video is set in a chrysalis, and it opens with a scene of a snake slithering on a floor; it explodes into colorful butterflies to show the end of Taylor’s previous era. The video pans up to Urie and Taylor engaging in an argument. Taylor is donning a beautiful black and white tule dress that has floral accents.
Common Things About the Top 10 Most Watched YouTube Video in 24 Hours
Videos with the most YouTube views in 24 hours are all high-quality. The content is also engaging and innovative. Therefore, when viewers watch the videos, they repeat them several times.
Additionally, the channels where these videos have been posted have loads of subscribers. What’s more? The top ten videos with the most views in 24 hours have attention-grabbing thumbnails.
How to Get as Many Views as Possible?
If you want your YouTube videos to get lots of views, here are a few hacks you might want to consider.
- Make Eye-catching Videos with Filmora
You need to create high-quality, engaging videos to earn more views on YouTube. Luckily, you can use Filmora to make HD and attention-grabbing videos that will keep your viewers watching. This software allows you to add effects and filters to your videos to make them eye-catching. What’s more? You can use the tool to increase the brightness and adjust tone, white balance, saturation, and more. Your videos will look professional, and they will get more views when you upload them on your YouTube channel.
For Win 7 or later (64-bit)
For macOS 10.12 or later
- Actively Engage with Your Followers
Because YouTube’s algorithm heavily bases its rankings on clicks and comments, you need to engage with your audience and open the doors for more people to watch your video. Interaction with your audience also builds a strong following. You can nurture a community by responding to comments, particularly if one of the viewers asks a direct question. Other viewers will most likely comment on your videos when they are sure you will respond.
- Use Other Social Channels to Get More Views
Let the followers on your other social channels know every time you upload new video on your YouTube channel. You use a short teaser video to do this. People will see the teaser video and click the link you have provided to watch the video. You can also embed the videos in relevant blogs and web pages on your site.
- Optimize the Titles of Your Videos
Because YouTube is a search engine, SEO is crucial if you want people to find your videos and increase your views. As such, you need to conduct keyword research and include the primary keyword in your titles and video descriptions.
Conclusion
● Now that you know which videos have the most YouTube views in 24 hours and what they have in common, you can make a video that will get tons of views. Filmora helps you create videos that your audience will like and share. In turn, more people will watch your videos and subscribe to your channel.
Elite Recording Devices for Livestream Producers
Best YouTube Livestreaming Screen Recorders

Richard Bennett
Oct 26, 2023• Proven solutions
The global pandemic has changed the way we live for the time being, and right now, we cannot attend events in the same way we did at the beginning of the year.
A growing number of cultural organizations, businesses, and influential YouTubers are turning towards YouTube’s Live feature because it provides a simple way of broadcasting different types of content in real-time. YouTube Live is by no means a new option, since the platform first introduced live streaming features in 2008, and some twelve years later, the feature has never been more popular.
However, the live streams you broadcast on YouTube are stored for just a brief period of time, which means you have to search for alternative methods of saving them. That’s why in this article we are going to take you through the best YouTube Live screen recorders you can use to capture the video content you are sharing with your followers.
Note: We resolutely oppose all forms of copyright-infringing downloads. This tutorial is only for downloading YouTube videos/audio materials from your own channel.
Top 10+ YouTube Live Screen Recorders
The maximum resolution in which you can record computer screen , audio recording options, or customization of the recording area are some of the most important features you need to consider while choosing a YouTube Live screen recorder.
We have selected some of the best YouTube Live screen recorders that enable you to do much more than just record live streams. So, let’s take a look at what they have to offer.
1. OBS Studio
Price: Free
Compatibility: Windows, Linux, macOS
The vast majority of live streams you can find on Twitch and YouTube are made with OBS Studio, but besides broadcasting videos, the software also gives you access to screencasting tools. This means that you can specify the area of the screen you want to record, choose the recording’s resolution and frame rate, or adjust the audio recording options.
OBS Studio is the best free, open-source screen recording program you can download. You shouldn’t use a software just because it’s free, but OBS Studio is also an extremely versatile tool. You can both record and stream in high definition and it comes with the ability to record either through your webcam or through your screen. It records directly through the graphics card , which means it can capture games even when in full-screen mode whereas a lot of other screen-recording software forces you to play games in windowed mode. The high quality can be seen easily in whatever you choose to broadcast.
OBS Studio allows you to record videos from a variety of sources, which makes it a perfect option for capturing the content you share through YouTube Live since you can select a browser window you want to capture in just a few clicks. What’s more, this open-source software is equipped with basic video editing tools, which enables you to preview the video you recorded before publishing it, apply transitions between cuts, or perform basic color correction.
Check the detailed guide to How to Record with OBS .
2. XSplit
Price: $24.95 for a three-month license
Compatibility: Windows
This is yet another broadcasting software that is equipped with powerful screen recording tools. Setting up a new screencasting session with XSplit is a simple and intuitive process that is not going to take much more than a few moments of your time.
All you need to do is define a workspace, then pick the preferred resolution and frame rate. The software allows you to capture screens in 4K resolution and at 60 fps, but it also offers a variety of resolution and frame rate options so that you can choose the one that best fits your needs. Furthermore, you can record the computer audio, which enables you to capture the live stream’s audio in excellent quality. Besides YouTube Live, XSplit can be used with Zoom , Skype, Google Hangouts, and numerous other live streaming and video calling apps.
3. Filmora
Price: Free, pricing plans start at $49.99/year
Compatibility: macOS, Windows


If you are looking for a screen recorder that is stacked with powerful video editing features, then Filmora is a great option for you. Customizing a YouTube Live or any other screencasting session with this video editing software is easy, and you can choose the resolution, frame rate, or even if you want to show mouse clicks in the recording.
Capturing the webcam feed and the computer’s screen simultaneously is also an option, while you can also decide whether or not you want to record audio from a microphone, computer audio, or both at the same time.
What’s more Filmora lets you set up the maximum duration of a screen recording and you start, pause, resume or stop a screen recording session by using hotkeys. Once you are done recording the live stream you shared on YouTube, you can edit the footage you created before uploading it to your YouTube channel.
4. Wondershare DemoCreator
Compatibility: Windows
Price: Start from $9.99
DemoCreator is a recorder that focuses its overall user experience. It is able to easily record high-quality videos at up to 120 FPS (60 FPS for Mac) and allows you to simultaneously record both your screen and webcam. This software is incredibly user friendly and makes for an easy experience for new streamers. The dual recording makes it great for gamers who are also looking to film their reactions.
5. CloudApp
Price: Free, $10 per month for an individual user
Compatibility: Windows, macOS, Linux, Chrome
Starting a new screen capturing session with the CloudApp requires you to just specify the portion of the screen you want to capture and hit the record button. Moreover, you can choose if you want to record with or without a webcam and you have the option to enable or disable the audio recording option.
However, you can only create 90-second screen recordings with the free version of the CloudApp and you cannot set resolution or frame rate of the recording. That’s why you need to upgrade to the Pro version if you want to use it to record live streams on YouTube. The Pro subscription model also grants you access to basic video editing tools and a variety of file sharing options. In addition, CloudApp lets you create and annotate still images and GIFs, which makes it a great option for digital marketers.
6. Techsmith Camtasia
Price: Free trial, $269.05 one-time fee
Compatibility: Windows, macOS
You don’t need years of video editing experience to start a new screen recording session in Camtasia. In fact, you just have to click on the Record button that is located in the software’s tool panel and then customize the settings.
Camtasia lets you choose if you want to record the full screen or just a selected portion of the screen or decide if you want to switch the webcam or the microphone off. You should make sure that the System Audio feature is enabled in order to record the sound of the live stream you’re sharing on YouTube. Pausing or stopping a screencasting session requires you to either click on the appropriate buttons or use the keyboard-based hotkeys. After you are done recording a live stream you can edit the footage using Camtasia’s video editing tools.
7. ScreenRec
Price: Free
Compatibility: Windows, macOS, Linux
Recording any live stream or TV show you play on your computer with ScreenRec is a straightforward process that can be completed in just a few clicks. Simply drag the mouse cursor over the area you want to record, then hit the Record button when you are ready and ScreenRec will start capturing the computer screen.
Once the screencasting session is completed you will get a sharable link that can be embedded to a website or used to save an MP4 file on your hard drive. Furthermore, ScreenRec is equipped with analytics tools that show you how many views your videos attracted or for how long each visitor watched them. All of these features make ScreenRec an excellent option for anyone who wants to record a live stream on YouTube or any other on-screen activity.
8. Flashback Express
Price: Free
Compatibility: Windows
Flashback Express is a simple screen recorder that lets you create high-res videos effortlessly. Setting up a new screencasting session requires you to just specify the area of the screen you want to record, choose whether or not you want to record the webcam feed and hit the Record button.
There are no restrictions in terms of the duration of screen recordings you can make with Flashback Express and the software doesn’t watermark the video you create.
However, you can only save the files in MP4, AVI, or WMW formats and you cannot adjust the video’s frame rate or resolution. What’s more, editing videos or applying effects with Flashback Express isn’t possible and you must upgrade to FlashBack Pro if you want to edit the live streams you broadcast on YouTube.
This piece of software is user friendly, but it doesn’t have as many features as other products on the market. Having said that, it is still an excellent tool that will help you live stream gameplay easily. Although it doesn’t come with built-in video editing software, it is possible to download another program to do this for you (i.e. Filmora). Flashback Express has the ability to record through your headset or microphone as well.
9. VLC
Price: Free
Compatibility: macOS, Linux, Windows
This is an iconic media player that became famous for its versatility and support for nearly all video file formats. Besides being one of the best media players ever created, VLC is also equipped with screen recording and video editing tools.
In order to start a new screencasting session, you will have to go to the Media menu and then select the Open Capture Device option. Once the new window pops up on the screen you should change the Capture Mode to Desktop and then adjust the frame rate in accordance with your needs.
Click on the Play button, and then hit the Record button after the screen recording window appears on the screen. You can only record the entire screen with VLC, since customizing the recording area isn’t an option, and all your files will be captured in the RAW format which means that you may have to resize them before you upload them to YouTube.
10. Screencast-o-matic
Price: Free, pricing options start at $1.65 per month
Compatibility: macOS, Windows
As its name suggests, this software product makes the screen recording process almost automatic. You can choose if you want to record an entire screen or just a window you selected. In addition, Screencast-o-matic lets you record the desktop and webcam footage at the same time, and you can even zoom in while the screencasting session is still in progress.
The free version of the software offers only a basic set of features that doesn’t include the option to record system audio. This means that you have to opt for one of the available subscription models if you want to record your live streams on YouTube with Screencast-o-matic. What’s more, you will be to create videos that are longer than 15 minutes, create recordings without watermarks or add music to your recordings if you opt for Deluxe or Premiere pricing options.
11. QuickTime Player
Price: Free
Compatibility: macOS, Windows
Mac users who want to record content that is broadcasted via YouTube Live can do so without having to install a third-party app. Apple ceased the support for the Windows-based version of QuickTime Player in 2016 and PC users can only capture their screens with this software if they have some of its earlier versions.
In order to start a new screen recording session in QuickTime Player, you just have to go to the File menu and select the New Screen Recording option. The Screen Recording window where you can choose if you want to record audio or show mouse click in the recording will pop up on the screen. QuickTime Player lets you choose if you want to capture the entire screen or just a portion of it, and you can click on the Record button to start a new screencasting session. In order to save a video file you created, you just have to go to the File menu and pick the Save option.
How to Record a YouTube Live Stream with Filmora
Recording a YouTube Live stream with Filmora is easy even if you never went through this process before. You can set up a new screencasting session in just a few easy steps that won’t take more than a few moments to complete. Here’s what you need to do:
Step 1: Launch Filmora and create a new project. Go to the Media tab once the video editor’s main window loads and click on the Record drop-down menu that is located next to the Import drop-down menu.
Choose the Record PC Screen option and then proceed to customize the settings for your screencasting session.

Step 2: Click on the Rectangular icon in the upper left corner of the Wondershare Filmora Scrn window and choose either Full Screen, Custom, or Target Window option, depending on how you want to record a YouTube Live stream to define the area of the screen that is going to be recorded.
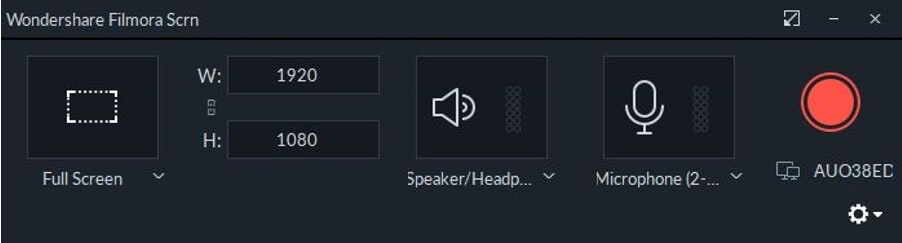
You can then proceed to insert the resolution your screen recording is going to have, and choose if you want to record system audio and sound from an external microphone.
Step 3: Click on the Gear icon below the Record button to gain access to additional settings, and then proceed to set the frame rate, adjust the video’s quality or activate the Show Mouse Clicks in Recording option.
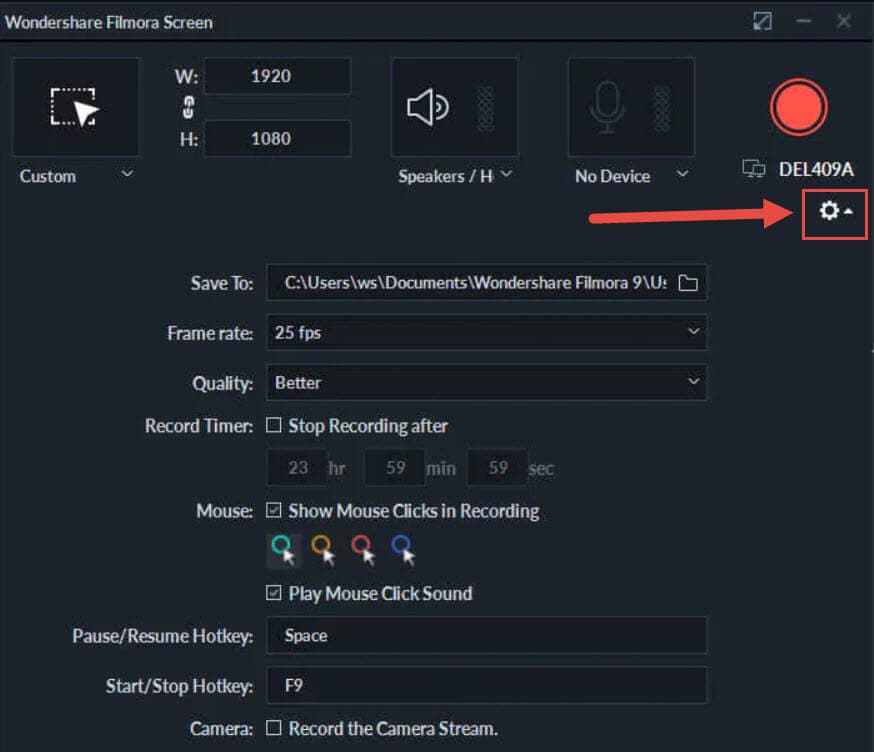
Make sure that the checkbox next to the Record the Camera Stream is marked if you want to record webcam feed and computer desktop at the same time.
Step 4: Press the red Record button in the upper right corner of the window and jump to the live stream. Once the broadcast is completed, you should click on the Stop button and use Filmora’s editing tools to remove all imperfections from the recording.
Filmora allows you to export all of your projects directly to your YouTube channel immediately after the rendering process is completed.
Frequently Asked Questions about YouTube Live Screen Recorders
1. Does YouTube Save Live Videos?
Stream Now, Mobile, Webcam, and Events streams can be stored automatically for 12 hours after they end. You can access all of your live streams by clicking on the Videos menu in the YouTube Studio and selecting the Live option and then change the Privacy setting in the Visibility menu.
2. How to use YouTube to Archive a Live Stream?
Once the live stream ends, you should go to the Dashboard and click on the Live feature, and then choose the Stream option. Check the Make Archive Unlisted When Complete checkbox and the live stream video will be saved accordingly.
Richard Bennett
Richard Bennett is a writer and a lover of all things video.
Follow @Richard Bennett
Richard Bennett
Oct 26, 2023• Proven solutions
The global pandemic has changed the way we live for the time being, and right now, we cannot attend events in the same way we did at the beginning of the year.
A growing number of cultural organizations, businesses, and influential YouTubers are turning towards YouTube’s Live feature because it provides a simple way of broadcasting different types of content in real-time. YouTube Live is by no means a new option, since the platform first introduced live streaming features in 2008, and some twelve years later, the feature has never been more popular.
However, the live streams you broadcast on YouTube are stored for just a brief period of time, which means you have to search for alternative methods of saving them. That’s why in this article we are going to take you through the best YouTube Live screen recorders you can use to capture the video content you are sharing with your followers.
Note: We resolutely oppose all forms of copyright-infringing downloads. This tutorial is only for downloading YouTube videos/audio materials from your own channel.
Top 10+ YouTube Live Screen Recorders
The maximum resolution in which you can record computer screen , audio recording options, or customization of the recording area are some of the most important features you need to consider while choosing a YouTube Live screen recorder.
We have selected some of the best YouTube Live screen recorders that enable you to do much more than just record live streams. So, let’s take a look at what they have to offer.
1. OBS Studio
Price: Free
Compatibility: Windows, Linux, macOS
The vast majority of live streams you can find on Twitch and YouTube are made with OBS Studio, but besides broadcasting videos, the software also gives you access to screencasting tools. This means that you can specify the area of the screen you want to record, choose the recording’s resolution and frame rate, or adjust the audio recording options.
OBS Studio is the best free, open-source screen recording program you can download. You shouldn’t use a software just because it’s free, but OBS Studio is also an extremely versatile tool. You can both record and stream in high definition and it comes with the ability to record either through your webcam or through your screen. It records directly through the graphics card , which means it can capture games even when in full-screen mode whereas a lot of other screen-recording software forces you to play games in windowed mode. The high quality can be seen easily in whatever you choose to broadcast.
OBS Studio allows you to record videos from a variety of sources, which makes it a perfect option for capturing the content you share through YouTube Live since you can select a browser window you want to capture in just a few clicks. What’s more, this open-source software is equipped with basic video editing tools, which enables you to preview the video you recorded before publishing it, apply transitions between cuts, or perform basic color correction.
Check the detailed guide to How to Record with OBS .
2. XSplit
Price: $24.95 for a three-month license
Compatibility: Windows
This is yet another broadcasting software that is equipped with powerful screen recording tools. Setting up a new screencasting session with XSplit is a simple and intuitive process that is not going to take much more than a few moments of your time.
All you need to do is define a workspace, then pick the preferred resolution and frame rate. The software allows you to capture screens in 4K resolution and at 60 fps, but it also offers a variety of resolution and frame rate options so that you can choose the one that best fits your needs. Furthermore, you can record the computer audio, which enables you to capture the live stream’s audio in excellent quality. Besides YouTube Live, XSplit can be used with Zoom , Skype, Google Hangouts, and numerous other live streaming and video calling apps.
3. Filmora
Price: Free, pricing plans start at $49.99/year
Compatibility: macOS, Windows
If you are looking for a screen recorder that is stacked with powerful video editing features, then Filmora is a great option for you. Customizing a YouTube Live or any other screencasting session with this video editing software is easy, and you can choose the resolution, frame rate, or even if you want to show mouse clicks in the recording.
Capturing the webcam feed and the computer’s screen simultaneously is also an option, while you can also decide whether or not you want to record audio from a microphone, computer audio, or both at the same time.
What’s more Filmora lets you set up the maximum duration of a screen recording and you start, pause, resume or stop a screen recording session by using hotkeys. Once you are done recording the live stream you shared on YouTube, you can edit the footage you created before uploading it to your YouTube channel.
4. Wondershare DemoCreator
Compatibility: Windows
Price: Start from $9.99
DemoCreator is a recorder that focuses its overall user experience. It is able to easily record high-quality videos at up to 120 FPS (60 FPS for Mac) and allows you to simultaneously record both your screen and webcam. This software is incredibly user friendly and makes for an easy experience for new streamers. The dual recording makes it great for gamers who are also looking to film their reactions.
5. CloudApp
Price: Free, $10 per month for an individual user
Compatibility: Windows, macOS, Linux, Chrome
Starting a new screen capturing session with the CloudApp requires you to just specify the portion of the screen you want to capture and hit the record button. Moreover, you can choose if you want to record with or without a webcam and you have the option to enable or disable the audio recording option.
However, you can only create 90-second screen recordings with the free version of the CloudApp and you cannot set resolution or frame rate of the recording. That’s why you need to upgrade to the Pro version if you want to use it to record live streams on YouTube. The Pro subscription model also grants you access to basic video editing tools and a variety of file sharing options. In addition, CloudApp lets you create and annotate still images and GIFs, which makes it a great option for digital marketers.
6. Techsmith Camtasia
Price: Free trial, $269.05 one-time fee
Compatibility: Windows, macOS
You don’t need years of video editing experience to start a new screen recording session in Camtasia. In fact, you just have to click on the Record button that is located in the software’s tool panel and then customize the settings.
Camtasia lets you choose if you want to record the full screen or just a selected portion of the screen or decide if you want to switch the webcam or the microphone off. You should make sure that the System Audio feature is enabled in order to record the sound of the live stream you’re sharing on YouTube. Pausing or stopping a screencasting session requires you to either click on the appropriate buttons or use the keyboard-based hotkeys. After you are done recording a live stream you can edit the footage using Camtasia’s video editing tools.
7. ScreenRec
Price: Free
Compatibility: Windows, macOS, Linux
Recording any live stream or TV show you play on your computer with ScreenRec is a straightforward process that can be completed in just a few clicks. Simply drag the mouse cursor over the area you want to record, then hit the Record button when you are ready and ScreenRec will start capturing the computer screen.
Once the screencasting session is completed you will get a sharable link that can be embedded to a website or used to save an MP4 file on your hard drive. Furthermore, ScreenRec is equipped with analytics tools that show you how many views your videos attracted or for how long each visitor watched them. All of these features make ScreenRec an excellent option for anyone who wants to record a live stream on YouTube or any other on-screen activity.
8. Flashback Express
Price: Free
Compatibility: Windows
Flashback Express is a simple screen recorder that lets you create high-res videos effortlessly. Setting up a new screencasting session requires you to just specify the area of the screen you want to record, choose whether or not you want to record the webcam feed and hit the Record button.
There are no restrictions in terms of the duration of screen recordings you can make with Flashback Express and the software doesn’t watermark the video you create.
However, you can only save the files in MP4, AVI, or WMW formats and you cannot adjust the video’s frame rate or resolution. What’s more, editing videos or applying effects with Flashback Express isn’t possible and you must upgrade to FlashBack Pro if you want to edit the live streams you broadcast on YouTube.
This piece of software is user friendly, but it doesn’t have as many features as other products on the market. Having said that, it is still an excellent tool that will help you live stream gameplay easily. Although it doesn’t come with built-in video editing software, it is possible to download another program to do this for you (i.e. Filmora). Flashback Express has the ability to record through your headset or microphone as well.
9. VLC
Price: Free
Compatibility: macOS, Linux, Windows
This is an iconic media player that became famous for its versatility and support for nearly all video file formats. Besides being one of the best media players ever created, VLC is also equipped with screen recording and video editing tools.
In order to start a new screencasting session, you will have to go to the Media menu and then select the Open Capture Device option. Once the new window pops up on the screen you should change the Capture Mode to Desktop and then adjust the frame rate in accordance with your needs.
Click on the Play button, and then hit the Record button after the screen recording window appears on the screen. You can only record the entire screen with VLC, since customizing the recording area isn’t an option, and all your files will be captured in the RAW format which means that you may have to resize them before you upload them to YouTube.
10. Screencast-o-matic
Price: Free, pricing options start at $1.65 per month
Compatibility: macOS, Windows
As its name suggests, this software product makes the screen recording process almost automatic. You can choose if you want to record an entire screen or just a window you selected. In addition, Screencast-o-matic lets you record the desktop and webcam footage at the same time, and you can even zoom in while the screencasting session is still in progress.
The free version of the software offers only a basic set of features that doesn’t include the option to record system audio. This means that you have to opt for one of the available subscription models if you want to record your live streams on YouTube with Screencast-o-matic. What’s more, you will be to create videos that are longer than 15 minutes, create recordings without watermarks or add music to your recordings if you opt for Deluxe or Premiere pricing options.
11. QuickTime Player
Price: Free
Compatibility: macOS, Windows
Mac users who want to record content that is broadcasted via YouTube Live can do so without having to install a third-party app. Apple ceased the support for the Windows-based version of QuickTime Player in 2016 and PC users can only capture their screens with this software if they have some of its earlier versions.
In order to start a new screen recording session in QuickTime Player, you just have to go to the File menu and select the New Screen Recording option. The Screen Recording window where you can choose if you want to record audio or show mouse click in the recording will pop up on the screen. QuickTime Player lets you choose if you want to capture the entire screen or just a portion of it, and you can click on the Record button to start a new screencasting session. In order to save a video file you created, you just have to go to the File menu and pick the Save option.
How to Record a YouTube Live Stream with Filmora
Recording a YouTube Live stream with Filmora is easy even if you never went through this process before. You can set up a new screencasting session in just a few easy steps that won’t take more than a few moments to complete. Here’s what you need to do:
Step 1: Launch Filmora and create a new project. Go to the Media tab once the video editor’s main window loads and click on the Record drop-down menu that is located next to the Import drop-down menu.
Choose the Record PC Screen option and then proceed to customize the settings for your screencasting session.
Step 2: Click on the Rectangular icon in the upper left corner of the Wondershare Filmora Scrn window and choose either Full Screen, Custom, or Target Window option, depending on how you want to record a YouTube Live stream to define the area of the screen that is going to be recorded.
You can then proceed to insert the resolution your screen recording is going to have, and choose if you want to record system audio and sound from an external microphone.
Step 3: Click on the Gear icon below the Record button to gain access to additional settings, and then proceed to set the frame rate, adjust the video’s quality or activate the Show Mouse Clicks in Recording option.
Make sure that the checkbox next to the Record the Camera Stream is marked if you want to record webcam feed and computer desktop at the same time.
Step 4: Press the red Record button in the upper right corner of the window and jump to the live stream. Once the broadcast is completed, you should click on the Stop button and use Filmora’s editing tools to remove all imperfections from the recording.
Filmora allows you to export all of your projects directly to your YouTube channel immediately after the rendering process is completed.
Frequently Asked Questions about YouTube Live Screen Recorders
1. Does YouTube Save Live Videos?
Stream Now, Mobile, Webcam, and Events streams can be stored automatically for 12 hours after they end. You can access all of your live streams by clicking on the Videos menu in the YouTube Studio and selecting the Live option and then change the Privacy setting in the Visibility menu.
2. How to use YouTube to Archive a Live Stream?
Once the live stream ends, you should go to the Dashboard and click on the Live feature, and then choose the Stream option. Check the Make Archive Unlisted When Complete checkbox and the live stream video will be saved accordingly.
Richard Bennett
Richard Bennett is a writer and a lover of all things video.
Follow @Richard Bennett
Also read:
- In 2024, Culinary Crescendo High-Impact Food Network Monikers
- First Offset Guide Affordable Channel Buys to Monetize
- Transform Ideas Into Visuals Free Templates for Video Makers
- [New] Avoid Blandness - Optimize Your Thumbnail with 20 Fonts
- In 2024, Anime for the Soul Selecting YouTube Channels to Brighten Today
- Harmonizing Hit Hits Building the Perfect YouTube Soundtrack
- Step Into Success Mastering Tagging for Engaging Content
- [Updated] Affordable & Accessible The Definitive Guide to 9 Budget-Friendly Editors
- Perfect Sound Placement Adding Music Seamlessly to YouTube Videos
- Your Essential Gift A Compact Bundle of 50 Banners!
- In 2024, Content Hub Hierarchy Stand Out Amongst Titans – Vimeo, YouTube & Dailymotion?
- [Updated] Elevating Your YT Content with the Top Thumbnail Hacks
- [Updated] A Decade of YouTube Dominance Breakthrough Videos Hitting a Billion Views
- Maximize Engagement with Proper YouTube Video Dimensions
- [New] Crafting a Digital Identity Simple Steps to Create Business/Personal YouTube Channels on Smartphones
- Crafting Visual Narratives with YouTube Studio's Editing Suite for 2024
- Unlock Google Meet's Potential on YouTube with This Guide
- Maximizing Revenue A Complete Framework for Tracking YouTube Views & Income
- Enhancing Visual Content Turning Youtube Clips Into Animated GIFs for 2024
- [Updated] Discover the Prime Lineup of Affordable Cutting Tools
- Effortless Video Uploads with iOS The Complete YouTube Guide for 2024
- Enhancing Content Discovery via Thumbnails for 2024
- Expert Tips Migrating Twitch Videos to YouTube
- [Updated] Best Livestream Capturing Solutions for Content Makers
- 2024 Approved Becoming a Lyric Video Pro A Lyric Video Maker's Journey
- Editing Excellence Identifying 10 Superior Online Trimmer Apps for 2024
- In 2024, Designing the Ideal YouTube Playlist for You
- 2024 Approved Aspiring YouTubers' Guide to Affiliate Allies
- In 2024, Becoming a Director Top Film Tips & Tricks on YouTube
- Celebrating Clickers Channel & Buttons Incentives
- [New] Alternative Classics New Filmmaking Titles to Love
- [Updated] Editing Elegance Into News Summations
- 20 Best YouTube Thumbnail Fonts to Make Your Video Stunning for 2024
- Emotionally-Enhanced YouTube Commentary
- [Updated] Access the Archived Unique Methods for Viewing Old YouTube
- In 2024, Creating Striking Channel Imagery Best Practices for Success
- Top 10 Global Voyages for Discovery Enthusiasts
- 2024 Approved Enhancing User Engagement How to Use YouTube Tags Effectively
- Navigating the World of Viral Unboxing Content
- [Updated] Decoding Video Thread Embellishments
- A Closer Look at YouTube’s ‘Unlisted’ Content Category
- [New] A Step-by-Step Guide to Becoming a Vtuber?
- [New] Essential Websites for YouTube Preview Creation Tools
- [New] Beyond Boundaries Recognizing Leading Women in Digital Storytelling
- [Updated] From Creation to Consumption Posting Vids on Twt+Tumb
- [New] In 2024, Cryptic SnapShots Advanced Concealed Image Recording on Snapchat
- In 2024, How to get the dragon scale and evolution-enabled pokemon On Nubia Z50 Ultra? | Dr.fone
- Best 6 Celebrity Text to Speech AI Voice Generators You May Like for 2024
- How To Revive Your Bricked Vivo Y77t in Minutes | Dr.fone
- Facebook's Essential Steps Smoothly Uploading Videos via PC, iOS/Android
- How to Change Location On Facebook Dating for your Poco X6 | Dr.fone
- New 8 Best Motion Graphics Online Tools for Your Inspiration for 2024
- [New] In 2024, In-Depth Analysis ScreenFlow Performance on MacBooks
- [New] 2024 Approved Twitter's Reactive Content Unveiled
- 2024 Approved How to Choose A Nice GoPro for Vlogging?
- How to Fix Life360 Shows Wrong Location On OnePlus Ace 2 Pro? | Dr.fone
- What To Do When Oppo Find N3 Has Black Screen of Death? | Dr.fone
- [New] 2024 Approved Accidental TikTok Overload – Regain Access
- In 2024, Set Your Preferred Job Location on LinkedIn App of your Poco M6 Pro 5G | Dr.fone
- [New] Elite Desktop/Mobile Communication Software (Zoom Substitutes)
- [New] 2024 Approved In-Depth Look Top 6 Screen Recording Software Reviewed
- Updated Calculate Image Dimensions with Ease A Ratio Finder for 2024
- [New] In 2024, Expert Tips Mastering the Skip Button on TikTok
- In 2024, Best Ways on How to Unlock/Bypass/Swipe/Remove Vivo X100 Pro Fingerprint Lock
- 5 Easy Ways to Copy Contacts from Honor 90 to iPhone 14 and 15 | Dr.fone
- 2024 Approved Capturing Adventures with Right Tools & Tech
- 11 Best Pokemon Go Spoofers for GPS Spoofing on Apple iPhone 15 | Dr.fone
- Updated Change Video Aspect Ratio in Final Cut Pro Easy Instructions for Beginners for 2024
- New Guide to High-Quality Voice Capture with Your Samsung Galaxy S10/S9
- New 2024 Approved Free Video Editors for Chrome OS A Review of the Top Options
- [Updated] In 2024, Harmonizing Hearts and Hertz Music on the Vimeo Scene
- Step-by-Step Process of Capturing FB Messages
- [Updated] 2024 Approved Quick Fixes for a Larger TikTok Following Must-Know Hacks
- Fix Slowly Loading YouTube Content on Mobile for 2024
- In 2024, How to Unlock Infinix Hot 40 Bootloader Easily
- [Updated] 2024 Approved StreamMine Group Video Downloads
- In 2024, 5 Techniques to Transfer Data from Vivo X Flip to iPhone 15/14/13/12 | Dr.fone
- [Updated] 2024 Approved Mastering Insta Metrics Comprehensive IG Data Analysis
- [New] In 2024, Unlocking Snapchat's Secret Symbolic Messages
- In 2024, A Step-by-Step Guide on Using ADB and Fastboot to Remove FRP Lock from your Vivo S18e
- [New] Affordable Cam Recorders The Ultimate Free List for 2024
- How to Unlock Disabled iPhone 14 Plus/iPad Without Computer
- [New] Virtual Stage War Is Likee Poised to Overtake TikTok, In 2024
- 2024 Approved Locate Premium Solutions for Enhancing Sound Quality Online
- Title: "Minute-by-Minute Mastery The Top Ten on YouTube Daily"
- Author: Kevin
- Created at : 2024-05-25 15:47:00
- Updated at : 2024-05-26 15:47:00
- Link: https://youtube-videos.techidaily.com/minute-by-minute-mastery-the-top-ten-on-youtube-daily/
- License: This work is licensed under CC BY-NC-SA 4.0.
