

"Maximize YouTube Presence 11 Must-Know SEO Strategies for Success"
Maximize YouTube Presence: 11 Must-Know SEO Strategies for Success
Improve Your YouTube Video Performance with Wondershare Filmora
An easy and powerful video editor
Numerous video and audio effects to choose from
Detailed tutorials provided by the official channel
More than 85% of businesses use YouTube videos as a marketing tool. YouTube is the second most visited website on the internet, with users uploading over 500 hours of video content every minute. Because video SEO is constantly evolving, you need to stay current on optimization best practices to rank higher on search results.
Luckily, this article offers YouTube SEO tips to help you create a solid strategy that will help you rank your videos.
In this article
11 Useful YouTube SEO Tips to Help Boost Your Video Ranking
How Does YouTube SEO Work?
YouTube SEO is an excellent way to ensure your videos get more views. The main goal of YouTube SEO is to rank high for specific keywords in search engines. As such, it is crucial to know how YouTube SEO works if you want to boost the ranking of your videos.
Whether you are a blogger, market researcher, or video marketer, you need YouTube SEO to generate traffic to your videos. YouTube SEO involves optimizing your videos, channel, descriptions, metadata, and playlists. You can optimize videos for search within and outside YouTube.
Because search engine bots can’t watch YouTube videos, they depend on accompanying text data when indexing them. So you must also know how to harness the power of text in your video, which can positively impact SEO, viewership, engagement, and user experience.
Watch Video: YouTube SEO Tips 2022: Boost Your Video Ranking
11 Useful YouTube SEO Tips to Help Boost Your Video Ranking
Want to drive more traffic and increase your video views? Here are eleven YouTube SEO tips that will help you to boost your video ranking.
1. Conduct Keyword Research First 

When it comes to YouTube SEO, keywords are crucial. YouTube uses these keywords to determine the subject of your video, index the content, and then associate it with what users are searching for. As such, you must add them to certain fields, including description, tags, and title, when you are uploading the video file. YouTube will then get this information and use it to rank your video.
For this reason, you have to know the keywords that best identify your videos and have the potential to attract viewers to your channel.
2. Use a Good Video Title
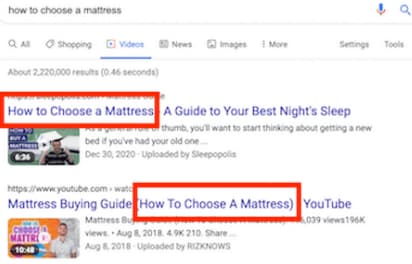
The title of your video is the first thing other people see, and it’s what decides whether or not they watch it. Given how important it is, you’ll want to make sure that your title accurately reflects the content of your video and includes all relevant keywords.
3. Link Your Videos Directly to Your Website
Each time you publish a new video, make sure you embed it on your website or blog. Not only will this encourage viewers to stay on your website instead of leaving immediately, but it will also make it easier for search engines crawlers to index your website.
4. Add Tags To The Video Description

When you upload your video, remember to add tags to the “About” section of the page. You can do this by adding some relevant keywords with each tag like you would with blog posts.
When planning your strategy for YouTube keywords, you need to find 10-20 single keyword tags you want to rank for; keep in mind that this platform limits the number of tags users can include in a video. So you should first add the most relevant keyword phrases then include specific multi-word tags that will easily rank on top of search results.
5. Edit The Filename

The filename of your video, or the “video URL,” can also affect its rankings. Including keywords in this section will help the crawlers index your video faster, which will increase its chances of ranking higher.
6. Add Subtitles and Closed Captions
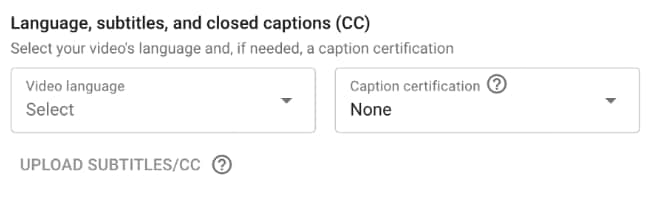
Adding subtitles and closed captions to your videos is also a good idea, especially if you want the video’s ranking and viewership to improve. Subtitles make it easier for new viewers to understand your videos, especially if your audience comes from different linguistic backgrounds.
7. Select Video Category
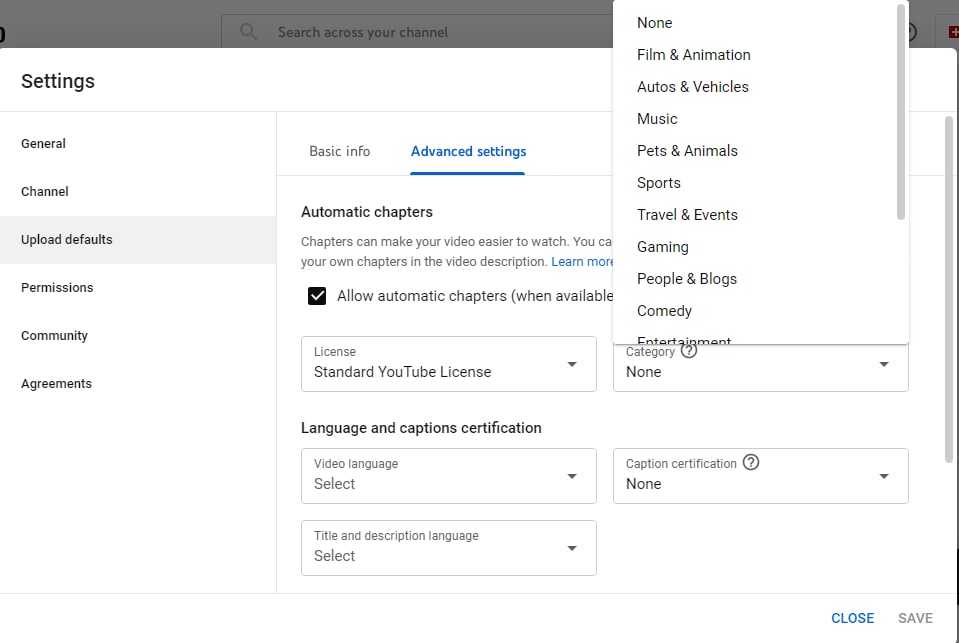
When uploading a video, be sure to select the most appropriate category for it. Essentially, this helps with SEO optimization because choosing the right category means that YouTube’s algorithm will place your video in the proper search results. In turn, viewers will easily find your video and watch it.
8. Use a Compelling Thumbnail

Make sure you use the right YouTube video thumbnail image , as this makes a big difference in the click-through rate. You might want to use high-quality, high-contrast images with a 16:9 aspect ratio. YouTube will choose which frame it will display as the video thumbnail. The platform will present three screenshots that you can choose from; however, you can upload your image or select a shot of another moment in the video.
Remember that YouTube overlays the duration of the video in the corner of your thumbnail. So make sure it does not obstruct any relevant details in your thumbnail. Google also uses image recognition to filter out specific imagery, including the YouTube logo.
Ideally, you need an image that is a perfect visual representation of the keywords you are targeting. In turn, this is going to take your presence in relevant search results even further.
9. Make High-Quality Longer
Videos that are less than 2 minutes long often rank low. The duration of most of the videos in the first five positions is usually 11 minutes 44 seconds. Therefore, you need to invest in longer videos that are around 10 minutes long. These videos meet the expectations of many users seeking complete and in-depth content. Additionally, you should create high-quality videos to ensure your viewers will keep watching.
Create High-Quality YouTube Video with Filmora
Wondershare’s Filmora program allows you to edit your video content with trim, transitions, and overlays. You can also add cool effects to your videos to make them more captivating. It also includes advanced editing features like Key Framing, Motion Tracking and more. Learn about Filmora now!
Improve Your YouTube Video Performance with Wondershare Filmora
An easy and powerful video editor
Numerous video and audio effects to choose from
Detailed tutorials provided by the official channel
10. Focus on User Engagement
Encourage your audience to like, comment, and share your videos. You should also respond to messages and comments. These engagement metrics strongly correlate with higher rankings.
Google cares about how people respond to your content because this is what keeps people on their platform.
11. Add End Screens and YouTube Cards
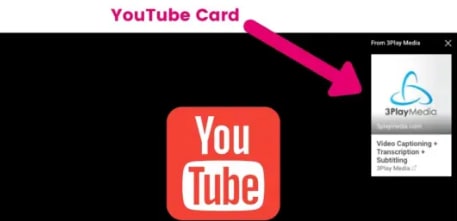
YouTube cards encourage viewers to take action during your video. The cards show up in the top right corner of your videos; users can click on and explore more. Using YouTube cards is an excellent way to boost your ranking. YouTube allows you to add a maximum of five cards to each video.
Conclusion
Using these YouTube SEO tips will ensure that your videos rank on top search results. That means more people will watch your videos and subscribe to your channel. Let’s start editing now Try It Free
More than 85% of businesses use YouTube videos as a marketing tool. YouTube is the second most visited website on the internet, with users uploading over 500 hours of video content every minute. Because video SEO is constantly evolving, you need to stay current on optimization best practices to rank higher on search results.
Luckily, this article offers YouTube SEO tips to help you create a solid strategy that will help you rank your videos.
In this article
11 Useful YouTube SEO Tips to Help Boost Your Video Ranking
How Does YouTube SEO Work?
YouTube SEO is an excellent way to ensure your videos get more views. The main goal of YouTube SEO is to rank high for specific keywords in search engines. As such, it is crucial to know how YouTube SEO works if you want to boost the ranking of your videos.
Whether you are a blogger, market researcher, or video marketer, you need YouTube SEO to generate traffic to your videos. YouTube SEO involves optimizing your videos, channel, descriptions, metadata, and playlists. You can optimize videos for search within and outside YouTube.
Because search engine bots can’t watch YouTube videos, they depend on accompanying text data when indexing them. So you must also know how to harness the power of text in your video, which can positively impact SEO, viewership, engagement, and user experience.
Watch Video: YouTube SEO Tips 2022: Boost Your Video Ranking
11 Useful YouTube SEO Tips to Help Boost Your Video Ranking
Want to drive more traffic and increase your video views? Here are eleven YouTube SEO tips that will help you to boost your video ranking.
1. Conduct Keyword Research First
When it comes to YouTube SEO, keywords are crucial. YouTube uses these keywords to determine the subject of your video, index the content, and then associate it with what users are searching for. As such, you must add them to certain fields, including description, tags, and title, when you are uploading the video file. YouTube will then get this information and use it to rank your video.
For this reason, you have to know the keywords that best identify your videos and have the potential to attract viewers to your channel.
2. Use a Good Video Title
The title of your video is the first thing other people see, and it’s what decides whether or not they watch it. Given how important it is, you’ll want to make sure that your title accurately reflects the content of your video and includes all relevant keywords.
3. Link Your Videos Directly to Your Website
Each time you publish a new video, make sure you embed it on your website or blog. Not only will this encourage viewers to stay on your website instead of leaving immediately, but it will also make it easier for search engines crawlers to index your website.
4. Add Tags To The Video Description
When you upload your video, remember to add tags to the “About” section of the page. You can do this by adding some relevant keywords with each tag like you would with blog posts.
When planning your strategy for YouTube keywords, you need to find 10-20 single keyword tags you want to rank for; keep in mind that this platform limits the number of tags users can include in a video. So you should first add the most relevant keyword phrases then include specific multi-word tags that will easily rank on top of search results.
5. Edit The Filename
The filename of your video, or the “video URL,” can also affect its rankings. Including keywords in this section will help the crawlers index your video faster, which will increase its chances of ranking higher.
6. Add Subtitles and Closed Captions
Adding subtitles and closed captions to your videos is also a good idea, especially if you want the video’s ranking and viewership to improve. Subtitles make it easier for new viewers to understand your videos, especially if your audience comes from different linguistic backgrounds.
7. Select Video Category
When uploading a video, be sure to select the most appropriate category for it. Essentially, this helps with SEO optimization because choosing the right category means that YouTube’s algorithm will place your video in the proper search results. In turn, viewers will easily find your video and watch it.
8. Use a Compelling Thumbnail
Make sure you use the right YouTube video thumbnail image , as this makes a big difference in the click-through rate. You might want to use high-quality, high-contrast images with a 16:9 aspect ratio. YouTube will choose which frame it will display as the video thumbnail. The platform will present three screenshots that you can choose from; however, you can upload your image or select a shot of another moment in the video.
Remember that YouTube overlays the duration of the video in the corner of your thumbnail. So make sure it does not obstruct any relevant details in your thumbnail. Google also uses image recognition to filter out specific imagery, including the YouTube logo.
Ideally, you need an image that is a perfect visual representation of the keywords you are targeting. In turn, this is going to take your presence in relevant search results even further.
9. Make High-Quality Longer
Videos that are less than 2 minutes long often rank low. The duration of most of the videos in the first five positions is usually 11 minutes 44 seconds. Therefore, you need to invest in longer videos that are around 10 minutes long. These videos meet the expectations of many users seeking complete and in-depth content. Additionally, you should create high-quality videos to ensure your viewers will keep watching.
Create High-Quality YouTube Video with Filmora
Wondershare’s Filmora program allows you to edit your video content with trim, transitions, and overlays. You can also add cool effects to your videos to make them more captivating. It also includes advanced editing features like Key Framing, Motion Tracking and more. Learn about Filmora now!
Improve Your YouTube Video Performance with Wondershare Filmora
An easy and powerful video editor
Numerous video and audio effects to choose from
Detailed tutorials provided by the official channel
10. Focus on User Engagement
Encourage your audience to like, comment, and share your videos. You should also respond to messages and comments. These engagement metrics strongly correlate with higher rankings.
Google cares about how people respond to your content because this is what keeps people on their platform.
11. Add End Screens and YouTube Cards
YouTube cards encourage viewers to take action during your video. The cards show up in the top right corner of your videos; users can click on and explore more. Using YouTube cards is an excellent way to boost your ranking. YouTube allows you to add a maximum of five cards to each video.
Conclusion
Using these YouTube SEO tips will ensure that your videos rank on top search results. That means more people will watch your videos and subscribe to your channel. Let’s start editing now!
Transform Your Twitch Broadcasts for YouTube Viewers
Create High-Quality Video - Wondershare Filmora
An easy and powerful YouTube video editor
Numerous video and audio effects to choose from
Detailed tutorials provided by the official channel
Amidst many online applications is Twitch. This live streaming platform takes your experience to another level. You can use it to make crafts, play games, attract broadcasters, and many more. Twitch was launched in 2011, and since then, it has attracted millions of users, managing a database of about 4 million broadcasters by early 2020. With it, users can stream their activities as others watch in real-time. Just browse a category to find a stream.
You can also follow streamers that you like on the platform and get updates and notifications immediately after they are posted. But how do you start a career on a platform like Twitch? You need to broadcast and gather a large following. You can use built-in audiences from other platforms like Facebook. Let’s dive into the core of the matter and look at how to upload Twitch streams to YouTube and build your platform.

In this article
02 What is the benefit of uploading your Twitch Streams to YouTube
03 How to upload your Twitch Streams to YouTube
What is Twitch VOD?
Twitch Video on Demand (VOD) is a recording of previously streamed content. It provides briefings if you missed catching the Twitch live stream. Just watch the VOD from your favorite streamer and be engaged the best way possible. However, VODs don’t last forever. They are removed after two weeks of broadcast. But streamers with Partner Status can have their VODs last up to 60 days.
- How to enable Twitch VOD?
VODs are the best form to archive streams that your fans missed. Even though they are not enabled by default, you can manually enable them and not let your fans miss any important event from your channel. They’ll find it under the “Videos” tab on any Twitch channel. Follow these steps to enable VOD on your channel.
Step 1. Go to your profile icon in the top right corner of Twitch
Check in the “Channel & Video” section and locate the “Stream Key & Preferences” menu.

Step 2. Click on “Creator Dashboard”
Remember, you can enable VODs from your creator dashboard. Just go under the “Settings” tab and click on the “Stream section” of the creator dashboard. Check under the subtitle “VOD Settings” and get the option to store past broadcasts. You can also toggle the slider to store your past broadcasts.

Step 3 Click on the “Settings” tab on the left-hand side and go to Stream
You’ll get various drop-down menu options. Click on the “Settings” tab and choose the “Stream” option. The system will navigate to a new page, thus setting your preferences for VODs and clips.
Step 4. Go to “VOD Settings” and toggle on the “Store Past Broadcast.”
Ensure you have the toggle option turned ON under the “VOD Settings.” If it’s “ON,” you’ll realize the toggle will be purple, with a checkmark in it. Twitch will be confirmed to be enabled if it’s purple.

- Frequently Asked Question about Twitch VOD
These are some questions frequently asked by Twitch users.
1. How long will Twitch store my VOD
Your Twitch can either be stored for 14 or 60 days, depending on your level. For Twitch Prime, Twitch Partner or a Twitch Turbo user has their past broadcasts automatically saved for 60 days before deletion. But if you are not connected to these three options, your past broadcasts will be saved for only 14 days before deletion.
Since your past broadcasts cannot be live for more than 60 days, you have the option to download the video to your computer before the validity days expire and Twitch deletes it. You can use an External Hard drive to save the past broadcast content. Likewise, it is possible to turn your past broadcast content into Highlight and, in turn, permanently store them on Twitch.
2. What is the difference between Twitch VOD, Highlights, and Clips
Twitch VOD is a previously saved video of your live stream content. You choose to save either part or the entire content of your previously streamed content. More so, you don’t need any additional requirements to use VOD.
Highlights are short videos that have been edited from your past broadcast content. You can save them on Twitch permanently. Streamers majorly use highlights to save video game achievements. Unlike VOD Twitch that can be saved up to 60 days, Highlights usually lasts no more than 3 minutes.
- To make Highlights on Twitch, first, navigate to your Dashboard.
- Then scroll down and click on “Content” > “Video Producer.
- Next, press on “All Videos” to change them to “Past Broadcasts.”
- Now press the “Highlight” button, and Twitch will immediately open a new tab for “Twitch Highlighter Tool.”
- Then select the video part to include as “Highlight” and press the “Create Highlights” button.
- Wait a while for the process to be completed, and Voila! You have your Highlights created.
When it comes to Twitch Clip, you can capture special moments in a stream you are currently watching. On the same note, you can share clips with friends and other users on social media platforms. Such shared clips contain a link where others view the source or video from.
The clips you create will automatically be saved on the streamer’s channel on the “Clips” page, where other viewers can see them too. Nonetheless, you can download “clips” to your computer and, in turn, upload them whenever you want to. And note that you can help your stream grow via “Clips” by letting your viewers clip and share your stream moments.
- To create “Clips” on Twitch, identify which Streamers channel you wish to create a clip from.
- Then click on the “Clapper board” icon. Next, edit your clip between 5 and 60 seconds long.
- Finally, create a title and publish your Clip. You’ll also enjoy the privilege to share your clip’s link to other social media networks.
What is the benefit of uploading your Twitch Streams to YouTube
You stand to gain a lot when you upload your Twitch Streams to YouTube.
1) To enlighten your followers
Your followers will see your streams and make the best decisions. Viewers can check out your recordings and other highlights from past streams. It will help them decide whether they like what they see and probably join your live streams.
2) Twitch provides content for you to share and monetize on YouTube
Since Twitch streaming is more popular nowadays, many people throng it for content. It is not wise to rely entirely on Twitch to discover as a Twitch Streamer. Posting to YouTube will make it known within a short time. You would have announced your streams most nobly and kept your followers up to date, attracting new ones as well.
3) To keep your followers engaged even when you are offline
Even though live streaming is important, some viewers may not attend the live sessions due to different time zones or other commitments. In this regard, when uploaded to YouTube, Twitch will give them a chance to watch your content just whenever they log in. They, therefore, have the option to watch a Twitch VOD of the live stream they missed.
How to upload your Twitch Streams to YouTube
Check how to upload Twitch streams to YouTube from the Twitch website.
Step 1. Identify the little arrow next to your name on the Twitch website and click on it. Then click on the “Video Producer” to take you to a list of your Twitch videos.

Step 2. Check out and click on the “three-dots” on the video you wish to upload to YouTube. Click on the “Export” tab.
Step 3. A menu will then pop up. Here, you can fill in the description, title, and tags that you would like to appear on the YouTube video. There is an option for Twitch to split your video automatically. If you wish so, then tick the “Checkbox” to enable it. Then click on the “Start Export” option to export your Twitch streams to YouTube.

Bouns! Edit Your Twitch Video with Filmora
The quality of your video matters when it comes to uploading Twitch Streams to YouTube. Using a third-party tool to edit your video is the first step in ensuring your videos communicate meaningful content. Filmora comes in handy to bring your imaginations to life. Use it for simple creation without limits, even for beginners.
- Use it to track moving objects in video clips
- Easily match any image of the selected clip
- Its powerful tools let you edit your video by cropping, splitting, adjusting speed, etc
- The video keyframe easily indicates the beginning and end of the parameters
For Win 7 or later (64-bit)
For macOS 10.12 or later
Conclusion
● Don’t just focus on how to upload Twitch streams to YouTube but also consider the quality of video you are posting to YouTube. Remember, your video quality will speak much more of you than any other description. So, strive to produce quality videos using the best tool, Filmora. The app is easy to use and will elevate your views and imaginations through your video in the most impactful way.
Amidst many online applications is Twitch. This live streaming platform takes your experience to another level. You can use it to make crafts, play games, attract broadcasters, and many more. Twitch was launched in 2011, and since then, it has attracted millions of users, managing a database of about 4 million broadcasters by early 2020. With it, users can stream their activities as others watch in real-time. Just browse a category to find a stream.
You can also follow streamers that you like on the platform and get updates and notifications immediately after they are posted. But how do you start a career on a platform like Twitch? You need to broadcast and gather a large following. You can use built-in audiences from other platforms like Facebook. Let’s dive into the core of the matter and look at how to upload Twitch streams to YouTube and build your platform.
In this article
02 What is the benefit of uploading your Twitch Streams to YouTube
03 How to upload your Twitch Streams to YouTube
What is Twitch VOD?
Twitch Video on Demand (VOD) is a recording of previously streamed content. It provides briefings if you missed catching the Twitch live stream. Just watch the VOD from your favorite streamer and be engaged the best way possible. However, VODs don’t last forever. They are removed after two weeks of broadcast. But streamers with Partner Status can have their VODs last up to 60 days.
- How to enable Twitch VOD?
VODs are the best form to archive streams that your fans missed. Even though they are not enabled by default, you can manually enable them and not let your fans miss any important event from your channel. They’ll find it under the “Videos” tab on any Twitch channel. Follow these steps to enable VOD on your channel.
Step 1. Go to your profile icon in the top right corner of Twitch
Check in the “Channel & Video” section and locate the “Stream Key & Preferences” menu.
Step 2. Click on “Creator Dashboard”
Remember, you can enable VODs from your creator dashboard. Just go under the “Settings” tab and click on the “Stream section” of the creator dashboard. Check under the subtitle “VOD Settings” and get the option to store past broadcasts. You can also toggle the slider to store your past broadcasts.
Step 3 Click on the “Settings” tab on the left-hand side and go to Stream
You’ll get various drop-down menu options. Click on the “Settings” tab and choose the “Stream” option. The system will navigate to a new page, thus setting your preferences for VODs and clips.
Step 4. Go to “VOD Settings” and toggle on the “Store Past Broadcast.”
Ensure you have the toggle option turned ON under the “VOD Settings.” If it’s “ON,” you’ll realize the toggle will be purple, with a checkmark in it. Twitch will be confirmed to be enabled if it’s purple.
- Frequently Asked Question about Twitch VOD
These are some questions frequently asked by Twitch users.
1. How long will Twitch store my VOD
Your Twitch can either be stored for 14 or 60 days, depending on your level. For Twitch Prime, Twitch Partner or a Twitch Turbo user has their past broadcasts automatically saved for 60 days before deletion. But if you are not connected to these three options, your past broadcasts will be saved for only 14 days before deletion.
Since your past broadcasts cannot be live for more than 60 days, you have the option to download the video to your computer before the validity days expire and Twitch deletes it. You can use an External Hard drive to save the past broadcast content. Likewise, it is possible to turn your past broadcast content into Highlight and, in turn, permanently store them on Twitch.
2. What is the difference between Twitch VOD, Highlights, and Clips
Twitch VOD is a previously saved video of your live stream content. You choose to save either part or the entire content of your previously streamed content. More so, you don’t need any additional requirements to use VOD.
Highlights are short videos that have been edited from your past broadcast content. You can save them on Twitch permanently. Streamers majorly use highlights to save video game achievements. Unlike VOD Twitch that can be saved up to 60 days, Highlights usually lasts no more than 3 minutes.
- To make Highlights on Twitch, first, navigate to your Dashboard.
- Then scroll down and click on “Content” > “Video Producer.
- Next, press on “All Videos” to change them to “Past Broadcasts.”
- Now press the “Highlight” button, and Twitch will immediately open a new tab for “Twitch Highlighter Tool.”
- Then select the video part to include as “Highlight” and press the “Create Highlights” button.
- Wait a while for the process to be completed, and Voila! You have your Highlights created.
When it comes to Twitch Clip, you can capture special moments in a stream you are currently watching. On the same note, you can share clips with friends and other users on social media platforms. Such shared clips contain a link where others view the source or video from.
The clips you create will automatically be saved on the streamer’s channel on the “Clips” page, where other viewers can see them too. Nonetheless, you can download “clips” to your computer and, in turn, upload them whenever you want to. And note that you can help your stream grow via “Clips” by letting your viewers clip and share your stream moments.
- To create “Clips” on Twitch, identify which Streamers channel you wish to create a clip from.
- Then click on the “Clapper board” icon. Next, edit your clip between 5 and 60 seconds long.
- Finally, create a title and publish your Clip. You’ll also enjoy the privilege to share your clip’s link to other social media networks.
What is the benefit of uploading your Twitch Streams to YouTube
You stand to gain a lot when you upload your Twitch Streams to YouTube.
1) To enlighten your followers
Your followers will see your streams and make the best decisions. Viewers can check out your recordings and other highlights from past streams. It will help them decide whether they like what they see and probably join your live streams.
2) Twitch provides content for you to share and monetize on YouTube
Since Twitch streaming is more popular nowadays, many people throng it for content. It is not wise to rely entirely on Twitch to discover as a Twitch Streamer. Posting to YouTube will make it known within a short time. You would have announced your streams most nobly and kept your followers up to date, attracting new ones as well.
3) To keep your followers engaged even when you are offline
Even though live streaming is important, some viewers may not attend the live sessions due to different time zones or other commitments. In this regard, when uploaded to YouTube, Twitch will give them a chance to watch your content just whenever they log in. They, therefore, have the option to watch a Twitch VOD of the live stream they missed.
How to upload your Twitch Streams to YouTube
Check how to upload Twitch streams to YouTube from the Twitch website.
Step 1. Identify the little arrow next to your name on the Twitch website and click on it. Then click on the “Video Producer” to take you to a list of your Twitch videos.
Step 2. Check out and click on the “three-dots” on the video you wish to upload to YouTube. Click on the “Export” tab.
Step 3. A menu will then pop up. Here, you can fill in the description, title, and tags that you would like to appear on the YouTube video. There is an option for Twitch to split your video automatically. If you wish so, then tick the “Checkbox” to enable it. Then click on the “Start Export” option to export your Twitch streams to YouTube.
Bouns! Edit Your Twitch Video with Filmora
The quality of your video matters when it comes to uploading Twitch Streams to YouTube. Using a third-party tool to edit your video is the first step in ensuring your videos communicate meaningful content. Filmora comes in handy to bring your imaginations to life. Use it for simple creation without limits, even for beginners.
- Use it to track moving objects in video clips
- Easily match any image of the selected clip
- Its powerful tools let you edit your video by cropping, splitting, adjusting speed, etc
- The video keyframe easily indicates the beginning and end of the parameters
For Win 7 or later (64-bit)
For macOS 10.12 or later
Conclusion
● Don’t just focus on how to upload Twitch streams to YouTube but also consider the quality of video you are posting to YouTube. Remember, your video quality will speak much more of you than any other description. So, strive to produce quality videos using the best tool, Filmora. The app is easy to use and will elevate your views and imaginations through your video in the most impactful way.
Also read:
- 2024 Approved Dynamic Slideshows Embedding YouTube Content
- In 2024, Engaging Everyone How to Multistream Effectively on YouTube and Twitch
- Direct Download Destiny Ultimate Guide to Mp3 Makers
- Key 10 Acoustic Amplifiers for Android, iOS
- Creating a Memorable and Unique Moniker for Your Filmora Content
- Meet the Top 10 YouTube Sensations with Millions of Fans
- The Complete Guide to YouTube's Movie Maker Features
- Match Up With Moguls Six Questions to Identify YouTubers
- Supercharge Your Channel Growth Harness the Potential of Collaborative Videos
- 2024 Approved Earning Excellence A Guide to Maximize Money From Mobile YouTube Viewers
- 2024 Approved Best GIF Creation Tools Reviewed by Industry Vets
- Beyond Basic The Advanced Techniques of YouTube Counts
- A Guide to Finding Hidden YouTube Treasures for 2024
- Audiovisual Excellence YouTube Videos in Premiere Pro
- Block Spontaneous YouTube Video Triggers
- [New] Essential Thumbnail Strategies for Amplifying Viewership on YouTube
- The Sound Sphere Navigating Music Uploads
- [Updated] Crafting Powerful Thumbnails with Top 20 Font Options
- [New] Audio Dialogue Recorder
- 2024 Approved Cutting-Edge Strategies for YouTube Split-Screen Videos
- Elevate Your Soundtrack Journey Subscribe for Our Picks of 20 YouTube Musicians
- [Updated] Beyond YouTube Ranking Your Top Picks for Streaming Video Content
- [New] Essential Video Promo Tips for Startups (Infographic)
- [New] Essential Steps to Implement Video Card Anchors on YouTube
- The Content Dilemma Deciding on the Best Platform - IGTV or YouTube
- [Updated] CarryMinati's Income Evolution with Ajey Nagar
- Critical Channels for ASMR Lovers
- Sourav Joshi's Financial Acumen in the World of YouTube Earnings
- [New] Bite-Sized Content Explanation The Lowdown
- [New] Cool Climates with a Warm Twist Selecting Video Bg's
- [New] Clip Concoction Station
- In 2024, Cutting-Edge Tips for Professional YouTube Content Creation
- Effortless Earnings Channel Size No Longer a Challenge
- Ultimate Trend Watcher Track Top 8 Rankings
- Crafting the Perfect Gaming Channel Header
- [Updated] Driving View Counts Upward on YouTube 6 Proven Techniques
- Free YouTube Thumbnails Saving Guide
- 2024 Approved Sculpting Visual Stories Editing Vertical Videos for IG in FCPX
- [Updated] In 2024, 77 Hilarious TikTok Quiz Time
- Snapchat Savvy Mastering Screen Recordings on Your Phone
- Complete guide for recovering messages files on Honor X50
- [Updated] TOP Time-Lapse Tools - The Finest Screen Recorders
- Unlock High-Quality Recording with Mac Cameras
- CaptureElite Pro Windows Enhanced
- [Updated] In 2024, Top 10 Unique TikTok Filters Sparking Engagement
- In 2024, The Pro's Guide to Xbox Players on Facebook Live
- [New] Top 30 Webcams Built for Windows OS
- [New] Unveiling IGTV Insights Key Measures for Effective Content for 2024
- [New] Unlocking Dance Potentials TikTok Creation on Mac for 2024
- Updated In 2024, Simple and Free The Best Online Tone Generators Reviewed
- [New] 2024 Approved Culinary Exploration via TikTok Feeds
- How to Share/Fake Location on WhatsApp for Lava Agni 2 5G | Dr.fone
- How To Restore Missing Messages Files from Tecno Pop 8
- [New] 2024 Approved Time-Saving Tricks for PowerPoint Projections
- Best Anti Tracker Software For Samsung Galaxy A54 5G | Dr.fone
- How to Lock Apps on Realme C53 to Protect Your Individual Information
- In 2024, How to Track Realme GT Neo 5 SE Location without Installing Software? | Dr.fone
- Can You Unlock iPhone X After Forgetting the Passcode?
- Updated In 2024, Blender Tips - How to Make Blender Render Transparent Background
- New Best HD Video Editors Top Picks for 2024
- 6 Solutions to Fix Error 505 in Google Play Store on Nokia 130 Music | Dr.fone
- Updated Locate Audiovisual Tap Noise Representation for 2024
- Ways to trade pokemon go from far away On Honor Play 8T? | Dr.fone
- 2024 Approved The Ultimate Guide to Pre-Processing Tracks Using Lame & Audacity
- Navigating the World of Android Video Snapshots for 2024
- Innovative Ideas for Dazzling and Distinctive TikTok Profiles for 2024
- In 2024, Chrome Users, Explore Our Curated List of Voice Modification Apps
- Updated How to Make Strobe Light Text Effect, In 2024
- Updated Best Free-Flowing Tunes for Creative Slideshows for 2024
- [Updated] Broadcast Bunkers for Facebook's 2023 for 2024
- 8 Solutions to Solve YouTube App Crashing on Samsung Galaxy S23 | Dr.fone
- In 2024, Top 10 Fingerprint Lock Apps to Lock Your Poco M6 5G Phone
- Title: "Maximize YouTube Presence 11 Must-Know SEO Strategies for Success"
- Author: Kevin
- Created at : 2024-06-26 14:16:35
- Updated at : 2024-06-27 14:16:35
- Link: https://youtube-videos.techidaily.com/maximize-youtube-presence-11-must-know-seo-strategies-for-success/
- License: This work is licensed under CC BY-NC-SA 4.0.
