
:max_bytes(150000):strip_icc()/GettyImages-961095824-5c3143f446e0fb0001272b67.jpg)
"Mastering YouTube Video Extraction A Step-by-Step Guide"
Mastering YouTube Video Extraction: A Step-by-Step Guide
How to Download Part of YouTube Video?

Richard Bennett
Mar 27, 2024• Proven solutions
YouTube is the second-most viewed social platform, with around 2.3 Billion people active on it every day.
It’s easy to find videos of your choice with a simple search online. You’ve probably come across ways to download a YouTube video, but what if you only want to download a part of the video and not the whole? Well, that’s exactly what we’ll be covering here.
Here in this article, you will learn about the most straightforward YouTube video cutter and its uses. The next time you see something interesting, you can straightaway download it!
- Part 1: How to Download a Certain Part of a YouTube Video?
- Part 2: How to Record YouTube Videos with Filmora? [Video Tutorial]
Part 1: How to Download a Certain Part of a YouTube Video?
Below are 6 software that are available to download part of youtube video, find which one fit you much. Watch a video description first!
Note: We resolutely oppose all forms of copyright-infringing downloads. This tutorial is only for downloading YouTube videos/audio materials from your own channel.
| 1 - Clideo | 2 - YT Cutter | 3 - VEED.IO |
|---|---|---|
| 4 - Hashcut | 5 - VideoCrops | 6 - Kapwing |
Try Filmora to Download and Edit YouTube Video for Free!
Filmora YouTube Video Editor is an expert in creating and editing videos for all YouTubers. You can use the built-in screen recorder to download YouTube videos and add cool visual effects and popular emojis to re-edit your video. Then you can upload to YouTube directly and gain more views!
Download & Edit YouTube Videos Download & Edit YouTube Videos Download & Edit YouTube Videos Learn More >
1. Clideo
Clideo is not only easy to use, but it’s safe too. It helps you cut parts of the video in just a few steps, and it’s completely free! Furthermore, it will delete the user information in 24 hours. Clideo also works even if you don’t log in or register.
You just need to follow the simple steps below to download the part of the YouTube video.
Step 1: Copy the YouTube link you want and paste it on the Clideo video cutter. As shown in the figure below, you need to paste it in the space on the homepage. You can also export the file to Google Drive and Dropbox. It is also compatible with Mobile and PC.

Step 2: Once you paste the link, you need to cut the video part using the slider. You then have to set the start and end times accordingly. You can also choose the “Fade in” or “Fade out” option to give your video smooth finishing. Clideo provides several extensions to download, but if you want to post your video on social media, it’s better to use the MP4 option. After finishing, press the “Cut” button.

Step 3: You can preview your video and save it on your device as the final step.
2. YT Cutter
It’s a super-easy video cutter that can download a part of any YouTube video in no time. YT Cutter also allows downloading and trimming the video online. The maximum limit is 1 minute for free account users, but it’s 20 minutes for premium users.
Here are the steps to download part of your YouTube video using YT Cutter.
Step 1: Click on the “start” button after pasting your YouTube URL.
Step 2: You can preview the part of the video you want to download online. After that, add the start and end times in the options bar on the left. Then, you’re good to go! Your video will be ready to download once you hit the “download” button.

3. VEED.IO
Veed.io YouTube video cutter is another flexible and easy tool to use. Paste the YouTube URL on Veed and cut or trim any part of the YouTube video easily.
Check out the simple steps to use Veed below:
Step 1: You will find the option to upload your file, record a video, or paste the YouTube video URL on Veed.
Step 2: Once you have uploaded your video in Veed, you can trim or cut a section by dragging or clicking the video ends.
Step 3: Soon after finishing your work, press the “download” button, and you finish it.

Filmora Video Editor
Create AI-Generated Video with Filmora
Filmora Discord video editor offers a ChatGPT plug-in and AI tools to enhance your creative vision. Make your idea into reality.
Create Video with ChatGPT Create Video with ChatGPT Create Video with ChatGPT Learn More >
4. Hashcut
Hashcut is user-friendly as it does not save up your video. If you like a video on YouTube and want to download a part of the video, Hashcut is your go-to!
Want to know how it works? Read below:
Step 1: You can search for the YouTube video you want to cut and paste the URL on the Hashcut box. Then, click the START RECORDING button to add the start timing, and then click the END RECORDING button to add the ending timing.

Step 2: You can also add stickers and texts as per your choice before saving the part of the YouTube video.

Step 3: Finally, you can compile multiple clips into a single clip and then hit “SAVE HASHCUT” to finish your work.
5. VideoCrops
VideoCrops is another wonderful tool to download a part of the YouTube video you want. It has limited tools as it is free. Be sure to download your video immediately after your work is done.
Here are the simple steps you need to follow to use VideoCrops.
Step 1: Open VideoCrops on your device, paste the YouTube video URL, and click the “Play” button.
Step 2: Select the video interval you want to crop and hit the “Crop selection” button below the video.

Step 3: Click the “Download” button below and enjoy your clip.
6. Kapwing
Kapwing is another cool tool that works on all devices such as Android, Mac, and iOS. It makes your work easy with a few simple trims and cuts.
Know how to get your work done with Kapwing here!
Step 1: If you want a part of any YouTube video, paste the link into the given space and wait for the video to be displayed on the screen.
Step 2: When the video appears, you need to select the slider and drag it to the part of the video you want for a final cut. You can also use the arrow key if you want better trimming. You can also zoom in or out for better results and adjust the video’s speed.

Step 3: When you’re finally done with the cropping and editing, press the “Export Video” button at the top right corner. You can now share and download the shortened video.
Part 2: How to Record YouTube Videos with Filmora?
Filmora is a software editor that is available for both Windows and MacOS. It can give you many editing and recording facilities. Besides, it offers many editing facilities like effects, color match, motion tracking, direct upload to social platforms, and a lot more. You need to follow a few steps to record YouTube videos using Filmora and easily save parts of the video.
You need to follow a few steps to record YouTube videos using Filmora and easily save parts of the video.
 Secure Download
Secure Download
- Open Wondershare Filmora and then click the PC Screen button to enter the screen recording interface.

- In the Wondershare Screen Recorder tool, you can choose to record your full screen or any target window. For example, since we want to record part of the YouTube video, choose target window and then select the browser playing the YouTube video.
You need to choose the file location of where you want your video to be saved, set a record time limit and hit the red record button.

- If you want to save only a part of the YouTube video, you can drag the play header to the section of your choice and trim it or use scissors to slice the part you want in Filmora. You can edit the part by adding headings and effects. And finally, export the video to use.
You can check this part to learn more details about how to use Filmora to record screen .
Final thoughts
That’s about it! These were some of the best tools to download sections of the YouTube videos of your choice. The steps are pretty much the same for all the tools mentioned above. You no longer have to reach out to your friends to do this for you. This article will help you out as we’ve mentioned the step-by-step process for each tool. First, you need to ensure you have a stable internet connection.
Download segments of the YouTube video effortlessly with a few taps on your phone now!
![]()
A cross-platform for making videos anywhere for all creators

Why your video editing isn’t good enough? How about some creative inspo?
- 100 Million+ Users
- 150+ Countries and Regions
- 4 Million+ Social Media Followers
- 5 Million+ Stock Media for Use
* Secure Download

Richard Bennett
Richard Bennett is a writer and a lover of all things video.
Follow @Richard Bennett
Richard Bennett
Mar 27, 2024• Proven solutions
YouTube is the second-most viewed social platform, with around 2.3 Billion people active on it every day.
It’s easy to find videos of your choice with a simple search online. You’ve probably come across ways to download a YouTube video, but what if you only want to download a part of the video and not the whole? Well, that’s exactly what we’ll be covering here.
Here in this article, you will learn about the most straightforward YouTube video cutter and its uses. The next time you see something interesting, you can straightaway download it!
- Part 1: How to Download a Certain Part of a YouTube Video?
- Part 2: How to Record YouTube Videos with Filmora? [Video Tutorial]
Part 1: How to Download a Certain Part of a YouTube Video?
Below are 6 software that are available to download part of youtube video, find which one fit you much. Watch a video description first!
Note: We resolutely oppose all forms of copyright-infringing downloads. This tutorial is only for downloading YouTube videos/audio materials from your own channel.
| 1 - Clideo | 2 - YT Cutter | 3 - VEED.IO |
|---|---|---|
| 4 - Hashcut | 5 - VideoCrops | 6 - Kapwing |
Try Filmora to Download and Edit YouTube Video for Free!
Filmora YouTube Video Editor is an expert in creating and editing videos for all YouTubers. You can use the built-in screen recorder to download YouTube videos and add cool visual effects and popular emojis to re-edit your video. Then you can upload to YouTube directly and gain more views!
Download & Edit YouTube Videos Download & Edit YouTube Videos Download & Edit YouTube Videos Learn More >
1. Clideo
Clideo is not only easy to use, but it’s safe too. It helps you cut parts of the video in just a few steps, and it’s completely free! Furthermore, it will delete the user information in 24 hours. Clideo also works even if you don’t log in or register.
You just need to follow the simple steps below to download the part of the YouTube video.
Step 1: Copy the YouTube link you want and paste it on the Clideo video cutter. As shown in the figure below, you need to paste it in the space on the homepage. You can also export the file to Google Drive and Dropbox. It is also compatible with Mobile and PC.
Step 2: Once you paste the link, you need to cut the video part using the slider. You then have to set the start and end times accordingly. You can also choose the “Fade in” or “Fade out” option to give your video smooth finishing. Clideo provides several extensions to download, but if you want to post your video on social media, it’s better to use the MP4 option. After finishing, press the “Cut” button.
Step 3: You can preview your video and save it on your device as the final step.
2. YT Cutter
It’s a super-easy video cutter that can download a part of any YouTube video in no time. YT Cutter also allows downloading and trimming the video online. The maximum limit is 1 minute for free account users, but it’s 20 minutes for premium users.
Here are the steps to download part of your YouTube video using YT Cutter.
Step 1: Click on the “start” button after pasting your YouTube URL.
Step 2: You can preview the part of the video you want to download online. After that, add the start and end times in the options bar on the left. Then, you’re good to go! Your video will be ready to download once you hit the “download” button.
3. VEED.IO
Veed.io YouTube video cutter is another flexible and easy tool to use. Paste the YouTube URL on Veed and cut or trim any part of the YouTube video easily.
Check out the simple steps to use Veed below:
Step 1: You will find the option to upload your file, record a video, or paste the YouTube video URL on Veed.
Step 2: Once you have uploaded your video in Veed, you can trim or cut a section by dragging or clicking the video ends.
Step 3: Soon after finishing your work, press the “download” button, and you finish it.
Filmora Video Editor
Create AI-Generated Video with Filmora
Filmora Discord video editor offers a ChatGPT plug-in and AI tools to enhance your creative vision. Make your idea into reality.
Create Video with ChatGPT Create Video with ChatGPT Create Video with ChatGPT Learn More >
4. Hashcut
Hashcut is user-friendly as it does not save up your video. If you like a video on YouTube and want to download a part of the video, Hashcut is your go-to!
Want to know how it works? Read below:
Step 1: You can search for the YouTube video you want to cut and paste the URL on the Hashcut box. Then, click the START RECORDING button to add the start timing, and then click the END RECORDING button to add the ending timing.
Step 2: You can also add stickers and texts as per your choice before saving the part of the YouTube video.
Step 3: Finally, you can compile multiple clips into a single clip and then hit “SAVE HASHCUT” to finish your work.
5. VideoCrops
VideoCrops is another wonderful tool to download a part of the YouTube video you want. It has limited tools as it is free. Be sure to download your video immediately after your work is done.
Here are the simple steps you need to follow to use VideoCrops.
Step 1: Open VideoCrops on your device, paste the YouTube video URL, and click the “Play” button.
Step 2: Select the video interval you want to crop and hit the “Crop selection” button below the video.
Step 3: Click the “Download” button below and enjoy your clip.
6. Kapwing
Kapwing is another cool tool that works on all devices such as Android, Mac, and iOS. It makes your work easy with a few simple trims and cuts.
Know how to get your work done with Kapwing here!
Step 1: If you want a part of any YouTube video, paste the link into the given space and wait for the video to be displayed on the screen.
Step 2: When the video appears, you need to select the slider and drag it to the part of the video you want for a final cut. You can also use the arrow key if you want better trimming. You can also zoom in or out for better results and adjust the video’s speed.
Step 3: When you’re finally done with the cropping and editing, press the “Export Video” button at the top right corner. You can now share and download the shortened video.
Part 2: How to Record YouTube Videos with Filmora?
Filmora is a software editor that is available for both Windows and MacOS. It can give you many editing and recording facilities. Besides, it offers many editing facilities like effects, color match, motion tracking, direct upload to social platforms, and a lot more. You need to follow a few steps to record YouTube videos using Filmora and easily save parts of the video.
You need to follow a few steps to record YouTube videos using Filmora and easily save parts of the video.
Secure Download
Secure Download
- Open Wondershare Filmora and then click the PC Screen button to enter the screen recording interface.
- In the Wondershare Screen Recorder tool, you can choose to record your full screen or any target window. For example, since we want to record part of the YouTube video, choose target window and then select the browser playing the YouTube video.
You need to choose the file location of where you want your video to be saved, set a record time limit and hit the red record button.
- If you want to save only a part of the YouTube video, you can drag the play header to the section of your choice and trim it or use scissors to slice the part you want in Filmora. You can edit the part by adding headings and effects. And finally, export the video to use.
You can check this part to learn more details about how to use Filmora to record screen .
Final thoughts
That’s about it! These were some of the best tools to download sections of the YouTube videos of your choice. The steps are pretty much the same for all the tools mentioned above. You no longer have to reach out to your friends to do this for you. This article will help you out as we’ve mentioned the step-by-step process for each tool. First, you need to ensure you have a stable internet connection.
Download segments of the YouTube video effortlessly with a few taps on your phone now!
![]()
A cross-platform for making videos anywhere for all creators
Why your video editing isn’t good enough? How about some creative inspo?
- 100 Million+ Users
- 150+ Countries and Regions
- 4 Million+ Social Media Followers
- 5 Million+ Stock Media for Use
* Secure Download
Richard Bennett
Richard Bennett is a writer and a lover of all things video.
Follow @Richard Bennett
Editor’s Assistant: Top 5 Portable Devices for VFX Artists
The Best Laptops for Video Editing
Richard Bennett
Oct 26, 2023• Proven solutions
This article lists the 3 best laptops for video editing in 2018.
Whether you’re an industry professional or an avid YouTuber, you know how important it is to produce quality videos consistently.
The quality of the videos you create will depend on your creativity, the editing software you use, and the hardware that software is installed on. And as you probably know, it can be tough to work fast and get good results when your hardware or laptop isn’t strong enough to power your software properly and allow you to work at the pace you want.
The best laptops for video editing in 2018 have three things in common. First, they have top-of-the-line display technology for color accuracy, color depth, and clarity. Next, they have discrete (dedicated) Graphic Processing Units (GPUs) with accompanying RAM to enable them to handle video processing fast without compromising other system functions. And finally, they have Intel core i7 CPU processors and Solid-State Drives (SSD) for faster overall performance.
THE TOP 3 LAPTOPS FOR EDITING VIDEO IN 2018
The top 3 laptops below are quite impressive. They have the right mix of power and function that video editing requires.
1.MACBOOK PRO WITH TOUCH BAR
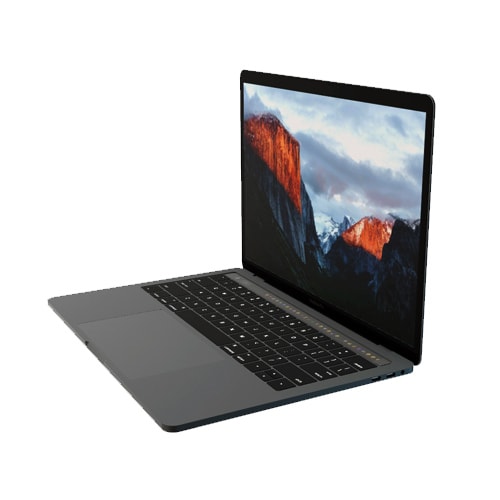
PRICE: $1500 - $1800
SYSTEM SPECS:
CPU: Intel Core i7 Processor
GRAPHICS: Radeon Pro 555 with 2GB memory – 560 with 4GB memory
RAM: 16GB
SCREEN: 15.4” Retina Display
RES: 2880 x 1800px
STORAGE: 128 – 256GB SSD
PROS
- OLED Touch Bar
- Thunderbolt 3 ports
- Large Trackpad
CONS:
- No other input ports available besides Thunderbolt 3
- Expensive
The MacBook Pro with Touch Bar is the best video editing laptop produced by Apple. It has a wide 15.4” screen with thin bezels, and its proprietary OLED Touch bar amps up its flexibility and functionality considerably. The Touch Bar is set-up to show different shortcuts for different apps. It works quite well with Photoshop and will show thumbnails, filter options, a color picker, and more while you’re editing videos or stills.
Working with large 4K video files is much easier with the MacBook Pro. It’s fitted with Thunderbolt 3 Ports which have the highest data and video bandwidth available for USB-C connections. With these Thunderbolt ports, you can also use high-speed and high-power peripherals without a hitch. This laptop also has an extra-wide touchpad or Trackpad (as Apple calls it) which expands your physical working surface while also making it easier to do detailed video editing.
Unfortunately, if you need a variety of ports like most videographers, working with the MacBook Pro could be a challenge as it only has Thunderbolt 3 ports. If this is the laptop you prefer, you’ll need to buy additional connection hardware to work with different input devices. And while this laptop impresses in many ways, it’s also quite expensive. There are certainly other laptops on the market which can give you similar performance at a lower cost.
2. DELL XPS 15
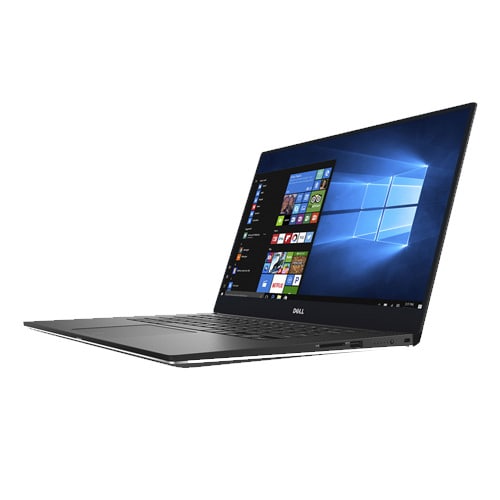
PRICE: $999 - $1300
SYSTEM SPECS:
CPU: Intel Core i7 Processor
GRAPHICS: NVIDIA GeForce GTX 1050
RAM: 8 - 16GB
SCREEN: 15.6”
RES: FHD - 4k UHD 3840 x 2160px
STORAGE: 256GB – 1TB SSD
PROS
- 4k InfinityEdge display
- Good battery life
- Has multiple input ports
CONS:
- Webcam is oddly positioned
The Dell XPS 15 is one laptop that hits the sweet spot for many videographers. It’s considered the closest competitor to the MacBook Pro reviewed above. In fact, many would argue that it tops the MacBook Pro when it comes to speed, color accuracy, and color depth. Its 15.6” screen has very thin bezels for minimal distraction and immersive work experience. At 4K resolution and displaying a wide range of the sRGB gamut, video editing with the Dell XPS 15 promises to be both smooth and enjoyable.
The Dell XPS 15 is certainly more affordable, while still delivering excellent graphics performance. It features an Intel i7 processor and the NVIDIA GeForce GTX 1050 graphics processor. This makes it remarkably fast for video editing, as well as energy-efficient. People who work with different input devices will also like that this laptop has legacy adapters (USB, HDMI, ethernet) alongside a USB type C port.
The biggest downside to the Dell XPS 15 laptop is its oddly positioned webcam. It feels awkward and can be an inconvenience to use since you’ll have to adjust your position significantly while making video calls or recording for your YouTube channel.
3. MICROSOFT SURFACE BOOK 2
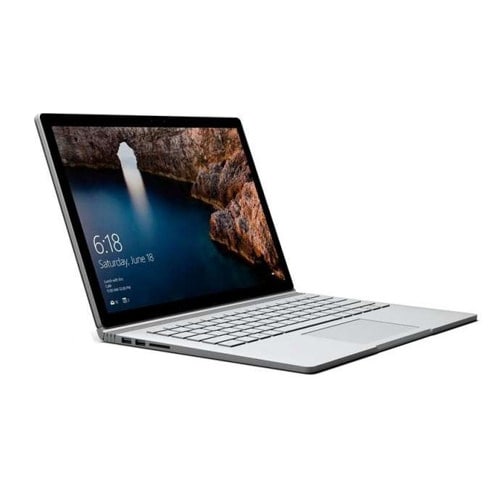
PRICE: $1499 - $2499
SYSTEM SPECS:
CPU: Intel Core i7 Processor
GRAPHICS: Intel HD 620 or Nvidia GTX 1050 / GTX 1060
RAM: 16GB
SCREEN: 15.0”
RES: 3240 x 2160px
STORAGE: 256GB, 512GB – 1TB SSD
PROS
- Detachable screen
- Has multiple input ports (USB Type-A, USB Type-C, SD card reader)
- Works with a Stylus
CONS:
- Expensive
- Fulcrum hinge
The Microsoft Surface Book 2 is a laptop and a tablet thanks to its detachable screen. At a resolution of 3240 x 2160px, its screen is nearly 4k and can handle Full HD and HD footage with ease. Add to this its capacity to show a considerable portion of the sRGB gamut and its easy-to-use stylus and you can see why this 2-in-1 combo from Microsoft is one of the top 3 laptops for video editing in 2018.
Surface Book 2 also has the right combination of power and storage capacity that video editing requires. It boasts a state-of-the-art NVIDIA graphics processor and an Intel i7 processor for a smooth workflow no matter the size or level of detail involved in your video editing project.
On the downside, this laptop is undoubtedly very expensive. Compared to the function and power you can get from the DELL XPS 15, it’s hard to justify paying nearly $2500 for the Surface Book 2. Its detachable screen, supported by a fulcrum hinge, also comes at a price. It makes the laptop a bit bulky at one end when it’s folded. This in turn can make day-to-day handling a bit more tricky than it has to be.
CONCLUSION
If you’re searching for a good laptop to help you improve the quality of your videos in 2018, look no further than these 3. They have all the power, function, and storage capacity you need to handle any project with ease. Just be mindful of your budget and consider which extras are worth the expense. Go for the MacBook Pro with Touch Bar if customizing your workflow is a priority. Opt for the Dell XPS 15 if you want the best combination of display quality and graphics processing. Finally, consider the Surface Book 2 if you need the flexibility of a 2-in-1 device.
What do you think is the best laptop for video editing?
Equip Your Laptop with the Best Video Editing Software


Richard Bennett
Richard Bennett is a writer and a lover of all things video.
Follow @Richard Bennett
Richard Bennett
Oct 26, 2023• Proven solutions
This article lists the 3 best laptops for video editing in 2018.
Whether you’re an industry professional or an avid YouTuber, you know how important it is to produce quality videos consistently.
The quality of the videos you create will depend on your creativity, the editing software you use, and the hardware that software is installed on. And as you probably know, it can be tough to work fast and get good results when your hardware or laptop isn’t strong enough to power your software properly and allow you to work at the pace you want.
The best laptops for video editing in 2018 have three things in common. First, they have top-of-the-line display technology for color accuracy, color depth, and clarity. Next, they have discrete (dedicated) Graphic Processing Units (GPUs) with accompanying RAM to enable them to handle video processing fast without compromising other system functions. And finally, they have Intel core i7 CPU processors and Solid-State Drives (SSD) for faster overall performance.
THE TOP 3 LAPTOPS FOR EDITING VIDEO IN 2018
The top 3 laptops below are quite impressive. They have the right mix of power and function that video editing requires.
1.MACBOOK PRO WITH TOUCH BAR
PRICE: $1500 - $1800
SYSTEM SPECS:
CPU: Intel Core i7 Processor
GRAPHICS: Radeon Pro 555 with 2GB memory – 560 with 4GB memory
RAM: 16GB
SCREEN: 15.4” Retina Display
RES: 2880 x 1800px
STORAGE: 128 – 256GB SSD
PROS
- OLED Touch Bar
- Thunderbolt 3 ports
- Large Trackpad
CONS:
- No other input ports available besides Thunderbolt 3
- Expensive
The MacBook Pro with Touch Bar is the best video editing laptop produced by Apple. It has a wide 15.4” screen with thin bezels, and its proprietary OLED Touch bar amps up its flexibility and functionality considerably. The Touch Bar is set-up to show different shortcuts for different apps. It works quite well with Photoshop and will show thumbnails, filter options, a color picker, and more while you’re editing videos or stills.
Working with large 4K video files is much easier with the MacBook Pro. It’s fitted with Thunderbolt 3 Ports which have the highest data and video bandwidth available for USB-C connections. With these Thunderbolt ports, you can also use high-speed and high-power peripherals without a hitch. This laptop also has an extra-wide touchpad or Trackpad (as Apple calls it) which expands your physical working surface while also making it easier to do detailed video editing.
Unfortunately, if you need a variety of ports like most videographers, working with the MacBook Pro could be a challenge as it only has Thunderbolt 3 ports. If this is the laptop you prefer, you’ll need to buy additional connection hardware to work with different input devices. And while this laptop impresses in many ways, it’s also quite expensive. There are certainly other laptops on the market which can give you similar performance at a lower cost.
2. DELL XPS 15
PRICE: $999 - $1300
SYSTEM SPECS:
CPU: Intel Core i7 Processor
GRAPHICS: NVIDIA GeForce GTX 1050
RAM: 8 - 16GB
SCREEN: 15.6”
RES: FHD - 4k UHD 3840 x 2160px
STORAGE: 256GB – 1TB SSD
PROS
- 4k InfinityEdge display
- Good battery life
- Has multiple input ports
CONS:
- Webcam is oddly positioned
The Dell XPS 15 is one laptop that hits the sweet spot for many videographers. It’s considered the closest competitor to the MacBook Pro reviewed above. In fact, many would argue that it tops the MacBook Pro when it comes to speed, color accuracy, and color depth. Its 15.6” screen has very thin bezels for minimal distraction and immersive work experience. At 4K resolution and displaying a wide range of the sRGB gamut, video editing with the Dell XPS 15 promises to be both smooth and enjoyable.
The Dell XPS 15 is certainly more affordable, while still delivering excellent graphics performance. It features an Intel i7 processor and the NVIDIA GeForce GTX 1050 graphics processor. This makes it remarkably fast for video editing, as well as energy-efficient. People who work with different input devices will also like that this laptop has legacy adapters (USB, HDMI, ethernet) alongside a USB type C port.
The biggest downside to the Dell XPS 15 laptop is its oddly positioned webcam. It feels awkward and can be an inconvenience to use since you’ll have to adjust your position significantly while making video calls or recording for your YouTube channel.
3. MICROSOFT SURFACE BOOK 2
PRICE: $1499 - $2499
SYSTEM SPECS:
CPU: Intel Core i7 Processor
GRAPHICS: Intel HD 620 or Nvidia GTX 1050 / GTX 1060
RAM: 16GB
SCREEN: 15.0”
RES: 3240 x 2160px
STORAGE: 256GB, 512GB – 1TB SSD
PROS
- Detachable screen
- Has multiple input ports (USB Type-A, USB Type-C, SD card reader)
- Works with a Stylus
CONS:
- Expensive
- Fulcrum hinge
The Microsoft Surface Book 2 is a laptop and a tablet thanks to its detachable screen. At a resolution of 3240 x 2160px, its screen is nearly 4k and can handle Full HD and HD footage with ease. Add to this its capacity to show a considerable portion of the sRGB gamut and its easy-to-use stylus and you can see why this 2-in-1 combo from Microsoft is one of the top 3 laptops for video editing in 2018.
Surface Book 2 also has the right combination of power and storage capacity that video editing requires. It boasts a state-of-the-art NVIDIA graphics processor and an Intel i7 processor for a smooth workflow no matter the size or level of detail involved in your video editing project.
On the downside, this laptop is undoubtedly very expensive. Compared to the function and power you can get from the DELL XPS 15, it’s hard to justify paying nearly $2500 for the Surface Book 2. Its detachable screen, supported by a fulcrum hinge, also comes at a price. It makes the laptop a bit bulky at one end when it’s folded. This in turn can make day-to-day handling a bit more tricky than it has to be.
CONCLUSION
If you’re searching for a good laptop to help you improve the quality of your videos in 2018, look no further than these 3. They have all the power, function, and storage capacity you need to handle any project with ease. Just be mindful of your budget and consider which extras are worth the expense. Go for the MacBook Pro with Touch Bar if customizing your workflow is a priority. Opt for the Dell XPS 15 if you want the best combination of display quality and graphics processing. Finally, consider the Surface Book 2 if you need the flexibility of a 2-in-1 device.
What do you think is the best laptop for video editing?
Equip Your Laptop with the Best Video Editing Software
Richard Bennett
Richard Bennett is a writer and a lover of all things video.
Follow @Richard Bennett
Also read:
- In 2024, Elevate Audience Reach Through Collaborative YouTube Videos
- How to Block YouTube Channels on Computer and Mobile Phones
- 2024 Approved Bring Imagination to Life Self-Animated Artistry
- Maximizing YouTube Visibility with Key #Hashtags
- 2024 Approved Deleting YouTube Comments
- Bewitching Blend YouTube Edition of Top Magic Tricks!
- 2024 Approved Elevating Channels Strategies for Stardom on YouTube
- Cutting Edge Creativity Choosing High-Quality Camera Lenses for 2024
- [Updated] Closing Powerhouses Free Top 6 Video Closers
- In 2024, Elevate Your Marketing Game - Free 50 YouTube Adornments Here
- In 2024, Achieving Professional-Level Youtube Streams Using WireCast
- In 2024, Cross-Application Title Guidance YTB to Fb
- DIY Movie Making YouTube's Boutique Method for 2024
- 2024 Approved Charting the Course of Creative Conquests Self Vs. Competitors on YouTube
- Boosting Bank Balance Crafting Commercial Video Content for 2024
- In 2024, Capturing Life in Motion Top 9 Smartphone Props for Dynamic Cinematography
- Beyond Basic The Advanced Techniques of YouTube Counts for 2024
- In 2024, Efficient Broadcast Techniques Incorporating YouTube Loops on TV
- The Eminence of Online Influence Top 10 by Subs
- [New] Achieving Cohesion in Content with FlV Video Integration
- Precision Cinematography Ideal Lenses for Digital Storytellers
- [Updated] Effortless Rearrangement of Your Personalized Lists
- Counterclockwise Watch How to Unravel Your YouTube Sequence for 2024
- Enhancing Your Content with Effortlessly Added YouTube Subtitles
- PlayCapture X The Cost-Free Videography for Games for 2024
- Updated 2024 Approved The Best of Both Worlds Top 10 Free and Paid FCPX Plugins for Every Editor
- [Updated] Store Complete Online Interface for 2024
- Avoid High Costs Buying Budget-Friendly GoPros for 2024
- In 2024, Evaluating IGTV Video Impact Effectively
- How to Unlock Apple iPhone 6s Online? Here are 6 Easy Ways
- 2024 Approved Utilizing Instagram Filters to Elevate Your Photos
- [Updated] High-Quality Video Transfer From FB to MP4 – No Cost Online Method for 2024
- In 2024, Adding Text to Your Collage Not only Makes It Look Sophisticated but Also Versatile. So, if You Too Are Looking for Ways to Create a Collage Text, Check Out Our Article
- [New] Crack the Code of Creativity In-Depth Snapchat Filters Exploration
- New In 2024, S Must-Have Time-Lapse Apps for Smartphone Photography
- Forgotten The Voicemail Password Of Samsung Galaxy Z Fold 5? Try These Fixes
- My Videos Arent Playing on Oppo Reno 10 5G – What Can I Do? | Dr.fone
- In 2024, The Essential Guide for Swift iPad Screen Captures
- In 2024, How to See Someones Location on Apple iPhone 14 Pro Max | Dr.fone
- From Novice to Pro Conquering Twitter Streams
- ZTE Nubia Z60 Ultra Tutorial - Bypass Lock Screen,Security Password Pin,Fingerprint,Pattern
- How to Stop Life360 from Tracking You On Apple iPhone 11? | Dr.fone
- How To Use Allshare Cast To Turn On Screen Mirroring On Oppo Find X6 | Dr.fone
- [New] 2024 Approved Discord Video Calls for Mobile & Desktop Users Unpacked
- In 2024, Latest way to get Shiny Meltan Box in Pokémon Go Mystery Box On Realme GT Neo 5 SE | Dr.fone
- [Updated] In 2024, Mastering Creative Content for Fb Video Advertising
- Best Methods for Huawei Nova Y91 Wont Turn On | Dr.fone
- New Guide How To Check iCloud Activation Lock Status From Your Apple iPhone 6s
- Title: "Mastering YouTube Video Extraction A Step-by-Step Guide"
- Author: Kevin
- Created at : 2024-05-25 15:45:45
- Updated at : 2024-05-26 15:45:45
- Link: https://youtube-videos.techidaily.com/mastering-youtube-video-extraction-a-step-by-step-guide/
- License: This work is licensed under CC BY-NC-SA 4.0.
