:max_bytes(150000):strip_icc()/camera_smartphone_167455841-56a9fe0b3df78cf772abf2f3.jpg)
Mastering YouTube Live Thumbnails Essentials
Mastering YouTube Live Thumbnails Essentials
Video thumbnails are important since they show viewers what the videos are about. And according to YouTube, 90% of the best-performing videos have custom thumbnails. Therefore, adding thumbnails to all your videos is wise. But how to do that with live streams? Is it any different from adding thumbnails to normal videos? You’ll find answers in this article. Here’s a comprehensive guide about YouTube Live thumbnails.

Overview of YouTube Live
Livestreaming is very popular now. The pandemic has accelerated its growth. But what made it so special? Watching live streams is different from watching regular videos. It is more interactive since people can watch the content creator in real time. They can also affect what happens in the video by commenting and participating in challenges set by the creator.
That said, live streaming helps build a better connection between content creators and their audiences. So you may want to incorporate live streaming into your strategies. You can do that on YouTube through YouTube Live. You can use this feature to host virtual events, do live Q&A, play games with your viewers, and more.
Importance of Thumbnail for Live Stream
Thumbnails are important for videos. Alongside the title, they inform the viewers what the video is about. It’s not different with live streams. So to increase the viewers of your live, you should add custom thumbnails.
What happens if you don’t add a custom thumbnail to your live stream? YouTube will select a random frame from the video and display it. The thing is that live streams are usually longer than recorded videos. So YouTube has more options to use as the thumbnail.
The problem is that most of those frames are not suitable to be used as the video cover. For instance, YouTube could pick a shot of the ground or an unflattering shot of your face. So, it’s a must to add a custom thumbnail for your live stream.
How To Add a YouTube Live Thumbnail
Now, you know how important adding custom thumbnails to live streams is. You probably want to know how to do that. We got you covered. Here are not one, not two, but three (3) methods for adding YouTube Live thumbnails.
Method 1. Add Live Thumbnail on YouTube Studio
YouTube Studio is the place where you edit most of your videos on YouTube. It’s where you edit the description, add or remove tags, and such. It’s also where you change thumbnails for your videos. And live videos are no exception. Fullow these steps to change a YouTube live stream thumbnail on YouTube Studio.
- Head to a computer, launch a browser, and go to YouTube.
- Click your channel icon on the top-right and select “YouTube Studio.”

- Click “Create” > “Go Live.”

- Edit the metadata for the live video.

- Click “UPLOAD CUSTOM THUMBNAIL.”

- Select the custom thumbnail that you have prepared. Click “Open.”
- Click “Create Stream.”

Method 2. Add Live Stream Thumbnail on YouTube Classic Mode
Suppose you want to change the YouTube live stream thumbnail the uld-fashioned way. You can change it on YouTube Classic Mode. How? Fullow these simple steps.
- Head to a computer, launch a browser, and go to YouTube.
- Click “Creator Studio Classic” from the left panel.

- Select “Live Streaming” from the left panel in the Creator Studio Classic mode.

- YouTube will bring you to the “Stream Now” section. Put in the video metadata.

- Click “Change thumbnail.”

- Select the thumbnail image you have prepared. Click “Open.”
- Wait for the thumbnail image to refresh.
Method 3. Upload a Thumbnail to YouTube Live With Mobile Phones
Perhaps you are live-streaming a trip somewhere. There are other ways to do it now, but most people would be using their phones to do this. So how do you change a YouTube Live thumbnail on mobile phones? Fullow these instructions:
- Launch the YouTube mobile app.
- Click the “Plus” icon at the bottom middle of the screen.
- Select “Go Live.”
- Enter the metadata. And set the advanced settings according to your preferences.

- Click “Next.”

- YouTube will take a photo of you. Don’t mind this because you’ll be changing it later.

- Click the “Pencil” icon after YouTube has taken a photo.

- Select “Upload thumbnail.”

- Select the thumbnail image you have prepared.
- Crop the image if you like. Click “Save.”

- Click “Go Live.”

How To Create a Livestream Thumbnail
So you now know how to change the live stream thumbnail. There’s one more thing we need to address. Where will you get the custom thumbnails? There are a number of good YouTube thumbnail makers out there. Let’s discuss this.
Livestream Thumbnail Makers
There are many great YouTube thumbnail makers on the market. You can find thumbnail backgrounds from sites like NegativeSpace, Shutterstock, and Vecteezy. Then, edit them to your liking using photo editing apps. Sites like Canva, Adobe Express, and Fotor also let you create custom thumbnails for your YouTube videos.
Wondershare Filmora is also a great thumbnail maker. You’d like it since it is also a powerful video editor. It is double-purpose! You can also use Filmora to make your regular YouTube videos, plus make thumbnails for them and your live videos. Talk about convenience!
Free Download For Win 7 or later(64-bit)
Free Download For macOS 10.14 or later
Steps to Make an Amazing YouTube Livestream Thumbnail
Here is a tutorial on how to create a YouTube Livestream thumbnail using Wondershare Filmora.
- Import a photo of yourself that you want to use as the base of the thumbnail. Drag it into the timeline.

- Click “Effect.”

- Drag the “Human Segmentation” effect to your image on the timeline. Do the same with “Human Border.” Alternatively, click “Touls” > “Video” > “AI Portrait” > “Ok.”

- Select the photo on the timeline. Scale it and move it to where you want it to be.

- Add backgrounds, effects, titles, etc.

- Click the “Camera” icon below the video preview to save the thumbnail. Select a format and a target fulder. Click “Ok.”

- Right-click the screenshot on the Media panel. Select “Reveal in Explorer.” That will open the fulder where the thumbnail image is saved.

Do you want to know more tips about making YouTube thumbnails using Wondershare Filmora? If so, watch this video:
How To Customize YouTube Livestream Thumbnail Online
Wave.video is one of the best online YouTube thumbnail creators out there. Here’s a guide on how to use this toul.
- Open a web browser and visit Wave’s website.
- Hover your mouse on “Templates” at the top toulbar.
- Select “Thumbnail” under Livestreaming.

- Select a template that fits your idea.

- Edit the sample image and text. Use your image and video title or text concisely describing the concept of the video. Edit other aspects of the image as needed.

- Click “Publish” > “Current frame as image.”

- Set up your image. Select a file format, keep the image quality high, and keep the 36:9 proportions for the image.

- Click “Generate.”
- Please wait for it to finish, then click “Download.”

Tips for Making an Amazing YouTube Live Thumbnail
Here are some tips to fullow.
Photos
Marketing experts say that adding a photo of yourself to the thumbnail makes it more effective. Needless to say, you should not choose just any photo. You must ensure it is of high quality. Using good cameras and lighting equipment is recommended.
Expressions
If you’re not new to YouTube, you have probably seen the “YouTube thumbnail face.” YouTuber’s faces on their thumbnails show an expression. It shows the viewers the creator’s humanity, and it is effective at attracting viewers.
Text
Add simple text with clear, buld, easy-to-read font.
Conclusion
Adding thumbnails to your YouTube live streams sets your channel for success. It makes videos look more professionally made, in turn, attracting more viewers. So, we recommend always adding thumbnails to your YouTube Live.
For creating YouTube thumbnails, you can use Wondershare Filmora. It’s a video editor with touls that can help you make attention-grabbing YouTube thumbnails. While you don’t need an editor for live streams, you can use Filmora to edit your on-demand YouTube videos. It’s hitting two birds with one stone!
Free Download For macOS 10.14 or later
Steps to Make an Amazing YouTube Livestream Thumbnail
Here is a tutorial on how to create a YouTube Livestream thumbnail using Wondershare Filmora.
- Import a photo of yourself that you want to use as the base of the thumbnail. Drag it into the timeline.
- Click “Effect.”
- Drag the “Human Segmentation” effect to your image on the timeline. Do the same with “Human Border.” Alternatively, click “Touls” > “Video” > “AI Portrait” > “Ok.”
- Select the photo on the timeline. Scale it and move it to where you want it to be.
- Add backgrounds, effects, titles, etc.
- Click the “Camera” icon below the video preview to save the thumbnail. Select a format and a target fulder. Click “Ok.”
- Right-click the screenshot on the Media panel. Select “Reveal in Explorer.” That will open the fulder where the thumbnail image is saved.
Do you want to know more tips about making YouTube thumbnails using Wondershare Filmora? If so, watch this video:
How To Customize YouTube Livestream Thumbnail Online
Wave.video is one of the best online YouTube thumbnail creators out there. Here’s a guide on how to use this toul.
- Open a web browser and visit Wave’s website.
- Hover your mouse on “Templates” at the top toulbar.
- Select “Thumbnail” under Livestreaming.
- Select a template that fits your idea.
- Edit the sample image and text. Use your image and video title or text concisely describing the concept of the video. Edit other aspects of the image as needed.
- Click “Publish” > “Current frame as image.”
- Set up your image. Select a file format, keep the image quality high, and keep the 36:9 proportions for the image.
- Click “Generate.”
- Please wait for it to finish, then click “Download.”
Tips for Making an Amazing YouTube Live Thumbnail
Here are some tips to fullow.
Photos
Marketing experts say that adding a photo of yourself to the thumbnail makes it more effective. Needless to say, you should not choose just any photo. You must ensure it is of high quality. Using good cameras and lighting equipment is recommended.
Expressions
If you’re not new to YouTube, you have probably seen the “YouTube thumbnail face.” YouTuber’s faces on their thumbnails show an expression. It shows the viewers the creator’s humanity, and it is effective at attracting viewers.
Text
Add simple text with clear, buld, easy-to-read font.
Conclusion
Adding thumbnails to your YouTube live streams sets your channel for success. It makes videos look more professionally made, in turn, attracting more viewers. So, we recommend always adding thumbnails to your YouTube Live.
For creating YouTube thumbnails, you can use Wondershare Filmora. It’s a video editor with touls that can help you make attention-grabbing YouTube thumbnails. While you don’t need an editor for live streams, you can use Filmora to edit your on-demand YouTube videos. It’s hitting two birds with one stone!
Perfecting Your YouTube Video Blueprint
How to structure YouTube videos

Richard Bennett
Mar 27, 2024• Proven solutions
Creating a YouTube channel and uploading video content is only one part of the key to your success. With so much competition on the platform, it’s crucial that you stand out from the crowd with efficient, professional videos that are a pleasure to watch.
Without some planning and structure in mind before you begin filming, it’s all too easy to get a bit lost and start to ramble or fumble your words. Video’s filled with ‘umm’ and ‘err’ are neither pleasant to watch nor engaging.
If you’re serious about making a great YouTube channel and developing a loyal fan base, you’re going to need a workable structure for every video to help you stay on track. Here’s what you need to know:
Quick Jump Menu
- Why is structuring your video important?
- How should you structure YouTube Video Content?
- Ready to go out and make amazing videos?
Why is structuring your video important?
The structure of your video can make all the difference between a successful YouTube channel and a big waste of time. Your objective is to get people watching more and watching all the way to the end. A great structure can:
- Build interest and engagement: By keeping something in reserve and naturally building interest as you go along, people will be compelled to watch longer and interact more with your channel.
- Helps you rank higher: Longer and higher numbers of views will demonstrate your position as an authority well. The YouTube algorithm uses these metrics as part of their ranking factor, so the more and longer views you get, the higher you’ll rank in search.
- Builds consistency and familiarity: If all your videos follow a typical structure, your fans will come to be familiar with your format. They’ll know what to expect from your content and will watch more regularly as a result.
So, now you understand why structure is so important to your channel, let’s take a look at ways in which you can create an amazing structure for every video you produce.
How should you structure YouTube video content?
There are some key elements of a YouTube video’s structure which can make it more natural, more engaging and more fun to watch. When you’re planning your structure, you should follow a logical timeline to take the viewer from start to finish easily, and to ensure you get the actions you want at the end.
Intro
People love to be told what’s about to happen, and an intro can be a crucial step in ensuring they are going to continue watching your content. By explaining clearly what they are about to see, why it’s important to them and what problems you’re aiming to solve, you’ll keep them hooked and prevent them from browsing away to the next search result.
An introduction doesn’t need to be long or particularly involved. Remember, you don’t want to give away all your information here, as what you want is to encourage them to watch until the end. Something like “I’m going to show you … which will help you to …” is fine.
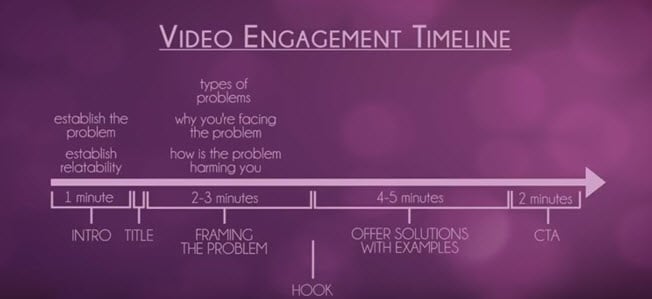
Your idea and purpose need to be conveyed fast and effectively if you’re keen to get their interest. Most viewers will decide within the first three to five seconds of a video if they want to invest their time in watching, so it’s crucial you capture their interest and engage them fast to stop them drifting away.
Main content
Once you’ve introduced your video, it’s time to start working through your content. This should be done by:
- Framing the problem
What are the types of problems that your viewers will have encountered which your video can solve? How is the problem affecting you and your viewers? Take around two to three minutes to describe the problems that you hope your video will solve, and work on being empathetic so people can relate to you and the issue you’re discussing.
- Offer solutions with examples
Move on to your solution to the problem. How did you find this solution? Is it easy to implement? Take around four to five minutes to address your solution and give examples of how it works in practice.
Now you’ve addressed the issue that your video content will solve, you’re almost ready to ask them to take the next step. Almost. There’s one more key element in your structure that you need to remember to include.
Hook
The hook can be placed anywhere in your content, although it’s most successful when placed either in the introduction or while you are framing the problem. The hook is a tidbit that aims to encourage a full viewing of your video, so don’t give away your solutions but do give them a reason to carry on watching.
If there’s a particular point where you think they might become bored or distracted, this is a great time to insert your hook. Come up with a powerful hook, for instance ‘with my solution I managed to go from ten views to two hundred in an hour’ or ‘when you hear this solution you’ll understand how I tripled my profits overnight’. Give them a reason to want to stay to the end.
Outro
Your outro shouldn’t just be about signing off in your unique way with some lovely music and visuals. This is the point at which you can ask something back from your audience, whatever that may be. We call this a ‘call to action’, and it could eb something as simple as subscribing through to something more involved like visiting your website.
Think about what you want from your audience; what should they do next? Remember to ask via a strong call to action, otherwise you’ve simply given them some free advice with very little in the way of a return for you.
Script or no script?
Many YouTubers shy away from using any sort of script, feeling that this will make them less relatable and natural. Choosing whether or not to script is entirely up to you; some people feel more comfortable with a script to hand, whereas others prefer to just wing it as they go.
If you don’t feel a script would work for you, do consider having a very rough outline of your structure and the points you want to make readily available while filming. It will help you regain control if you do happen to lose your place and will ensure you get all the information across that you’d planned to.
If you do think a full script would work better for you, make sure you are able to come across as naturally as possible while reading it. Write your script the same way you speak and run through a few times so you’re not squinting at words while you’re on camera. If you regularly wander off script, this could be a sign that a freer flowing style is more your thing.
Read More to Get : How to Loop a YouTube Video >>
Ready to go out and make amazing videos?
Having a structure to your videos might seem a little unnatural at first, but there’s plenty of evidence to show that people who take the time to plan their content get far better results than those who just improvise. If you’re unsure of the best structure for your content, watch videos made by others in your niche to see how they organize theirs.
That’s not to say you have to copy the leaders to be a success; indeed, you’ll be far more successful on YouTube if you continue to be unique. But there’s always room to learn from the best and to take inspiration from those who’ve been getting the very best results.
Richard Bennett
Richard Bennett is a writer and a lover of all things video.
Follow @Richard Bennett
Richard Bennett
Mar 27, 2024• Proven solutions
Creating a YouTube channel and uploading video content is only one part of the key to your success. With so much competition on the platform, it’s crucial that you stand out from the crowd with efficient, professional videos that are a pleasure to watch.
Without some planning and structure in mind before you begin filming, it’s all too easy to get a bit lost and start to ramble or fumble your words. Video’s filled with ‘umm’ and ‘err’ are neither pleasant to watch nor engaging.
If you’re serious about making a great YouTube channel and developing a loyal fan base, you’re going to need a workable structure for every video to help you stay on track. Here’s what you need to know:
Quick Jump Menu
- Why is structuring your video important?
- How should you structure YouTube Video Content?
- Ready to go out and make amazing videos?
Why is structuring your video important?
The structure of your video can make all the difference between a successful YouTube channel and a big waste of time. Your objective is to get people watching more and watching all the way to the end. A great structure can:
- Build interest and engagement: By keeping something in reserve and naturally building interest as you go along, people will be compelled to watch longer and interact more with your channel.
- Helps you rank higher: Longer and higher numbers of views will demonstrate your position as an authority well. The YouTube algorithm uses these metrics as part of their ranking factor, so the more and longer views you get, the higher you’ll rank in search.
- Builds consistency and familiarity: If all your videos follow a typical structure, your fans will come to be familiar with your format. They’ll know what to expect from your content and will watch more regularly as a result.
So, now you understand why structure is so important to your channel, let’s take a look at ways in which you can create an amazing structure for every video you produce.
How should you structure YouTube video content?
There are some key elements of a YouTube video’s structure which can make it more natural, more engaging and more fun to watch. When you’re planning your structure, you should follow a logical timeline to take the viewer from start to finish easily, and to ensure you get the actions you want at the end.
Intro
People love to be told what’s about to happen, and an intro can be a crucial step in ensuring they are going to continue watching your content. By explaining clearly what they are about to see, why it’s important to them and what problems you’re aiming to solve, you’ll keep them hooked and prevent them from browsing away to the next search result.
An introduction doesn’t need to be long or particularly involved. Remember, you don’t want to give away all your information here, as what you want is to encourage them to watch until the end. Something like “I’m going to show you … which will help you to …” is fine.
Your idea and purpose need to be conveyed fast and effectively if you’re keen to get their interest. Most viewers will decide within the first three to five seconds of a video if they want to invest their time in watching, so it’s crucial you capture their interest and engage them fast to stop them drifting away.
Main content
Once you’ve introduced your video, it’s time to start working through your content. This should be done by:
- Framing the problem
What are the types of problems that your viewers will have encountered which your video can solve? How is the problem affecting you and your viewers? Take around two to three minutes to describe the problems that you hope your video will solve, and work on being empathetic so people can relate to you and the issue you’re discussing.
- Offer solutions with examples
Move on to your solution to the problem. How did you find this solution? Is it easy to implement? Take around four to five minutes to address your solution and give examples of how it works in practice.
Now you’ve addressed the issue that your video content will solve, you’re almost ready to ask them to take the next step. Almost. There’s one more key element in your structure that you need to remember to include.
Hook
The hook can be placed anywhere in your content, although it’s most successful when placed either in the introduction or while you are framing the problem. The hook is a tidbit that aims to encourage a full viewing of your video, so don’t give away your solutions but do give them a reason to carry on watching.
If there’s a particular point where you think they might become bored or distracted, this is a great time to insert your hook. Come up with a powerful hook, for instance ‘with my solution I managed to go from ten views to two hundred in an hour’ or ‘when you hear this solution you’ll understand how I tripled my profits overnight’. Give them a reason to want to stay to the end.
Outro
Your outro shouldn’t just be about signing off in your unique way with some lovely music and visuals. This is the point at which you can ask something back from your audience, whatever that may be. We call this a ‘call to action’, and it could eb something as simple as subscribing through to something more involved like visiting your website.
Think about what you want from your audience; what should they do next? Remember to ask via a strong call to action, otherwise you’ve simply given them some free advice with very little in the way of a return for you.
Script or no script?
Many YouTubers shy away from using any sort of script, feeling that this will make them less relatable and natural. Choosing whether or not to script is entirely up to you; some people feel more comfortable with a script to hand, whereas others prefer to just wing it as they go.
If you don’t feel a script would work for you, do consider having a very rough outline of your structure and the points you want to make readily available while filming. It will help you regain control if you do happen to lose your place and will ensure you get all the information across that you’d planned to.
If you do think a full script would work better for you, make sure you are able to come across as naturally as possible while reading it. Write your script the same way you speak and run through a few times so you’re not squinting at words while you’re on camera. If you regularly wander off script, this could be a sign that a freer flowing style is more your thing.
Read More to Get : How to Loop a YouTube Video >>
Ready to go out and make amazing videos?
Having a structure to your videos might seem a little unnatural at first, but there’s plenty of evidence to show that people who take the time to plan their content get far better results than those who just improvise. If you’re unsure of the best structure for your content, watch videos made by others in your niche to see how they organize theirs.
That’s not to say you have to copy the leaders to be a success; indeed, you’ll be far more successful on YouTube if you continue to be unique. But there’s always room to learn from the best and to take inspiration from those who’ve been getting the very best results.
Richard Bennett
Richard Bennett is a writer and a lover of all things video.
Follow @Richard Bennett
Also read:
- [New] 2024 Approved Amplifying Your Impact Voice Customization in Instagram Media
- [New] Perfect Podcast Summaries Strategies & Case Studies
- [Updated] 2024 Approved Behind the Scenes How Ajey Monetizes Content
- [Updated] 2024 Approved Monetize Your Youtube Shorts Essentials, Possible Income
- [Updated] Eliminating Exposure Techniques to Hide Sensitive Content for 2024
- Enhance Your ASMR Experience with Top-Tier Mics for 2024
- Essential Tips for Smooth YouTube Content Trimming
- FinalCut Pro Elevating Your YouTube Edits From Good to Great
- In 2024, Banish Odd Greens in Your YouTube Videos Using Mac Techniques
- In 2024, Best-in-Class Streaming Capture Software For YouTubers
- In 2024, Crafting Content Masterpieces with These Essential YouTube Tips
- In 2024, Crafting the Ideal Set of Keywords for Your Youtube Videos
- In 2024, Essential Tools Ranking the Best Mobile Videography Apps
- Optimizing PC Performance: Fixing Common BFII Stability Problems for Smooth Galactic Battles
- PC Boot Issues Resolved! Essential Tips for When Your Computer Won't Start by YL Software Experts
- Style Spectrum Top 10 DiscoTheme Innovations by Expert Curators
- What is Fake GPS Location Pro and Is It Good On Apple iPhone 12 Pro? | Dr.fone
- Title: Mastering YouTube Live Thumbnails Essentials
- Author: Kevin
- Created at : 2024-12-27 23:34:24
- Updated at : 2025-01-03 18:43:45
- Link: https://youtube-videos.techidaily.com/mastering-youtube-live-thumbnails-essentials/
- License: This work is licensed under CC BY-NC-SA 4.0.