
:max_bytes(150000):strip_icc()/what-is-g-suite-4686959-207e64f4d3944612bd68f690d8f143f9.png)
"Mastering Tagging Elevate Your YouTube Content"
Mastering Tagging: Elevate Your YouTube Content
Create High-Quality Video - Wondershare Filmora
An easy and powerful YouTube video editor
Numerous video and audio effects to choose from
Detailed tutorials provided by the official channel
Tagging your content online greatly impacts how viewers will react to your post. However, it doesn’t end at adding tags; you need to know more. Be savvy to put the tags strategically depending on your topic’s trending. So, why add a tag to YouTube videos? You want to gain enough clicks, yes, right? And that’s what hashtags do. They are online content features that will push the number of clicks to an unimaginable level.
Your content will gain more views and go viral within a short time. After all, that’s what we purpose for when posting videos. No one wants to put effort into editing videos and posting then don’t get a considerable number of views or clicks. But also, know that the ball is at your court. There are no go-zone areas when it comes to dealing with YouTube tags. Check this article on what to do for more views.
In this article
02 How will YouTube tag affect your video performance?
03 Things to consider before you start adding a tag.
04 How to add a tag to YouTube video
What is a YouTube tag?
A tag is a word used to describe a video or image. It is generally added to video titles and descriptions or used independently. They make YouTubers easily discover other posts with similar tags. YouTube tags are vital as they help the YouTube algorithm fully understand the videos you post. It’s by this that those who are interested in your video get hooked to them.
For tags to work ideally, you need to include your brand-specific tags before adding similar tags. YouTube auto-suggest is another gem in this scenario. Just see what YouTube suggests when you type while searching other similar topics. For great results, place the most important keywords and tags first, as these will act as the face of your video.
How will YouTube tag affect your video performance?
It is YouTube tags that help viewers to find videos they are searching for on YouTube. Besides, this is how it works: An audience will type keywords into YouTube’s search bar. Then videos with the same tag and keywords will appear in the search results. If not correctly done, the YouTube tag could affect your video performance and lead to such outcomes.
1. No adequate audience engagement
Your main focus should be audience engagement. You are trying to drive the attention of many YouTube users as possible. A small mistake, and you lose track. It is wise to know the best approach to use your tags. Improper YouTube tagging will not drive enough audience to your channel. You, therefore, won’t get adequate audience engagement.
2. Your video won’t go viral
Anything selling should strive to reach thousands and probably millions of viewers. Perhaps you have put in several days and months of work on a single video, only for it to be viewed by a few fellows. You will feel like a waste of time when you put so much effort, yet your videos don’t go viral. It means there will be fewer people looking out for your content.
3. Limited chances of your video ranking high
If you don’t do YouTube tagging the right way, then the chances are that your video won’t rank high. Everyone feels better when they get a pat on the back for a well-done job. But what happens if there is no traffic to your video? You probably lose the urge to continue doing more videos. Just play right, so you are not demoralized whenever you post your videos.
Things to consider before you start adding a tag
If used properly, YouTube tags are a great way for your video and business to perform well. You’ll attract the audience and probably get a flux of customers. And the tricks are just at your fingertips. You only need to give the best approach possible to all the steps of your YouTube tagging. Here are some tips to help you out.
1) Use keyword variations
Try to use variations of keywords to increase the chances of your video ranking high. The audience will use several phrases to lead them to the right YouTube video. More so, they’ll even change the order of keywords for best results. It would be best to strive to appear in as many searches as possible. The best option is to use the “YouTube” tag generator to gather as many relevant tags as possible. It will pop you more ideas and let you identify the most important core terms that you can build on.
2) Research competitors
This trick works well for you before you add a tag to a YouTube video. Check out what your competitors are up to and what tags they use. While you check at what competitors do, also mind the trending tags. You don’t want to be left behind in the quick-paced technological advances. But ensure your searches are related to your content. Any misleading tags will plunge you into more drawbacks. Checking out on the latest trends will help you generate more ideas for useful keywords that make your videos rank better.
3) Conduct keyword research
Research is a vital point to start from. By this, you’ll find other keyword possibilities for your video. Don’t just think of keywords out of the blue but ensure that the audience searches what you use. It is better to check out the generic relationship between YouTube tags and your video content. Find keywords that will directly link to what your video is all about. You can also find out what has worked for those in your industry to know the best approach to give.
4) Write a keyword-optimized title and description
Ensure that the texts associated with your video are keyword-optimized. Your audience will majorly rely on the video title and description. The description should emphasize more on what the title is. Consider that first, and then find the kinds of tags that would correlate with both your title and description. Besides, it is the best way for your audience to quickly find your videos as the keywords will directly link them.
5) Don’t go overboard
Even though there are no limits on words for YouTube tags, don’t use so many words; it may turn away your audience. Instead, focus on adding relevant tags but don’t stuff in keywords. Going overboard may automatically take you off the topic and mislead your audience.
How to add a tag to a YouTube video
Adding the right YouTube tag will increase the chances of YouTubers finding and watching your video. Here are the steps how to add a tag to a YouTube video.
Step 1. First, log in to your YouTube account and hit the “Camera” icon. It is located at the top-right corner of your screen.
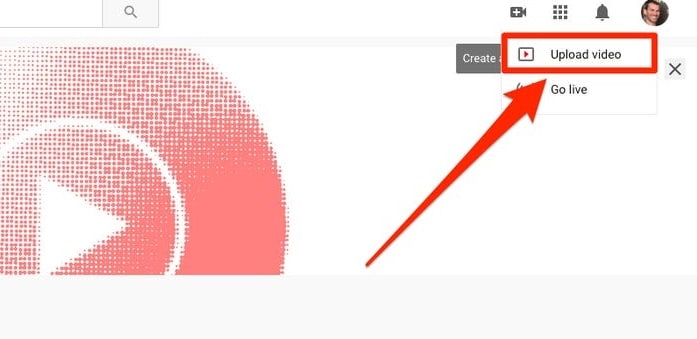
Step 2. Check the drop-down menu and choose the “Upload Video” option.
Step 3. Select from your videos which one to upload. Then click on the “Edit” tab to add relevant information like keywords, descriptions, etc.
Step 4. Give your video a name and description. Ensure the description correlates to the title of your video.
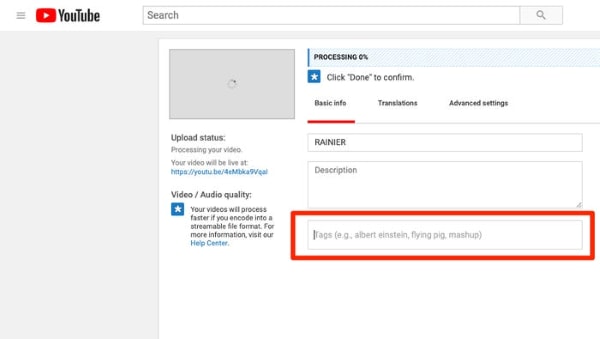
Step 5. Add relevant tags, separating them with commas. You can use from five to fifteen tags. YouTube may ignore your tags if they are more than 15.
Step 6. Click on the “Save” tab to complete the upload.

Make Your Video Better with Filmora
You may know how to add a tag to a YouTube video, but you might not know how to come up with a compelling piece of video. Filmora works in simple steps to produce a quality video that makes heads turn around. Its powerful editing tools enable you to add several effects for better viewing. It has over 800 stunning effects to enhance your videos with. The export feature also lets you upload your videos to YouTube in any format just with a click of a button.
Key Features
- Edit and export your videos at a high resolution of up to 4K
- Easily remove any background noise from the video
- Make unique clips by slowing them down or increasing speed up to ten times
- It supports GIF files among other output formats
- Easily flip your clips and play them backward.
For Win 7 or later (64-bit)
For macOS 10.12 or later
Conclusion
● YouTube tags play a vital role for you and your potential customers. YouTube’s algorithm uses your tags to match them to similar search queries. When properly utilized, tags can bring an over flux of customers to your video. You have to know how to add a tag to a YouTube video for better results. Remember that YouTube tags can also drive away customers if not properly utilized. We have covered the effects and the best approach when settling on YouTube tags.
● Nonetheless, ensure your videos are top-notch before you tag them around. The best video editor – Filmora – works to produce high-end videos. Try it and gain additional traffic to your video.
Tagging your content online greatly impacts how viewers will react to your post. However, it doesn’t end at adding tags; you need to know more. Be savvy to put the tags strategically depending on your topic’s trending. So, why add a tag to YouTube videos? You want to gain enough clicks, yes, right? And that’s what hashtags do. They are online content features that will push the number of clicks to an unimaginable level.
Your content will gain more views and go viral within a short time. After all, that’s what we purpose for when posting videos. No one wants to put effort into editing videos and posting then don’t get a considerable number of views or clicks. But also, know that the ball is at your court. There are no go-zone areas when it comes to dealing with YouTube tags. Check this article on what to do for more views.
In this article
02 How will YouTube tag affect your video performance?
03 Things to consider before you start adding a tag.
04 How to add a tag to YouTube video
What is a YouTube tag?
A tag is a word used to describe a video or image. It is generally added to video titles and descriptions or used independently. They make YouTubers easily discover other posts with similar tags. YouTube tags are vital as they help the YouTube algorithm fully understand the videos you post. It’s by this that those who are interested in your video get hooked to them.
For tags to work ideally, you need to include your brand-specific tags before adding similar tags. YouTube auto-suggest is another gem in this scenario. Just see what YouTube suggests when you type while searching other similar topics. For great results, place the most important keywords and tags first, as these will act as the face of your video.
How will YouTube tag affect your video performance?
It is YouTube tags that help viewers to find videos they are searching for on YouTube. Besides, this is how it works: An audience will type keywords into YouTube’s search bar. Then videos with the same tag and keywords will appear in the search results. If not correctly done, the YouTube tag could affect your video performance and lead to such outcomes.
1. No adequate audience engagement
Your main focus should be audience engagement. You are trying to drive the attention of many YouTube users as possible. A small mistake, and you lose track. It is wise to know the best approach to use your tags. Improper YouTube tagging will not drive enough audience to your channel. You, therefore, won’t get adequate audience engagement.
2. Your video won’t go viral
Anything selling should strive to reach thousands and probably millions of viewers. Perhaps you have put in several days and months of work on a single video, only for it to be viewed by a few fellows. You will feel like a waste of time when you put so much effort, yet your videos don’t go viral. It means there will be fewer people looking out for your content.
3. Limited chances of your video ranking high
If you don’t do YouTube tagging the right way, then the chances are that your video won’t rank high. Everyone feels better when they get a pat on the back for a well-done job. But what happens if there is no traffic to your video? You probably lose the urge to continue doing more videos. Just play right, so you are not demoralized whenever you post your videos.
Things to consider before you start adding a tag
If used properly, YouTube tags are a great way for your video and business to perform well. You’ll attract the audience and probably get a flux of customers. And the tricks are just at your fingertips. You only need to give the best approach possible to all the steps of your YouTube tagging. Here are some tips to help you out.
1) Use keyword variations
Try to use variations of keywords to increase the chances of your video ranking high. The audience will use several phrases to lead them to the right YouTube video. More so, they’ll even change the order of keywords for best results. It would be best to strive to appear in as many searches as possible. The best option is to use the “YouTube” tag generator to gather as many relevant tags as possible. It will pop you more ideas and let you identify the most important core terms that you can build on.
2) Research competitors
This trick works well for you before you add a tag to a YouTube video. Check out what your competitors are up to and what tags they use. While you check at what competitors do, also mind the trending tags. You don’t want to be left behind in the quick-paced technological advances. But ensure your searches are related to your content. Any misleading tags will plunge you into more drawbacks. Checking out on the latest trends will help you generate more ideas for useful keywords that make your videos rank better.
3) Conduct keyword research
Research is a vital point to start from. By this, you’ll find other keyword possibilities for your video. Don’t just think of keywords out of the blue but ensure that the audience searches what you use. It is better to check out the generic relationship between YouTube tags and your video content. Find keywords that will directly link to what your video is all about. You can also find out what has worked for those in your industry to know the best approach to give.
4) Write a keyword-optimized title and description
Ensure that the texts associated with your video are keyword-optimized. Your audience will majorly rely on the video title and description. The description should emphasize more on what the title is. Consider that first, and then find the kinds of tags that would correlate with both your title and description. Besides, it is the best way for your audience to quickly find your videos as the keywords will directly link them.
5) Don’t go overboard
Even though there are no limits on words for YouTube tags, don’t use so many words; it may turn away your audience. Instead, focus on adding relevant tags but don’t stuff in keywords. Going overboard may automatically take you off the topic and mislead your audience.
How to add a tag to a YouTube video
Adding the right YouTube tag will increase the chances of YouTubers finding and watching your video. Here are the steps how to add a tag to a YouTube video.
Step 1. First, log in to your YouTube account and hit the “Camera” icon. It is located at the top-right corner of your screen.
Step 2. Check the drop-down menu and choose the “Upload Video” option.
Step 3. Select from your videos which one to upload. Then click on the “Edit” tab to add relevant information like keywords, descriptions, etc.
Step 4. Give your video a name and description. Ensure the description correlates to the title of your video.
Step 5. Add relevant tags, separating them with commas. You can use from five to fifteen tags. YouTube may ignore your tags if they are more than 15.
Step 6. Click on the “Save” tab to complete the upload.
Make Your Video Better with Filmora
You may know how to add a tag to a YouTube video, but you might not know how to come up with a compelling piece of video. Filmora works in simple steps to produce a quality video that makes heads turn around. Its powerful editing tools enable you to add several effects for better viewing. It has over 800 stunning effects to enhance your videos with. The export feature also lets you upload your videos to YouTube in any format just with a click of a button.
Key Features
- Edit and export your videos at a high resolution of up to 4K
- Easily remove any background noise from the video
- Make unique clips by slowing them down or increasing speed up to ten times
- It supports GIF files among other output formats
- Easily flip your clips and play them backward.
For Win 7 or later (64-bit)
For macOS 10.12 or later
Conclusion
● YouTube tags play a vital role for you and your potential customers. YouTube’s algorithm uses your tags to match them to similar search queries. When properly utilized, tags can bring an over flux of customers to your video. You have to know how to add a tag to a YouTube video for better results. Remember that YouTube tags can also drive away customers if not properly utilized. We have covered the effects and the best approach when settling on YouTube tags.
● Nonetheless, ensure your videos are top-notch before you tag them around. The best video editor – Filmora – works to produce high-end videos. Try it and gain additional traffic to your video.
Time Traveling Through Retro Filmmaking Techniques
How to Create Vintage Videos: A Comprehensive Tutorial

Richard Bennett
Mar 27, 2024• Proven solutions
“Every accomplishment starts with a decision to try.” – A Vintage Thought

Vintage videos are ultimately the retro videos you have ever imagined. The look is highly inspirational in itself. The vintage effect in photography and videos results in a must-see look that everyone wants to capture all day long. The meaning of vintage is ‘the time when something of quality was produced.’ When something is called retro, it means old, recognized, and essential. Vintage also resembles love apart from videos and photos. All in all, it’s a positive and result-oriented thing to carry on in your videos. And this is what we want to mention in this post relating to the creation of vintage videos.
Here are some vintage-style video ideas for you to have a look at.
- Part 1: What to Consider When Shooting a Vintage Video?
- Part 2: How to Create a Stunning Vintage Video?
- Part 3: Tips to Make Your Vintage Videos Stand Out
What to Consider When Shooting a Vintage Video?
Vintage videos are kind of old school vibes and must be shooting accordingly by keeping in mind the following points. These are a sort of expert tips given by photographers based on their practical experience. First of all, you have to understand that a video can be made vintage, but you can’t change the actual environment of shooting. Some editing always involves there in every project out there. Still, the tips given below will help you a lot in creating a retro look.
Use Vintage Lenses
The very first helpful tip is to use a vintage lens. They allow chromatic aberration by distorting colors around the frame. Furthermore, you can find various kinds of lenses in terms of a vintage effect.
Decrease Contrast
Do the correct color grading by reducing the contrast a little bit. You must not level the retro videos in black or white or like-new videos. You can simply add a contrasting effect and then reduce it to have that vintage look.
Keep it a little soft
If you have ever noticed, the vintage videos are a little soft and look like degraded with time. It’s a result of decreased sharpness in the camera’s menu settings. You can even add a slight blur to the final video or simply use recognized software made for video editing .
Brighten up the black levels
Lots of black points in the video are not ideal for a vintage effect. The suitable approach is to bring up black levels and make it dark gray instead of inky black. This look can be achieved either by levels effect or curves effect in your editing software.
Reduce Saturation levels
Bringing down the saturation levels is another tip to create a vintage effect. The old videos are also absent in bright colors. Don’t go too crazy about reduction as 20%-30% saturation level is more than enough.
How to Create a Stunning Vintage Video?
What you need to get started as both beginner and professional is Wondershare Filmora Video Editor. It is a highly recommended software to create vintage videos. The intuitive user interface and lots of editing functions are helpful for a video editor. It has both primary as well as advanced editing programs to check. It has various advanced color tuning tools to promote the making of original videos. It features tint, temperature, Vignette, 3D Luts, Lights, and so on.


Steps for the vintage effect to videos on Wondershare Filmora Video Editor
Step 1: Upload video & make specific changes

The very step is to add the video by clicking the + icon. We have added the three sample videos from the library of Wondershare Filmora itself. Adjust them in the timeline as per your requirements.
After doing all the essential editing functions, click on the Effects tab given at the upper-left corner. Simply type the word Old in the Search tab.
The Old Video filter will immediately appear in the list of filters. Tap the “+” icon in Old Video filter to add to the timeline. Drag its ends right or left to adjust the duration.
Step 2: Apply White & Black Filters

The second step is to apply the Black & White filters. Go to the Effects tab and explore five Black & White filters available. Each of these filters is quite different and must be applied accordingly. Check the aesthetic of your video clip before any filter application to retro videos.
Step 3: Add the Sun Kissed or Sepia Tone Rise Filters to the video clip

There are various other categories of filters you can apply, such as Retro, Sun Kissed, and Sepia Tone, etc. The features of Filmora also present several subcategories such as Faux Film or Shake.

On the other hand, the subcategory of Sepia Tone features Sun-Kissed & Rise Filters to stimulate sepia-tinted texture and recreate the old visual style. The Sun Kissed filter presents brown and red colors to give that warm image atmosphere.
Step 4: Desaturate Video Clip

Now, you need to desaturate the video clip with Ash & Willow filters. We have typed Ash in the Search bar, and you can see the filter below. These filters are essential to desaturate the video with preset contrast, brightness, or exposure values.

Then, we have combined the black & white filter with an overlay of Film Reel Horizontal. It will help you sell the effect and make the video look more authentic. However, the only application of Black & White or Ash & Willow filters is not going to make any creative thing in terms of vintage videos. You have to mix overlays with features such as Random Dust or Film Reel Horizontal.
Step 5: Apply Black & White and Old Film Color Correction Presets to the video
You can also access the Advanced color correction Tab of Filmora from the Color button. It also features Preset and Adjusts Tabs to desaturate footage. The Preset presents a variety of options, including Black & White and Old Film. You just need to right-click the particular preset and select the Apply option.

Tips to Make Your Vintage Videos Stand Out
Following the helpful tips would assist you in creating awesome retro videos.
- You can use various vintage apps such as Retro VHS, RTRO Camera, 8mm, Camcorder, VSCO, etc. Or, despite using these limited apps, you can directly use our preferred video editing software called Wondershare Filmora.
- If you use a specific vintage camera, keep it on low highlights and low contrasts. Use color grading, as we have discussed above. They help to provide the ultimate old-school effect.
- Always keep low saturation settings for shooting vintage videos. Take control over Saturation, Hue, and Luminance of video.
- Add overlays and respective filters to recreate a required vintage look. You must add things that dust, scratch, and grain the heck out from the video that you have created.
- Lower the frame rate or FPS to create an excellent vintage look. You can make it to 18 or 14 FPS depending upon the aesthetic requirements.
- Keep an eye on black and white filters you have used. It’s because more of a black and white can ruin the actual vintage experience.
Conclusion
So, this is an ultimate tutorial on the creation of vintage videos. We Hope you have admired the steps and our recommended video editing software. Vintage means grand, and thus you should make it amazing as well. It is the reason we have stated all facts regarding the vintage effect in our post above. Wondering how to add such effect in FCPX? check this article:How to Create a Vignette in Final Cut Pro X?
Surely give a read and thank us later!
Richard Bennett
Richard Bennett is a writer and a lover of all things video.
Follow @Richard Bennett
Richard Bennett
Mar 27, 2024• Proven solutions
“Every accomplishment starts with a decision to try.” – A Vintage Thought
Vintage videos are ultimately the retro videos you have ever imagined. The look is highly inspirational in itself. The vintage effect in photography and videos results in a must-see look that everyone wants to capture all day long. The meaning of vintage is ‘the time when something of quality was produced.’ When something is called retro, it means old, recognized, and essential. Vintage also resembles love apart from videos and photos. All in all, it’s a positive and result-oriented thing to carry on in your videos. And this is what we want to mention in this post relating to the creation of vintage videos.
Here are some vintage-style video ideas for you to have a look at.
- Part 1: What to Consider When Shooting a Vintage Video?
- Part 2: How to Create a Stunning Vintage Video?
- Part 3: Tips to Make Your Vintage Videos Stand Out
What to Consider When Shooting a Vintage Video?
Vintage videos are kind of old school vibes and must be shooting accordingly by keeping in mind the following points. These are a sort of expert tips given by photographers based on their practical experience. First of all, you have to understand that a video can be made vintage, but you can’t change the actual environment of shooting. Some editing always involves there in every project out there. Still, the tips given below will help you a lot in creating a retro look.
Use Vintage Lenses
The very first helpful tip is to use a vintage lens. They allow chromatic aberration by distorting colors around the frame. Furthermore, you can find various kinds of lenses in terms of a vintage effect.
Decrease Contrast
Do the correct color grading by reducing the contrast a little bit. You must not level the retro videos in black or white or like-new videos. You can simply add a contrasting effect and then reduce it to have that vintage look.
Keep it a little soft
If you have ever noticed, the vintage videos are a little soft and look like degraded with time. It’s a result of decreased sharpness in the camera’s menu settings. You can even add a slight blur to the final video or simply use recognized software made for video editing .
Brighten up the black levels
Lots of black points in the video are not ideal for a vintage effect. The suitable approach is to bring up black levels and make it dark gray instead of inky black. This look can be achieved either by levels effect or curves effect in your editing software.
Reduce Saturation levels
Bringing down the saturation levels is another tip to create a vintage effect. The old videos are also absent in bright colors. Don’t go too crazy about reduction as 20%-30% saturation level is more than enough.
How to Create a Stunning Vintage Video?
What you need to get started as both beginner and professional is Wondershare Filmora Video Editor. It is a highly recommended software to create vintage videos. The intuitive user interface and lots of editing functions are helpful for a video editor. It has both primary as well as advanced editing programs to check. It has various advanced color tuning tools to promote the making of original videos. It features tint, temperature, Vignette, 3D Luts, Lights, and so on.
Steps for the vintage effect to videos on Wondershare Filmora Video Editor
Step 1: Upload video & make specific changes
The very step is to add the video by clicking the + icon. We have added the three sample videos from the library of Wondershare Filmora itself. Adjust them in the timeline as per your requirements.
After doing all the essential editing functions, click on the Effects tab given at the upper-left corner. Simply type the word Old in the Search tab.
The Old Video filter will immediately appear in the list of filters. Tap the “+” icon in Old Video filter to add to the timeline. Drag its ends right or left to adjust the duration.
Step 2: Apply White & Black Filters
The second step is to apply the Black & White filters. Go to the Effects tab and explore five Black & White filters available. Each of these filters is quite different and must be applied accordingly. Check the aesthetic of your video clip before any filter application to retro videos.
Step 3: Add the Sun Kissed or Sepia Tone Rise Filters to the video clip
There are various other categories of filters you can apply, such as Retro, Sun Kissed, and Sepia Tone, etc. The features of Filmora also present several subcategories such as Faux Film or Shake.
On the other hand, the subcategory of Sepia Tone features Sun-Kissed & Rise Filters to stimulate sepia-tinted texture and recreate the old visual style. The Sun Kissed filter presents brown and red colors to give that warm image atmosphere.
Step 4: Desaturate Video Clip
Now, you need to desaturate the video clip with Ash & Willow filters. We have typed Ash in the Search bar, and you can see the filter below. These filters are essential to desaturate the video with preset contrast, brightness, or exposure values.
Then, we have combined the black & white filter with an overlay of Film Reel Horizontal. It will help you sell the effect and make the video look more authentic. However, the only application of Black & White or Ash & Willow filters is not going to make any creative thing in terms of vintage videos. You have to mix overlays with features such as Random Dust or Film Reel Horizontal.
Step 5: Apply Black & White and Old Film Color Correction Presets to the video
You can also access the Advanced color correction Tab of Filmora from the Color button. It also features Preset and Adjusts Tabs to desaturate footage. The Preset presents a variety of options, including Black & White and Old Film. You just need to right-click the particular preset and select the Apply option.
Tips to Make Your Vintage Videos Stand Out
Following the helpful tips would assist you in creating awesome retro videos.
- You can use various vintage apps such as Retro VHS, RTRO Camera, 8mm, Camcorder, VSCO, etc. Or, despite using these limited apps, you can directly use our preferred video editing software called Wondershare Filmora.
- If you use a specific vintage camera, keep it on low highlights and low contrasts. Use color grading, as we have discussed above. They help to provide the ultimate old-school effect.
- Always keep low saturation settings for shooting vintage videos. Take control over Saturation, Hue, and Luminance of video.
- Add overlays and respective filters to recreate a required vintage look. You must add things that dust, scratch, and grain the heck out from the video that you have created.
- Lower the frame rate or FPS to create an excellent vintage look. You can make it to 18 or 14 FPS depending upon the aesthetic requirements.
- Keep an eye on black and white filters you have used. It’s because more of a black and white can ruin the actual vintage experience.
Conclusion
So, this is an ultimate tutorial on the creation of vintage videos. We Hope you have admired the steps and our recommended video editing software. Vintage means grand, and thus you should make it amazing as well. It is the reason we have stated all facts regarding the vintage effect in our post above. Wondering how to add such effect in FCPX? check this article:How to Create a Vignette in Final Cut Pro X?
Surely give a read and thank us later!
Richard Bennett
Richard Bennett is a writer and a lover of all things video.
Follow @Richard Bennett
Also read:
- Unveiling the Mysteries Accessing Secretive YouTube Content
- [Updated] Audiovisual Standards for Success on YouTube – Top Format Choices
- Creative Geniuses Selecting the Best YouTube Videos for Channels for 2024
- [New] Adobe's Toolset Perfecting Your YouTube Uploads
- Unleash Your Potential with These 12 Best Flip-Screen Cameras
- 2024 Approved Earn More Maximizing Income Through YouTube Mobile Advertising
- [New] Decoding the Best of Beauty YouTube's Elite Artists Showcased
- [New] Balancing Creativity and Monetization in YouTube Shorts
- Beat Drops in Seconds A Beginner’s Guide to Music Videos for 2024
- Deciphering Hidden Content on YouTube An Ordered Walkthrough
- [Updated] Earnings Explosion How to Maximize Income on YouTube Shorts
- 2024 Approved Discover Ultimate ASMR Microphones for Clear Sounds
- [New] Discover The 10 Best Yoga Platforms For Enhanced Fitness
- Dive Deep Into Unreal Worlds with These Titles for 2024
- The Essential Playbook YouTube's SEO Keywords Guide
- Fixing Obscured Content on YouTube Platform
- In 2024, Diving Into the World of Youtubers Starting Your Channel, Earning Cash
- Step-by-Step Guide to Professional Filmmaking via YouTube
- In 2024, Crafting Splitscreen YouTube Videos A Guide to Creativity
- [Updated] Building Successful YouTube Collaborations Step by Step
- Elevate Your Video Game Top Unboxer Techniques for 2024
- Maximizing Mobile Media Posts IOS and YouTube Techniques
- [New] Are There Benefits to Purchasing YouTube Engagement?
- [Updated] Combining YouTube and iMovie for Professional Results
- Dissecting the Narrative in YouTube Dialogues for 2024
- Audience Engagement Where to Captivate Viewers for 2024
- 2024 Approved Break Through Bot Barriers Rising From the Crowd
- Conquer YouTube's Copy-Paste Loop Mastery Essentials
- How to Clear Black Boards in Your YouTube Videos?
- AddROM Bypass An Android Tool to Unlock FRP Lock Screen For your ZTE
- Should I Apply Pitch Correction to Elevate Speech Sounds for 2024
- In 2024, Step-by-Step Guide to Optimize Your Instagram Posts Using Hashtags
- In 2024, Crafting Shareable Instagram Stories That Spread Like Wildfire
- [Updated] Discover How to Get Sounds From Twitter Vids for 2024
- Speedy Sound Apps Phones' Best Friends
- In 2024, How and Where to Find a Shiny Stone Pokémon For Honor Magic 6? | Dr.fone
- In 2024, Essential Tips for Game Recording on Windows 10
- Updated In 2024, Nikon Video Post-Production Tips and Tricks for Perfect Edits
- In 2024, Audio Capture Mastery in Windows 10
- In 2024, The Ultimate Guide How to Bypass Swipe Screen to Unlock on Samsung Galaxy S24+ Device
- [Updated] Making Social Video Viewing a Breeze on Your AppleTV
- [New] Social Media Connectivity Embedding Live Streams From Twitch to FB
- Updated In 2024, Make Your Videos Epic How to Add Slow Motion in Windows Live Movie Maker
- Dose Life360 Notify Me When Someone Checks My Location On Vivo V30? | Dr.fone
- Possible solutions to restore deleted call logs from Honor 90
- [Updated] Blend Media Items for Enhanced YouTube Organization
- Updated The Ultimate Guide to GIF for Discord Profile for 2024
- Unearthly Utility Top Five Terrafirma Maps for 2024
- How to Bypass FRP from Realme 12 5G?
- [New] Strategies for Broadcasting Social Media Happenings for 2024
- Title: "Mastering Tagging Elevate Your YouTube Content"
- Author: Kevin
- Created at : 2024-05-25 15:44:58
- Updated at : 2024-05-26 15:44:58
- Link: https://youtube-videos.techidaily.com/mastering-tagging-elevate-your-youtube-content/
- License: This work is licensed under CC BY-NC-SA 4.0.
