
:max_bytes(150000):strip_icc()/Google-Cloud-Next-59a9cb4a03e644389e2ffa9939c420f8.jpg)
"Mastering ASMR - The Ultimate List of Mics"
Mastering ASMR - The Ultimate List of Mics
Best ASMR Microphones

Richard Bennett
Mar 27, 2024• Proven solutions
ASMR can be triggered by visual, audio, and tactile stimuli, which is the reason why most YouTubers who produce this type of content dedicate a lot of attention to the image and sound quality.
Furthermore, the vast majority of ASMR videos you can find on YouTube utilizes audio triggers to spark the autonomous sensory meridian response in one form or the other. Consequently, the quality of the audio recording determines whether or not your videos will be able to trigger ASMR. That’s why we selected some of the ASMR microphones novice and seasoned YouTubers can use to record the audio for their ASMR YouTube videos.
Part 1: Which Features Should an ASMR Microphone Have?
Thinking that you can use any microphone you can lay your hands on to record sound for you ASMR videos is a mistake, because the quality of the recording may not be at a satisfactory level if your microphone is producing a lot of self-noise or if it is not able to pick up soft noises.
Let’s take a closer look at the features and ASMR microphone should have.
1. The mic’s source of power
A microphone can draw power from two sources, as you can either connect it to a computer via a USB cable or you can use an XLR cable to connect the device to an external power source.
The so-called Phantom Power can be any type of adapter or audio recorder that supplies a microphone with power. All professional condenser microphones are connected to a power source through an XLR connection although some mics can have a built-in phantom power source that requires only an AA battery to function normally.
2. The microphone’s recording direction
Although there are a number of direction categories of microphones, ASMR content produces commonly use Omnidirectional and Binaural mics.
As its name suggests, an omnidirectional microphone can pick up sounds from all sides, which makes it a good option if you want to record ambient sounds like brushing or tapping. However, you should also keep in mind that this type of microphone can capture background noises which may impact the overall quality of the recording.
The binaural mics are composed of two microphones are used to record the left and right channel separately. You don’t necessarily have to get a binaural microphone in order to create a binaural audio recording since you can just use two different microphones to record the left and right channels individually.
3. The level of self-noise a microphone makes
Recording low sounds can be challenging if your microphone is creating humming or crackling noises automatically. The so-called self-noise level a microphone makes is quantified in A-weighted decibels, and ideally, you should get a mic that makes around 15dBA in order to keep sounds a microphone produces automatically at the very minimum.
Besides the self-noise, you should also look into S/N (Signal to Noise Ratio) that depicts the ratio of signal power to noise power. A mic that has approximately 80dBA or more should enable you to record low voices without having to worry about the unwanted noises.
Part 2: What Are The Best Budget ASMR Microphones for Beginners?
If you are thinking about starting an ASMR YouTube channel, you don’t have to get a professional microphone right away, because there lots of affordable mics that will enable you to create crystal-clear audio recordings.
We’ve shortlisted a few of the best budget ASMR microphones for beginners on the market with the aim to help you narrow down your choices. Here’s what they have to offer.
1. Tascam DR-05X Stereo Handheld Digital Recorder
Price: $89.99
This versatile digital recorder can be used for different purposes that range from capturing audio for podcasts to recording your personal notes. The Tascam DR-05X is equipped with a pair of dual condenser microphones that enable you to record low or high sounds with the same level of efficiency.
The device is powered by two AA batteries and it can record for almost 18 hours continually before you have to change the batteries. The Tascam DR-05X’s interface is intuitive which allows you to adjust audio levels, delete a take you didn’t like, or add markers to a recording effortlessly.
What’s more, this handheld digital recorder has a USB port which enables you to connect it to a computer and use it to record audio during live streams or while creating a new ASMR video for your YouTube channel. Nonetheless, this omnidirectional digital recorder doesn’t have an XLR jack and you can’t use it to capture sound from professional microphones.
2. Blue Yeti USB Microphone
Price: $129.99
Arguably the most popular microphone within YouTube’s ASMR community Blue Yeti USB microphone is a versatile mic you can use to record ambient sounds and vocals. The microphone has three condenser capsules which enables you to record audio with it in a broad range of different contexts.
In addition, you can switch between stereo, omnidirectional, cardioid, and bidirectional pattern modes and choose the direction from which the microphone is going to pick up sounds. Blue Yeti has the 20 Hz to 20 kHz frequency response and it features the mute and gain buttons so that you can quickly adjust this value even if you are still recording.
The mic’s signal to noise ratio is 100dBA which means that it produces a minimum amount of noises while you’re recording low sounds. You can use this mic on Windows XP and all other later versions of the OS as well as macOS X or higher.
3. Zoom H4N Pro
Price: $218.99
Yet another digital recorder that is frequently used to capture the audio for ASMR videos. Zoom H4N Pro is equipped with x/Y stereo microphones capable of recording audio at 140dBA SPA and it offers the possibility to record sound on four channels.
What’s more, this device enables you to create 24-bit audio files that can have up to 96kHz, while its output level is set to -10dBu. Zoom H4N Pro has two XLR/TRS jacks that are equipped with locking connectors as well as a 400 W monaural speaker.
Besides connecting XLR microphones to this digital recorder, you can also connect the device to your computer or a Smartphone through its USB port. The device supports SD cards that have up to 32GB of storage space, which means that you can record hours of audio without having to worry about the size of these files.
4. Blue Microphones Baby Bottle SL Large-Diaphragm Condenser Microphone
Price: $399.99
Music industry professionals have been using microphones manufactured by Blue Microphones for decades, which is why it is hardly surprising that their Baby Bottle mic is one of the best ASMR microphones on the market.
This is a cardioid microphone that utilizes the pressure gradient to pick up sounds from all directions. In addition, the device has a large-diaphragm capsule that enables it to produce sounds that are clear and rich in detail.
Moreover, this model has a high pass filter and -20dBA pad that ensures you can record high and soft sounds with the same level of quality. The noise level of this USB microphone is 87dbA which means that it doesn’t create humming sounds while it is recording low sounds. In addition, the microphone’s vintage design makes it a trendy option for all ASMR video content creators in search of a powerful and esthetically pleasing microphone.
Part 3: Which High-End ASMR Mics You Should Try?
As your ASMR YouTube channel grows, the quality of the audio recordings you create is becoming increasingly important, because it impacts the overall quality of the content you’re sharing with your followers.
In case you’re looking for a microphone that is going to improve the quality of your audio recordings you should check out the mics below.
1. Rode NT1-A Stereo Vocal Condenser Microphone
Price: $439.00
Rode is probably the most famous microphone manufacturer in the world, as the company produced some of the best mics ever created. Their NT1-A Stereo Vocal Condenser Microphone features a 1’’ capsule that contains a gold plated diaphragm. The mic has a cardioid polar pattern and its maximum SPL capability cannot exceed 137dBSPL.
Moreover, you can pair two of the NT1-A microphones if you want to create a stereo or binaural recordings. This Rode’s model has a noise level of just 5dB, which makes it one of the best studio microphones on the market.
This mic requires one A battery to function, and it only has an XRL jack, which means that you cannot connect it to a computer via a USB cable. Although its price may seem a bit steep, the audio quality this microphone can produce more than justifies the high cost.
2. 3Dio FS Pro II
Price: $2, 057.88
In case you want to record your ASMR videos with a microphone that meets the highest industry standards, then 3Dio FS Pro II is one of the best choices you have at your disposal. The microphone has the shape of human ears and like all omnidirectional microphones, it can pick up sounds from all directions.
This model has two XLR jacks and a 3.5mm stereo output jack so that you can connect it to a 16-channel mixer or different types of audio recording devices. 3Dio FS Pro II needs 48 V to run normally and it uses 1.9 V batteries that can provide you with up 300 hours of recording time.
The microphone is designed to imitate the way human beings hear by preserving the direction from which the sound came. This means that the listeners of your ASMR recordings are going to be able to detect the direction from which the sounds are coming from.
We’ve summarized the key features of the mics mentioned above for helping you making a quick decision.
| Product name | Polar Pattern | Self-noise / S/N ratio | Power Source type | Best for | Price |
|---|---|---|---|---|---|
| Tascam DR-05X | Stereo, omnidirectional | 92dB | USB | Whispers and low sounds | $89.99 |
| Blue Yeti | Bidirectional, omnidirectional, cardioid, stereo | 100dB | USB | Low and high sounds | $129.99 |
| Zoom H4N Pro | Stereo, omnidirectional | 140dB | USB | Whispers and ambient sounds | $218.99 |
| Blue Microphones Baby Bottle SL Large-Diaphragm Condenser Microphone | Cardioid | 87dB | Phantom power | Whispers and ambient sounds | $399.99 |
| Rode NT1-A Stereo | Cardioid or binaural | 5dB | Phantom power | Ambient sounds and voice recordings | $439.00 |
| 3Dio FS Pro II | Binaural, omnidirectional | 14dB | Phantom power | Ambient sounds and voice recordings | $2, 057.88 |
Part 4: Frequently Asked Questions About ASMR Microphones
1. Should I use a USB or XLR microphone for ASMR recordings?
Although both USB and XLR microphones are frequently used to capture ASMR recordings, and XLR microphone produces a much better sound quality. So, if you want to prioritize the audio quality you should record all your ASMR videos with an XLR microphone.
However, there are quite a few affordable USB mics on the market that will enable you to capture sound in decent quality at a relatively low price.
2. Which type of microphone should be used to record ASMR sounds?
Condenser microphones are a much better option than the dynamic mics because they pick up soft sounds easily. Also, getting an XLR mic is usually a better choice than opting for a USB mic.
3. Is an omnidirectional microphone better for ASMR than the binaural mic?
The answer to this question depends on the type of ASMR video you want to create. If it is important for you to capture tapping or scratching sounds from all sides then you should choose an omnidirectional microphone.
A binaural mic will enable you to create a more immersive audio recording, but they are also more expensive.
Conclusion
In the world of video production, the quality of your equipment often determines how good the final product is going to be. That’s why a good microphone is one of the essential items for an ASMR artist.
Finding a good microphone you can use to record ASMR sounds shouldn’t be too difficult, because you can get a high-quality option in different price tiers. If you are on a budget, then a microphone like Blue Yeti may be a great choice, because it lets you choose between different polar patterns and it produces a great quality of sound.
On the other hand, 3Dio FS Pro II or Rode NT1-A Stereo microphones are worth investing in because they will enable you to record sound at a professional level.
Richard Bennett
Richard Bennett is a writer and a lover of all things video.
Follow @Richard Bennett
Richard Bennett
Mar 27, 2024• Proven solutions
ASMR can be triggered by visual, audio, and tactile stimuli, which is the reason why most YouTubers who produce this type of content dedicate a lot of attention to the image and sound quality.
Furthermore, the vast majority of ASMR videos you can find on YouTube utilizes audio triggers to spark the autonomous sensory meridian response in one form or the other. Consequently, the quality of the audio recording determines whether or not your videos will be able to trigger ASMR. That’s why we selected some of the ASMR microphones novice and seasoned YouTubers can use to record the audio for their ASMR YouTube videos.
Part 1: Which Features Should an ASMR Microphone Have?
Thinking that you can use any microphone you can lay your hands on to record sound for you ASMR videos is a mistake, because the quality of the recording may not be at a satisfactory level if your microphone is producing a lot of self-noise or if it is not able to pick up soft noises.
Let’s take a closer look at the features and ASMR microphone should have.
1. The mic’s source of power
A microphone can draw power from two sources, as you can either connect it to a computer via a USB cable or you can use an XLR cable to connect the device to an external power source.
The so-called Phantom Power can be any type of adapter or audio recorder that supplies a microphone with power. All professional condenser microphones are connected to a power source through an XLR connection although some mics can have a built-in phantom power source that requires only an AA battery to function normally.
2. The microphone’s recording direction
Although there are a number of direction categories of microphones, ASMR content produces commonly use Omnidirectional and Binaural mics.
As its name suggests, an omnidirectional microphone can pick up sounds from all sides, which makes it a good option if you want to record ambient sounds like brushing or tapping. However, you should also keep in mind that this type of microphone can capture background noises which may impact the overall quality of the recording.
The binaural mics are composed of two microphones are used to record the left and right channel separately. You don’t necessarily have to get a binaural microphone in order to create a binaural audio recording since you can just use two different microphones to record the left and right channels individually.
3. The level of self-noise a microphone makes
Recording low sounds can be challenging if your microphone is creating humming or crackling noises automatically. The so-called self-noise level a microphone makes is quantified in A-weighted decibels, and ideally, you should get a mic that makes around 15dBA in order to keep sounds a microphone produces automatically at the very minimum.
Besides the self-noise, you should also look into S/N (Signal to Noise Ratio) that depicts the ratio of signal power to noise power. A mic that has approximately 80dBA or more should enable you to record low voices without having to worry about the unwanted noises.
Part 2: What Are The Best Budget ASMR Microphones for Beginners?
If you are thinking about starting an ASMR YouTube channel, you don’t have to get a professional microphone right away, because there lots of affordable mics that will enable you to create crystal-clear audio recordings.
We’ve shortlisted a few of the best budget ASMR microphones for beginners on the market with the aim to help you narrow down your choices. Here’s what they have to offer.
1. Tascam DR-05X Stereo Handheld Digital Recorder
Price: $89.99
This versatile digital recorder can be used for different purposes that range from capturing audio for podcasts to recording your personal notes. The Tascam DR-05X is equipped with a pair of dual condenser microphones that enable you to record low or high sounds with the same level of efficiency.
The device is powered by two AA batteries and it can record for almost 18 hours continually before you have to change the batteries. The Tascam DR-05X’s interface is intuitive which allows you to adjust audio levels, delete a take you didn’t like, or add markers to a recording effortlessly.
What’s more, this handheld digital recorder has a USB port which enables you to connect it to a computer and use it to record audio during live streams or while creating a new ASMR video for your YouTube channel. Nonetheless, this omnidirectional digital recorder doesn’t have an XLR jack and you can’t use it to capture sound from professional microphones.
2. Blue Yeti USB Microphone
Price: $129.99
Arguably the most popular microphone within YouTube’s ASMR community Blue Yeti USB microphone is a versatile mic you can use to record ambient sounds and vocals. The microphone has three condenser capsules which enables you to record audio with it in a broad range of different contexts.
In addition, you can switch between stereo, omnidirectional, cardioid, and bidirectional pattern modes and choose the direction from which the microphone is going to pick up sounds. Blue Yeti has the 20 Hz to 20 kHz frequency response and it features the mute and gain buttons so that you can quickly adjust this value even if you are still recording.
The mic’s signal to noise ratio is 100dBA which means that it produces a minimum amount of noises while you’re recording low sounds. You can use this mic on Windows XP and all other later versions of the OS as well as macOS X or higher.
3. Zoom H4N Pro
Price: $218.99
Yet another digital recorder that is frequently used to capture the audio for ASMR videos. Zoom H4N Pro is equipped with x/Y stereo microphones capable of recording audio at 140dBA SPA and it offers the possibility to record sound on four channels.
What’s more, this device enables you to create 24-bit audio files that can have up to 96kHz, while its output level is set to -10dBu. Zoom H4N Pro has two XLR/TRS jacks that are equipped with locking connectors as well as a 400 W monaural speaker.
Besides connecting XLR microphones to this digital recorder, you can also connect the device to your computer or a Smartphone through its USB port. The device supports SD cards that have up to 32GB of storage space, which means that you can record hours of audio without having to worry about the size of these files.
4. Blue Microphones Baby Bottle SL Large-Diaphragm Condenser Microphone
Price: $399.99
Music industry professionals have been using microphones manufactured by Blue Microphones for decades, which is why it is hardly surprising that their Baby Bottle mic is one of the best ASMR microphones on the market.
This is a cardioid microphone that utilizes the pressure gradient to pick up sounds from all directions. In addition, the device has a large-diaphragm capsule that enables it to produce sounds that are clear and rich in detail.
Moreover, this model has a high pass filter and -20dBA pad that ensures you can record high and soft sounds with the same level of quality. The noise level of this USB microphone is 87dbA which means that it doesn’t create humming sounds while it is recording low sounds. In addition, the microphone’s vintage design makes it a trendy option for all ASMR video content creators in search of a powerful and esthetically pleasing microphone.
Part 3: Which High-End ASMR Mics You Should Try?
As your ASMR YouTube channel grows, the quality of the audio recordings you create is becoming increasingly important, because it impacts the overall quality of the content you’re sharing with your followers.
In case you’re looking for a microphone that is going to improve the quality of your audio recordings you should check out the mics below.
1. Rode NT1-A Stereo Vocal Condenser Microphone
Price: $439.00
Rode is probably the most famous microphone manufacturer in the world, as the company produced some of the best mics ever created. Their NT1-A Stereo Vocal Condenser Microphone features a 1’’ capsule that contains a gold plated diaphragm. The mic has a cardioid polar pattern and its maximum SPL capability cannot exceed 137dBSPL.
Moreover, you can pair two of the NT1-A microphones if you want to create a stereo or binaural recordings. This Rode’s model has a noise level of just 5dB, which makes it one of the best studio microphones on the market.
This mic requires one A battery to function, and it only has an XRL jack, which means that you cannot connect it to a computer via a USB cable. Although its price may seem a bit steep, the audio quality this microphone can produce more than justifies the high cost.
2. 3Dio FS Pro II
Price: $2, 057.88
In case you want to record your ASMR videos with a microphone that meets the highest industry standards, then 3Dio FS Pro II is one of the best choices you have at your disposal. The microphone has the shape of human ears and like all omnidirectional microphones, it can pick up sounds from all directions.
This model has two XLR jacks and a 3.5mm stereo output jack so that you can connect it to a 16-channel mixer or different types of audio recording devices. 3Dio FS Pro II needs 48 V to run normally and it uses 1.9 V batteries that can provide you with up 300 hours of recording time.
The microphone is designed to imitate the way human beings hear by preserving the direction from which the sound came. This means that the listeners of your ASMR recordings are going to be able to detect the direction from which the sounds are coming from.
We’ve summarized the key features of the mics mentioned above for helping you making a quick decision.
| Product name | Polar Pattern | Self-noise / S/N ratio | Power Source type | Best for | Price |
|---|---|---|---|---|---|
| Tascam DR-05X | Stereo, omnidirectional | 92dB | USB | Whispers and low sounds | $89.99 |
| Blue Yeti | Bidirectional, omnidirectional, cardioid, stereo | 100dB | USB | Low and high sounds | $129.99 |
| Zoom H4N Pro | Stereo, omnidirectional | 140dB | USB | Whispers and ambient sounds | $218.99 |
| Blue Microphones Baby Bottle SL Large-Diaphragm Condenser Microphone | Cardioid | 87dB | Phantom power | Whispers and ambient sounds | $399.99 |
| Rode NT1-A Stereo | Cardioid or binaural | 5dB | Phantom power | Ambient sounds and voice recordings | $439.00 |
| 3Dio FS Pro II | Binaural, omnidirectional | 14dB | Phantom power | Ambient sounds and voice recordings | $2, 057.88 |
Part 4: Frequently Asked Questions About ASMR Microphones
1. Should I use a USB or XLR microphone for ASMR recordings?
Although both USB and XLR microphones are frequently used to capture ASMR recordings, and XLR microphone produces a much better sound quality. So, if you want to prioritize the audio quality you should record all your ASMR videos with an XLR microphone.
However, there are quite a few affordable USB mics on the market that will enable you to capture sound in decent quality at a relatively low price.
2. Which type of microphone should be used to record ASMR sounds?
Condenser microphones are a much better option than the dynamic mics because they pick up soft sounds easily. Also, getting an XLR mic is usually a better choice than opting for a USB mic.
3. Is an omnidirectional microphone better for ASMR than the binaural mic?
The answer to this question depends on the type of ASMR video you want to create. If it is important for you to capture tapping or scratching sounds from all sides then you should choose an omnidirectional microphone.
A binaural mic will enable you to create a more immersive audio recording, but they are also more expensive.
Conclusion
In the world of video production, the quality of your equipment often determines how good the final product is going to be. That’s why a good microphone is one of the essential items for an ASMR artist.
Finding a good microphone you can use to record ASMR sounds shouldn’t be too difficult, because you can get a high-quality option in different price tiers. If you are on a budget, then a microphone like Blue Yeti may be a great choice, because it lets you choose between different polar patterns and it produces a great quality of sound.
On the other hand, 3Dio FS Pro II or Rode NT1-A Stereo microphones are worth investing in because they will enable you to record sound at a professional level.
Richard Bennett
Richard Bennett is a writer and a lover of all things video.
Follow @Richard Bennett
The Ultimate Youtube Editing Guide for Content Creators of All Levels
How To Edit YouTube Videos
Richard Bennett
Oct 26, 2023• Proven solutions
YouTube videos have a certain look and feel that many viewers have come to expect and enjoy. Much of the aesthetics of YouTube videos developed as a result of the biggest YouTubers having to quickly and efficiently edit videos together on a daily basis. Below is our list of some of the most common video editing techniques used by famous YouTubers.
Part 1: Introduction
1. Start Big
“I’m doing something really exciting… within the first ten seconds of this video. That way you stay here.” – Liza Koshy (How To Be A YouTuber 101!! | Lizzza)
In the same way that a teaser or trailer builds anticipation for a full film, many YouTubers start with a preview of the most high-energy part of their video.
In Jake Paul’s prank vlog (above), Jake shows his brother, Logan, chasing and beating him up as Jake screams for help at the top of his lungs. The already high-energy scene is even more intensified by the epic music playing in the background. This seven-second clip, which resurfaces halfway through the video, is enough to entice many viewers to continue watching. It very effectively leaves enough room for viewers to wonder, “How did Logan’s room actually look in the end?” “What was Logan’s initial reaction before he started chasing Jake?” By creating curiosity gaps like these, you can incentivize your viewers to close these gaps by watching longer.
2. Opening Title Introduction
Just as TV episodes begin with opening credits and theme music, quite similarly, some YouTubers start their YouTube videos with an intro.
Greg from “How To Drink” has an effective twenty-second intro (above). In this video, he shows you who he is and what his videos are generally about. Since these two things don’t change so much for him from video to video, he can start many of his videos off with this same intro.
Below is a video tutorial about how to add text and titles to video in Filmora, hope that helps you in creating your own YouTube video texts and titles.


For more information on intros, check out our post on How to Make a YouTube Intro?
Part 2: Cuts
1. Jump Cut
A jump cut is a simple and straightforward type of video editing cutting technique that “jumps” from one section of a clip to a later section of a clip, cutting out whatever happened in the middle. Some of the middle parts you might want to remove may include mistakes, long silent pauses, and filler words (umm, like, etc.).
Although the use of jump cuts to remove these parts had been discouraged for a long time in the film world, its extensive use by so many YouTubers has established it as its own style that many viewers have come to expect and enjoy. The jumpiness that comes from jump cuts can be effective in keeping your audience’s attention in a shock-inducing manner.
Jump cuts can also be used to show a passage of time in a creative way or make objects magically appear on-screen.
Zack King (above) makes a toy taxi magically appear in his hands using this video editing technique. Filmora allows you to do jump cut easily, you can watch the tutorial below and learn more jump cut tips and tricks .
2. Associative Cut
Not everyone in your audience may recognize the cultural or historical references you make in your videos. It can, therefore, be helpful (and also quite enjoyable) to show the original clip of the reference you are making.
In the same vlog that Jake Paul gets chased down by his brother (above), twenty-eight seconds into the video, Jake expresses his desire to go fast in his car. Right after he says “I want to go fast,” Jake cuts into a scene from the movie Talladega Nights. In that scene, Ricky Bobby, Will Ferrell’s character, also says that he wants to go fast.

Part 3: Transform
1. Zoom
Many YouTubers digitally adjust the zoom of their talking head shots in order to create additional emphasis or suspense. When zoom is used very slowly and smoothly, this technique can be effective in building up suspense and drawing a viewer deeper into the speaker’s message. When a drastic zoom is used suddenly, it can be effective in emphasizing a particular spoken line.
RiceGum is one YouTuber who uses zoom video editing effects extensively in his talking head videos. Want to pan and zoom your video footage too? Check our guide to getting Ken Burns Effect on Videos .
2. Camera Shake
Camera shake is a video effect that makes the original clip appear like it was filmed during a violent earthquake. Many YouTubers use this effect to emphasize their voice when they are talking about something erratic or out of control.
3. Color/Level Adjustment
A lot of comedy YouTubers change the color and levels of their videos in order to emphasize different moods. One common thing YouTubers do when they talk about anything slightly sad is to gradually fade out the colors in their talking head shots. In a cheesy way, the black and white look can emphasize a feeling of emptiness. For his “sad” reactions, PewDiePie often jump cuts into a black and white, slowed down clip of his sad face while playing some sad music in the background. To emphasize a darker message, some YouTubers increase the amount of shadows in their video. In the video below, while his daughter is delivering a darker message from 0:32 to 0:50, La Guardia Cross gradually adds more shadows around his daughter’s face through what appears to be a vignette effect.
Part 4: Transitions
1. Wipe
Many YouTubers transition from one scene into the next using a wipe transition. In a wipe transition, the next clip that you want to transition into slides into the frame horizontally or vertically until it completely covers the first clip. For additional wiping effect, many YouTubers also use a fast, high pitched “woosh” sound effect with this transition.
2. Zoom
The zoom transition is quite similar to the wipe transition, except it uses a zoom effect. Many of the top YouTubers combine this transition with a lower-pitched “woosh” sound effect.
Part 5: Visual Elements
In other genres of film, the only appropriate visual elements filmmakers can tastefully add to their footage seem to be clean looking, seamlessly integrated text and motion graphics. YouTube, on the other hand, is another world with much more room to get outrageous. Many of the top YouTubers add a lot of visual elements (emojis , images, filters, explosions) to their videos to emphasize their jokes, play-on-words, historical or cultural references, and mood.
1. Call-To-Action Visuals
Whether they’re prompting you to subscribe, like, comment, or check out their purchasable merchandise, many YouTubers include visuals to strengthen their calls-to-action.
Part 6: Time Manipulation
1. Timelapse
“The staple of any Casey Neistat vlog is the timelapse, which he uses both to further the narrative or set the time of day.” -@omgurheadsgone
A lot of cameras now come with a timelapse/hyperlapse function, requiring no further video editing. To achieve the kind of timelapses that Casey Neistat makes, though, you’ll have to film real-time footage and then manipulate the speed of it in post. Since sped up ambient sound is hardly ever pleasing to the ear, a lot of YouTubers replace the audio with music that enhances the mood of the timelapse.
2. Slow Motion
Slowing down footage is another way YouTubers like to manipulate the passage of time. This technique can draw the audience’s attention into the intricacies of a movement captured on film. But if you stretch your video clip digitally in order to achieve this look, your video may not look so smooth – your software will need to create extra frames of footage based on your existing footage. The solution around this problem is to make sure to record your video at a very high frame rate.

Part 7: Audio
1. Censor
The traditional practice for censoring out explicit language in television has been to replace profanity with a high pitched “bleep” sound effect . YouTubers, however, have popularized the use of animal sound effects to censor out explicit language. Epic Meal Time frequently uses the “caw” of a crow for this purpose.
2. Sound Effects
Whether it is pouring water into a cup or drinking a glass of water, adding louder sound effects can enhance your viewer’s experience of the action that is taking place on camera.
3. Background Music
Music is very effective in helping people feel all kinds of emotions. It is no wonder so many of the top YouTubers make gratuitous use of music in their videos. Some even add background music to every single clip of their entire YouTube video and only drop the music when the following technique (below) is used.
4. Muting Background Music
A lot of YouTubers who talk over background music abruptly mute the music when they want their audience to focus their attention on whatever it is that they have to say at that very moment. Isolating one’s speech in this way can be a very effective way to emphasize something serious or emphasize a punchline to a joke.
5. Voice-Over
Adding additional recorded verbal commentary is another technique used by many of the top YouTubers. This technique can be helpful when the visuals of your footage do not sufficiently communicate the full message you want to get across to your audience.
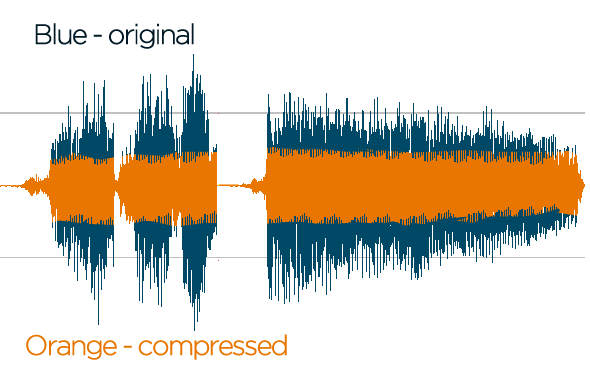
6. Compressor
A lot of video editing software programs give you the option to add compression to your video’s audio. Compression lessens the dynamic range between the softest and loudest parts of your audio. This technique can help your speech sound more uniform in volume.
For those who want to make their YouTube videos better, I recommend Wondershare Filmora for editing YouTube videos . Filmora video editor allows you to create and edit a YouTube video easily with plentiful templates and effects pre-programmed.
Richard Bennett
Richard Bennett is a writer and a lover of all things video.
Follow @Richard Bennett
Richard Bennett
Oct 26, 2023• Proven solutions
YouTube videos have a certain look and feel that many viewers have come to expect and enjoy. Much of the aesthetics of YouTube videos developed as a result of the biggest YouTubers having to quickly and efficiently edit videos together on a daily basis. Below is our list of some of the most common video editing techniques used by famous YouTubers.
Part 1: Introduction
1. Start Big
“I’m doing something really exciting… within the first ten seconds of this video. That way you stay here.” – Liza Koshy (How To Be A YouTuber 101!! | Lizzza)
In the same way that a teaser or trailer builds anticipation for a full film, many YouTubers start with a preview of the most high-energy part of their video.
In Jake Paul’s prank vlog (above), Jake shows his brother, Logan, chasing and beating him up as Jake screams for help at the top of his lungs. The already high-energy scene is even more intensified by the epic music playing in the background. This seven-second clip, which resurfaces halfway through the video, is enough to entice many viewers to continue watching. It very effectively leaves enough room for viewers to wonder, “How did Logan’s room actually look in the end?” “What was Logan’s initial reaction before he started chasing Jake?” By creating curiosity gaps like these, you can incentivize your viewers to close these gaps by watching longer.
2. Opening Title Introduction
Just as TV episodes begin with opening credits and theme music, quite similarly, some YouTubers start their YouTube videos with an intro.
Greg from “How To Drink” has an effective twenty-second intro (above). In this video, he shows you who he is and what his videos are generally about. Since these two things don’t change so much for him from video to video, he can start many of his videos off with this same intro.
Below is a video tutorial about how to add text and titles to video in Filmora, hope that helps you in creating your own YouTube video texts and titles.
For more information on intros, check out our post on How to Make a YouTube Intro?
Part 2: Cuts
1. Jump Cut
A jump cut is a simple and straightforward type of video editing cutting technique that “jumps” from one section of a clip to a later section of a clip, cutting out whatever happened in the middle. Some of the middle parts you might want to remove may include mistakes, long silent pauses, and filler words (umm, like, etc.).
Although the use of jump cuts to remove these parts had been discouraged for a long time in the film world, its extensive use by so many YouTubers has established it as its own style that many viewers have come to expect and enjoy. The jumpiness that comes from jump cuts can be effective in keeping your audience’s attention in a shock-inducing manner.
Jump cuts can also be used to show a passage of time in a creative way or make objects magically appear on-screen.
Zack King (above) makes a toy taxi magically appear in his hands using this video editing technique. Filmora allows you to do jump cut easily, you can watch the tutorial below and learn more jump cut tips and tricks .
2. Associative Cut
Not everyone in your audience may recognize the cultural or historical references you make in your videos. It can, therefore, be helpful (and also quite enjoyable) to show the original clip of the reference you are making.
In the same vlog that Jake Paul gets chased down by his brother (above), twenty-eight seconds into the video, Jake expresses his desire to go fast in his car. Right after he says “I want to go fast,” Jake cuts into a scene from the movie Talladega Nights. In that scene, Ricky Bobby, Will Ferrell’s character, also says that he wants to go fast.
Part 3: Transform
1. Zoom
Many YouTubers digitally adjust the zoom of their talking head shots in order to create additional emphasis or suspense. When zoom is used very slowly and smoothly, this technique can be effective in building up suspense and drawing a viewer deeper into the speaker’s message. When a drastic zoom is used suddenly, it can be effective in emphasizing a particular spoken line.
RiceGum is one YouTuber who uses zoom video editing effects extensively in his talking head videos. Want to pan and zoom your video footage too? Check our guide to getting Ken Burns Effect on Videos .
2. Camera Shake
Camera shake is a video effect that makes the original clip appear like it was filmed during a violent earthquake. Many YouTubers use this effect to emphasize their voice when they are talking about something erratic or out of control.
3. Color/Level Adjustment
A lot of comedy YouTubers change the color and levels of their videos in order to emphasize different moods. One common thing YouTubers do when they talk about anything slightly sad is to gradually fade out the colors in their talking head shots. In a cheesy way, the black and white look can emphasize a feeling of emptiness. For his “sad” reactions, PewDiePie often jump cuts into a black and white, slowed down clip of his sad face while playing some sad music in the background. To emphasize a darker message, some YouTubers increase the amount of shadows in their video. In the video below, while his daughter is delivering a darker message from 0:32 to 0:50, La Guardia Cross gradually adds more shadows around his daughter’s face through what appears to be a vignette effect.
Part 4: Transitions
1. Wipe
Many YouTubers transition from one scene into the next using a wipe transition. In a wipe transition, the next clip that you want to transition into slides into the frame horizontally or vertically until it completely covers the first clip. For additional wiping effect, many YouTubers also use a fast, high pitched “woosh” sound effect with this transition.
2. Zoom
The zoom transition is quite similar to the wipe transition, except it uses a zoom effect. Many of the top YouTubers combine this transition with a lower-pitched “woosh” sound effect.
Part 5: Visual Elements
In other genres of film, the only appropriate visual elements filmmakers can tastefully add to their footage seem to be clean looking, seamlessly integrated text and motion graphics. YouTube, on the other hand, is another world with much more room to get outrageous. Many of the top YouTubers add a lot of visual elements (emojis , images, filters, explosions) to their videos to emphasize their jokes, play-on-words, historical or cultural references, and mood.
1. Call-To-Action Visuals
Whether they’re prompting you to subscribe, like, comment, or check out their purchasable merchandise, many YouTubers include visuals to strengthen their calls-to-action.
Part 6: Time Manipulation
1. Timelapse
“The staple of any Casey Neistat vlog is the timelapse, which he uses both to further the narrative or set the time of day.” -@omgurheadsgone
A lot of cameras now come with a timelapse/hyperlapse function, requiring no further video editing. To achieve the kind of timelapses that Casey Neistat makes, though, you’ll have to film real-time footage and then manipulate the speed of it in post. Since sped up ambient sound is hardly ever pleasing to the ear, a lot of YouTubers replace the audio with music that enhances the mood of the timelapse.
2. Slow Motion
Slowing down footage is another way YouTubers like to manipulate the passage of time. This technique can draw the audience’s attention into the intricacies of a movement captured on film. But if you stretch your video clip digitally in order to achieve this look, your video may not look so smooth – your software will need to create extra frames of footage based on your existing footage. The solution around this problem is to make sure to record your video at a very high frame rate.
Part 7: Audio
1. Censor
The traditional practice for censoring out explicit language in television has been to replace profanity with a high pitched “bleep” sound effect . YouTubers, however, have popularized the use of animal sound effects to censor out explicit language. Epic Meal Time frequently uses the “caw” of a crow for this purpose.
2. Sound Effects
Whether it is pouring water into a cup or drinking a glass of water, adding louder sound effects can enhance your viewer’s experience of the action that is taking place on camera.
3. Background Music
Music is very effective in helping people feel all kinds of emotions. It is no wonder so many of the top YouTubers make gratuitous use of music in their videos. Some even add background music to every single clip of their entire YouTube video and only drop the music when the following technique (below) is used.
4. Muting Background Music
A lot of YouTubers who talk over background music abruptly mute the music when they want their audience to focus their attention on whatever it is that they have to say at that very moment. Isolating one’s speech in this way can be a very effective way to emphasize something serious or emphasize a punchline to a joke.
5. Voice-Over
Adding additional recorded verbal commentary is another technique used by many of the top YouTubers. This technique can be helpful when the visuals of your footage do not sufficiently communicate the full message you want to get across to your audience.
6. Compressor
A lot of video editing software programs give you the option to add compression to your video’s audio. Compression lessens the dynamic range between the softest and loudest parts of your audio. This technique can help your speech sound more uniform in volume.
For those who want to make their YouTube videos better, I recommend Wondershare Filmora for editing YouTube videos . Filmora video editor allows you to create and edit a YouTube video easily with plentiful templates and effects pre-programmed.
Richard Bennett
Richard Bennett is a writer and a lover of all things video.
Follow @Richard Bennett
Also read:
- Enhance Video Visibility Using Creator Studio Wisdom
- [Updated] Cutting-Edge Gadgets for Elite Gamers
- [Updated] A Peek Into Popularity List of the Top 10 YouTubers
- From Novice to Pro YouTube Shorts Guide
- Essential Free Apps for YouTube to WAV Transformation for 2024
- Efficacy of Monetized YouTube Engagement for Content Creators, In 2024
- Enabling Your Brand's Mobile Reach Launching YouTube Channels with Ease for 2024
- [New] Essential ASMR Apps Android & iOS Edition
- 2024 Approved Easing Into Your YouTube Watches 3 Methods (50 Chars)
- Mastering YouTube & Twitch Expand Your Viewership with Multi-Streaming Techniques
- 2024 Approved Effortless Tutorial for Top-Notch YT Video Thumbnails
- Sparking Interest with the Top 8 Most Effective YouTube Thumbnails
- [New] DIY Unleashing Creative Power in Animation Effects
- A Beginner's Roadmap to Professional Sports Edits
- [New] Cutting-Edge PC Techniques for Stellar YouTube Video Production
- 2024 Approved Crafting Timeless Videos with Retro Filmmaking Skills
- Leverage Social Blade's Platform for In-Depth Video Analytics
- [Updated] Enhance Youtubes' Conversations with Emojis
- 2024 Approved Inexpensive Capture Apps Reviewed For Budget PCs
- In 2024, How to Turn Off Find My Apple iPhone 8 when Phone is Broken? | Dr.fone
- How to remove Google FRP Lock on V27
- Enhance Imagery with Elegant Borders – IG Edition
- 2024 Approved Unlock Free Vocal Manipulation Expertise with In-Depth Guide to Voice Editing via Filmora
- 6 Solutions to Fix Error 505 in Google Play Store on Oppo A79 5G | Dr.fone
- 3uTools Virtual Location Not Working On Lava Storm 5G? Fix Now | Dr.fone
- [New] Top Quality SD Card for Sony Alpha 7S II
- 2024 Approved The Leading Audio Tinkering Tools IOS and Android Edition, Revised
- From Pro to Max The Evolutionary Journey in Apple's M Chips
- [Updated] Top Five Game-Changing Updates From Facebook
- 2024 Approved Capturing Skype Chats An OBS Guide
- 6 Ways to Change Spotify Location On Your Tecno Pova 6 Pro 5G | Dr.fone
- [Updated] Zoom Meetings Effectively Utilizing Whiteboard on Various Devices for 2024
- Undelete lost photos from Honor X50i+.
- Title: "Mastering ASMR - The Ultimate List of Mics"
- Author: Kevin
- Created at : 2024-05-25 15:44:30
- Updated at : 2024-05-26 15:44:30
- Link: https://youtube-videos.techidaily.com/mastering-asmr-the-ultimate-list-of-mics/
- License: This work is licensed under CC BY-NC-SA 4.0.
