
:max_bytes(150000):strip_icc()/hashtag-56a9fe065f9b58b7d0006572.jpg)
"Leveraging Both Platforms A Detailed Guide to YouTube-Facebook Linking"
Leveraging Both Platforms: A Detailed Guide to YouTube-Facebook Linking
Create High-Quality Video - Wondershare Filmora
An easy and powerful YouTube video editor
Numerous video and audio effects to choose from
Detailed tutorials provided by the official channel
YouTube reports that Facebook is the most utilized platform fans use to watch online content. More so, up to 40% of those who watch the content do share links with their friends online – this then makes it quick to promote YouTube content on Facebook. Simply by making your new YouTube content visible on your Facebook page, and you’ll be certain that thousands of viewers will have a glimpse of it. You must already be scratching your head for ways on how to post a YouTube video on a Facebook page. Well, we bring you several ways to go through that and make your YouTube content accessible on Facebook.
In this article
01 How to Post YouTube video on Facebook?
02 Extra Tip: Facebook Video Tips for more Views and Shares
03 Frequently Asked Question about Facebook video
How to Post YouTube video on Facebook?
Since Facebook is easily accessible, many users have more access to it than other social media platforms. More so, the page allows you to communicate with your audience via photos, videos, graphics, text, among many other multimedia contents. You don’t even need any programming skills to operate it. Here are ways to post YouTube content to Facebook.
How to share a YouTube video on Facebook using a computer
If you have a stationary point of work, i.e., a computer, it is possible to share your YouTube video through it.
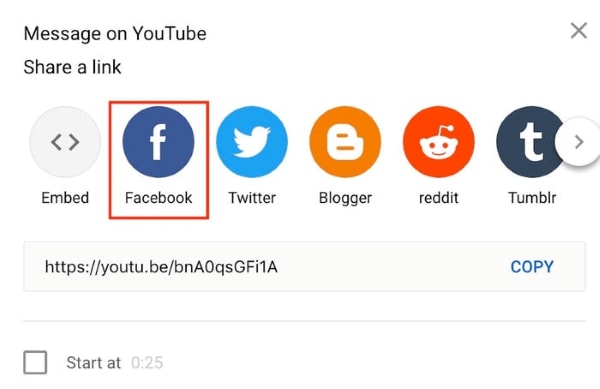
Step 1. First, visit the YouTube site at https://www.youtube.com . It can launch from any web browser.
Step 2. Choose from among your videos on YouTube the one you wish to share on Facebook.
Step 3. Then find the “Share” icon located directly under the video you want to share. Click on the video and hit the “Share” button below the video.
Step 4. Choose “Facebook” from the sharing options that pop up.
Step 5. Next, sign in to “Facebook” on your desktop. Then select the destination point you want your video to land in by using the drop-down menu at the top of your desktop screen. Select the “Share to News Feed” or perhaps the share to “Story.”
Step 6. Finally, click the “Post to Facebook” tab to share your YouTube content with Facebook.
How to share a YouTube video on Facebook using a mobile device
Are you on the go and want your Facebook fans to know what content you have on your YouTube channel? Here are the simple steps on how to post a YouTube video on Facebook right from the palm of your hands – a mobile device.
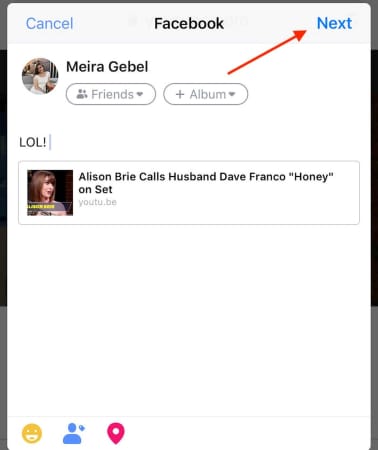
Step 1. Use any browser on your mobile device to launch the YouTube app from the official website.
Step 2. Peruse through your YouTube videos and choose the one you wish to share on Facebook.
Step 3. Check below the video and click on the “Share” icon.
Step 4. Search through the app’s options and choose Facebook. Also, ensure that the “Facebook” app is installed on your mobile device to make your videos sharable.
Step 5. Click on the “Next” option in the upper right-hand corner of your mobile screen. It will enable video sharing.
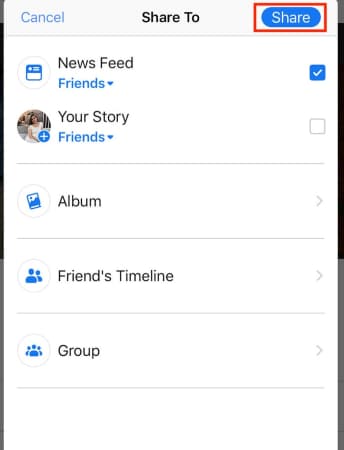
Step 6. Then choose the YouTube video’s post destination to your Facebook. It could be shared on your timeline, story, or a Facebook group’s page.
Step 7. Finally, click on the “Share” tab to make your video viewable on Facebook.
How to post a YouTube video on Facebook
Easily post your YouTube video on Facebook and let viewers access them directly from your Facebook feed. By this, your fans don’t have to click on other tabs but will access the videos directly.
Step 1. Copy the YouTube video’s link
First, go to your YouTube channel and copy the video link that you want to post to Facebook. You can as well copy the embed code.
Step 2. Embed the video link you copied
This link should be embedded into a Facebook post. Do this by first logging into your Facebook account. Then go to the top of your “Facebook News Feed” and click the “What’s on your mind” box.
Step 3. Paste your link
Right-click on the “What’s on your mind” box, then select the “Paste” option.
Step 4. Preview video
Facebook will let you preview the video you just posted. Check whether you have pasted the right video before you post it.
Step 5. Post your video
Now, scroll down and click on the “Post” tab. You can also add a message to your post. Just place a cursor after the video URL and hit the “Enter” key on your keyboard. Finally, scroll down and hit the “Post” tab to make your video public on Facebook.
Extra Tip: Facebook Video Tips for more Views and Shares
You have to play your cards well when it comes to posting and sharing your videos on Facebook. These tips are all you need.
- Catch viewer’s attention within the shortest time possible
Here, your main aim is to convince your viewers. So, don’t let them spend so much time before you catch their attention. You can bring up a point about some latest news or adventures that let your viewers connect immediately.
- Add captions to the video
It is not necessarily possible that viewers will watch your videos with the sound on. Some like it when it’s silent and might disable the sound auto-play. Add some captions so that viewers will understand your video, even on silent mode.
- Emphasize on one key-point
Focus on one key point so that your viewers are not swayed away. Your video is highly sharable if it is easy to understand.
- Add a Call To Action
Including a call-to-action will encourage your viewers to subscribe to your channel. Ensure you include it at the end of your video to tell viewers what to do next. You could also include a link to your blog post to let your viewers read and find more content from your other channels.
- Facebook ads can make a great difference
Facebook is a great place for running ads that reach a wider audience. Adverts are great ways to target a specific audience. They explain your products and services more straightforwardly.
- Embed your videos on blog posts
Numerous people get to access guest posts and blog posts. You can embed your Facebook videos on such posts to reach more people. Just get the embed code from your video, then copy and paste it to a guest or blog post.
Frequently Asked Question about Facebook video
Both viewers and content creators have a few concerns about YouTube and Facebook videos. Here are some frequently asked questions that will be of benefit to you.
1) Is it legal to share YouTube videos?
YouTube is just one platform where content creators showcase their productions. Yes, it is legal to share your content on other forums like Facebook, Twitter, Instagram, etc.
2) What is the best time to post to your Facebook page?
The best time to post on a Facebook page depends on your time zone. Generally, viewers access Facebook late in the evening and early in the night. Perhaps they are off work and now want to relax by checking the day’s updates.
3) What are Facebook business accounts and personal accounts?
Facebook business accounts are designed for users who want to use Facebook to administer their pages and advert campaigns. This account cannot be found in searching or receiving friend request apps. Nonetheless, personal accounts are used at basic and casual levels. You can search for friends and send requests. Personal accounts are also easy to manage.
4) Can I mobilize people to share my posted content on Facebook?
Yes, it is possible to let others share what you have posted. Just ensure they know your intention by constant reminders. Some popular ways that are proven to be effective include the use of “Call to Action,” using an image or video with your Facebook status update and offering some incentive to your fans for sharing.
5) Does the quality of my YouTube content drop when I share it with Facebook?
Of course not! What you pull from your YouTube channel is the kind of video that will be watched from Facebook. The quality cannot deteriorate. However, it is good to ensure you compose quality videos on YouTube before sharing them. Several video editing apps like Filmora can help you compose quality videos with high resolution.
Conclusion
● Facebook is a great platform that is accessed by a wide audience. More so, you can share your content from other platforms easily. The article has covered how to share YouTube videos on Facebook and hook your audience. You can use your computer or share directly from your mobile device in simple steps. It is also better to play some tricks on your effort to reach a wider audience. These include a CTA, embedding your Facebook videos to blogs posts, among other options.
YouTube reports that Facebook is the most utilized platform fans use to watch online content. More so, up to 40% of those who watch the content do share links with their friends online – this then makes it quick to promote YouTube content on Facebook. Simply by making your new YouTube content visible on your Facebook page, and you’ll be certain that thousands of viewers will have a glimpse of it. You must already be scratching your head for ways on how to post a YouTube video on a Facebook page. Well, we bring you several ways to go through that and make your YouTube content accessible on Facebook.
In this article
01 How to Post YouTube video on Facebook?
02 Extra Tip: Facebook Video Tips for more Views and Shares
03 Frequently Asked Question about Facebook video
How to Post YouTube video on Facebook?
Since Facebook is easily accessible, many users have more access to it than other social media platforms. More so, the page allows you to communicate with your audience via photos, videos, graphics, text, among many other multimedia contents. You don’t even need any programming skills to operate it. Here are ways to post YouTube content to Facebook.
How to share a YouTube video on Facebook using a computer
If you have a stationary point of work, i.e., a computer, it is possible to share your YouTube video through it.
Step 1. First, visit the YouTube site at https://www.youtube.com . It can launch from any web browser.
Step 2. Choose from among your videos on YouTube the one you wish to share on Facebook.
Step 3. Then find the “Share” icon located directly under the video you want to share. Click on the video and hit the “Share” button below the video.
Step 4. Choose “Facebook” from the sharing options that pop up.
Step 5. Next, sign in to “Facebook” on your desktop. Then select the destination point you want your video to land in by using the drop-down menu at the top of your desktop screen. Select the “Share to News Feed” or perhaps the share to “Story.”
Step 6. Finally, click the “Post to Facebook” tab to share your YouTube content with Facebook.
How to share a YouTube video on Facebook using a mobile device
Are you on the go and want your Facebook fans to know what content you have on your YouTube channel? Here are the simple steps on how to post a YouTube video on Facebook right from the palm of your hands – a mobile device.
Step 1. Use any browser on your mobile device to launch the YouTube app from the official website.
Step 2. Peruse through your YouTube videos and choose the one you wish to share on Facebook.
Step 3. Check below the video and click on the “Share” icon.
Step 4. Search through the app’s options and choose Facebook. Also, ensure that the “Facebook” app is installed on your mobile device to make your videos sharable.
Step 5. Click on the “Next” option in the upper right-hand corner of your mobile screen. It will enable video sharing.
Step 6. Then choose the YouTube video’s post destination to your Facebook. It could be shared on your timeline, story, or a Facebook group’s page.
Step 7. Finally, click on the “Share” tab to make your video viewable on Facebook.
How to post a YouTube video on Facebook
Easily post your YouTube video on Facebook and let viewers access them directly from your Facebook feed. By this, your fans don’t have to click on other tabs but will access the videos directly.
Step 1. Copy the YouTube video’s link
First, go to your YouTube channel and copy the video link that you want to post to Facebook. You can as well copy the embed code.
Step 2. Embed the video link you copied
This link should be embedded into a Facebook post. Do this by first logging into your Facebook account. Then go to the top of your “Facebook News Feed” and click the “What’s on your mind” box.
Step 3. Paste your link
Right-click on the “What’s on your mind” box, then select the “Paste” option.
Step 4. Preview video
Facebook will let you preview the video you just posted. Check whether you have pasted the right video before you post it.
Step 5. Post your video
Now, scroll down and click on the “Post” tab. You can also add a message to your post. Just place a cursor after the video URL and hit the “Enter” key on your keyboard. Finally, scroll down and hit the “Post” tab to make your video public on Facebook.
Extra Tip: Facebook Video Tips for more Views and Shares
You have to play your cards well when it comes to posting and sharing your videos on Facebook. These tips are all you need.
- Catch viewer’s attention within the shortest time possible
Here, your main aim is to convince your viewers. So, don’t let them spend so much time before you catch their attention. You can bring up a point about some latest news or adventures that let your viewers connect immediately.
- Add captions to the video
It is not necessarily possible that viewers will watch your videos with the sound on. Some like it when it’s silent and might disable the sound auto-play. Add some captions so that viewers will understand your video, even on silent mode.
- Emphasize on one key-point
Focus on one key point so that your viewers are not swayed away. Your video is highly sharable if it is easy to understand.
- Add a Call To Action
Including a call-to-action will encourage your viewers to subscribe to your channel. Ensure you include it at the end of your video to tell viewers what to do next. You could also include a link to your blog post to let your viewers read and find more content from your other channels.
- Facebook ads can make a great difference
Facebook is a great place for running ads that reach a wider audience. Adverts are great ways to target a specific audience. They explain your products and services more straightforwardly.
- Embed your videos on blog posts
Numerous people get to access guest posts and blog posts. You can embed your Facebook videos on such posts to reach more people. Just get the embed code from your video, then copy and paste it to a guest or blog post.
Frequently Asked Question about Facebook video
Both viewers and content creators have a few concerns about YouTube and Facebook videos. Here are some frequently asked questions that will be of benefit to you.
1) Is it legal to share YouTube videos?
YouTube is just one platform where content creators showcase their productions. Yes, it is legal to share your content on other forums like Facebook, Twitter, Instagram, etc.
2) What is the best time to post to your Facebook page?
The best time to post on a Facebook page depends on your time zone. Generally, viewers access Facebook late in the evening and early in the night. Perhaps they are off work and now want to relax by checking the day’s updates.
3) What are Facebook business accounts and personal accounts?
Facebook business accounts are designed for users who want to use Facebook to administer their pages and advert campaigns. This account cannot be found in searching or receiving friend request apps. Nonetheless, personal accounts are used at basic and casual levels. You can search for friends and send requests. Personal accounts are also easy to manage.
4) Can I mobilize people to share my posted content on Facebook?
Yes, it is possible to let others share what you have posted. Just ensure they know your intention by constant reminders. Some popular ways that are proven to be effective include the use of “Call to Action,” using an image or video with your Facebook status update and offering some incentive to your fans for sharing.
5) Does the quality of my YouTube content drop when I share it with Facebook?
Of course not! What you pull from your YouTube channel is the kind of video that will be watched from Facebook. The quality cannot deteriorate. However, it is good to ensure you compose quality videos on YouTube before sharing them. Several video editing apps like Filmora can help you compose quality videos with high resolution.
Conclusion
● Facebook is a great platform that is accessed by a wide audience. More so, you can share your content from other platforms easily. The article has covered how to share YouTube videos on Facebook and hook your audience. You can use your computer or share directly from your mobile device in simple steps. It is also better to play some tricks on your effort to reach a wider audience. These include a CTA, embedding your Facebook videos to blogs posts, among other options.
Effortless YouTube Live with Step-by-Step OBS Guide for Beginners
Live stream to youtube with OBS step by step guide for beginners

Richard Bennett
Mar 27, 2024• Proven solutions
- Part1. Stream Now set up
- Part2. Set up Your Live Streaming Encoder
- Part3. Youtube Events set up
- Part4. Video tutorial
1. Stream Now set up
Follow these steps to live stream your impressive videos to YouTube using Stream Now tool:
Step 1: First of all you need to login with your account and then move to Creator Studio option directly.

Step 2: Choose the Video Manager option from top most toolbar.

Step 3: From the drop down menu, simply select Live Streaming option to begin with.

Step 4: Now hot the steam now option on your screen.

Step 5: Change or Upload your thumbnail as per need.

Step 6: It is time to provide an eye catching title to your video, add description and finally choose category from the drop down menu.

Step 7: While using stream option, never forget to click on ‘make archive unlisted when complete’ option so that you can save as well as watch your content on YouTube at later stage.

Step 8: You can monetize your ads as per need.

Step 9: It also provides options to add cards.

Step 10: Now move to encoder setup and then simply copy and paste these details to your streaming software.

Step 11: Now you can set your live chat option as per your requirement.

Step 12: The analysis window will help you to know about how many viewers are connected to your video as well as the message updates will be reflected.

Step 13: Stream health can be monitored directly.

Step 14: One can also use the social media button for live shares.

2.Set up Your Live Streaming Encoder
As soon as you have completed the above set up then next task is to adjust settings of your streaming encoder. It is possible to make easy selection out of wide range of live streaming encoders. The details below are provided with reference to OBS too that is open source type free to access software.
Step 1: First of all you need to visit official website of OBS and get your software tool installed on your system.
Step 2: Now launch OBS on your device and directly go to settings option.

Step 3: It is time to copy the stream key from YouTube and then paste it directly in the specified field of OBS.

Step 4: Users can now add their sources and scenes.

Step 5: Once all these settings are done then you can simply hit the option for start streaming and it will bring your content to YouTube directly.

3. Youtube Events set up
Live stream is little different from Stream Now platform as it allows users to schedule the streams as well as a connectivity to Google Hangouts is provided. These easy to follow steps will assist you to handle all settings for your events using Live Stream tool:
Step 1: Simply click on the schedule event option on screen.

Step 2: It is much easier to make settings for basic information as well as audience type. Make some desired changes to SNS platform. If you select the Quick type then it will directly select your webcam and you need not to make additional complicated settings whereas the custom type option provides easy set up options with OBS.

Step 3: The advance settings option works same as that of stream now features and users can adjust most of these settings as per their streaming needs.

Step 4: Users can turn monetization On or Off as per their preferences.

Step 5: As soon as you finish all above settings then simply click on the create event option.

Step 6: One more window will appear on your screen and here you can make adjustment for preferred bit rate. Also put your dedicated stream key with encoder.

Step 7: When all above steps are completed then you need to hit the option for save changes so that your tool can act accordingly.

Step 8: Now click on events and here you will be able to find your event. Move to live control room if you want to access complete details about this event and you can easily delete it.

Step 9: Users can set privacy terms or simple delete the event that is currently in action.

Video tutorial
Richard Bennett
Richard Bennett is a writer and a lover of all things video.
Follow @Richard Bennett
Richard Bennett
Mar 27, 2024• Proven solutions
- Part1. Stream Now set up
- Part2. Set up Your Live Streaming Encoder
- Part3. Youtube Events set up
- Part4. Video tutorial
1. Stream Now set up
Follow these steps to live stream your impressive videos to YouTube using Stream Now tool:
Step 1: First of all you need to login with your account and then move to Creator Studio option directly.
Step 2: Choose the Video Manager option from top most toolbar.
Step 3: From the drop down menu, simply select Live Streaming option to begin with.
Step 4: Now hot the steam now option on your screen.
Step 5: Change or Upload your thumbnail as per need.
Step 6: It is time to provide an eye catching title to your video, add description and finally choose category from the drop down menu.
Step 7: While using stream option, never forget to click on ‘make archive unlisted when complete’ option so that you can save as well as watch your content on YouTube at later stage.
Step 8: You can monetize your ads as per need.
Step 9: It also provides options to add cards.
Step 10: Now move to encoder setup and then simply copy and paste these details to your streaming software.
Step 11: Now you can set your live chat option as per your requirement.
Step 12: The analysis window will help you to know about how many viewers are connected to your video as well as the message updates will be reflected.
Step 13: Stream health can be monitored directly.
Step 14: One can also use the social media button for live shares.
2.Set up Your Live Streaming Encoder
As soon as you have completed the above set up then next task is to adjust settings of your streaming encoder. It is possible to make easy selection out of wide range of live streaming encoders. The details below are provided with reference to OBS too that is open source type free to access software.
Step 1: First of all you need to visit official website of OBS and get your software tool installed on your system.
Step 2: Now launch OBS on your device and directly go to settings option.
Step 3: It is time to copy the stream key from YouTube and then paste it directly in the specified field of OBS.
Step 4: Users can now add their sources and scenes.
Step 5: Once all these settings are done then you can simply hit the option for start streaming and it will bring your content to YouTube directly.
3. Youtube Events set up
Live stream is little different from Stream Now platform as it allows users to schedule the streams as well as a connectivity to Google Hangouts is provided. These easy to follow steps will assist you to handle all settings for your events using Live Stream tool:
Step 1: Simply click on the schedule event option on screen.
Step 2: It is much easier to make settings for basic information as well as audience type. Make some desired changes to SNS platform. If you select the Quick type then it will directly select your webcam and you need not to make additional complicated settings whereas the custom type option provides easy set up options with OBS.
Step 3: The advance settings option works same as that of stream now features and users can adjust most of these settings as per their streaming needs.
Step 4: Users can turn monetization On or Off as per their preferences.
Step 5: As soon as you finish all above settings then simply click on the create event option.
Step 6: One more window will appear on your screen and here you can make adjustment for preferred bit rate. Also put your dedicated stream key with encoder.
Step 7: When all above steps are completed then you need to hit the option for save changes so that your tool can act accordingly.
Step 8: Now click on events and here you will be able to find your event. Move to live control room if you want to access complete details about this event and you can easily delete it.
Step 9: Users can set privacy terms or simple delete the event that is currently in action.
Video tutorial
Richard Bennett
Richard Bennett is a writer and a lover of all things video.
Follow @Richard Bennett
Also read:
- Showcasing the Most Swiftly Advancing YouTube Sites
- [Updated] Easy-to-Navigate Top 10 YouTube Downloader Tools
- [New] Detailed Insights Into YouTube's Perfected Aspect Ratios
- Navigating Complex Editing A Practical Guide for YouTube Video Creators on PC
- Trim the Excessive Green Revamping YouTubes on a Mac
- Curating Your Music Collection The Easy Guide to YouTube Playlist Creation (Web/App)
- [New] Enhance Your Content Filmmaking for YouTube Trailers with Filmora
- In 2024, Elevate Play Button Visuals Vivid Neon Lines Added
- Harmonize Your Routine with These Top 20 YouTube Songstars
- 2024 Approved Driving Results with Effective YouTube Advertising
- Find Rich Ambiance for Video Content!
- In 2024, Embark Into the Best YouTube VR Content Ever
- [New] Elite 10 Audio Boosters for OS X, iOS, Android
- [New] Climbing to YouTube Zenith A Step-by-Step Guide to Creative Studio Mastery
- [New] Earnings Enlightenment Joshi and YouTube Success Stories
- 2024 Approved Boredom Be Gone Find Joy with These Top 15 Humorists
- [Updated] Access Exclusive Video Artwork – Free, Flawless, and Fast
- [New] Does Immediate Subscribing Affect Content Recommendations?
- 2024 Approved Best Online Stock Market Channels Reviewed
- [New] Channel Success Metrics Subscriber & Play Buttons
- [New] CarryMinati's Income Blueprint Journey Through 2023
- Detailed Instructions for Embedding and Displaying YouTube Playlists Online for 2024
- [New] Craft Your Channel's Moniker YouTube Naming Tools and Tips
- [Updated] Essential Techniques to Elevate Your Channel's Visibility
- 2024 Approved Access Royalty-Free Beats for Your Vlog & More
- [Updated] 15 Best Free YouTube Introduction Tools
- 2024 Approved Efficiently Upload and Render YouTube Videos with Precision
- Chart-Toppers Top 10 YouTube Personalities in Views for 2024
- 2024 Approved Epic Editing Illusions YouTube Edition
- [New] 10 Mock Musicals That Bring Smiles
- Celebrating Clickers Channel & Buttons Incentives
- Becoming a Wealthy Beauty Channel Host
- Unraveling YouTube's Vision for a Thriving Ecosystem of Short-Form Video
- From Basic to Exceptional A Step-by-Step Thumbnail Guide
- In 2024, Achieve Sharpness Camera Tips Without a Tripod
- Tune Into Music Top Free Apps for YouTube Songs on Android Phones
- Enhance Viewing Experience Best YouTube Converters to AVI for 2024
- [New] Efficient Broadcast Techniques Incorporating YouTube Loops on TV
- 2024 Approved Becoming a Top YouTuber with Gaming Livestreams
- [New] Essential Guide to Hashtagging for Game-Focused YT Channels
- In 2024, DIY YouTube Thumbnails Made Simple
- Apex Chart Analyst Master Video Popularity for 2024
- Mastering YouTube Ad Removal Chrome, Firefox, Android, iPhone Methods
- [Updated] Closing Powerhouses Free Top 6 Video Closers
- In 2024, Elevating Your Content Strategy YouTube Keywords Explained
- [Updated] Elevate Your Video Guide with Annotations on YouTube
- [Updated] Capture Chuckles Quickly Efficient Methods for Exciting YouTube Reaction Videos (3 Tips)
- What Are the Earning Prospects for YouTubers From Branded Video Plays?
- How to Reset Gmail Password on Xiaomi Redmi Note 12R Devices
- In 2024, What Does Enter PUK Code Mean And Why Did The Sim Get PUK Blocked On Lava Yuva 2 Pro Device
- Updated In 2024, 10 Essential Animation Programs for School Projects
- How to Unlock Apple iPhone 14 Pro, Apples New iPhone | Dr.fone
- In 2024, Android Unlock Code Sim Unlock Your Infinix Smart 8 HD Phone and Remove Locked Screen
- Novice's Nook Top 6 Minecraft Homes Explained for 2024
- [New] Explore the Best DiscoVoice Changers A Comprehensive 2023 Review for 2024
- The Quintessential Editing Advantages of Filmora
- Innovative Storytelling Constructing Audio Waves Visualization and Imbuing Videos with Kinetic Animations Through Premiere Pro for 2024
- New 2024 Approved Top 15 Innovative Solutions for Synching Audios to Videos – A Comprehensive List
- In 2024, How to Unlock Honor X9b Phone without PIN
- Revitalizing a Frozen OBS Video Source Feed
- [Updated] In 2024, Strategies for Maximizing Your Twitter Archive
- [New] Navigating the World of Instagram Stories Easily for 2024
- Detailed guide of ispoofer for pogo installation On Samsung Galaxy A25 5G | Dr.fone
- How to Check Distance and Radius on Google Maps For your Infinix Note 30 VIP | Dr.fone
- [Updated] 2024 Approved Video Editing Journey's End Discover the Best 10 Tools
- 2024 Approved Capturing Desktop Image on Windows Editions
- Best Podcast Apps for Android
- [Updated] Top 10 Must-Have Windows 11 Cam Recorders
- How to Reset a Realme 11 5G Phone That Is Locked | Dr.fone
- In 2024, Top 15 Augmented Reality Games Like Pokémon GO To Play On Realme GT Neo 5 SE | Dr.fone
- [New] Elevate Your Insta Game with Flawless Picture Borders
- In 2024, How to Change/Fake Your Oppo Find N3 Location on Viber | Dr.fone
- Preventing Frames Gaps for Flawless Video Captures for 2024
- 2024 Approved WeVideo The Ultimate Online Video Creation Solution
- Title: "Leveraging Both Platforms A Detailed Guide to YouTube-Facebook Linking"
- Author: Kevin
- Created at : 2024-05-25 15:43:17
- Updated at : 2024-05-26 15:43:17
- Link: https://youtube-videos.techidaily.com/leveraging-both-platforms-a-detailed-guide-to-youtube-facebook-linking/
- License: This work is licensed under CC BY-NC-SA 4.0.
