
:max_bytes(150000):strip_icc()/james-yarema-ZYVrM9caRpU-unsplash-ab032eae5afc45d7bdbc2b4e11f00a47.jpg)
Laying The Groundwork For Successful Channels
Laying The Groundwork For Successful Channels
How to Create a YouTube Account

Richard Bennett
Mar 27, 2024• Proven solutions
People create YouTube accounts for a lot of different reasons. Some YouTubers just love making videos and created their channels so they would have somewhere to post their work. Others have strong opinions they need a platform to share. There are a lot of people on YouTube whose main interest is in a separate website or other social media page, but they use their YouTube channels to help generate traffic. If you are considering starting your own YouTube channel then you should take a second to consider why you want to, since this will have an impact on what kind of videos you make. Your reasons for wanting to make a YouTube account do not have to be very elaborate. Maybe you just think it will be fun. Good news; it will be!
Once you know for sure that you want to create a YouTube account, and also know why you want to do it, you have already started building your channel. There are still a few important things to consider, though. This article will walk you through signing up for a YouTube account, and give you some tips about starting your channel.
Creating Your YouTube Account in 6 Steps
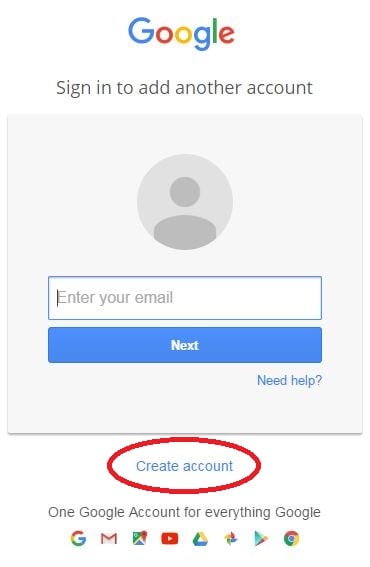
1. Go to YouTube.com and look at the top right corner of your screen. There will either be a blue Sign In button, or an icon representing you. YouTube accounts and Google accounts are the same, so if you are signed into your Gmail account you are already signed into YouTube as well.
2. If you see a Sign In button, click it. If you see your icon click on that, and in the window that pops up select Add Account. Either way, you will be taken into a sign in screen. Under where it asks for your email address it will say Create Account. Click on Create Account.
3. In the sign up page you will need to put in your name, email address, and mobile phone number as well as some other personal information. Do not enter your current Gmail address. Enter an alternate email you have created for your vlog, or click on I would like a new Gmail address. This will change your page slightly so that the email field becomes Choose a Username.


You will probably need to try a few different usernames before you find one that is not taken.
4. You will have to put in both a first and last name when you create your account, but you can change it to one name later.
5. Your password will need to be at least 8 characters long. Try to use a combination of letters or numbers, and make sure it is not something easily guessable (i.e spouses name).
6. After you finish the form click Next Step and, in the next screen, Continue to YouTube.
Tips on Starting a YouTube Channel
1. Choose a Topic you Love
When choosing a topic for your YouTube channel make sure you pick something you are passionate about. If you already have an interest or hobby which you are always researching and are extremely up-to-date on then that should probably be the theme of your vlog. If you plan to have a channel where people go to learn anything then you will need to be an authority on that topic. Whatever you make videos about it will need to be something you can realistically see yourself putting a lot of time into. If you cannot think of more than a couple ideas for videos on your topic then that is a sign that you need to choose something else to focus on.
You should check to see how much demand there is for videos on your topic. This can be done by googling your topic to see what else is out there. If not many people have addressed your topic yet it probably means that it is not something a lot of people want to know about. However, it could also mean that the people who do want to watch videos like yours have been starved for content. Your channel will flop if you do not love what you are making videos about, so do not choose something just because you think it will be popular. Follow your passion.
2. Check out the Competition
You should look for other vlogs with similar topics to yours not only to gauge how much demand there is for your videos, but to check out the competition. If there are a lot of YouTube channels dedicated to the same topic you want to vlog about then this should not discourage you from going after the same viewers. People who are excited about a topic frequently watch more than one vlog about it. It might not even be correct to think of other vloggers within your genre as ‘the competition’ since you are ultimately part of the same community. You will need to watch these people’s videos as part of keeping yourself informed and will likely become a fan – maybe even a collaborator some day – of theirs.
The main reason you want to look into YouTube channels like yours is because you do not want to be creating content that is overdone and boring. You are tackling the same topic as other people, and may even make some videos on the exact same subjects as others already have. There needs to be something unique about your videos that makes them stand out from what already exists. By looking at what other people are already doing you will be able to come up with ideas for what you can do differently.
3. Choose a Great Name
Picking a great name for your YouTube account can take a lot of effort. Chances are you will not want to use your own name, at least not in full. Although your real name can work for if you are a lifestyle vlogger in most cases you will have a more specific topic that will need to be addressed in your channel’s name. Try out your name or a nickname for yourself in combination with different words associated with the topic of your vlog. Aim to create a name that is catchy and easy to remember.
Chances are a few of your first couple picks will be unavailable. YouTube is a popular site and a lot of the best names are taken. The last thing you should ever do while naming your YouTube channel is add numbers or letters to the end of a name you like because it is taken. Names with numbers at the end are hard for viewers to remember and find again. Choosing a weak name with a trail of numbers or letters after it will make it very hard for your channel to grow. Brainstorm a long list of potential names that are actually good and keep on trying them out until you find one that’s available.
For more information on naming your YouTube channel read our post ‘How To Pick a Name for Your YouTube Channel’.
4. Make a Schedule
Maintaining a YouTube channel is a big time commitment. You need to post videos regularly or people will forget about you, and videos can take a long time to make. When you are first starting your vlog you should make yourself a schedule for when you want to upload videos. Having a schedule will help you budget your time and ensure that your vlog never gets in the way of the rest of your life.
Having a posting schedule will also help you grow your channel. Viewers like it when they know when to expect new content from vloggers they like. They are more likely to subscribe and tune in for every post if they are given a chance to anticipate when your new entry is coming.
5. Take Inventory
Think about what equipment you have that you can use for your YouTube channel. The only thing you absolutely cannot get by without is a decent camera, but there are other types of equipment that it is a good idea to have too. Lights, a tripod, an external microphone – these are all things that a lot of YouTubers find they need in order to produce great videos. If you do not have these things, or money you are prepared to invest in them, then you will need to find ways around them until your situation changes. For more information check out our post ‘The Best YouTube Equipment: What You Need to Start Your Channel’.
Read More to Get : Best Video Websites Like YouTube >>
Richard Bennett
Richard Bennett is a writer and a lover of all things video.
Follow @Richard Bennett
Richard Bennett
Mar 27, 2024• Proven solutions
People create YouTube accounts for a lot of different reasons. Some YouTubers just love making videos and created their channels so they would have somewhere to post their work. Others have strong opinions they need a platform to share. There are a lot of people on YouTube whose main interest is in a separate website or other social media page, but they use their YouTube channels to help generate traffic. If you are considering starting your own YouTube channel then you should take a second to consider why you want to, since this will have an impact on what kind of videos you make. Your reasons for wanting to make a YouTube account do not have to be very elaborate. Maybe you just think it will be fun. Good news; it will be!
Once you know for sure that you want to create a YouTube account, and also know why you want to do it, you have already started building your channel. There are still a few important things to consider, though. This article will walk you through signing up for a YouTube account, and give you some tips about starting your channel.
Creating Your YouTube Account in 6 Steps
1. Go to YouTube.com and look at the top right corner of your screen. There will either be a blue Sign In button, or an icon representing you. YouTube accounts and Google accounts are the same, so if you are signed into your Gmail account you are already signed into YouTube as well.
2. If you see a Sign In button, click it. If you see your icon click on that, and in the window that pops up select Add Account. Either way, you will be taken into a sign in screen. Under where it asks for your email address it will say Create Account. Click on Create Account.
3. In the sign up page you will need to put in your name, email address, and mobile phone number as well as some other personal information. Do not enter your current Gmail address. Enter an alternate email you have created for your vlog, or click on I would like a new Gmail address. This will change your page slightly so that the email field becomes Choose a Username.
You will probably need to try a few different usernames before you find one that is not taken.
4. You will have to put in both a first and last name when you create your account, but you can change it to one name later.
5. Your password will need to be at least 8 characters long. Try to use a combination of letters or numbers, and make sure it is not something easily guessable (i.e spouses name).
6. After you finish the form click Next Step and, in the next screen, Continue to YouTube.
Tips on Starting a YouTube Channel
1. Choose a Topic you Love
When choosing a topic for your YouTube channel make sure you pick something you are passionate about. If you already have an interest or hobby which you are always researching and are extremely up-to-date on then that should probably be the theme of your vlog. If you plan to have a channel where people go to learn anything then you will need to be an authority on that topic. Whatever you make videos about it will need to be something you can realistically see yourself putting a lot of time into. If you cannot think of more than a couple ideas for videos on your topic then that is a sign that you need to choose something else to focus on.
You should check to see how much demand there is for videos on your topic. This can be done by googling your topic to see what else is out there. If not many people have addressed your topic yet it probably means that it is not something a lot of people want to know about. However, it could also mean that the people who do want to watch videos like yours have been starved for content. Your channel will flop if you do not love what you are making videos about, so do not choose something just because you think it will be popular. Follow your passion.
2. Check out the Competition
You should look for other vlogs with similar topics to yours not only to gauge how much demand there is for your videos, but to check out the competition. If there are a lot of YouTube channels dedicated to the same topic you want to vlog about then this should not discourage you from going after the same viewers. People who are excited about a topic frequently watch more than one vlog about it. It might not even be correct to think of other vloggers within your genre as ‘the competition’ since you are ultimately part of the same community. You will need to watch these people’s videos as part of keeping yourself informed and will likely become a fan – maybe even a collaborator some day – of theirs.
The main reason you want to look into YouTube channels like yours is because you do not want to be creating content that is overdone and boring. You are tackling the same topic as other people, and may even make some videos on the exact same subjects as others already have. There needs to be something unique about your videos that makes them stand out from what already exists. By looking at what other people are already doing you will be able to come up with ideas for what you can do differently.
3. Choose a Great Name
Picking a great name for your YouTube account can take a lot of effort. Chances are you will not want to use your own name, at least not in full. Although your real name can work for if you are a lifestyle vlogger in most cases you will have a more specific topic that will need to be addressed in your channel’s name. Try out your name or a nickname for yourself in combination with different words associated with the topic of your vlog. Aim to create a name that is catchy and easy to remember.
Chances are a few of your first couple picks will be unavailable. YouTube is a popular site and a lot of the best names are taken. The last thing you should ever do while naming your YouTube channel is add numbers or letters to the end of a name you like because it is taken. Names with numbers at the end are hard for viewers to remember and find again. Choosing a weak name with a trail of numbers or letters after it will make it very hard for your channel to grow. Brainstorm a long list of potential names that are actually good and keep on trying them out until you find one that’s available.
For more information on naming your YouTube channel read our post ‘How To Pick a Name for Your YouTube Channel’.
4. Make a Schedule
Maintaining a YouTube channel is a big time commitment. You need to post videos regularly or people will forget about you, and videos can take a long time to make. When you are first starting your vlog you should make yourself a schedule for when you want to upload videos. Having a schedule will help you budget your time and ensure that your vlog never gets in the way of the rest of your life.
Having a posting schedule will also help you grow your channel. Viewers like it when they know when to expect new content from vloggers they like. They are more likely to subscribe and tune in for every post if they are given a chance to anticipate when your new entry is coming.
5. Take Inventory
Think about what equipment you have that you can use for your YouTube channel. The only thing you absolutely cannot get by without is a decent camera, but there are other types of equipment that it is a good idea to have too. Lights, a tripod, an external microphone – these are all things that a lot of YouTubers find they need in order to produce great videos. If you do not have these things, or money you are prepared to invest in them, then you will need to find ways around them until your situation changes. For more information check out our post ‘The Best YouTube Equipment: What You Need to Start Your Channel’.
Read More to Get : Best Video Websites Like YouTube >>
Richard Bennett
Richard Bennett is a writer and a lover of all things video.
Follow @Richard Bennett
Best Free YouTube Video Editing Apps for iPhone & iPad & How-Tos
Best Free YouTube Video Editing Apps for iPhone & iPad [2024]
Richard Bennett
Mar 27, 2024• Proven solutions
iPhones and iPads can capture footage in high resolution, however, video clips you record with an iPhone or an iPad may contain imperfections sometimes. Removing parts of a video clip you don’t want to share publicly, or stabilizing the shaky footage are just a few ways in which you can improve the quality of the videos you’re creating.
The good news is that the iPhone and iPad support a broad range of video editing apps, which enables you to edit all videos you record on these devices before you post them on YouTube or other social media platforms.
There are hundreds of video editing apps to choose from at the App Store , but such a wide range of options can make the process of choosing a video editing app you are going to use to edit your videos, more complicated.
So, in this article, we are going to take you through the some of the best video editing apps for YouTube videos on iPhones and iPads and help you determine which of these apps is the right choice for you.
- Part 1: Best Video Editing Apps for YouTube Video [Free & Paid]
- Part 2: Edit YouTube Videos on iPhone with YouTube Studio
Before we get started, I want to recommend thebest video editing software for YouTubers - Wondershare Filmora video editor , an easy to use while powerful video editor that allows you not only cut, split, crop, resize, reverse your videos, but also offers you multiple video effects specially designed for Fashion, Beauty, Gaming, Travel, Education, etc. Check the video to know more fantastic features:
For Win 7 or later (64-bit)
 Secure Download
For macOS 10.14 or later
Secure Download
Click here to get Filmora for PC by email
or Try Filmora App for mobile >>>
download filmora app for ios ](https://app.adjust.com/b0k9hf2%5F4bsu85t ) download filmora app for android ](https://app.adjust.com/b0k9hf2%5F4bsu85t )
- Windows & Mac Cross-Platform compatible
- Various Templates, Effects, Elements, Transitions, Filters for making Hollywood like movie easily
- Practical Audio Editing Tools and Color Grading Feature
Part 1: Best Free Video Editing Apps for iPhone to Edit YouTube Videos You Should Know
Before you opt for one of the apps we’ve featured in our top list, you must first make sure that the app you’re interested in offers all the video editing tools you need to process the footage you recorded for your YouTube channel. Considering the number of audio and video tracks an app supports, the number of visual effects it offers or its file-sharing capabilities can make it easier for you to decide which app you are going to install on your device. However, your choice ultimately depends on how frequently and how professionally you want to edit your YouTube videos. Here are the top 5 video editing apps for iPhones and iPads.
1. Filmora
Price: Free, but offers in-app purchases
Compatibility: Requires iOS 9.0 or later. Compatible with iPhone, iPad, and iPod touch.


This is an easy and convenient video editing app that is going to allow you to turn regular videos into artistic renditions that are going to look as if they were production-valued. All you need to do is choose the video and select the overall theme for it as well as the design and music. Furthermore, the app delivers some fantastic visual effects such as overlays, filters, elements and transitions, basic function. It also allows you to trim and split video clips, rotate and crop the footage, change the video speed, play the video backwards or add your own voiceover. Another special feature is that you can automate the video by selecting the best parts and letting the application handle everything else.
Pros
- Lots of titles, overlays, filters, elements, transitions, themes for making artistic video
- Enough editing tools to trim, split, rotate, crop videos on iPhone and iPad
Cons
- NO advanced features such as Green Screen video compositing
- Not connected to Filmora desktop video editor
2. iMovie
Price: Free
Compatibility: Requires iOS 11.4 or later.
This is a very comprehensive video editing app and a benchmark release for Apple. It is very similar to the desktop iMovie version, and it should definitely be featured on your device if you’re looking for a free YouTube video editing app for iOS. You can use it to add voiceovers, music, titles as well as photos to your work. There are a lot of templates, themes as well as filters for movie trailers that you can take advantage of if you want to make the video even better. You can enhance the video with slow motion and fast forward by changing video speed and add your own narration as well.
Pros
- Totally Free for iPhone and iPad Users
- Trailer Templates, Themes, Filters Available
- Projects can edit on Mac with iMovie or Final Cut Pro X
Cons
- No elements
- Speed up limited to 2X
Learn more details about How to Edit YouTube videos with iMovie >>
3. Adobe Premiere Rush
Price: Free, but offers in-app purchases
Compatibility: Requires iOS 11.0 or later
Adobe’s software products have been at the center of the video editing world for several decades, but most of the company’s video and audio editing products are aimed athigh-end professional users .
Adobe Premiere Rush has a built-in camera feature, which allows you to capture high-resolution footage from the app and edit it as soon as you stop recording. Creating a soundtrack for a video, arranging video clips in any way you want or customizing a title template are just a few among countless video editing options Adobe Premiere Rush offers.
Its file-sharing capabilities are also impressive since you can share your videos to all major social media platforms directly from the app or edit the file on desktop with Premiere Pro CC. This makes Adobe Premiere Rush an excellent choice for YouTubers, vloggers and all other video content creators who often shoot their videos on different locations.
Pros:
- Let users change a video’s aspect ratio effortlessly
- Records high-definition footage
- Rich title template library
- Multitrack timeline
Cons:
- A limited selection of video effects
- The rendering process can be slow
- Offers only a basic set of transitions
4. LumaFusion
Price: $29,00 – offers in-app purchases
Compatibility: Requires iOS 11 or later
The LumaFusion app is equipped with a wide spectrum of professional video editing tools, that enable video content creators to edit their footage with ease. You can choose a project’s frame rate or its aspect ratio in order to meet the content specifications of the social network on which you want to share your videos.
There are six separate video tracks as well as six audio tracks on the app’s timeline, which means that you can use media files like photos, videos and motion graphics in your projects or create stunning soundtracks.
LumaFusion’s selection of visual effects includes effects like Chroma Key or LUTs and you can also utilize the app’s color correction tools to make your own effects. This iOS-based video editor supports fast and slow-motion effects so that you can create smooth slow-motion videos at 120fps or 240fps.
Pros
- Rich media library that contains free videos, sounds, and backgrounds
- Lets users animate effects with keyframes
- The app’s titler grants users full creative control over the process of creating titles for a video
- Excellent file-sharing capabilities
Cons:
- No video recording features
- Requires previous video editing experience
Check the detailed comparison between LumaFusion and Premiere Rush
5. KineMaster
Price: Free, but offers in-app purchases
Compatibility: Requires iOS 10.3 or later
This video editor for iPhones and iPads grants you access to all the tools you are going to need to create videos that attract a lot of attention on YouTube. In fact, a lot of content creators who share their videos on TikTok, Instagram and YouTube are already using KineMaster to edit their footage.
Adding text layers, stickers or overlaying several videos or photos is easy with KineMaster, while you can also choose from a variety of blending modes that let you decide how the images are going to be combined.
The app features rich filters, music, visual and audio effect libraries and it supports 4K video editing. However, each video you create with the free version of KineMaster is going to be watermarked, and you must purchase the monthly or the annual subscription in order to remove the watermark and gain access to all of the app’s features.
Pros:
- Excellent time-lapse and slow-motion video editing tools
- Offers a broad range of image and text overlays
- Allows users to animate layers with keyframes
- The app’s Asset Store contains hundreds of free stickers, transitions, and music
Cons
- You must make an in-app purchase to remove the watermark
- No video recording capability
- Limited color correction options
6. Magisto
Price: Free, but offers in-app purchases
Compatibility: Requires iOS 11.0 or later
Creating a new video with Magisto won’t take much more than a few moments of your time. You just have to select one of the available templates such as Birthday or Wedding, import the footage from your phone’s camera roll and add music to your project. Magisto’s AI-powered super-smart editor will do the rest for you.
Such a quick and simple video editing process makes this video editor for iPhones and iPads an excellent choice for digital marketers who want to create tutorials or promotional videos they can share on social media.
Purchasing the Magisto’s Business Plan will grant you access to dozens of business-based templates that can help you grow your online audience and improve your brand’s visibility. Keep in mind that purchasing one of the available subscription models is necessary if you want to use Magisto for professional purposes.
Pros:
- A simple 3-step video creation process
- Huge library of royalty-free songs
- Offers a wide range of themes and templates
- Lets users create video collages and videos from photos
Cons:
- No 4K video editing support
- The free version of the app has limited capabilities
- More expensive than the competition
7. Filmmaker Pro Video Editor
Price: Free, but offers in-app purchases
Compatibility: Requires iOS 11.0 or later
Filmmaker Pro Video Editor is equipped with a versatile set of video editing tools that allow users to create attention-grabbing video content from their iPhones and iPads. The app lets you create as many audio and video tracks as your project demands, while it also supports 4K editing, although only on iPad Pro, iPhone SE and later iPhone models.
The Filmmaker Pro Video Editor provides more than thirty filters, as well as color grading tools that enable you to adjust a video’s contrast, exposure or brightness. Moreover, the app grants you access to Green Screen and Ken Burns effects that can be used to make your videos more visually dynamic.
In case you’re editing videos with the Filmmaker Pro Video Editor from an iPad you can use Apple Pen to draw over the footage you’re editing. The only downside is that you must make an in-app purchase to remove the watermark from the videos you export from this app.
Pros
- Excellent font selection
- Built-in fade-in and fade-out audio effects
- Offers support for 4K video editing
- The app doesn’t limit the number of projects you can create
Cons
- Pricy
- Limited file-sharing capabilities
- Requires previous video editing experience
8. QUIK
This is an app which was initially designed for Instagram users, but it quickly transitioned to being one of the best apps for video editing on iPhone. You can make a variety of tweaks to your videos such as fonts, titles, filters, styles and pace of the video and trims. It is easy and convenient for usage.
9. SPLICE
This is another convenient option that you can take advantage of. You would be provided with the chance to add transitions, filters, and text. You can adjust the speed as well as trim the video as you see fit. There is a lot of flexibility delivered by the video which is quite convenient.
Part 2: How to Edit YouTube Videos on iPhone with the YouTube Studio Application
Being able to edit the videos you’ve uploaded to YouTube on your iPhone is without a doubt something very beneficial. The YouTube iOS application - YouTube Studio is a powerful mini video-editing tool. You can easily trim your video, add different effects and filters in order to prominently enhance the way that your video looks as well as to add music as a background and many more.
To edit videos with YouTube Studio, you need to upload the video footge first. To upload the video, navigate to the upper corner of your home screen, and click on the icon like a camera. Now that you can allow access to camera and go through and select your videos, you can easily take advantage of the three convenient tools.
You can trim the beginning as well as the ending of the video quickly, and you can select new start as well as end points. However, you wouldn’t be able to separate the clip in two different ones. Once you are through with that, you can easily add different filter effects through the filter option – there are six of them that you can take advantage of. Furthermore, you can easily add background music by tapping on the music icon which is located in the lower-right part of your screen.
The YouTube Studio app might be a good idea, but it doesn’t provide you with all the necessary capabilities as it is rather limited.
As you can see, there are quite a lot of different ways to edit YouTube videos on iPhone and all you need to do is download a specific application or use the one which YouTube has built-in. There is no need for any previous specific knowledge or skills in video editing as they provide quite comprehensive features.
For Win 7 or later (64-bit)
Secure Download
For macOS 10.14 or later
Secure Download
Click here to get Filmora for PC by email
or Try Filmora App for mobile >>>
download filmora app for ios ](https://app.adjust.com/b0k9hf2%5F4bsu85t ) download filmora app for android ](https://app.adjust.com/b0k9hf2%5F4bsu85t )
Check our guide for beginners about How to Edit YouTube videos with Filmora.
Richard Bennett
Richard Bennett is a writer and a lover of all things video.
Follow @Richard Bennett
Richard Bennett
Mar 27, 2024• Proven solutions
iPhones and iPads can capture footage in high resolution, however, video clips you record with an iPhone or an iPad may contain imperfections sometimes. Removing parts of a video clip you don’t want to share publicly, or stabilizing the shaky footage are just a few ways in which you can improve the quality of the videos you’re creating.
The good news is that the iPhone and iPad support a broad range of video editing apps, which enables you to edit all videos you record on these devices before you post them on YouTube or other social media platforms.
There are hundreds of video editing apps to choose from at the App Store , but such a wide range of options can make the process of choosing a video editing app you are going to use to edit your videos, more complicated.
So, in this article, we are going to take you through the some of the best video editing apps for YouTube videos on iPhones and iPads and help you determine which of these apps is the right choice for you.
- Part 1: Best Video Editing Apps for YouTube Video [Free & Paid]
- Part 2: Edit YouTube Videos on iPhone with YouTube Studio
Before we get started, I want to recommend thebest video editing software for YouTubers - Wondershare Filmora video editor , an easy to use while powerful video editor that allows you not only cut, split, crop, resize, reverse your videos, but also offers you multiple video effects specially designed for Fashion, Beauty, Gaming, Travel, Education, etc. Check the video to know more fantastic features:
For Win 7 or later (64-bit)
Secure Download
For macOS 10.14 or later
Secure Download
Click here to get Filmora for PC by email
or Try Filmora App for mobile >>>
download filmora app for ios ](https://app.adjust.com/b0k9hf2%5F4bsu85t ) download filmora app for android ](https://app.adjust.com/b0k9hf2%5F4bsu85t )
- Windows & Mac Cross-Platform compatible
- Various Templates, Effects, Elements, Transitions, Filters for making Hollywood like movie easily
- Practical Audio Editing Tools and Color Grading Feature
Part 1: Best Free Video Editing Apps for iPhone to Edit YouTube Videos You Should Know
Before you opt for one of the apps we’ve featured in our top list, you must first make sure that the app you’re interested in offers all the video editing tools you need to process the footage you recorded for your YouTube channel. Considering the number of audio and video tracks an app supports, the number of visual effects it offers or its file-sharing capabilities can make it easier for you to decide which app you are going to install on your device. However, your choice ultimately depends on how frequently and how professionally you want to edit your YouTube videos. Here are the top 5 video editing apps for iPhones and iPads.
1. Filmora
Price: Free, but offers in-app purchases
Compatibility: Requires iOS 9.0 or later. Compatible with iPhone, iPad, and iPod touch.
This is an easy and convenient video editing app that is going to allow you to turn regular videos into artistic renditions that are going to look as if they were production-valued. All you need to do is choose the video and select the overall theme for it as well as the design and music. Furthermore, the app delivers some fantastic visual effects such as overlays, filters, elements and transitions, basic function. It also allows you to trim and split video clips, rotate and crop the footage, change the video speed, play the video backwards or add your own voiceover. Another special feature is that you can automate the video by selecting the best parts and letting the application handle everything else.
Pros
- Lots of titles, overlays, filters, elements, transitions, themes for making artistic video
- Enough editing tools to trim, split, rotate, crop videos on iPhone and iPad
Cons
- NO advanced features such as Green Screen video compositing
- Not connected to Filmora desktop video editor
2. iMovie
Price: Free
Compatibility: Requires iOS 11.4 or later.
This is a very comprehensive video editing app and a benchmark release for Apple. It is very similar to the desktop iMovie version, and it should definitely be featured on your device if you’re looking for a free YouTube video editing app for iOS. You can use it to add voiceovers, music, titles as well as photos to your work. There are a lot of templates, themes as well as filters for movie trailers that you can take advantage of if you want to make the video even better. You can enhance the video with slow motion and fast forward by changing video speed and add your own narration as well.
Pros
- Totally Free for iPhone and iPad Users
- Trailer Templates, Themes, Filters Available
- Projects can edit on Mac with iMovie or Final Cut Pro X
Cons
- No elements
- Speed up limited to 2X
Learn more details about How to Edit YouTube videos with iMovie >>
3. Adobe Premiere Rush
Price: Free, but offers in-app purchases
Compatibility: Requires iOS 11.0 or later
Adobe’s software products have been at the center of the video editing world for several decades, but most of the company’s video and audio editing products are aimed athigh-end professional users .
Adobe Premiere Rush has a built-in camera feature, which allows you to capture high-resolution footage from the app and edit it as soon as you stop recording. Creating a soundtrack for a video, arranging video clips in any way you want or customizing a title template are just a few among countless video editing options Adobe Premiere Rush offers.
Its file-sharing capabilities are also impressive since you can share your videos to all major social media platforms directly from the app or edit the file on desktop with Premiere Pro CC. This makes Adobe Premiere Rush an excellent choice for YouTubers, vloggers and all other video content creators who often shoot their videos on different locations.
Pros:
- Let users change a video’s aspect ratio effortlessly
- Records high-definition footage
- Rich title template library
- Multitrack timeline
Cons:
- A limited selection of video effects
- The rendering process can be slow
- Offers only a basic set of transitions
4. LumaFusion
Price: $29,00 – offers in-app purchases
Compatibility: Requires iOS 11 or later
The LumaFusion app is equipped with a wide spectrum of professional video editing tools, that enable video content creators to edit their footage with ease. You can choose a project’s frame rate or its aspect ratio in order to meet the content specifications of the social network on which you want to share your videos.
There are six separate video tracks as well as six audio tracks on the app’s timeline, which means that you can use media files like photos, videos and motion graphics in your projects or create stunning soundtracks.
LumaFusion’s selection of visual effects includes effects like Chroma Key or LUTs and you can also utilize the app’s color correction tools to make your own effects. This iOS-based video editor supports fast and slow-motion effects so that you can create smooth slow-motion videos at 120fps or 240fps.
Pros
- Rich media library that contains free videos, sounds, and backgrounds
- Lets users animate effects with keyframes
- The app’s titler grants users full creative control over the process of creating titles for a video
- Excellent file-sharing capabilities
Cons:
- No video recording features
- Requires previous video editing experience
Check the detailed comparison between LumaFusion and Premiere Rush
5. KineMaster
Price: Free, but offers in-app purchases
Compatibility: Requires iOS 10.3 or later
This video editor for iPhones and iPads grants you access to all the tools you are going to need to create videos that attract a lot of attention on YouTube. In fact, a lot of content creators who share their videos on TikTok, Instagram and YouTube are already using KineMaster to edit their footage.
Adding text layers, stickers or overlaying several videos or photos is easy with KineMaster, while you can also choose from a variety of blending modes that let you decide how the images are going to be combined.
The app features rich filters, music, visual and audio effect libraries and it supports 4K video editing. However, each video you create with the free version of KineMaster is going to be watermarked, and you must purchase the monthly or the annual subscription in order to remove the watermark and gain access to all of the app’s features.
Pros:
- Excellent time-lapse and slow-motion video editing tools
- Offers a broad range of image and text overlays
- Allows users to animate layers with keyframes
- The app’s Asset Store contains hundreds of free stickers, transitions, and music
Cons
- You must make an in-app purchase to remove the watermark
- No video recording capability
- Limited color correction options
6. Magisto
Price: Free, but offers in-app purchases
Compatibility: Requires iOS 11.0 or later
Creating a new video with Magisto won’t take much more than a few moments of your time. You just have to select one of the available templates such as Birthday or Wedding, import the footage from your phone’s camera roll and add music to your project. Magisto’s AI-powered super-smart editor will do the rest for you.
Such a quick and simple video editing process makes this video editor for iPhones and iPads an excellent choice for digital marketers who want to create tutorials or promotional videos they can share on social media.
Purchasing the Magisto’s Business Plan will grant you access to dozens of business-based templates that can help you grow your online audience and improve your brand’s visibility. Keep in mind that purchasing one of the available subscription models is necessary if you want to use Magisto for professional purposes.
Pros:
- A simple 3-step video creation process
- Huge library of royalty-free songs
- Offers a wide range of themes and templates
- Lets users create video collages and videos from photos
Cons:
- No 4K video editing support
- The free version of the app has limited capabilities
- More expensive than the competition
7. Filmmaker Pro Video Editor
Price: Free, but offers in-app purchases
Compatibility: Requires iOS 11.0 or later
Filmmaker Pro Video Editor is equipped with a versatile set of video editing tools that allow users to create attention-grabbing video content from their iPhones and iPads. The app lets you create as many audio and video tracks as your project demands, while it also supports 4K editing, although only on iPad Pro, iPhone SE and later iPhone models.
The Filmmaker Pro Video Editor provides more than thirty filters, as well as color grading tools that enable you to adjust a video’s contrast, exposure or brightness. Moreover, the app grants you access to Green Screen and Ken Burns effects that can be used to make your videos more visually dynamic.
In case you’re editing videos with the Filmmaker Pro Video Editor from an iPad you can use Apple Pen to draw over the footage you’re editing. The only downside is that you must make an in-app purchase to remove the watermark from the videos you export from this app.
Pros
- Excellent font selection
- Built-in fade-in and fade-out audio effects
- Offers support for 4K video editing
- The app doesn’t limit the number of projects you can create
Cons
- Pricy
- Limited file-sharing capabilities
- Requires previous video editing experience
8. QUIK
This is an app which was initially designed for Instagram users, but it quickly transitioned to being one of the best apps for video editing on iPhone. You can make a variety of tweaks to your videos such as fonts, titles, filters, styles and pace of the video and trims. It is easy and convenient for usage.
9. SPLICE
This is another convenient option that you can take advantage of. You would be provided with the chance to add transitions, filters, and text. You can adjust the speed as well as trim the video as you see fit. There is a lot of flexibility delivered by the video which is quite convenient.
Part 2: How to Edit YouTube Videos on iPhone with the YouTube Studio Application
Being able to edit the videos you’ve uploaded to YouTube on your iPhone is without a doubt something very beneficial. The YouTube iOS application - YouTube Studio is a powerful mini video-editing tool. You can easily trim your video, add different effects and filters in order to prominently enhance the way that your video looks as well as to add music as a background and many more.
To edit videos with YouTube Studio, you need to upload the video footge first. To upload the video, navigate to the upper corner of your home screen, and click on the icon like a camera. Now that you can allow access to camera and go through and select your videos, you can easily take advantage of the three convenient tools.
You can trim the beginning as well as the ending of the video quickly, and you can select new start as well as end points. However, you wouldn’t be able to separate the clip in two different ones. Once you are through with that, you can easily add different filter effects through the filter option – there are six of them that you can take advantage of. Furthermore, you can easily add background music by tapping on the music icon which is located in the lower-right part of your screen.
The YouTube Studio app might be a good idea, but it doesn’t provide you with all the necessary capabilities as it is rather limited.
As you can see, there are quite a lot of different ways to edit YouTube videos on iPhone and all you need to do is download a specific application or use the one which YouTube has built-in. There is no need for any previous specific knowledge or skills in video editing as they provide quite comprehensive features.
For Win 7 or later (64-bit)
Secure Download
For macOS 10.14 or later
Secure Download
Click here to get Filmora for PC by email
or Try Filmora App for mobile >>>
download filmora app for ios ](https://app.adjust.com/b0k9hf2%5F4bsu85t ) download filmora app for android ](https://app.adjust.com/b0k9hf2%5F4bsu85t )
Check our guide for beginners about How to Edit YouTube videos with Filmora.
Richard Bennett
Richard Bennett is a writer and a lover of all things video.
Follow @Richard Bennett
Also read:
- 2024 Approved Boost Your Blogging Bravery Following YouTuber Leaders
- Embellish Your YT Previews with Sparkly Borders
- In 2024, Beyond Indexation Understanding YouTube's Unlisted Mechanism
- Launching Successful Online Gaming Shows on YouTube
- Skyrocketing Subscribers Free Techniques for YouTube Success
- [New] Cutting-Edge Visual Techniques Selecting Premium Camera Lenses
- In 2024, DJ Beats Unleashed High-Fidelity Templates Downloaded Easily
- [Updated] Calculating Monetary Gain for a Milion of YouTube Watchers
- In 2024, Cutting Edge Youtube End Card Tactics & Layouts
- [New] Earning Mastery Executing a 3-Step Procedure to Evaluate Your YouTube Income
- The Ultimate Conclusion to Your YouTube Journey
- Do Paid Subscribers Truly Influence Content Reach for 2024
- Navigating File Extraction From Youtube Browser, OS and Terminal Methods
- [New] Crafting Your Custom YouTube Subscriber URL
- [Updated] Buzzing Tracks Ultimate Backdrops for YouTube Shorts
- Find Rich Ambiance for Video Content!
- [New] Crafting Compelling YouTube Content Through Split-Screens
- [New] Elevating Your Content Powerful Tags to Watch Out For
- 2024 Approved Essential Science YouTube Networks Expand Your Mind
- Breakthrough Techniques in YouTube Content Creation for 2024
- Backward Glance Decoding YouTube Video Reversals for 2024
- [New] DIY Guide to Turning YouTube Screen Time Into a FREE Screencast
- [Updated] DIY Tips for Affordable YouTube Intro/End Videos
- 2024 Approved Crafting the Perfect Strategy Exclusive YouTube to Gmail Connection
- Unveiling the Secrets to Youtube Success Titles & Tags
- Command the YouTube Stage Mastering Visibility Through Tactics for 2024
- 2024 Approved Dynamic Decibels The Best Background Sounds for YT Shorts
- 10 Best Non-YouTube Video Platforms IPhone/Android Edition
- [Updated] Champion's Tech The Ultimate Gaming Toolkit
- [New] Engineering Captivating Video Teasers for Online Presence
- In 2024, The Impact and Value of Instagram's Self-Verifying Feature
- Digging Deeper Into Uncomplicated HDR Methods
- [Updated] Dashboard Directions Entering Google Meet (PC/Mobile) for 2024
- From Separation to Synergy Unite OBS with Zoom for 2024
- In 2024, Cost-Effective Action Cameras Secure Your Selection Below $100
- In 2024, Mastering Lock Screen Settings How to Enable and Disable on Nubia Red Magic 9 Pro+
- [New] Top 6 TikTok Money Calculators for 2024
- In 2024, How to use iSpoofer on Google Pixel 8 Pro? | Dr.fone
- 8 Prime Vocal Tracking & Editing Apps Suitable for Mac and Windows Devices
- 2024 Approved When Struggling to Find a Suitable Game Recorder for Your PC, You Might Come Across Many Options. Explore the Best Game Recorders for Sharing Game Highlights
- Restore Missing App Icon on Xiaomi Redmi Note 12 Pro 5G Step-by-Step Solutions | Dr.fone
- In 2024, Enigmatic Engagements in Top Escape Venues
- Unleash Potential Blend the Best of TikTok and Instagram Reel Artistry
- 2024 Approved Sony Vegas Audio Editor A Step-by-Step Tutorial for Professionals
- In 2024, How to Bypass iPhone 15 Pro Max Passcode Easily Video Inside
- New Download and Play The Best Websites for PC Games for 2024
- All About Factory Reset, What Is It and What It Does to Your Honor 90 GT? | Dr.fone
- [Updated] Streamlining Presentations Webcam Recording Tips
- How to Fix ZTE Nubia Flip 5G Find My Friends No Location Found? | Dr.fone
- Discovering the Secret to Instagram Voice Change for 2024
- Sim Unlock Oppo K11 5G Phones without Code 2 Ways to Remove Android Sim Lock
- Updated How to Add Audio to MKV for 2024
- [New] Capturing Life in New Ways Hero 4 & Hero 5
- In 2024, Top 10 Password Cracking Tools For Xiaomi Redmi Note 12 5G
- [Updated] Crafting Your Online Identity A Facebook Tutorial
- Title: Laying The Groundwork For Successful Channels
- Author: Kevin
- Created at : 2024-05-25 15:42:49
- Updated at : 2024-05-26 15:42:49
- Link: https://youtube-videos.techidaily.com/laying-the-groundwork-for-successful-channels/
- License: This work is licensed under CC BY-NC-SA 4.0.
