
:max_bytes(150000):strip_icc()/is-uber-cheaper-or-a-taxi-5a68b71ffa6bcc003664df84.jpg)
Joint Filmmaking & Gaining Followers Quickly
Joint Filmmaking & Gaining Followers Quickly
How to Make Collab Videos and Grow Your Channel?

Richard Bennett
Oct 26, 2023• Proven solutions
The following post will teach you how to find and contact partners for YouTube collaborations, as well as provide advice for actually making the collab. We also did a post earlier this week about how to get other creators to collab with you,which includes videos from 4 different YouTubers on that subject.
- Choosing A Potential Partner
- How to Contact A Partner
- Types of collab videos
- Getting the Most Out of Your Collaborations


1. Choosing A Potential Partner
Before you think about how you’re going to approach someone you need to decide who you want to approach.
A lot of people automatically want to approach their YouTube hero, and that can be a mistake. Liking your partner’s videos is a must – why would you want to refer your subscribers to someone whose channel you wouldn’t watch yourself? – but it can be really hard to get someone with a significantly bigger channel than yours to work with you.

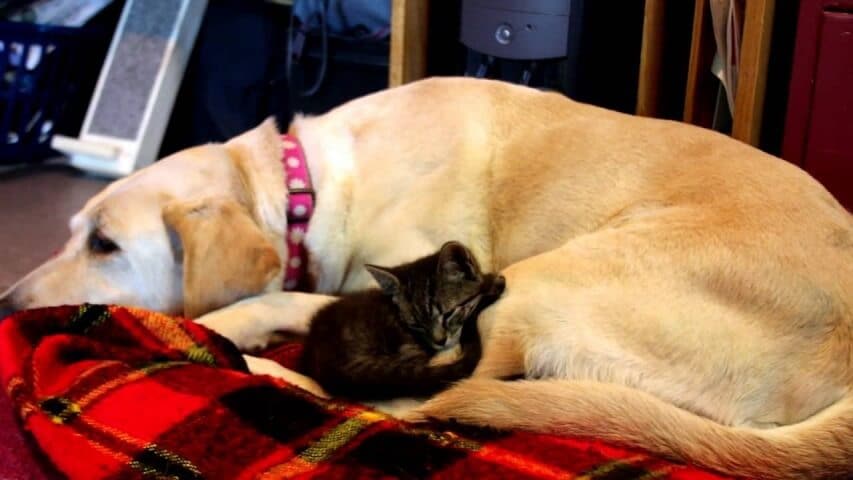
Will Kitty get to collab with the big dog?
Larger YouTubers get a lot of collab requests, and they are really busy with their own channels. Even if they love your content, it can be hard to justify taking time away from working on their own channel to do videos that won’t help them grow too.
Collaborating with someone your own size means you both stand to gain equally in channel growth. Instead of approaching someone you love that’s huge, try finding someone you like just as much whose sub count is similar to yours.
There are exceptions to this, of course. The team at Mr.Kate managed to work with YouTubers who had millions of subs while they were still under 1 million. They got these high profile collabs because they had something additional to offer that made up for the subscriber gap – they were redesigning the apartments, offices, or studios of the YouTubers they did the collabs with. If you want to work with someone bigger than you, think about what you might be able to offer them in place of new subscribers.
Mr.Kate makes over **MyLifeAsEva **’s bedroom.
Also, try to find someone whose channel has something in common with yours thematically so you know your subscribers will be interested in them. They don’t have to do exactly what you do, but your topics should be related. For example: if you do quirky video game reviews and they do quirky movie reviews, you could team up to review a movie based on a game. That would make sense. But if you quirky video game reviews and they review do very serious ice cream reviews, that’ll make a lot less sense.
A good way to find potentially collab partners is to look at your list of subscribers. You already know everyone there likes your channel!
2. How to contact a partner
Sometimes people leave contact info in their video descriptions, but it might be easier to go to the About tab on their channel page and check for an email address. Look for a field that says for business inquiries, click on view email address, and use the CAPTCHA that appears to prove you aren’t a robot.
Reaching out more casually through Twitter DMs, YouTube comments, or Facebook is good too, but you should use those platforms more to build a relationship that could lead to a collab. If someone had never commented on a video of yours before and then commented once just to ask you to collab it’d be hard to believe they were really interested in your channel.
3. Popular Types of Collab Videos
Gabrielletalks about different types of collabs and how well they work.
In most cases when you do a collab, you’ll each want to have content to post to your own channels (unless you’re doing some type of interview). You don’t want to put a lot of effort into a video that won’t end up being ‘yours’. Here are a few different ways to collaborate:
#1. Shout outs
In this type of collab all you do is mention each other and, usually, use YouTube cards to link to each other’s channels. You make a video that is completely yours, and at some point in it you talk about your partner’s channel and why you like it. To make things fair, you should discuss how long the mentions will be and where in the videos they will happen. It wouldn’t feel good to gush about how great someone is for a full minute near the beginning of your video and have them spend two seconds mentioning you near the end of theirs.
I personally don’t check people out just because someone I like mentions them, so this might not be the best way to go if you’re hoping to bring in new subscribers. It is the easiest kind of collab to do, though.
2. Guest spots
This is my favorite kind of collab to watch, because each YouTuber has sole creative control over the video that goes on their channel. Instead of trying to blend your styles together, you each make videos that reflect your own personal styles.
For your video, you have the other vlogger on as a guest. In the video you do the same kinds of things your fans like watching you do, and you include the other person. If they’re alright with it, it can be fun to draw them a bit outside their comfort zone. If you like to dance on your channel, and they never dance on theirs, ask them to dance with you!
Matthias gets NateWantsToBattle – who does song parodies on his channel – to make balloon animals.
Turnabout is fair play, of course, so be prepared to step a bit outside of your own comfort zone when you appear as a guest in one of their videos.
Alternatively, you could just introduce your guest and then let them take over and then do the same thing in reverse on their channel.
3. Long distance collabs
Lauren is in Toronto and Aja is in LA, but that doesn’t mean they can’t cook together! Also: Lauren’s channel is about food and Aja’s is about healthy living – they aren’t exactly the same, but they’re related enough that the collab makes sense.
Sometimes you really want to work together, but geography just won’t bend to your wills. That doesn’t mean you can’t collab. You can always send each other some footage to cut to and make videos together that way. Or, you can do a Google Hangout or Skype chat and record it.
4. Getting the Most Out of Your Collaborations
Usually, you have two reasons for wanting to do a collab; having fun with another YouTuber, and growing your channel. The collab exposes you to their subscribers, who will hopefully decide they like you and subscribe to you too. There are ways of increasing the odds of this happening.
Commenting on each other’s videos, and responding to viewer comments, is one of the best. It will help you seem more like a person who is being introduced than a guest star in a video.
Kitty got the collab! They’re friends now – doesn’t that make you want to sub?
What have your experiences with YouTube collaborations been like?
Use Split-Screen Presets to Create Collab Videos in Filmora
Wondershare Filmora features lots of split-screen presets which allows you to put several videos together at the same time.
Richard Bennett
Richard Bennett is a writer and a lover of all things video.
Follow @Richard Bennett
Richard Bennett
Oct 26, 2023• Proven solutions
The following post will teach you how to find and contact partners for YouTube collaborations, as well as provide advice for actually making the collab. We also did a post earlier this week about how to get other creators to collab with you,which includes videos from 4 different YouTubers on that subject.
- Choosing A Potential Partner
- How to Contact A Partner
- Types of collab videos
- Getting the Most Out of Your Collaborations
1. Choosing A Potential Partner
Before you think about how you’re going to approach someone you need to decide who you want to approach.
A lot of people automatically want to approach their YouTube hero, and that can be a mistake. Liking your partner’s videos is a must – why would you want to refer your subscribers to someone whose channel you wouldn’t watch yourself? – but it can be really hard to get someone with a significantly bigger channel than yours to work with you.
Will Kitty get to collab with the big dog?
Larger YouTubers get a lot of collab requests, and they are really busy with their own channels. Even if they love your content, it can be hard to justify taking time away from working on their own channel to do videos that won’t help them grow too.
Collaborating with someone your own size means you both stand to gain equally in channel growth. Instead of approaching someone you love that’s huge, try finding someone you like just as much whose sub count is similar to yours.
There are exceptions to this, of course. The team at Mr.Kate managed to work with YouTubers who had millions of subs while they were still under 1 million. They got these high profile collabs because they had something additional to offer that made up for the subscriber gap – they were redesigning the apartments, offices, or studios of the YouTubers they did the collabs with. If you want to work with someone bigger than you, think about what you might be able to offer them in place of new subscribers.
Mr.Kate makes over **MyLifeAsEva **’s bedroom.
Also, try to find someone whose channel has something in common with yours thematically so you know your subscribers will be interested in them. They don’t have to do exactly what you do, but your topics should be related. For example: if you do quirky video game reviews and they do quirky movie reviews, you could team up to review a movie based on a game. That would make sense. But if you quirky video game reviews and they review do very serious ice cream reviews, that’ll make a lot less sense.
A good way to find potentially collab partners is to look at your list of subscribers. You already know everyone there likes your channel!
2. How to contact a partner
Sometimes people leave contact info in their video descriptions, but it might be easier to go to the About tab on their channel page and check for an email address. Look for a field that says for business inquiries, click on view email address, and use the CAPTCHA that appears to prove you aren’t a robot.
Reaching out more casually through Twitter DMs, YouTube comments, or Facebook is good too, but you should use those platforms more to build a relationship that could lead to a collab. If someone had never commented on a video of yours before and then commented once just to ask you to collab it’d be hard to believe they were really interested in your channel.
3. Popular Types of Collab Videos
Gabrielletalks about different types of collabs and how well they work.
In most cases when you do a collab, you’ll each want to have content to post to your own channels (unless you’re doing some type of interview). You don’t want to put a lot of effort into a video that won’t end up being ‘yours’. Here are a few different ways to collaborate:
#1. Shout outs
In this type of collab all you do is mention each other and, usually, use YouTube cards to link to each other’s channels. You make a video that is completely yours, and at some point in it you talk about your partner’s channel and why you like it. To make things fair, you should discuss how long the mentions will be and where in the videos they will happen. It wouldn’t feel good to gush about how great someone is for a full minute near the beginning of your video and have them spend two seconds mentioning you near the end of theirs.
I personally don’t check people out just because someone I like mentions them, so this might not be the best way to go if you’re hoping to bring in new subscribers. It is the easiest kind of collab to do, though.
2. Guest spots
This is my favorite kind of collab to watch, because each YouTuber has sole creative control over the video that goes on their channel. Instead of trying to blend your styles together, you each make videos that reflect your own personal styles.
For your video, you have the other vlogger on as a guest. In the video you do the same kinds of things your fans like watching you do, and you include the other person. If they’re alright with it, it can be fun to draw them a bit outside their comfort zone. If you like to dance on your channel, and they never dance on theirs, ask them to dance with you!
Matthias gets NateWantsToBattle – who does song parodies on his channel – to make balloon animals.
Turnabout is fair play, of course, so be prepared to step a bit outside of your own comfort zone when you appear as a guest in one of their videos.
Alternatively, you could just introduce your guest and then let them take over and then do the same thing in reverse on their channel.
3. Long distance collabs
Lauren is in Toronto and Aja is in LA, but that doesn’t mean they can’t cook together! Also: Lauren’s channel is about food and Aja’s is about healthy living – they aren’t exactly the same, but they’re related enough that the collab makes sense.
Sometimes you really want to work together, but geography just won’t bend to your wills. That doesn’t mean you can’t collab. You can always send each other some footage to cut to and make videos together that way. Or, you can do a Google Hangout or Skype chat and record it.
4. Getting the Most Out of Your Collaborations
Usually, you have two reasons for wanting to do a collab; having fun with another YouTuber, and growing your channel. The collab exposes you to their subscribers, who will hopefully decide they like you and subscribe to you too. There are ways of increasing the odds of this happening.
Commenting on each other’s videos, and responding to viewer comments, is one of the best. It will help you seem more like a person who is being introduced than a guest star in a video.
Kitty got the collab! They’re friends now – doesn’t that make you want to sub?
What have your experiences with YouTube collaborations been like?
Use Split-Screen Presets to Create Collab Videos in Filmora
Wondershare Filmora features lots of split-screen presets which allows you to put several videos together at the same time.
Richard Bennett
Richard Bennett is a writer and a lover of all things video.
Follow @Richard Bennett
Acoustic Mastery: Secrets for Exceptional Audio Capture
10 Recording Tips for Recording Audio with High Quality
Richard Bennett
Oct 26, 2023• Proven solutions
Getting the best sound for your recording is not as simplistic as buying an expensive microphone. There are many different things you can do to record your audio more clearly. Here are 10 recording tips to record high-quality audio.
1. Silence everything you don’t want your microphone to record
2. Put your mobile phone in airplane mode
3. Minimize echo
4. Block wind from reaching your microphone
5. Upgrade your microphone
6. Adjust your levels
7. Start with a sound cue if you’re planning to do some syncing in post
8. Get close to the sound
9. ADR
10. Record Ambient Sound
Bonus Tip-Record Your Audio with Wondershare Filmora
Wondershare Filmora has great recording features that enable you to record screen , voiceover, and webcam. Just connect the recording device to your computer, and start the recording in Wondershare Filmora and you will get high-quality audio. And you can also easily pick a song from the royalty-free music library on Wondershare Filmora. These audio features on Filmora are rare and very simple to use, you only need to click a few times and your video will have a new sound and background song.
1. Silence everything you don’t want your microphone to record
When you’re recording audio, you have to be more aware of the subtle sounds that drone on in your background. These sounds may include humming from machines with fans, buzzing from lights, and jingling from your pet’s collar. Observe your recording space and find ways to silence everything that you don’t want in your audio recording.
2. Put your mobile phone in airplane mode
Although it may be quite obvious to turn your phone’s ring tone off when you’re recording, it may not be as obvious to put your phone in airplane mode. When phones receive calls or perform searches as part of their background processes, they emit signals that can get picked up by your recording system. Avoid ruining good takes with unwanted sounds of phone signals by putting your phones in airplane mode.
3. Minimize echo
If you are recording yourself talk or sing, make sure to set up your recording space in a way where the sound projected from your voice bounces minimally off the walls and back to your microphone. Bare walls and hardwood floors will cause a lot of bouncing. Make use of materials that will absorb your sound rather than bounce it, like a thick rug or a comforter. If you want your voice to echo, that’s something you should do in post-production.
4. Block wind from reaching your microphone
Although it might not sound so loud and distracting to the naked ear, wind sounds terribly loud through a microphone recording and can cause your audio to clip (distortion of waveform due to output of sound exceeding maximum capacity or 0 dB point). This includes the “wind” that comes out of your mouth when you pronounce words starting with the letter “p.” Use pop filters, windscreens, and deadcats to block wind from reaching your microphone.
5. Upgrade your microphone
As much as you try to control all the noise in your surroundings, your greatest recording limitation will come from the hardware that you use. Improve your recordings by plugging in an external microphone into your camera’s microphone jack or record audio completely separately with a professional microphone.
Need help with deciding on a microphone to buy? Check out our recommended list of microphones.
6. Adjust your levels
Before pressing the record button, see how loudly your microphone picks up the sound you wish to record. Adjust your levels (sensitivity of your microphone) until the sound sits in between -6 dBs and -12dBs. This range gives the source of your sound some room to get louder without the recorded audio getting clipped. When you first listen to audio recorded within this range, it may sound very quiet. No need to worry though because you can increase the volume later in editing.
7. Start with a sound cue if you’re planning to do some syncing in post
If you’re recording separate audio that you plan to sync to your video later in editing, start your recording with a short and loud sound cue like a clap or a high pitched “beep” tone. Later, when you’re editing, it’ll be much easier for you to find the section where your video and additional audio match.
8. Get close to the sound
Unless you’re aiming to record ambient sound, bring your microphone close to the source of sound you are wanting to record. The closer your microphone is to the source of sound, the lower your sensitivity setting can be on your microphone. As a result of lowering your levels, sounds you are not meaning to record will also sound fainter.
9. ADR
When you need to record a scene in a loud setting where you have very little control over the noise, record additional vocals later and replace the original vocals through a process called automated dialogue replacement.
10. Record Ambient Sound
Remember to record ambient sound or “room tone.” You can use these recordings to fill in the blanks if you run out of audio and also smooth out parts of your audio where you hear pops, clicks, and other unwanted noise.
Richard Bennett
Richard Bennett is a writer and a lover of all things video.
Follow @Richard Bennett
Richard Bennett
Oct 26, 2023• Proven solutions
Getting the best sound for your recording is not as simplistic as buying an expensive microphone. There are many different things you can do to record your audio more clearly. Here are 10 recording tips to record high-quality audio.
1. Silence everything you don’t want your microphone to record
2. Put your mobile phone in airplane mode
3. Minimize echo
4. Block wind from reaching your microphone
5. Upgrade your microphone
6. Adjust your levels
7. Start with a sound cue if you’re planning to do some syncing in post
8. Get close to the sound
9. ADR
10. Record Ambient Sound
Bonus Tip-Record Your Audio with Wondershare Filmora
Wondershare Filmora has great recording features that enable you to record screen , voiceover, and webcam. Just connect the recording device to your computer, and start the recording in Wondershare Filmora and you will get high-quality audio. And you can also easily pick a song from the royalty-free music library on Wondershare Filmora. These audio features on Filmora are rare and very simple to use, you only need to click a few times and your video will have a new sound and background song.
1. Silence everything you don’t want your microphone to record
When you’re recording audio, you have to be more aware of the subtle sounds that drone on in your background. These sounds may include humming from machines with fans, buzzing from lights, and jingling from your pet’s collar. Observe your recording space and find ways to silence everything that you don’t want in your audio recording.
2. Put your mobile phone in airplane mode
Although it may be quite obvious to turn your phone’s ring tone off when you’re recording, it may not be as obvious to put your phone in airplane mode. When phones receive calls or perform searches as part of their background processes, they emit signals that can get picked up by your recording system. Avoid ruining good takes with unwanted sounds of phone signals by putting your phones in airplane mode.
3. Minimize echo
If you are recording yourself talk or sing, make sure to set up your recording space in a way where the sound projected from your voice bounces minimally off the walls and back to your microphone. Bare walls and hardwood floors will cause a lot of bouncing. Make use of materials that will absorb your sound rather than bounce it, like a thick rug or a comforter. If you want your voice to echo, that’s something you should do in post-production.
4. Block wind from reaching your microphone
Although it might not sound so loud and distracting to the naked ear, wind sounds terribly loud through a microphone recording and can cause your audio to clip (distortion of waveform due to output of sound exceeding maximum capacity or 0 dB point). This includes the “wind” that comes out of your mouth when you pronounce words starting with the letter “p.” Use pop filters, windscreens, and deadcats to block wind from reaching your microphone.
5. Upgrade your microphone
As much as you try to control all the noise in your surroundings, your greatest recording limitation will come from the hardware that you use. Improve your recordings by plugging in an external microphone into your camera’s microphone jack or record audio completely separately with a professional microphone.
Need help with deciding on a microphone to buy? Check out our recommended list of microphones.
6. Adjust your levels
Before pressing the record button, see how loudly your microphone picks up the sound you wish to record. Adjust your levels (sensitivity of your microphone) until the sound sits in between -6 dBs and -12dBs. This range gives the source of your sound some room to get louder without the recorded audio getting clipped. When you first listen to audio recorded within this range, it may sound very quiet. No need to worry though because you can increase the volume later in editing.
7. Start with a sound cue if you’re planning to do some syncing in post
If you’re recording separate audio that you plan to sync to your video later in editing, start your recording with a short and loud sound cue like a clap or a high pitched “beep” tone. Later, when you’re editing, it’ll be much easier for you to find the section where your video and additional audio match.
8. Get close to the sound
Unless you’re aiming to record ambient sound, bring your microphone close to the source of sound you are wanting to record. The closer your microphone is to the source of sound, the lower your sensitivity setting can be on your microphone. As a result of lowering your levels, sounds you are not meaning to record will also sound fainter.
9. ADR
When you need to record a scene in a loud setting where you have very little control over the noise, record additional vocals later and replace the original vocals through a process called automated dialogue replacement.
10. Record Ambient Sound
Remember to record ambient sound or “room tone.” You can use these recordings to fill in the blanks if you run out of audio and also smooth out parts of your audio where you hear pops, clicks, and other unwanted noise.
Richard Bennett
Richard Bennett is a writer and a lover of all things video.
Follow @Richard Bennett
Also read:
- Essential Insights Into YouTube's Content Policy Framework for 2024
- [New] Escalate Your Channel's Popularity to 1K+
- Addressed Discrepancy in Shorts Showcase for 2024
- [Updated] Beyond Blockbuster Horizons Favorite Films
- Hasty Instruction Saving Your Photos as YouTube Channel Thumbnails
- Smooth Sound Transformation Essential iOS Apps to Convert YouTube MP3-Wise
- Crafting Captivating Cinematic Experiences in YouTube Videos for 2024
- In 2024, Channel Branding Hacks 10 Must-Use Online Tools
- Effortlessly Embedding Visual Media in Free Content Creation for 2024
- In 2024, Best Mac Slicer Software Enhance Video Production Prowess
- Filmmaker's Choice Selecting Perfect Lenses for YouTube Creation
- In 2024, Channel Creation Chronicles The Ultimate Beauty Blogging Start-Up
- Shield Yourself Online A Step-by-Step Guide for Smoothing Images
- Channel Design Mastery Selecting the Right YT Banner & Art Sizes
- [New] Clearing Up Confusion Addressing YouTube Short Concerns
- Unlocking Income Insights Google's Simplified Three-Step Strategy for Monetizing YouTube
- The Significance of Analytics in YouTube Rank Enhancement
- In 2024, Elevate Engagement on YouTube Fending Off Automated Audiences
- In 2024, Essential Game Streamers for Your Watchlist
- In 2024, Essential Software to Rip YouTube Trailers
- In 2024, Elevate Your Content's Appeal Professional BG Techniques for YouTube Thumbnails
- 2024 Approved Becoming a Skin-Deep Sage Setting Up Your Beauty Channel
- A Comprehensive Review Camera Lenses for YouTube
- In 2024, Constructing Captivating Valorant YouTube Thumbnails
- In 2024, Boosting Viewer Interest with Optimal Video Thumbnail Sizes
- [New] Cut the Cost on Downloads Exclusive Access to This List of 23 Affordable Extractors
- Unveiling the Top 20 YouTube Music Spaces for Your Favorite Tunes
- In 2024, How to Transfer Music from Itel S23 to iPod | Dr.fone
- Updated 8 Best Cartoon Sound Effects You Can Download
- In 2024, Twitter's Top Jokesters
- 10 Easy-to-Use FRP Bypass Tools for Unlocking Google Accounts On Infinix Hot 40 Pro
- Quickly Remove Google FRP Lock on Red Magic 9 Pro
- Ultimate Guide to Free PPTP VPN For Beginners On Xiaomi 13T | Dr.fone
- In 2024, How to Remove and Reset Face ID on iPhone 15 Plus
- 2024 Approved Revolutionize Your Online Presence with Live Screenshares
- New Guide How To Check iCloud Activation Lock Status From Your iPhone 15 Pro
- [New] Counterclockwise Playback in Instagram Videos for 2024
- New FCP Color Tutorial Seamlessly Blend Clips in Minutes for 2024
- New How to Get Zoom on TV Easy Solutions
- Title: Joint Filmmaking & Gaining Followers Quickly
- Author: Kevin
- Created at : 2024-05-25 15:42:13
- Updated at : 2024-05-26 15:42:13
- Link: https://youtube-videos.techidaily.com/joint-filmmaking-and-gaining-followers-quickly/
- License: This work is licensed under CC BY-NC-SA 4.0.
