
"In 2024, Erasing the Spotlight Hide Visuals in Shared Media"
Erasing the Spotlight: Hide Visuals in Shared Media
How to Blur Faces or Objects in YouTube Videos

Richard Bennett
Mar 27, 2024• Proven solutions
Suppose you are interested in preserving the identity of people in your YouTube videos, or you are simply interested in luring out some of the faces of the objects in your YouTube videos to retain filming rights. In that case, you can do it quite easily. With the help of a proper editing application and some online tools, you can very quickly blur out faces or objects from your YouTube videos.
Blur Faces With the Best YouTube Video Editing Software
Wondershare Filmora is one of the best video editing tools for YouTube videos. Through the Filmora editing suite, you can quickly import the video and then go to the power town to blur out faces, distort objects, and more.
 Download Mac Version ](https://tools.techidaily.com/wondershare/filmora/download/ )
- You first need to download and install Wondershare Filmora
- Then it is time to load the video you wish to edit
- You can either browse the tape from your computer or drag and drop it
- Once loading is finished, you can drag and drop the video to the Video Timeline
- Afterward, you must target the exact video on the timeline
- Right-click and choose the Power Tool available
- A pop-up window will appear, where you must choose Face-Off and then Apply Face Off to the Clip
- The effect you want is the first option you get, or else the mosaic
- By clicking on the mosaic, it will be applied to your video
- Click OK
- Now you must choose Export to save the video
- Please choose the right format and the save option of your choosing (instant post on YouTube, burn the video on CD/DVD or save it on your PC)
If you are recording your tutorial for YouTube or your demonstration videos, you may need to blur or hide the private and sensitive information. Click to check how did I hide the personal info in the video .
How to Blur Faces or Objects in Videos With YouTube Video Editor
YouTube has offered the chance to blur out images, faces, and more since 2012. The face blur tool available on YouTube works quite well.
Here is what you need to do:
- First of all, open YouTube Video Manager
- Click on the Edit button
- Choose the Enhancements
- Click on the Blurring option (it is on the right of your screen)
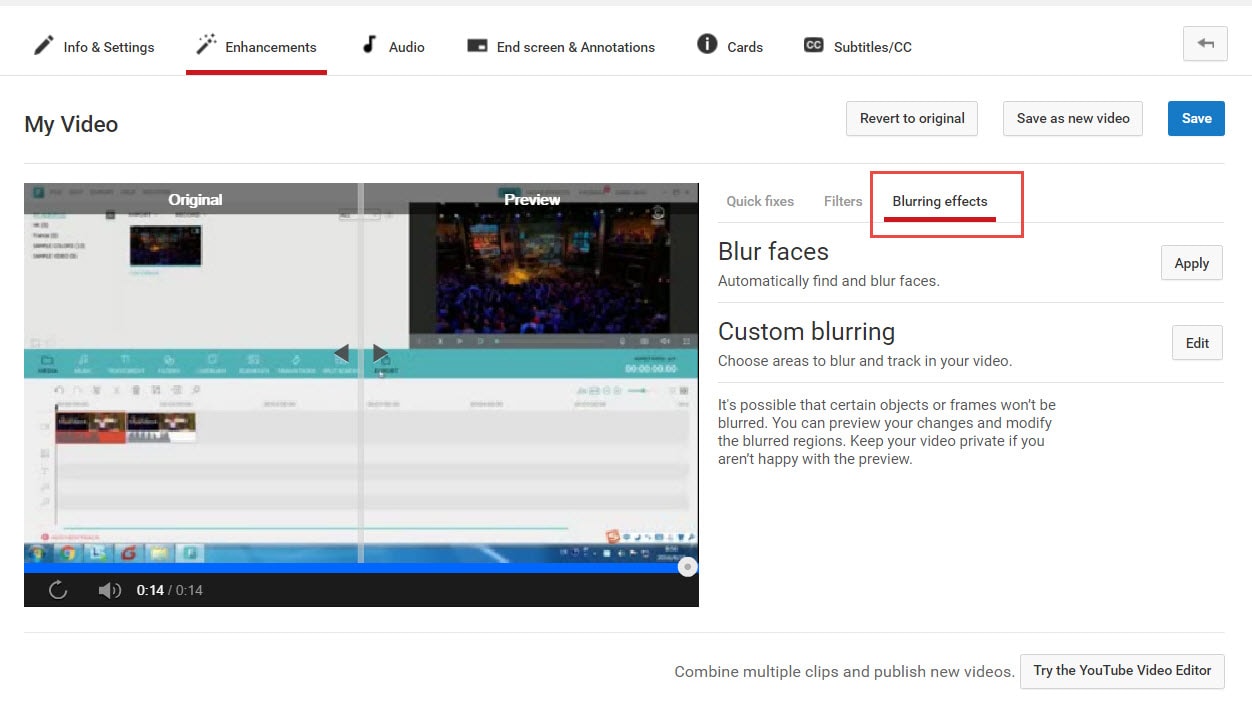
- Click on the Edit button of the Custom blurring option
- This time, a pop-up window will appear
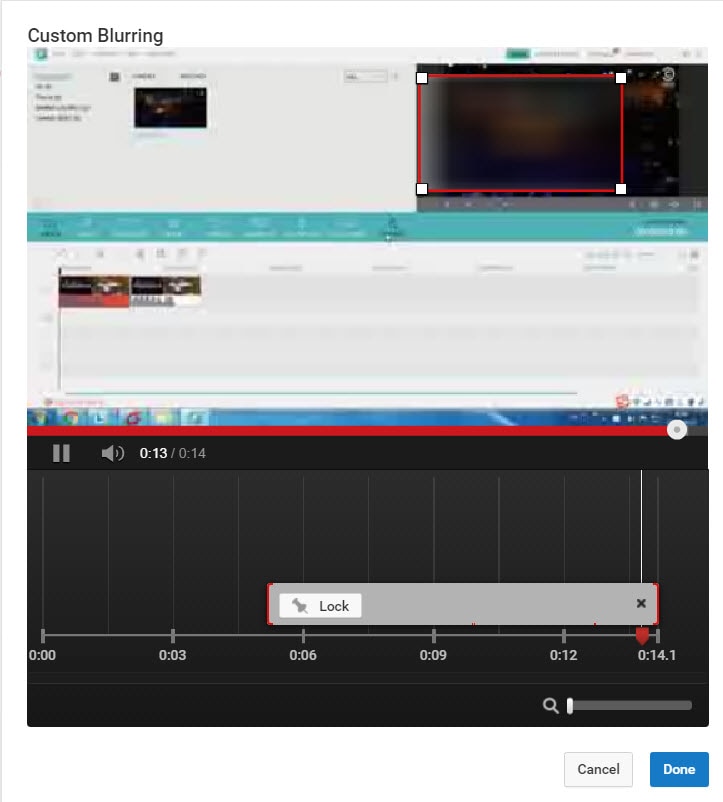
- With the use of click and drag properties, you can create the blurred content
- Click on Done
- Save the video, as per your preferences (Save as new video, revert to the original or overwrite)
Here is a tutorial video for how to blur faces or objects on YouTube:
Richard Bennett
Richard Bennett is a writer and a lover of all things video.
Follow @Richard Bennett
Richard Bennett
Mar 27, 2024• Proven solutions
Suppose you are interested in preserving the identity of people in your YouTube videos, or you are simply interested in luring out some of the faces of the objects in your YouTube videos to retain filming rights. In that case, you can do it quite easily. With the help of a proper editing application and some online tools, you can very quickly blur out faces or objects from your YouTube videos.
Blur Faces With the Best YouTube Video Editing Software
Wondershare Filmora is one of the best video editing tools for YouTube videos. Through the Filmora editing suite, you can quickly import the video and then go to the power town to blur out faces, distort objects, and more.
Download Mac Version ](https://tools.techidaily.com/wondershare/filmora/download/ )
- You first need to download and install Wondershare Filmora
- Then it is time to load the video you wish to edit
- You can either browse the tape from your computer or drag and drop it
- Once loading is finished, you can drag and drop the video to the Video Timeline
- Afterward, you must target the exact video on the timeline
- Right-click and choose the Power Tool available
- A pop-up window will appear, where you must choose Face-Off and then Apply Face Off to the Clip
- The effect you want is the first option you get, or else the mosaic
- By clicking on the mosaic, it will be applied to your video
- Click OK
- Now you must choose Export to save the video
- Please choose the right format and the save option of your choosing (instant post on YouTube, burn the video on CD/DVD or save it on your PC)
If you are recording your tutorial for YouTube or your demonstration videos, you may need to blur or hide the private and sensitive information. Click to check how did I hide the personal info in the video .
How to Blur Faces or Objects in Videos With YouTube Video Editor
YouTube has offered the chance to blur out images, faces, and more since 2012. The face blur tool available on YouTube works quite well.
Here is what you need to do:
- First of all, open YouTube Video Manager
- Click on the Edit button
- Choose the Enhancements
- Click on the Blurring option (it is on the right of your screen)
- Click on the Edit button of the Custom blurring option
- This time, a pop-up window will appear
- With the use of click and drag properties, you can create the blurred content
- Click on Done
- Save the video, as per your preferences (Save as new video, revert to the original or overwrite)
Here is a tutorial video for how to blur faces or objects on YouTube:
Richard Bennett
Richard Bennett is a writer and a lover of all things video.
Follow @Richard Bennett
Harmonizing YouTube Content: A Guide to Blending Files
How to Merge/Combine/Join YouTube (FLV) Videos
Richard Bennett
Mar 27, 2024• Proven solutions
YouTube is the most popular video sites in the world. You may have downloaded loads of videos from this website. But how to merge them together so that you can play all YouTube videos as one either on a PC, device, or TV? Here a professional YouTube merger is introduced in part 1 for you to easily complete the job. If you just want to merge the videos that have been already uploaded to YouTube, the YouTube Video Editor can help you with that.
Part 1: How to Merge Downloaded YouTube Videos
Part 2: How to Merge YouTube Videos Online
Part 1: How to Merge Downloaded YouTube Videos

Tool you need: Wondershare Filmora video editor
Wondershare Filmora is an easy-to-use video editing tool. With it, YouTube videos will be automatically merged orderly without interrupts. On top of that, you can add transitions between two YouTube videos to make your videos more harmonious. It also enables you to easily make a picture-in-picture (PIP) video , which is definitely another creative way to merge YouTube videos.
Sounds good? Download it now and use this YouTube merger to merge all your YouTube videos.

Below is the details about how to merge YouTube video in Filmora
Step 1.Import YouTube files to the program
Download and install Wondershare Filmora. It gives good support to the downloaded YouTube videos (usually in FLV or MP4 format). You can either click “Import” on the primary windows and select YouTube video files from your computer, or simply drag and drop YouTube video files from File Explorer to the User’s Album.

Step 2. Drag and drop YouTube videos to merge
To merge YouTube videos, select multiple YouTube videos in the User’s Album by holding down Ctrl or Shift key, and then drag and drop them to the video track on the Timeline. All YouTube files will join one after another without interrupts and there is none transition by default, but you can add transitions between video clips as you want. This will be introduced in Step 3.

Step 3. Merge YouTube videos with transition
By adding transitions, YouTube videos will flow nicely from one to the next. To do so, switch to Transition tab, and drag the desired transition to the Timeline. Alternatively, right click any transition and choose “Apply to All” and “Random to All” from the popup menu to add transitions between YouTube videos in seconds.

Step 4. Merge multiple YouTube files into one
Make sure you are satisfied with everything. You can click Play button to preview how YouTube videos will be merged. If the result is good, click “Export” button to save the YouTube video as one.

Therefore, go to the “Format” tab and select one desired format and click Create to start merging YouTube videos. By the way, if you want to play the merged YouTube files on iPod, iPhone, iPad, choose “Device” and select your device from the list. You can also directly upload back to YouTube for sharing or burn to DVD for playing on TV.
Part 2: How to Merge YouTube Videos Online

Tool you need: YouTube Video Editor
YouTube Video Editor is a browser-based video editor released by YouTube itself. It enables users to make minor edits to videos they’ve uploaded onto YouTube, as well as merge several clips together into one. It requires no additional software, or browser plug-ins (besides Adobe’s Flash), which makes it convenient to use. However, it lacks many basic features of modern day consumer video editing software and often crashes while dealing with large video files.

Get access to the editor
Sign in to your YouTube (or Google) account. Click “Upload”>> “Edit” to the Video Editor tab.

Place videos on the timeline
Simply drag the videos that need merge onto the timeline or hit the plus icon in the top right hand corner of each clip.

Save the settings
Review the result. If satisfied, hit the “Publish” button to save the settings.
Richard Bennett
Richard Bennett is a writer and a lover of all things video.
Follow @Richard Bennett
Richard Bennett
Mar 27, 2024• Proven solutions
YouTube is the most popular video sites in the world. You may have downloaded loads of videos from this website. But how to merge them together so that you can play all YouTube videos as one either on a PC, device, or TV? Here a professional YouTube merger is introduced in part 1 for you to easily complete the job. If you just want to merge the videos that have been already uploaded to YouTube, the YouTube Video Editor can help you with that.
Part 1: How to Merge Downloaded YouTube Videos
Part 2: How to Merge YouTube Videos Online
Part 1: How to Merge Downloaded YouTube Videos
Tool you need: Wondershare Filmora video editor
Wondershare Filmora is an easy-to-use video editing tool. With it, YouTube videos will be automatically merged orderly without interrupts. On top of that, you can add transitions between two YouTube videos to make your videos more harmonious. It also enables you to easily make a picture-in-picture (PIP) video , which is definitely another creative way to merge YouTube videos.
Sounds good? Download it now and use this YouTube merger to merge all your YouTube videos.
Below is the details about how to merge YouTube video in Filmora
Step 1.Import YouTube files to the program
Download and install Wondershare Filmora. It gives good support to the downloaded YouTube videos (usually in FLV or MP4 format). You can either click “Import” on the primary windows and select YouTube video files from your computer, or simply drag and drop YouTube video files from File Explorer to the User’s Album.
Step 2. Drag and drop YouTube videos to merge
To merge YouTube videos, select multiple YouTube videos in the User’s Album by holding down Ctrl or Shift key, and then drag and drop them to the video track on the Timeline. All YouTube files will join one after another without interrupts and there is none transition by default, but you can add transitions between video clips as you want. This will be introduced in Step 3.
Step 3. Merge YouTube videos with transition
By adding transitions, YouTube videos will flow nicely from one to the next. To do so, switch to Transition tab, and drag the desired transition to the Timeline. Alternatively, right click any transition and choose “Apply to All” and “Random to All” from the popup menu to add transitions between YouTube videos in seconds.
Step 4. Merge multiple YouTube files into one
Make sure you are satisfied with everything. You can click Play button to preview how YouTube videos will be merged. If the result is good, click “Export” button to save the YouTube video as one.
Therefore, go to the “Format” tab and select one desired format and click Create to start merging YouTube videos. By the way, if you want to play the merged YouTube files on iPod, iPhone, iPad, choose “Device” and select your device from the list. You can also directly upload back to YouTube for sharing or burn to DVD for playing on TV.
Part 2: How to Merge YouTube Videos Online
Tool you need: YouTube Video Editor
YouTube Video Editor is a browser-based video editor released by YouTube itself. It enables users to make minor edits to videos they’ve uploaded onto YouTube, as well as merge several clips together into one. It requires no additional software, or browser plug-ins (besides Adobe’s Flash), which makes it convenient to use. However, it lacks many basic features of modern day consumer video editing software and often crashes while dealing with large video files.
Get access to the editor
Sign in to your YouTube (or Google) account. Click “Upload”>> “Edit” to the Video Editor tab.
Place videos on the timeline
Simply drag the videos that need merge onto the timeline or hit the plus icon in the top right hand corner of each clip.
Save the settings
Review the result. If satisfied, hit the “Publish” button to save the settings.
Richard Bennett
Richard Bennett is a writer and a lover of all things video.
Follow @Richard Bennett
Also read:
- [New] Behind the Scenes YouTube's View Count Algorithm
- [New] Elevate Your YouTube Presentations with iMovie Editing Skills
- [Updated] A Practical Guide To Applying Creative Commons Rights
- 2024 Approved Advanced Techniques Using Jump Cuts Effectively
- 2024 Approved Racing to the Top Olympic Highlights in Short Track Speed
- Comprehensive Analysis of Tech Products by Tom's Hardware Experts
- Detecting Disconnection: Methods to Find Out If Your Contact Has Blocked You on iMessage
- Easy steps to recover deleted data from F5 5G
- In 2024, Unlock Viewers' Interest with These 10 YT Reaction Strategies
- Mastering Creative Splitscreens in YouTube Filmmaking
- Protecting Your Work YouTube Copyright Essentials Explained
- Snicker Surgeons Top 7 Sketches for YouTube Laughter Aficionados
- Starting Out on YouTube - Top Gear Essentials
- The Pros' Picks Top 10 Mic Technology for Podcasters
- Top YouTube Titles Crafted by AI
- Ultimate guide to get the meltan box pokemon go For Xiaomi Redmi K70 Pro | Dr.fone
- Understanding the Fundamental Contrasts in Video Streaming
- Title: In 2024, Erasing the Spotlight Hide Visuals in Shared Media
- Author: Kevin
- Created at : 2025-01-01 23:01:26
- Updated at : 2025-01-03 21:02:12
- Link: https://youtube-videos.techidaily.com/in-2024-erasing-the-spotlight-hide-visuals-in-shared-media/
- License: This work is licensed under CC BY-NC-SA 4.0.