
:max_bytes(150000):strip_icc()/snappy-driver-1-9-0-4ff8d72b8707420bb1eaf43ae8ad2a66.png)
"In 2024, Enhance Videos at No Extra Cost Best Editors Ranked (Top 9)"
Enhance Videos at No Extra Cost: Best Editors Ranked (Top 9)
9 Best Free and Easy Editing Apps You Should Know

Richard Bennett
Dec 14, 2023• Proven solutions
Have you ever made a video 100% on your phone using a mobile video editing app?
If you’ve just started off on YouTube, there’s a good chance your main camera is the one in your phone. Actually, there’s a good chance of that even if you’ve been making YouTube videos for a while now.
Since you’re shooting videos on your phone, why shouldn’t you edit them there too? Here are 9 free video editing apps you can use for YouTube.
Note: This is not a ranked list. The apps will appear in alphabetical order.
- Adobe Premiere Clip (Android or iOS)
- Cameo (iOS)
- Clips (iOS)
- Filmora (Android or iOS)
- Funimate (Android or iOS)
- iMovie (iOS)
- Movie Maker Filmmaker by Alive (Android or iOS)
- PowerDirector (Android)
- Vlogit (Android or iOS)
Adobe Premiere Clip (Android or iOS )

Key Points:
- Automatic using clips. Times them to music
- Guides you with pop-up tips
- No text/title overlays
- Exports directly to YouTube
Adobe Premiere Pro is a professional-grade desktop editor, and Adobe Premiere Clip lives up to the quality standards set by its big-brother software. It is missing some features you might want for YouTube videos, like title effects, but it does have some bells and whistles. There’s a good selection of filters.

Making changes to your picture, like adjusting the exposure or the prevalence of highlights or shadows, is just a matter of sliding bars. The tools for splitting and duplicating clips are easy to find too. You just toggle between the two icons right above your video – the one that looks like a shutter and the one that looks like adjustment bars – to switch between the picture tools and the other tools.

You cannot add what you might normally think of as a title effect in Adobe Premiere Clip, so it’ll be hard to fully complete your video. You can add text cards to put in-between your video clips, but you can’t overlay the title on top of a clip.
You can share your video directly to YouTube when you export.
Cameo (iOS)

Key Points:
- Easy-to-apply themes
- Customizable titles
- Limited features
- Exports to 4K (if your clips are 4K)
Vimeo is a video sharing site with more of a ‘filmmaker’ focus than YouTube, so it isn’t a surprise that their mobile editing app Cameo can export high-quality 4K videos.
Like some of the other apps on this list, Cameo does not have a huge variety of functions. You can reorder your clips, trim them, add titles, and apply themes (essentially filter and title combos).
There are three icons on the main interface: Scissors, a Music Note, and Filters.
The Scissors will take you to the trimming screen, where you can make your clip shorter or longer.

You can also add a title in the trimming screen, but you will not be able to change the font style or color until you are in the Filter screen.
In the Filter screen (tap the overlapping filters icon on the main interface) you will be able to adjust the color of your text by tapping on the circle with the A in it. Tapping where it says ‘Font’ will change your font style.

You can also tap on Themes and choose a premade style.

Here’s what ‘Crush’ looks like applied:

My font was changed, and there’s also a filter now. In order to apply a filter, you must start with a theme.
Clips (iOS)

Key Points:
- Great selection of stickers
- Lacks some basic tools
- Simple interface
Clips is an intuitive app with a lot of options for decorating your videos. It is lacking in some of the more basic editings features you might expect (i.e. you cannot split clips or do any color correction), but it has a lot of fun features like stickers and emojis that could make up for that depending on your needs.

There are also more traditional effects, like filters and titles. There are a wide range of title options in styles that are popular on YouTube, and a fairly standard filter selection.

While you cannot split clips in this app, but trimming and reordering them is easy. For trimming, you just select the clip and then Trim to open a screen where you can drag the start and end points of the clip.
To rearrange your clips, just tap the clip you want to move and hold down. You’ll be able to drag it to a new location.
It’d be hard to rely on Clips exclusively as your YouTube video editor, but it’s well suited for Instagram or for making quick ‘on-the-go’ videos.
Filmora (Android or iOS)

Key Points:
- Export directly to YouTube
- 16:9 or 1:1 for Instagram
- Includes effects like transitions, filters, and overlays
- End-roll logo
You can make a complete video easily just by tapping and dragging in Filmora, and there are even effects like filters, transitions, and overlays you can add to make your video more polished.
After importing your media into Filmora (you can import videos and photos saved on your phone, or media which has been uploaded to a social media account like Facebook or Instagram) you can change the order of your clips by tapping one, pressing down for a moment, and then dragging your clips where you want them.
Trimming a clip is as simple as tapping on it and then Duration. You’ll get this screen where you can adjust the length easily by dragging the markers to beginning or endpoints.

Cropping and zooming are simple too.

Filmora comes with pre-made themes you can apply which include titles, filters, and other effects. These might not be ideal if you already have branding you like to use for YouTube, but in some situations, they can make video creation a lot faster.

Filmora comes loaded with music, or you can even import your own music from your phone.
Once you’re done, tap ‘save’ in the top right corner of your screen to export your video. From the save screen, you’ll be able to export your video directly to YouTube.

One potential drawback is that Filmora will add its own logo to the end of your exported video. This logo will not distract from your video content since it is added at the end and never overlaps any of your clips, but it still might not be ideal for all creators.
Funimate (Android or iOS )

Key Points:
- Easily add text and shapes
- Rainbow doodling
- Shake effects
- Small ‘Funimate’ watermark in videos from the free version
Funimate is lives up to the ‘fun’ promise in its name. It’s designed mostly for music videos/Musical.ly and while it is missing a lot of more typical editing options, there are a few free tools in Funimate that other apps just don’t have.
For example, there are shake and distortion effects available through Funimate that you usually only find in desktop software.
You can also draw rainbow designs on your video with your finger – no other app on this list can do that.
The text tool in Funimate is easy to use, and there are cool looking glow effects you can apply in the color selection screen. Those options are also available when you’re adding shapes, likes stars and sparkles.
Funimate is not built for typical editing, which is both its strength and its weakness. Trimming your clips is its own stage which you must complete before you start adding effects, and you cannot split clips or add multiple clips.
The free version of Funimate does add a small watermark to your videos in the bottom-right corner, but it is subtle enough that I almost missed it completely while reviewing the app.
iMovie (iOS)

Key Points:
- Trailer templates
- Themes
- Limited tools and resources
iMovie’s mobile app is designed for ease and includes things like ‘trailer templates’ and themes that allow you to make a video quickly and with minimal effort.
This streamlined app is limited in its features. Other apps on this list have left out color correction tools or clip splitting tools and instead loaded up on decorative features like stickers, emojis, and overlays. iMovie has left out these tools and does not have an abundance of decorative features either.
There are filters, themes, and titles, however.
The titles are simple but polished, and you’ll find all the standard types of filters.
The themes include a variety of graphics and are applied to your entire video, not individual clips. You can also apply one filter to your entire video.
iMovie also includes a decent selection of transitions, which you can apply easily by tapping the area between two clips.
Movie Maker Filmmaker by Alive (Android or iOS )

Key Points:
- Good title tool
- Stickers
- Change clip duration
- 16:9 or 1:1
Movie Maker Filmmaker (the app will be labeled ‘Alive’ in on your phone) has a lot of features that will help you put together a fun YouTube video. There’s a great selection of stickers, filters, and overlays and they’re all easy to apply. You just click on what you want and resize/reposition it in the player.

This app is missing a lot of basic editing features, however. You cannot adjust things like brightness or saturation. This won’t be a problem if you’re happy with your clips as-is, but it’s a bit odd to not have those options.
There is a text tool and while it is fairly basic, it is also flexible. There is a good selection of fonts to choose from, and you can also choose whether or not you want a colored background, and if your text should have a shadow.
Once you’ve decided on the look of your text you can drag it, resize it, and tilt it however you want in the preview screen.
A slightly odd feature of this app is that it doesn’t save your video to your phone or export it directly to YouTube. Instead, it saves it – and shares it – within the app and gives you the option of sharing it with YouTube after.
Power Director (Android)

Key Points:
- A timeline like desktop software
- All the basic editing features
- Lots of transitions
- Videos from the free version will be watermarked
The first thing you’ll notice when you open up Power Director is that the interface looks a lot like the interface of a lot of desktop editors with a very classic timeline. This familiarity could make it easy to jump into if you’re used to editing on your laptop.
However, Power Director is a bit less intuitive than most of the other apps on this list. I wouldn’t go so far as to say it’s difficult to use – it isn’t, it’s much easier than a lot of desktop software – but among mobile apps designed for streamlined efficiency it does stand out as being a bit harder to dive into.
That is partly because there’s a lot you can do with it. It has the tools you would expect in an editor. You can split and trim clips, and you have all the standard color tools including some that most mobile apps leave out.
A lot of apps have Brightness, Contrast, and Saturation, but PowerDirector also has Color Temperature and Tint.
In addition to editing tools, PowerDirector has bells and whistles like filters –
- and a ton of great transitions.
One drawback of PowerDirector is that the free version will watermark your videos. This watermark is not intrusive, but it isn’t as subtle as the Funimate one either.
You can export videos from PowerDirector directly to YouTube.
Vlogit (Android or iOS )

Key Points:
- Easy thumbnail maker
- Export directly to YouTube
- Animated stickers
Vlogit is also an app from the creators of the Filmora Video Editor. It isn’t quite as intuitive as Filmora, but the major benefit of Vlogit for YouTube creators is that it was designed with you in mind. It has features like animated stickers, emojis, and a thumbnail maker which were included specifically because YouTubers and vloggers need them.
All the usual adjustments you might want to make, like saturation or sharpness, are easy in Vlogit. So are adjustments to the length or crop of clips.
After you save your video you’ll have the option of creating a thumbnail using a screenshot from your video. You can add a colored border, text, emojis, and more!
Once you’re done, you can export directly to YouTube. Like Filmora, Vlogit does have a post-video logo roll.
Have you ever used a free mobile app to edit one of your YouTube videos? What did you use, and were you happy with the results?
Richard Bennett
Richard Bennett is a writer and a lover of all things video.
Follow @Richard Bennett
Richard Bennett
Dec 14, 2023• Proven solutions
Have you ever made a video 100% on your phone using a mobile video editing app?
If you’ve just started off on YouTube, there’s a good chance your main camera is the one in your phone. Actually, there’s a good chance of that even if you’ve been making YouTube videos for a while now.
Since you’re shooting videos on your phone, why shouldn’t you edit them there too? Here are 9 free video editing apps you can use for YouTube.
Note: This is not a ranked list. The apps will appear in alphabetical order.
- Adobe Premiere Clip (Android or iOS)
- Cameo (iOS)
- Clips (iOS)
- Filmora (Android or iOS)
- Funimate (Android or iOS)
- iMovie (iOS)
- Movie Maker Filmmaker by Alive (Android or iOS)
- PowerDirector (Android)
- Vlogit (Android or iOS)
Adobe Premiere Clip (Android or iOS )
Key Points:
- Automatic using clips. Times them to music
- Guides you with pop-up tips
- No text/title overlays
- Exports directly to YouTube
Adobe Premiere Pro is a professional-grade desktop editor, and Adobe Premiere Clip lives up to the quality standards set by its big-brother software. It is missing some features you might want for YouTube videos, like title effects, but it does have some bells and whistles. There’s a good selection of filters.
Making changes to your picture, like adjusting the exposure or the prevalence of highlights or shadows, is just a matter of sliding bars. The tools for splitting and duplicating clips are easy to find too. You just toggle between the two icons right above your video – the one that looks like a shutter and the one that looks like adjustment bars – to switch between the picture tools and the other tools.
You cannot add what you might normally think of as a title effect in Adobe Premiere Clip, so it’ll be hard to fully complete your video. You can add text cards to put in-between your video clips, but you can’t overlay the title on top of a clip.
You can share your video directly to YouTube when you export.
Cameo (iOS)
Key Points:
- Easy-to-apply themes
- Customizable titles
- Limited features
- Exports to 4K (if your clips are 4K)
Vimeo is a video sharing site with more of a ‘filmmaker’ focus than YouTube, so it isn’t a surprise that their mobile editing app Cameo can export high-quality 4K videos.
Like some of the other apps on this list, Cameo does not have a huge variety of functions. You can reorder your clips, trim them, add titles, and apply themes (essentially filter and title combos).
There are three icons on the main interface: Scissors, a Music Note, and Filters.
The Scissors will take you to the trimming screen, where you can make your clip shorter or longer.
You can also add a title in the trimming screen, but you will not be able to change the font style or color until you are in the Filter screen.
In the Filter screen (tap the overlapping filters icon on the main interface) you will be able to adjust the color of your text by tapping on the circle with the A in it. Tapping where it says ‘Font’ will change your font style.
You can also tap on Themes and choose a premade style.
Here’s what ‘Crush’ looks like applied:
My font was changed, and there’s also a filter now. In order to apply a filter, you must start with a theme.
Clips (iOS)
Key Points:
- Great selection of stickers
- Lacks some basic tools
- Simple interface
Clips is an intuitive app with a lot of options for decorating your videos. It is lacking in some of the more basic editings features you might expect (i.e. you cannot split clips or do any color correction), but it has a lot of fun features like stickers and emojis that could make up for that depending on your needs.
There are also more traditional effects, like filters and titles. There are a wide range of title options in styles that are popular on YouTube, and a fairly standard filter selection.
While you cannot split clips in this app, but trimming and reordering them is easy. For trimming, you just select the clip and then Trim to open a screen where you can drag the start and end points of the clip.
To rearrange your clips, just tap the clip you want to move and hold down. You’ll be able to drag it to a new location.
It’d be hard to rely on Clips exclusively as your YouTube video editor, but it’s well suited for Instagram or for making quick ‘on-the-go’ videos.
Filmora (Android or iOS)
Key Points:
- Export directly to YouTube
- 16:9 or 1:1 for Instagram
- Includes effects like transitions, filters, and overlays
- End-roll logo
You can make a complete video easily just by tapping and dragging in Filmora, and there are even effects like filters, transitions, and overlays you can add to make your video more polished.
After importing your media into Filmora (you can import videos and photos saved on your phone, or media which has been uploaded to a social media account like Facebook or Instagram) you can change the order of your clips by tapping one, pressing down for a moment, and then dragging your clips where you want them.
Trimming a clip is as simple as tapping on it and then Duration. You’ll get this screen where you can adjust the length easily by dragging the markers to beginning or endpoints.
Cropping and zooming are simple too.
Filmora comes with pre-made themes you can apply which include titles, filters, and other effects. These might not be ideal if you already have branding you like to use for YouTube, but in some situations, they can make video creation a lot faster.
Filmora comes loaded with music, or you can even import your own music from your phone.
Once you’re done, tap ‘save’ in the top right corner of your screen to export your video. From the save screen, you’ll be able to export your video directly to YouTube.
One potential drawback is that Filmora will add its own logo to the end of your exported video. This logo will not distract from your video content since it is added at the end and never overlaps any of your clips, but it still might not be ideal for all creators.
Funimate (Android or iOS )
Key Points:
- Easily add text and shapes
- Rainbow doodling
- Shake effects
- Small ‘Funimate’ watermark in videos from the free version
Funimate is lives up to the ‘fun’ promise in its name. It’s designed mostly for music videos/Musical.ly and while it is missing a lot of more typical editing options, there are a few free tools in Funimate that other apps just don’t have.
For example, there are shake and distortion effects available through Funimate that you usually only find in desktop software.
You can also draw rainbow designs on your video with your finger – no other app on this list can do that.
The text tool in Funimate is easy to use, and there are cool looking glow effects you can apply in the color selection screen. Those options are also available when you’re adding shapes, likes stars and sparkles.
Funimate is not built for typical editing, which is both its strength and its weakness. Trimming your clips is its own stage which you must complete before you start adding effects, and you cannot split clips or add multiple clips.
The free version of Funimate does add a small watermark to your videos in the bottom-right corner, but it is subtle enough that I almost missed it completely while reviewing the app.
iMovie (iOS)
Key Points:
- Trailer templates
- Themes
- Limited tools and resources
iMovie’s mobile app is designed for ease and includes things like ‘trailer templates’ and themes that allow you to make a video quickly and with minimal effort.
This streamlined app is limited in its features. Other apps on this list have left out color correction tools or clip splitting tools and instead loaded up on decorative features like stickers, emojis, and overlays. iMovie has left out these tools and does not have an abundance of decorative features either.
There are filters, themes, and titles, however.
The titles are simple but polished, and you’ll find all the standard types of filters.
The themes include a variety of graphics and are applied to your entire video, not individual clips. You can also apply one filter to your entire video.
iMovie also includes a decent selection of transitions, which you can apply easily by tapping the area between two clips.
Movie Maker Filmmaker by Alive (Android or iOS )
Key Points:
- Good title tool
- Stickers
- Change clip duration
- 16:9 or 1:1
Movie Maker Filmmaker (the app will be labeled ‘Alive’ in on your phone) has a lot of features that will help you put together a fun YouTube video. There’s a great selection of stickers, filters, and overlays and they’re all easy to apply. You just click on what you want and resize/reposition it in the player.
This app is missing a lot of basic editing features, however. You cannot adjust things like brightness or saturation. This won’t be a problem if you’re happy with your clips as-is, but it’s a bit odd to not have those options.
There is a text tool and while it is fairly basic, it is also flexible. There is a good selection of fonts to choose from, and you can also choose whether or not you want a colored background, and if your text should have a shadow.
Once you’ve decided on the look of your text you can drag it, resize it, and tilt it however you want in the preview screen.
A slightly odd feature of this app is that it doesn’t save your video to your phone or export it directly to YouTube. Instead, it saves it – and shares it – within the app and gives you the option of sharing it with YouTube after.
Power Director (Android)
Key Points:
- A timeline like desktop software
- All the basic editing features
- Lots of transitions
- Videos from the free version will be watermarked
The first thing you’ll notice when you open up Power Director is that the interface looks a lot like the interface of a lot of desktop editors with a very classic timeline. This familiarity could make it easy to jump into if you’re used to editing on your laptop.
However, Power Director is a bit less intuitive than most of the other apps on this list. I wouldn’t go so far as to say it’s difficult to use – it isn’t, it’s much easier than a lot of desktop software – but among mobile apps designed for streamlined efficiency it does stand out as being a bit harder to dive into.
That is partly because there’s a lot you can do with it. It has the tools you would expect in an editor. You can split and trim clips, and you have all the standard color tools including some that most mobile apps leave out.
A lot of apps have Brightness, Contrast, and Saturation, but PowerDirector also has Color Temperature and Tint.
In addition to editing tools, PowerDirector has bells and whistles like filters –
- and a ton of great transitions.
One drawback of PowerDirector is that the free version will watermark your videos. This watermark is not intrusive, but it isn’t as subtle as the Funimate one either.
You can export videos from PowerDirector directly to YouTube.
Vlogit (Android or iOS )
Key Points:
- Easy thumbnail maker
- Export directly to YouTube
- Animated stickers
Vlogit is also an app from the creators of the Filmora Video Editor. It isn’t quite as intuitive as Filmora, but the major benefit of Vlogit for YouTube creators is that it was designed with you in mind. It has features like animated stickers, emojis, and a thumbnail maker which were included specifically because YouTubers and vloggers need them.
All the usual adjustments you might want to make, like saturation or sharpness, are easy in Vlogit. So are adjustments to the length or crop of clips.
After you save your video you’ll have the option of creating a thumbnail using a screenshot from your video. You can add a colored border, text, emojis, and more!
Once you’re done, you can export directly to YouTube. Like Filmora, Vlogit does have a post-video logo roll.
Have you ever used a free mobile app to edit one of your YouTube videos? What did you use, and were you happy with the results?
Richard Bennett
Richard Bennett is a writer and a lover of all things video.
Follow @Richard Bennett
Content Creation Evolution: Studio Vs. Innovative Beta
YouTube Creator Studio vs. YouTube Studio (Beta): Which One is Better?
Richard Bennett
Oct 26, 2023• Proven solutions
In 2017, YouTube revealed YouTube Studio Beta , a video management and analytics dashboard that will replace the classic Creator Studio that most YouTubers are familiar with by 2021.
In this article, we will look at the new features YouTube Studio Beta has, what we can expect from it in the future, and why YouTube will eventually phase out the older YouTube Creator Studio… and whether that change will be an improvement.
Edit YouTube Videos with Filmora
As one of the most widely used video editing software in YouTube video editing, Filmora provides lots of templates and effects with an intuitive interface, which saves much time. Download the free trial version and get started now.


Why YouTube Is Getting Rid of Classic Creator Studio?
Data-driven YouTubers have long loved the YouTube Creator Studio. It has supplied so much information that it took this comprehensive post about Analytics to highlight all the insights. So why would YouTube change it?
Change to a popular social media platform is always worrisome to content creators because it means there will be a new learning phase forced upon them. While the Classic YouTube Creator Studio has a lot of features and functionality, the data was often hard to interpret and inconvenient to find. Many creators weren’t sure where their data was located or how to use the information presented to them.
YouTube Studio was designed to be a friendly management and analysis tool. YouTube also offers more guidance, showcasing the key metrics the algorithm uses to evaluate the success of a video more prominently. Additionally, the graphs presented offer more clarity, shortening the time a creator spends finding the information they need.
Undoubtedly, YouTube updated its Creator Studio to offer a tool that enables its users to better understand their video performance and make better content that serves YouTube’s requirements.
Intro to YouTube Studio (Beta)
YouTube Studio (Beta), for many YouTubers, is now the default. However, for the time being, creators can still switch back to the Classic view (as some of the features are still being built). YouTube’s objective is to receive data of their own by understanding how creators are using the new Studio and gaining feedback to improve upon it.
If you have any feedback, simply click on this button on the bottom left menu of the YouTube Studio (Beta) and send YouTube your thoughts.
In addition to the new layout of the tools and dashboards, YouTube Studio (Beta) will also debut 3 metrics for creators:
1. Impressions: See the total reach of all your videos or each individual video. Each time your video thumbnail and title are visible to the user counts as an impression.
2. Click-through rate: Determine how click-worthy your thumbnails and titles are, by seeing the percentage of people who click into your video.
3. Unique viewers: Know how many different people have watched your videos. This data can be used to compare the size of your subscriber base to the actual number of your audience.
Tips for Using YouTube Studio Beta Features
Now that you are more familiar with the new YouTube Studio (Beta), let us dive into what you can accomplish with all the new features.
1. Optimization Tips
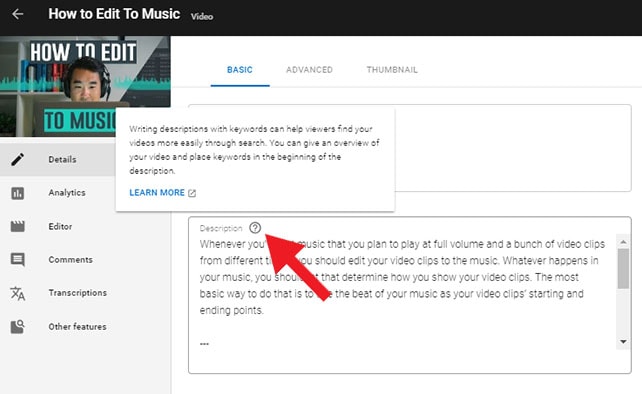
In the past, there has been a lot of speculations about how creators should treat their video titles and descriptions. Well, now YouTube is letting you know exactly which area to focus on. Simply hover over any “?” icon to see the advice and click “Learn More” to go to YouTube Creator Academy to get more details.
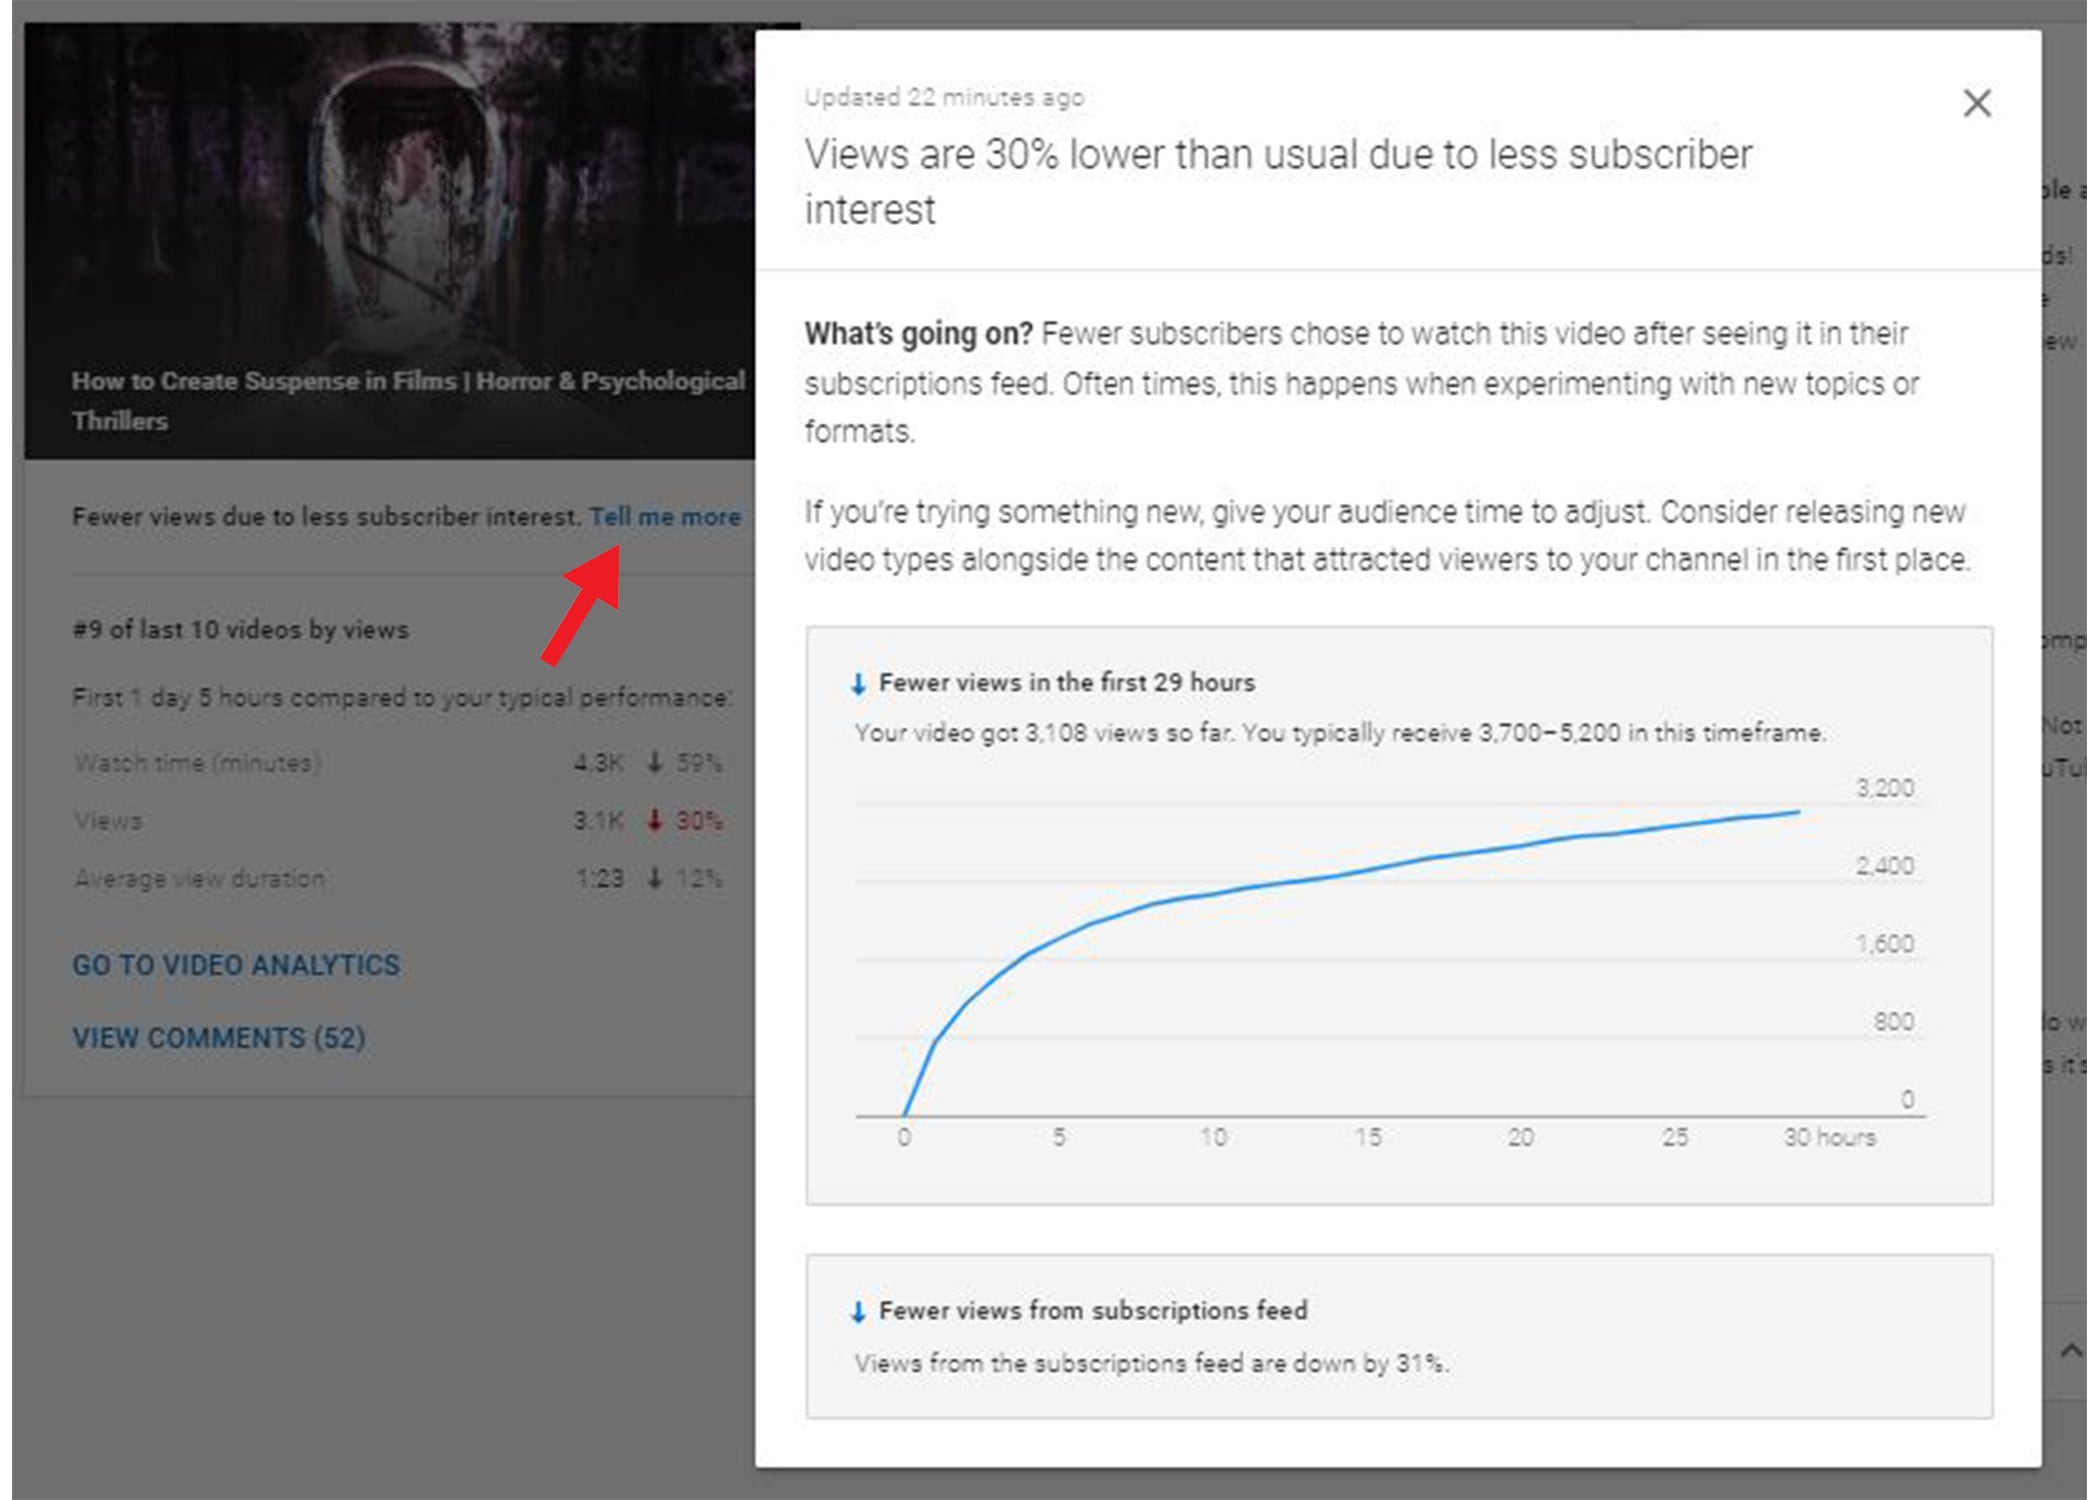
2. Recent Video Data
See data and improvement tips for your latest video. If YouTube identifies a notable issue with your video, they will help you by offering tips, which you can click “Tell Me More” to look into.
YouTube wants you to know how your videos are performing in the first few days. In order for YouTube to determine whether your content is worth sharing, it wants to know how your audience is responding to it right away. This means, the launch of your video matters.
3. Video Analysis
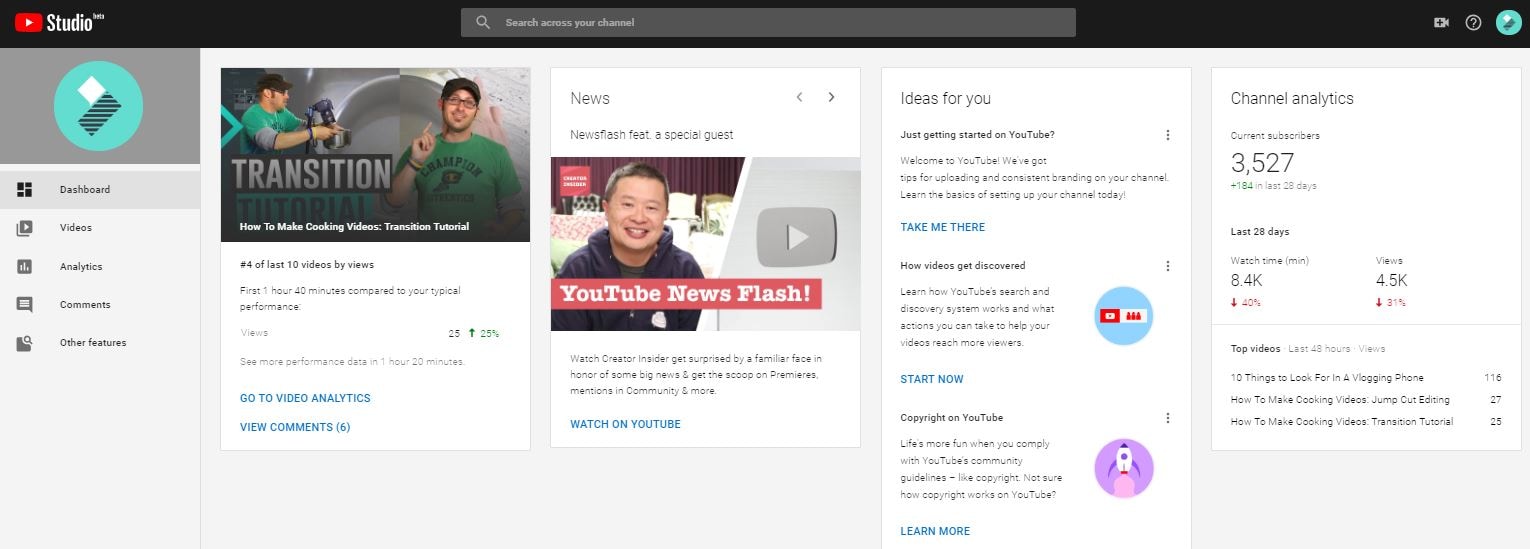
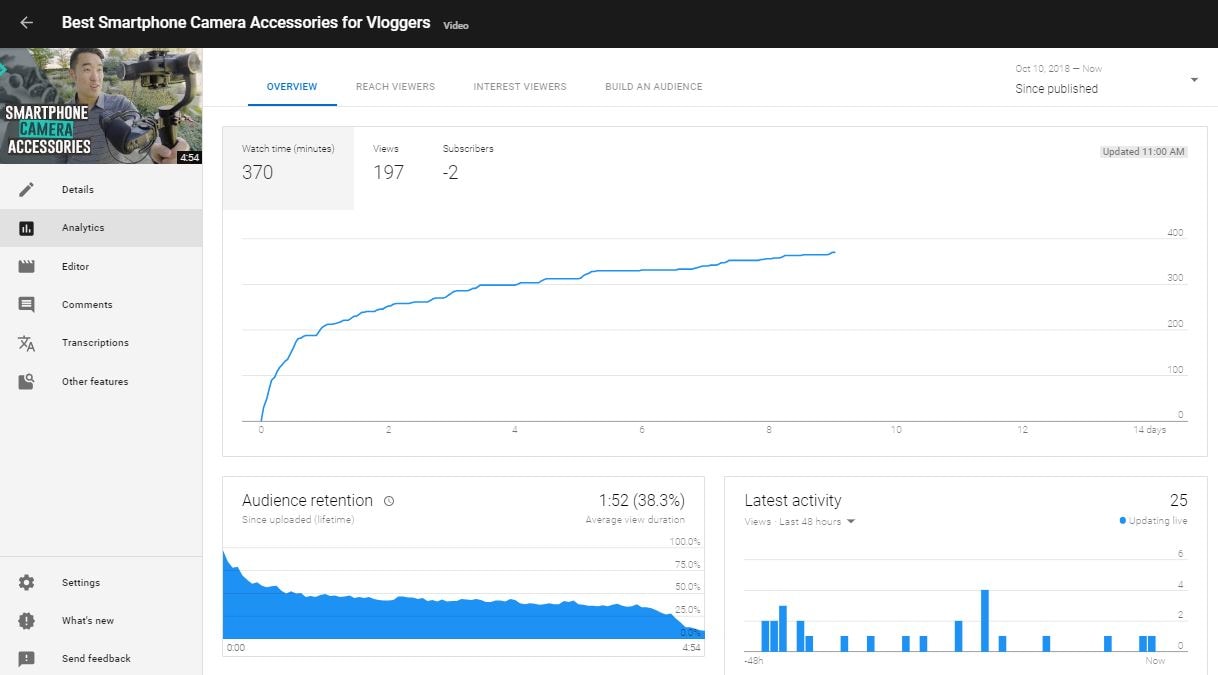
In the Classic Creator Studio, you couldn’t get an aggregated view of all the important video data on one dashboard. You would have to click to each set of analytics individually and then dive deeper. This ate up your precious content creation time and made it hard to combine insights. Now with Studio Beta, you can see all the critical data in one spot. Right away, you can see how that video is performing through different factors. This will let you know where audience retention is dropping off or which traffic source is supplying most of the views.
4. Watch Time Funnel
The objective is to increase watch time, the metric YouTube puts the most weight on. With the new Watch Time Funnel, which you can find in the Analytics section under the Reach Viewer dashboard, you can see exactly at which level of your channel or wherein an individual video you will need to improve.
If the impression numbers are low, that means you need to improve how your video is being discovered by doing more research to understand what your viewers are searching for.
If the click-through rate (CTR) is low, then you will have to improve your thumbnail and title. This will better entice your audience to click. According to Google, half of all videos have an average CTR of 2-10%.
If the average view duration is not up to your standards, then you will have to improve your content itself. While it is most ideal to have all your viewers watch all the way to the end of all your videos, that is certainly unrealistic. However, 60-70% is a great number to aim towards.

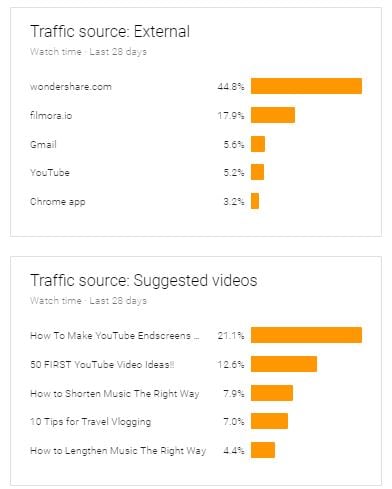
5. Traffic Sources
YouTube now presents all the different traffic sources in one easy-to-find page in the Reach Viewer tab, so creators no longer have to click between them to analyze where their traffic is coming from. This new design is far less intimidating and messy. At a glance, you can now see where the majority of your audiences are coming from.
YouTube has always put a lot of value into its analytic tools, and with YouTube Studio Beta the features and design are continuously improving. Having better data and understanding of how an individual video or an entire channel is performing will help creators succeed on this ever more competitive platform.
Have you tried the new YouTube Studio (Beta)? What are your thoughts? Please let us know in the comments below.
Richard Bennett
Richard Bennett is a writer and a lover of all things video.
Follow @Richard Bennett
Richard Bennett
Oct 26, 2023• Proven solutions
In 2017, YouTube revealed YouTube Studio Beta , a video management and analytics dashboard that will replace the classic Creator Studio that most YouTubers are familiar with by 2021.
In this article, we will look at the new features YouTube Studio Beta has, what we can expect from it in the future, and why YouTube will eventually phase out the older YouTube Creator Studio… and whether that change will be an improvement.
Edit YouTube Videos with Filmora
As one of the most widely used video editing software in YouTube video editing, Filmora provides lots of templates and effects with an intuitive interface, which saves much time. Download the free trial version and get started now.
Why YouTube Is Getting Rid of Classic Creator Studio?
Data-driven YouTubers have long loved the YouTube Creator Studio. It has supplied so much information that it took this comprehensive post about Analytics to highlight all the insights. So why would YouTube change it?
Change to a popular social media platform is always worrisome to content creators because it means there will be a new learning phase forced upon them. While the Classic YouTube Creator Studio has a lot of features and functionality, the data was often hard to interpret and inconvenient to find. Many creators weren’t sure where their data was located or how to use the information presented to them.
YouTube Studio was designed to be a friendly management and analysis tool. YouTube also offers more guidance, showcasing the key metrics the algorithm uses to evaluate the success of a video more prominently. Additionally, the graphs presented offer more clarity, shortening the time a creator spends finding the information they need.
Undoubtedly, YouTube updated its Creator Studio to offer a tool that enables its users to better understand their video performance and make better content that serves YouTube’s requirements.
Intro to YouTube Studio (Beta)
YouTube Studio (Beta), for many YouTubers, is now the default. However, for the time being, creators can still switch back to the Classic view (as some of the features are still being built). YouTube’s objective is to receive data of their own by understanding how creators are using the new Studio and gaining feedback to improve upon it.
If you have any feedback, simply click on this button on the bottom left menu of the YouTube Studio (Beta) and send YouTube your thoughts.
In addition to the new layout of the tools and dashboards, YouTube Studio (Beta) will also debut 3 metrics for creators:
1. Impressions: See the total reach of all your videos or each individual video. Each time your video thumbnail and title are visible to the user counts as an impression.
2. Click-through rate: Determine how click-worthy your thumbnails and titles are, by seeing the percentage of people who click into your video.
3. Unique viewers: Know how many different people have watched your videos. This data can be used to compare the size of your subscriber base to the actual number of your audience.
Tips for Using YouTube Studio Beta Features
Now that you are more familiar with the new YouTube Studio (Beta), let us dive into what you can accomplish with all the new features.
1. Optimization Tips
In the past, there has been a lot of speculations about how creators should treat their video titles and descriptions. Well, now YouTube is letting you know exactly which area to focus on. Simply hover over any “?” icon to see the advice and click “Learn More” to go to YouTube Creator Academy to get more details.
2. Recent Video Data
See data and improvement tips for your latest video. If YouTube identifies a notable issue with your video, they will help you by offering tips, which you can click “Tell Me More” to look into.
YouTube wants you to know how your videos are performing in the first few days. In order for YouTube to determine whether your content is worth sharing, it wants to know how your audience is responding to it right away. This means, the launch of your video matters.
3. Video Analysis
In the Classic Creator Studio, you couldn’t get an aggregated view of all the important video data on one dashboard. You would have to click to each set of analytics individually and then dive deeper. This ate up your precious content creation time and made it hard to combine insights. Now with Studio Beta, you can see all the critical data in one spot. Right away, you can see how that video is performing through different factors. This will let you know where audience retention is dropping off or which traffic source is supplying most of the views.
4. Watch Time Funnel
The objective is to increase watch time, the metric YouTube puts the most weight on. With the new Watch Time Funnel, which you can find in the Analytics section under the Reach Viewer dashboard, you can see exactly at which level of your channel or wherein an individual video you will need to improve.
If the impression numbers are low, that means you need to improve how your video is being discovered by doing more research to understand what your viewers are searching for.
If the click-through rate (CTR) is low, then you will have to improve your thumbnail and title. This will better entice your audience to click. According to Google, half of all videos have an average CTR of 2-10%.
If the average view duration is not up to your standards, then you will have to improve your content itself. While it is most ideal to have all your viewers watch all the way to the end of all your videos, that is certainly unrealistic. However, 60-70% is a great number to aim towards.
5. Traffic Sources
YouTube now presents all the different traffic sources in one easy-to-find page in the Reach Viewer tab, so creators no longer have to click between them to analyze where their traffic is coming from. This new design is far less intimidating and messy. At a glance, you can now see where the majority of your audiences are coming from.
YouTube has always put a lot of value into its analytic tools, and with YouTube Studio Beta the features and design are continuously improving. Having better data and understanding of how an individual video or an entire channel is performing will help creators succeed on this ever more competitive platform.
Have you tried the new YouTube Studio (Beta)? What are your thoughts? Please let us know in the comments below.
Richard Bennett
Richard Bennett is a writer and a lover of all things video.
Follow @Richard Bennett
Also read:
- In 2024, Essential Information for Choosing the Best Video Platform
- Beat Buzzers Up-and-Coming Background Scores For YT Shorts
- The Definitive User's Manual for YouTube TV
- How to Make a YouTube Subscribe Link - Easy!
- Reel It In Pro-Level Techniques for YouTube Video Editors
- 2024 Approved Charting the Course of Creative Conquests Self Vs. Competitors on YouTube
- Earnings Expansion on Glamour Channels for 2024
- [New] Beating the Blues of Overly Green A Mac Video Editor's Handbook
- [New] A Filmmaker's Dream The 8 Best No-Fee Video Editors on the Market
- Start Saving Smiles on YouTube A Beginner's Mac Tutorial
- From Viewing Voids to Viral Videos The Top Ten Reasons & Cures for Zero Traffic
- Expert Smartphone Photo & Film Capture IPhone/Android Comparison
- [Updated] Audience Alchemy Converting Shorts to Sensations
- Prime Capture Device Your Ally in YouTube Ventures
- Securing Viewer Return with These Effective Strategies for Higher Retention Rates
- From Conference Call to Online Showcase Google Meet on YouTube
- [New] Ease Into Content Creation Crafting the Top 10 Accessible YouTube Videos
- [Updated] Elevate Your Biz Game YouTube Channels That Succeeded
- In 2024, Digital Content Contenders Compare & Contrast Vimeo, YouTube + Dailymotion
- Comprehensive YouTube Etiquette Guide
- Transform Videos with Easy-to-Use Sound Effects!
- Simple Guide to Free YouTube Downloads
- Channel Success Stories Earning While You Edit for 2024
- [Updated] 15 Best Free YouTube Introduction Tools
- [New] Editorial Elegance at the End
- RhythmCutter Studio High-End Audio in Every Frame
- In 2024, Digital Phenoms Who Has the Most Followers?
- In 2024, 24-Hour Scoreboard Top Ten Viewership Heavyweights on YT
- [New] Discover the Power of 5 Editors Beyond Youtube's Boundaries
- Maximizing Reach Strategies From Seasoned TubeBuddy Experts
- In 2024, Brightening Filmmaking Ranking the 17 Best Lights
- In 2024, Audible Savings The Essential Guide to Using These 24 No-Cost Splitters on YouTube
- Making Money with YouTube Understanding Partner Program
- Freshest Beats Newly Trending Music for YouTube Short Videos
- In 2024, Cross-Platform Content Dimensions YouTube, Facebook, Insta & More
- [New] Elevate Your Video Game Select Top 20 Thumbnail Fonts
- Innocence Betrayed Consequences of Acquiring Sham Supporters in Social Media
- [New] 5 Innovative YouTube Thumbnail Designers for Aspiring Filmmakers
- [Updated] Enjoy Uninterrupted Viewing Top 20 YouTube Download Apps
- Unleash the Power of Optimization 5 Secrets to Skyrocket Your Audience
- 2024 Approved Brighten Up Techniques for Improving Video Lighting on YouTube
- Shine On Top 17 Studio Lights for YouTube
- 2024 Approved Crafting Perfect Ad Videos on YouTube Without Expense
- Best Video Experts in Photo-Song Collaboration
- [New] Enhancing Your Visual Mark Implementing Neon-Edged YouTubes
- Crafting a Stellar Visual Identity The Ultimate Guide to YT Design
- Bridging the Gap Integrating Spotify and YouTube Music Playlists for 2024
- Unlock Viral Potential with YouTube Short Strategies
- How to Track a Lost Vivo Y36 for Free? | Dr.fone
- [Updated] Increase FB Engagement & Sales The 15 Most Effective Analyzers
- How to Track a Lost Samsung Galaxy Z Flip 5 for Free? | Dr.fone
- Updated What Is AI Marketing?
- [New] FreeCam X Live Streaming Software Reviewed
- A Detailed Guide on Faking Your Location in Mozilla Firefox On Lava Blaze 2 Pro | Dr.fone
- Cutting-Edge Free 4K Video Editing Software for Professionals
- Auditory Interface Excellence For Podcasters
- Revolutionary TikTok Profits Estimator Guide
- 7 Top Ways To Resolve Apple ID Not Active Issue For iPhone SE (2020)
- [Updated] 2024 Approved Superior Sound Recognizers in Education
- [Updated] How to Make Money on TikTok in 8 Ways [Cannot Miss]
- [Updated] Top 5 Platforms For Active Engagement Outside of Twitter
- [New] In-Depth Minecraft Gameplay Recording Strategies
- [Updated] 2024 Approved Navigating TikTok on Both Mac & Windows Devices
- In 2024, 10 Free Location Spoofers to Fake GPS Location on your Honor Magic 6 | Dr.fone
- Best Android Data Recovery - Undelete Lost Messages from Itel
- Recover lost data from Xiaomi 13 Ultra
- In 2024, How to Transfer Apps from Vivo Y100 to Another | Dr.fone
- New Breakdown of Job Functions in the World of Movie-Making for 2024
- In 2024, 5 Quick Methods to Bypass Vivo Y78+ FRP
- Updated Convert YouTube Videos Like a Pro Top MP3 Converter Tools and Techniques for 2024
- In 2024, Real-Time Recording Tech That Never Delays You
- [Updated] 2024 Approved Unpacking Twitter Video Sharing The WhatsApp Connection
- In 2024, Quick Guide to Boost Your TikTok Production Speed
- New 2 Methods to Crop a Video in VLC for 2024
- New In 2024, Silence the Microphone A Complete Blueprint to Remove Vocals From Tracks in Adobe Audition
- 2024 Approved Best Video Editing Software to Remove Audio From Video For Windows
- Updated 2024 Approved Top Free GIF Animators for Endless Loops
- New In 2024, The 2023 Guide to Integrating Creative Audio Elements Into Your Film Projects
- [Updated] Essential Screen Recorder Guide Top 5 for Win Users
- How to Reset Apple ID and Apple Password From Apple iPhone 12 mini
- In 2024, Capturing Motion Spectacle with Polaroid Cam+ Cube
- 2024 Approved Watermark-Free Video Editing The Top 7 Merging Solutions
- Seamlessly Download IGTV for iPhone/Android Users for 2024
- [New] In 2024, A Complete Guide to Personalizing Your Virtual Space on Discord
- [Updated] VSDM Video Capture Overview Thorough Scrutiny
- [New] 2024 Approved Frame It Up Right Insta-Ready Video Edits for Final Cut Pro X
- [Updated] Step-by-Step Guide to the Best Game Editing Apps for 2024
- Instant Impressions Fast-Forwarding PPT Slide Showtimes
- [Updated] 2024 Approved Unlock the Secrets to Amazing Instagram Films
- All Must-Knows to Use Fake GPS GO Location Spoofer On Poco F5 Pro 5G | Dr.fone
- Methods to Change GPS Location On Honor 70 Lite 5G | Dr.fone
- 2024 Approved Secure Your Footage How to Blur Faces in Videos
- In 2024, Streamlining Your Ad Engagement Configuring & Measuring Instream Ads on Facebook
- In 2024, Blender Is a 3D Animation Software that Can Be Used to Create Stunning 3D Models and Videos
- Undeleted lost videos from Infinix Smart 7 HD
- Title: "In 2024, Enhance Videos at No Extra Cost Best Editors Ranked (Top 9)"
- Author: Kevin
- Created at : 2024-05-25 15:38:43
- Updated at : 2024-05-26 15:38:43
- Link: https://youtube-videos.techidaily.com/in-2024-enhance-videos-at-no-extra-cost-best-editors-ranked-top-9/
- License: This work is licensed under CC BY-NC-SA 4.0.
