
:max_bytes(150000):strip_icc()/AirTags-d0c59672dec24b1b947c239fd7c6b934.jpg)
"In 2024, Engaging Everyone How to Multistream Effectively on YouTube and Twitch"
Engaging Everyone: How to Multistream Effectively on YouTube and Twitch
Youtube Video Maker - Wondershare Filmora
Provide abundant video effects - A creative video editor
Powerful color correction and grading
Detailed tutorials provided by the official channel
As the world has progressed, a great deal has changed, and it has transformed into a digital hub. People have started to use different platforms to entertain themselves, watch their favorite content online, gaming, music, sports, or any other form of entertainment.
Cross-platform streaming is a concept people have started to follow especially when it comes to gaming. The audience has a wide variety of choices when it comes to viewing live content online.
YouTube and Twitch are two major platforms streamers use to publish their content online for their targeted audience. They need to stream their content on YouTube and Twitch simultaneously as it engages a wider range of audiences worldwide, and newer streamers can benefit from it.
In this article
Part 1: How Can You Stream on Twitch and YouTube at the Same Time?
Part 2: How to Multi-stream using Streamlabs Prime
Part 3: Bonus Tips | Enlarge your Live Stream Performance!
Part 1: How Can You Stream on Twitch and YouTube at the Same Time?
To stream simultaneously on multiple platforms, a certain program or application is required to provide you with the required tools to enable you to broadcast your content. Several programs provide the option to stream to multiple websites at the same time e.g., Restream, Streamlabs Prime, and MelonApp.
Restream
Restream.io is a service that provides you with the option to broadcast your content to more than 30 different platforms including Twitch and YouTube. When you log in, you can choose the channels you wish to broadcast on and restream will issue a unique key for you.

After you have selected your desired selection, go to your broadcasting software, and choose Restream.io as your preferred service and insert your unique key provided by Restream.
Restream will let you use their services for free provided you use it with their watermark. It is recommended for newer users but if you wish to remove the watermark and go ad-free you will have to upgrade your plan.
Below is a step-by-step guide to help you stream using Restream.io
Step 1: Sign up or log in
The first step is to sign up on Restream. It will require you to choose a unique username, password and enter a valid email address.
Step 2: Choose your desired Platforms
From the list of different platforms, choose the ones you wish to stream to and add your channels by authorizing with the required credentials. Restream has an option of more than 30 platforms including YouTube, Twitch, Facebook, Twitter, and LinkedIn.

Step 3: Choose your subscription plan
Choose your desired plan that caters to your needs. Keep in mind that Restream is 100% free but free accounts do not come with recording or storage and will show a Restream watermark.

You can remove this watermark by upgrading your subscription plan to a Professional one from the dashboard.
Step 4: Choose the final streaming platforms
Connect all your channels so you can stream from a single platform. Click the platform icon and connect your preferred accounts with Restream.
Step 5: Tweak the settings according to your preference
Set up for streaming preferences and settings along with your streaming software. You can broadcast directly from your browser, multiple members from different locations, from your mobile phone, or even your GoPro. More available streaming features can be found on the Restream Help Center.

Restream also offers a wide range of services including the option to stream pre-recorded videos on Twitch at a preselected time and date. However, there is a caveat that you will not be able to multi-stream after you get an affiliate status on your Twitch channel.
Part 2: How to Multi-stream using Streamlabs Prime
Streamlabs Prime is the premium version of Streamlabs. It provides you with a range of 40+ apps that can also improve the quality of your streams and allow you to multi-stream. It is one of the best streaming software in the game currently.
Many content creators use Streamlabs to simultaneously run their streams on YouTube along with Twitch to grasp a wider range of audiences and get more views. One of the best things about Streamlabs is that you can connect to the broadcast services directly from the program without entering any stream key.
Streamlabs has included the option to Multi Stream on different platforms within its OBS client. Below are the steps required to set you up for streaming on YouTube and Twitch at the same time.
Step 1: Open the settings of your desired client
Click on the gear icon to open the settings on the bottom left of the client, click on the Stream tab where you will see the three main platforms for streaming.
Step 2: Add your preferred platforms
Add YouTube and Twitch by pressing the connect button; you can also add other services as well with the Add Destination feature.

Your stream will automatically be broadcast to all selected platforms when you go live. Although, you will be required to use the premium service of Streamlabs to ensure you can Multistream to different platforms at the same time.

Melon is a web-based service that lets you live-stream onto different platforms at the same time such as YouTube, Twitch, Facebook, and LinkedIn in just a matter of a few clicks. No downloads are required and there are umpteen options of customizations to personalize your feed according to your preference.
You can earn through donations from your live stream and are provided with the best customer support 24/7. Everything is hosted on a cloud-based setup and you can stream and record in 1080p.
Below are the steps to guide you on how to stream using the MelonApp.
Step 1: Login or Sign up
Login or Signup with your credentials into Melon and allow the required permissions i.e., microphone and camera.

Step 2: Choose your subscription plan
Choose your premium plan to avail of multi-streaming along with high-quality broadcasting, unlimited streaming, and tons of customization.

Step 3: Choose your desired platforms
Choose and connect the platforms you want to stream to from the Settings in the top right corner. If you have to reselect, simply click x, and reconnect to a different service.
Step 4: Finalize your preferences
Click on ‘Go Live’ and select the platforms for the current stream you wish to broadcast. Selected platforms will be highlighted.

Step 5: Go live
In the end, click next, put in the title of your stream and its description and you are all set to broadcast your content.
Part 3: Bonus Tips | Enlarge your Live Stream Performance
Now that you know how to stream on Twitch and YouTube, here are some tips to improve your live streams!
Tip # 1: Enhance Your Content
You can enhance your content in multiple ways to grasp a wider audience and get your message all around the globe.
Tip # 2: Introduce Graphics and Transitions
You can use interesting gifs, screens, intros, and outros for your streams. Announcing your streams beforehand can also help build up hype and make people anticipate your feed.
Tip # 3: Work More on Post Production
People stream different content on these streaming platforms including gaming, podcasts, educational and entertainment videos. Editing your content to near perfection is one of the most major aspects of a successful broadcast.
Tip # 4: Use Editing Tools to Make Your Videos Interesting
You can use different editing tools such as Wondershare Filmora which is a great video editing software that allows you to edit, trim, cut, add sounds and apply tons of effects to your content no matter what type or genre it is.
Tip # 5: Add Certain Effects to Appear Professional
You can also introduce motion tracking, keyframing, and use other powerful features, and that too for free using Wondershare Filmora. However, if you wish to go a step further you can always opt for their premium version and transcend into a world of endless options and opportunities to edit and enhance your content.
Tip # 6: Promote Your Content Using Social Media
Multi-streaming helps build up a wider community of fans as it is targeting different sets of people and you can also earn from your streams using advertisements and introducing click-on banners for brand endorsements.
Some platforms also let you promote and manage your merchandise, so it is always a good opportunity for these streaming clients and platforms.
Conclusion
Now you can also monetize your streams and broadcast on different platforms such as YouTube and Twitch at the same time. This will boost your reach and views in a very positive way. You can also tweak your content by editing it and inserting sound effects, gifs, and much more to make it more interesting and catchier.
And by multi-streaming on YouTube and Twitch, you will have a greater chance of being found by gaming sponsors and your growth will not be tied just to a single platform. You can also promote your streams on other social media platforms and your handles as well.
Pre-recorded videos are also a great way to present your content with perfection without any chances of being prone to any potential online mishaps.
As the world has progressed, a great deal has changed, and it has transformed into a digital hub. People have started to use different platforms to entertain themselves, watch their favorite content online, gaming, music, sports, or any other form of entertainment.
Cross-platform streaming is a concept people have started to follow especially when it comes to gaming. The audience has a wide variety of choices when it comes to viewing live content online.
YouTube and Twitch are two major platforms streamers use to publish their content online for their targeted audience. They need to stream their content on YouTube and Twitch simultaneously as it engages a wider range of audiences worldwide, and newer streamers can benefit from it.
In this article
Part 1: How Can You Stream on Twitch and YouTube at the Same Time?
Part 2: How to Multi-stream using Streamlabs Prime
Part 3: Bonus Tips | Enlarge your Live Stream Performance!
Part 1: How Can You Stream on Twitch and YouTube at the Same Time?
To stream simultaneously on multiple platforms, a certain program or application is required to provide you with the required tools to enable you to broadcast your content. Several programs provide the option to stream to multiple websites at the same time e.g., Restream, Streamlabs Prime, and MelonApp.
Restream
Restream.io is a service that provides you with the option to broadcast your content to more than 30 different platforms including Twitch and YouTube. When you log in, you can choose the channels you wish to broadcast on and restream will issue a unique key for you.
After you have selected your desired selection, go to your broadcasting software, and choose Restream.io as your preferred service and insert your unique key provided by Restream.
Restream will let you use their services for free provided you use it with their watermark. It is recommended for newer users but if you wish to remove the watermark and go ad-free you will have to upgrade your plan.
Below is a step-by-step guide to help you stream using Restream.io
Step 1: Sign up or log in
The first step is to sign up on Restream. It will require you to choose a unique username, password and enter a valid email address.
Step 2: Choose your desired Platforms
From the list of different platforms, choose the ones you wish to stream to and add your channels by authorizing with the required credentials. Restream has an option of more than 30 platforms including YouTube, Twitch, Facebook, Twitter, and LinkedIn.
Step 3: Choose your subscription plan
Choose your desired plan that caters to your needs. Keep in mind that Restream is 100% free but free accounts do not come with recording or storage and will show a Restream watermark.
You can remove this watermark by upgrading your subscription plan to a Professional one from the dashboard.
Step 4: Choose the final streaming platforms
Connect all your channels so you can stream from a single platform. Click the platform icon and connect your preferred accounts with Restream.
Step 5: Tweak the settings according to your preference
Set up for streaming preferences and settings along with your streaming software. You can broadcast directly from your browser, multiple members from different locations, from your mobile phone, or even your GoPro. More available streaming features can be found on the Restream Help Center.
Restream also offers a wide range of services including the option to stream pre-recorded videos on Twitch at a preselected time and date. However, there is a caveat that you will not be able to multi-stream after you get an affiliate status on your Twitch channel.
Part 2: How to Multi-stream using Streamlabs Prime
Streamlabs Prime is the premium version of Streamlabs. It provides you with a range of 40+ apps that can also improve the quality of your streams and allow you to multi-stream. It is one of the best streaming software in the game currently.
Many content creators use Streamlabs to simultaneously run their streams on YouTube along with Twitch to grasp a wider range of audiences and get more views. One of the best things about Streamlabs is that you can connect to the broadcast services directly from the program without entering any stream key.
Streamlabs has included the option to Multi Stream on different platforms within its OBS client. Below are the steps required to set you up for streaming on YouTube and Twitch at the same time.
Step 1: Open the settings of your desired client
Click on the gear icon to open the settings on the bottom left of the client, click on the Stream tab where you will see the three main platforms for streaming.
Step 2: Add your preferred platforms
Add YouTube and Twitch by pressing the connect button; you can also add other services as well with the Add Destination feature.
Your stream will automatically be broadcast to all selected platforms when you go live. Although, you will be required to use the premium service of Streamlabs to ensure you can Multistream to different platforms at the same time.
Melon is a web-based service that lets you live-stream onto different platforms at the same time such as YouTube, Twitch, Facebook, and LinkedIn in just a matter of a few clicks. No downloads are required and there are umpteen options of customizations to personalize your feed according to your preference.
You can earn through donations from your live stream and are provided with the best customer support 24/7. Everything is hosted on a cloud-based setup and you can stream and record in 1080p.
Below are the steps to guide you on how to stream using the MelonApp.
Step 1: Login or Sign up
Login or Signup with your credentials into Melon and allow the required permissions i.e., microphone and camera.
Step 2: Choose your subscription plan
Choose your premium plan to avail of multi-streaming along with high-quality broadcasting, unlimited streaming, and tons of customization.
Step 3: Choose your desired platforms
Choose and connect the platforms you want to stream to from the Settings in the top right corner. If you have to reselect, simply click x, and reconnect to a different service.
Step 4: Finalize your preferences
Click on ‘Go Live’ and select the platforms for the current stream you wish to broadcast. Selected platforms will be highlighted.
Step 5: Go live
In the end, click next, put in the title of your stream and its description and you are all set to broadcast your content.
Part 3: Bonus Tips | Enlarge your Live Stream Performance
Now that you know how to stream on Twitch and YouTube, here are some tips to improve your live streams!
Tip # 1: Enhance Your Content
You can enhance your content in multiple ways to grasp a wider audience and get your message all around the globe.
Tip # 2: Introduce Graphics and Transitions
You can use interesting gifs, screens, intros, and outros for your streams. Announcing your streams beforehand can also help build up hype and make people anticipate your feed.
Tip # 3: Work More on Post Production
People stream different content on these streaming platforms including gaming, podcasts, educational and entertainment videos. Editing your content to near perfection is one of the most major aspects of a successful broadcast.
Tip # 4: Use Editing Tools to Make Your Videos Interesting
You can use different editing tools such as Wondershare Filmora which is a great video editing software that allows you to edit, trim, cut, add sounds and apply tons of effects to your content no matter what type or genre it is.
Tip # 5: Add Certain Effects to Appear Professional
You can also introduce motion tracking, keyframing, and use other powerful features, and that too for free using Wondershare Filmora. However, if you wish to go a step further you can always opt for their premium version and transcend into a world of endless options and opportunities to edit and enhance your content.
Tip # 6: Promote Your Content Using Social Media
Multi-streaming helps build up a wider community of fans as it is targeting different sets of people and you can also earn from your streams using advertisements and introducing click-on banners for brand endorsements.
Some platforms also let you promote and manage your merchandise, so it is always a good opportunity for these streaming clients and platforms.
Conclusion
Now you can also monetize your streams and broadcast on different platforms such as YouTube and Twitch at the same time. This will boost your reach and views in a very positive way. You can also tweak your content by editing it and inserting sound effects, gifs, and much more to make it more interesting and catchier.
And by multi-streaming on YouTube and Twitch, you will have a greater chance of being found by gaming sponsors and your growth will not be tied just to a single platform. You can also promote your streams on other social media platforms and your handles as well.
Pre-recorded videos are also a great way to present your content with perfection without any chances of being prone to any potential online mishaps.
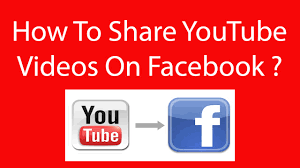
Share Smart: Optimizing YouTube Videos on FB Platform
Create High-Quality Video - Wondershare Filmora
An easy and powerful YouTube video editor
Numerous video and audio effects to choose from
Detailed tutorials provided by the official channel
YouTube reports that Facebook is the most utilized platform fans use to watch online content. More so, up to 40% of those who watch the content do share links with their friends online – this then makes it quick to promote YouTube content on Facebook. Simply by making your new YouTube content visible on your Facebook page, and you’ll be certain that thousands of viewers will have a glimpse of it. You must already be scratching your head for ways on how to post a YouTube video on a Facebook page. Well, we bring you several ways to go through that and make your YouTube content accessible on Facebook.
In this article
01 How to Post YouTube video on Facebook?
02 Extra Tip: Facebook Video Tips for more Views and Shares
03 Frequently Asked Question about Facebook video
How to Post YouTube video on Facebook?
Since Facebook is easily accessible, many users have more access to it than other social media platforms. More so, the page allows you to communicate with your audience via photos, videos, graphics, text, among many other multimedia contents. You don’t even need any programming skills to operate it. Here are ways to post YouTube content to Facebook.
How to share a YouTube video on Facebook using a computer
If you have a stationary point of work, i.e., a computer, it is possible to share your YouTube video through it.
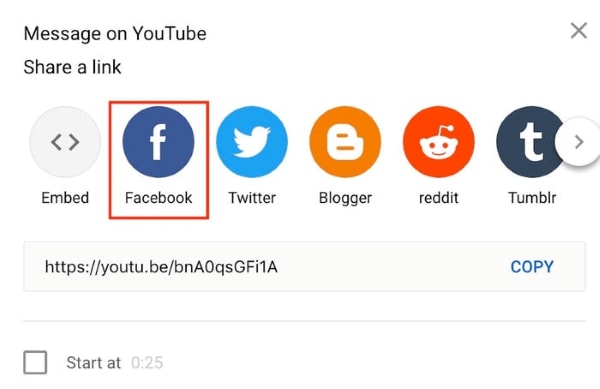
Step 1. First, visit the YouTube site at https://www.youtube.com . It can launch from any web browser.
Step 2. Choose from among your videos on YouTube the one you wish to share on Facebook.
Step 3. Then find the “Share” icon located directly under the video you want to share. Click on the video and hit the “Share” button below the video.
Step 4. Choose “Facebook” from the sharing options that pop up.
Step 5. Next, sign in to “Facebook” on your desktop. Then select the destination point you want your video to land in by using the drop-down menu at the top of your desktop screen. Select the “Share to News Feed” or perhaps the share to “Story.”
Step 6. Finally, click the “Post to Facebook” tab to share your YouTube content with Facebook.
How to share a YouTube video on Facebook using a mobile device
Are you on the go and want your Facebook fans to know what content you have on your YouTube channel? Here are the simple steps on how to post a YouTube video on Facebook right from the palm of your hands – a mobile device.
Step 1. Use any browser on your mobile device to launch the YouTube app from the official website.
Step 2. Peruse through your YouTube videos and choose the one you wish to share on Facebook.
Step 3. Check below the video and click on the “Share” icon.
Step 4. Search through the app’s options and choose Facebook. Also, ensure that the “Facebook” app is installed on your mobile device to make your videos sharable.
Step 5. Click on the “Next” option in the upper right-hand corner of your mobile screen. It will enable video sharing.
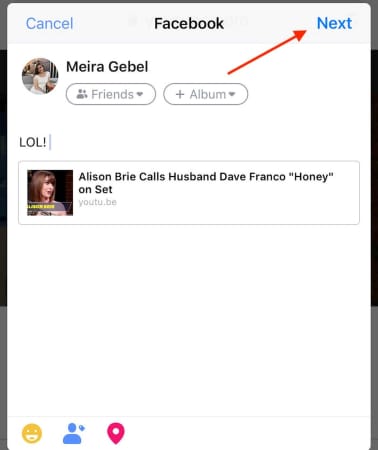
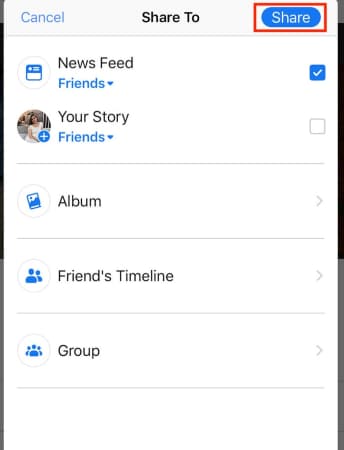
Step 6. Then choose the YouTube video’s post destination to your Facebook. It could be shared on your timeline, story, or a Facebook group’s page.
Step 7. Finally, click on the “Share” tab to make your video viewable on Facebook.
How to post a YouTube video on Facebook
Easily post your YouTube video on Facebook and let viewers access them directly from your Facebook feed. By this, your fans don’t have to click on other tabs but will access the videos directly.
Step 1. Copy the YouTube video’s link
First, go to your YouTube channel and copy the video link that you want to post to Facebook. You can as well copy the embed code.
Step 2. Embed the video link you copied
This link should be embedded into a Facebook post. Do this by first logging into your Facebook account. Then go to the top of your “Facebook News Feed” and click the “What’s on your mind” box.
Step 3. Paste your link
Right-click on the “What’s on your mind” box, then select the “Paste” option.
Step 4. Preview video
Facebook will let you preview the video you just posted. Check whether you have pasted the right video before you post it.
Step 5. Post your video
Now, scroll down and click on the “Post” tab. You can also add a message to your post. Just place a cursor after the video URL and hit the “Enter” key on your keyboard. Finally, scroll down and hit the “Post” tab to make your video public on Facebook.
Extra Tip: Facebook Video Tips for more Views and Shares
You have to play your cards well when it comes to posting and sharing your videos on Facebook. These tips are all you need.
- Catch viewer’s attention within the shortest time possible
Here, your main aim is to convince your viewers. So, don’t let them spend so much time before you catch their attention. You can bring up a point about some latest news or adventures that let your viewers connect immediately.
- Add captions to the video
It is not necessarily possible that viewers will watch your videos with the sound on. Some like it when it’s silent and might disable the sound auto-play. Add some captions so that viewers will understand your video, even on silent mode.
- Emphasize on one key-point
Focus on one key point so that your viewers are not swayed away. Your video is highly sharable if it is easy to understand.
- Add a Call To Action
Including a call-to-action will encourage your viewers to subscribe to your channel. Ensure you include it at the end of your video to tell viewers what to do next. You could also include a link to your blog post to let your viewers read and find more content from your other channels.
- Facebook ads can make a great difference
Facebook is a great place for running ads that reach a wider audience. Adverts are great ways to target a specific audience. They explain your products and services more straightforwardly.
- Embed your videos on blog posts
Numerous people get to access guest posts and blog posts. You can embed your Facebook videos on such posts to reach more people. Just get the embed code from your video, then copy and paste it to a guest or blog post.
Frequently Asked Question about Facebook video
Both viewers and content creators have a few concerns about YouTube and Facebook videos. Here are some frequently asked questions that will be of benefit to you.
1) Is it legal to share YouTube videos?
YouTube is just one platform where content creators showcase their productions. Yes, it is legal to share your content on other forums like Facebook, Twitter, Instagram, etc.
2) What is the best time to post to your Facebook page?
The best time to post on a Facebook page depends on your time zone. Generally, viewers access Facebook late in the evening and early in the night. Perhaps they are off work and now want to relax by checking the day’s updates.
3) What are Facebook business accounts and personal accounts?
Facebook business accounts are designed for users who want to use Facebook to administer their pages and advert campaigns. This account cannot be found in searching or receiving friend request apps. Nonetheless, personal accounts are used at basic and casual levels. You can search for friends and send requests. Personal accounts are also easy to manage.
4) Can I mobilize people to share my posted content on Facebook?
Yes, it is possible to let others share what you have posted. Just ensure they know your intention by constant reminders. Some popular ways that are proven to be effective include the use of “Call to Action,” using an image or video with your Facebook status update and offering some incentive to your fans for sharing.
5) Does the quality of my YouTube content drop when I share it with Facebook?
Of course not! What you pull from your YouTube channel is the kind of video that will be watched from Facebook. The quality cannot deteriorate. However, it is good to ensure you compose quality videos on YouTube before sharing them. Several video editing apps like Filmora can help you compose quality videos with high resolution.
Conclusion
● Facebook is a great platform that is accessed by a wide audience. More so, you can share your content from other platforms easily. The article has covered how to share YouTube videos on Facebook and hook your audience. You can use your computer or share directly from your mobile device in simple steps. It is also better to play some tricks on your effort to reach a wider audience. These include a CTA, embedding your Facebook videos to blogs posts, among other options.
YouTube reports that Facebook is the most utilized platform fans use to watch online content. More so, up to 40% of those who watch the content do share links with their friends online – this then makes it quick to promote YouTube content on Facebook. Simply by making your new YouTube content visible on your Facebook page, and you’ll be certain that thousands of viewers will have a glimpse of it. You must already be scratching your head for ways on how to post a YouTube video on a Facebook page. Well, we bring you several ways to go through that and make your YouTube content accessible on Facebook.
In this article
01 How to Post YouTube video on Facebook?
02 Extra Tip: Facebook Video Tips for more Views and Shares
03 Frequently Asked Question about Facebook video
How to Post YouTube video on Facebook?
Since Facebook is easily accessible, many users have more access to it than other social media platforms. More so, the page allows you to communicate with your audience via photos, videos, graphics, text, among many other multimedia contents. You don’t even need any programming skills to operate it. Here are ways to post YouTube content to Facebook.
How to share a YouTube video on Facebook using a computer
If you have a stationary point of work, i.e., a computer, it is possible to share your YouTube video through it.
Step 1. First, visit the YouTube site at https://www.youtube.com . It can launch from any web browser.
Step 2. Choose from among your videos on YouTube the one you wish to share on Facebook.
Step 3. Then find the “Share” icon located directly under the video you want to share. Click on the video and hit the “Share” button below the video.
Step 4. Choose “Facebook” from the sharing options that pop up.
Step 5. Next, sign in to “Facebook” on your desktop. Then select the destination point you want your video to land in by using the drop-down menu at the top of your desktop screen. Select the “Share to News Feed” or perhaps the share to “Story.”
Step 6. Finally, click the “Post to Facebook” tab to share your YouTube content with Facebook.
How to share a YouTube video on Facebook using a mobile device
Are you on the go and want your Facebook fans to know what content you have on your YouTube channel? Here are the simple steps on how to post a YouTube video on Facebook right from the palm of your hands – a mobile device.
Step 1. Use any browser on your mobile device to launch the YouTube app from the official website.
Step 2. Peruse through your YouTube videos and choose the one you wish to share on Facebook.
Step 3. Check below the video and click on the “Share” icon.
Step 4. Search through the app’s options and choose Facebook. Also, ensure that the “Facebook” app is installed on your mobile device to make your videos sharable.
Step 5. Click on the “Next” option in the upper right-hand corner of your mobile screen. It will enable video sharing.
Step 6. Then choose the YouTube video’s post destination to your Facebook. It could be shared on your timeline, story, or a Facebook group’s page.
Step 7. Finally, click on the “Share” tab to make your video viewable on Facebook.
How to post a YouTube video on Facebook
Easily post your YouTube video on Facebook and let viewers access them directly from your Facebook feed. By this, your fans don’t have to click on other tabs but will access the videos directly.
Step 1. Copy the YouTube video’s link
First, go to your YouTube channel and copy the video link that you want to post to Facebook. You can as well copy the embed code.
Step 2. Embed the video link you copied
This link should be embedded into a Facebook post. Do this by first logging into your Facebook account. Then go to the top of your “Facebook News Feed” and click the “What’s on your mind” box.
Step 3. Paste your link
Right-click on the “What’s on your mind” box, then select the “Paste” option.
Step 4. Preview video
Facebook will let you preview the video you just posted. Check whether you have pasted the right video before you post it.
Step 5. Post your video
Now, scroll down and click on the “Post” tab. You can also add a message to your post. Just place a cursor after the video URL and hit the “Enter” key on your keyboard. Finally, scroll down and hit the “Post” tab to make your video public on Facebook.
Extra Tip: Facebook Video Tips for more Views and Shares
You have to play your cards well when it comes to posting and sharing your videos on Facebook. These tips are all you need.
- Catch viewer’s attention within the shortest time possible
Here, your main aim is to convince your viewers. So, don’t let them spend so much time before you catch their attention. You can bring up a point about some latest news or adventures that let your viewers connect immediately.
- Add captions to the video
It is not necessarily possible that viewers will watch your videos with the sound on. Some like it when it’s silent and might disable the sound auto-play. Add some captions so that viewers will understand your video, even on silent mode.
- Emphasize on one key-point
Focus on one key point so that your viewers are not swayed away. Your video is highly sharable if it is easy to understand.
- Add a Call To Action
Including a call-to-action will encourage your viewers to subscribe to your channel. Ensure you include it at the end of your video to tell viewers what to do next. You could also include a link to your blog post to let your viewers read and find more content from your other channels.
- Facebook ads can make a great difference
Facebook is a great place for running ads that reach a wider audience. Adverts are great ways to target a specific audience. They explain your products and services more straightforwardly.
- Embed your videos on blog posts
Numerous people get to access guest posts and blog posts. You can embed your Facebook videos on such posts to reach more people. Just get the embed code from your video, then copy and paste it to a guest or blog post.
Frequently Asked Question about Facebook video
Both viewers and content creators have a few concerns about YouTube and Facebook videos. Here are some frequently asked questions that will be of benefit to you.
1) Is it legal to share YouTube videos?
YouTube is just one platform where content creators showcase their productions. Yes, it is legal to share your content on other forums like Facebook, Twitter, Instagram, etc.
2) What is the best time to post to your Facebook page?
The best time to post on a Facebook page depends on your time zone. Generally, viewers access Facebook late in the evening and early in the night. Perhaps they are off work and now want to relax by checking the day’s updates.
3) What are Facebook business accounts and personal accounts?
Facebook business accounts are designed for users who want to use Facebook to administer their pages and advert campaigns. This account cannot be found in searching or receiving friend request apps. Nonetheless, personal accounts are used at basic and casual levels. You can search for friends and send requests. Personal accounts are also easy to manage.
4) Can I mobilize people to share my posted content on Facebook?
Yes, it is possible to let others share what you have posted. Just ensure they know your intention by constant reminders. Some popular ways that are proven to be effective include the use of “Call to Action,” using an image or video with your Facebook status update and offering some incentive to your fans for sharing.
5) Does the quality of my YouTube content drop when I share it with Facebook?
Of course not! What you pull from your YouTube channel is the kind of video that will be watched from Facebook. The quality cannot deteriorate. However, it is good to ensure you compose quality videos on YouTube before sharing them. Several video editing apps like Filmora can help you compose quality videos with high resolution.
Conclusion
● Facebook is a great platform that is accessed by a wide audience. More so, you can share your content from other platforms easily. The article has covered how to share YouTube videos on Facebook and hook your audience. You can use your computer or share directly from your mobile device in simple steps. It is also better to play some tricks on your effort to reach a wider audience. These include a CTA, embedding your Facebook videos to blogs posts, among other options.
Also read:
- 2024 Approved Cut to Perfection Editing Video Duration on YouTube
- Master the Motion Personalized Animation Techniques
- In 2024, Android's Best YouTube Video Downloaders Reviewed
- The Art of Initiating Your YouTube Content Compellingly
- 2024 Approved Chortle Chamber Ideas for 7 Amusing Online Sessions
- 2024 Approved Elevating Your Content Choosing Right YouTube Duos/Groups
- [Updated] Defining Your Digital DNA A Guide to YouTubing Personal Branding
- [Updated] Enhancing Video Quality Editing Tips for Published Content
- Top 11 Economical Cameras for Professional Vloggers
- [Updated] Breaking Down TSeries' Income Strategy on YouTube Platform
- [Updated] DIY Unleashing Creative Power in Animation Effects
- [Updated] Elevate Your Video Presence with Stellar Intros in iMovie
- 2024 Approved A Global Perspective Your Favorite Travel Youtubers
- Decoding YouTube Community Terms and Policies
- [Updated] Essential Mobile Privacy The Best 7 AdBlocker Apps for Android
- The Methodical Path to Discovering Hidden YouTube Footage
- [Updated] Comprehensive List Securing Monetized YouTube Content
- [New] Broadcast Your Music MP3 Conversion and Upload on YouTube
- In 2024, Discovering the Past Best History YouTubers
- Enhancing Your Content with Effortlessly Added YouTube Subtitles
- In 2024, Dodge Digital Duplicates to Increase YouTube Exposure
- In 2024, Boosting Your YouTube Presence with Extended Videos
- [New] Complete Guide to Aspect Ratios About YouTube Videos/Shorts/Ads
- Enabling Your Brand's Mobile Reach Launching YouTube Channels with Ease for 2024
- [New] Dive Into Creating Alluring YouTube Video Intros
- Essential List 7 Cost-Free Video Tags Extractors on YouTube for 2024
- 2024 Approved Enhancing Presentations Adding YouTube to Google Slides
- [Updated] 1 Choice Transcribe YouTube Videos in a Flash
- Compre-Web Resources for Effortless YouTube Template Access
- From Hidden Gems to Hit Videos Strategies for Success
- Bridging the Gap Transitioning YouTube to Televisions Smoothly
- Add YouTube Melodies in iMovie Without Hurdles for 2024
- AdSense on YouTube Determining Your Income From 1K Viewer Engagement for 2024
- Starting Stronger Must-Have Tech for Creators
- 2024 Approved No Cost, No Problem? Here Are the 10 Best for Discord Voice Captures
- [Updated] In 2024, VLC Recordings Tips and Tricks
- Cycling's Finest Gaming Experiences for 2024
- Accelerate Your Vimeo Experience
- Simple Solutions to Fix Android SystemUI Has Stopped Error For Motorola Moto G14 | Dr.fone
- [Updated] Webcam Visuals Uncluttered Remove Obscurants for 2024
- How To Remove Screen Lock PIN On Honor Magic V2 Like A Pro 5 Easy Ways
- [New] Airborne Cameras Clash DJI Inspire vs GoPro MAX
- How To Deal With the Lava Agni 2 5G Screen Black But Still Works? | Dr.fone
- Simple ways to get lost music back from Samsung Galaxy S23
- Updated In 2024, WhatsApp Status Designers Top Rated Apps
- The Ultimate Evaluation How Does Recmeister Stack Up, In 2024
- [New] Fraps Your Go-To Screen Recorder for 2024
- [New] In 2024, Streamlining Your Video Creation OOTD on a Mac
- How to Intercept Text Messages on Oppo Find X6 | Dr.fone
- Prank Your Friends! Easy Ways to Fake and Share Google Maps Location On Apple iPhone 14 Pro | Dr.fone
- In 2024, VisualCapture Master All-in-One Windows & Mac Image Tool
- Hacks to do pokemon go trainer battles For Honor 90 Pro | Dr.fone
- New In 2024, Streamlining Your Workflow Importing and Exporting Videos in Adobe Premiere 2023
- In 2024, The Quintessential Guide to Music & Voiceovers in Reels
- What Experts Say Optimizing Your 4K Lens Selection Process
- 8 Solutions to Fix Find My Friends Location Not Available On Vivo Y02T | Dr.fone
- 2024 Approved Mastering IGTV Strategies for Uploading Horizontal Videos
- In 2024, Top 10 AirPlay Apps in Vivo S18 for Streaming | Dr.fone
- Top 10 Best Spy Watches For your Xiaomi 14 Ultra | Dr.fone
- In 2024, Top-Rated Motion Graphics Software for Text Tracking
- 2024 Approved The Article Shall Offer an Overview to Create a Promising Sports Intro and Edit a YouTube Outro for a Sports Channel. There Will Also Be Three Recommended Apps to Download Background Music for Exercise
- Title: "In 2024, Engaging Everyone How to Multistream Effectively on YouTube and Twitch"
- Author: Kevin
- Created at : 2024-05-25 15:38:28
- Updated at : 2024-05-26 15:38:28
- Link: https://youtube-videos.techidaily.com/in-2024-engaging-everyone-how-to-multistream-effectively-on-youtube-and-twitch/
- License: This work is licensed under CC BY-NC-SA 4.0.
