
:max_bytes(150000):strip_icc()/GettyImages-174750928-58a48cc35f9b58819cc45552-5bd8c2274cedfd00264695bd.jpg)
"In 2024, Elevate Your Channel's Reach Proven Techniques for Multistreaming on YouTube and Twitch"
Elevate Your Channel’s Reach: Proven Techniques for Multistreaming on YouTube and Twitch
Youtube Video Maker - Wondershare Filmora
Provide abundant video effects - A creative video editor
Powerful color correction and grading
Detailed tutorials provided by the official channel
As the world has progressed, a great deal has changed, and it has transformed into a digital hub. People have started to use different platforms to entertain themselves, watch their favorite content online, gaming, music, sports, or any other form of entertainment.
Cross-platform streaming is a concept people have started to follow especially when it comes to gaming. The audience has a wide variety of choices when it comes to viewing live content online.
YouTube and Twitch are two major platforms streamers use to publish their content online for their targeted audience. They need to stream their content on YouTube and Twitch simultaneously as it engages a wider range of audiences worldwide, and newer streamers can benefit from it.
In this article
Part 1: How Can You Stream on Twitch and YouTube at the Same Time?
Part 2: How to Multi-stream using Streamlabs Prime
Part 3: Bonus Tips | Enlarge your Live Stream Performance!
Part 1: How Can You Stream on Twitch and YouTube at the Same Time?
To stream simultaneously on multiple platforms, a certain program or application is required to provide you with the required tools to enable you to broadcast your content. Several programs provide the option to stream to multiple websites at the same time e.g., Restream, Streamlabs Prime, and MelonApp.
Restream
Restream.io is a service that provides you with the option to broadcast your content to more than 30 different platforms including Twitch and YouTube. When you log in, you can choose the channels you wish to broadcast on and restream will issue a unique key for you.

After you have selected your desired selection, go to your broadcasting software, and choose Restream.io as your preferred service and insert your unique key provided by Restream.
Restream will let you use their services for free provided you use it with their watermark. It is recommended for newer users but if you wish to remove the watermark and go ad-free you will have to upgrade your plan.
Below is a step-by-step guide to help you stream using Restream.io
Step 1: Sign up or log in
The first step is to sign up on Restream. It will require you to choose a unique username, password and enter a valid email address.
Step 2: Choose your desired Platforms
From the list of different platforms, choose the ones you wish to stream to and add your channels by authorizing with the required credentials. Restream has an option of more than 30 platforms including YouTube, Twitch, Facebook, Twitter, and LinkedIn.

Step 3: Choose your subscription plan
Choose your desired plan that caters to your needs. Keep in mind that Restream is 100% free but free accounts do not come with recording or storage and will show a Restream watermark.

You can remove this watermark by upgrading your subscription plan to a Professional one from the dashboard.
Step 4: Choose the final streaming platforms
Connect all your channels so you can stream from a single platform. Click the platform icon and connect your preferred accounts with Restream.
Step 5: Tweak the settings according to your preference
Set up for streaming preferences and settings along with your streaming software. You can broadcast directly from your browser, multiple members from different locations, from your mobile phone, or even your GoPro. More available streaming features can be found on the Restream Help Center.

Restream also offers a wide range of services including the option to stream pre-recorded videos on Twitch at a preselected time and date. However, there is a caveat that you will not be able to multi-stream after you get an affiliate status on your Twitch channel.
Part 2: How to Multi-stream using Streamlabs Prime
Streamlabs Prime is the premium version of Streamlabs. It provides you with a range of 40+ apps that can also improve the quality of your streams and allow you to multi-stream. It is one of the best streaming software in the game currently.
Many content creators use Streamlabs to simultaneously run their streams on YouTube along with Twitch to grasp a wider range of audiences and get more views. One of the best things about Streamlabs is that you can connect to the broadcast services directly from the program without entering any stream key.
Streamlabs has included the option to Multi Stream on different platforms within its OBS client. Below are the steps required to set you up for streaming on YouTube and Twitch at the same time.
Step 1: Open the settings of your desired client
Click on the gear icon to open the settings on the bottom left of the client, click on the Stream tab where you will see the three main platforms for streaming.
Step 2: Add your preferred platforms
Add YouTube and Twitch by pressing the connect button; you can also add other services as well with the Add Destination feature.

Your stream will automatically be broadcast to all selected platforms when you go live. Although, you will be required to use the premium service of Streamlabs to ensure you can Multistream to different platforms at the same time.

Melon is a web-based service that lets you live-stream onto different platforms at the same time such as YouTube, Twitch, Facebook, and LinkedIn in just a matter of a few clicks. No downloads are required and there are umpteen options of customizations to personalize your feed according to your preference.
You can earn through donations from your live stream and are provided with the best customer support 24/7. Everything is hosted on a cloud-based setup and you can stream and record in 1080p.
Below are the steps to guide you on how to stream using the MelonApp.
Step 1: Login or Sign up
Login or Signup with your credentials into Melon and allow the required permissions i.e., microphone and camera.

Step 2: Choose your subscription plan
Choose your premium plan to avail of multi-streaming along with high-quality broadcasting, unlimited streaming, and tons of customization.

Step 3: Choose your desired platforms
Choose and connect the platforms you want to stream to from the Settings in the top right corner. If you have to reselect, simply click x, and reconnect to a different service.
Step 4: Finalize your preferences
Click on ‘Go Live’ and select the platforms for the current stream you wish to broadcast. Selected platforms will be highlighted.

Step 5: Go live
In the end, click next, put in the title of your stream and its description and you are all set to broadcast your content.
Part 3: Bonus Tips | Enlarge your Live Stream Performance
Now that you know how to stream on Twitch and YouTube, here are some tips to improve your live streams!
Tip # 1: Enhance Your Content
You can enhance your content in multiple ways to grasp a wider audience and get your message all around the globe.
Tip # 2: Introduce Graphics and Transitions
You can use interesting gifs, screens, intros, and outros for your streams. Announcing your streams beforehand can also help build up hype and make people anticipate your feed.
Tip # 3: Work More on Post Production
People stream different content on these streaming platforms including gaming, podcasts, educational and entertainment videos. Editing your content to near perfection is one of the most major aspects of a successful broadcast.
Tip # 4: Use Editing Tools to Make Your Videos Interesting
You can use different editing tools such as Wondershare Filmora which is a great video editing software that allows you to edit, trim, cut, add sounds and apply tons of effects to your content no matter what type or genre it is.
Tip # 5: Add Certain Effects to Appear Professional
You can also introduce motion tracking, keyframing, and use other powerful features, and that too for free using Wondershare Filmora. However, if you wish to go a step further you can always opt for their premium version and transcend into a world of endless options and opportunities to edit and enhance your content.
Tip # 6: Promote Your Content Using Social Media
Multi-streaming helps build up a wider community of fans as it is targeting different sets of people and you can also earn from your streams using advertisements and introducing click-on banners for brand endorsements.
Some platforms also let you promote and manage your merchandise, so it is always a good opportunity for these streaming clients and platforms.
Conclusion
Now you can also monetize your streams and broadcast on different platforms such as YouTube and Twitch at the same time. This will boost your reach and views in a very positive way. You can also tweak your content by editing it and inserting sound effects, gifs, and much more to make it more interesting and catchier.
And by multi-streaming on YouTube and Twitch, you will have a greater chance of being found by gaming sponsors and your growth will not be tied just to a single platform. You can also promote your streams on other social media platforms and your handles as well.
Pre-recorded videos are also a great way to present your content with perfection without any chances of being prone to any potential online mishaps.
As the world has progressed, a great deal has changed, and it has transformed into a digital hub. People have started to use different platforms to entertain themselves, watch their favorite content online, gaming, music, sports, or any other form of entertainment.
Cross-platform streaming is a concept people have started to follow especially when it comes to gaming. The audience has a wide variety of choices when it comes to viewing live content online.
YouTube and Twitch are two major platforms streamers use to publish their content online for their targeted audience. They need to stream their content on YouTube and Twitch simultaneously as it engages a wider range of audiences worldwide, and newer streamers can benefit from it.
In this article
Part 1: How Can You Stream on Twitch and YouTube at the Same Time?
Part 2: How to Multi-stream using Streamlabs Prime
Part 3: Bonus Tips | Enlarge your Live Stream Performance!
Part 1: How Can You Stream on Twitch and YouTube at the Same Time?
To stream simultaneously on multiple platforms, a certain program or application is required to provide you with the required tools to enable you to broadcast your content. Several programs provide the option to stream to multiple websites at the same time e.g., Restream, Streamlabs Prime, and MelonApp.
Restream
Restream.io is a service that provides you with the option to broadcast your content to more than 30 different platforms including Twitch and YouTube. When you log in, you can choose the channels you wish to broadcast on and restream will issue a unique key for you.
After you have selected your desired selection, go to your broadcasting software, and choose Restream.io as your preferred service and insert your unique key provided by Restream.
Restream will let you use their services for free provided you use it with their watermark. It is recommended for newer users but if you wish to remove the watermark and go ad-free you will have to upgrade your plan.
Below is a step-by-step guide to help you stream using Restream.io
Step 1: Sign up or log in
The first step is to sign up on Restream. It will require you to choose a unique username, password and enter a valid email address.
Step 2: Choose your desired Platforms
From the list of different platforms, choose the ones you wish to stream to and add your channels by authorizing with the required credentials. Restream has an option of more than 30 platforms including YouTube, Twitch, Facebook, Twitter, and LinkedIn.
Step 3: Choose your subscription plan
Choose your desired plan that caters to your needs. Keep in mind that Restream is 100% free but free accounts do not come with recording or storage and will show a Restream watermark.
You can remove this watermark by upgrading your subscription plan to a Professional one from the dashboard.
Step 4: Choose the final streaming platforms
Connect all your channels so you can stream from a single platform. Click the platform icon and connect your preferred accounts with Restream.
Step 5: Tweak the settings according to your preference
Set up for streaming preferences and settings along with your streaming software. You can broadcast directly from your browser, multiple members from different locations, from your mobile phone, or even your GoPro. More available streaming features can be found on the Restream Help Center.
Restream also offers a wide range of services including the option to stream pre-recorded videos on Twitch at a preselected time and date. However, there is a caveat that you will not be able to multi-stream after you get an affiliate status on your Twitch channel.
Part 2: How to Multi-stream using Streamlabs Prime
Streamlabs Prime is the premium version of Streamlabs. It provides you with a range of 40+ apps that can also improve the quality of your streams and allow you to multi-stream. It is one of the best streaming software in the game currently.
Many content creators use Streamlabs to simultaneously run their streams on YouTube along with Twitch to grasp a wider range of audiences and get more views. One of the best things about Streamlabs is that you can connect to the broadcast services directly from the program without entering any stream key.
Streamlabs has included the option to Multi Stream on different platforms within its OBS client. Below are the steps required to set you up for streaming on YouTube and Twitch at the same time.
Step 1: Open the settings of your desired client
Click on the gear icon to open the settings on the bottom left of the client, click on the Stream tab where you will see the three main platforms for streaming.
Step 2: Add your preferred platforms
Add YouTube and Twitch by pressing the connect button; you can also add other services as well with the Add Destination feature.
Your stream will automatically be broadcast to all selected platforms when you go live. Although, you will be required to use the premium service of Streamlabs to ensure you can Multistream to different platforms at the same time.
Melon is a web-based service that lets you live-stream onto different platforms at the same time such as YouTube, Twitch, Facebook, and LinkedIn in just a matter of a few clicks. No downloads are required and there are umpteen options of customizations to personalize your feed according to your preference.
You can earn through donations from your live stream and are provided with the best customer support 24/7. Everything is hosted on a cloud-based setup and you can stream and record in 1080p.
Below are the steps to guide you on how to stream using the MelonApp.
Step 1: Login or Sign up
Login or Signup with your credentials into Melon and allow the required permissions i.e., microphone and camera.
Step 2: Choose your subscription plan
Choose your premium plan to avail of multi-streaming along with high-quality broadcasting, unlimited streaming, and tons of customization.
Step 3: Choose your desired platforms
Choose and connect the platforms you want to stream to from the Settings in the top right corner. If you have to reselect, simply click x, and reconnect to a different service.
Step 4: Finalize your preferences
Click on ‘Go Live’ and select the platforms for the current stream you wish to broadcast. Selected platforms will be highlighted.
Step 5: Go live
In the end, click next, put in the title of your stream and its description and you are all set to broadcast your content.
Part 3: Bonus Tips | Enlarge your Live Stream Performance
Now that you know how to stream on Twitch and YouTube, here are some tips to improve your live streams!
Tip # 1: Enhance Your Content
You can enhance your content in multiple ways to grasp a wider audience and get your message all around the globe.
Tip # 2: Introduce Graphics and Transitions
You can use interesting gifs, screens, intros, and outros for your streams. Announcing your streams beforehand can also help build up hype and make people anticipate your feed.
Tip # 3: Work More on Post Production
People stream different content on these streaming platforms including gaming, podcasts, educational and entertainment videos. Editing your content to near perfection is one of the most major aspects of a successful broadcast.
Tip # 4: Use Editing Tools to Make Your Videos Interesting
You can use different editing tools such as Wondershare Filmora which is a great video editing software that allows you to edit, trim, cut, add sounds and apply tons of effects to your content no matter what type or genre it is.
Tip # 5: Add Certain Effects to Appear Professional
You can also introduce motion tracking, keyframing, and use other powerful features, and that too for free using Wondershare Filmora. However, if you wish to go a step further you can always opt for their premium version and transcend into a world of endless options and opportunities to edit and enhance your content.
Tip # 6: Promote Your Content Using Social Media
Multi-streaming helps build up a wider community of fans as it is targeting different sets of people and you can also earn from your streams using advertisements and introducing click-on banners for brand endorsements.
Some platforms also let you promote and manage your merchandise, so it is always a good opportunity for these streaming clients and platforms.
Conclusion
Now you can also monetize your streams and broadcast on different platforms such as YouTube and Twitch at the same time. This will boost your reach and views in a very positive way. You can also tweak your content by editing it and inserting sound effects, gifs, and much more to make it more interesting and catchier.
And by multi-streaming on YouTube and Twitch, you will have a greater chance of being found by gaming sponsors and your growth will not be tied just to a single platform. You can also promote your streams on other social media platforms and your handles as well.
Pre-recorded videos are also a great way to present your content with perfection without any chances of being prone to any potential online mishaps.
Behind Closed Doors of YouTube: A Discovery Manual
You may have noticed that some videos in your YouTube playlist are unavailable. This is because the platform allows content creators to categorize their videos into public, private, or unlisted based on their preferences.
To help you uncover the content that you otherwise wouldn’t have access to, we’ve compiled a detailed guide to show you how to find YouTube hidden videos. We’ve also explained why so many unlisted videos are now labeled as private.
So, let’s get started with our guide without any further delay!
4 Types of Videos on YouTube
Firstly, let’s learn about the background of the types of YouTube videos. YouTube videos fall into the following four broad categories:
Public Videos: YouTube contains videos on many themes and topics. It makes it impossible to watch all uploaded content under a specific category.
So, whenever you search for a video or theme, a list of content is displayed in the search result: “Public Videos.” It means that they are visible to everyone around the globe (depending on the terms and conditions). Moreover, you can share, like, unlike, download, or add these videos to your playlists for later watching.
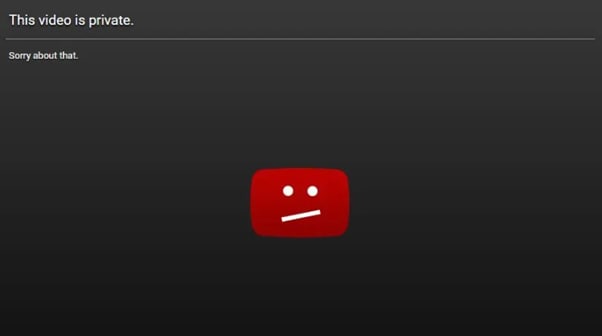
Private Videos: Private videos on YouTube can only be seen by people invited by the person who uploaded the video. This means that only those with access to the video’s shareable link can watch it.
Private videos are not visible to the public or to people who are not logged into YouTube. Hence, it is a great way to share sensitive or personal information with a select group.
Unlisted Video Unlisted videos on YouTube are not publicly visible on the site. They can only be seen by people who have the URL. This category works as a bridge between private and public videos. It is accessible only through sharable links without appealing in any YouTube public playlist or search result.
You might upload an unlisted video to YouTube if you do not want everyone to see it. However, you still want to share it with specific people, like your friends or family. You might also use an unlisted video to test out a new idea before making it public on the video-sharing platform.
Age-Restricted Videos: Age-restricted videos on YouTube are not suitable for all audiences. It may contain content that includes violence, profanity, sexual content, and other inappropriate material. YouTube requires that users be at least 18 years old to view these types of videos.
If you search on YouTube and come across an age-restricted video, you will be asked to confirm your age before viewing its content.

How To Find Unlisted YouTube Videos
Now that we’ve learned about the four types of YouTube content, let’s discuss how you can find unlisted YouTube videos:
How To Find Other People’s Unlisted YouTube Videos?
Since unavailable videos in YouTube playlists are hidden from general public viewers, you cannot find them on YouTube or Google search results.
However, the following workaround can help you watch these YouTube videos without facing much trouble:
Step 1: First, open a browser on your PC and visit the Unlisted Videos website. This platform contains over 600,000 unlisted YouTube videos from 2016 and earlier. You can also submit your unlisted video on the site.

Step 2: Use the search bar at the top of your screen to search for other people’s YouTube playlists. You can also click the “All Video” or “Random Videos” option to find the hidden content of a user.
How To See Unlisted Videos on My YouTube Channel?
To see your unlisted videos on your YouTube channel, do the following steps in sequence:
Step 1: In the first step, install the YouTube Studio app on your mobile device or visit its website using a browser on your computer. Next, launch the app and sign in to your channel’s account using your email and password.
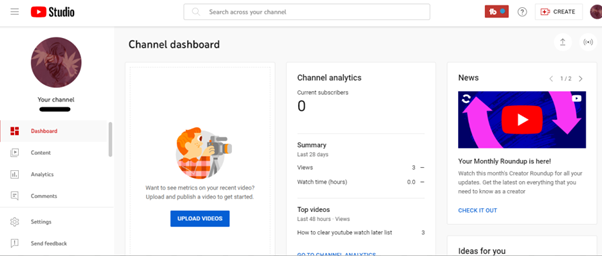
Step 2: In the next step, tap/ click the “Content” tab and tap/click the “Funnel” icon at the top of the video list to access the visibility options.
Step 3:
- Now, choose the “Visibility” option.
- Select “Unlisted” to change the visibility.
- Click the “Save” option to apply changes.
- See the hidden videos on your channel.

Since YouTube has marked the videos uploaded before 2017 as private as of July 2021, you can find your old unlisted videos under the “Private” list. To access it, choose “Private” as the visibility option.
How To Find Unlisted YouTube Videos with Google
Sometimes, unlisted YouTube videos appear on Google when someone shares the link to them on a public forum or website.
To confirm this, open a browser on your computer or a mobile device, head to the Google website, and search for your query. With some luck, you can find these unlisted YouTube videos in the search results.
You May Want to Know: Why Are So Many Unlisted Videos Now Private?
All unlisted videos uploaded to YouTube before January 2017 were switched to private. Therefore, if you have any older unlisted videos added to your Playlist or embedded on your website, you won’t be able to access them now.
However, the channel’s owner can restore access to the video by switching it back to unlisted or public. If now, the video will be labeled as “Private” indefinitely or until its settings are changed.
Conclusion
In this detailed guide, we’ve explored the four types of videos on YouTube and how to find YouTube hidden videos in three different ways. We’ve also explained why so many videos are now listed as “Private” and inaccessible.
Hopefully, you’ve found this article helpful and can now access the unlisted videos on YouTube without hassle.
You may have noticed that some videos in your YouTube playlist are unavailable. This is because the platform allows content creators to categorize their videos into public, private, or unlisted based on their preferences.
To help you uncover the content that you otherwise wouldn’t have access to, we’ve compiled a detailed guide to show you how to find YouTube hidden videos. We’ve also explained why so many unlisted videos are now labeled as private.
So, let’s get started with our guide without any further delay!
4 Types of Videos on YouTube
Firstly, let’s learn about the background of the types of YouTube videos. YouTube videos fall into the following four broad categories:
Public Videos: YouTube contains videos on many themes and topics. It makes it impossible to watch all uploaded content under a specific category.
So, whenever you search for a video or theme, a list of content is displayed in the search result: “Public Videos.” It means that they are visible to everyone around the globe (depending on the terms and conditions). Moreover, you can share, like, unlike, download, or add these videos to your playlists for later watching.
Private Videos: Private videos on YouTube can only be seen by people invited by the person who uploaded the video. This means that only those with access to the video’s shareable link can watch it.
Private videos are not visible to the public or to people who are not logged into YouTube. Hence, it is a great way to share sensitive or personal information with a select group.
Unlisted Video Unlisted videos on YouTube are not publicly visible on the site. They can only be seen by people who have the URL. This category works as a bridge between private and public videos. It is accessible only through sharable links without appealing in any YouTube public playlist or search result.
You might upload an unlisted video to YouTube if you do not want everyone to see it. However, you still want to share it with specific people, like your friends or family. You might also use an unlisted video to test out a new idea before making it public on the video-sharing platform.
Age-Restricted Videos: Age-restricted videos on YouTube are not suitable for all audiences. It may contain content that includes violence, profanity, sexual content, and other inappropriate material. YouTube requires that users be at least 18 years old to view these types of videos.
If you search on YouTube and come across an age-restricted video, you will be asked to confirm your age before viewing its content.
How To Find Unlisted YouTube Videos
Now that we’ve learned about the four types of YouTube content, let’s discuss how you can find unlisted YouTube videos:
How To Find Other People’s Unlisted YouTube Videos?
Since unavailable videos in YouTube playlists are hidden from general public viewers, you cannot find them on YouTube or Google search results.
However, the following workaround can help you watch these YouTube videos without facing much trouble:
Step 1: First, open a browser on your PC and visit the Unlisted Videos website. This platform contains over 600,000 unlisted YouTube videos from 2016 and earlier. You can also submit your unlisted video on the site.
Step 2: Use the search bar at the top of your screen to search for other people’s YouTube playlists. You can also click the “All Video” or “Random Videos” option to find the hidden content of a user.
How To See Unlisted Videos on My YouTube Channel?
To see your unlisted videos on your YouTube channel, do the following steps in sequence:
Step 1: In the first step, install the YouTube Studio app on your mobile device or visit its website using a browser on your computer. Next, launch the app and sign in to your channel’s account using your email and password.
Step 2: In the next step, tap/ click the “Content” tab and tap/click the “Funnel” icon at the top of the video list to access the visibility options.
Step 3:
- Now, choose the “Visibility” option.
- Select “Unlisted” to change the visibility.
- Click the “Save” option to apply changes.
- See the hidden videos on your channel.
Since YouTube has marked the videos uploaded before 2017 as private as of July 2021, you can find your old unlisted videos under the “Private” list. To access it, choose “Private” as the visibility option.
How To Find Unlisted YouTube Videos with Google
Sometimes, unlisted YouTube videos appear on Google when someone shares the link to them on a public forum or website.
To confirm this, open a browser on your computer or a mobile device, head to the Google website, and search for your query. With some luck, you can find these unlisted YouTube videos in the search results.
You May Want to Know: Why Are So Many Unlisted Videos Now Private?
All unlisted videos uploaded to YouTube before January 2017 were switched to private. Therefore, if you have any older unlisted videos added to your Playlist or embedded on your website, you won’t be able to access them now.
However, the channel’s owner can restore access to the video by switching it back to unlisted or public. If now, the video will be labeled as “Private” indefinitely or until its settings are changed.
Conclusion
In this detailed guide, we’ve explored the four types of videos on YouTube and how to find YouTube hidden videos in three different ways. We’ve also explained why so many videos are now listed as “Private” and inaccessible.
Hopefully, you’ve found this article helpful and can now access the unlisted videos on YouTube without hassle.
Also read:
- AdRevenue on YouTube Unpacked Average Income From 1,000 Viewers' Engagement
- Choosing Prime Audio Editors for YouTube Creators for 2024
- 2024 Approved Elevating Your Video's Reach - Top 8 YouTube Ranks Unveiled
- [Updated] Building Confidence Against YouTube Critiques
- [Updated] Elevate Video Playback with YouTube's Latest Feature - AV1
- Boosting Revenue with the Perfect YouTube Trailer Strategy
- In 2024, Essential Vids Summary Uncovered
- Amplify Your Video's Value Anywhere on Multiple Devices for 2024
- How to Create GIFs From YouTube Videos on Desktop and Mobile Devices
- Best Alternative to YouTube IOS & Android's 10 Leading Video Sites for 2024
- 2024 Approved Building a Brand, Building Income YouTube Edition
- Mastering the Download of Your YouTube Playlist Today!
- The Ultimate Guide to Saving YouTube Tracks & Dialogues
- Navigate Through Green Screen Muddle on Mac for Smooth YouTubing
- Video Editing Power Filmora for YouTube Trailers
- Decoding the Mysteries of Effective YouTube Keywords
- [Updated] Discovering the Speedy Scaling Channels Among YouTube Titans
- The Ultimate Guide to Cost-Effective Video Cameras
- In 2024, Cutting-Edge Video Edits Without Spending Navigate Through The 8 Tools
- Stock Savvy Streams Discover the Top Video Resources
- [New] Enhance YouTube Livestreams Webcam Selection Mastery
- [New] Elevate Your Short-Form Content Top 10 Edits for iOS/Android
- [Updated] Accelerate YT Growth Strategies for 1K+ Subscribers
- Navigating the World of Time Stamps in YouTube Links (Desktop/Mobile)
- In 2024, Broadview Networks Navigating MCN Choices
- In 2024, Affluent Online Broadcasting Houses
- Unlocking Visual Appeal Making Top-Tier Video Banner Templates
- In 2024, Here Is a Step-by-Step Guide to Color Correct and Color Grade a Video Professionally with Wondershare Filmora. Lets Get Going
- 2024 Approved Crafting a Seamless Gift Discovery Journey
- The Secret Sauce of Compelling TikTok Footage on Mac
- [New] In 2024, Ace Trackers Our Top Five Games
- In 2024, Getting the Pokemon Go GPS Signal Not Found 11 Error in Motorola G54 5G | Dr.fone
- [New] Mac Audio Sync for Screen Captures
- Updated In 2024, Cutting-Edge, Cost-Free DAW Software Options Revealed A Beginners Guide to 2023
- [Updated] Mastering Profit on Facebook Essential Insights & Hacks for 2024
- How To Restore Missing Contacts Files from Reno 11F 5G.
- 3 Easy Ways to Factory Reset a Locked Apple iPhone XR Without iTunes
- New Best Zero-Cost WMV Video Editors A Comprehensive Review for 2024
- 2023S Premier Windows Free Audio Cutting Programs - The Essential List for Digital Creatives
- 2024 Approved The Ultimate Guide to WhatsApp Status Maker Apps
- Updated 2024 Approved Leveraging Machine Learning for Clean Audio Transmission
- [Updated] 2024 Approved Authoritative Selection Optimal TikTok Video Grabs
- In 2024, Online Aspect Ratio Calculators Top Picks for Accuracy
- How to recover deleted contacts from Sony Xperia 5 V.
- Latest Guide How To Bypass Vivo Y100A FRP Without Computer
- In 2024, 3uTools Virtual Location Not Working On ZTE Nubia Z60 Ultra? Fix Now | Dr.fone
- [New] In 2024, Viral Video Roundup Top TikTok Reaction Shenanigans
- [New] Becoming a Social Media Star with These Trending TikTok HashTags for 2024
- In 2024, Step by Step Guide to Creating Compelling, Multi-Picture Insta Stories
- What Pokémon Evolve with A Dawn Stone For OnePlus Nord CE 3 Lite 5G? | Dr.fone
- Discovering the Best 5 Web-Based Title Artists of Today
- Best 10 Mock Location Apps Worth Trying On HTC U23 Pro | Dr.fone
- [New] 2024 Approved Android & iOS Leading Titles Mimicking PlayStation Games
- Title: "In 2024, Elevate Your Channel's Reach Proven Techniques for Multistreaming on YouTube and Twitch"
- Author: Kevin
- Created at : 2024-05-25 15:37:03
- Updated at : 2024-05-26 15:37:03
- Link: https://youtube-videos.techidaily.com/in-2024-elevate-your-channels-reach-proven-techniques-for-multistreaming-on-youtube-and-twitch/
- License: This work is licensed under CC BY-NC-SA 4.0.
