
:max_bytes(150000):strip_icc()/solarcharging-topimage-5bfdb29546e0fb0051056c03.jpg)
In 2024, Effortless Sound Transformation From YouTube to WAV Format
Effortless Sound Transformation From YouTube to WAV Format
YouTube to WAV File: 4 Best Free Convert Solutions

Richard Bennett
Mar 27, 2024• Proven solutions
YouTube to WAV converter is a very common phenomenon. This is done by the users as they want to play the video on selected devices.
In this article, we will help you manage to convert YouTube to WAV file with ease.
You will Learn :
- What is WAV?
- How to Convert YouTube to WAV Format? (4 Options)
- Tips to Convert YouTube to WAV
- Beside WAV Other Popular Formats for YouTube Videos
What is WAV?
WAV, known as Wave Form Audio File Format and is fully supported by Windows, is a common format that was launched back in 1991, which supports most of the older devices as well.
For the users that want uncompressed and lossless quality prefer to use WAV format. It is extended from the RIFF format to the RF64 format.
How to Convert YouTube to WAV Format?
Some many ways and programs can be used as YouTube to WAV converter. All these programs are easy to use and definitive guides are also available online. Some of the best ways are mentioned below.
Option 1: Convert YouTube to WAV by Wondershare Filmora
Filmora is by far the best program that can be used to convert YouTube to WAV format. YouTube to WAV file conversion has never been as easy as it is with this program. The program is easy to use and allows the users to overcome the issues which other programs present.
Features of the Program
- It is one of the very few programs that come with split-screen functionality. It means that the video and audio can be played simultaneously on a single interface.
- The audio equalizer ensures that the tuning is done as per the requirements.
- There is an advanced functionality of text editing which allows the users to mention the text onto the converted video as well.
- The UI of the program is graphical and hence it is easy to use. The independent reviews have granted a score of 9.5 based on this functionality of the program.
- The part selection is available in the program. It means that multiple conversions can be done at the same time without losing quality.
How to Convert YouTube to WAV Using Filmora?
This YouTube WAV converter is easy to use. The best part is that it is compatible with major platforms i.e. Windows and Mac. The processes for both will be explained in detail so that you can understand the program better.
The Process to Convert YouTube to WAV:
Step 1: Download Filmora for Windows or Mac (depends on your operating system).
If you want to download the program for Windows then click below download icon:

For Mac version download click below icon:

Step 2: There are three ways to import media into the program.
Methond 1: Click File > Import Media. Choose the YouTube file that you want to convert to WAV format. If the file is on another device then you can get it from there as well.

Method 2: Click Import Media on the main interface and select the file from the window that pops up.
Method 3: You can also drag and drop the files onto the interface to make sure that they are imported.
Step 3: You now just need to export the video in the WAV format. Click the Export button and then go for the Local tab. The export formats that are currently supported by the program are WMV, MP4, AVI, MOV, F4V, MKV, TS, 3GP, MPEG-2, WEBM, GIF and MP3.

Step 4: You can then alter the settings within the settings tab. The bit rate is the main thing that defines the quality of the video. Once the settings are done press OK
Step 5: You can also export the video as per the device that you want to play it on.
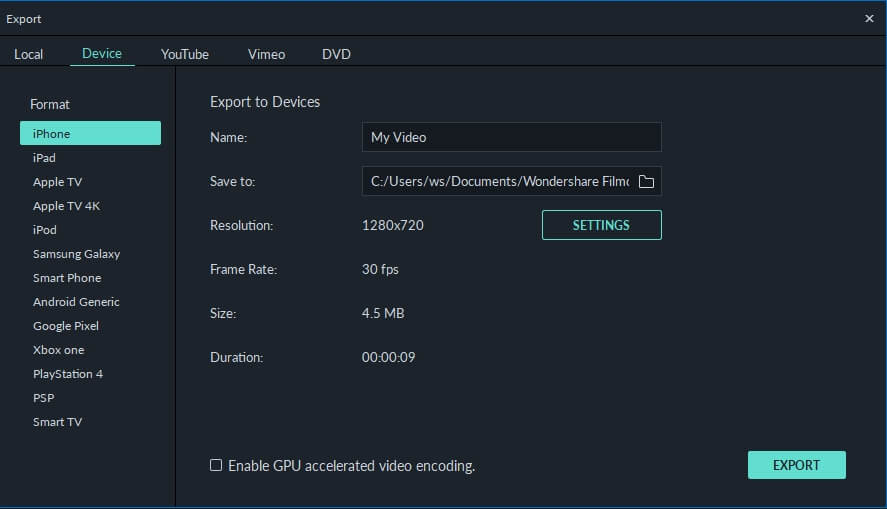
Step 6: You can also upload the video to social media platforms such as YouTube and Vimeo.
Step 7: You can also burn the converted format onto a DVD. Select the appropriate settings and press Export.
The process is explained as under. For video guides please visit Filmora 101 as it will get you the complete knowledge thoroughly.
You may also like: How to Convert YouTube to MP4 Safely? [Step by Step Guide] >>
Option 2: Other Way to Convert YouTube to WAV on Windows
5K Player is one of the best and the most used players that also work as YouTube to WAV conversion platform as well. The process is very easy to follow and is mentioned as under.
Step 1: Copy and paste the URL of the video on the desired location within the player. Click download and the process starts.

Step 2: Click “To Music” and select the WAV format from the drop-down that appears. You can also choose the bit rate, frame rate, and resolution. Once the conversion is completed you can save the file and the process ends here.
You may also like: >> How to to Convert WMV to MP4 Easily?
Option 3: Other Way to Convert YouTube to WAV on Mac
The Allavsoft is one of the best converters that can be used to convert YouTube to WAV on Mac. The process is simple and has been explained as under.
Step 1: Paste the URL of the YouTube video that you want to convert. You can also select the download quality and can access the file once the download has been completed.

Step 2: You can then select the format and once the conversion has been completed click the download button. The same has been depicted by numbers 2 and 3 in the picture below. WAV lossless quality should be selected from the dropdown to make sure that the work is done without any issue and problem.
Right format selection is important as the conversion is done instantly.
Option 4: YouTube to WAV Conversion Online
The process that you need to follow is explained as under.
Step 1: Visit https.//www.savethevideo.com/convert to access the converter.
Step 2: Paste the URL of the YouTube video that you want to convert and click the “Convert” button:

Step 3: Wait till the converter fetches the information.
Step 4: From the drop-down make sure that you select the WAV format.
Step 5: Click “Convert” once again and the process of conversion starts.
Step 6: The video then starts to download in the desired format.
Step 7: Click “Download” and save the file to the desired location. This concludes the process in full.
Tips to Convert YouTube to WAV
Below are some tips that would be useful for the users that want to convert YouTube to WAV format.
1. Always use the multipurpose software. It will allow you to download and convert the video at the same time-saving time.
2. Lossless quality is always to be selected while you are converting the format. It will make sure that the video is never compressed at all.
3. One of the best ways to convert the video is to disable the background noise. This will lead to awesome results.
4. Converting from YouTube to WAV also requires you to choose the software that is fast and reliable or else you will get the outcome which is not as per your requirements.
5. Free software programs can also get the malware to your system and therefore these are not recommended at all.
6. WAV is a format that is of high quality as the converters have loads of options so it is advised to use these carefully.
7. Make sure that the converters that are used are the ones that are highly rated and have a graphical user interface.
8. The YouTube to WAV downloader should be there on with the converter as it will make the process easy and you don’t need tons of software programs for a single purpose.
9. Always go for the program that supports the containers instead of just the format. If a program supports the containers then it is easy to convert a number of formats.
10. The conversion should be done with converters that do not cause any type of loss to enhance the quality as well.
Beside WAV Other Popular Formats for YouTube Videos
Many other video formats should be used to make sure that the best and the most advanced outcome is generated. Some of the most popular formats are as under.
- Audio Video Interleave Format, AVI
It is one of the oldest formats that are on the market. It was developed by Microsoft as a part of their video processing format for Windows. It was made publically available in 1992.
This one of the oldest formats is used universally. Many people consider it the standard to save videos. The AVI files are simple to use and are supported by almost every video player currently on the market.
It is easy to store as it takes less space than many other formats that are on the market. It will also let you transfer the files relatively faster due to the small size.
- Flash Video Format, FLV
The flash player by Adobe is one of the most common software programs on the system. This has made this video format one of the common ones on the market. The format can be played with ease as the supported plugins are there for other apps as well.
The flash content is supported by all browsers and therefore it is common to play these videos without any additional plugins. The best part of this format is the lossless quality that it provides to its users. Even if you compress these videos they remain HD as the quality remains the same.
- Apple QuickTime Movie, MOV
Among the Mac users, it is one of the most used formats. Developed by Apple it is a format that allows the users to overcome issues such as playback errors. The new version has also been launched which is known as QuickTime X.
The best part of this format is that it is available for Windows users as well. The files of the MOV format are usually of high quality. It is for the same that the size of such files is large as compared to other formats.
- Moving Pictures Expert Group 4, MP4
Introduced in 1998 it is a format that is used by the motion pictures association responsible for setting the standards. The format is widely used and is supported by various platforms as well as devices.
Even after the MP4 file is compressed it remains lossless and the quality remains the same. The HTML5 that has been launched currently also supports this format. It is compatible with almost all of the browsers that are on the market.
- 264
As the name suggests it is one of the best and the most used formats for HD videos. The compression remains lossless and even if the resolution is low the quality is maintained. The MP4 container is the one that is used to contain this format.
Most of the streaming devices, as well as the services, use this format while referring to HD video. The best part is that the format is widely accepted as industry standards for HD videos. Most of the users all over the world use this format to save their HD videos with ease.
- OGG
It is one of the most used video formats. It has been developed by the Xiph.org foundation to maintain the video as well as the audio quality on different platforms. The format is free and the documentation, as well as the configuration, can be downloaded by anyone.
- Advanced Systems Format, .ASF
If you want to stream videos then this is the format that is considered to be the best. It is still being used by the major popular streaming platforms of the world. The .ASF format is one of the best and it allows the users to overcome issues such as quality loss as well as streaming related issues.
You may also like: How to Post/Share a Video From YouTube on Instagram >>
Conclusion
If you require lossless compression then YouTube to WAV conversion is something that is required. Some many ways and means can be used to make sure that the idea is approached. The best way is to use Filmora as it is an easy and efficient operation.
The best way to get around the issue is to always use the service that is embedded with quality.
If you like this article then it is requested to comment and share it on social media. It will not only help others but will also let them have knowledgeable ideas.
Richard Bennett
Richard Bennett is a writer and a lover of all things video.
Follow @Richard Bennett
Richard Bennett
Mar 27, 2024• Proven solutions
YouTube to WAV converter is a very common phenomenon. This is done by the users as they want to play the video on selected devices.
In this article, we will help you manage to convert YouTube to WAV file with ease.
You will Learn :
- What is WAV?
- How to Convert YouTube to WAV Format? (4 Options)
- Tips to Convert YouTube to WAV
- Beside WAV Other Popular Formats for YouTube Videos
What is WAV?
WAV, known as Wave Form Audio File Format and is fully supported by Windows, is a common format that was launched back in 1991, which supports most of the older devices as well.
For the users that want uncompressed and lossless quality prefer to use WAV format. It is extended from the RIFF format to the RF64 format.
How to Convert YouTube to WAV Format?
Some many ways and programs can be used as YouTube to WAV converter. All these programs are easy to use and definitive guides are also available online. Some of the best ways are mentioned below.
Option 1: Convert YouTube to WAV by Wondershare Filmora
Filmora is by far the best program that can be used to convert YouTube to WAV format. YouTube to WAV file conversion has never been as easy as it is with this program. The program is easy to use and allows the users to overcome the issues which other programs present.
Features of the Program
- It is one of the very few programs that come with split-screen functionality. It means that the video and audio can be played simultaneously on a single interface.
- The audio equalizer ensures that the tuning is done as per the requirements.
- There is an advanced functionality of text editing which allows the users to mention the text onto the converted video as well.
- The UI of the program is graphical and hence it is easy to use. The independent reviews have granted a score of 9.5 based on this functionality of the program.
- The part selection is available in the program. It means that multiple conversions can be done at the same time without losing quality.
How to Convert YouTube to WAV Using Filmora?
This YouTube WAV converter is easy to use. The best part is that it is compatible with major platforms i.e. Windows and Mac. The processes for both will be explained in detail so that you can understand the program better.
The Process to Convert YouTube to WAV:
Step 1: Download Filmora for Windows or Mac (depends on your operating system).
If you want to download the program for Windows then click below download icon:
For Mac version download click below icon:
Step 2: There are three ways to import media into the program.
Methond 1: Click File > Import Media. Choose the YouTube file that you want to convert to WAV format. If the file is on another device then you can get it from there as well.
Method 2: Click Import Media on the main interface and select the file from the window that pops up.
Method 3: You can also drag and drop the files onto the interface to make sure that they are imported.
Step 3: You now just need to export the video in the WAV format. Click the Export button and then go for the Local tab. The export formats that are currently supported by the program are WMV, MP4, AVI, MOV, F4V, MKV, TS, 3GP, MPEG-2, WEBM, GIF and MP3.
Step 4: You can then alter the settings within the settings tab. The bit rate is the main thing that defines the quality of the video. Once the settings are done press OK
Step 5: You can also export the video as per the device that you want to play it on.
Step 6: You can also upload the video to social media platforms such as YouTube and Vimeo.
Step 7: You can also burn the converted format onto a DVD. Select the appropriate settings and press Export.
The process is explained as under. For video guides please visit Filmora 101 as it will get you the complete knowledge thoroughly.
You may also like: How to Convert YouTube to MP4 Safely? [Step by Step Guide] >>
Option 2: Other Way to Convert YouTube to WAV on Windows
5K Player is one of the best and the most used players that also work as YouTube to WAV conversion platform as well. The process is very easy to follow and is mentioned as under.
Step 1: Copy and paste the URL of the video on the desired location within the player. Click download and the process starts.
Step 2: Click “To Music” and select the WAV format from the drop-down that appears. You can also choose the bit rate, frame rate, and resolution. Once the conversion is completed you can save the file and the process ends here.
You may also like: >> How to to Convert WMV to MP4 Easily?
Option 3: Other Way to Convert YouTube to WAV on Mac
The Allavsoft is one of the best converters that can be used to convert YouTube to WAV on Mac. The process is simple and has been explained as under.
Step 1: Paste the URL of the YouTube video that you want to convert. You can also select the download quality and can access the file once the download has been completed.
Step 2: You can then select the format and once the conversion has been completed click the download button. The same has been depicted by numbers 2 and 3 in the picture below. WAV lossless quality should be selected from the dropdown to make sure that the work is done without any issue and problem.
Right format selection is important as the conversion is done instantly.
Option 4: YouTube to WAV Conversion Online
The process that you need to follow is explained as under.
Step 1: Visit https.//www.savethevideo.com/convert to access the converter.
Step 2: Paste the URL of the YouTube video that you want to convert and click the “Convert” button:
Step 3: Wait till the converter fetches the information.
Step 4: From the drop-down make sure that you select the WAV format.
Step 5: Click “Convert” once again and the process of conversion starts.
Step 6: The video then starts to download in the desired format.
Step 7: Click “Download” and save the file to the desired location. This concludes the process in full.
Tips to Convert YouTube to WAV
Below are some tips that would be useful for the users that want to convert YouTube to WAV format.
1. Always use the multipurpose software. It will allow you to download and convert the video at the same time-saving time.
2. Lossless quality is always to be selected while you are converting the format. It will make sure that the video is never compressed at all.
3. One of the best ways to convert the video is to disable the background noise. This will lead to awesome results.
4. Converting from YouTube to WAV also requires you to choose the software that is fast and reliable or else you will get the outcome which is not as per your requirements.
5. Free software programs can also get the malware to your system and therefore these are not recommended at all.
6. WAV is a format that is of high quality as the converters have loads of options so it is advised to use these carefully.
7. Make sure that the converters that are used are the ones that are highly rated and have a graphical user interface.
8. The YouTube to WAV downloader should be there on with the converter as it will make the process easy and you don’t need tons of software programs for a single purpose.
9. Always go for the program that supports the containers instead of just the format. If a program supports the containers then it is easy to convert a number of formats.
10. The conversion should be done with converters that do not cause any type of loss to enhance the quality as well.
Beside WAV Other Popular Formats for YouTube Videos
Many other video formats should be used to make sure that the best and the most advanced outcome is generated. Some of the most popular formats are as under.
- Audio Video Interleave Format, AVI
It is one of the oldest formats that are on the market. It was developed by Microsoft as a part of their video processing format for Windows. It was made publically available in 1992.
This one of the oldest formats is used universally. Many people consider it the standard to save videos. The AVI files are simple to use and are supported by almost every video player currently on the market.
It is easy to store as it takes less space than many other formats that are on the market. It will also let you transfer the files relatively faster due to the small size.
- Flash Video Format, FLV
The flash player by Adobe is one of the most common software programs on the system. This has made this video format one of the common ones on the market. The format can be played with ease as the supported plugins are there for other apps as well.
The flash content is supported by all browsers and therefore it is common to play these videos without any additional plugins. The best part of this format is the lossless quality that it provides to its users. Even if you compress these videos they remain HD as the quality remains the same.
- Apple QuickTime Movie, MOV
Among the Mac users, it is one of the most used formats. Developed by Apple it is a format that allows the users to overcome issues such as playback errors. The new version has also been launched which is known as QuickTime X.
The best part of this format is that it is available for Windows users as well. The files of the MOV format are usually of high quality. It is for the same that the size of such files is large as compared to other formats.
- Moving Pictures Expert Group 4, MP4
Introduced in 1998 it is a format that is used by the motion pictures association responsible for setting the standards. The format is widely used and is supported by various platforms as well as devices.
Even after the MP4 file is compressed it remains lossless and the quality remains the same. The HTML5 that has been launched currently also supports this format. It is compatible with almost all of the browsers that are on the market.
- 264
As the name suggests it is one of the best and the most used formats for HD videos. The compression remains lossless and even if the resolution is low the quality is maintained. The MP4 container is the one that is used to contain this format.
Most of the streaming devices, as well as the services, use this format while referring to HD video. The best part is that the format is widely accepted as industry standards for HD videos. Most of the users all over the world use this format to save their HD videos with ease.
- OGG
It is one of the most used video formats. It has been developed by the Xiph.org foundation to maintain the video as well as the audio quality on different platforms. The format is free and the documentation, as well as the configuration, can be downloaded by anyone.
- Advanced Systems Format, .ASF
If you want to stream videos then this is the format that is considered to be the best. It is still being used by the major popular streaming platforms of the world. The .ASF format is one of the best and it allows the users to overcome issues such as quality loss as well as streaming related issues.
You may also like: How to Post/Share a Video From YouTube on Instagram >>
Conclusion
If you require lossless compression then YouTube to WAV conversion is something that is required. Some many ways and means can be used to make sure that the idea is approached. The best way is to use Filmora as it is an easy and efficient operation.
The best way to get around the issue is to always use the service that is embedded with quality.
If you like this article then it is requested to comment and share it on social media. It will not only help others but will also let them have knowledgeable ideas.
Richard Bennett
Richard Bennett is a writer and a lover of all things video.
Follow @Richard Bennett
Pocket-Friendly Pro Mics for YouTube Enthusiasts
Cheap Microphones for Youtubers on a Budget
Richard Bennett
Dec 30, 2022• Proven solutions
An expensive microphone doesn’t mean it is the best option — at least, not for YouTubers. Without professional experience or additional equipment, having a $1000 studio microphone could be wasted money.
If you are on a budget or new to YouTube, and what you want is to improve the audio quality of your video gradually, you should look into the cheaper options first.
In this article, I will highlight microphones in 3 price ranges.
We will have a look at each of these microphones, their pros, and cons, and then you can decide which one will be best for your channel and your budget.
As for keeping with your financial needs, we aren’t going to be looking at any XLR microphones, as they will require an audio interface, thus increasing your price range. The microphones in this list will be plug-and-plays, and you will only need the basic audio recording skills to get started.
Disclaimer: Prices are subjected to change.
YouTube Microphones for Under $20
BOYA BY-M1 - $16.99
TheBOYA BY-M1 is a lavalier microphone (a hand-free mic that clips onto your clothing) that connects to smartphones, DSLR, computers, and other audio recorders.

Pro: As an omnidirectional condenser microphone, it will be able to pick up audio from 360 degrees, and with 20 feet (6 meters) of cable, you can have a significant range movement even if you are connected to the camera.
The BOYA BY-M1 is a terrific choice for YouTubers on a budget that is frequently making videos on the go. It’s easy to carry around, and the ability to simply connect to a smartphone means you can set up and shoot your video on the fly.
Con: This mic, although it has a great range, can also pick up subtle movements you make as it is clipped onto you. Not great if there is a lot of action in your videos.
TONOR PC Microphone Computer Condenser - $15.99
The TONOR is an easy-to-setup condenser microphone that you can connect to your computer via USB and start recording in seconds.

Pro: The value of this microphone is in its ease of use. With a flexible, foldable stand, you can adjust the TONOR PC microphone the way it suits your setup. The legs of the stand are retractable, which makes it easy for you to store. If you are a gamer or creating videos primarily from your desk, this is a perfectly suitable microphone for you to start your YouTube journey with.
Con: The audio quality of this mic can help you get the job done, but it won’t blow you away. The cable is attached to the microphone and is 6.5 feet (2 meters) long, which isn’t a wide range. It’s pretty much restricted to the desk with your computer. This microphone has limitations, and high-achieving YouTubers will certainly grow out of it.
YouTube Microphones for Under $50
Purple Panda Lavalier Microphone - $23.99
The Purple Panda lavalier microphone comes with multiple adapters and is compatible with nearly all devices, including smartphone, DSLR, computers, and even GoPro cameras. The only device where you will need anadditional adapter is if you have an iPhone 7.

Pro: This microphone is a versatile option for YouTubers who create a variety of content. It doesn’t require any battery and is powered by whatever device it is plugged into, which is great for YouTubers with already so many devices to keep charged.
Con: Much like the BOYA BY-M1, the Purple Panda, as it is clipped onto your lapel or shirt collar, will capture the sound of your clothes brushing against it if too much movement occurs.
Samson Go Mic Portable USB Condenser Microphone - $37.73
The Samson Go microphone is the kind of mic that can fit in your pocket and be taken with you anywhere.

Pro: This microphone has both a cardioid and an omnidirectional mode. This means that you can choose to have your microphone focused more on the subject speaking by switching to cardio or switch to Omni-directional to capture audio from the entire surrounding.
It is designed to be able to clip onto a flat surface such as your computer screen. This allows you to place the microphone on different levels to record.
Con: Because of its unique design and the portability of the device, it will suffer wear-and-tear faster. Attention to storage is necessary to increase the lifespan of the device.
XIAOKOA Mini Condenser Microphone with Stand - $24.99
TheXIAOKOA portable mini condenser microphone is compatible with smartphones, computers, and any devices using 3.5mm recording jacks.

Pro: With a cardioid pickup, this condenser microphone will do a fine job picking up vocals. If you are a YouTuber who does a lot of singing videos, this is definitely an affordable microphone to check out.
Con: This microphone, perhaps primarily designed for karaoke, has an echo feature that, although might create new dimensions to your vocals, may not be desired for your YouTube video. This feature can be problematic, as it could spoil your recording.
TAKSTAR SGC-598 - $26.93
The TAKSTAR SGC is a condenser microphone, and it can be fixed onto your camera, which simplifies your YouTube setup. This camera can plug directly into your camera, reducing the audio tracks you need to manage when editing.

Pro: The camera-mounted microphone has a shock-resistant design that reduces noise when the camera is moved. The cardioid microphone will be able to pick up audio in the direction it is pointed in, reducing noise capturing from behind the camera. This is a good microphone for vlogging or interviews.
Con: The TAKSTAR SGC requires one AA battery, so you’ll have to remember to carry a backup every time you film.
Limited to a vocal subject standing 4-5 feet away, any more and the microphone will be hard-pressed to pick up the audio without capturing a lot of surround audio.
The design requires it to be mounted to the camera. If you want to separate it from the camera and still have it recorded, a bit of creativity is required to keep it standing.
YouTube Microphones for Under $100
Behringer C-1U - $59.99
The Behringer C-1U is a condenser microphone with a cardioid pickup pattern that connects to your computer via USB.

Pro: This microphone has a solid metal build and has a good weight. It is quick and easy to set up and is a good microphone for anyone wanting a simple solution for better audio on YouTube.
Con: A pop filter is recommended for this microphone as it picks up a lot of popping sounds when the subject speaks.
Blue Microphones Snowball iCE - $64.94
The Blue Microphones Snowball iCE is a cardioid condenser microphone that connects to your computer via USB.

Pro: The Snowball iCE is a plug-and-play microphone that is super easy to use and doesn’t require any additional battery. Simply connect it to the computer, and you are ready to record your voice. It captures clear and crisp audio for a single voice or single-person recording.
Con: The range of this microphone is not that great; you’ll have to be close and be speaking directly into the microphone to get the best audio. It is not ideal for recording moving subjects or those who are further than 2-3 feet away.
Marantz Professional MPM-1000U - $57.06
The Marantz Professional MPM-1000U is a condenser microphone that records in a cardioid polar pattern that connects to your computer via USB.

Pro: This budget microphone has excellent all-metal construction. It has a plug-and-play setup and doesn’t require any drivers or installations. It records great instrumentals and would recommend it to those who are recording music for YouTube.
Con: May pick up extraneous noises if you are recording vocals while there are movements in your surrounding, but otherwise, this is an excellent microphone in its price range.
Final Thoughts
When looking for microphones under $100, the difference in audio quality is not going to be drastic. What you need to consider is how you are going to be using this piece of equipment.
If your YouTube videos consist of you in a quiet studio environment, I would recommend the Marantz Professional MPM-1000U .
However, if you will be recording on the go and require your hands to be free in the scene, I recommend getting a lavalier microphone such as the Purple Panda .
But, if you are going to be recording other people, in addition to yourself, I’d say go with the TAKSTAR SGC as it will give you more audio control in busy environments.
What are you looking for in a budget microphone? Let us know in the comments below.
If you want to find a video editing solution that empowers your imagination and creativity yet takes less effort, please try this robust and user-friendly video editing software Wondershare Filmora. It provides special effects, stock photo & video, sound library, etc., which will definitely enhance your productivity and helps to make money by making videos much accessible.
Richard Bennett
Richard Bennett is a writer and a lover of all things video.
Follow @Richard Bennett
Richard Bennett
Dec 30, 2022• Proven solutions
An expensive microphone doesn’t mean it is the best option — at least, not for YouTubers. Without professional experience or additional equipment, having a $1000 studio microphone could be wasted money.
If you are on a budget or new to YouTube, and what you want is to improve the audio quality of your video gradually, you should look into the cheaper options first.
In this article, I will highlight microphones in 3 price ranges.
We will have a look at each of these microphones, their pros, and cons, and then you can decide which one will be best for your channel and your budget.
As for keeping with your financial needs, we aren’t going to be looking at any XLR microphones, as they will require an audio interface, thus increasing your price range. The microphones in this list will be plug-and-plays, and you will only need the basic audio recording skills to get started.
Disclaimer: Prices are subjected to change.
YouTube Microphones for Under $20
BOYA BY-M1 - $16.99
TheBOYA BY-M1 is a lavalier microphone (a hand-free mic that clips onto your clothing) that connects to smartphones, DSLR, computers, and other audio recorders.
Pro: As an omnidirectional condenser microphone, it will be able to pick up audio from 360 degrees, and with 20 feet (6 meters) of cable, you can have a significant range movement even if you are connected to the camera.
The BOYA BY-M1 is a terrific choice for YouTubers on a budget that is frequently making videos on the go. It’s easy to carry around, and the ability to simply connect to a smartphone means you can set up and shoot your video on the fly.
Con: This mic, although it has a great range, can also pick up subtle movements you make as it is clipped onto you. Not great if there is a lot of action in your videos.
TONOR PC Microphone Computer Condenser - $15.99
The TONOR is an easy-to-setup condenser microphone that you can connect to your computer via USB and start recording in seconds.
Pro: The value of this microphone is in its ease of use. With a flexible, foldable stand, you can adjust the TONOR PC microphone the way it suits your setup. The legs of the stand are retractable, which makes it easy for you to store. If you are a gamer or creating videos primarily from your desk, this is a perfectly suitable microphone for you to start your YouTube journey with.
Con: The audio quality of this mic can help you get the job done, but it won’t blow you away. The cable is attached to the microphone and is 6.5 feet (2 meters) long, which isn’t a wide range. It’s pretty much restricted to the desk with your computer. This microphone has limitations, and high-achieving YouTubers will certainly grow out of it.
YouTube Microphones for Under $50
Purple Panda Lavalier Microphone - $23.99
The Purple Panda lavalier microphone comes with multiple adapters and is compatible with nearly all devices, including smartphone, DSLR, computers, and even GoPro cameras. The only device where you will need anadditional adapter is if you have an iPhone 7.
Pro: This microphone is a versatile option for YouTubers who create a variety of content. It doesn’t require any battery and is powered by whatever device it is plugged into, which is great for YouTubers with already so many devices to keep charged.
Con: Much like the BOYA BY-M1, the Purple Panda, as it is clipped onto your lapel or shirt collar, will capture the sound of your clothes brushing against it if too much movement occurs.
Samson Go Mic Portable USB Condenser Microphone - $37.73
The Samson Go microphone is the kind of mic that can fit in your pocket and be taken with you anywhere.
Pro: This microphone has both a cardioid and an omnidirectional mode. This means that you can choose to have your microphone focused more on the subject speaking by switching to cardio or switch to Omni-directional to capture audio from the entire surrounding.
It is designed to be able to clip onto a flat surface such as your computer screen. This allows you to place the microphone on different levels to record.
Con: Because of its unique design and the portability of the device, it will suffer wear-and-tear faster. Attention to storage is necessary to increase the lifespan of the device.
XIAOKOA Mini Condenser Microphone with Stand - $24.99
TheXIAOKOA portable mini condenser microphone is compatible with smartphones, computers, and any devices using 3.5mm recording jacks.
Pro: With a cardioid pickup, this condenser microphone will do a fine job picking up vocals. If you are a YouTuber who does a lot of singing videos, this is definitely an affordable microphone to check out.
Con: This microphone, perhaps primarily designed for karaoke, has an echo feature that, although might create new dimensions to your vocals, may not be desired for your YouTube video. This feature can be problematic, as it could spoil your recording.
TAKSTAR SGC-598 - $26.93
The TAKSTAR SGC is a condenser microphone, and it can be fixed onto your camera, which simplifies your YouTube setup. This camera can plug directly into your camera, reducing the audio tracks you need to manage when editing.
Pro: The camera-mounted microphone has a shock-resistant design that reduces noise when the camera is moved. The cardioid microphone will be able to pick up audio in the direction it is pointed in, reducing noise capturing from behind the camera. This is a good microphone for vlogging or interviews.
Con: The TAKSTAR SGC requires one AA battery, so you’ll have to remember to carry a backup every time you film.
Limited to a vocal subject standing 4-5 feet away, any more and the microphone will be hard-pressed to pick up the audio without capturing a lot of surround audio.
The design requires it to be mounted to the camera. If you want to separate it from the camera and still have it recorded, a bit of creativity is required to keep it standing.
YouTube Microphones for Under $100
Behringer C-1U - $59.99
The Behringer C-1U is a condenser microphone with a cardioid pickup pattern that connects to your computer via USB.
Pro: This microphone has a solid metal build and has a good weight. It is quick and easy to set up and is a good microphone for anyone wanting a simple solution for better audio on YouTube.
Con: A pop filter is recommended for this microphone as it picks up a lot of popping sounds when the subject speaks.
Blue Microphones Snowball iCE - $64.94
The Blue Microphones Snowball iCE is a cardioid condenser microphone that connects to your computer via USB.
Pro: The Snowball iCE is a plug-and-play microphone that is super easy to use and doesn’t require any additional battery. Simply connect it to the computer, and you are ready to record your voice. It captures clear and crisp audio for a single voice or single-person recording.
Con: The range of this microphone is not that great; you’ll have to be close and be speaking directly into the microphone to get the best audio. It is not ideal for recording moving subjects or those who are further than 2-3 feet away.
Marantz Professional MPM-1000U - $57.06
The Marantz Professional MPM-1000U is a condenser microphone that records in a cardioid polar pattern that connects to your computer via USB.
Pro: This budget microphone has excellent all-metal construction. It has a plug-and-play setup and doesn’t require any drivers or installations. It records great instrumentals and would recommend it to those who are recording music for YouTube.
Con: May pick up extraneous noises if you are recording vocals while there are movements in your surrounding, but otherwise, this is an excellent microphone in its price range.
Final Thoughts
When looking for microphones under $100, the difference in audio quality is not going to be drastic. What you need to consider is how you are going to be using this piece of equipment.
If your YouTube videos consist of you in a quiet studio environment, I would recommend the Marantz Professional MPM-1000U .
However, if you will be recording on the go and require your hands to be free in the scene, I recommend getting a lavalier microphone such as the Purple Panda .
But, if you are going to be recording other people, in addition to yourself, I’d say go with the TAKSTAR SGC as it will give you more audio control in busy environments.
What are you looking for in a budget microphone? Let us know in the comments below.
If you want to find a video editing solution that empowers your imagination and creativity yet takes less effort, please try this robust and user-friendly video editing software Wondershare Filmora. It provides special effects, stock photo & video, sound library, etc., which will definitely enhance your productivity and helps to make money by making videos much accessible.
Richard Bennett
Richard Bennett is a writer and a lover of all things video.
Follow @Richard Bennett
Also read:
- [Updated] Enhanced Engagement with Effective YouTube Video Outros Strategies
- Laugh Loophole Ideas for 7 Hilarious YouTube Showcases
- 2024 Approved What Is the Difference Between YouTube and Dailymotion
- 2024 Approved Effortless Guide to Adding Banners on Gaming Channels
- Your Shorts Are Here – No More Waiting Game
- Hits & Tags Mastering the Language of Virality in YouTube Shorts
- Eradicated Muted Video Entries (Shorts)
- 2024 Approved 11-Year-Old Video Sensation Unprecedented Wealth Accumulation
- In 2024, Are There Legal Restrictions to Recording YouTube Videos?
- [Updated] Beginner's Guide to Choosing Lenses and Cameras for YouTube Vloggers
- Banish Annoying Ads Instantly with These 7 Best Android Tools
- Investigating Prominently Displayed YouTube Comments
- [Updated] Creative Backgrounds for Engaging Thumbnails
- 2024 Approved Deciphering Revenue Sharing in YouTube Shorts
- Enhancing Television Experience Playback Tips for YouTube Content for 2024
- Perfect End Screen & Cards Strategies for YT
- [New] Unleash Potential in Online Collaboration Using Snap Photography for 2024
- A Comprehensive Guide to iCloud Unlock From iPhone 12 mini Online
- [New] In 2024, FBX Recorder Alternatives The New Era of Gaming Capture
- In 2024, Premier Video Editors Transforming IGTV Videos
- Best Places for Downloading Free Lofi Imagery and Tunes
- Chuckle Chronicles Hilarious Meme Crafting Simplified
- New Audience Captivation Technique How to Personalize Your Speech with Audacitys Vocal Effects for 2024
- [New] In 2024, Viral Visionaries Top Meme Creators on Social Media
- [New] 2024 Approved Precision in Video Calls The Art of Border Reduction
- Screen-Savvy Starting Point Deciphering Display Standards
- How to Change GPS Location on Samsung Galaxy S23 Ultra Easily & Safely | Dr.fone
- How to Update Apple iPhone 8 to the Latest iOS/iPadOS Version? | Dr.fone
- [Updated] Honorable 5 Quicktime Frame Recorder
- In 2024, How to Migrate Android Data From Xiaomi Redmi 13C 5G to New Android Phone? | Dr.fone
- Title: In 2024, Effortless Sound Transformation From YouTube to WAV Format
- Author: Kevin
- Created at : 2024-05-25 15:36:39
- Updated at : 2024-05-26 15:36:39
- Link: https://youtube-videos.techidaily.com/in-2024-effortless-sound-transformation-from-youtube-to-wav-format/
- License: This work is licensed under CC BY-NC-SA 4.0.
